i-box Resonate User manual

02 | Resonate
EN Introduction
The ibox resonate functions as a soundbar for your TV, a Bluetooth speaker for your phone or tablet, and
an auxillary speaker for you mp3 player or portable CD player.
Caring for your
Wireless Soundbar with Subwoofer
Do not place naked flame sources, such as lighted candles on or near the soundbar.
Do not expose to liquids. In case of accidental spillage on the unit, disconnect power immediately and then
dry the product with clean, soft cloth or paper towels. If you believe fluids may have penetrated the casing
allow the unit time to properly dry out at room temperature for as long as it takes. Do not heat the unit or
disassemble it as this will invalidate your warranty.
The unit should not be exposed to strong direct sunlight, very high or low temperatures, moisture, strong
magnetic fields, or very dusty environments.
Always leave sufficient space around the unit for ventilation.
To clean, wipe with a clean soft cloth. Do not use abrasives, or solvents.
Never attempt to insert wires, pins or other such objects into the unit.
Do not disassemble or modify the unit, there are no user serviceable parts. If the soundbar is damaged or
malfunctions do not use. Consult a qualified service engineer.
Batteries – Please recycle. Take to a designated collection point (local supermarket etc) or to your local
council recycle centre.
Contents
Introduction ...................................................................... 2
Safety Information ......................................................... 2
Box Contents...................................................................... 2
Controls and Features .................................................... 3
LED Indicators ...................................................................4
Set up.................................................................................... 5
Pairing................................................................................... 5
Audio Settings and Inputs............................................. 6
Connections ...................................................................... 7
Bluetooth Pairing..............................................................8
Specifications .................................................................44
Technical Support.........................................................44
Box Contents
1Wireless Soundbar
2Wireless Subwoofer
3Remote Control
4User Manual
5Figure-8 power lead
63.5mm - 3.5mm jack aux lead
2
1
3 4
6
5

Resonate | 03
Top Panel - Soundbar
Back Panel - Soundbar
Front Panel - Soundbar
Side Panel- Soundbar
Front /Back/Side- Subwoofer
1
1
2
3
10 11 12 13 14
4 5 6 7 8 9
Controls and Features
1. Speaker drivers
2. LED indicator
3. HDMI (ARC) input
4. Optical input
5. USB input
6. AUX input
7. COAX input
8. On/Off switch
9. Figure-8 mains lead socket
10. Standby/ Off switch
11. Mode selection
12. Play/Pause
13. Previous track / Volume -
14. Next track / Volume +
15. Subwoofer reflex port
16. Power Switch
17. Power cable
18. Subwoofer speaker
POWER
ON
OFF
AC110/2 40v
50/60Hz
15
16 17 18
See page 8 for the Remote
Control features and buttons.

04 | Resonate
Indicators (Soundbars)
RED LED: Standby mode
WHITE LED:
Bluetooth: Bluetooth mode. Has 2 functions
1. Pairing with subwoofer during initial set-up
2. Pairing with phone or tablet for audio input.
bt flashing = is ready to pair, bt static = paired
USB: USB media mode - reading mp3/WAV media attached to USB socket
AUX: Auxiliary input mode – reading from 3.5mm AUX in port and compatible device
OPT: Optical input mode – reading from Optical in port and device connected by
TOSlink opitcal cable
HDMI (ARC): Playing from device connected by HDMI cable
COAX: Playing from device connected by Coaxial cable
Indicators (Subwoofer)
Red LED (on rear panel); Flashes when ready to pair, static when paired
USBUSB
AUXAUX
OPTOPT
ARCARC
COACOA
POWER
ON
OFF
AC 110/240v
50/60Hz
POWER
ON
OFF
AC 110/240v
50/60Hz
POWER
ON
OFF
AC 110/240v
50/60Hz
Ready to pair Paired

Resonate | 05
Set up
Insert batteries (2x AAA Alkaline) into the remote taking care to observe polarity as stated in the battery
compartment.
Pair the soundbar to the subwoofer
The subwoofer and soundbar should operate within a range of about 10m of each other (provided they have
line of sight) but this range can be affected by interference from other radio signals and particularly by other
Bluetooth signals. To avoid problems setting up, place the soundbar and subwoofer close together when pairing.
Connect the soundbar and subwoofer into the mains. Switch them both on. The system is now in standby.
POWER
ON
OFF
AC110/240v
50/60Hz
Turn on the soundbar and subwoofer by pressing the Power On / Off button (1), the soundbar should
automatically enter the BT pairing mode. Press the BT button (13) to manually enter the Bluetooth mode.
The LED display on the soundbar and the the Red LED on the rear of the subwoofer will flash.
POWER
ON
OFF
AC 110/240v
50/60Hz
POWER
ON
OFF
AC 110/240v
50/60Hz
You don’t need to pair it again. Every time you switch on, they will reconnect automatically.
Press and hold the Play/Pause button on the remote for a couple of seconds. The soundbar will connect
to the wireless subwoofer. If it pairs successfully, the ‘BT’ and red LED on the subwoofer will stop flashing
and the soundbar will beep once.

06 | Resonate
Controls and Features -Remote Control
1. Power on/off
2. Mute
3. Bass + (increases bass)
4. Treble - (deceases treble)
5. Treble + (increases treble)
6. Bass - (decreases bass)
7. Volume + (increase volume)
8. Play/Pause
9. Previous track
10. Next track
11. Volume - (decrease volume)
12. USB mode
13. Bluetooth mode
14. Mode selection
15. Optical mode
16. AUX mode
17. HDMI (ARC) mode
18. EQ selection
19. 3D surround on/off
20.USB repeat mode
1
2
3
4
5
6
7
8
9
10
11
12
13
14
15
16
17
18
19
20
Audio Settings and Inputs
Now you can connect audio sources to your soundbar and use the remote to select those sources. You
can use the volume and bass/treble buttons to set up the sound. There are also some preset EQ settings
to choose from.
Mode: Toggles through BT (Bluetooth paired device, e.g. phone or
tablet), AUX (3.5mm jack input, mp3 player, phone etc.), OPT (Optical
lead to TV) and ARC (HDMI audio from TV) and coaxial (audio from
TV or mini stereo system).
Source buttons: Alternatively you can just jump straight the source
you want via the BT, USB, AUX, OPT and HDMI buttons.

Resonate | 07
3
USB IN: Use to connect a flash drive containing MP3/WAV files for direct playback (FAT32 format and 32GB max).
The media player also has a memory function that will recall and continue from the last-played point
when a USB flash drive that has previously been used with the soundbar is reinserted.
Stop playback and switch off the soundbar before removing USB media to avoid corruption.
1
1
2
2
3
4
3
5
45
Ensure the desired connection is selected as
the devices audio output.
1HDMI (ARC): Use to connect to TV audio using a HDMI cable (not provided).
2OPTICAL IN: Use to connect compatible TV audio using an optical cable (not provided).
1 2
4AUX IN: Use to connect compatible devices (mp3 players, portable CD’s etc.) using the 3.5mm – 3.5mm
stereo jack cable (provided).
5
COAXIAL IN: Use to connect compatible devices using a coaxial cable (not provided). Note that to select
coaxial source there is no dedicated button. You have to cycle through the sources on the mode button (14).
Use the Next Track button (10)
on the remote to select the track
you want.

08 | Resonate
Pairing a Bluetooth audio source
To play music from your phone, tablet or mp3 player wirelessly pair it with the soundbar.
Enter the Bluetooth mode by pressing the BT button (13), the LED on the soundbar will flash to indicate
the device is searching for devices. Open the Bluetooth menu on your device, look for ‘i-box Resonate’ tap
that to connect. When paired successfully the LED on the soundbar will be solid.
Auto Power Off
Please Note: If there is no signal input to the soundbar for 15 minutes continuously it will automatically
power off, and the red LED will come on. Press the power button on the remote control or long press the
Power / Mode button on the soundbar to turn the unit back on.
Now select a piece of music, podcast, audio book etc. and play! Adjust the volume on your device first
then on the soundbar to avoid sudden volume increases when changing source.
If it doesn’t show the first time, move closer and search for new device again.
You don’t need to re-pair. Your
soundbar will automatically
reconnect with this device when it is
in range and both are turned on.
Bluetooth SCAN
On
1 Bluetooth device is connected
PAIRED DEVICES
i-box Resonate
Connected
Bluetooth SCAN
On
Bluetooth devices have been found
AVAILABLE DEVICES
i-box Resonate

Resonate | 09
DE Einführung
Der ibox resonate funktioniert als Klangleiste für Ihren Fernseher, als Bluetooth-Lautsprecher für Ihr
Smartphone oder Tablet, und als Zusatzlautsprecher für Ihren mp3-Player oder tragbaren CD-Player.
Pflegehinweise für Ihre kabellose Klangleiste mit Subwoofer
Stellen Sie keine offenen Flammen, wie z. B. brennende Kerzen, auf oder in die Nähe der Klangleiste.
Das Gerät keinen Flüssigkeiten aussetzen. Im Falle unbeabsichtigter Verschüttungen auf dem Gerät sofort
vom Strom trennen und das Gerät dann mit einem sauberen, weichen Tuch oder mit Papiertüchern
abtrocknen. Falls Sie den Verdacht haben, dass Flüssigkeiten in das Gehäuse eingedrungen sein könnten,
dann lassen Sie das Gerät gründlich bei Raumteperatur austrocknen, so lange wie es braucht. Das Gerät
sollte nicht aufgeheizt oder auseinandergenommen werden; dies führt zum Erlöschen Ihrer Garantie.
Das Gerät sollte keinem direktem Sonnenlicht, sehr hohen oder niedrigen Temperaturen, Feuchtigkeit,
starken Magnetfeldern oder sehr staubigen Umgebungen ausgesetzt werden.
Lassen Sie zur Belüftung stets genügend Platz um das Gerät herum.
Wischen Sie zur Reinigung mit einem sauberen, weichen Tuch drüber. Keine Scheuer- oder Reinigungsmittel
verwenden.
Versuchen Sie niemals, Drähte, Stifte oder ähnliche Gegenstände in das Gerät zu stecken.
Bauen Sie das Gerät nicht auseinander oder modifizieren es; es existieren keine vom Endbenutzer zu
wartenden Teile. Verwenden Sie die Klangleiste nicht, falls sie beschädigt ist oder nicht ordnungsgemäß
funktioniert. Wenden Sie sich in einem solchen Fall an einen qualifizierten Service-Techniker.
Batterien – bitte recyceln. Bei einer speziellen Sammelstelle (z. B. Ihrem Supermarkt) oder bei Ihrem
örtlichen Recyclingzentrum entsorgen.
Inhalt
Einführung .......................................................................... 9
Sicherheitshinweise......................................................... 9
Packungsinhalt .................................................................. 9
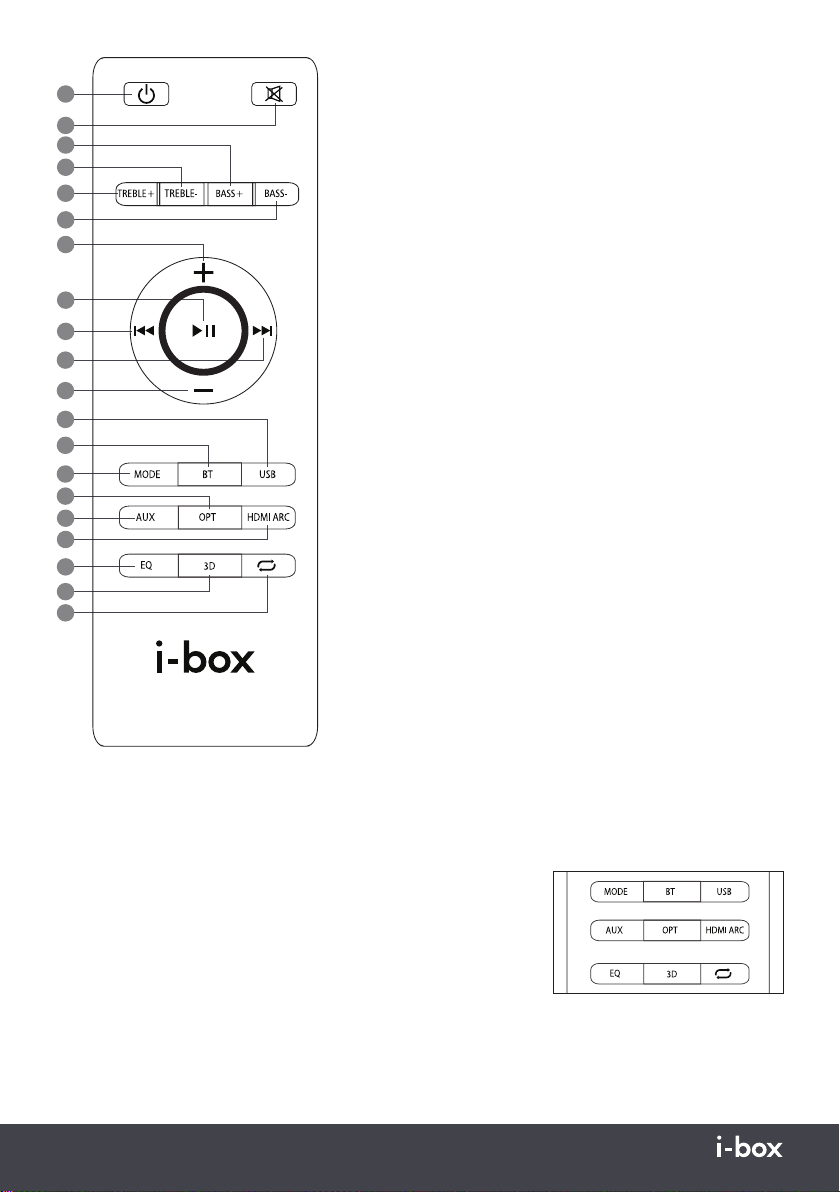
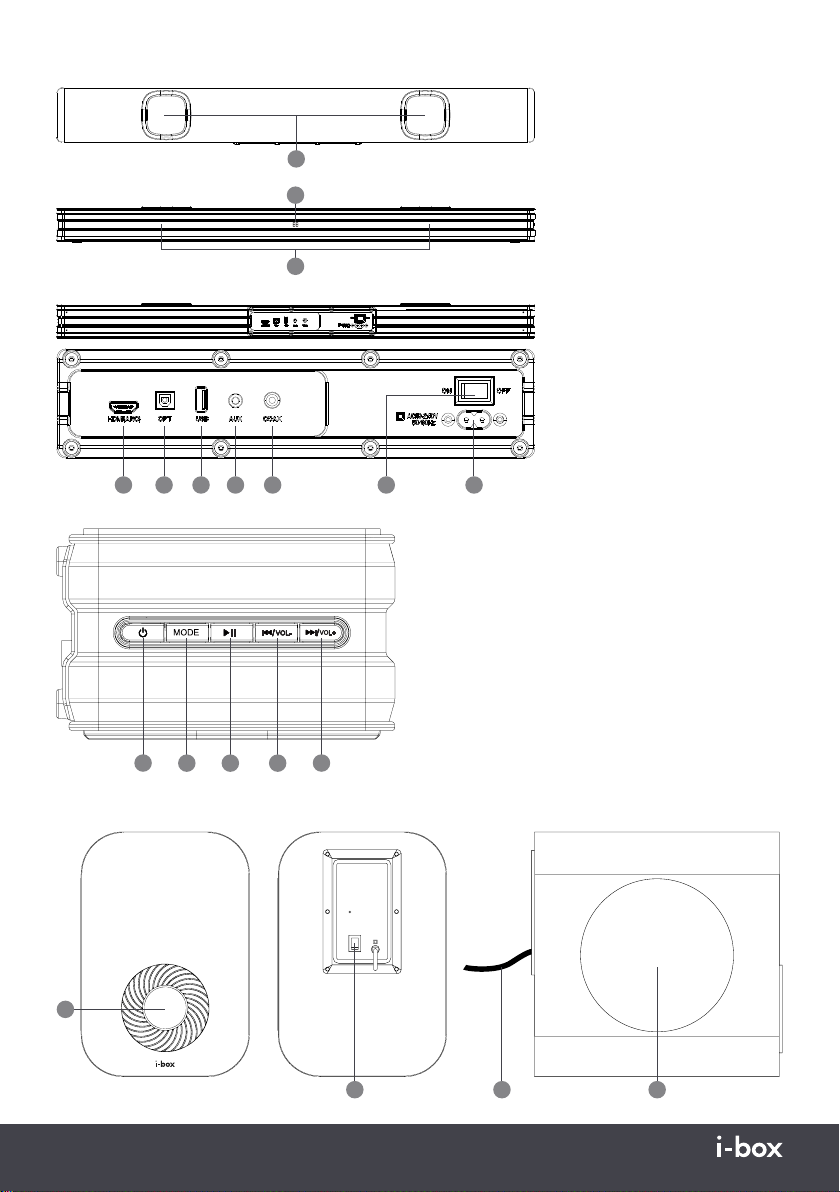
Bedienelemente und Funktionen ............................10
LED-Anzeigen....................................................................11
Einrichten des Geräts.....................................................12
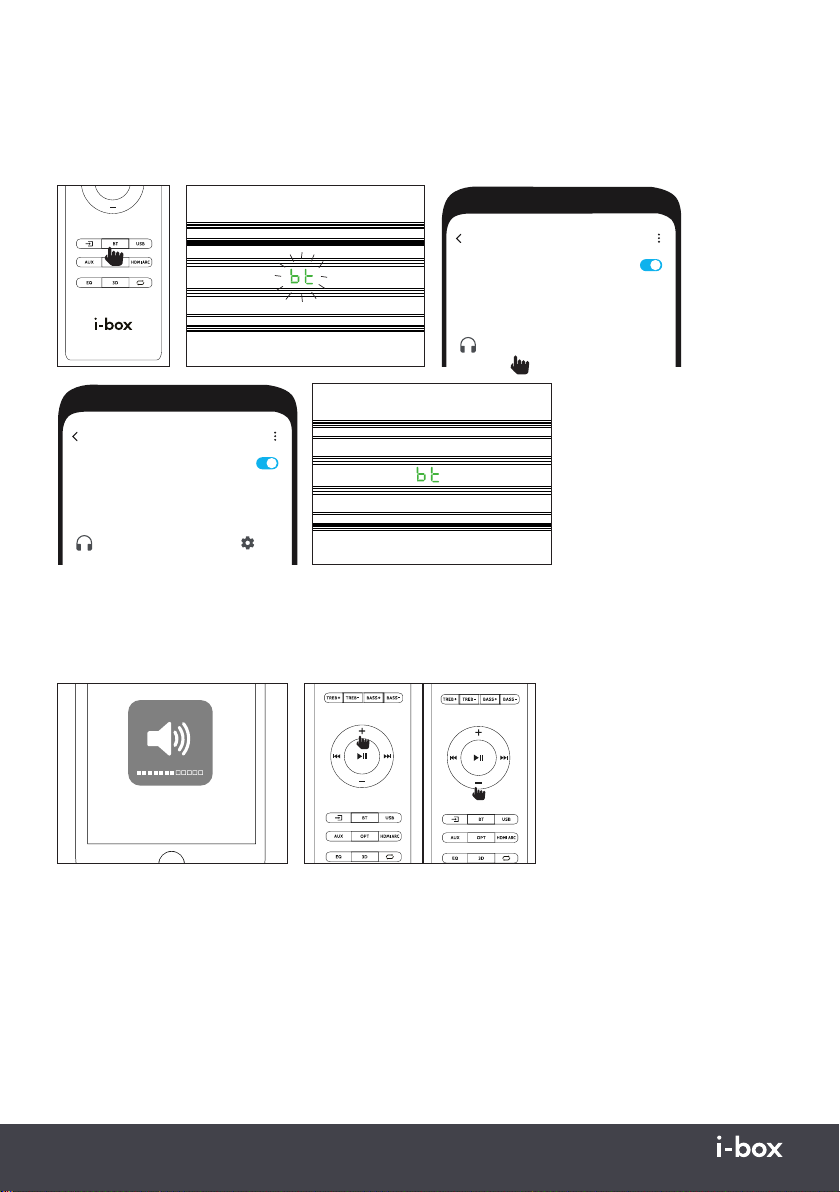
Kopplung............................................................................12
Audio-Einstellungen und -Eingänge........................13
Anschlüsse........................................................................ 14
Bluetooth-Kopplung......................................................15
Technische Daten..........................................................44
Technischer Support.................................................... 44
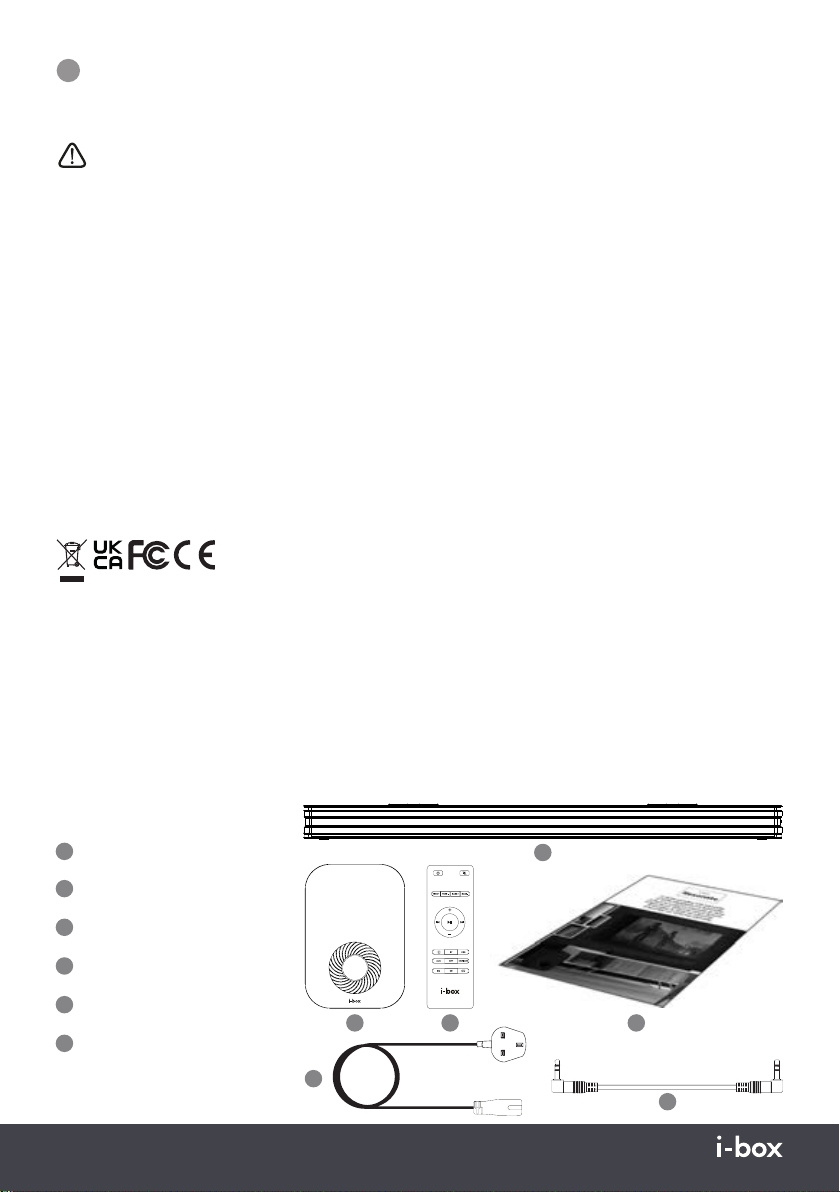
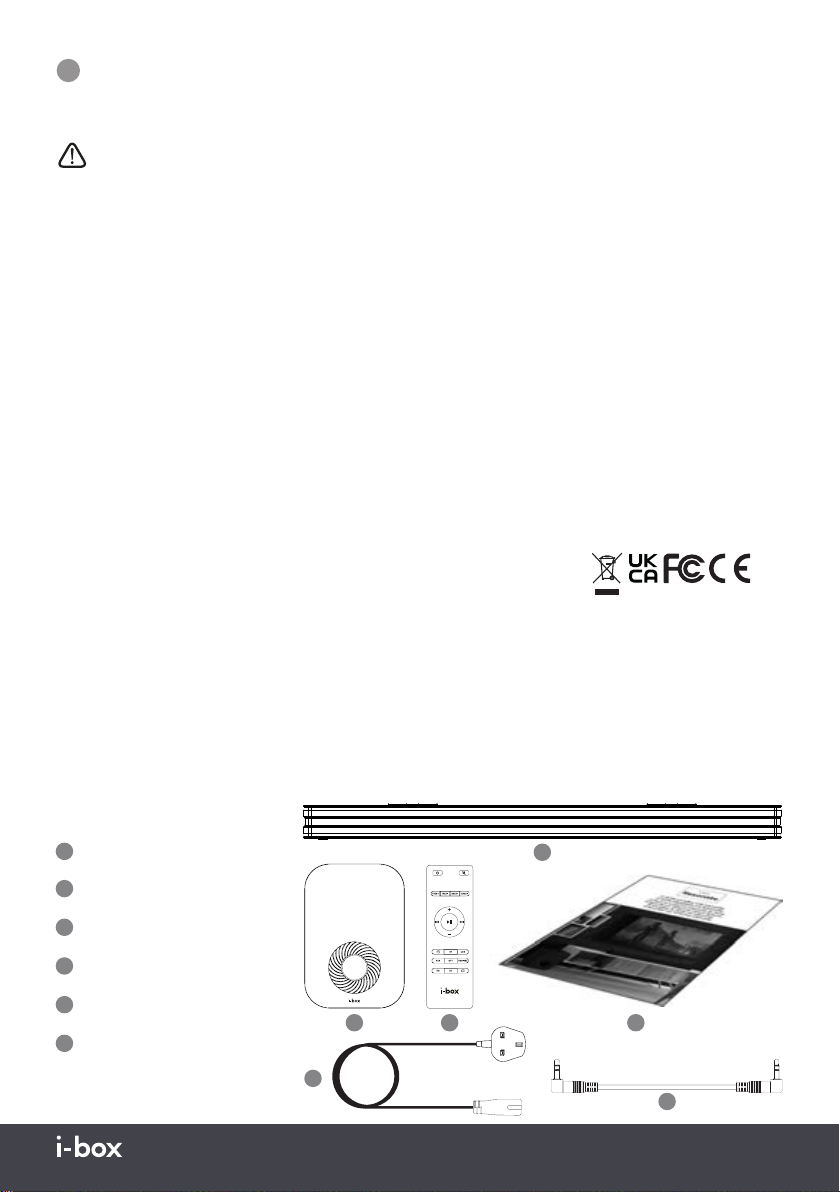
Packungsinhalt
1Kabellose Klangleiste
2Kabelloser Subwoofer
3Fernbedienung
4Bedienungsanleitung
5Abb-8 Stromkabel
63,5 mm - 3,5 mm
Anschlusskabelstecker
2
1
3 4
6
5

10 | Resonate
Oberseite - Klangleiste
Rückseite - Klangleiste
Vorderseite - Klangleiste
Seitenplatte - Klangleiste
Vorder-/Rückseite/Seitenplatte Subwoofer
1
1
2
3
10 11 12 13 14
4 5 6 7 8 9
Bedienelemente und
Funktionen
1. Lautsprecher-Treiber
2. LED-Anzeige
3. HDMI- (ARC-)Eingang
4. Optischer TOSlink-Eingang
5. USB-Eingang
6. AUX-Eingang (3,5 mm)
7. COAX-RCA-Eingang
8. Ein-/Aus-Schalter
9. Abb-8 Netzkabelanschluss
10. Standby-/Aus-Schalter
11. Modus-Auswahl
12. Wiedergabe/Pause
13. Vorheriger Titel / Lautstärke -
14. Nächster Titel / Lautstärke +
15. Subwoofer-Reflex-Anschluss
16. Hauptschalter
17. Netzkabel
18. Subwoofer-Lautsprecher
POWER
ON
OFF
AC110/2 40v
50/60Hz
15
16 17 18
Siehe Seite 13 für die Funktionen
und Tasten der Fernbedienung.

Resonate | 11
Anzeigen (Klangleisten)
ROTE LED-ANZEIGE: Standby-Modus
WEISS LED-ANZEIGE:
Bluetooth: Bluetooth-Modus. Hat 2 Funktionen
1. Kopplung mit Subwoofer während der erstmaligen Einrichtung
2. Kopplung mit Smartphone oder Tablet für Audio-Eingabe.
bt blinkend = zum Koppeln bereit, bt konstant = gekoppelt
USB: USB-Media-Modus – Abspielen von mp3-/WAV-Medien, die mit dem
USB-Anschluss verbunden sind
AUX: Zusatzgerät-Eingangsmodus – Abspielen von einem mit AUX-IN-Kabel
verbundenen Gerät
OPT: Optischer Eingangsmodus – Abspielen von einem mit TOSlink-Optikka-
bel verbundenen Gerät
HDMI (ARC): Abspielen von einem mit HDMI-Kabel verbundenen Gerät
COAX: Abspielen von einem mit Koaxialkabel verbundenen Gerät
Anzeigen (Subwoofer)
Rote LED-Anzeige (Rückseite); blinkt wenn zum Koppeln bereit; konstant wenn gekoppelt
POWER
ON
OFF
AC 110/240v
50/60Hz
POWER
ON
OFF
AC 110/240v
50/60Hz
POWER
ON
OFF
AC 110/240v
50/60Hz
Zum Koppeln bereit Gekoppelt
USBUSB
AUXAUX
OPTOPT
ARCARC
COACOA

12 | Resonate
Einrichten des Geräts
Batterien (2x AAA-Alkaline oder Akku-Batterien) in die Fernbedienung einlegen; dabei auf die richtige
Polung, wie im Batteriefach gekennzeichnet, achten.
Klangleiste mit Subwoofer koppeln
Der Subwoofer und die Klangleiste sollten innerhalb einer Reichweite von ca. 10 m voneinander funktionsfähig sein
(vorausgesetzt, sie sind in einer Sichtlinie zueinander positioniert); diese Reichweite kann jedoch durch Störungen
von anderen Funksignalen und insbesondere durch andere Bluetooth-Signale beeinträchtigt werden. Um Probleme
bei der Einrichtung zu vermeiden, sollten die Klangleiste und der Subwoofer beim Koppeln nahe beieinander stehen.
Die Klangleiste und den Subwoofer ans Netz anschließen. Beide einschalten. Das System ist jetzt im
Standby-Modus.
Die Klangleiste und den Subwoofer einschalten, indem Sie die Ein-/Aus-Taste (1) drücken. Dann sollte die
Klangleiste automatisch in den BT-Kopplungsmodus gehen. Betätigen Sie die BT-Taste (13), um den BT-
Modus manuell aufzurufen. Dann blinken die LED-Anzeige an der Klangleiste und die rote LED-Anzeige
auf der Rückseite des Subwoofers auf.
POWER
ON
OFF
AC 110/240v
50/60Hz
POWER
ON
OFF
AC 110/240v
50/60Hz
Es ist kein erneutes Koppeln erforderlich. Sie verbinden sich bei jedem neuen Einschalten automatisch.
Die Wiedergabe-/Pause-Taste auf der Fernbedienung einige Sekunden lang gedrückt halten. Jetzt wird die
Klangleiste mit dem kabellosen Subwoofer verbunden. Wenn sie erfolgreich gekoppelt sind, hören die ‚BT’- und
die rote LED-Anzeige am Subwoofer auf zu blinken, und die Klangleiste piept einmal.
POWER
ON
OFF
AC110/240v
50/60Hz

Resonate | 13
Bedienelemente und Funktionen - Fernbedienung
1. Ein/Aus
2. Stumm
3. Bass + (verstärkt Tiefen)
4. Treble - (verringert Höhen)
5. Treble + (verstärkt Höhen)
6. Bass - (verringert Tiefen)
7. Lautstärke + (Lautstärke erhöhen)
8. Wiedergabe/Pause
9. Vorheriger Titel
10. Nächster Titel
11. Lautstärke - (Lautstärke verringern)
12. USB-Modus
13. Bluetooth-Modus
14. Modus-Auswahl
15. Optik-Modus
16. AUX-Modus
17. HDMI- (ARC-)-Modus
18. EQ-Auswahl
19. 3D-Surround ein/aus
20.USB-Wiederholungsmodus
1
2
3
4
5
6
7
8
9
10
11
12
13
14
15
16
17
18
19
20
Audio-Einstellungen und -Eingänge
Jetzt können Sie Audioquellen mit Ihrer Klangleiste verbinden und diese mithilfe der Fernbedienung aus-
wählen. Mit den Lautstärke- und den Bass-/Treble-Tasten können Sie den Klang einrichten. Es gibt auch
einige voreingestellte EQ-Einstellungen zur Auswahl.
Modus: Umschalten zwischen BT (Bluetooth-gekoppelte Geräte,
z. B. Smartphone oder Tablet), AUX (3,5 mm-Anschlussbuchse,
mp3-Player, Smartphone etc.), OPT (Optikkabel zum Fernseher)
und ARC (HDMI-Audio vom Fernseher) und Koaxialkabel (Audio von
Fernseher oder Mini-Stereoanlage).
Quell-Tasten:
Ansonsten können Sie auch einfach direkt über die BT-,
USB-, AUX-, OPT- und HDMI-Tasten zu Ihrer gewünschten Quelle gehen.

14 | Resonate
3
USB IN: Für den Anschluss eines USB-Sticks, auf dem MP3-/WAV-Dateien für die direkte Wiedergabe (FAT32-For-
mat und max. 32 GB) gespeichert sind. Der Mediaplayer hat auch eine Speicherfunktion, die die Wiedergabe ab dem
zuletzt abgespielten Punkt aufruft und fortsetzt, wenn ein zuvor mit der Klangleiste verwendeter USB-Stick erneut
eingesteckt wird. Vor dem Entfernen von USB-Medien die Wiedergabe stoppen und die Klangleiste ausschalten, um
die Beschädigung von Dateien zu vermeiden.
1
1
2
2
3
4
3
5
45
Sicherstellen, dass die gewünschte Verbindung
als Audio-Ausgang des Geräts ausgewählt ist.
1
HDMI (ARC): Für den Anschluss an eine TV-Audioquelle mit einem HDMI-Kabel (nicht im Lieferumfang inbegriffen).
2OPTICAL IN: Für den Anschluss an eine kompatible TV-Audioquelle mit einem Optikkabel (nicht im Lief-
erumfang inbegriffen).
1 2
4AUX IN: Für den Anschluss kompatibler Geräte (mp3-Player, tragbare CD-Player etc.) mit dem 3,5 mm – 3,5
mm-Stereo-Anschlusskabel (im Lieferumfang inbegriffen).
5
COAXIAL IN: Für den Anschluss kompatibler Geräte mit einem Koaxialkabel (nicht im Lieferumfang
inbegriffen). Hinweis: Für die Auswahl der Koaxialquelle ist keine spezielle Taste vorhanden. Sie müssen die
Quellen auf der Modus-Taste durchblättern (14).
Verwenden Sie die Taste
Next Track (10) auf der
Fernbedienung, um den
gewünschten Track auszuwählen.

Resonate | 15
Koppeln einer Bluetooth-Audioquelle
Für die drahtlose Wiedergabe von Musik von Ihrem Smartphone, Tablet oder Ihrem mp3-Player können
Sie diese Geräte mit der Klangleiste koppeln.
Drücken Sie die BT-Taste (13), um in den Bluetooth-Modus zu wechseln; dann blinkt die LED-Anzeige an
der Soundbar, um anzuzeigen, dass das Gerät nach anderen Geräten sucht. Öffnen Sie das Bluetooth-
Menü auf Ihrem Gerät, suchen Sie nach HD-0191K; Tippen Sie hier, um eine Verbindung herzustellen.
Wenn die Geräte erfolgreich gekoppelt sind, leuchtet die LED-Anzeige an der Soundbar dauerhaft.
Jetzt können Sie einen Musiktitel, einen Podcast, ein Hörbuch usw. auswählen und abspielen! Stellen
Sie zuerst die Lautstärke an Ihrem Gerät, dann an der Soundbar ein, um ein plötzliches Ansteigen der
Lautstärke beim Wechseln der Audioquelle zu vermeiden.
Wenn es beim ersten Mal nicht aufleuchtet, gehen Sie näher heran und suchen Sie erneut nach dem neuen Gerät.
Bluetooth SCAN
On
1 Bluetooth device is connected
PAIRED DEVICES
i-box Resonate
Connected
Bluetooth SCAN
On
Bluetooth devices have been found
AVAILABLE DEVICES
i-box Resonate
Eine erneute Kopplung ist nicht
erforderlich. Ihre Soundbar
verbindet sich automatisch mit
diesem Gerät, wenn es sich in
Reichweite befindet und beide
eingeschaltet sind.
Automatische Abschaltung
Bitte beachten: Wenn 15 Minuten lang kein Signal an der Soundbar anliegt, schaltet sie sich automatisch
aus und die rote LED leuchtet auf. Drücken Sie die Power-Taste auf der Fernbedienung oder drücken Sie
lange auf die Power / Mode-Taste an der Soundbar, um das Gerät wieder einzuschalten.

16 | Resonate
ES Introducción
ibox resonate funciona como una barra de sonido para el televisor, un altavoz Bluetooth para el teléfono o
la tableta y un altavoz auxiliar para el reproductor de mp3 o el reproductor de CD portátil.
Mantenimiento de la barra de sonido inalámbrica con subwoofer
No coloque fuentes de llamas desnudas, como velas encendidas, sobre la barra de sonido o cerca de ella.
No la exponga a líquidos. En caso de que se derrame algún líquido de forma accidental sobre la unidad,
desconecte la alimentación inmediatamente
y luego seque el producto con un paño limpio y suave o con servilletas de papel. Si cree que los líquidos
pueden haber penetrado en la carcasa, deje que la unidad se seque adecuadamente a temperatura
ambiente durante el tiempo que sea necesario. No caliente la unidad ni la desmonte, ya que esto anulará su
garantía.
La unidad no debe exponerse a la luz solar directa, temperaturas muy altas o bajas, humedad, campos
magnéticos o entornos polvorientos.
Deje siempre espacio suficiente alrededor de la unidad para su ventilación.
Para limpiarla, pase un paño suave y limpio. No utilice productos abrasivos ni disolventes.
No intente nunca introducir cables, alfileres u otros objetos de este tipo en la unidad.
No desmonte ni modifique la unidad, ya que no hay piezas reparables por el usuario. Si la barra de sonido
está dañada o funciona mal, no la utilice. Consulte con un técnico cualificado.
Pilas: recíclelas, por favor. Llévelas al punto de recogida designado (supermercado local, etc.) o a su centro
de reciclaje local.
Índice
Introducción .....................................................................16
Información de seguridad ...........................................16
Contenido de la caja ......................................................16
Controles y funciones ...................................................17
Indicadores LED.............................................................. 18
Configuración....................................................................19
Sincronización..................................................................19
Configuración de audio y entradas ......................... 20
Conexiones .......................................................................21
Emparejamiento Bluetooth........................................22
Especificaciones ............................................................44
Asistencia técnica..........................................................44
Contenido del envase
1Barra de sonido inalámbrica
2Subwoofer inalámbrico
3Control remoto
4Manual del usuario
5Conector británico
6Conector auxiliar
3,5 mm - 3,5 mm
2
1
3 4
6
5

Resonate | 17
Panel superior - barra de sonido
Panel trasero - barra de sonido
Panel frontal - barra de sonido
Panel lateral - barra de sonido
Frontal/trasero/lateral - subwoofer
1
1
2
3
10 11 12 13 14
4 5 6 7 8 9
Controles y funciones
1. Controladores del altavoz
2. Indicador LED
3. Entrada HDMI (ARC)
4. Entrada Optical TOSlink
5. Entrada USB
6. Entrada AUX 3,5 mm
7. Entrada COAX RCA
8. Interruptor encendido/
apagado
9. Toma conector británico
10. Interruptor en espera/
apagado
11. Modo de selección
12. Reproducir/Pausa
13. Pista anterior / - volumen
14. Pista siguiente /+ volumen
15. Puerto de reflejo de
subwoofer
16. Interruptor de encendido
17. Cable de alimentación
18. Altavoz de subwoofer
POWER
ON
OFF
AC110/2 40v
50/60Hz
15
16 17 18
Consultar la página 20 para ver
los botones y las funciones del
control remoto.

18 | Resonate
Indicadores (barras de sonido)
LED ROJO: Modo de espera
LED BLANCO:
Bluetooth: modo Bluetooth Tiene 2 funciones
1. Sincronización con el subwoofer durante la configuración inicial
2. Sincronización con el teléfono o la tablet para la entrada de audio.
bt parpadeante = listo para sincronizar, bt estático = sincronizado
USB: Modo multimedia USB – reproduciendo medios mp3/WAV conectados
a una toma USB
AUX: Modo de entrada auxiliar – Reproducción desde un dispositivo
conectado con el cable de entrada AUX
OPT: Modo de entrada óptica – Reproducción desde un dispositivo
conectado con el cable óptico TOSlink
HDMI (ARC): Reproducción desde un dispositivo conectado con un cable
HDMI
COAX: Reproducción desde un dispositivo conectado con un cable coaxial
Indicadores (Subwoofer)
LED rojo (en el panel trasero); parpadea cuando está listo para la sincronización, estático
cuando está sincronizado
POWER
ON
OFF
AC 110/240v
50/60Hz
POWER
ON
OFF
AC 110/240v
50/60Hz
POWER
ON
OFF
AC 110/240v
50/60Hz
Listo para sincronizar Sincronizado
USBUSB
AUXAUX
OPTOPT
ARCARC
COACOA

Resonate | 19
Configuración
Introduzca las pilas (2 pilas AAA alcalinas o recargables) en el mando a distancia, teniendo en cuenta la
polaridad indicada en el compartimento de las pilas.
Sincronizar la barra de sonido con el subwoofer
El subwoofer y la barra de sonido deberían funcionar en un alcance de unos 10 m entre sí (siempre que tengan
línea de visión), pero este rango puede verse afectado por las interferencias de otras señales de radio y, en
particular, por otras señales Bluetooth. Para evitar problemas de configuración, coloque la barra de sonido y el
subwoofer cerca al sincronizarlos..
Conecte la barra de sonido y el subwoofer a la red eléctrica. Encienda ambos. El sistema está en espera.
Encienda la barra de sonido y el subwoofer pulsando el botón de encendido/apagado (1), la barra de
sonido debería entrar automáticamente en el modo de sincronización BT. Pulse el botón BT (13) para
acceder manualmente al modo Bluetooth. La pantalla LED de la barra de sonido y el LED rojo de la parte
trasera del subwoofer parpadearán.
POWER
ON
OFF
AC 110/240v
50/60Hz
POWER
ON
OFF
AC 110/240v
50/60Hz
No es necesario volver a hacer la sincronización. Cada vez que se encienda, se reconectará automáticamente.
Mantenga pulsado el botón Reproducir/Pausa del mando a distancia durante un par de segundos. La
barra de sonido se conectará al subwoofer inalámbrico. Si la sincronización se realiza correctamente, el
indicador «BT» y el LED rojo del subwoofer dejarán de parpadear y la barra de sonido emitirá un pitido.
POWER
ON
OFF
AC110/240v
50/60Hz

20 | Resonate
Controles y funciones - control remoto
1. Encendido/apagado
2. Silencio
3. Bajo + (aumenta el bajo)
4. Agudos - (reduce los agudos)
5. Agudos+ (aumenta los agudos)
6. Bajo - (aumenta el bajo)
7. Volumen + (aumenta el volumen)
8. Reproducir/Pausa
9. Pista anterior
10. Pista siguiente
11. Volumen - (reduce el volumen)
12. Modo USB
13. Modo Bluetooth
14. Modo de selección
15. Modo óptico
16. Modo AUX
17. Modo HDMI (ARC)
18. Selección EQ
19. Envolvente 3D encendido/apagado
20.Modo de repetición USB
1
2
3
4
5
6
7
8
9
10
11
12
13
14
15
16
17
18
19
20
Configuración de audio y entradas
Ahora puede conectar fuentes de audio a su barra de sonido y utilizar el mando a distancia para
seleccionar esas fuentes. Puede utilizar los botones de volumen y de graves/agudos para configurar el
sonido. También hay algunos ajustes de ecualización preestablecidos entre los que puede elegir.
Modo: Alterna entre BT (dispositivo sincronizado por Bluetooth, por
ejemplo, teléfono o tableta), AUX (conector de entrada de 3,5 mm,
reproductor de mp3, teléfono, etc.), OPT (cable óptico al televisor)
y ARC (audio HDMI desde el televisor) y coaxial (audio desde el
televisor o el minisistema estéreo).
Botones de fuente: También puede acceder directamente a la fuente
que desee con los botones BT, USB, AUX, OPT y HDMI.
Table of contents
Languages: