idMEDIA LEW22BA63DB User manual

1
TABLE OF CONTENTS
IMPORTANT SAFETY INSTRUCTIONS........................................................................................ 5
PACKAGE CONTENTS................................................................................................................ 10
LOCATION AND FUNCTION OF CONTROLS.............................................................................11
FRONT PANEL......................................................................................................................................11
CONTROL BUTTONS AND TERMINALS................................................................................... 13
REAR RANEL........................................................................................................................................13
SIDE PANEL..........................................................................................................................................13
REMOTE CONTROL .............................................................................................................................15
BATTERY INSTALLATION.....................................................................................................................19
BASIC CONNECTION.................................................................................................................. 20
CONNECTING POWER CORD .............................................................................................................20
CONNECTING THE RF CABLE.............................................................................................................20
CONNECTING TO AV OUT....................................................................................................................21
CONNECTING TO COMPONECT VIDEO TERMINAL...........................................................................22
CONNECTING TO YPBPR TERMINAL..................................................................................................22
CONNECTING TO HDMI INPUT CONNECTOR ....................................................................................23
CONNECTING TO A HEADPHONE.......................................................................................................24
CONNECTING TO COAXIAL OUTPUT..................................................................................................24
BASIC OPERATION ..................................................................................................................... 25
SELECTING ON SCREEN LANGUAGE ................................................................................................25
CHOOSING TV CHANNEL....................................................................................................................25
SELECTING INPUT SOURCE...............................................................................................................25
FIRST TIME INSTALLATION ....................................................................................................... 26
CHANNEL MENU.......................................................................................................................... 29
Auto Tining.............................................................................................................................................31
DVB-T Auto Scan Menu .........................................................................................................................31

2
DVB-T Manual Tuning............................................................................................................................32
ATV Manual Tuning................................................................................................................................32
DVB-C Auto Tuning Menu ......................................................................................................................33
DVB-C Manual Tuning............................................................................................................................35
Program Edit..........................................................................................................................................35
Signal Information ..................................................................................................................................38
CI Information ........................................................................................................................................38
5V antenna power..................................................................................................................................38
LCN .......................................................................................................................................................38
Software Update(USB)......................................................................................................................38
CHANNEL MENU(SATELLITE).............................................................................................. 39
Channel Menu........................................................................................................................................39
Auto Tuning............................................................................................................................................39
DVB-S Manual Tuning............................................................................................................................42
Program Edit..........................................................................................................................................43
Satellite Edit...........................................................................................................................................44
PICTURE MENU ........................................................................................................................... 48
Picture Mode..........................................................................................................................................48
Color Temperature .................................................................................................................................49
Aspect Ratio...........................................................................................................................................50
Noise Reduction.....................................................................................................................................50
Dynamic CR...........................................................................................................................................50
SOUND MENU.............................................................................................................................. 51
Sound Mode...........................................................................................................................................51
Balance..................................................................................................................................................51
Auto Volume...........................................................................................................................................52
Surround Sound.....................................................................................................................................52
SPDIF Mode ..........................................................................................................................................53
AD Switch..............................................................................................................................................53
Main Speakers.......................................................................................................................................53

3
TIME MENU................................................................................................................................... 54
Clock......................................................................................................................................................54
Off time..................................................................................................................................................56
On time..................................................................................................................................................56
Sleep timer.............................................................................................................................................57
Auto standby..........................................................................................................................................57
Time Zone..............................................................................................................................................57
OSD timer..............................................................................................................................................57
OPTION MENU ............................................................................................................................. 58
OSD Language ......................................................................................................................................58
Audio Language.....................................................................................................................................60
Subtitle Language..................................................................................................................................60
Hearing Impaired....................................................................................................................................60
PVR File system.....................................................................................................................................60
Reset .....................................................................................................................................................60
HDMI CEC.............................................................................................................................................62
First time installation ..............................................................................................................................62
ECO Mode.............................................................................................................................................64
Blue screen............................................................................................................................................64
LOCK MENU................................................................................................................................. 65
Lock System ..........................................................................................................................................65
Set Password.........................................................................................................................................67
Block Program .......................................................................................................................................67
Parental Guidance .................................................................................................................................67
Key Lock................................................................................................................................................67
Hotel Menu.................................................................................................................................... 67
Hotel Mode ............................................................................................................................................67
Source Lock...........................................................................................................................................67
Default Source.......................................................................................................................................67
DTV Channel Type.................................................................................................................................67

4
Default Prog...........................................................................................................................................67
Max Volume...........................................................................................................................................67
Default Volume.......................................................................................................................................67
Clear Lock..............................................................................................................................................67
COPY DATA TO USB.............................................................................................................................68
LOAD DATA FROM USB........................................................................................................................68
EPG MENU.................................................................................................................................... 69
TIME SHIFT...........................................................................................................................................70
Recorded List.........................................................................................................................................71
Channel List...........................................................................................................................................71
MEDIA OPERATION..................................................................................................................... 72
Photo Menu............................................................................................................................................72
Music Menu............................................................................................................................................76
Moive Menu ...........................................................................................................................................77
Text Menu..............................................................................................................................................79
BLUETOOTH INTRODCTION...................................................................................................... 82
DVD BASIC OPERATION ............................................................................................................ 88
DVD REMOTE CONTROL OPERATION..................................................................................... 90
DVD SETUP.................................................................................................................................. 96
TROUBLE SHOOTING............................................................................................................... 104
SPECIFICATIONS....................................................................................................................... 106
STAND INSTALLATION ..............................................................................................................111
Location for WiFi and BT Antenna...........................................................................................113
TECHNICAL ASSISTANCE.........................................................................................................115

5
IMPORTANT SAF ETY INST RUCTIONS
CAUTION
RISK OF ELECTRIC
SHOCK DO NOT
OPEN
This symbol indicates
“dangerous voltage”
inside the product that
presents a risk of electric
shock or personal injury.
Read this Manual
Read this manual throughly before operating the unit.
Keep this manual
Keep this manual for future reference.
Observe all warnings
All warnings on the product and in the manual must be observed closely.
Follow all instructions
All operating instructions in the manual must be followed.
Do not insert liquids or objects
Liquids or objects could result in fire or electrical shock. Use special caution in households where
children are present. If liquids or objects should enter the LED TV, immediately turn off the power
switch, disconnect the power plug from the AC outlet and contact the qualified service personnel.
⚫Do not place the LED TV near the bathtub, bathroom, kitchen sink, wet basement or swimming pool,
and the like.
⚫Do not expose the LED TV to rain or moisture.
⚫Do not place flower vases, pots, cups, cosmetics, liquids as water, etc on or around the LED TV.
⚫Do not place metals, combustibles, etc on or around the LED TV.
TO REDUCE THE RISK OF
ELECTRIC SHOCK.
DO NOT REMOVE COVER.
NO USER-SERVICEABLE
PARTS INSIDE. REFER
SERVICING TO QUALIFIED
SERVICE PERSONNEL.
This symbol indicates
important instructions
accompanying the
product.

6
⚫Do not drip or splash liquid of any kind on the LED TV.
Do not give the LED TV any shock or impact
If the LED TV should be dropped and/or broken, it could result in an injury, and continued use could
result in fire or electrical shock.
If the glass panel is broken or damaged, immediately turn off the power switch, disconnect the power
plug from theAC power outlet and contact the qualified service personnel.
Prevent the unit from falling
⚫Fasten the LED TV to a wall using a cord or chain which is sufficient to support the weight of the
LED TV. Before moving the LED TV, the cord or chain should be removed.
⚫Do not allow children to climb on the LED TV.
⚫Do not place the LED TV on a bed, sofa, rug, similar surface. Do not place the LED TV on an
un-stable cart, stand, or table. The LED TV may fall, causing serious damage to the LED TV and/or
serious personal injury, death.
⚫When the product is used on a trolley, care should be taken to avoid quick stops, excessive force,
and uneven surfaces that may cause the product and trolley to overturn.

7
IMPORTAN T SAF ETY INST RUCTIONS
Do not block any ventilation openings
⚫The vents and other openings in the cabinet are designed to let hot air escape from the
LED TV. Do not cover or block these vents and openings since insufficient ventilation can
cause over-heating. Do not place the LED TV on a bed, sofa, rug or other similar surface,
since they can block ventilation openings, it may overheating and result in fire.
⚫Do not cover the LED TV with cloth, such as curtains, or items such as news paper, etc.
⚫This unit is not designed for built-in installation, do not place the product in an enclosed
place such as a bookcase or rack, unless proper ventilation is provided or the
manufacturer's instructions are followed.
Avoid high temperature environment
The heat adversely affect the LED TV and other parts, and could result in serious overheating
or risk of fire.
⚫Do not place the LED TV, the remote control and other parts in direct sunlight or near a hot
object such as heater, etc.
⚫Do not put the LED TV in a place where the temperature is widely changing
⚫To prevent the spread of fire, keep candles or other open flames away from this product at
all times.
Avoid oils
Do not install the LED TV in a place that uses oil. Dust absorbing oil may enter into the unit and
damage the unit.
Power cord protection
Incorrect connection of the power cord could result in fire or electrical shock.
⚫Do not connect too many appliances to the same mains socket as this could result in fire or
electrical shock.
⚫The apparatus shall be connected to a mains socket outlet with a protective earthing
connection.
⚫The socket outlet for connecting mains plug shall be easily accessible and remain readily
operable.
⚫Do not overload wall outlet as this can result in fire or electrical shock.
⚫Check that the connecting portion of the AC power cord is clean (with no dust), before
using. Use a soft and dry cloth to clean the power plug.
⚫AC power cord should be routed so that they are not likely to be walked on or pinched by
items placed upon or against it. Also do not put any heavy objects on the AC power cord.
⚫Do not touch the AC power cord with a wet hand.
⚫Pull out theAC power cord by the plug. Do not pull on the power cord.
⚫Insert the power plug into a power outlet firmly. Avoid using a loose, or damaged outlet.
⚫Do not pinch, bend, or twist the cable excessively. The core lines may be bared or cut,
causing a short-circuit which may induce fire or electrical shock.
⚫For your own safety, do not touch any part of the unit, power cord or aerial lead during
lightning storms.

8
⚫Do not modify theAC power cord.
⚫Disconnect the power cord if the LED TV is not used for a long time.
⚫Switch off and withdraw the power plug before making or changing connections.
⚫The mains plug is used as disconnect device, the disconnect device shall remain readily
operable.
Handing and cleaning the screen surface of display unit
To avoid screen degradation, follow points mentioned below. Do not push on or scratch with
hard objects, or throw anything at the screen. The screen may be damaged.
⚫Be sure to unplug the power cord from outlet before cleaning.
⚫Do not touch the display panel after operating continuously for a long period as the display
panel becomes hot.
⚫We recommend that the screen surface is touched as little as possible.
⚫To remove dust from the screen surface, wipe gently with a clean, soft and cotton-free dry
cloth.
⚫Do not use any type of abrasive pad, alkaline/acid cleaner or strong solvent such as alcohol,
thinner or benzene etc, as the surface may be impaired.
Cleaning the cabinet
⚫Be sure to unplug the power cord from the outlet before cleaning.
⚫Clean the cabinet with a soft cloth.

9
⚫Note that material deterioration or screen coating degradation may occur if the display unit
is ex-posed to a volatile solvent, such as alcohol, thinner, benzine or insecticide, or if
prolonged contact is maintained with rubber or vinyl materials.
Carrying and moving
⚫Be sure to always carry the LED TV by two people holding it with two hands, one hand on
each side of the LED TV. If you carry the unit in a manner other than that specified, it may
drop and a serious injury may be caused.
Servicing
Do not open the cabinet or remove the rear cover of the unit. If any of the following conditions
occurs, unplug the AC power cord from the AC outlet, and contact qualified service personnel.
⚫When the power cord or plug is damaged.
⚫When the LED panel is damaged.
⚫When the liquid is spilled on the unit or when objects have fallen into the unit.
⚫When the unit has been exposed to rain or water.
⚫If the unit has been dropped or the cabinet has been damaged in any way.
⚫If the unit does not work properly even after you have referred to the TROUBLESHOOTING
section
Replacement parts
⚫In case the unit needs replacement parts, make sure that the service personnel uses
replacement parts specified by the manufacturer, or those with the same characteristics
and performance as the original parts. Use of unauthorized parts can result in fire, electrical
shock and/or other danger.
⚫Upon completion of service or repair work, request the service technician to perform safety
checks to ensure that the unit is in proper operating condition.
WARNING: Excessive sound pressure from earphones and headphones can cause hearing
loss.
Other notices
⚫Sometimes, the image may have some tiny red, green, blue, white or black spots. This is
normal and does not affect the performance of the LED TV.
⚫Due to advanced technology of the LED TV, giving you fine picture details. Occasionally, a
few non-active pixels may appear on the screen as a fixed point of blue, green, or red.
Please note that this does not affect the performance of your LED TV.
⚫If the unit is used in a cold place, a smear may occur in the picture or the picture may
become dark. This does not indicate a failure. These phenomena improve as the
temperature rises.
⚫In some case, residual images may remain after the short-term display of still images is
displayed. These will disappear in a few minutes, and the display will return to normal.
⚫LED panel are made of finely processed glass, so please avoid pushing hands or a strong
impact on the panel. It may cause damage to the LCD cells, and/or there is danger of glass
breakage.
⚫Do not use immediately after moving from a low temperature to a high temperature
environment, as this causes condensation, which may result in fire, electrical shock or other
danger.

10
PACKAGE CONTENTS
Your LED TV package includes:
1.LED TV 6.User Manual
2.DC Power Cable L=10cm 7.Cigarette Lighter Car DC Power Cable
3.Remote Control 8.Stand
4. MiniAV Conversion Cable 9.Screws ×2
5.Mini YPBPR Conversion Cable
Note:
Your product may also include various other accessories depending on region of purchase.

11
LOCATI O N AND FUNCTION OF CO NTRO LS
FRONT PANEL
Item
Button Name
Description
➊
CH+/-
When you are watching the TV program, press these buttons
to select channel in ascending or descending order. Select the
upper or lower menu item in the OSD menu.
➋
VOL+/-
Increase or decrease the volume.
Adjust the values of the selected menu item in the OSD menu.
➌
MENU
Enter or exit from the menu.
➍
SOURCE
Select an input signal.
➎
Switch on the LED TV when at standby mode or vice versa.
➏
Power Indicator
Indicator will light up in standby mode.
No illuminates when the LED TV is switched on.
➐
Remote Sensor
Infrared sensor for the remote control.
➑
Main Power Switch
Switch on/off the LED TV.

12
Y·Note:
If there is no signal input for over 15 minutes, or no operation for over 180 minutes, the LED TV
will switch to standby automatically, the power indicator will light up .
13
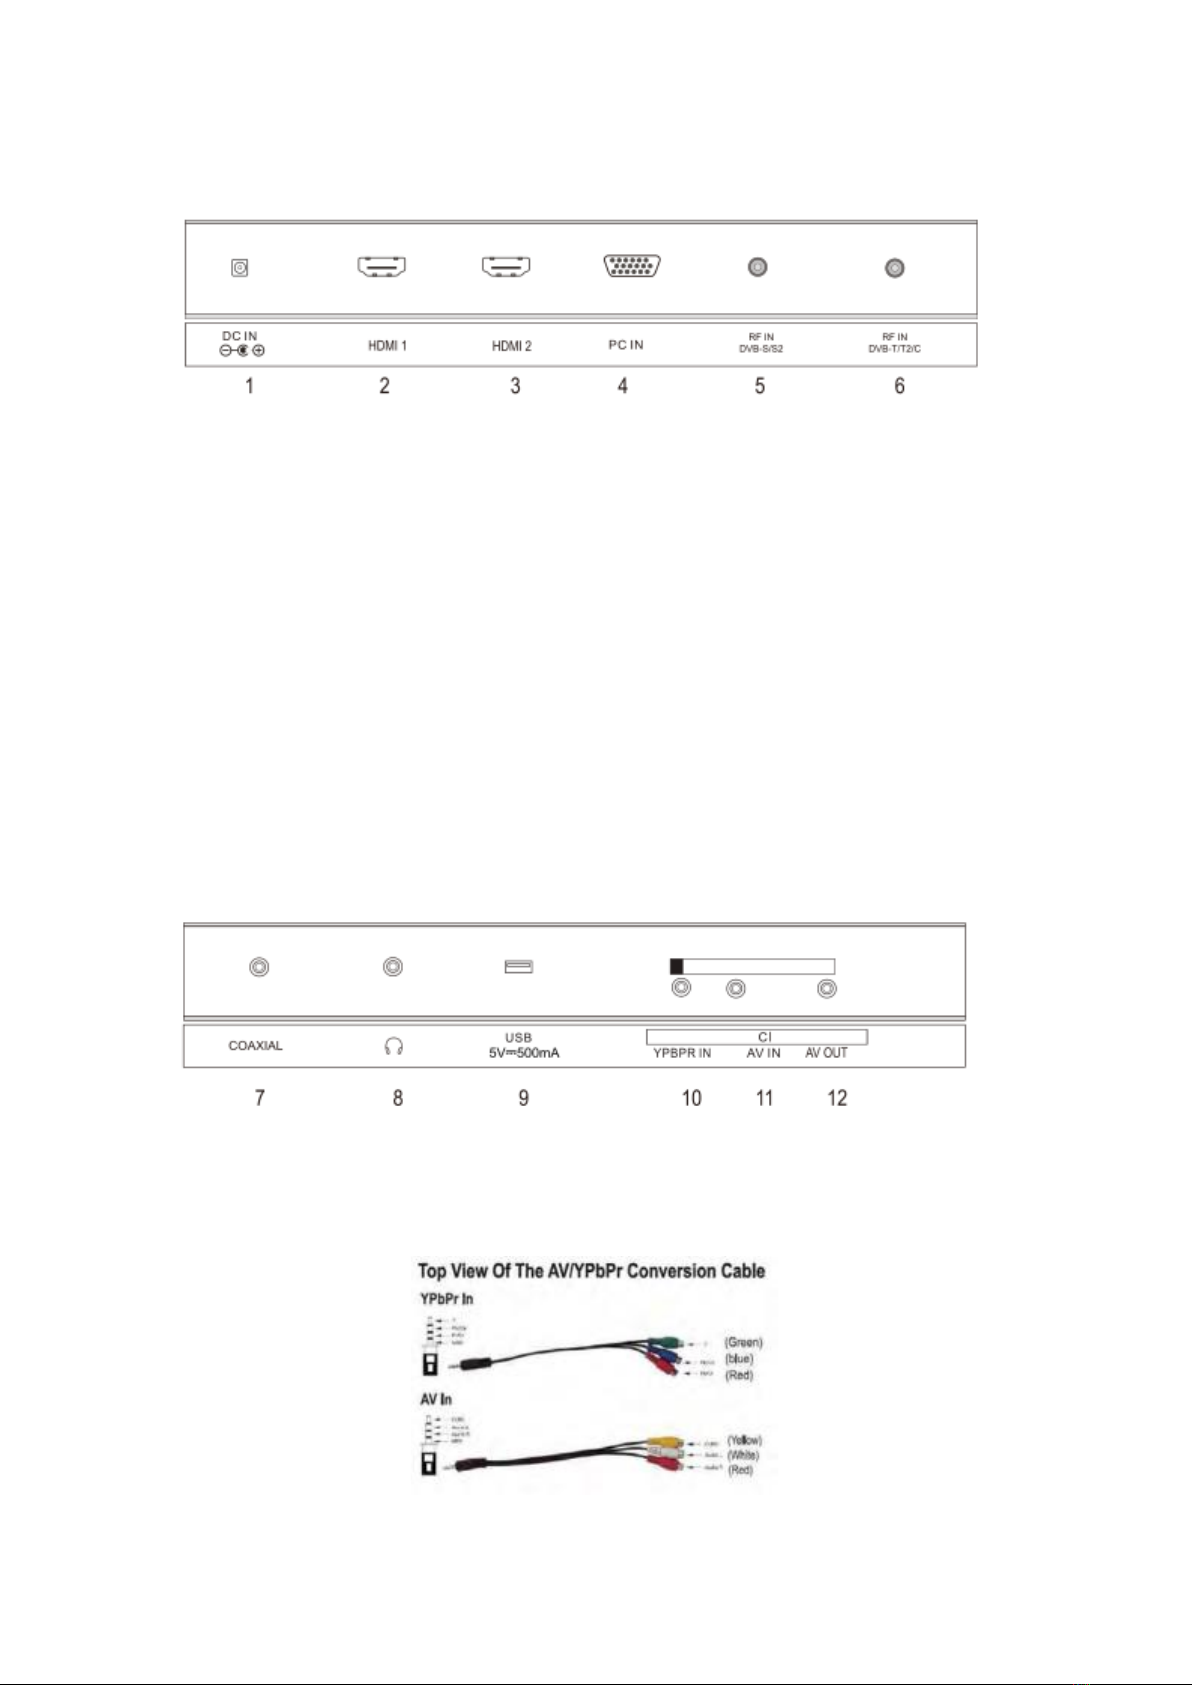
CONTROL BUTTONS AND TERMINALS
REAR RANEL
1.DC Terminal 2.HDMI Input Connector
3.HDMI Input Connector 4.PC IN Input Connector
5.RF IN 6.RF IN
SIDE PANEL

14
7.COAXIAL 8.Headphone Output Terminal
9.USB Input Terminal 10.YPbPr Input Terminal
11. AV Input Terminal 12. AV Output Terminal
15
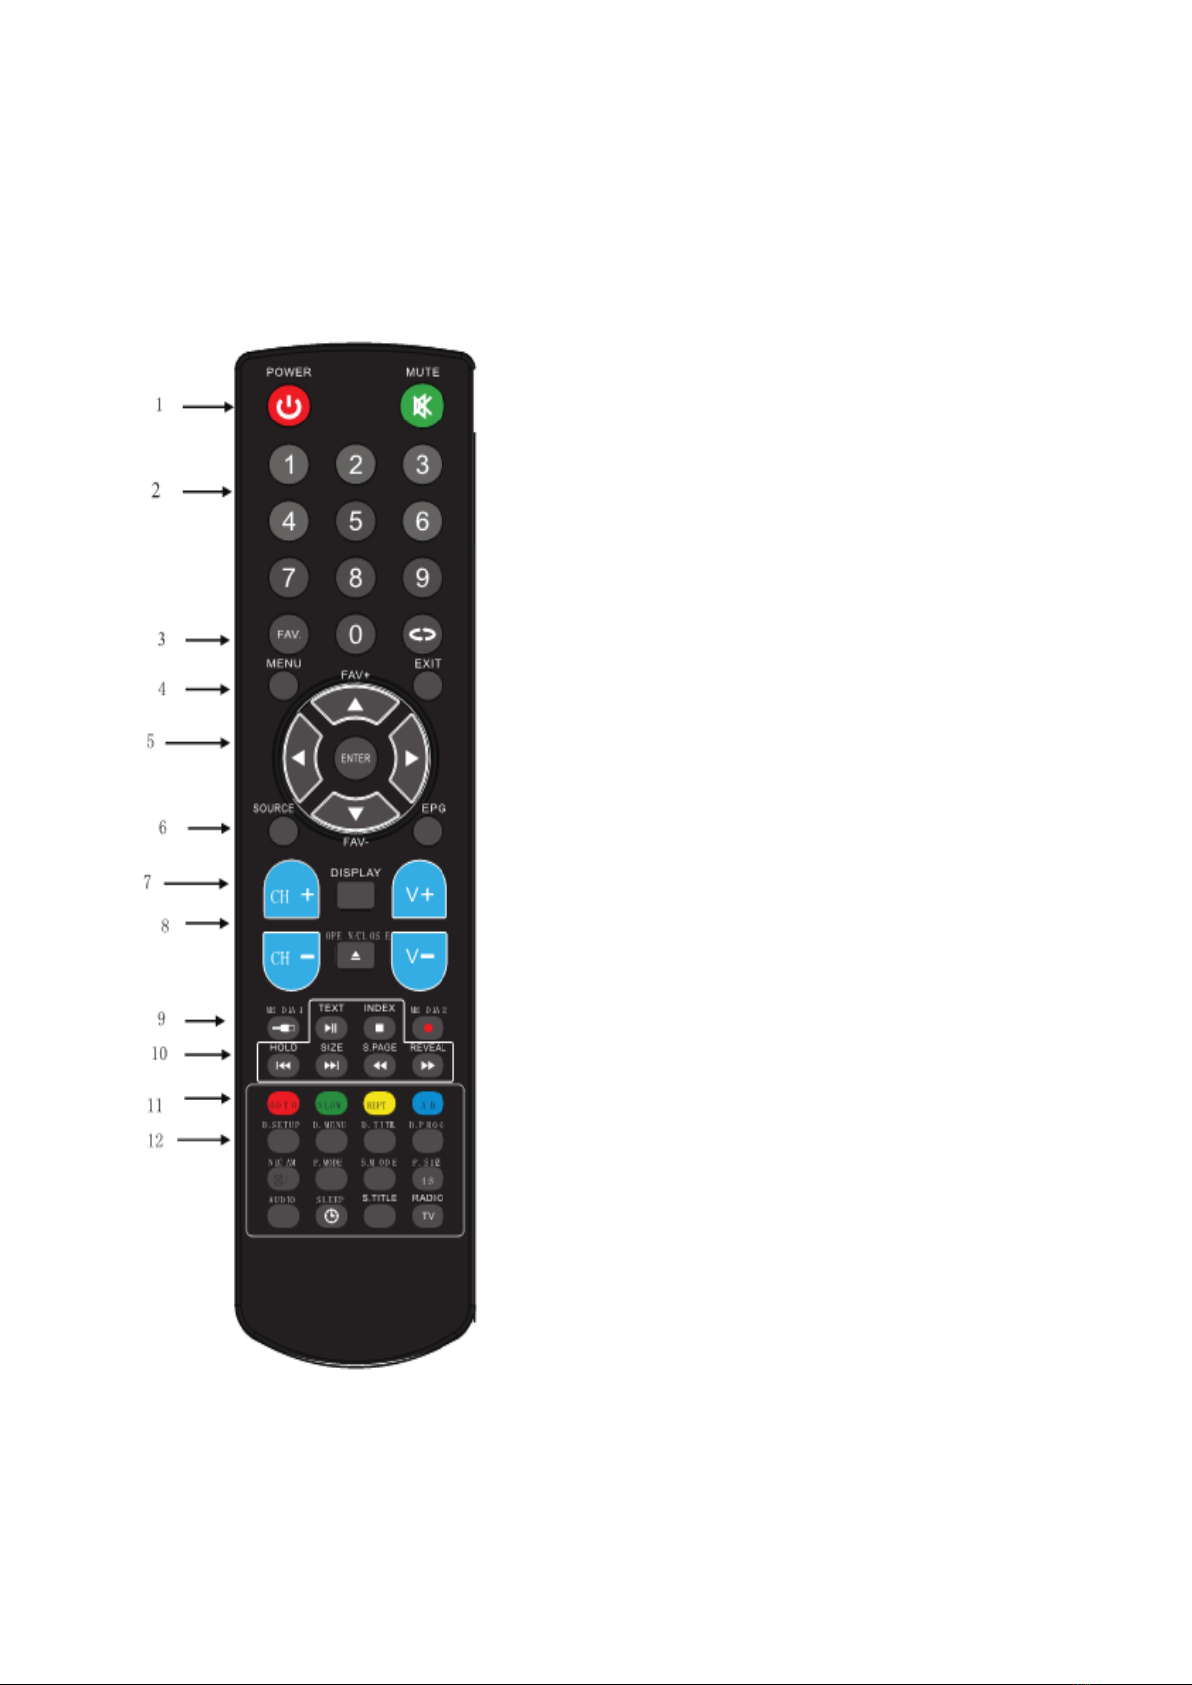
REMOTE CONTROL
1.POWER
To switch on the LED TV when at standby
mode or vice versa.
2.0-9 Number Buttons
Press any numbers 0-9.
Digital number for select channel or password or so on
3.FAV.
Start the “Favorite List"
4.MENU
To enter or exit from the MENU.
5.▲▼◀▶and ENTER
Use to select on screen menu items and
change menu values. Press ENTER can
display Channel List
6.SOURCE
To select an input signal.
7.DISPLAY
To display the source and channel information.
8.CH+/-
To select the channel forward or backward.
9.MEDIA
To enter the USB multi-media.
10.TELTEXT Buttons
These buttons are used for certain modes with
teletext functions only. For further details, refer
to the TELETEXT FUNCTION.
11.Colour function Buttons
These Red/Green/Yellow/Blue buttons are used

16
for certain modes with short key functions only. For
further details, refer to the related operation function in
following.
12.D. SETUP
Note. In DVD mode to activate the DVD SETUP menu.
In DTV mode to activate the Schedule List menu.
D. MENU
During EVD playback, press to enter the program menu.
During USB media playback, press to enter the setup menu.
D. TITLE
During DVD playback, press to display the DVD title Menu.

17
14.MUTE
To switch the sound on or off.
15.Retum
To return to the previously selected program number
16.EXIT
To exit the menu.
17.EPG
To star the EPG Application
18.VOL+/VOL-
To adjust the audio levels
19.OPEN/CLOSE
Press to open or close the disc tray.
20.MEDIA 2
Once button recording
21.D. PROG
While watching the digital TV, press to start time shift.
During DVD playback, press to display the program
menu for edit.
22.NICAM
To switch among Stereo, DUALI DUAL2 and
MONO in ATV mode.
P. MODE
To select picture mode.
S. MODE
To select the sound mode.
P. SIZE/4.3
To select picture size
23.AUDIO

18
To select Stereo/MONO. or change a udio's language in
DTV, USB and DVD mode.
SLEEP
To select how long sleep time.
S. TITLE
To enable/disable the subtitle in DTV, USB and DVD
mode.
TV/Radio
To select TV and Radio in DTV mode.
19
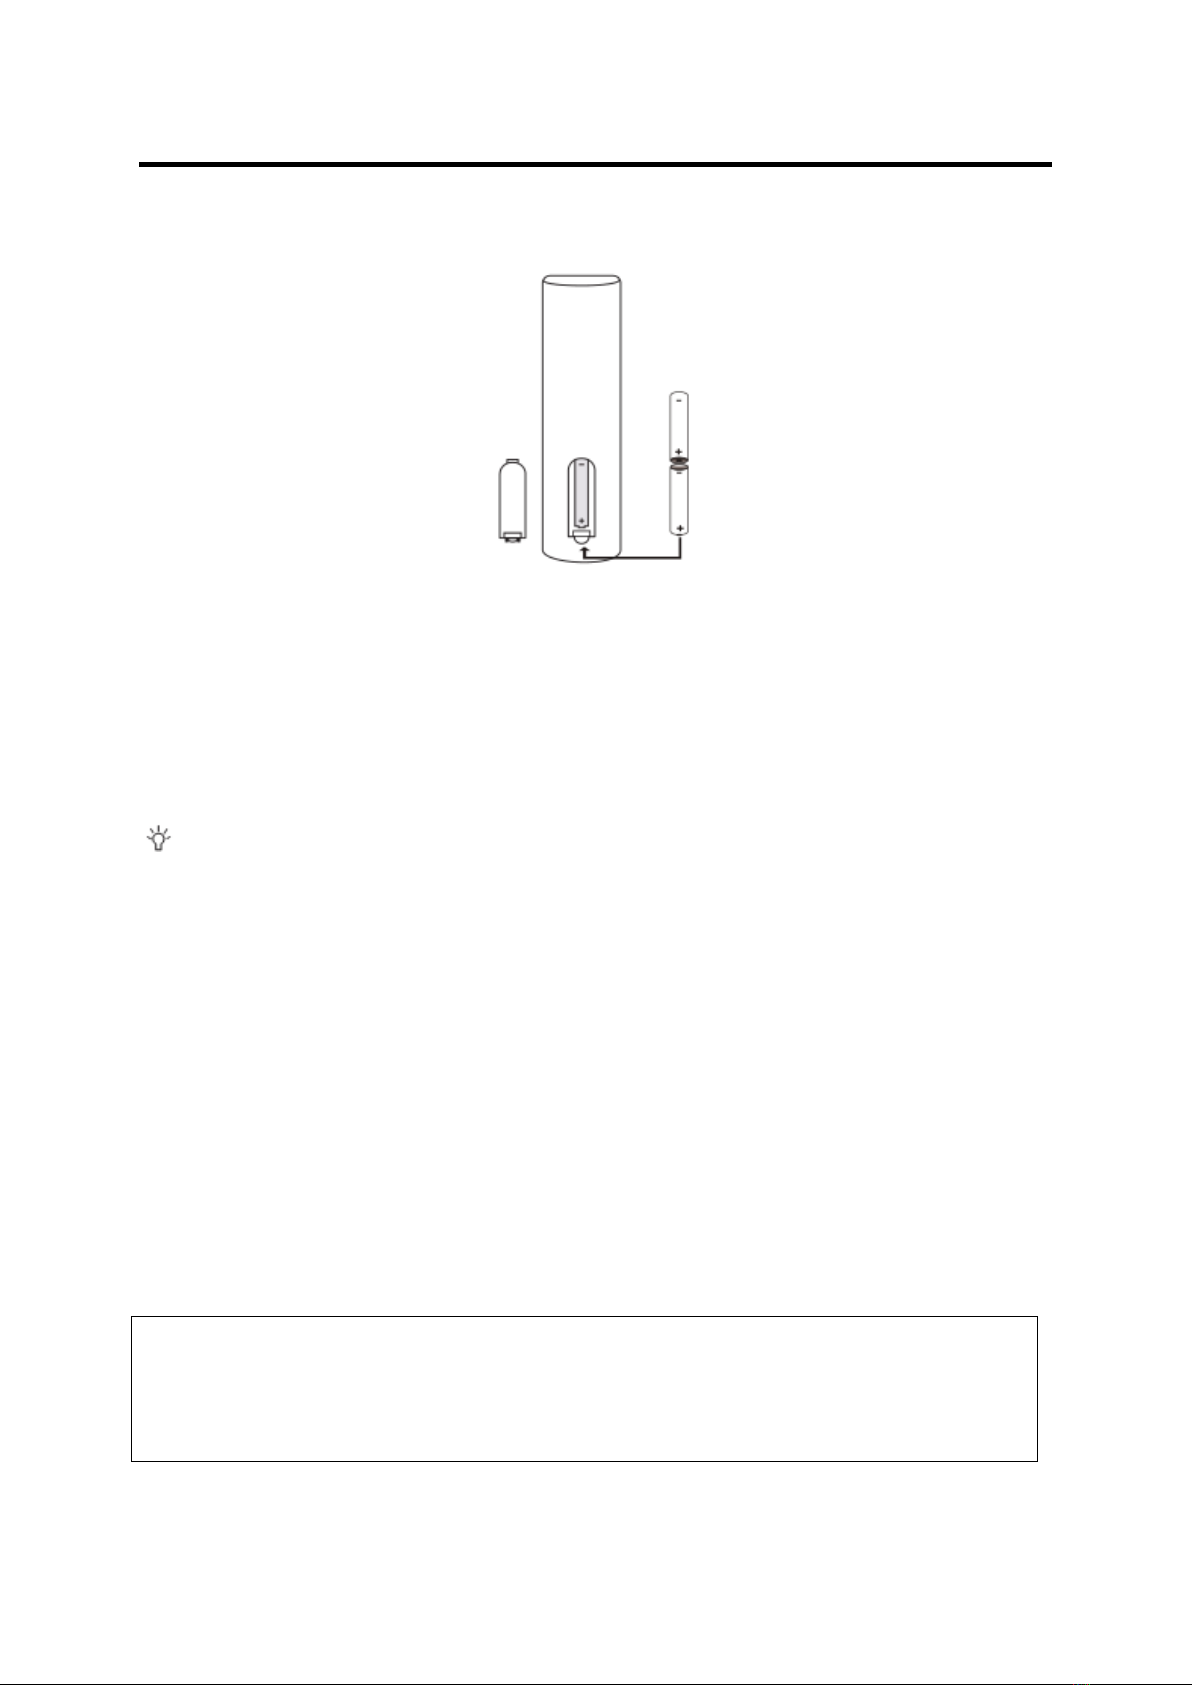
CONTROL BUT TONS AND TE RMINALS
BATTERY INSTALLATION
Insert the batteries while observing the correct(+)and(-)polarities as illustrated below.
About the batteries
⚫If the remote control unit fails to work even when it is operated near the LED TV, please replace the
batteries.
⚫Use size UM-4(AAA)batteries.
Note:
⚫Do not use rechargeable(Ni-Cd)batteries.
⚫Do not attempt to recharge, short circuit, disassemble, heat or throw the batteries into the fire.
⚫Do not splash the remote control with water or put it on a wet object to avoid damage.
⚫Do not drop, step on or cause any impact to the remote control unit. This may damage it, resulting
malfunction.
⚫Do not mix old and new batteries.
⚫If the remote control unit is not going to be used for a long time, remove the batteries.
⚫Strong light such as direct sunlight impinging on the remote sensor can cause operational failure.
Place the remote control to avoid direct contact with sunlight.
Caution
Keep batteries out of children's reach. If batteries are swallowed, contact a physician
immediately.
This manual suits for next models
2
Table of contents
Other idMEDIA LED TV manuals


