IDX L269 User manual
DUAL SCREENS PORTABLE DVD PLAYERDUAL SCREENS PORTABLE DVD PLAYER
ENGLISH
OWNER`S MANUAL
DUAL SCREENS PORTABLE DVD PLAYERDUAL SCREENS PORTABLE DVD PLAYER
Please read thismanual before operating
L269


Table of Contents
~ 1 ~
Table of Contents......................................................................................................................................................................1
Safety Information....................................................................................................................................................................2
Remote Control........................................................................................................................................................................3
Description of the Player...........................................................................................................................................................4
Description of the Game Pad.....................................................................................................................................................5
Using the Remote Control..........................................................................................................................................................6
Connecting the LCD Screens.....................................................................................................................................................7
Connecting the Game Pad.........................................................................................................................................................8
Using the AC Adaptor................................................................................................................................................................9
Playing a Disc....................................................................................................................................................................10-14
Playing MP3 and Regular Audio CD..........................................................................................................................................15
Playing Picture CD..................................................................................................................................................................16
Playing Games.......................................................................................................................................................................17
Setting System for TV system, Screen saver, TV type(4:3/16:9), Password, Rating, Default......................................................18-19
Setting Language forOSD, Voice, Subtitle, Menu.......................................................................................................................20
Setting Video for Brightness, Contrast, Hue, Saturation, Sharpness............................................................................................21
Troubleshooting.....................................................................................................................................................................21
Specifications........................................................................................................................................................................23
Safety Information
CLASS 1 LASERPRODUCT / KLASSE 1 LASERPRODUKT / LUOKAN 1 LASER LAITE / KLASS 1 LASER APPARAT / PRODUCTO
LASER CLASE.
INVISIBLE LASER RADIATION WHEN OPENAND INTERLOCKSDEFEATED. AVOIDEXPOSURE TO BEAM.
1.Toprevent fire orelectrical shock, donot expose thisPlayer to rainor moisture.
2.Toavoid electrical shock,do not openthe cabinet, nouser-serviceable parts inside,refer servicing toqualified personnel only.
3.Certain countries mayregulate the disposalof the batteryused to powerthis product. Pleaseconsult with yourlocal authority.
4.Listening with earphones for many hoursat maximum volumemay damage yourhearing.
5.The Player shouldbe connected toa power supplyonly of thetype described inthe operating instructionsor as markedon the Player.
Please read allof the safetyand operating instructionsbefore operating thisPlayer, followall warnings placedon the Player
and in theuser's manual. Thesesafety and operatinginstructions should beretained for futurereference.
WARNING
SAFETY WARNING
Safety Information
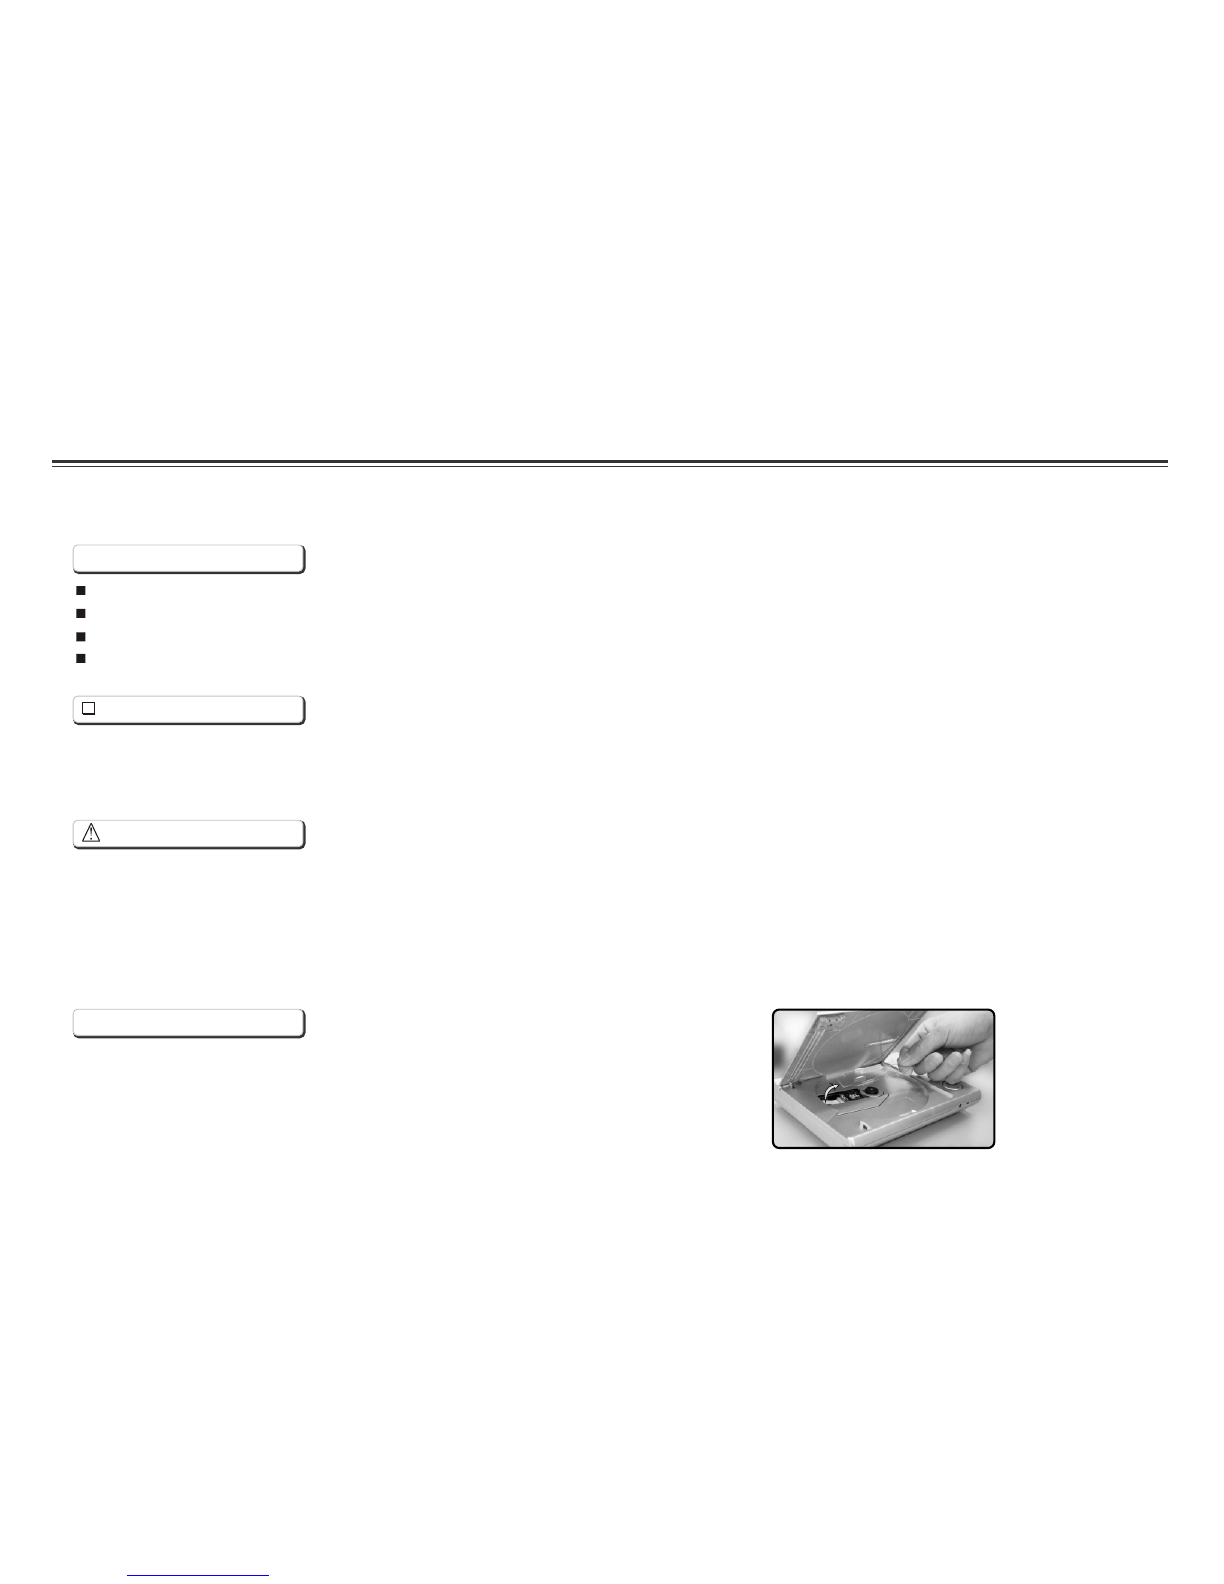
Do not exposethe system toexcessive moisture, rain,sand, or heat sources.
Place the DVDPlayer on afirm, flat surface.
Keep the DVDPlayer away fromdomestic heating equipment and direct sunlight.
When placing theDVD Player ina cabinet, allow about one inch of space all around the DVD Player for ventilation.
Attention:
Remove the protectioncard inside thedisc compartment beforeusing this Player.
~ 2 ~
Remote Control
~ 3 ~
P/N
TITLE
DISPLAY
ANGLE LANGUAGE SUBTITLE
MUTE
L/R
1234
5678
SETUP
ENTER
SLOW
ZOOMREPEAT MARK GOTO
MENU/PBC
90
1
2
3
4
5
6
7
8
9
10
11
13
14
15
16
17
18
19
20
21
22
12
24
23
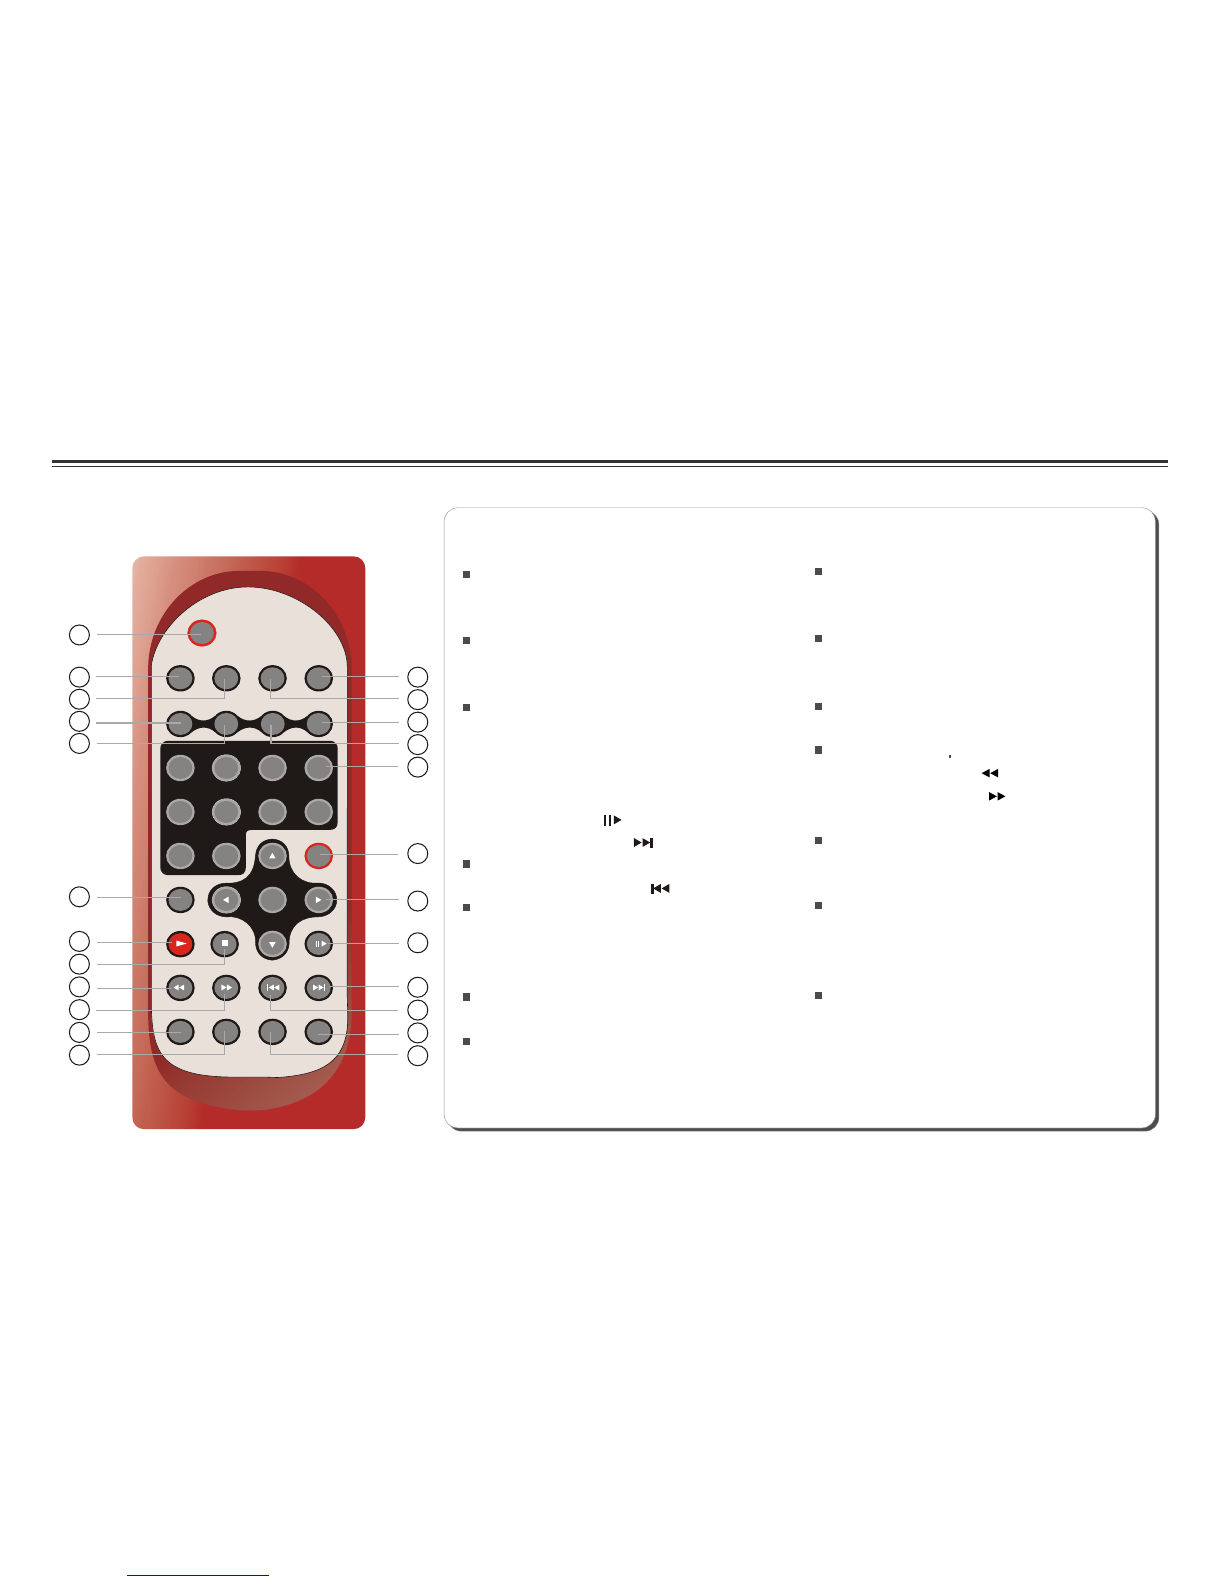
14.MUTE Button
15.ANGLE Button
16.LANGUAGE Button
17.SLOW Button
18.PLAYButton
19.STOP Button
20.FAST REVERSE( ) Button
21.FAST FORWARD ( ) Button
22.REPEAT Button
23.MARK Button
24.GOTO Button
Use to accessvarious
camera angles ona DVD.
Starts disc play.
Allows you torepeat play
a title, chapter, track, ordisc.
Selects the voicelanguage in a DVD.
Stops disc play
Use to marka point wherethe playback
starts each timewhen the MARKbutton
is pressed lateron.
Use to enterthe specific timeto
playback.
1.L/R Button
2.P/N Button
3.TITLE Button
4.SUBTITLE Button
5.Number Buttons (0,1,...,9)
6.SETUP Button
7.
8.PAUSE/STEP ( )Button
9.SKIP FORWARD ( )Button
10.SKIP BACKWARD ( ) Button
11.ZOOM Button
12.MENU/PBC Button
13.DISPLAYButton
Selects PAL/NTSC/AUTO TV systems.
Selects the subtitle'slanguage.
Brings up thesetup MENU
to set upthe system's
language, audio, display,
password etc.
Brings up thedisc menu.
Displays the currentdisc playback
information.
ENTER/DIRECTION Buttons
Use to skipto next title,chapter or track.
Use to skipto previous title,
chapter or track.
OUT 1 OUT2
ENTER
FR FF
MENU/PBC
POWER ON/OFF
POWER
ON OFF
PUSH
OPEN
DISPLAY PAUSE/STEP
6
7
8
9
10
11
12
13
4 5 14
2
3
15 16
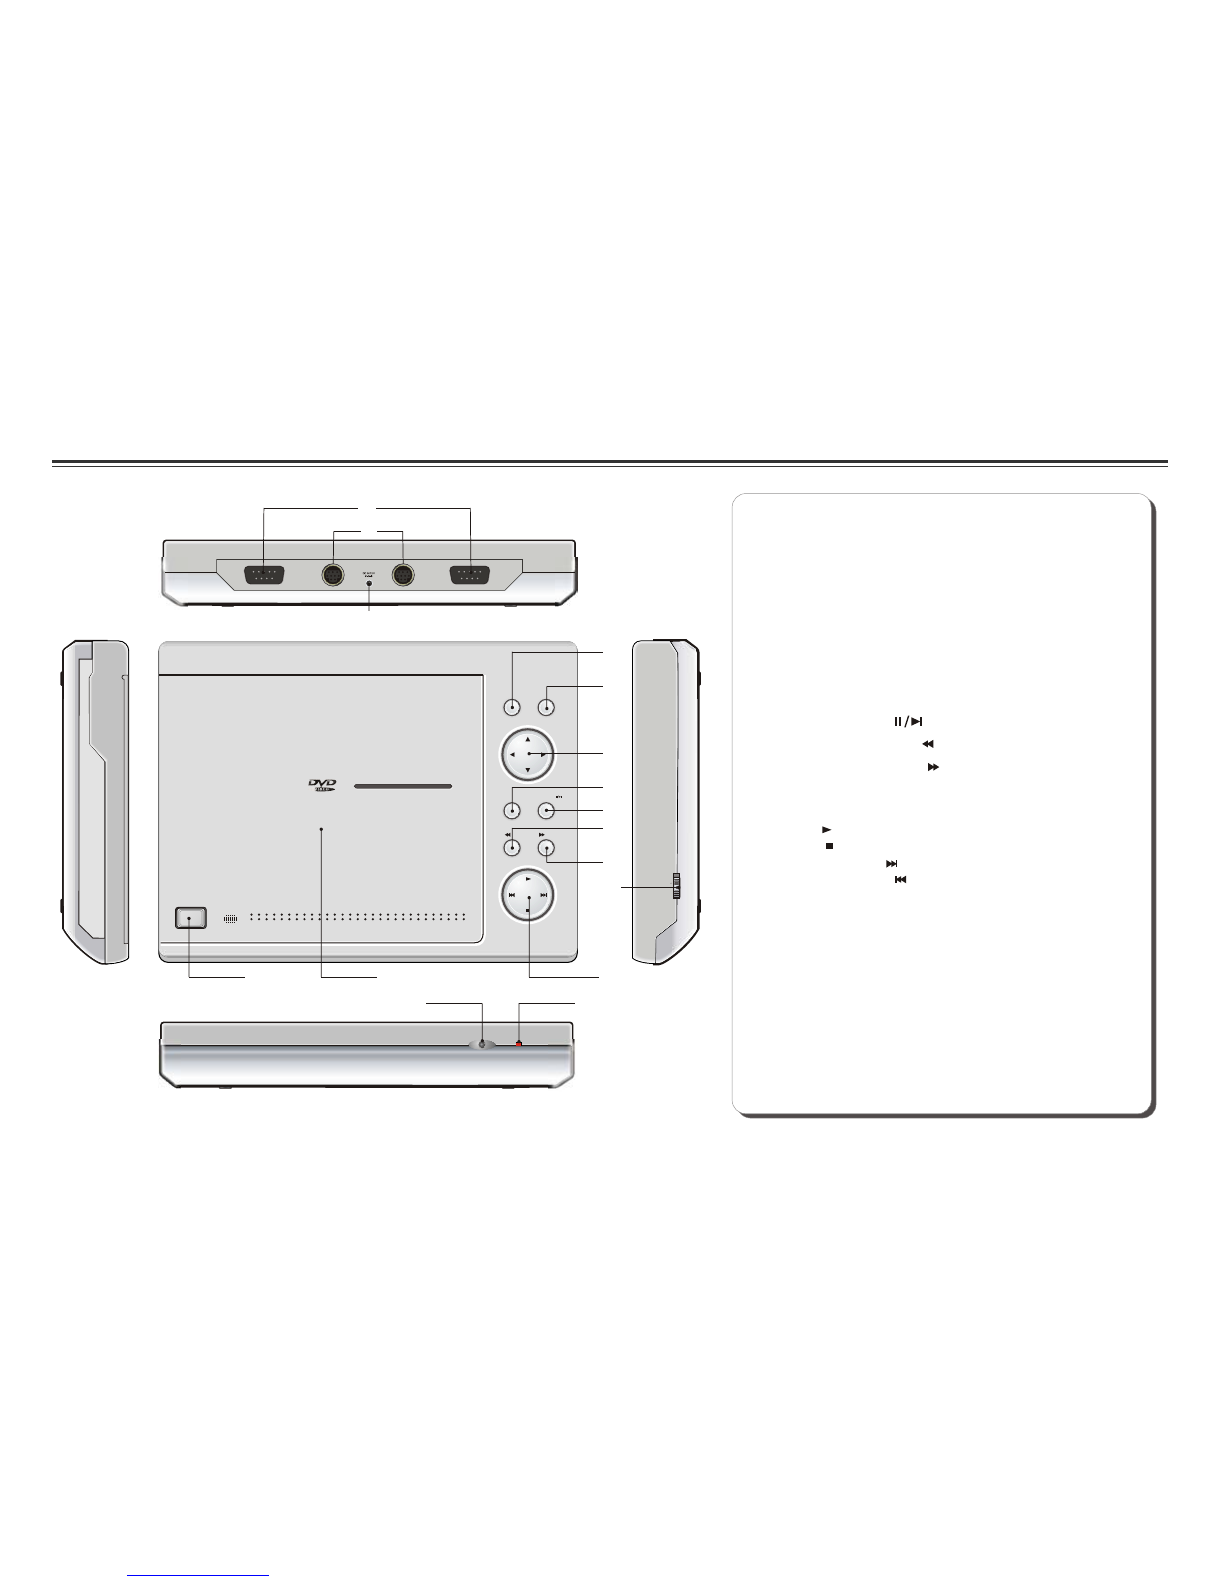
1.GAME1 / GAME2
2.OUT1 / OUT2 jack
3.DC IN 12 V jack
4.OPEN button
5.DISC COVER
6.MENU/PBC button
7.ENTER button
8.DIRECTION button ( up / down / left / right )
9.DISPLAY button
10.PAUSE/STEP ( )button
11.FAST REVERSE ( ) button
12.FAST FORWARD ( ) button
13.POWER ON/OFF
14.PLAY BUTTONS
PLAY ( )
STOP ( )
SKIP FORWARD ( )
SKIP BACKWARD ( )
15.REMOTE CONTROL SENSOR
16.LED LIGHT
Description of the Player
~ 4 ~
GAME1 GAME2
1

1.DIRECTION Buttons (UP/DOWN/
LEFT/RIGHT):Directional navigation,
DOWN button is also used for
“lie-down" .
2.SELECT Button:Select single or
double players.
3.A Button:Continuous move.
4.B Button:Continuous Jump.
5.C Button:One move.
6.D Button:One jump.
7.START Button:Start or pause the
game.
~ 5 ~
Description of the Game Pad
1
2
3
4
5
6
7
Using the Remote Control
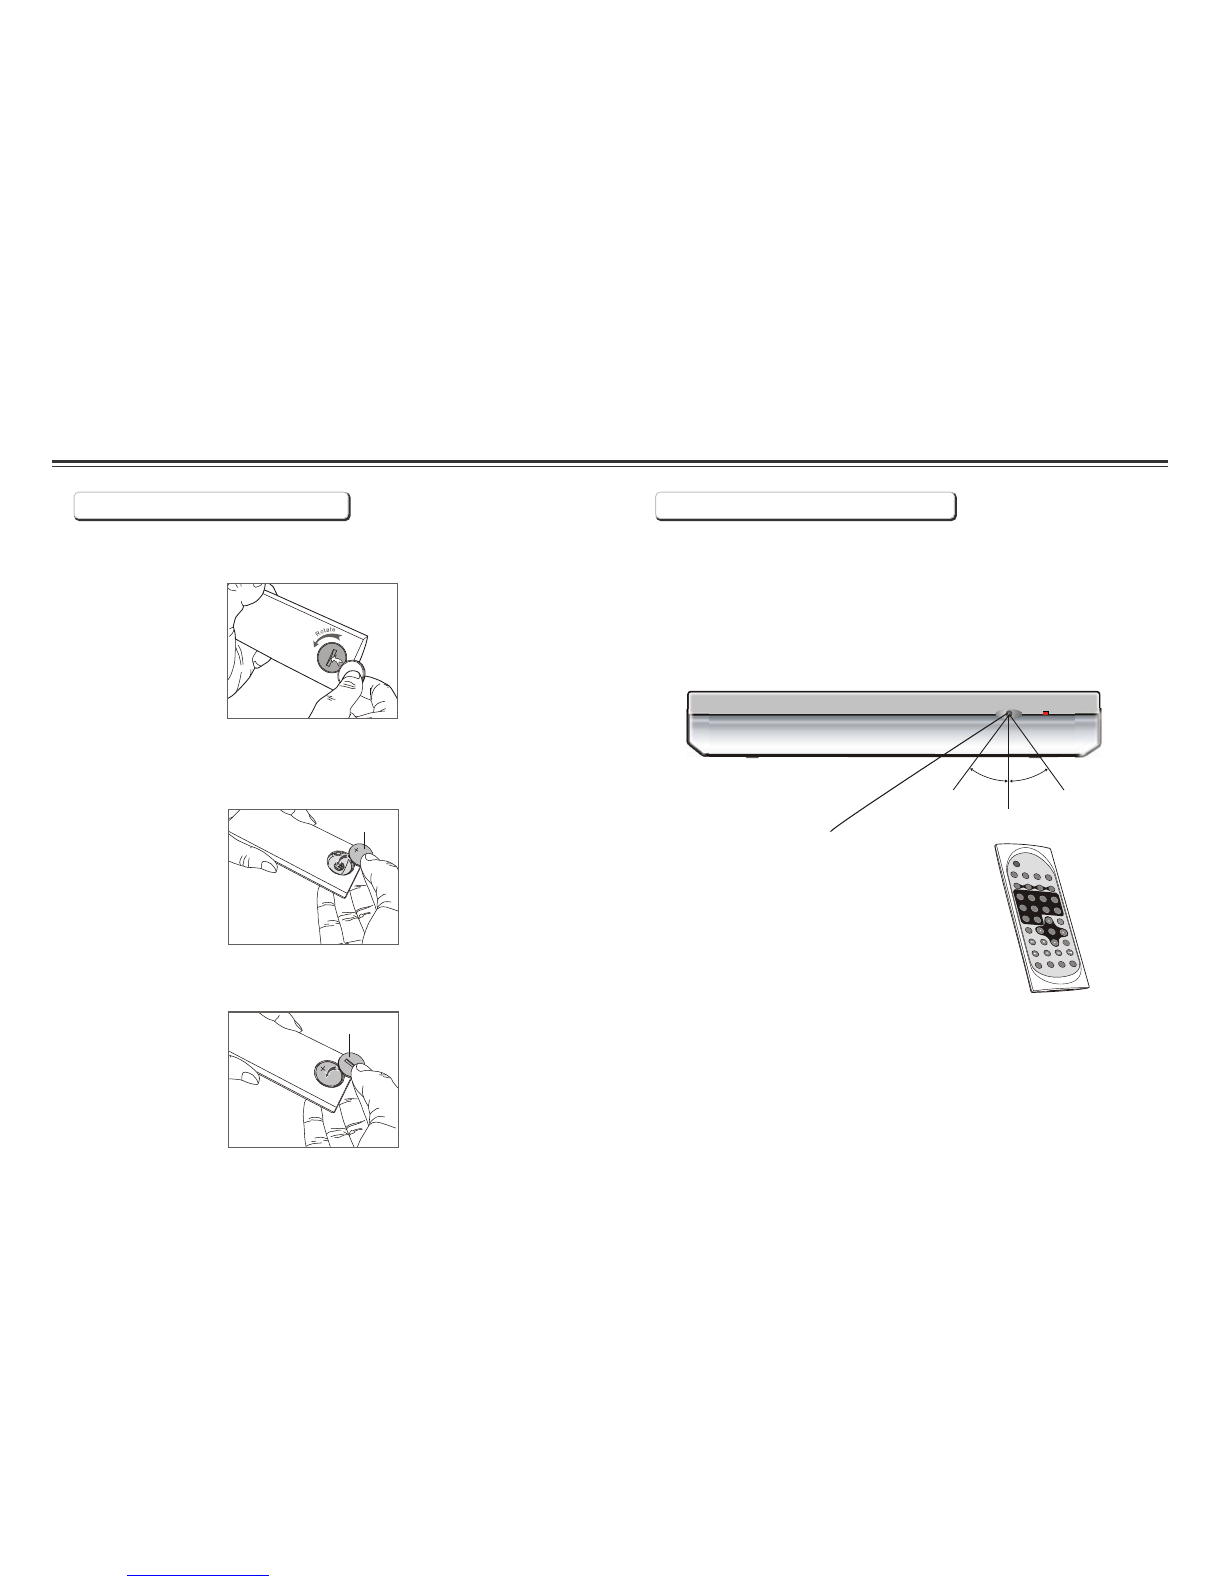
Installing the battery Using the remote control
Point the remotecontrol directly atthe remote sensor
on the frontof the DVDPlayer.
Remote Control Sensor
O
30
O
30
2m(6.5ft)
~ 6 ~
P/N
TITLE
DISPLAY
ANGLE LANGUAGE SUBTITLE
MUTEL/R
1234
5678
SETUP
ENTER
SLOW
ZOOM
REPEAT
MARK
GOTO
MENU/PBC
90
10+
1. Open thebattery compartment coverusing a coin.
3. Replace thebattery compartment coverand turn clockwise
until it stops.
2. Insert a3V lithium batteryinto the batterycompartment with
the polarity (+ ) facingup as marked.
Battery
battery compartment
cover
AV IN
ANT
ON
POWER
OFF
AV IN
ANT
ON
POWER
OFF
OUT 1 OUT2
GAME1 GAME2
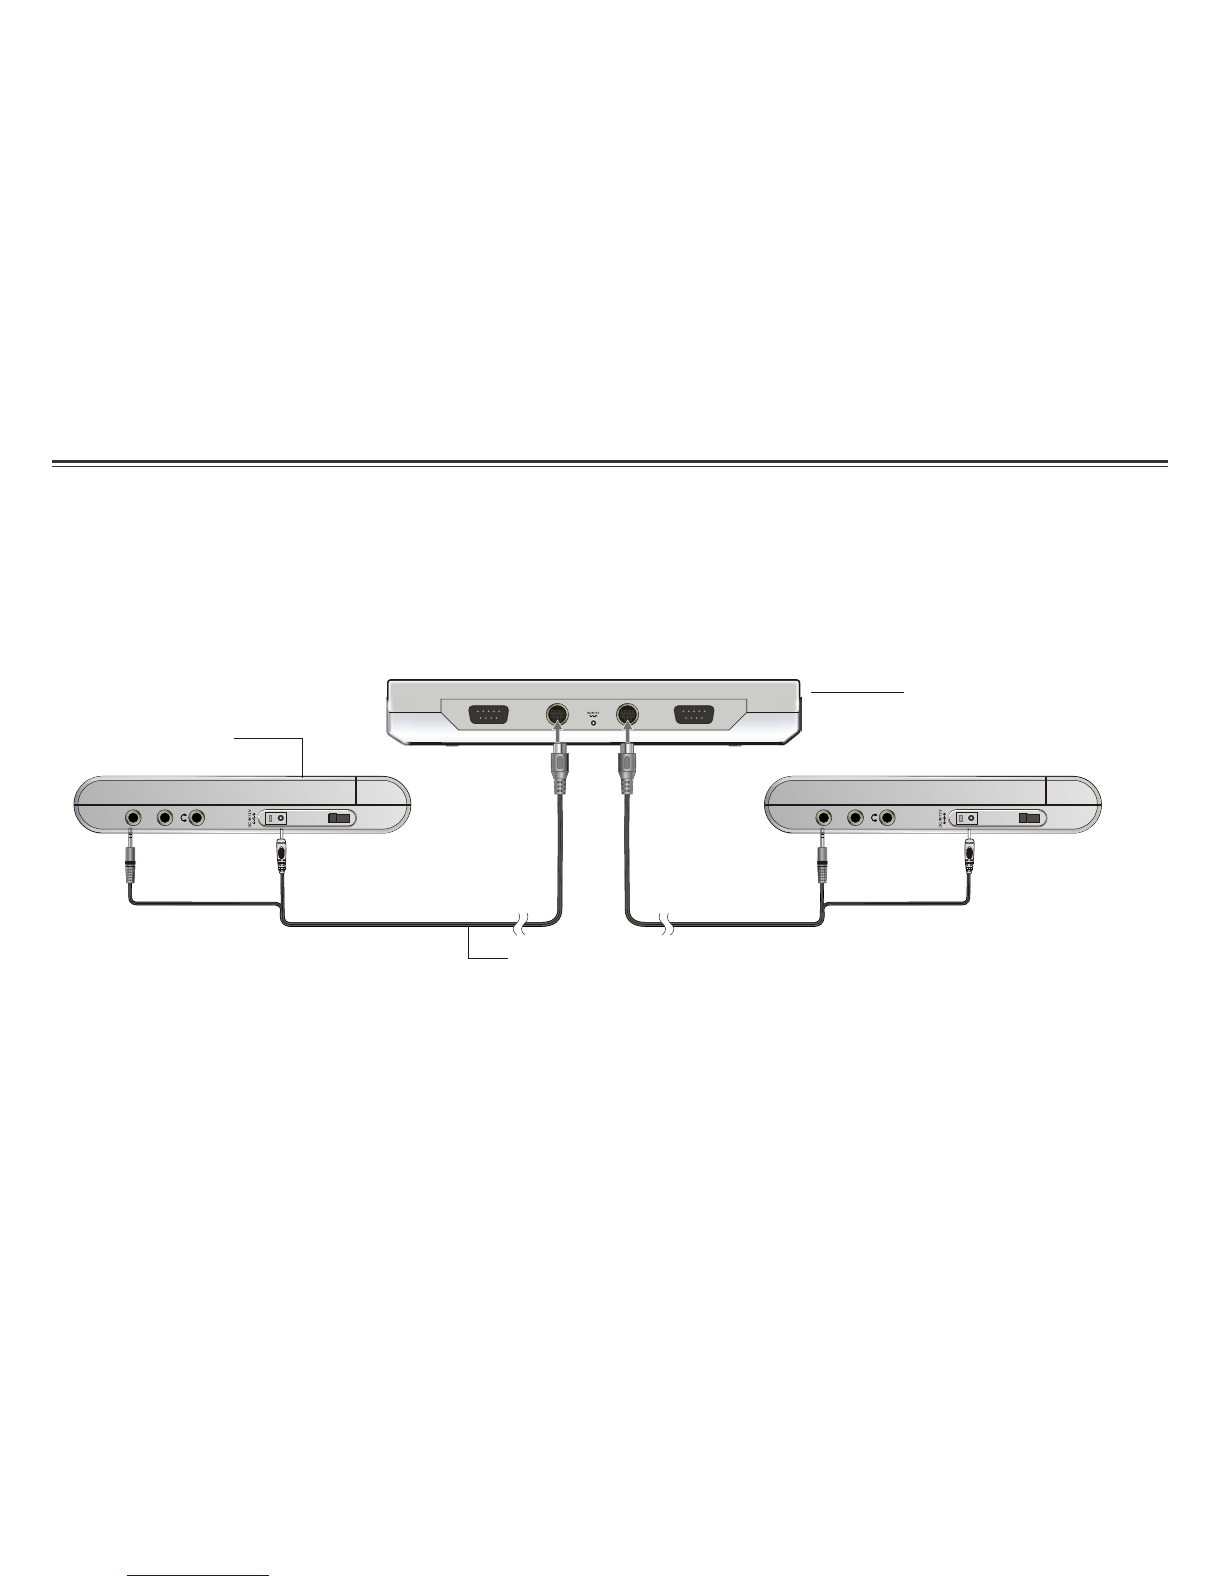
Connecting the LCD Screens
The power forthe two screensis provided bythe DVD playerthrough the providedcables which alsoserve to providethe audio/video
signal from theplayer to thescreens. Follow thesesteps to makethe connections.
DVD Player
LCD Screen
~ 7 ~
Power/AV Cable
Warning!
1. Do notturn on theDVD player poweruntil the connectionof Power/AV cable between the Player and the screen is done.
2. Alwaysturn off the DVD playerpower before disconnectingthe Power/AV cable betweenthe Player andthe screen.
1. Connect oneend of thePower/AV cable (mini DIN)to the OUT1 on the playerand the otherend to theDC. AV INPUT on the screen.
2. Repeat step1 for theother screen.
OUT 1 OUT2
GAME1 GAME2 DVD Player
~ 8 ~
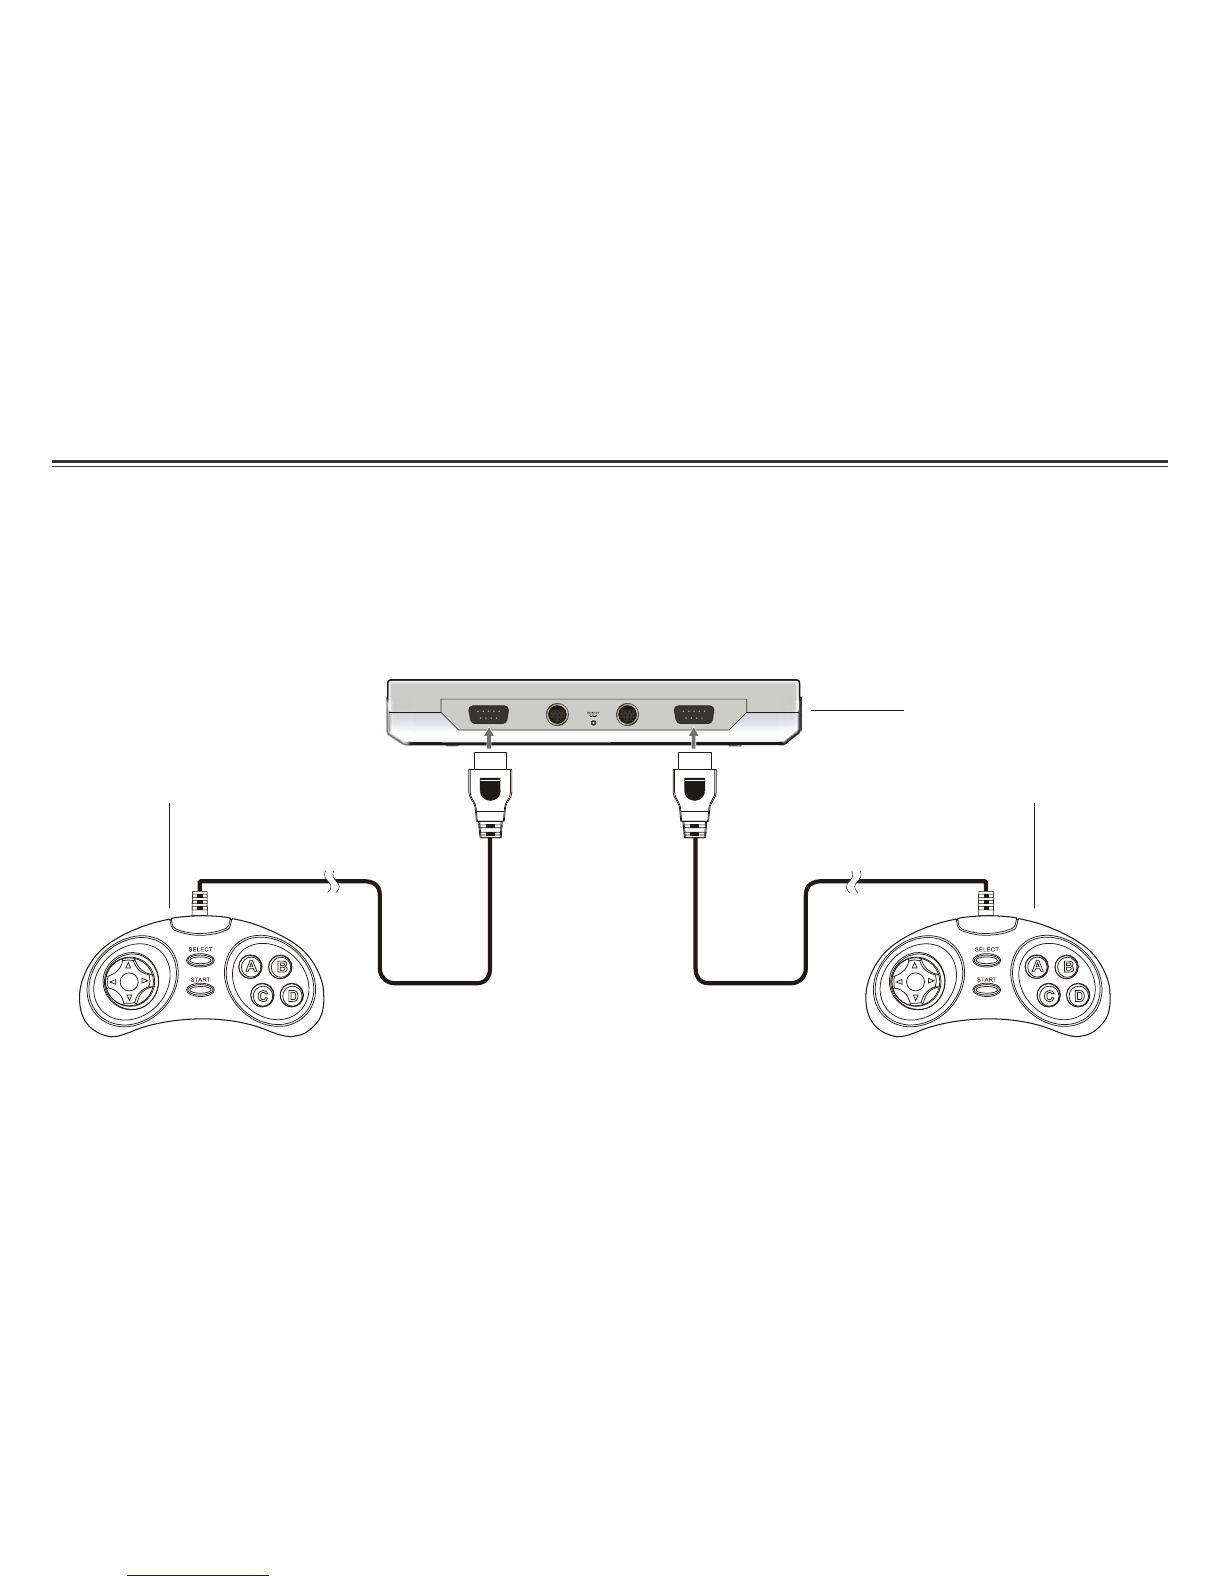
Connecting the Game Pad
Make connection ofthe game padsto the Playeras below.
DVD Player
Game pad Game pad

OUT 1 OUT2
GAME1 GAME2
Using the AC Adaptor
AC adaptor
To home power outlet
Power cord
Important !
Always turn off the DVDPlayer before connectingor disconnecting theAC cord.
. Using adifferent type of adaptor maycause malfunction ordamage to theproduct.Only use theAC adaptorsupplied with thisplayer
When theAC adaptor isused for prolongedperiod of time,the adaptor mayheat up, thisis normal andis not acause for concern.
When not usingthe adaptor,unplug it fromthe outlet.
Do not usethe ACadaptor if damaged.And donot try todisassemble or repairthis adaptor.
Do not usethis ACadaptor for otherproducts.
To DC12V IN onthe DVD player
This portable DVDplayer is poweredby ACthrough the suppliedswitching powerAC adaptor.
For in-car use,this Player ispowered by carbattery through thesupplied car(DC) adaptor.
~ 9 ~
Playing a Disc
1. Make surethe Player hasthe power eitherfrom theAC adaptor orDC(car) adaptor.
2.Loading adisc, following thesesteps:
Press the OPEN button to open the disc compartment cover.
Place a discinto the traywith the labelside facing up.
Close the disccover.
3. Turnon the powerof the Playerand the screens.
Slide POWER to ON.
Preparation for Playback
Turning ON /OFF the player
Press (on theremote or onthe player) tostart play.
Play
Stop
~ 10 ~
1.ToTurn Onthe Player
Slide POWER on the playerto ON, the LEDlights and ifthere is adisc in thedisc compartment, playingwill start automatically.
2. To Turn Off the Player
Simply slide POWER to OFF.
3. To Turn On the LCD Screen.
Slide POWER on the screento ON, LED lightsand the openingscreen appears.
4. To Turn Off the LCD Screen.
Simply slide POWER to OFF.
Press once tostop playback.

1.During playback,press (on theremote) or PAUSE/SETP (on the player) to pause.
2.Press toresume playback.
Pause
Resume
You can skip chapters on DVD-Video, tracks on CDs,and Video CDs.
1.To skip forward, press during playor while paused;it skips tothe next chapteror track. Each press increases the numbers of skips.
2.To skip to previous chapter ortrack, press .
Skip
1.During playback,to fast forward,repeatedly press toincrease the fast forward speed 2x, 4x, 8x, 20x.
2.During playback,to fast rewind,repeatedly press toincrease the fast reverse speed 2x ,4x ,8x ,20x.
3.To resume normal playback, press .
Slow Motion
1.During playback,repeatedly press SLOW to play at 1/2, 1/3, 1/4,1/5, 1/6, 1/7speeds.
2.To resume normal playback, press .
You can only perform slow motion play in the forward direction.
Fast Forward and Reverse
Playing a Disc
~ 11 ~
This Player providesa unique resumefunction for makingviewing movie moreconvenient. Follow thesesteps
1.When youwant to interruptthe playback andcome back laterto play whereyou interrupted it,you can pressOPEN on the Playerto
open the disccompartment cover.
2.You can now turn off the power, put it on standby, or even remove the disc from the Player, and when you play the same disc next
time, the discwill play fromwhere it wasinterrupted.

Playing a Disc
1.During playback, press PAUSE/SETP( ) topause.
2.Repeatedly pressPAUSE/SETP( ) toplay one frameat a time.
3.To resume normal playback, press .
You can only perform step play in the forward direction.
Frame-by-Frame Playback
The Mark function lets you select parts of a DVD so that you can quickly find the section at a later time.
Follow these steps to set up marker playback:
1.During playback, press MARK on the remote control.
2.Use to select the desired underscore.
3.When you reach the scene you want to mark, press ENTER to confirm; and the underscore changes to a number (1, 2, 3, 4 or 5 ).
4.Repeat the above procedure for a new scene. You can have up to 5bookmarks.
You can perform marker playback at any time by pressing MARK, and using to select one of the marks, then pressing on
the Player to start playing the bookmarked scene. The playback continues until the end of the disc. Repeat the above to play the
other marked scenes.
""
You can play a chapter, a track, a title, a file or the entire disc repeatedly.
1.During playback,repeatedly press REPEAT to choose a Repeat option. Depending on the type of disc,the Repeat options may
be different.
2.To cancel repeat playback, repeatedly press REPEAT until REP:[ OFF ] appears on thescreen.
Repeat Playback
Mark (Bookmark)
~ 12 ~

Playing a Disc
GOTO
You can go directly to a desired chapter and play, or play at a desired point of time. Follow these steps:
(A)To play a specific chapter
1. Press GOTO, use to select title (TT) and chapter
(CH) and enter the desired number.
2. Press ENTER to confirm and start play.
(B)To play from a specific point of time.
1. Press GOTO, repeatedly press to move to the time display and
it changes 00:00:00.
2. Fill in the time (hour: minute: second).
3. Press ENTER to confirm and start play.
MUTE
1. Repeatedly pressMUTE until MUTE appears on thedisplay to silencethe audio. PressMUTE again to turnon audio.""
ZOOM
1.Press ZOOM repeatedly during playbackor pause toenlarge (2X, 3x, 4x, ) or reduce (1/2, 1/3, 1/4) the image.
2.Use directionkeys ( and ) to movearound (pan andscan) the enlarged image.
MENU/PBC
Press MENU/PBC to return to the disc's Start Menu if it has the Start menu, if not, appears. Use TITLE to
return to the beginning of the disc if there is no Start Menu.
" INVALID KEY " " "
LANGUAGE
To switch voice language, press LANGUAGE, the currently selected language is displayed on the screen. Repeatedly
press LANGUAGE to select other language if the disc has multiple languages.
You can also switch the voice language in disc menu screen by pressing MENU.
~ 13 ~

SUBTITLE
Repeatedly press SUBTITLE during playback to change the subtitle's language if the disc has multiple language subtitle. You can
turn off subtitle when OFF is selected.""
ANGLE
With DVDs featuring recordings of pictures shot from different angles, you can choose any desired viewing angle during playback.
Toswitch to different view angle,press ANGLE, the currentlyselected angle isdisplayed on thescreen, repeatedly pressANGLE to
select your desiredangle.
TITLE
Press TITLE, it takesyou to thevery beginning ofthe title and play, or to the MENU if it has title menu.
DISPLAY
L/R
This function is mostly used for karaoke (sing along) discs, by repeatedly pressing L/R, you can select STEREO, MONO
(Left), MONO (Right) etc.
Repeatedly press DISPLAY during playback to display various playback information such as current title, chapter, track
elapsed time, languages etc.
P/N
This is used when you connect the Player to a TV and watch video on the TV. Repeatedly press P/N to select NTSC, PAL and AUTO to match that of your TV.
The LCD screen does not have NTSC or PAL, so if you watch video on the Player's screen, it is recommended to set to NTSC which will give a better video
quality. The player will play both PAL or NTSC DVD's tiltes even when the Player is set to NTSC.
Playing a Disc
~ 14 ~

Playing MP3 and Regular Audio CD
Valid MP3 CD and CD-R/RW
Play
The MP3 filesshould be ISO9660 or Joliet format.
Use "mp3" asthe file extension.
In most cases,when a MP3or CD is placed into the player, the first song file of the first folder plays.
In other cases,the file manager appears. Use direction keys ( and ) to select the song file and press (on the Player or on
the remote control)to play.
~ 15 ~
NOTE:
When playing CDor MP3, thescreen turns off when nokey is pressedfor 30 seconds.

Playing Picture CD
Valid Picture
The player can play both Kodak Picture CD that you order from photo processing store, and home-made CD by burning JPEG files onto a CD-R or
CD-RW disc.
1.During playback,press (on theremote) or (on the player) to pause.
2.Press to resume playback.(on the Playeror on theremote control)
The picture canbe rotated andflipped.
1.During playback,use direction keys( and )to rotate right90 degrees, left90 degrees, flip vertically and horizontally
respectively.
Next/Previous
You can manually skip to the next picture by pressing , and to skip to the previous picture by pressing .
Pause
Rotate
UP-DOWN LEFT-RIGHT
Original Rotate right 90degrees Flip vertically Flip horizontally
Play
In most cases,after the discis placed intothe player,the first filewill be shown.
In other cases,the file managerappears. Use directionkeys ( and ) to selectthe picture andpress ENTER to view one picture
or press PLAY (on the Player or on the remote control) to start the slide show ( plays photos automatically).
Press ZOOM to enlarge thephoto and use and to movearound the enlargedphoto.The slide showfunction stops whenyour
press ZOOM.
~ 16 ~

Playing Games
~ 17 ~
1. Connect thegame pads tothe Player.
2. Turnon the powerof the Player.
3. Place agame disc intothe Player,and the gamelist automatically displayson the screen.
4. Use directionkeys ( )to select thegame and pressSELECT to confirm.
5. Press START to start the game.
6. To stop the game, press SELECT and START simultaneously, it returns tothe game list.
Playing Games
R001 [131K]
001.R001
002.R002
003.R003
004.R004
005.R005
006.R006
007.R007
008.R008
009.R009
010.R0010
01. YOUXI
NOTE:
1. This Player supports 8-bitNintendo* NES games
2. The game disc mustcontain at least10 MB datafor CD-RW and 80MB data for DVD-RW in order for the Player to read properly.
Youmay put anyirrelevant data onthe disc inaddition to gamefiles just toincrease the datasize in caseyour games filefalls
under 10 MBfor CD-RW or 80 MBfor DVD-RW.
* Nintendo isa trademark ofNintendo Co., Ltd.

Selecting TV system
1.Press SETUP on the remotecontrol.
2.Use thedirection keys ( ) to select SYSTEM SETUP
and its sub-menu.
3.Press ENTER to confirm yourselection.
4.Press SETUP to exit, orselect EXIT SETUP to exit.
Turning on/off screen saver
Changing password
1. Use direction keys ( ) to select PASSWORD
and press ENTER to confirm.
2. Key in your old password ( 888888 if this is the first use).
press ENTER to confirm.
3.Key in new password and press ENTER to confirm.
4:3 LB (LetterBox)
Displays the contentof the DVDtitle in 16:9aspect ratio.
The black bars will appear at the top and bottom of the screen.
4:3 PS( PanScan)
The left and right of the screen are cut off and displays the
central portion ofthe 16:9 screen.
TV type 4:3 or 16:9
Setting TV system, Screen Saver, TV type (4:3/16:9), Password, Rating, Default
~ 18 ~
SYSTEM SETUP
TV SYSTEM
SCREEN SAVER
TV TYPE
PASSWORD
RATING
DEFAULT
EXIT SETUP
NTSC
PAL
AUTO
SYSTEM SETUP
TV SYSTEM
TV TYPE
PASSWORD
RATING
DEFAULT
EXIT SETUP
SCREEN SAVER ON
OFF
SYSTEM SETUP
TV SYSTEM
SCREEN SAVER
PASSWORD
RATING
DEFAULT
EXIT SETUP
TV TYPE 4:3PS
4:3LB
16:9
SYSTEM SETUP
TV SYSTEM
SCREEN SAVER
TV TYPE
RATING
DEFAULT
EXIT SETUP
PASSWORD
This manual suits for next models
1
Table of contents


