iFit Active IFITBAND-3IN1.0 User manual
1. It is the responsibility of the owner to ensure that all
users of this product are adequately informed of all
precautions.
2. Before beginning any exercise program, consult
your physician. This is especially important for per-
sons over age 35 or persons with pre-existing health
problems.
3. Use this product only as described in this manual.
4. Keep children under age 12 and pets away from this
product at all times.
5. Do not tamper with or attempt to open or
disassemble the tracker pod; the battery is not
replaceable or serviceable.
6. Do not use abrasive cleaners to clean this product.
7. Do not use this product in a sauna or a steam room,
or while swimming or showering. Do not submerge
this product in water; and do not place this product
in a dishwasher, washing machine, or dryer.
8. Do not expose the tracker pod to extremely high or
low temperatures, to direct sunlight for an extended
period of time, or to open flames.
9. Use only the included charger cable with a certified
computer, powered hub, or power supply to charge
the battery in the tracker pod.
10. Over exercising may result in serious injury or
death. If you feel faint or if you experience pain while
exercising, stop immediately and cool down.
GETTING STARTED
1. Install the iFit Track app on your iOS®or
Android™ device.
Use the iFit Track app to set up an iFit account, set up the
tracker pod, adjust settings for the tracker pod, set goals,
and enter and track information. See HOW TO INSTALL
THE IFIT TRACK APP.
2. Learn how to charge the tracker pod.
Charge the tracker pod with the included charger cable. See
HOW TO CHARGE THE TRACKER POD.
3. Learn how to wear the tracker pod.
Wear the tracker pod in the included band or clip, or carry it
independently. See HOW TO WEAR THE TRACKER POD.
4. Learn how to use the tracker pod.
Use the tracker pod to track and sync calorie information,
steps, distance, sleep time, and workout time to the iFit
Track app. See HOW TO USE THE TRACKER POD.
User’s Manual
Model No. IFITBAND-3IN1.0
WARNING: To reduce the risk of serious injury, read all important precautions and instructions in this man-
ual. ICON assumes no responsibility for personal injury or property damage sustained by or through the use of this
product.
QUESTIONS?
If you have questions after following the instructions in this man-
ual, PLEASE DO NOT CONTACT THE STORE. Please visit
our Customer Care website at support.iFit.com or send
HOW TO INSTALL THE IFIT TRACK APP
Pair, set up, and sync the tracker pod with your iOS device
(iPhone®4s and later) or your Android device (Android 4.3
and later) that supports BLUETOOTH®4.0 wireless technology.
On your iOS or Android device, open the App Store℠or the
Google Play™ store, search for the free iFit Track app, and
then install the app on your device. Make sure that the
BLUETOOTH option is enabled on your device. Then, open
the iFit Track app and follow the instructions to learn how to
set up an iFit account, set up and adjust settings for the tracker
pod, enter and track information, and set goals.
To pair the tracker pod to the iFit Track app on your device,
press both buttons on the tracker pod simultaneously for several
seconds until the words SYNC ON appear in the display. Then,
open the iFit Track app, select the tracker pod from the list of
discoverable devices, and touch the Connect button. After 1
minute, the display on the tracker pod will notify you if pair-
ing succeeded or failed. When the tracker pod is paired, the
BLUETOOTH icon will appear in the battery level display on the
tracker pod. After it is paired, the tracker pod will sync automati-
cally whenever the iFit Track app is open and the BLUETOOTH
option is enabled on your device.
HOW TO CHARGE THE TRACKER POD
Battery Life. The tracker pod contains a rechargeable lithium
battery. With normal use, a fully charged tracker pod will run for
approximately 5 to 7 days before needing a charge.
Check the battery level of the tracker pod by pressing the top
button on the tracker pod repeatedly until the battery level
display appears. When the battery level is at 10 percent and at
5 percent, the tracker pod will vibrate for 5 seconds to notify you
that the battery needs to be charged.
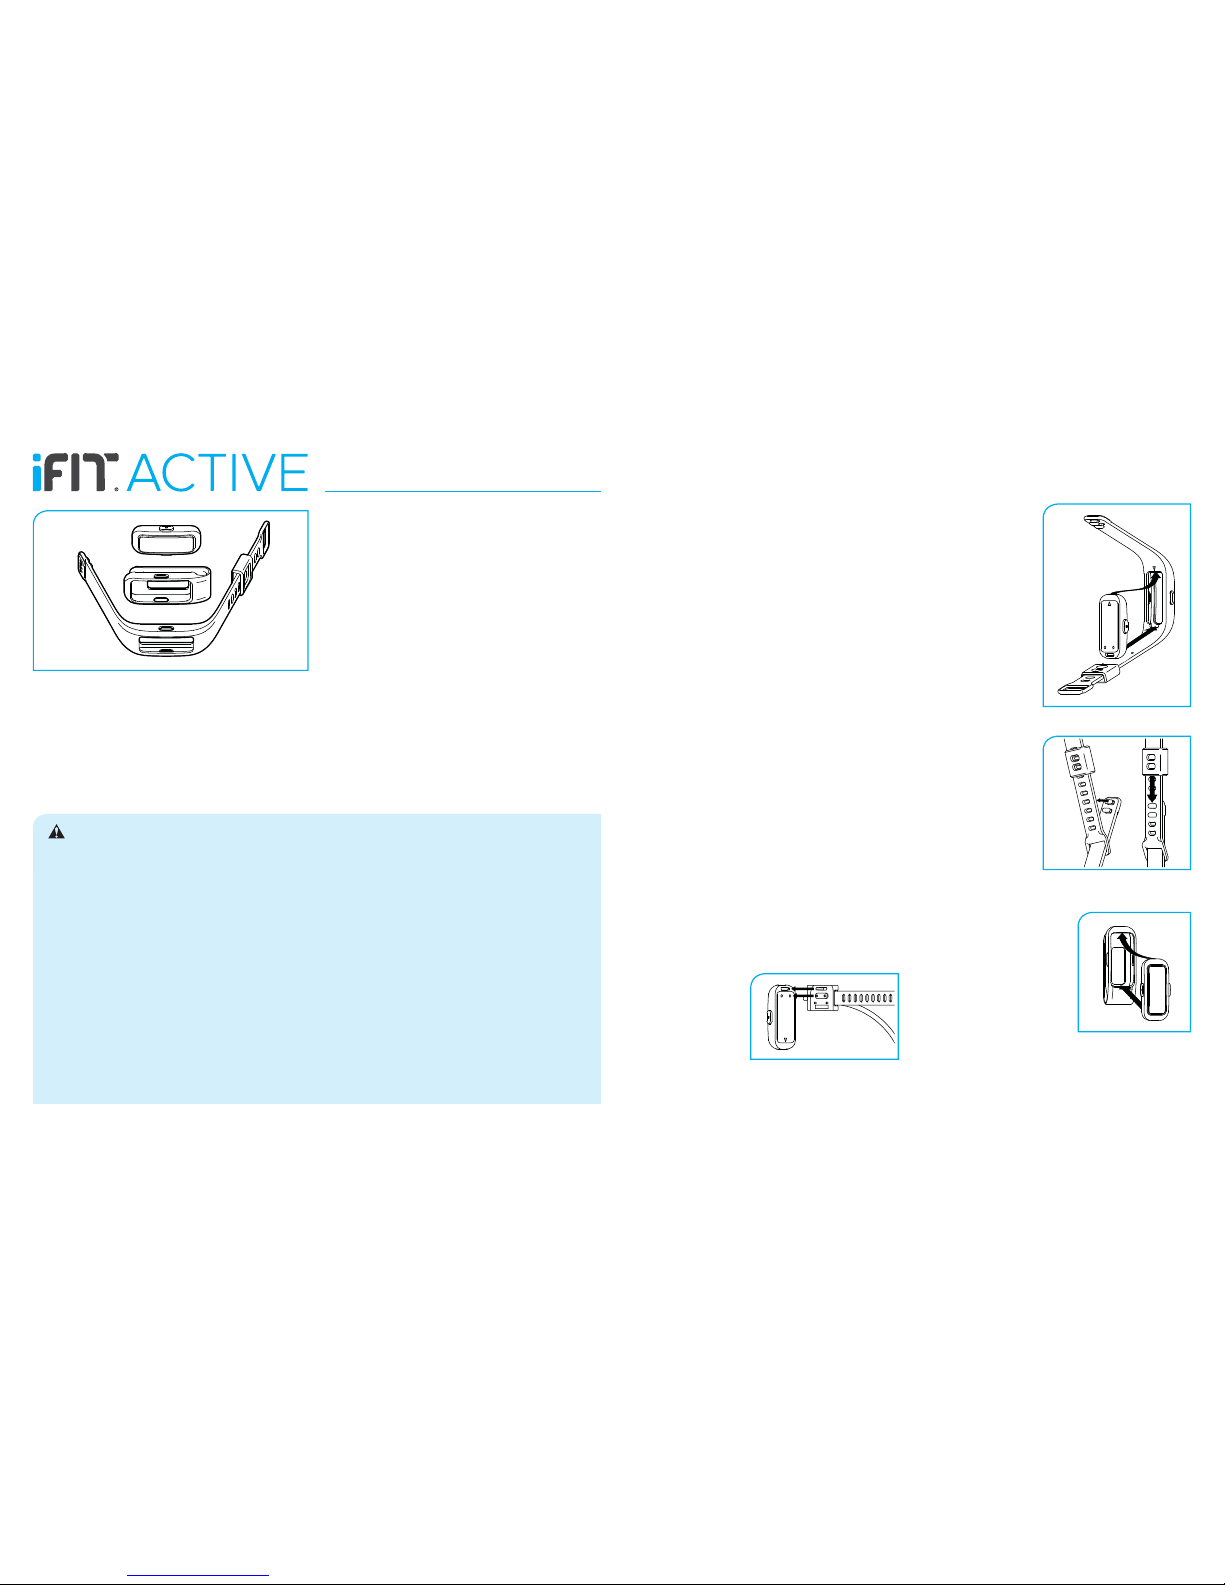
How to Charge the Tracker Pod. To charge the tracker pod,
first attach the charger cable to the tracker pod. Note: You can
attach the charger cable to the tracker pod while the tracker pod
is inserted in the band; you cannot attach the charger cable to
the tracker pod while it is inserted in the clip.
Align the tab and the
contacts on the charger
cable with the slot and the
contacts on the back of
the tracker pod, and then
fasten the strap on the
charger cable around the
tracker pod.
Next, plug the charger cable into a USB port on your com-
puter. It will take approximately 4 to 8 hours for the tracker pod
to charge completely. Note: To charge the tracker pod more
quickly, plug the charger cable into a USB wall adapter (not
included) or a USB car charger (not included).
HOW TO WEAR THE TRACKER POD
IN THE BAND
How to Insert the Tracker
Pod Into the Band. Orient
the tracker pod so that the
arrow on the underside of
the tracker pod is aligned
with the arrow on the inner
side of the band.
Then, press the tracker
pod into the opening in
the inner side of the band.
Tip: Insert the end of
the tracker pod with the
arrow into the band first,
and then press the other
end of the tracker pod
into place. Reverse these
actions to remove the
tracker pod from the band.
How to Fasten the Band.
Wrap the band around
your wrist and insert the
end with the clasp through
the loop. Press the pegs
on the clasp firmly into the
desired adjustment slots.
Then, slide the lock over
the clasp to hold the clasp
in place. Reverse these
actions to unfasten the
band.
IN THE CLIP
Orient the tracker pod so that the
display is facing upward. Then, ori-
ent the clip so that the opening in
the outer side of the clip is facing
upward.
Insert one end of the tracker pod
into the opening in the outer side
of the clip, and then press the
other end of the tracker pod into
place. Then, slide the clip onto
your clothing. Reverse these
actions to remove the tracker pod from the clip.
INDEPENDENTLY
Simply place the tracker pod in your pocket to carry the tracker
pod independently. Make sure that the tracker pod will not
fall out of your pocket as you move.

LIMITED WARRANTY
ICON Health & Fitness, Inc. (ICON) warrants this
product to be free from defects in workmanship and
material, under normal use and service conditions.
Parts are warranted for one (1) year from the date
of purchase.
This warranty extends only to the original purchaser
(customer). ICON’s obligation under this warranty
is limited to replacing this product. If a replacement
product is shipped while the product is under war-
ranty, the customer will be responsible for a minimal
handling charge. No other warranty beyond that
specifically set forth above is authorized by ICON.
ICON is not responsible or liable for indirect, special,
or consequential damages arising out of or in con-
nection with the use or performance of the product;
damages with respect to any economic loss, loss
of property, loss of revenues or profits, loss of
enjoyment or use, or costs of removal or installation;
or other consequential damages of any kind. Some
states do not allow the exclusion or limitation of inci-
dental or consequential damages. Accordingly, the
above limitation may not apply to the customer.
The warranty extended hereunder is in lieu of any
and all other warranties, and any implied warranties
of merchantability or fitness for a particular purpose
are limited in their scope and duration to the terms
set forth herein. Some states do not allow limitations
on how long an implied warranty lasts. Accordingly,
the above limitation may not apply to the customer.
This warranty provides specific legal rights; the
customer may have other rights that vary from state
to state.
For claims, please visit our Customer Care
website at support.iFit.com or send e-mail to
ICON Health & Fitness, Inc.
1500 S. 1000 W., Logan, UT 84321-9813
COMPLIANCE INFORMATION
UNITED STATES
FCC Statement. This device complies with Part
15 of the FCC Rules. Operation is subject to the
following two conditions: (1) This device may not
cause harmful interference, and (2) this device
must accept any interference received, including
interference that may cause undesired operation.
FCC Warning: Any changes or modifications
not expressly approved by the party respon-
sible for compliance could void the user’s
authority to operate this equipment.
Note: This equipment has been tested and found to
comply with the limits for a Class B digital device,
pursuant to Part 15 of the FCC Rules. These
limits are designed to provide reasonable protec-
tion against harmful interference in a residential
installation. This equipment generates, uses, and
can radiate radio frequency energy and, if not
installed and used in accordance with the instruc-
tions, may cause harmful interference to radio
communications. However, there is no guarantee
that interference will not occur in a particular
installation. If this equipment does cause harmful
interference to radio or television reception, which
can be determined by turning the equipment off
and on, the user is encouraged to try to correct the
interference by one of the following measures:
• Reorient or relocate the receiving antenna.
• Increase the separation between the equipment
and the receiver.
• Connect the equipment into an outlet on a
circuit different from that to which the receiver is
connected.
• Consult the dealer or an experienced radio/TV
technician for help.
This device meets the FCC and IC require-
ments for RF exposure in public or controlled
environments.
CANADA
IC Statement. This device complies with Industry
Canada license exempt RSS standard(s).
Operation is subject to the following two conditions:
(1) This device may not cause harmful interference,
and (2) this device must accept any interference
received, including interference that may cause
undesired operation.
This Class B digital apparatus complies with
Canadian ICES-003.
HOW TO USE THE TRACKER POD
KEY Top Button = B1
Bottom Button = B2 Press B1 to view displays, to answer No, or to enter numbers in increments of 50
Press B2 to view displays, to answer Yes, or to answer Next
VIEW GOAL ACHIEVED DISPLAY
Goal Achieved Display
This display appears and tracker pod vibrates when a goal is achieved
ENTER CALORIES CONSUMED
Display Off
B1
B1 or B2 or 2 seconds
B2
Time/Date Display
B1 for
2.5 seconds B1 for 2.5
seconds to exit
RESET THE TRACKER POD
If the tracker pod does not pair, press
B1 and B2 for 10 seconds to reset the
tracker pod, and then try again
Display Off
VIEW INFORMATION
NET CAL = CAL.IN - CAL.OUT
2 seconds
2 seconds
B2
B2
B1 to exit
B2
B2
B2
B2
B2 to repeat cycle B2 to repeat cycle
STEPS GOAL%
2 seconds
B2
2 seconds
2 seconds
B2
B2
ENTER SLEEP TIME OR WORKOUT TIME
Display Off
B1
Time/Date Display
B2 for
2.5 seconds B1 for 2.5
seconds to exit
B2 B2
B2 B2
B1
B1
B2 B2
B2 B2
VIEW TIME/DATE AND BATTERY LEVEL DISPLAYS
Display Off
B1
Time/Date Display Battery Level Display
B1
B1 or 10 seconds
Display Off
PAIR THE TRACKER POD
B1 and B2 for several seconds
B1 and B2 for 2 seconds 1 minute
Time/Date Display Battery Level Display When Paired
Time/Date Display Battery Level Display When Not Paired
B1
B1 or 10 seconds
B1
B1 or 10 seconds
IFIT is a registered trademark of ICON Health & Fitness, Inc. |App Store and iPhone are trademarks of Apple Inc., registered in the U.S. and other countries. | Android and Google Play are trademarks of Google Inc. |The
BLUETOOTH®word mark and logos are registered trademarks of Bluetooth SIG, Inc. and are used under license. |IOS is a trademark or registered trademark of Cisco in the U.S. and other countries and is used under license.
Part No. 359032 R0614A Printed in China © 2014 ICON Health & Fitness, Inc.


