IHOS NAXOS Series User manual
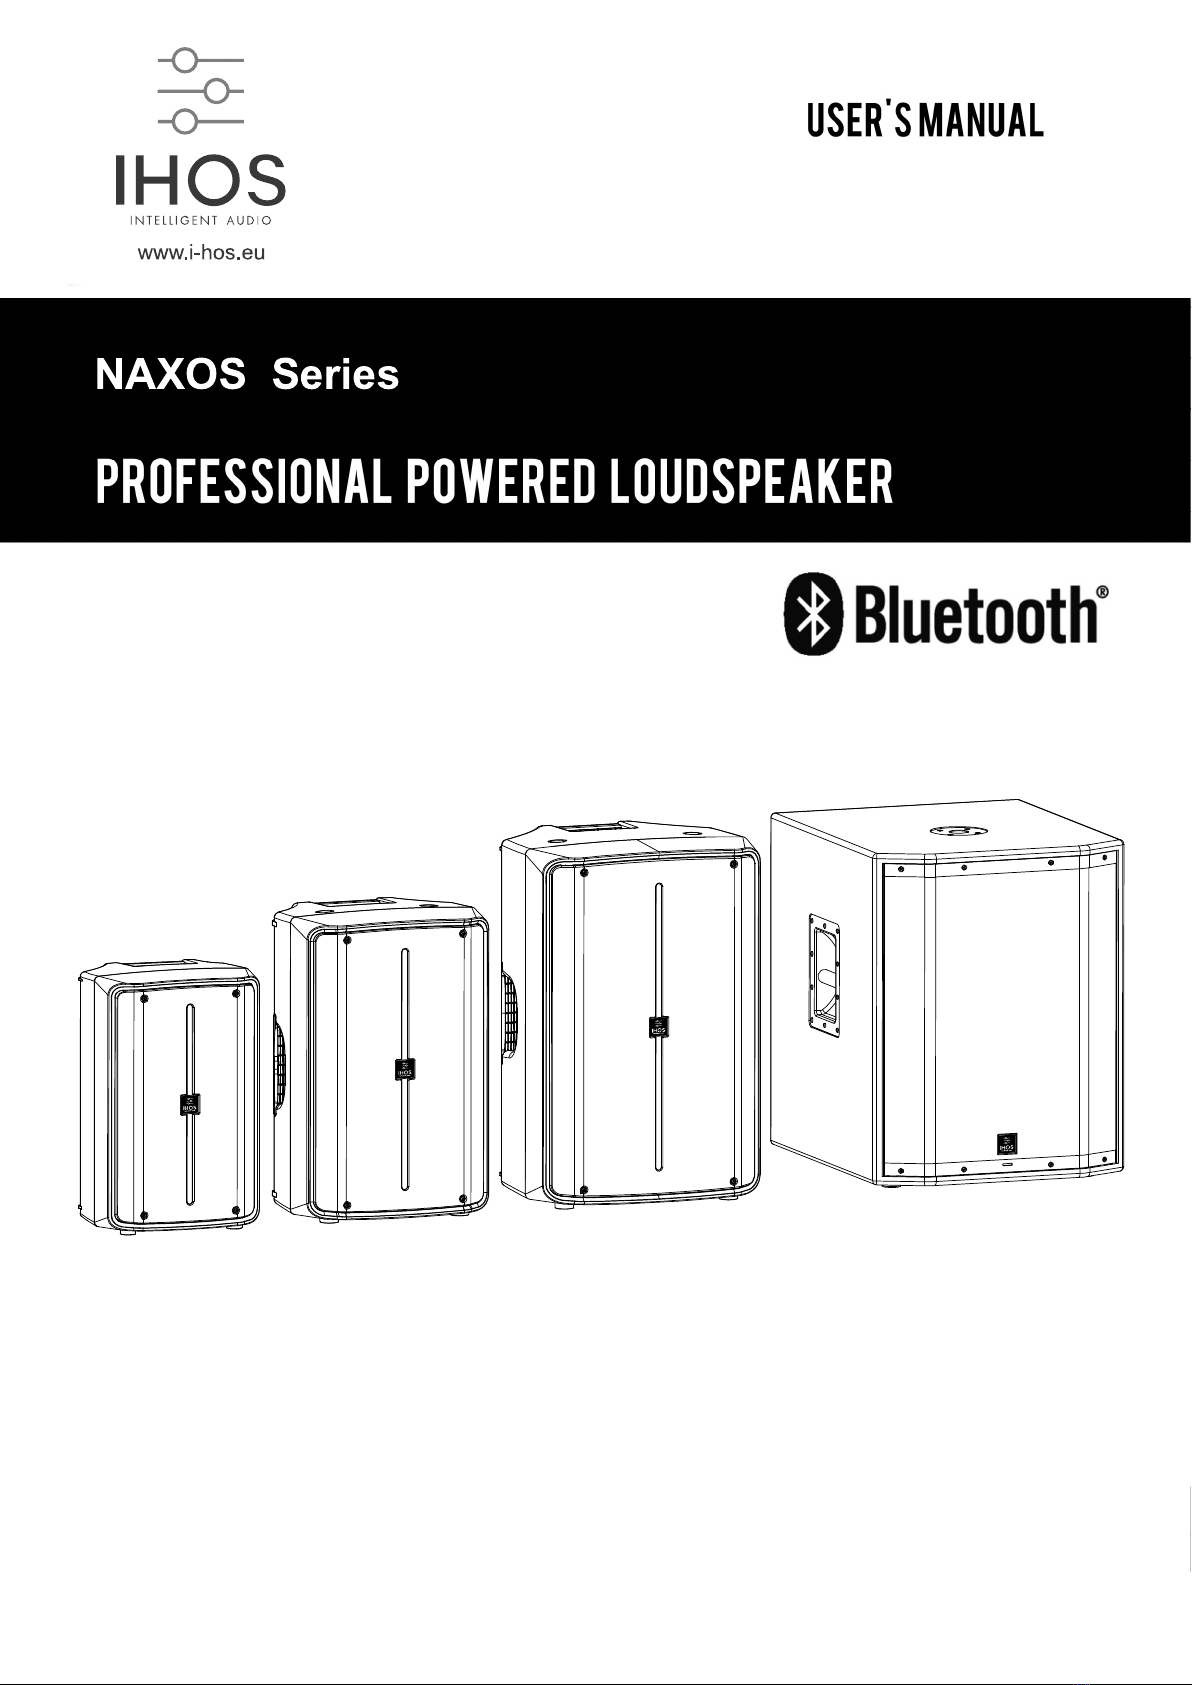
NAXOS 10A DSP NAXOS 12A DSP NAXOS 15A DSP NAXOS 18A SUB
Thank you for choosing this NAXOS Series powered loudspeaker. The NAXOS Series offer
a level of build quality and features intended to provide the best possible performance for a wide
range of user applications. From the detail required to faithfully reproduce classical music, to the
low frequency response, power and clarity demanded by dance music, the NAXOS Series will
not disappoint.
Please fully read this manual regarding all safety warnings, advice and available features in order
to safely get the best possible performance for your intended application. Please retain this
manual for future reference.
Lightweight, tough and durable high performance polymer cabinet.
Three mixed inputs with Line/Mic TRS, XLR and 3.5 Mini Jack connectivity.
Bluetooth 5.0 with True Wireless Stereo (TWS) linking capability.
DSP with Limiter for system overload protection and optimum audio clarity.
Soft start switched mode supply for maximum power and efficiency.
Combined class bi-amplified system with D driven low and AB driven high frequency for low
distortion reproduction.
Free standing upright, stage monitor or pole mountable cabinet design.
2
NAXOS Series loudspeakers have been designed and constructed to comply with all applicable safety
regulations for their intended country of use. However, the advice in this manual must be followed in order
to maintain safety. Failure to do so may result in damage to the speaker, to other equipment, personal
injury, electric shock, or death. The manufacturer accepts no liability for any consequences resulting from
failure to follow this advice.
3

Please keep this manual in a safe place for future reference.
Always follow the basic precautions listed below to avoid the possibility of serious injury or even death from electrical shock, short-circuiting,
damages, fire or other hazards. These precautions include, but are not limited to, the following:
Never force or push any objects into any of the receptacles or openings of the Loudspeaker other
than the correct connector.
Do not power NAXOS Loudspeakers from a generator or inverter.
High powered loudspeaker systems can produce excessive sound levels which can cause
permanent hearing damage or hearing loss. Exposure to such sound levels at close proximity or at
levels which feel uncomfortable for extended periods should be avoided.
Before connecting AC power or any external equipment to the loudspeaker, ensure that all controls
are set to their minimum positions.
NAXOS Series loudspeakers are capable of reproducing considerable bass (low frequencies) which can
cause gradual movement or creeping of the speaker cabinet at high volume levels and could result in
the loudspeaker falling. If used on a raised, low friction surface such as a stage or table, we strongly
recommend that the loudspeaker cabinet is placed on a non-slip mat or secured to prevent such
movement.
Only use the voltage specified as correct for the device. The
required voltage is printed on the name plate of the device.
Do not expose the device to rain, use it near water or in damp
or wet conditions, or place containers on it containing liquids
which might spill into any openings.
Use only the included power cord. Never insert or remove an electric plug with wet hands.
Do not place the power cord near heat sources such as heaters or
radiators, do not excessively bend or otherwise damage the cord,
place heavy objects on it, or place it in a position where anyone
could walk on, trip over, or rollanything over it. If the power cord or plug becomes frayed or damaged, there is
a sudden loss of sound during use of the device, or any
unusual smells or smoke should appear, turn off the power
switch, disconnect the electric plug from the outlet immediately,
and have the device inspected by qualified service personnel.
Do not open the device or attempt to disassemble the internal parts
or modify them in any way. The device contains no user-serviceable
parts. If it should appear to be malfunctioning, discontinue use
immediately and have it inspected by qualified service personnel.
If this device is dropped or damaged, immediately turn off the
power switch, disconnect the electric plug from the outlet, and
have the device inspected by qualified service personnel.
Do not open the device or attempt to disassemble the internal parts
or modify them in any way. The device contains no user-serviceable
parts. If it should appear to be malfunctioning, discontinue use
immediately and have it inspected by qualified service personnel.
4
Remove the electric plug from the outlet when the devices is not to
be used for extend periods of time, or during electrical storms.
Before connecting the device to other devices, turn off the power
for all devices. Before turning the power on or off for all devices,
set all volume levels to minimum.
When removing the electric plug from the device or an outlet, always
hold the plug itself and not the cord. Pulling by the cord can damage
it.
Use only the AC cord supplied. Use of other types of AC cords
may result in damage to the device(s), or even fire.
When transporting or moving the device, always use two or more
people. Attempting to lift the device by yourself may damage your
back, result in other injury, or cause damage to the device itself.
Before moving the device, remove all connected cables.
When setting up the device, make sure that the AC outlet you are
using is easily accessible. If some trouble or malfunction occurs,
immediately turn off the power switch and disconnect the plug from
the outlet.
Do not use the device in a confined, poorly ventilated location. Make
sure that there is adequate space between the mixer and
speaker cabinet, make sure to allow adequate space between the
can result in overheating, possibly causing damage to the device(s),
or even fire.
so could result in damage or personal injury.
Avoid setting all equaliser controls to their maximum. Doing so may
cause feedback and may damage the speakers.
Do not expose the device to excessive dust or vibrations, or extreme
cold or heat (such as in direct sunlight, near a heater, or in a car
during the day) to prevent the possibility of panel cabinet
deformation or damage to the internal components.
Do not place the device in an unstable position where it might
accidentally fall over.
Do not use the device in the vicinity of a TV, radio, stereo
equipment, mobile phone, or other electronic devices. Doing so may
result in noise, both in the loudspeaker itself and in the TV or radio
next to it.
When turning on the AC power in your audio system, always
turn on the device LAST, to avoid speaker damage. When
turning the power off, the device should be turned off FIRST for
the same reason.
Do not insert your fingers or hands in any gaps or openings on
the device (vents, ports, etc.).
Avoid inserting or dropping foreign objects (paper, plastic, metal,
etc.) into any gaps or openings on the device (vents, ports, etc.).
If this happens, turn off the power immediately and unplug the
power cord from the AC outlet. Then have the device inspected
by qualified service personnel.
Do not use the device for a long period of time at a high or
uncomfortable volume level, since this can cause permanent
hearing loss. If you experience any hearing loss or ringing in the
ears, consult a physician immediately.
Do not operate the device if the sound is distorting. Prolonged
use in this condition could cause overheating and result in fire.
Do not rest your weight on the device or place heavy objects on
it, and avoid use excessive force on the buttons, switches or
connectors.
Using a cell phone near the speaker system can induce noise. If
this occurs, move the cell phone further away from the speaker
system.
Air blowing out of the bass reflex ports is normal with heavy
bass content.
Always turn the power off when the device is not in use. The
performance of components with moving contacts, such as
switches, volume controls and connectors can deteriorate over
time. Consult qualified service personnel about replacing
defective parts.

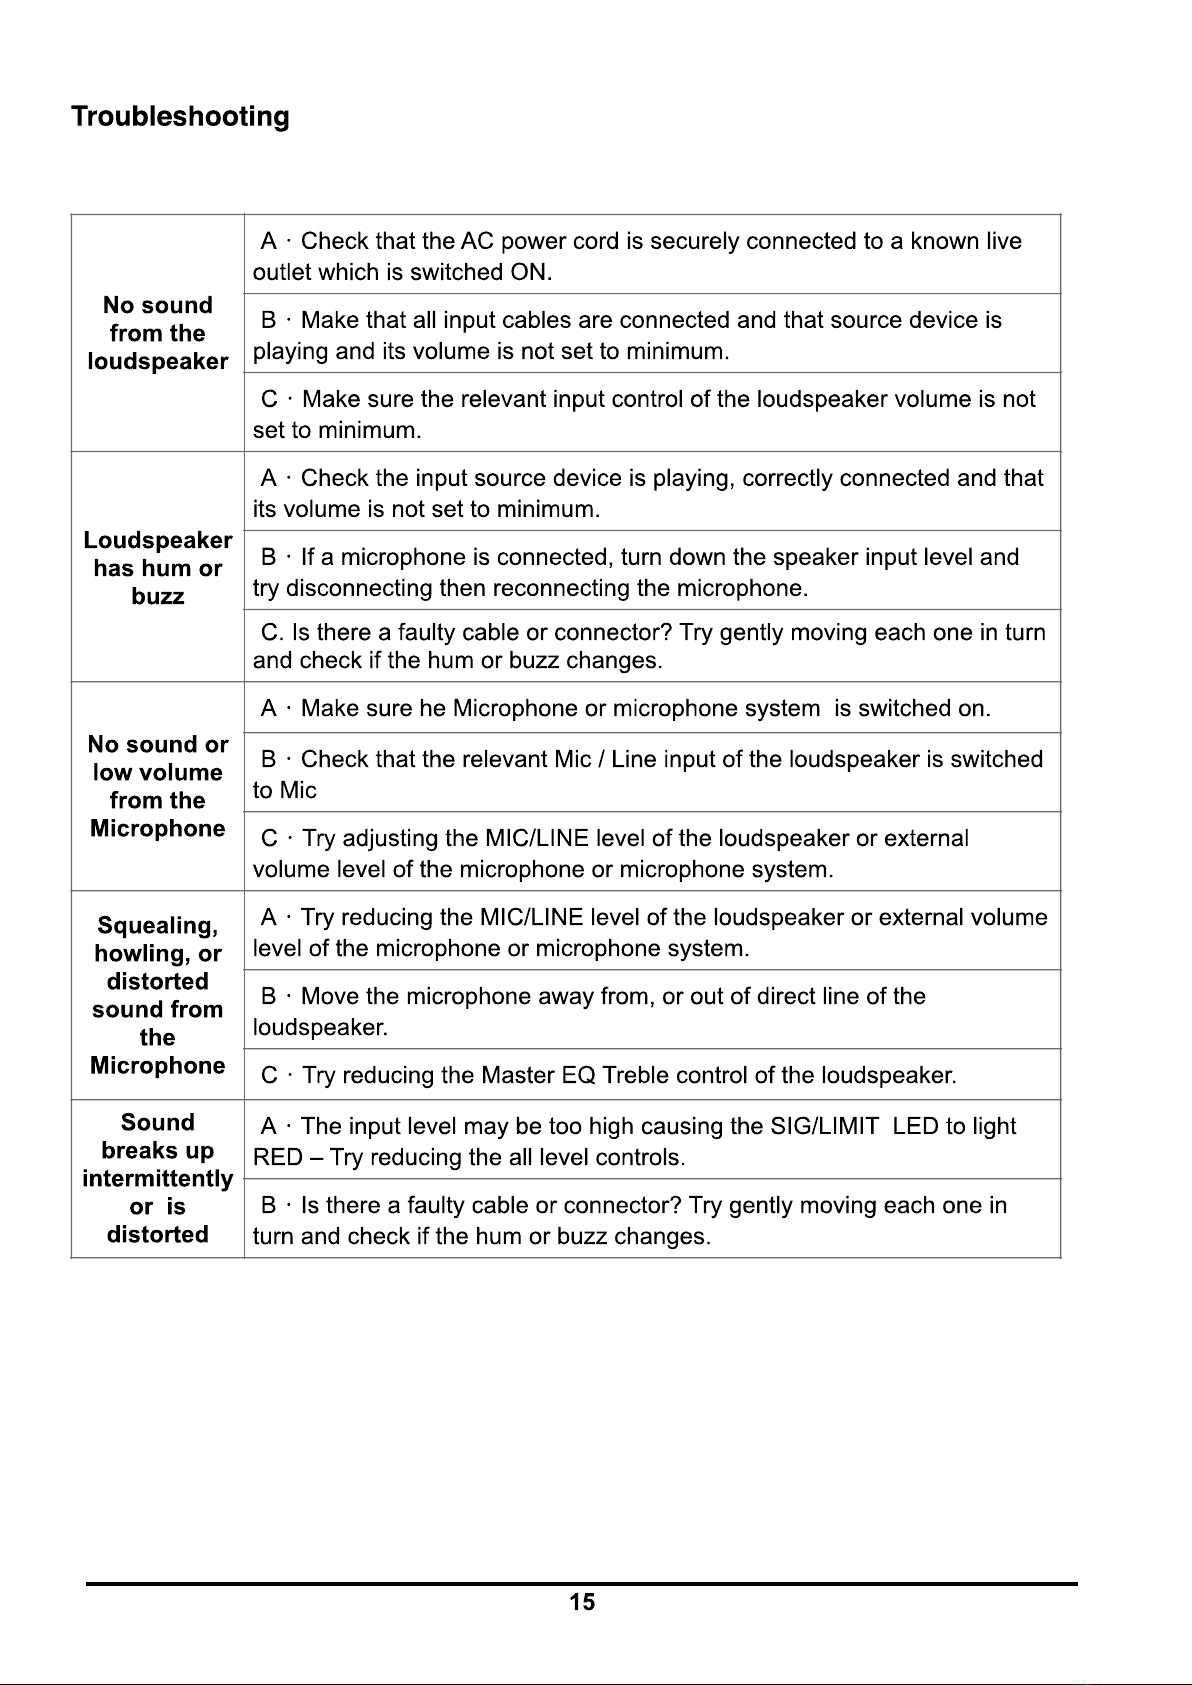
In the unlikely event of a suspected fault, in the first instance, always consult this manual to
eliminate user error. If you require further information, technical support or service, please contact
your supplying dealer or distributor, or email [email protected]
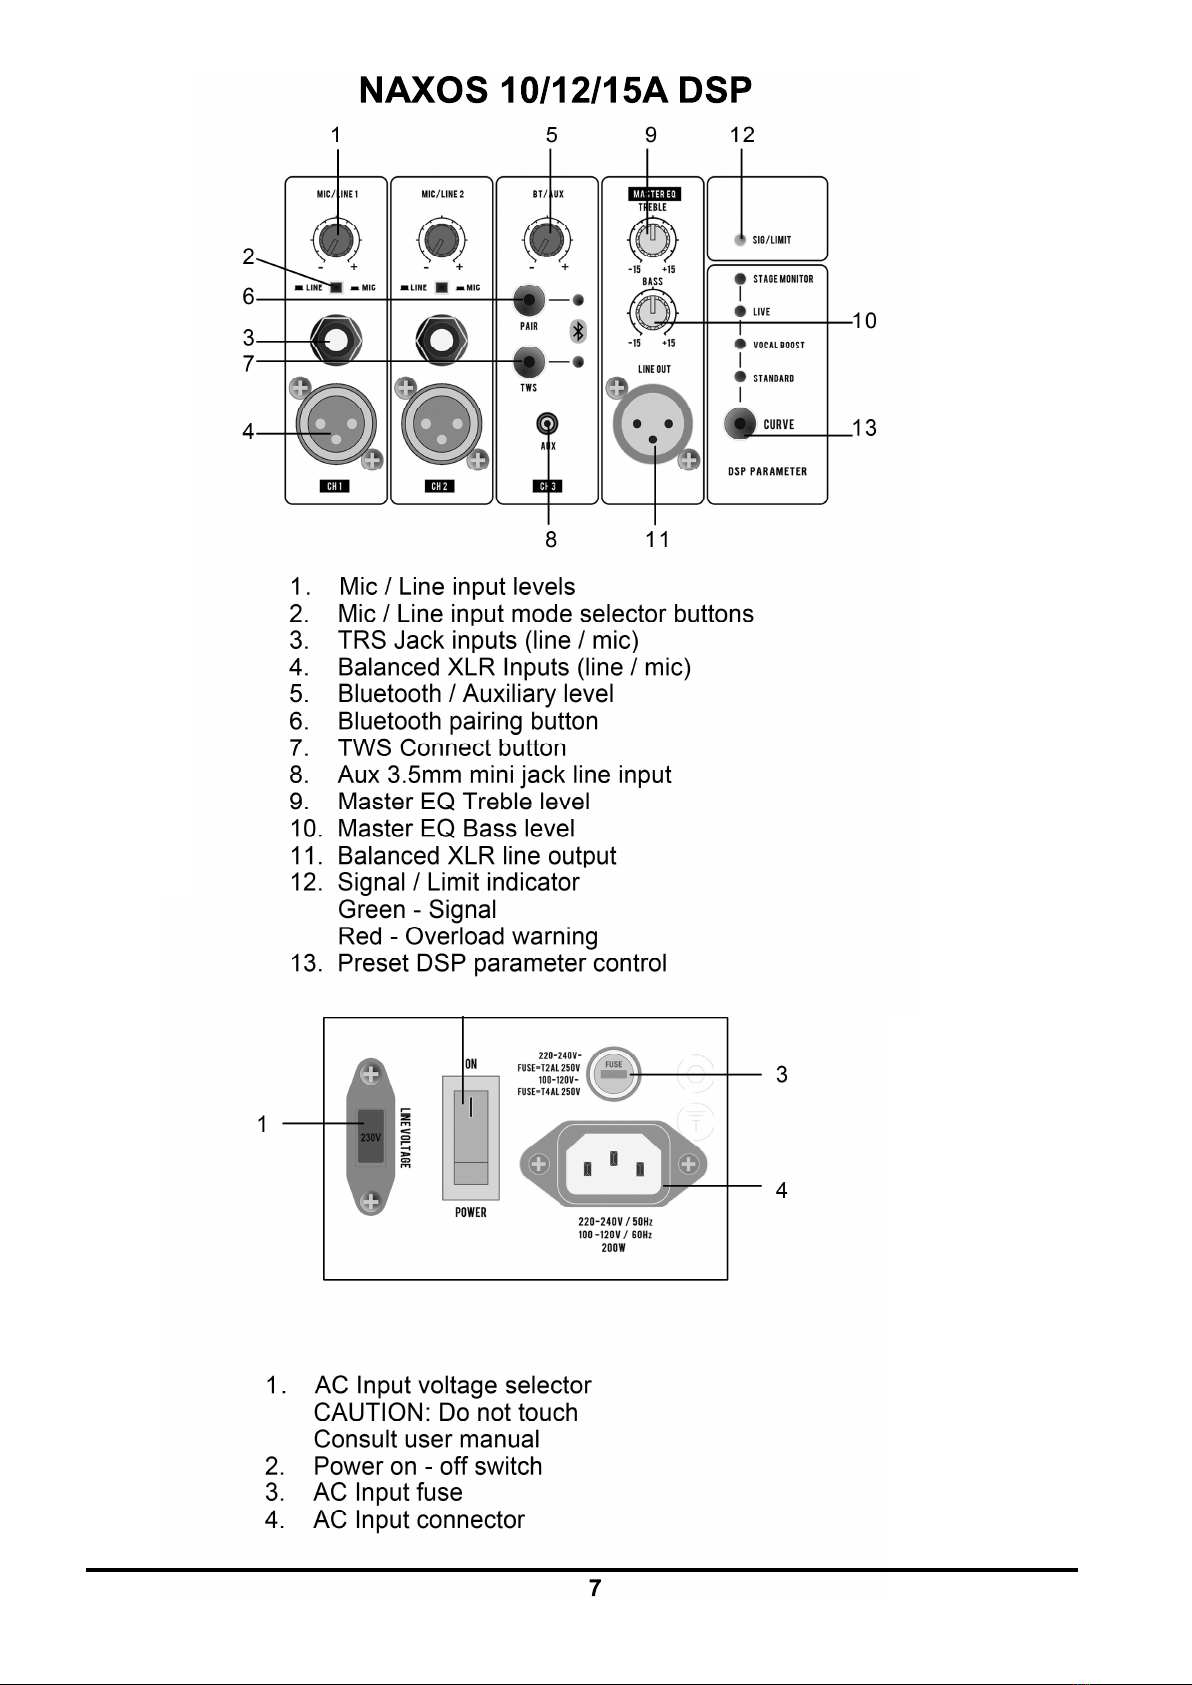


1.Before connecting the power or signal cables, mount or position your NAXOSLoudspeaker where
you intend to use or try it, do not carry it with any cables connected.
2. Set the MIC/LINE and BT/AUX input levels to minimum, the Master EQ controls to their mid
positions, then connect the AC power and switch on the Loudspeaker.
two second delay between switch-on and any indication of power.
NAXOS
3. Connect your source or host device as follows:-
1.Note: The MIC/LINE inputs of your NAXOS Loudspeaker will be set to LINE mode from new and will
need to be switched to MIC mode.
2. Using a small screwdriver or similar implement, with care, switch your chosen MIC/LINE1 or
the input to MIC mode.
3. Connect your microphone or wireless microphone receiver via the chosen TRS jack or XLR
input of your NAXOS Loudspeaker.
4. Ensure that your wired microphone or wireless microphone system is switched on and that its
volume control is not set to minimum.
5. Speak into the microphone while slowly increasing the level control of the corresponding MIC/
LINE NAXOS input until you hear your voice in the speaker.
6. Always keep the microphone away from the speaker when using increased levels to avoid
acoustic feedback squealing/howling.
1.The wired inputs of your NAXOS Loudspeaker will be set to LINE mode from new, therefore it should
be ready for connection to a sound mixer. But this can be confirmed as described in the previous
paragraph if required.
2. Connect your sound mixer to the Loudspeaker via its TRS jack or XLR inputs. Note: for stereo
reproduction from a stereo source, you will require two matching BX Loudspeakers connected as
one for each of the Left and Right stereo channels.
3. Ensure that your chosen sound mixer is outputting a signal and that its volume is not set to
minimum.

4. Slowly increase the level control of the corresponding MIC/LINE inputs. You should hear music
from the Loudspeaker.
1.Using the relevant cable, such devices can be connected by wire to any of the NAXOS
mini jack to mini jack stereo cable.
2. Connect one end of the mini jack cable to your desired device and the other end to the Aux
input of the NAXOS Loudspeaker.
3. After ensuring that there is music playing on your device and that its volume is not set to
minimum, slowly increase the BT/AUX, you should hear music from the Loudspeaker.
1.Ensure that the Bluetooth on your chosen host device is turned on.
2. On your NAXOS Loudspeaker, long press the Pair button for 2 seconds, the Pair blue LED should
NAXOS
NAXOS 10A DSP,NAXOS 12A DSP
,NAXOS 15A DSP
begin to flash rapidly.
4. Once the connection has been established, the Pair blue LED of the Loudspeaker will remain lit
continuously to indicate a successful connection.
5. Ensure that your host device is playing music and that its volume is not set to minimum.
6. When slowly increasing the level of the BT/AUX control of the Loudspeaker you should hear
your source music.
When connecting your host device to a single NAXOS loudspeaker using Bluetooth, both the left and
right channels of a stereo signal will be combined and played through the single Loudspeaker.
However, using two NAXOS Loudspeakers, the TWS function allows them both to be connected
wirelessly as a stereo pair to the same host Bluetooth device as described below. This assumes
that both Loudspeakers have been connected to AC power and are switched on.
Note: The NAXOS Loudspeaker first paired to your host device will become the Left stereo speaker.
1.Pair and connect the first NAXOS Loudspeaker to your host device as described in the previous
paragraph (connecting via Bluetooth). This will become the Left speaker.
2. Switch on the second NAXOS Loudspeaker and set the BT/AUX level to minimum.
3. Long press the Pair button on the second Loudspeaker for 2 seconds, the Pair blue LED should
begin to flash rapidly.
flash rapidly.
Loudspeakers should remain lit constantly to indicate a successful TWS connection. The Pair blue
LED of the second speaker should no longer be lit.
6. Ensure that your host Bluetooth device is playing music and that its volume is not set to
minimum.
7. When slowly increasing the level of the BT/AUX control of the Loudspeakers you should hear
music from them both. The volume of both speakers can be controlled by your host device.
Your NAXOS Series Loudspeaker incorporates a DSP (Digital Signal Processing) system
which has 4 preset modes of equalisation (tone control) to suit your intended mode of operation.
Pressing the Curve button on the DSP Parameter Control area of the panel will scroll through the
available modes as follows:-
The Bass and Treble controls are provided for additional adjustment of the equalisation where
required and are effective using all inputs of the speaker. The Line Out XLR connection is not
affected by the Bass and Treble settings.
Note: When increasing the desired volume level, it is possible to reach an overload situation
sooner as a result of a higher Bass setting or excessive bass content in music. This can be
improved by reducing the Bass level control of your NAXOS Loudspeaker.
NAXOS Loudspeakers can be linked together by connecting the LINE OUT of one

Loudspeaker (the master) to a MIC/LINE input of the next (the slave) using an XLR female to male
or XLR female to jack cable. Several speakers can be connected together in this way if required.
: When linking by wire, the MIC/LINE input of the slave speaker must be set to LINE mode as
described previously. Also, this configuration will not enable true stereo operation.
NAXOS Loudspeakers incorporate some degree of overload protection, but over driving is still
possible and can cause severe damage to the Loudspeaker. Such damage is not covered by
warranty and correct use remains the responsibility of the user.
The SIG/LIMIT LED on the upper right of the amplifier panel will light or may flicker Green to
indicate the presence of an input signal during normal use.
However, should it light RED, this is an indication of excessive input signal or that the Loudspeaker
is being over driven. In this case, the signal level from the connected device and/or the respective
MIC/LINE or BT/AUX level must immediately be reduced to avoid damage to the Loudspeaker.
The NAXOS 10A DSP Loudspeaker has a top carrying handle and the NAXOS 12A DSP and
NAXOS 15A DSP models have side and top carrying handles.
For safety they should only be carried using these handles. The cabinets are robust but they must be
lifted, handled and placed onto hard surfaces with care. All models can be mounted onto a standard
35mm pole using the integral receptacle in the cabinet base with hand locking hand bolt.Two M6 points
are provided in the top of the NAXOS 10A DSP cabinet and M8’s in the top and bottom of the
NAXOS 12A DSP and NAXOS 15A DSP. All fixing points are covered by easily removable cosmetic
caps during production.
No adjustment or maintenance of NAXOS Loudspeakers is necessary and cleaning should only be
done using a dry, non-abrasive cloth or dry dusting brush.
NAXOS Series Loudspeakers are warranted in the EU only for one year from the date of
supply or delivery against faulty parts or manufacturing defects. The warranty excludes electrical
or mechanical faults or damage as a result of over driving by excessive input signal, excessive AC
voltage, abuse, misuse, or failure to observe the operating guidelines detailed in this manual.
Model NAXOS 10A DSP NAXOS 12A DSP NAXOS 15A DSP
Inputs Bal XLR/TRS 6.35/
AUX/ Bluetooth
Bal XLR/TRS 6.35/
AUX/ Bluetooth
Bal XLR/TRS 6.35/
AUX/ Bluetooth
Outputs Balanced XLR / TWS Balanced XLR / TWS Balanced XLR / TWS
Power output 150W (LF) + 50W (HF)
RMS
250W (LF) + 50W (HF)
RMS
250W (LF) + 50W (HF)
RMS
Bluetooth
version 5.0 5.0 5.0
Power input 100V/240V ~50/60Hz
switchable
100V/240V ~50/60Hz
switchable
100V/240V ~50/60Hz
switchable
Features LF:CLASS-D
HF:CLASS-AB
LF:CLASS-D
HF:CLASS-AB
LF:CLASS-D
HF:CLASS-AB
Signal
processing DSP DSP DSP
DSP
Parameter
Standard/Vocal Boost/
Live/Stage monitor
Standard/Vocal Boost/
Live/Stage monitor
Standard/Vocal Boost/
Live/Stage monitor
EQ Bass/Treble Bass/Treble Bass/Treble
Frequency
Range 60-20K Hz 55-20K Hz 45-20K Hz
Max output
SPL
123dB (at max AMP
output)
125dB (at max AMP
output)
126dB (at max AMP
output)
Impedance LF 4 /HF 8 LF 4 /HF 8 LF 4 /HF 8
Driver 1'' Compression driver 1.35'' Compression
driver
1.35'' Compression
driver
Woofer 10'' Driver 12'' Driver
Cabinet HPP moulded cabinet HPP moulded cabinet HPP moulded cabinet
Fuse T3.15AL/250V T3.15AL/250V T3.15AL/250V
Pole mount 35mm stand pole 35mm stand pole 35mm stand pole
Dims / Weight 395x365x565mm /
12kg
460x430x660mm /
17.5kg
530x500x765mm /
22.2kg
NAXOS 18A SUB
Am
Inputs 2 XLR / TRS LINE input
Outputs
P w 500 w/RMS @ 8 Ohms / 1500 Watts P
V Main v t
P w nput 100V/240V ~50/60Hz swit
Class D+ swit hing p w
F180°)
LED p w t
C v f t t 120Hz)
T A v v t bw f
F q R 35-150Hz
Max Output SPL 1
Im 8 Ohm
W f 1 bw f V 18SW)
Cabin t Plyw th bla t
G 1.5mm st
P 35mm st
FR t t t g
Pa aging
Inf
Pa 740mm x 635mm x 765mm
N t W 44 g
.
if

This manual suits for next models
4


