iiView 3500STBII User manual

rviGW
rview
—
3500STBII
USER
MANUAL
NOTE:
For
Spanish
users,
please
go
to
"Settings",
then
go
to
"Installation
Guide"
to
change
from
English
so
Spanish
Language
OSD.
IVIEW
Multimedia
Converter
Box
Thankyou
foryour
purchase
of
iVIEW-3500STBII.
To
ensure
that
this
productwork
in
the
highest
performance,
please
read
the
USER
MANUAL
carefully
before
operation.

rviEW
Enjoy
life
with
Simplicity!
Gracias
por
adquirir
productos
iview,
para
mas
informacion
o
para
adquirir
nuevos
productos,
visitenos
en
WWW.IVIEWUS.COM
0
Name
al:
(909)
627-9888.
iVIEW-1030TPC
(10"
Tablet
PC)
iVIEW-975TPCII
(9.7"
Tablet
PC
with
Dual
Core)
iVIEW-900TPCII
(9"
Tablet
PC)
iVIEW-797TPC
(Color)
(7"
Tablet
PC
with
Phone)
iVIEW-999TPC
(9.7"
Tablet
PC
with
Quad
Core)
iVIEW-920TPC
(9"
Tablet
PC
with
Dual
Core)
iVIEW-785TPC
(7.85"
Tablet
PC
with
Quad
Core)
iVIEW-788TPC
(Color)
(7"
Tablet
PC
with
Quad
Core)

rviEW
Enjoy
life
with
Simplicity!
iVIEW-778TPC
(7"
Tablet
PC
with
Dual
Core)
iVIEW-776TPC
(7"
Tablet
PC
with
Dual
Core)
iVIEW-eOOTPC
(6"
Tablet
PC
with
Phone)
Mira
Dongle
(Miracast
/
WIFI
Display
on
TV)
iVIEW-777TPCII
(7"
Tablet
PC
with
Dual
Core)
iVIEW-650TPC
(6.5"
Tablet
PC
with
Phone)
iVIEW-420TPC
(4.3"
Tablet
PC)
iVIEW-3500STBII
(Converter
Box)
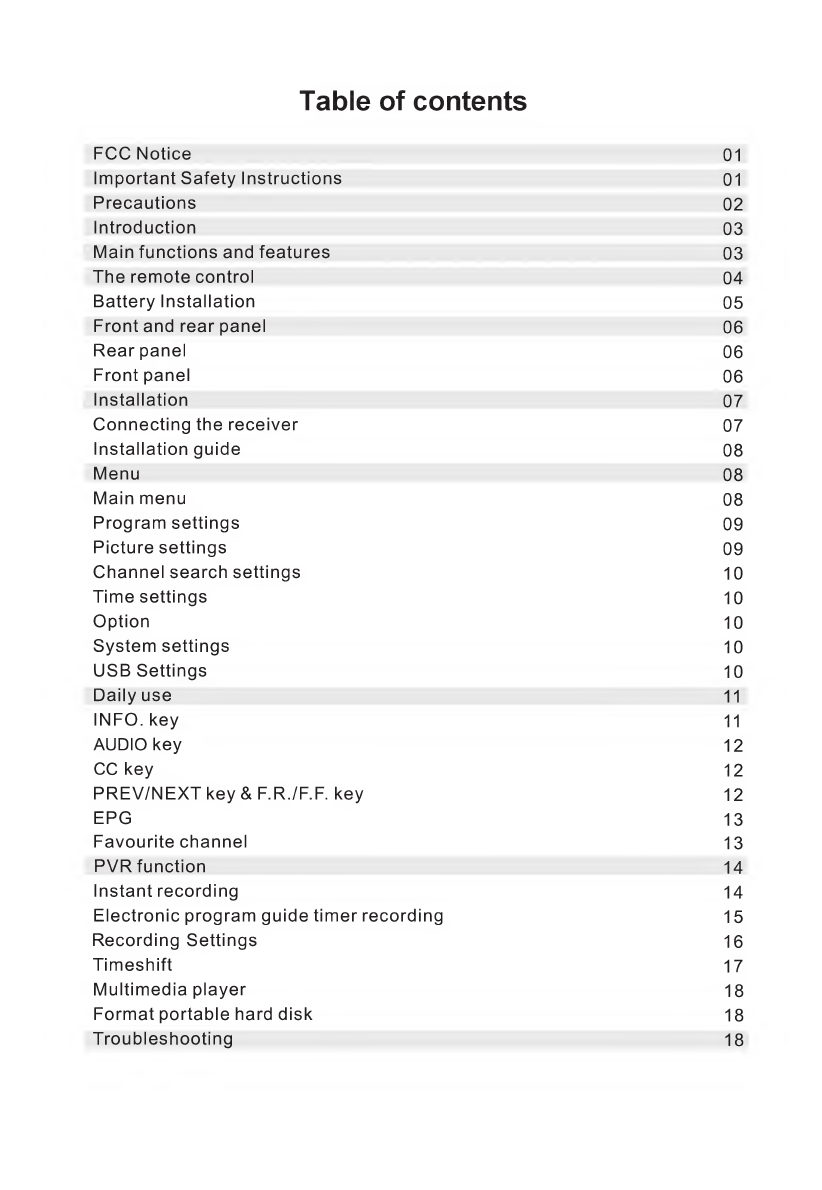
Table
of
contents
FCC
Notice
01
Important
Safety
Instructions
01
Precautions
02
Introduction
03
Main
functions
and
features
03
The
remote
control
04
Battery
Installation
05
Front
and
rear
panel
06
Rear
panel
06
Front
panel
06
Installation
07
Connecting
the
receiver
07
Installation
guide
08
Menu
08
Main
menu
08
Program
settings
09
Picture
settings
09
Channel
search
settings
10
Time
settings
10
Option
10
System
settings
10
USB
Settings
10
Daily
use
11
INFO,
key
11
AUDIO
key
12
CC
key
12
PREV/NEXTkey&F.R./F.F.
key
12
EPG
13
Favourite
channel
13
PVR
function
14
Instant
recording
14
Electronic
program
guide
timer
recording
15
Recording
Settings
16
Timeshift
17
Multimedia
player
18
Format
portable
hard
disk
18
Troubleshooting
18
User
Manual
FCC
NOTICE
This
equipment
has
been
tested
and
found
to
comply
with
the
limits
for
a
Class
B
digital
device,
pursuant
to
part
15
of
the
FCC
rule.
These
limits
are
designed
to
provide
reasonable
protection
against
harmful
interference
in
a
residential
installation.
This
equipment
generates,
uses
and
can
radiate
radio
frequency
energy
and,
if
not
installed
and
used
in
accordance
with
the
instructions,
may
cause
harmful
interference
to
radio
communications.
This
is
no
guarantee
that
interference
will
not
occur
in
a
particular
installation.
If
this
equipment
does
cause
harmful
interference
to
radio
ortelevision
reception,
which
can
be
determined
by
turning
the
equipment
off
or
on,
the
user
is
encouraged
to
try
to
correct
the
interference
by
one
or
more
of
the
follow
measures:
•
Reorient
or
relocate
the
receiving
antenna
•
Increase
the
separation
between
the
equipment
and
receiver
•
Connect
the
equipment
into
an
outlet
on
a
circuit
different
from
that
to
which
the
receiver
is
connected
•
Consult
the
dealer
or
an
experienced
radio/TV
technician
for
help
IMPORTANT
SAFETY
INSTRUCTIONS
ALinmmJ
A
To
reduce
the
risk
of
electric
shock.
Do
not
remove
cover.
No
user-serviceable
parts
inside.
Refer
servicing
to
qualified
service
personnel.
A
A
This
symbol
indicates"dangerous
voltage"
inside
the
product
that
presents
a
risk
of
electric
shock
or
personal
injury.
This
symbol
indicates
important
instructions
accompanying
the
product.
1
.Read,
follow
and
keep
these
instructions.
2.
D
o
not
use
this
apparatus
near
water.
3.
C
l
e
a
n
only
with
a
damp
cloth.
Please
unplug
power
prior
to
cleaning.
4.
D
o
not
block
any
of
the
ventilation
openings.
Install
in
accordance
with
the
manufacturer’s
instructions.
5.
D
o
not
install
near
any
heat
sources
such
as
radiators,
heat
registers,
stoves,
or
other
apparatus
(including
amplifiers)
that
produce
heat.
6.
P
r
otect
the
power
cord
from
being
walked
on
or
pinched
particularly
at
the
plug,
receptacles,
and
the
point
where
they
exit
from
the
apparatus.
/.Only
use
attachments/accessories
included
within
this
package.
8.
U
n
p
l
ug
this
apparatus
during
lighting
storms
or
when
unused
for
long
periods
of
time.
9.
R
e
f
er
all
servicing
to
qualified
service
personnel.
Servicing
is
required
when
the
apparatus
has
been
damaged
in
any
way;
such
as
when
the
power
supply
cord
or
plug
is
damaged,
liquid
has
been
spilled
or
objects
have
fallen
into
the
apparatus,
the
apparatus
has
been
exposed
to
rain
or
moisture,
does
not
operate
normally,
or
has
been
dropped.
WARNINGiThe
batteries
shall
not
be
exposed
to
excessive
heat
such
as
sunshine,fire
or
the
like.
WARNINGiThe
wall
socket
plug
is
used
as
disconnect
device,the
disconnect
device
shall
remain
readily
operable.
WARNING:
To
reduce
the
risk
of
fire
or
electric
shock,
do
not
expose
this
apparatus
to
rain
or
moisture.
01
User
Manual
PRECAUTIONS
Please
read
these
precautions
before
operating
this
unit.
1.
P
o
w
er
cord
protection
To
avoid
any
malfunctions
of
the
unit,
and
to
protect
against
electric
shock,
fire
or
personal
injury,
please
observe
the
following.
•
Hold
the
plug
firmly
when
connecting
or
disconnecting
the
AC
power
cord.
•
Keep
the
AC
power
cord
away
from
heating
appliances.
•
Never
put
any
heavy
object
on
the
AC
power
cord.
•
Do
not
attempt
to
repair
the
AC
power
cord
in
any
way.
•
Never
make
or
change
connections
with
the
power
switched
on.
2.
P
l
a
ce
m
e
n
t
Avoid
placing
the
unit
in
areas
of:
•Direct
sunlight
or
heating
radiators
•High
temperature
(over
35°C)
or
high
humidity
(over
90%)
•Dust
as
the
internal
parts
may
be
seriously
damaged.
3.
N
o
n
-
u
s
e
periods
When
the
unit
is
not
being
used,
turn
it
off.
When
left
unused
for
a
long
period
of
time,
the
unit
should
be
unplugged
from
the
power
source.
4.
N
o
fingers
or
other
objects
inside
•
Touching
internal
parts
of
this
unit
is
dangerous,
and
may
cause
serious
damage
to
the
unit.
Do
not
attempt
to
disassemble
the
unit.
•
Do
not
put
any
foreign
object
in
this
unit.
5.
K
e
e
p
away
from
water
•
Keep
the
unit
away
from
flower
vases,
tubs,
sinks,
etc.
if
liquids
are
spilled
into
the
unit,
serious
damage
could
occur.
02
User
Manual
INTRODUCTION
This
user
manual
is
intended
to
guide
you
through
the
operation
for
the
ATSCHigh
Definition
Digital
Terrestrial
Receiver.
A
password
will
be
required
when
modifying
advanced
options
in
the
Menu.
The
default
password
is
“000000”.
MAIN
FUNCTIONS
AND
FEATURES
This
product
is
a
high
performance
HDTV
Terrestrial
receiver.
It
fully
complies
with
ATSC
receiver
requirement
specifications.
It
provides
users
with
all
digital
terrestrial
TV
and
radio
signals
being
broadcast
in
Standard
Definition
and
High
Definition.
•
Converts
digital
broadcast
to
your
analog
TV
•
EPG(Electronic
Program
Guide)
and
program
information
•
Favorite
Channel
List
•
Parental
control
function
•
Auto
tuning(finds
all
digital
broadcasts)
•
Signal
Quality
Indicator
•
Closed
Captioning
•
Advanced
Video/Audio
parameters
adjustment
•
Universal
remote
control
•
Analog
passthrough
Channel
3/4
•
Cable/QAM
capability
•
Recording
function,
playback
for
movies,
pictures,
and
music
•
Video
Decoder:
MPEG-2
MP
at
HL,
MPEG-4
SP,
ASP,H.264
HP
at
L4.1,
DivX
3.11,4.X,
6.X,
FLV
format
and
VC-1,
MKV
•
Video
Resolution:
1080p,
1080i,
720p,
576p
•
Built
in
HDMI
Output
03

User
Manual
REMOTE
CONTROL
USB
W
CC
W
h«<
W
W
o
o
o
o
^lew
<
POWER>
<
Mute>
<
0-9
>
<
Info
>
<
EPG>
<
SCHD
>
<ASPECT>
<
AUDIO
<
Vol+
>
<
Vol-
>
<
GOTO
<REPEAT>
<
CC
>
<
EXIT
>
<
TV/RadIo
>
<
FAV>
<REC>
<
RETURN>
<ACH>
<TCH>
<
◄
◄
>
<
►
►
>
<USB
>
<
>
<
►
w
>
<Ni>
<
HDMI
>
<
TV/Radio
<
PVR
>
Press
this
key
to
turn
3500STBII
ON
and
OFF.
Enable/disable
mute.
When
STB
is
in
mute
state,
pressing
<Vol+/->
keys
would
result
in
mute
disabled.
Press
to
enter
a
channel
number
or
parental
control
password.
Press
ONCE
to
show
the
channel
you
are
on,
the
time
slot
and
the
next
program
that
follows
and
the
time
slot.
It
will
also
show
Quality
of
Reception
Adjutment.
Press
TWICE
and
It
will
show
the
Bandwidth
and
the
Frequency.
Electronic
Program
Guide.
Press
this
button
to
view
the
program
guide.
Lists
down
the
channel/station
and
the
time
of
the
program
recordings.
Selection
of
TV
Aspect
Ratio
(4:3
or
16:9)
Press
this
button
to
adjust
audio
frequency
in
English
or
Spanish
Turns
the
Volume
up
Turns
the
Volume
down
It
takes
you
to
a
specific
time
in
the
segment
of
the
recorded
program.
This
button
Repeats
the
current
option
Subtitle
Enter
the
Main
Menu
Exit
the
current
setting
Switch
button
from
TV
to
Radio
Same
as
<Fav
Up>,
taking
effect
in
service
mode.
Note:
When
favorite
group
is
not
set,
<Fav
Up>,<Fav
Down>
and
<Fav>
key
pressing
will
only
display
"Fav
off"
on
screen.
Start
to
record
current
TV/Radio
channel,
taking
effect
in
service
mode
with
storage
device
being
plug-in.
This
button
is
to
return
to
previous
function.
Channel
up
Channel
down
Play
fast
backward
with
x2,
x4,
x8,
xl6
and
x32
times
of
speed,
taking
effect
in
PVR
playback.
Play
fast
forward
with
x2,
x4,
x8,
xl6
and
x32
times
of
speed,
taking
effect
in
PVR
playback.
TO
play
USB
device
Page
up.
Same
as
<Page
Up>.
Switch
focus
item
up/down,
taking
effect
in
menu
mode.
Pause
/
Resume
current
play
from
pause,
taking
effect
in
service
mode.
Press
this
button
to
switch
your
converter
source
to
FIDMI.
press
this
button
to
switch
from
TV
stations
to
Radio
stations
Press
this
button
to
enter
your
PVR
recordings.
Instructions
for
programming
the
LEARNING
BUTTONS
(Blue
Buttons)
1.
Press
“SETUP”
for
3
seconds
until
red
light
turns
on.
2.
Press
“POWER”
in
TV
area
within
10
seconds
of
pressing
“Set
Up”
and
wait
until
the
red
light
flashes.
3.
Press
“POWER”on
TV
remote
for
3
seconds
and
point
LED
sensor
directly
with
3500STBII
remote
within
3cm
distance
of
each
other
until
the
red
light
flashes
3
times
and
remains
red.
4.
Repeat
step
2
&
3
to
program
the
option
buttons,
press
“SETUP”
to
quit.
Hotline:
(001)
909
627
9888
04

User
Manual
•
Power-
Press
this
button
to
turn
on/off
your
television
•
Vol+-
Volume
up
on
your
television
•
Vol
-
-
Volume
down
on
your
television
•
Setup-
Press
this
button
to
enter
the
setup
menu
on
your
television.
•
TV/AV-
Press
this
button
to
switch
between
TV/AV
sources
on
your
television.
•
Option
#1-
Press
this
button
to
operate
the
first
command
you
programmed
•
Option
#2-
Press
this
button
to
operate
the
second
command
you
programmed
Battery
Installation
Insert
the
batteries
making
sure
that
(+)
and
the
(-)
on
the
battery,
align
with
the
(+)
and
(-
on
the
battery
compartment.
1
.Remove
the
battery
compartment
cover
in
the
back
following
the
arrow
key
direction..
2.Insert
2
1.5V
AAA
batteries,
making
sure
that
(+)
and
the
(-)
on
the
battery,
align
with
the
(+)
and
(-)
on
the
battery
compartment.
3.Replace
the
Battery
Compartment
Cover
About
the
batteries
•
If
the
remote
control
unit
fails
to
work
even
if
used
within
short
distance
from
the
receiver,
please
replace
the
batteries.
•
Use
Size
UM-4
(AAA)
batteries
Notes:
•
Do
not
use
rechargeable
(Ni-Cd)
batteries.
•
Do
not
attempt
to
recharge,
short
circuit,
disassemble
or
throw
the
batteries
into
the
fire.
•
Do
not
drop,
step
on
or
cause
any
impact
to
the
remote
control
unit.
This
may
damage
it,
resulting
in
malfunction.
•
Do
not
mix
old
and
new
batteries.
•
If
the
remote
control
unit
is
not
going
to
be
used
for
a
long
time,
remove
the
batteries.
Caution
Keep
batteries
out
of
children’s
reach.
If
batteries
are
swallowed,
contact
a
physician
immediately.
05
User
Manual
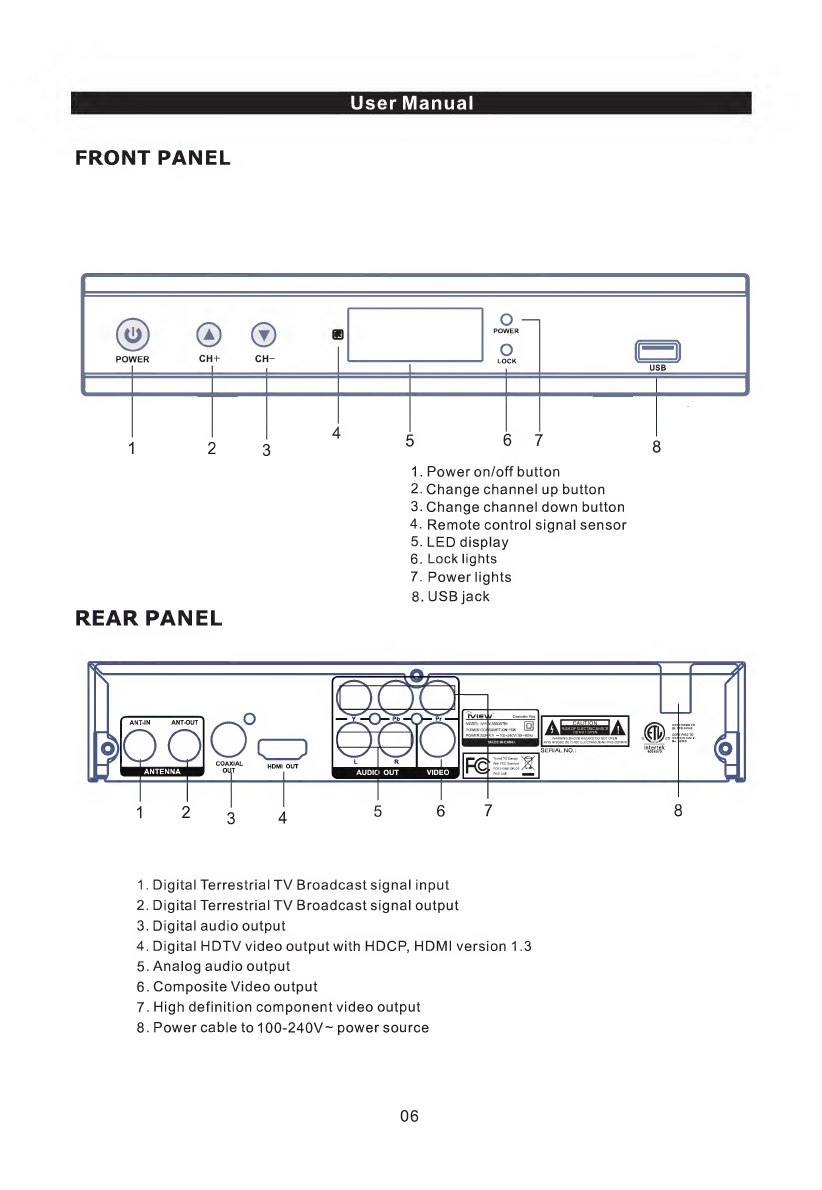
FRONT
PANEL
@00
■
pnwrR
nm-
o
^
1
POWER
O
USB
4
t
;
i
7
1.
Power
on/off
button
2.
Change
channel
up
button
3.
Change
channel
down
button
4.
Remote
control
signal
sensor
5.
LED
display
6.
Lock
lights
7.
Power
lights
8.
USB
jack
REAR
PANEL
1.
Digital
Terrestrial
TV
Broadcast
signal
input
2.
Digital
Terrestrial
TV
Broadcast
signal
output
3.
Digital
audio
output
4.
Digital
HDTV
video
output
with
HDCP,
H
DM
I
version
1.3
5.
Analog
audio
output
6.
Composite
Video
output
7.
High
definition
component
video
output
8.
Power
cable
to
100-240V~
power
source
06
User
Manual
INSTALLATION
CONNECTING
THE
RECEIVER
Before
you
connect
3500STBII
to
your
TV,
please
make
sure
that
the
box
is
laid
on
a
flat
and
stable
surface.
Please
referto
the
diagram
below
and
refer
on
yourTV
Manual
for
cable
installation
instructions.
Fig.
1
Using
Coaxial
cable
default
output
Channel
3
Fig.
2
Using
HDMI
default
output
video
source
HDMI
Fig.
3
Using
RCA
component
cable
default
output
mode
Video,
AV,
or
INPUT.
07
User
Manual
INSTALLATION
GUIDE
If
this
is
the
first
time
that
you
will
use
3500STBII,
or
you
have
restored
the
unit
to
the
Factory
Default,
the
screen
below
will
appear
on
yourTV
screen.
Follow
the
instructions
on
the
Installation
Guide
to
select
preferences
on
Language,
Country
and
start
Channel
Search.
Installation
Guide
iOSD
Lanquagt
Ergibh
tliSu
n
Li
V
Country
CSA
Channel
Searsh
(1)
[OSD
Language]
Press
RIGHT/LEFT
key
to
select
a
language.
(2)
[Country]
Press
RIGHT/LEFT
key
to
select
your
country
of
residence.
(3)
[Channel
Search]
Press
RIGHT
or
OK
key
to
begin
Automatic
channel
search.
Channel
Search
|
671.dHHz/GHHz
□
TV.
gi^D
iLidiii:
oai
wivi-riE)
CJMT
024
Clll-HD
02S
CUt-SD
026
CKWP-OT
□
3?
WriED-HD
02
a
wmED-50
02
9
WNED-TH
030CFMT
il-dl
PR
160007
1
OMIT
If
no
channel
can
be
found
during
the
channel
search
process,
please
check
your
antenna
connections
making
sure
that
antenna
are
in
proper
working
order.
After
the
scanning
process
is
completed,
the
receiver
will
automatically
save
the
scanned
channels
and
display
the
first
channel
from
the
list.
MENU
MAIN
MENU
Most
functions
are
available
in
main
menu.
Follow
the
operation
help
information
on
the
bottom
of
the
menu
to
modify
the
preference
options.
A
password
will
be
required
when
modifying
advanced
options
in
the
Menu.
The
default
password
is
“000000”.
Press
the
MENU
key
on
the
remote
control;
you
can
access
the
Main
MENU.
There
are
7
items
for
set
up.
Use
the
LEFT
and
RIGHT
keys
to
navigate
through
the
menu.
Select
the
desired
option
and
press
the
OK
key
or
the
RIGHT
key
to
adjust
the
settings.
Press
the
EXIT
key
to
exit
the
main
menu.
08
User
Manual
a.
Program
Settings:
You
can
edit
programs,
check
TV
Program
Guide,
sort
channels
and
set
LCN
from
the
Program
Settings.
1)
To
edit
your
program
preferences
(to
lock,
skip,
favourite,
rename,
move
or
delete
a
program),
you
need
to
enter
a
password.
Enter
the
default
password
"000000".
The
master
unlock
password
is
"888888".
2)
The
EPG
is
an
on-screen
TV
guide
that
shows
scheduled
programs
seven
days
in
advance
for
every
tuned
channel.
Press
the
EPG
key
on
the
Remote
Control
to
access
the
Electronic
Program
Guide.
3)
Sort
NOTE:
It
is
important
to
deactivate
the
LCN
function
while
sorting
out
the
position
of
the
channels.
The
"Sort"
function
allows
you
to
sort
the
channels
by
different
methods:
By
LCN:
This
will
sort
the
channels
by
ascending
order.
By
Service
name:
This
will
sort
the
channels
in
alphabetical
order.
By
Service
ID:
This
will
sort
the
channels
by
Service
ID.
By
ONID:
This
will
sort
the
channels
according
to
the
ONID.
b.
Picture
Settings:
The
Picture
option
allows
you
to
set
the
different
functions
such
as:
Aspect
ratio
Video
Aspect
Ratio
can
be
4:3
(also
known
as
Anamorphic
Image)
or
16:9
(also
known
as
Widescreen
TV)..
Press
the
MENU
button
and
select
the
Aspect
Ratio
setup
Menu.
If
you
have
a
Standard
Definition
TV,
select
4:3
Aspect
Ratio.
If
you
have
a
high
definition
TV,
select
16:9
Aspect
Ratio.
Please
refer
to
the
Screenshot
of
the
Aspect
Ratio
as
illustrated
below:
Below
is
an
illustration
on
different
mode
selections
on
aspect
ratio
and
the
appearance
of
the
video
picture
images
according
to
the
aspect
ratio
selection.
16:9
Stream
on
a
16:9
TV
4:3
Stream
on
a
4:3
TV
Whatever
the
mode
4:3
Stream
on
a
16:9
TV
Letter-box
Pan
and
scan
Whatever
the
mode
16:9
Stream
on
a
4:3
TV
Letter-box
Pan
and
scan
09
User
Manual
Resolution:
You
can
choose
different
resolution
according
to
your
TV:
480i
Coax
cable,
720p
RCA
cable,
1080p
or
1080i
for
HDMI
TV
format:
PAL/NTSC.
c.
Channel
Search
settings:
(a)
Auto
Search:
This
option
will
automatically
search
for
TV
and
Radio
channels
and
save
them
once
the
scanning
is
complete.
All
previously
saved
channels
and
settings
will
be
deleted.
(b)
Manual
Search:
This
option
allows
you
to
scan
for
new
channels
without
deleting
previously
saved
channels
and
settings.
(1)
Select
“Manual
Search”
and
press
the
“OK”
or
“Right”
key.
The
Manual
Channel
search
screen
will
appear.
(2)
Press
the
“Right”
or
“Left”
keys
to
select
the
channel
frequency.
(3)
Press
the
“OK”
key
to
start
scanning
for
new
channels.
(4)
If
a
new
channel
is
found,
it
will
be
saved
and
stored
along
with
the
rest
of
the
channels.
If
no
channels
are
found,
the
unit
will
automatically
exit
after
finishing
the
scanning
process.
d.
Time
settings:
It
allows
you
to
set:
Time
Offset:
Select
auto
or
manual
for
GMT
offset
adjustments.
Country
Region:
Select
the
Country
Region
when
[Time
Offset]
is
set
to
AUTO.
Time
Zone:
Select
the
Time
Zone
offset
when
[Time
Offset]
is
set
to
MANUAL.
Power
Down
(Sleep):
Select
the
desired
time
for
the
Auto-shut
off
function
(from
1
hour
to
12
hours
or
set
it
to
Off).
e.
Option:
The
menu
contains
the
following
options:
OSD
Language:
Change
the
ON
Screen
Display
language.
Subtitle
language:
Select
the
subtitle
language.
Audio
language:
If
the
program
has
multi-languages.
Set
your
preference
here.
f.
System
setting
s:
The
menu
contains
the
following
options:
a)
Parental
Guidance:
The
options
for
setting
up
the
age
preference
starts
from
4
years
old
to
18
years
old.
To
access
this
function,
you
will
be
required
to
enter
a
code.
The
default
password
is
“000000”.
This
function
can
also
be
deactivated
bt
simply
switching
to
“OFF”
setting.
b)
Set
Password:
It
allows
you
to
modify
the
default
password,
which
is
"000000".
c)
Restore
Factory
Default:
It
allows
you
to
restore
the
unit
to
its
default
factory
settings.
You
will
be
asked
to
enter
your
password
"000000".
Press
"OK"
key
once
done.
Note:
This
function
will
delete
all
your
saved
channels
and
your
personal
settings.
d)
Information:
You
can
check
the
software
version
of
your
unit.
g.
USB
Settings:
1)
MULTIMEDIA:
While
on
TV
Mode,
press
the
“
USB
”
button
to
access
to
the
Multimedia
menu.
The
menu
contains
4
different
icons:
Music,
Photo,
Movie,
and
PVR.
MUSIC
:
Select
“MUSIC”
icon,
move
the
cursor
to
enter
the
path
of
the
desired
audio
file.
Press
the
OK
button
to
play
the
selected
audio
file.
PHOTO:
Choose
PHOTO
icon,
and
enter
the
path
of
the
desired
photo
files.
Press
OK
button
to
view
the
desired
photo
files.
MOVIE
:
Choose
MOVIE
icon,
and
move
the
cursor
to
choose
the
path
of
the
desired
video
files.
Press
the
OK
button
to
play
the
desired
video
files.
10
User
Manual
PVR:
Select
PVR
icon.
Select
the
recorded
file
you
want
to
play,
press
OK
to
begin
playback.
Press
the
RETURN
key
to
move
up
to
the
up
Folder.
Press
the
SCHEDULE
key
to
switch
between
Preview
and
Full
screen
modes.
Use
the
epg
key
to
delete
the
file
you
don’t
want.
Press
the
aspect
key
to
rename
the
recorded
file
if
desired.
2)
Photo
Configure
-
Adjust
the
slide
time,
slide
mode
and
aspect
ratio
here
3)
PVR
Configure
-
Recording
Device.
View
information
of
your
connected
USB
storage
device
which
includes
Format
Type,
Total
and
Free
Space
available
on
the
drive.
Select
FORMAT
to
format
your
USB
compatible
device
in
Fat
32
of
NTFS
format.
4)
The
USB
Port
is
also
used
to
perform
Software
Update.
**
COPY
THE
SOFTWARE
UPDATE
FILE
FROM
YOUR
PC
TO
A
USB
FLASH
DRIVE
**
1.
To
upgrade
your
unit
via
USB,
plug
the
USB
compatible
drive
to
the
PC
and
backup
the
entire
data
of
the
USB
drive.
Right
click
the
USB
drive
and
select
Format
item.
Format
the
USB
drive
as
FAT32
file
system.
NOTE:
To
perform
a
software
upgrade
of
the
Receiver,
please
ensure
the
USB
Flash
Drive
or
Portable
hard
disk
is
in
FAT32
file
system
format.
The
USB
port
for
software
updates
is
not
compatible
with
USB
Flash
drives
or
Portable
Hard
Disk
Drives
in
NTFS,
FAT16
or
U3
PRO
File
System
formats.
2.
Press
MENU,
move
right
to
enter
SYSTEM
SET
UP,
move
down
to
enter
SOFTWARE
UPDATE.
Press
ENTER
and
enter
USB
drive
,
choose
update
file
name.
NOTE:
Please
do
not
remove
the
USB
drive
from
the
receiver
or
power
off
the
receiver
during
the
upgrade
process.
This
may
damage
the
receiver.
UP^RAOINO
SOFTWARE.
Pi
EASE
DO
**OT
TURN
Of
f
vt
Cl
a
u
-
-
Kj
o
r
E-
-
‘vCH
1
WkHf
rt.iMi'i,
1
f
i_
PI
L
AiiU
F^t
ST
iM^T
DAILY
USE
INFO.
KEY
Press
“INFO”
key
to
display
the
Information
banner
while
viewing
TV
programs.
Information
banner:
11

User
Manual
AUDIO
KEY
Some
programs
may
have
multilingual
audio
language
and
this
audio
broadcast
may
be
on
a
different
audio
mode
such
as
Stereo,
Left
or
Right.
All
the
available
audio
languages
will
be
displayed
on
the
audio
track
window
when
you
press
the
audio
key.
The
screenshot
illustrates
this
below.
If
there
is
no
audio
output
after
you
have
selected
the
audio
language,
it
indicates
that
there
is
no
audio
on
the
current
audio
mode,
so
you
have
to
select
the
previous
audio
mode.
CCKEY
Certain
programs
have
multilingual
subtitle
information.
All
available
subtitle
languages
will
be
displayed
in
the
subtitle
information
window
when
you
press
the
CC
key.
The
screenshot
illustrates
this
below.
Follow
the
help
information
in
the
subtitle
window
to
select
preferred
subtitle.
PREV/NEXT
KEY
&
F.R./F.F.
key
The
PREV/NEXT
key
and
F.R./F.F.
key
can
be
used
during
playback
of
multimedia
programs
from
your
external
USB
device.
Press
the
PREV/NEXT
key
to
go
to
the
previous/next
program
and
F.R./F.F.
key
to
fast
forward
or
rewind
during
playback.
12

User
Manual
EPG
Press
EPG
Key
to
display
Electronic
Program
Guide
on
the
screen.
This
displays
a
7-day
EPG
for
all
programs
being
broadcasted
from
all
broadcast
stations.
FAVOURITE
CHANNEL
Setting
up
Favourite
TV
or
Radio
Channels:
You
can
add
preferred
channels
to
a
Favourite
Channel
List.
Press
the
Menu
key
to
access
the
Program
Edit
Menu.
The
Favourite
channel
option
allows
you
to
classify
the
channels
by
different
genre:
Movies/News/Sports/Music.
Press
the
"FAV"
or
"OK"
key
to
confirm
your
selection.
A
heart
shaped
symbol
will
appear
next
to
that
channel
which
confirms
your
selection.
Disable
Favourite
TV
or
Radio
Channel:
Press
the
Menu
key
to
access
the
Program
Edit
Menu.
The
list
of
the
favourite
channels
will
be
displayed.
Highlight
the
desired
channel
to
be
disabled.
Press
"FAV"
button,
select
the
"Disable"
option
and
press
the
"FAV"
or
OK"
key
to
cancel.
Press
the
"Exit"
key
to
exit
the
menu.
13

User
Manual
View
Favourite
Channel:
While
in
normal
viewing
mode,
press
the
"FAV"
key
to
access
to
your
favourite
channel
menu.
Press
the
LEFT
or
RIGHT
keys
on
your
remote
to
access
to
the
classified
Sub-
Menu
(Movies/News/Sports/Music).
Press
the
UP
or
DOWN
keys
to
browse
through
your
favourite
channels.
Press
the
"OK"
key
to
select
your
favourite
channel.
Delete
a
TV
or
RADIO
Program:
Press
the
Menu
key
to
access
the
Program
Edit
Menu.
Select
the
program
you
wish
to
delete
and
press
the
"
4
"
key
on
your
remote.
A
warning
message
will
appear
on
your
TV
screen.
Press
the
"OK"
key
to
confirm
the
deletion
of
the
channel.
Repeat
the
above
procedure
to
delete
further
channels.
Skip
TV
or
RADIO
Channel:
Press
the
Menu
key
to
access
the
Program
Edit
Menu.
Select
the
channel
you
would
like
to
"Skip"
and
press
the
"
2
"
key
on
your
remote.
A
skip
symbol
will
appear.
Now
the
channel
is
marked
as
a
SKIP.
To
save
your
settings
and
exit
the
menu,
press
the
"Exit"
key.
Move
a
TV
or
RADIO
Program:
Press
the
Menu
key
to
access
the
Program
Edit
Menu.
Select
the
desired
channel
you
wish
to
move
and
press
the
"
1
"
key
on
your
remote.
A
"MOVE"
symbol
will
appear
on
your
TV
screen.
Press
the
UP
or
DOWN
keys
to
move
the
channel
to
the
desired
position.
Press
the
"OK"
key
to
confirm
your
selection.
Repeat
the
above
process
to
move
further
channels.
PVR
FUNCTION
The
PVR
function
allows
you
to
record
and
play
your
favorite
programs
recorded.
Instant
Recording,
Electronic
Program
Guide
Timer
Recording
are
all
available.
To
use
various
functions,
such
as
the
PVR
Function,
Instant
Recording
Function,
TV
Program
Guide
Timer
Recording
Function,
Timeshift
Function,
Playback
of
Recorded
Program
Function,
and
Multi-Media
Player
Function,
it
is
necessary
to
connect
an
USB
flash
drive
or
an
external
hard
disk
to
the
USB
port
of
the
converter.
The
maximum
capacity
of
HDD
supported
by
3500STBII
is
up
to
a
size
of
3
Terra
Bytes.
Please
note
that
due
to
the
buffer
speed
requirement
some
USB
flash
drives
may
not
be
compatible
for
use
with
the
Timeshift
function
NOTE:
3500STBII
supports
FAT
32
and
NTFS
file
formats
1)
Instant
recording
Press
the
REC.
key
to
start
instant
recording
of
the
TV
program
currently
being
viewed,
the
recording
symbol
would
be
displayed
in
the
top
left
of
the
screen.
Press
the
INFO,
key
to
view
information
of
the
instant
recording.
Press
the
STOP
key
to
stop
the
instant
recording.
14
User
Manual
2)
Electronic
Program
Guide
Timer
recording
You
will
never
miss
any
of
your
favourite
programs
again
with
the
Electronic
Program
Guide
recording
feature.
While
in
TV
mode,
press
the
“EPG”
key
to
access
the
on
screen
Electronic
Program
Guide,
select
the
channel
and
program
you
wish
to
record.
Press
the
“OK”
key
to
select
the
desired
program
to
be
recorded.
A
Schedule
Event
window
will
appear.
Select
and
set
the
correct
parameters
to
schedule
the
recording.
Set
the
Mode
option
to
“Record”.
This
program
will
be
automatically
recorded
at
the
scheduled
time.
You
can
edit
the
set
timer
recording
in
the
Schedule
Event
Menu
by
editing
the
channel
number,
name,
date,
start
time,
and
end
time.
Select
the
option
of
Once,
Daily,
Weekly
or
Monthly
recording
as
desired.
Once
the
recording
schedule
setup
has
been
set,
you
can
at
any
time
edit
the
schedule
recording
by
pressing
the
“
2
”
key
or
delete
the
scheduled
recording
by
pressing
the
“
3
”
key
on
your
remote.
After
having
finished
the
Schedule
Recording
setup,
press
the
“EXIT”
key
to
save
and
exit.
15
User
Manual
RECORDING
SETTINGS:
To
record
you
will
need
to
press
“SCHEDULE”
on
the
remote
to
program
the
channels
you
want
to
record
and
schedule
the
time.
Menu
will
appear.
You
can
add
list
of
program
or
channels
that
you
want
to
record.
But
you
cannot
schedule
recording
the
same
time.
16
Table of contents


