iKEY-AUDIO M Series User manual

All manuals and user guides at all-guides.com
all-guides.com
TABLE OF CONTENTS
Warnings and WEE.............................................2
Introduction/ Unpacking.......................................3
Monitor/Subwoofer rear panel.............................4
Rear Panel Connections.....................................5
System Control/
Speaker Placement.............................................6
Troubleshooting...................................................7
Technical Specifications.......................................8
Warranty Information...........................................9
SPL Curves........................................................10
All manuals and user guides at all-guides.com
CAUTION: This product satisfies CC regulations
when shielded cables and connectors are used to
connect the unit to other equipment. To prevent elec-
tromagnetic interference with electric appliances
such as radios and televisions, use shielded cables
and connectors for connections.
The exclamation point within an equilateral trian-
gle is intended to alert the user to the presence of
important operating and maintenance (servicing)
instructions in the literature accompanying the appli-
ance.
The lightning flash with arrowhead symbol, within
an equilateral triangle, is intended to alert the user
to the presence of uninsulated "dangerous voltage"
within the product's enclosure that may be of suffi-
cient magnitude to constitute a risk of electric shock
to persons.
READ INSTRUCTIONS: All the safety and operating
instructions should be read before the product is
operated.
RETAIN INSTRUCTIONS: The safety and operating
instructions should be retained for future reference.
EED WARNINGS: All warnings on the product and
in the operating instructions should be adhered to.
FOLLOW INSTRUCTIONS: All operating and use
instructions should be followed.
CLEANING: The product should be cleaned only
with a polishing cloth or a soft dry cloth. Never clean
with furniture wax, benzine, insecticides or other
volatile liquids since they may corrode the cabinet.
ATTAC MENTS: Do not use attachments not recom-
mended by the product manufacturer as they may
cause hazards.
WATER & MOISTURE: Do not use this product near
water, for example, near a bathtub, wash bowl,
kitchen sink, or laundry tub; in a wet basement; or
near a swimming pool; and the like.
ACCESSORIES: Do not place this product on an
unstable cart, stand, tripod, bracket, or table. The
product may fall, causing serious injury to a child or
adult, and serious damage to the product. Use only
with a cart, stand, tripod, bracket, or table recom-
mended by the manufacturer, or sold with the prod-
uct. Any mounting of the product should follow the
manufacturer's instructions, and should use a mount-
ing accessory recommended by the manufacturer.
CART: A product and cart combination should be
moved with care. Quick stops, excessive force, and
uneven surfaces may cause the product and cart
combination to overturn. SEE FIGURE A.
VENTILATION: Slots and openings in the cabinet
are provided for ventilation and to ensure reliable
operation of the product and to protect it from over-
heating, and these openings must not be blocked or
covered. The openings should never be blocked by
placing the product on a bed, sofa, rug, or other
similar surface. This product should not be placed in
a built-in installation such as a bookcase or rack
unless proper ventilation is provided or the manu-
facturer's instructions have been adhered to.
POWER SOURCES: This product should be operated
only from the type of power source indicated on the
marking label. If you are not sure of the type of
power supply to your home, consult your product
dealer or local power company.
LOCATION: The appliance should be installed in a
stable location.
NON-USE PERIODS: The power cord of the appli-
ance should be unplugged from the outlet when left
unused for a long period of time.
GROUNDING OR POLARIZATION:
- If this product is equipped with a polarized alter-
nating current line plug (a plug having one blade
wider than the other), it will fit into the outlet only
one way. This is a safety feature. If you are unable
to insert the plug fully into the outlet, try reversing
the plug. If the plug should still fail to fit, contact
your electrician to replace your obsolete outlet. Do
not defeat the safety purpose of the polarized
plug.
- If this product is equipped with a three-wire
grounding type plug, a plug having a third (ground-
ing) pin, it will only fit into a grounding type power
outlet. This is a safety feature. If you are unable to
insert the plug into the outlet, contact your electri-
cian to replace your obsolete outlet. Do not defeat
the safety purpose of the grounding type plug.
POWER-CORD PROTECTION: Power-supply cords
should be routed so that they are not likely to be
walked on or pinched by items placed upon or
against them, paying particular attention to cords at
plugs, convenience receptacles, and the point where
they exit from the product.
OUTDOOR ANTENNA GROUNDING: If an outside
antenna or cable system is connected to the product,
be sure the antenna or cable system is grounded so
as to provide some protection against voltage
surges and built-up static charges. Article 810 of the
National Electrical Code, ANSI/N PA 70, provides
information with regard to proper grounding of the
mast and supporting structure, grounding of the
lead-in wire to an antenna discharge unit, size of
grounding conductors, location of antenna-dis-
charge unit, connection to grounding electrodes, and
requirements for the grounding electrode. SEE FIGURE B.
LIG TNING: or added protection for this product
during a lightning storm, or when it is left unattend-
ed and unused for long periods of time, unplug it
from the wall outlet and disconnect the antenna or
cable system. This will prevent damage to the prod-
uct due to lightning and power-line surges.
POWER LINES: An outside antenna system should
not be located in the vicinity of overhead power
lines or other electric light or power circuits, or
where it can fall into such power lines or circuits.
When installing an outside antenna system, extreme
care should be taken to keep from touching such
power lines or circuits as contact with them might be
fatal.
OVERLOADING: Do not overload wall outlets,
extension cords, or integral convenience receptacles
as this can result in a risk of fire or electric shock.
OBJECT & LIQUID ENTRY: Never push objects of
any kind into this product through openings as they
may touch dangerous voltage points or short-out
parts that could result in a fire or electric shock.
Never spill liquid of any kind on the product.
SERVICING: Do not attempt to service this product
yourself as opening or removing covers may expose
you to dangerous voltage or other hazards. Refer
all servicing to qualified service personnel.
DAMAGE REQUIRING SERVICE: Unplug this prod-
uct from the wall outlet and refer servicing to qual-
ified service personnel under the following condi-
tions:
- When the power-supply cord or plug is dam-
aged.
- If liquid has been spilled, or objects have fallen
into the product.
- If the product has been exposed to rain or water.
- If the product does not operate normally by fol-
lowing the operating instructions. Adjust only those
controls that are covered by the operating instruc-
tions as an improper adjustment of other controls
may result in damage and will often require exten-
sive work by a qualified technician to restore the
product to its normal operation.
- If the product has been dropped or damaged in
any way.
- When the product exhibits a distinct change in
performance, this indicates a need for service.
REPLACEMENT PARTS: When replacement parts
are required, be sure the service technician has used
replacement parts specified by the manufacturer or
have the same characteristics as the original part.
Unauthorized substitutions may result in fire, electric
shock, or other hazards.
SAFETY C ECK: Upon completion of any service or
repairs to this product, ask the service technician to
perform safety checks to determine that the product
is in proper operating condition.
WALL OR CEILING MOUNTING: The product should
not be mounted to a wall or ceiling.
EAT: The product should be situated away from
heat sources such as radiators, heat registers, stoves,
or other products (including amplifiers) that produce
heat.
DISPOSAL: This product shall not be treated as
household waste. Instead it shall be handed over to
the applicable collection point for the recycling of
electrical and electronic equipment. By ensuring this
product is disposed of correctly, you will help pre-
vent potential negative consequences for the envi-
ronment and human health, which could otherwise
be caused by inappropriate waste handling of this
product. The recycling of materials will help to con-
serve natural resources. or more detailed informa-
tion about recycling of this product, please contact
your local city office, your household waste disposal
service or the shop where you purchased the prod-
uct.
IMPORTANT WARNING & SAFETY INSTRUCTIONS
PLEASE READ PRIOR TO OPERATING THIS DEVICE!
2
All manuals and user guides at all-guides.com

3
INTRODUCTION
Congratulations on your new iKEY Audio purchase!
Growing demands on music recording professionals have created the
need for better monitor performance at more affordable prices.
The iKEY Audio M-Series class of Powered studio monitors was created
to meet these needs. Please take a moment to carefully read the
information in this guide
UNPACKING
Your iKEY Audio Powered Monitor/ Subwoofer have been carefully inspected
and tested before packing and shipping. After unpacking your Monitor/Subwoofer carefully
inspect it for exterior damage and immediately report any physical damage during transit to
your shipping carrier.Save the shipping boxes and all packaging materials in case the unit
needs to be returned to your local dealer or iKEY Audio.
Additional contents (1) Power Cord.......(1) User Manual
Dear Customer:
Selecting fine audio equipment such as the unit you
have just purchased is only the start of your musical enjoy-
ment. ow it’s time to consider how you can maximize the
fun and excitement your equipment offers. This
Manufacturer and the Electronic Industries Association’s
Consumer Electronics Group want you to get the most out
of your equipment by playing it at a safe level.One that lets
the sound come through loud and clear without annoying
blaring or distortion-and, most importantly, without affecting
your sensitive hearing.
Sound can be deceiving. Over time your hearing “com-
fort level” adapts to higher volumes of sound. So what's
sounds “normal” can actually be loud and harmful to your
hearing. Guard against this by setting your equipment at a
safe level BEFORE your hearing adapts.
To establish a safe le el:
-Start your volume control at a low setting.
- Slowly increase the sound until you can hear it
comfortably and clearly, and without distortion.
Once you ha e established a comfortable sound le el:
-Set the dial and leave it there.
Taking a minute to do this now will help to prevent
hearing damage or loss in the future. After all, we want you
listening for a lifetime.
Used wisely, your new sound equipment will provide a
lifetime of fun and enjoyment. Since hearing damage from
loud noise is often undetectable until it is too late, This
Manufacturer and the Electronic Industries Association’s
Consumer Electronics Group recommend you avoid pro-
longed exposure to excessive noise. This list of sound lev-
els is included for your protection.
Decibel
Le el Example
30 Quiet library, soft whispers
40 Living room, refrigerator, bedroom away from traffic
50 Light traffic, normal conversation, quiet office
60 Air conditioner at 20 feet, sewing machine
70 Vacume cleaner, hair dryer, noisy restaurant
80 Average city traffic, garbage disposals, alarm clock
at two feet
THE FOLLOWI G OISES CA BE DA GEROUS
U DER CO STA T EXPOSURE
90 Subway, motorcycle, truck traffic, lawn mower
100 Garbage truck, chain saw, pneumatic drill
120 Rock band concert in front of speakers, thunderclap
140 Gunshot blast, jet plane
180 Rocket launching pad
Information courtesy of the Deafness Research Foundation.
We Want You Listening For A Lifetime!
All manuals and user guides at all-guides.com

MONITOR/SUBWOOFER
REAR PANELS
1
2
3
6
7
3
4
11 6
8
9
10
5
Note: 505,606 and 808 have similar back panels.
4
All manuals and user guides at all-guides.com

CONNECTIONS
All Connections should be made, all fader controls should be set at their
minimum levels, and all other equipment should be powered on prior to
powering on your iKEY audio monitors.
The power On/Off switch is located on the rear panel a red LED locat-
ed on the front of the speaker behind the iKEY logo will illuminate when
power is applied
To change the voltage, remove the power cord, slide voltage selector to
desired voltage setting. Please note when making voltage changes the
fuses will have to be replaced (See changing fuses section below)
C ANGING FUSES
Under normal operation the fuses should not blow. A blown fuse usually
indicates an overload or fault condition. To change the fuse, remove the
power cord pry off the fuse block with a small flathead screwdriver and
change the blown fuses.
Refer to specifications page (8) for fuse current ratings.
IF A FUSE BLOWS UPON POWER UP T IS INDICATES A FAULT CON-
DITION AND T E MONITOR S OULD BE RETURNED TO IKEY AUDIO
FOR REPAIR.
The XLR and TRS are balanced inputs
The RCA input is an unbalanced input.
AUDIO INPUT
10K O MS BALANCED
PIN2 + TIP = IG
PIN 3 + RING = LOW
PIN 1 + SLEAVE = GROUND
The iKEY Subwoofer includes a built-in crossover and amplifier,
so you only need the appropriate hookup cables to integrate
it into your existing monitor system. irst, you need to connect a
pair of cables from the stereo monitor outputs of your console or
DJ mixer to the XLR or 1/4” input jacks on the subwoofer.
Next, if you are using the internal 80-hz high-pass filter built into
the subwoofer for the existing full-range monitors (and most of-
you will), hook up the 1/4” output jacks on the subwoofer to the line-
level inputs of your full range speakers
If on the other hand, you are using passive (non-powered) monitor
speakers that require an external amplifier, hook the two outputs of the
subwoofer up to the inputs of the stereo monitor amplifier. Typically this
would also be an XLR connector, but if need be, you could use the con-
nections providing the amplifier will accept them at amp input. Connect
the power amplifier to the speakers as you normally would.
DO NOT ATTEMPT TO OOK T E SPEAKER OUTPUT OF T E MONI-
TOR AMPLIFIER TO T E INPUT OF T E SUBWOOFER, YOU RUN T E
RISK OF DAMAGING T E EQUIPMENT.
Powering On
1
Changing Voltage
2
Audio Inputs
3
Su woofer Hook-Up
4Wiring
5
Typical setup
Passive Setup
5
All manuals and user guides at all-guides.com
all-guides.com

SYSTEM CONTROL/
SPEAKER PLACEMENT
The input sensitivity is adjusted (counterclockwise reduces sensitivity) with
the rear panel mounted system gain control. Adjustment range is from -
80db to + 6db, which should suffice for most conditions. Normally
adjustments would only be made if you’re using your monitor in a sur-
round system and need to balance levels or if your monitor send is to hot
and not adjustable.
High requency Adjustment is through a rear panel mounted 4-position
rotary switch. Range of control is +1db, flat, -1db, or -2db Shelving
above 2khz. actory setting for your iKEY Audio powered Monitor is flat
(switch is the 0db position). Room acoustics may dictate which type of
adjustment you nee to make to retain a flat frequency response from the
monitor.
This adjusts the crossover frequency for the built-in 24db/octave vari-
able crossover. The crossover frequency can be adjusted from 50Hz to
110Hz. requencies below the crossover frequency are sent to the sub-
woofer, and frequencies above the crossover frequency are sent to the
LE T and RIGHT OUTputs, which are connected to the main satellite
speakers. Set the crossover frequency to the lowest frequency response
rating of the main /Satellite speakers.
This switch reverses the polarity of the signal going to the subwoofer
amplifier by 180 . It has no effect on the signal at the LE T and RIGHT
OUT or the MASTER OUT. There is no right or wrong setting for this
switch. Listen to the overall blend of the subwoofer with the rest of the
system, and select the switch position that gives you the best sound.
If set to the AUTO position the subwoofer will go into STANDBY mode
(mute) if Idle for more than 45 minutes it resumes working immediately
after an input signal is received. If set to the ON position it will be on
constantly, and the O position allows you to use the subwoofers power
switch Manually.
The Peak LED will illuminate if the input channels are being overloaded.
Positioning your monitors correctly in the studio is critical to their perform-
ance.Typically, they should be placed so that the listening position is fully
“covered” with all monitors resting on the same horizontal plane. A great
way to test a monitor for its imaging capability is to play back a CD or
DVD recorded acoustically in stereo . We recommend acoustic music
because it represents the spectrum of sound. You can adjust the angle of
each monitor by listening for dead spots. keep in mind, changing the
angle or position of a monitor will change the sound.
System Volume
6
HF Adjustment
7
Crossover
8
Phase
9
Auto Power
10
Peak LED
11
Speaker Placement
6
All manuals and user guides at all-guides.com

PROBLEM: IF T ERE IS NO POWER, C ECK TO SEE IF...
• The power cord is plugged into both the IEC socket on the rear panel
of the unit and into the AC mains
• The AC mains voltage is matched to the operating voltage require-
ments See Changing Voltage in the Connecting the System section on
page 5). If the AC mains voltage is higher than the iKEY Audio monitor is
selected voltage it is possible that the fuse needs to be replaced. (See
Changing uses in the Connecting the System section on page 5).
• The power light is illuminated on the front panel of the Ikey audio. If
not, turn the power switch O and check the A/C mains fuse(s). NEVER
USE A LARGER AMPERAGE USE THAN IS SPECI IED! Turn the power
switch back on. The power light should illuminate.
• If a fuse change was needed and upon powering the monitor back up
the fuse(s) blow again, the monitor needs to be returned to the dealer
you purchased it from or to IKEY AUDIO Monitor for servicing.
PROBLEM: IF YOU CAN'T EAR ANY SOUND...
• Repeat steps in the previous troubleshooting section above before con-
tinuing to the next steps.
• Check to see if all other audio devices using the same AC outlet are
still operating.
• MAKE SURE T AT:
• The audio source cable is plugged into both the source output and
the monitor input.
• The system gain pot is turned up fully clockwise (+ 6 dB).
• The signal source (E.g. mixing console, work station, CD player, etc.) is
turned up to a level that can properly send a signal to the monitors.
• If one of the monitors is working. Exchange the audio input cable from
the non-working monitor to the working unit. This will determine whether
it's really the monitor, a faulty cable, or some other glitch in the audio
chain.
• If the monitor is still not responding, it should be returned to the dealer
that you purchased it from or to IKEY AUDIO for servicing.
PROBLEM: IF T E MONITOR SUDDENLY STOPS WORKING...
• Turn the monitor send down or off.
• Repeat steps in the troubleshooting sections above before continuing to
the next steps.
• Carefully check to see if the amplifier's back plate is hot! If the monitor
has been running at highest power output for an extended period of
time, it could be that the unit has become overheated and the protection
circuitry has shut the system down momentarily. The Ikey audio monitor
provides maximum circuitry protection against AC power surges, amplifi-
er overdrive, and overheating of the amplifiers. Turn the monitor off then
wait 30 minutes to allow the back plate to cool down. Turn the power
switch back on.
• Increase the volume to check for normal operation.
• If the monitor is still not responding, it should be returned to the dealer
that you purchased it from or to IKEY AUDIO for servicing.
Problem: The sound quality changes... • Repeat steps in the previous trou-
bleshooting section above before
continuing to the next steps.
• Disconnect the signal cable at the
input of the monitor. With power on,
place your ear close to each driver
(tweeter/woofer) and listen for
noise (i.e., a slight hiss or hum). If there's absolutely no sound whatsoever,
it could be that one or more of the drivers (woofer or tweeter or both) is
at fault. It's also possible that the problem lies some where in the elec-
tronics.
• Play some non-distorted source material at a low volume. Carefully
cover the tweeter (to block the sound) without touching the diaphragm. Is
the woofer producing a clean sound? If there is not a clear tonal quality
or any sound at all then the woofer probably needs to be replaced.
• Cover the woofer so you can hear mostly the tweeter. Is the tweeter
producing a clear sound? If there is not a clear tonal quality or any
sound at all then the tweeter probably needs to be replaced.
• Once you have a better idea of what may be at fault then call us and
speak with someone in the service department. They will help you deter-
mine the best solution to correct your monitors.
PROBLEM: T E MONITOR ISSES, UMS OR MAKES OT ER LOUD
NOISES...
Here are some suggestions that will help you eliminate these undesirable
from your system:
• Make sure that the power cord is plugged snugly into the IEC socket on
the rear of the monitor.
• Check the connections between the signal source and the monitor. The
Ikey audio's XLR and TRS connector is a completely balanced system. If
you're connecting an unbalanced output to the monitor, be sure that
you're using PIN 2 for signal and have PIN 1 and PIN 3 tied together at
the source end.
• Refer to the Connecting the System section on page 4 of this manual to
ensure that the AC mains is matched to the operating voltage require-
ments.
• All audio equipment should use the same ground point. Check all other
devices using the same AC output in the building like dimmers, neon signs,
TV screens, and computer monitors. These devices should not be using the
same circuit. .
TROUBLESHOOTING
7
All manuals and user guides at all-guides.com

requency Response
High requency Driver
Low frequency Driver
Cabinet Dimensions
(HxWxD)
Net Weight
AMPLIFIER
Power rating (H /L )
Signal to Noise (H /L )
T.H.D. (H /L )
Input Impedance
Balanced
Unbalanced
CROSSOVER
Crossover frequency
Subsonic ilter
USE 5mm x 20mm
100V 120V
220V - 240V
FEATURES
XLR & 1/4”TRS
Connectors
RCA Connectors
System Volume Control
Auto Power
LED Power indicator
53Hz -20kHz +/- 2.0dB
1” Soft Dome
5” Aramid Glass iber
11” x 7.5” x 9”
28 cm x 19 cm x 22.5 cm
7.2Kg
25 watts/50 watts
82dB/90dB
.05/.02
10K Ohm
10K Ohm
3KHz
45Hz
0.8A
Yes
Yes
Yes
Yes
No
Yes
50Hz -20kHz +/- 2.0dB
1” Soft Dome
6.5” Aramid Glass iber
12.7” x 9”x 10.5”
32 cm x 22.5 cm x 26.5
9.4Kg
30 watts/60 watts
82dB/90dB
.05/.02
10K Ohm
10K Ohm
2.6KHz
40Hz
1A
Yes
Yes
Yes
Yes
No
Yes
45Hz -20kHz +/- 1.5dB
1” Soft Dome
8” Aramid Glass iber
15” x 10.5” x 12”
38 cm x 26.5 cm x 30.5cm
12.4Kg
40 watts/85 watts
82dB/90dB
.05/.02
10K Ohm
10K Ohm
2.4KHz
35KHz
1.6A
Yes
Yes
Yes
Yes
No
Yes
35Hz -150Hz
N/C
10” Aramid Glass iber
15” x 12.6” x 15.7”
38.2 cm x 32.2 cm x 39.8
17Kg
175 watts
90dB
1
10K Ohm
10K Ohm
160Hz
35Hz
1A
Yes
Yes
Yes
Yes
Yes
Yes
GCI Technologies USA: +1 (732)346-0061
GCI Latin America and Carribean: +1 (305)592-4746
GCI United Kingdom LTD: +44 (0)87 087-00880
GCI France +33 1 69 79 97 72
GCI SA (Spain): +34 93 436 37 00
GCI Gmb (Germany): +49 8131 39171-0
Should your Ikey audio product require warranty or non-warranty serv-
ice in the USA, or if you wish to purchase replacement parts, operating
instructions, or accessories, please contact GCI Technologies at the phone
number listed below:
732-346-0061
Do not, under any circumstance, ship your product to GCI without first
calling the Technical Support Department at the number listed above.
ailure to establish an RMA (Return Merchandise Authorization) number
prior to shipping your product will delay your repair indefinitely. GCI
reserves the right to refuse all packages that arrive without an RMA num-
ber.
or warranty information, please refer to the warranty page included in
this manual.
Once an RMA number is established, your unit should be sent to the
address specified by your customer service representative, with the
RMA clearly written on the outer carton:
or support or repair outside of the USA, please visit the Ikey audio
website at http://www.ikeyaudio.com.
Published by GCI Technologies Corporation
Copyright © 2006 GCI Technologies Corp.
All rights reserved.
eatures & specifications subject to change without notice.
SPECIFICATIONS
M505 M606 M808 M10s
8
All manuals and user guides at all-guides.com

Ikey audio products are designed and manufactured to the highest standards in professional audio. With proper
care and maintenance, your product will provide years of reliable service. Please register your product online at
http://www.ikeyaudio.com
Limited Warranty:
In the USA, Ikey audio guarantees its products against defects in workmanship for the period of One (1) year*
from the original date of purchase.
This limited warranty does not cover damage or failure caused by abuse, misuse, abnormal use, faulty installation, improper maintenance or any repairs
other than those provided by an authorized service center.
There are no obligations of liability on the part of GCI, Ikey audio, or any of its retailers for consequential damages arising out of or in connection with
the use or performance of the product or other indirect damages with respect to loss of property, revenues, profit, or costs of removal, installation, or
reinstallation. All implied warranties for GCI, including implied warranties for fitness, are limited in duration to One (1) year from the original date of
purchase, unless otherwise mandated by local statutes.
Returning Your Product for Service:
In the U.S.A., please call our helpful Customer Service Representatives at (732) 346-0061, and they will be happy to give you a Return Merchandise
Authorization (RMA) number and the address of an authorized service center closest to you.
After receiving an RMA, include a copy of the original sales receipt, with defective product and a description of the defect. Send by insured freight
to GCI Technologies Corporation, and use the address provided by your customer service representative. Your RMA must be written on the outside
of the package, or processing will be delayed indefinitely! GCI reserves the right to refuse all packages that arrive without an RMA number.
Service covered under warranty will be paid for by GCI and returned to you. or non-warrantied products, GCI will repair your unit after payment is
received. Repair charges do not include return freight.
Your warranty is valid only in the country where the unit has been purchased. Repairs performed outside of the country of purchase will be treated as
out-of-warranty.
or warranty service, you pay for shipping to GCI; we pay for return shipping within the Continental United States. Alaska, Hawaii, Puerto Rico,
Canada, Bahamas, and the Virgin Islands will be charged for freight.
Please allow 2-4 weeks for return of your product. Under normal circumstances your product will spend no more than 10 working days at GCI. We
are not responsible for shipping times.
or repairs and warranty information outside of the USA, please call the GCI affiliate closest to where you reside, listed on the specifications page of
this manual (page 30), or visit the Ikey audio website at http://www.ikeyaudio.com.
Serial Number of Product:
Original Purchase Date:
Name of Retailer:
Please register your warranty online at http://www.ikeyaudio.com
US WARRANTY INFORMATION
9
All manuals and user guides at all-guides.com

All manuals and user guides at all-guides.com
all-guides.com
ÍNDICE DE CONTENIDOS
Advertencias de seguridad..................................2
Introducción/Desembalaje...................................3
Panel trasero del Monitor/Subwoofer..................4
Conexiones del panel trasero..............................5
Control del Sistema/
Disposición de los altavoces...............................6
Solución de problemas........................................7
Especificaciones técnicas....................................8
Información sobre la garantía..............................9
All manuals and user guides at all-guides.com

ATENCIÓN: Este producto cumple con la normativa legal
si se utilizan cables y conectores blindados para conectar
la unidad a otro equipo. Para evitar interferencias electro-
magnéticas con otros aparatos eléctricos, como radios y
televisores, deben emplearse cables y conectores blinda-
dos.
Los signos de exclamación dentro de un triángulo que
puedan aparecer en la documentación que acompaña a la
unidad pretenden alertar al usuario de instrucciones de
operación o mantenimiento importantes.
El signo de un rayo dentro de un triángulo pretende aler-
tar al usuario de la presencia de "voltaje peligroso" no ais-
lado en el interior de la unidad, que podría ser de sufi-
ciente intensidad como para constituir riesgo de descarga
eléctrica.
LEA LAS INSTRUCCIONES: Deben leerse todas las indi-
caciones de uso y seguridad antes de usar este producto.
CONSERVE LAS INSTRUCCIONES: Las instrucciones de
uso y seguridad deben conservarse para referencias
futuras.
ATIENDA A LAS ADVERTENCIAS: Deben seguirse todas
las advertencias sobre este producto que fi-guran en el
manual de instrucciones.
SIGA LAS INSTRUCCIONES: Deben seguirse todas las
instrucciones del manual.
LIMPIEZA: Este producto debe limpiarse con una mopa
suave o con un paño seco. Nunca utilice cera para muebles,
gasolina, insecticidas u otros líquidos volátiles, ya que
podrían corroer la carcasa.
COMPLEMENTOS: No utilice accesorios que no estén
recomendados por el fabricante, pues podrían dañar la
unidad.
AGUA Y HUMEDAD: No use este producto cerca de
medios acuáticos, como una bañera, un cubo de agua, un
fregadero o un lavadero; tampoco en un sótano húmedo, ni
cerca de una piscina o similar.
ACCESORIOS: No coloque el producto sobre un carrito,
soporte, trípode, brazo o mesa. Podría caer y causar
graves daños a un niño o adulto, así como a la propia
unidad. Úsese sólo con un carrito, soporte, trípode, brazo o
mesa recomendado por el fabricante. Al montar la unidad
deben seguirse siempre las instrucciones y emplearse acce-
sorios recomendados por el fabricante.
CARRITO: Si el producto va sobre un carrito, debe
moverse el conjunto con cuidado. Detenciones bruscas, una
fuerza excesiva o superficies inadecuadas pueden provo-
car la caída de todo el conjunto. VÉASE FIGURA A.
VENTILACIÓN: Las aperturas y ranuras de la carcasa
están diseñadas para la ventilación, aseguran un manejo
fiable y lo protegen de cualquier sobrecalentamiento, por
tanto, nunca deben cubrirse ni bloquearse. Estas aperturas
no deben taparse colocando el producto sobre un sofá, una
cama, una alfombra o superficies similares. Nunca debe
colocarse en una estructura prefabricada, como una caja o
un rack, a menos que tengan la ventilación adecuada o lo
permitan las instrucciones del fabricante.
FUENTES DE ALIMENTACIÓN: Esta unidad debe uti-
lizarse exclusivamente con el tipo de suministro eléctrico
indicado en la etiqueta correspondiente. Consúltelo antes
de enchufar el producto si no está seguro del tipo de sum-
inistro del lugar donde lo va a usar.
UBICACIÓN: Este aparato debe colocarse en una ubi-
cación estable.
PERIODOS SIN USARLO: Si no se va a usar la unidad
durante un tiempo prolongado, desenchúfelo de la corri-
ente eléctrica.
TOMA DE TIERRA O POLARIZACIÓN:
-Si este producto lleva una clavija de corriente alterna
polarizada (con un pivote más grueso que otro, tipo inglés),
sólo entrará en una posición. Es una medida de seguridad.
Si no puede introducir la clavija en el enchufe, gírela. En
ningún caso debe forzarse. Si sigue sin entrar, un electricista
debería cambiar el enchufe.
- Si la unidad lleva una clavija con tres pivotes (el tercero
corresponde a la toma de tierra), sólo entrará en un tipo
de enchufe. Se trata de una medida de seguridad. Si el
enchufe y la clavija no son compatibles, un electricista
deberá cambiar el enchufe. En ningún caso deberá
forzarse.
PROTECCIÓN DEL CABLE DE CORRIENTE: Los cables de
corriente deben protegerse para que nadie los pise ni cor-
ran el riesgo de pinzarse por elementos colocados encima
oque los aprisionen. Debe prestarse especial atención al
cable, al enchufe, a los extensores de cable y al punto por
donde el cable sale de la unidad.
TIERRA DE LA ANTENA EXTERIOR: Si el producto lleva
conectada una antena exterior o sistema de cables,
asegúrese de que cuenta con la toma de tierra correspon-
diente, a fin de proteger la unidad de variaciones de volta-
je y cargas de electricidad estática. Existe documentación
oficial acerca de la correcta utilización de la toma de tier-
ra y de las medidas de seguridad pertinentes, conexión de
los electrodos de descarga y sus requisitos. VÉASE FIGURA B.
RAYOS: Como protección adicional del producto durante
una tormenta eléctrica, o durante periodos prolongados sin
usarlo, desenchúfelo de la corriente y desconecte la ante-
na o sistema de cables. De este modo se protegerá el pro-
ducto de los daños que pueda producir la caída de un rayo
o las fluctuaciones de la red eléctrica.
LÍNEAS ELÉCTRICAS: Nunca debe situarse un sistema de
antena cerca de líneas eléctricas u otros circuitos de corri-
ente. Tampoco debe colocarse en lugares donde pueda
caer sobre dichos circuitos eléctricos. Al instalar un sistema
de antenización exterior, debe tomarse la extrema precau-
ción de no tocar dichas líneas eléctricas, pues el más míni-
mo contacto puede ser mortal.
SOBRECARGA: No sobrecargue los enchufes de la pared
con ladrones o instalando enchufes múltiples, pues correría
el riesgo de electrocución o incendio.
ENTRADA DE OB ETOS O LÍQUIDOS: Nunca introduzca
objetos de ningún tipo en el interior del producto, pues
podrían tocar una parte eléctrica y cortocircuitar el apara-
to, lo que resultaría en un incendio o descarga eléctrica. No
verter nunca ningún líquido sobre el producto.
REPARACIÓN: No intente reparar el producto por cuen-
ta propia, ya que abrir o retirar la carcasa le expondría a
un voltaje peligroso u otros peligros. Diríjase siempre a un
centro de servicio técnico autorizado.
DAÑOS QUE REQUIEREN REPARACIÓN: Desenchufe el
aparato de la corriente y diríjase a un servicio técnico
autorizado si se da alguna de las siguientes situaciones:
- El cable de alimentación o la clavija están dañados.
- Se ha vertido líquido o ha caído algún objeto sobre la
unidad.
- El aparato se ha expuesto a la lluvia o a salpicaduras.
- La unidad se ha caído al suelo o dañado de algún
modo.
-El aparato no funciona con normalidad, ni aun siguiendo
las instrucciones. Ajuste sólo los mandos que se indican en
las instrucciones, ja que la mani-pulación inadecuada de
otros controles podría dañar la unidad y requeriría un
mayor trabajo de un técnico para restablecer su fun-
cionamiento normal.
- Si el producto muestra anomalías en su funcionamiento,
necesita revisión por parte de un servicio técnico autoriza-
do.
RECAMBIOS: Cuando se necesite alguna pieza de
recambio, asegúrese de que el servicio técnico uti-lice
piezas originales autorizadas o que tengan las mismas car-
acterísticas que las originales. Los reemplazos no autoriza-
dos pueden causar descargas eléctricas, incendios u otros
daños.
COMPROBACIÓN DE SEGURIDAD: Tras la reparación,
solicite al técnico que efectúe las comprobaciones de
seguridad necesarias para determinar que el producto se
encuentra en las condiciones adecuadas para su fun-
cionamiento.
MONTA E EN UNA PARED O TECHO: Este producto
nunca debe montarse en una pared o en el techo.
CALOR: Este producto debe alejarse de fuentes de calor,
como radiadores, estufas u otros aparatos que irradien
calor, incluyendo amplificadores.
RESIDUO: Este producto no debe tratarse como
basura doméstica, sino que debe llevarse al punto
más cercano de recogida selectiva de residuos, a
fin de que puedan reciclarse los componentes eléc-
tricos y electrónicos. Al asegurarse de que este pro-
ducto se desecha correctamente, está evitando
cualquier consecuencia potencialmente negativa
para el medio ambiente y para la salud humana. El
reciclaje de materiales ayudará a conservar los
recursos naturales. Para más información, contacte
con su departamento local especializado, con el
servicio de manejo de residuos de su localidad o
con el comercio donde adquirió este producto.
ADVERTENCIAS E INSTRUCCIONES DE SEGURIDAD IMPORTANTES
LEER DETENIDAMENTE ANTES DE UTILIZAR EL PRODUCTO
2
All manuals and user guides at all-guides.com

3
INTRODUCCIÓN
Le felicitamos por adquirir su iKEY Audio.
La creciente demanda de profesionales de la grabación musical ha dado
lugar a la necesidad de una mejor monitorización a mejores precios.
Los monitores de estudio autoamplificados iKEY Audio Serie M se crearon
para satisfacer tales necesidades. Por favor, tómese unos minutos en leer
atentamente la información de esta guía.
DESEMBALAJE
Su Monitor/Subwoofer autoamplificado iKEY Audio se ha revisado y comprobado cuidadosa-
mente antes de ser embalado y enviado. Tras desembalar su Monitor/Subwoofer revíselo
detalladamente para detectar cualquier daño exterior, en cuyo caso deberá informar de
cualquier tara o daño sufrido durante el transporte. Conserve los embalajes y cajas originales
por si necesitara devolver su iKEY Audio a su distribuidor local.
Contenido adicional (1) Cable de corriente.......(1) Manual de usuario
Distinguido cliente:
Haber elegido un equipo de audio de alta calidad como
el que acaba de adquirir es sólo el principio de su disfrute
personal con la música. Ahora es el momento de que con-
sidere de qué manera puede aprovechar al máximo lo que
su equipo le ofrece. Este fabricante y el Consumer
Electronics Group, de la Electronic Industries Alliance
desean que aproveche al máximo este producto repro-
duciendo el sonido a un nivel de volumen seguro para sus
oídos. Un nivel que permita al sonido llegar alto y claro sin
llegar a la molesta distorsión o saturación. Y, lo más impor-
tante: que no afecte a sus oídos.
El sonido puede resultar inicialmente molesto. o
obstante, con el tiempo, el “nivel de confort” de su oído se
adapta a volúmenes más elevados. Por este motivo, lo
que pueda parecer un volumen “normal” puede ser en
realidad demasiado alto y dañino para sus oídos.
Protéjase de estas amenazas para su salud auditiva y
ajuste su equipo a un nivel de audición seguro A TES de
que su oído llegue a adaptarse.
Para establecer un nivel de volumen seguro:
-Sitúe inicialmente el control de volumen a un nivel bajo.
- Vaya incrementándolo gradualmente hasta que oiga el
sonido de forma confortable, clara y sin distorsión.
Una vez establecido el nivel de volumen confortable:
-Deje el control de volumen en este punto.
Tomarse ahora unos minutos en realizar esta operación le
ayudará a prevenir daños en los oídos o una pérdida de
audición. Al fin y al cabo lo que deseamos es que conserve
su audición en perfecto estado durante toda la vida.
Usado con buen juicio, su nuevo equipo de sonido le pro-
porcionará toda una vida de diversión y entretenimiento.
Dado que los daños por sonido demasiado alto no son
detectables hasta que es demasiado tarde, este Fabricante
y el Consumer Electronics Group de la Electronic Industries
Alliance le recomiendan que evite la exposición prolongada
a los ruidos excesivos. Para su protección, le ofrecemos la
siguiente lista de niveles de sonido.
Decibelios
Nivel Ejemplo
30 Biblioteca silenciosa, susurros
40 Salón de casa, frigorífico, dormitorio aislado
50 Poco tráfico, conversación normal, oficina tranquila
60 Aire acondicionado a 5m, máquina de coser
70 Aspirador, secador de pelo, restaurante ruidoso
80 Tráfico urbano normal, vertidos de basuras, desper-
tador a medio metro
LOS SIGUIE TES RUIDOS PUEDE SER PERJUDI-
CIALES CO U A EXPOSICIÓ PROLO GADA
90 El metro, una moto, un camión, una segadora
100 Camión de basura, motosierra, martillo neumático
120 Ponerse ante los altavoces en un concierto de rock
140 Disparos, el vuelo de un avión
180 Plataforma de lanzamiento de un cohete
Información ofrecida por la Deafness Research Foundation.
Deseamos que conserve su audición!
All manuals and user guides at all-guides.com

MONITOR/SUBWOOFER
PANELES TRASEROS
1
2
3
6
7
3
4
11 6
8
9
10
5
Nota: 505, 606 y 808 tienen paneles traseros similares.
4
All manuals and user guides at all-guides.com

CONE IONES
Antes de encender los monitores iKEY Audio, deben estar todos los
cables conectados, los potenciómetros al volumen mínimo y el resto de
equipos encendidos.
El interruptor de encendido (On/Off) se encuentra en el panel trasero.
Al ponerlo en marcha se iluminará un LED rojo junto al logo de iKEY, en
la parte frontal del altavoz.
Para cambiar el voltaje, desconecte primero el cable de corriente y sitúe
el selector de voltaje al valor deseado. Note que al cambiar el voltaje
deberán sustituirse los fusibles (véase la sección Cambio de Fusibles, a
continuación).
CAMBIO DE FUSIBLES
En condiciones normales, los fusibles no tienen por qué fundirse. Un
fusible fundido suele indicar sobrecarga o fallo. Para sustituirlo,
desconecte el cable de corriente, extraiga el módulo de fusibles con un
pequeño destornillador plano y reponga el fusible inservible.
Consulte la página de especificaciones (8) para más información sobre
los fusibles.
SI UN FUSIBLE SE FUNDE AL ENCENDER LA UNIDAD ES INDICATIVO
DE FALLO, POR LO QUE EL MONITOR DEBERÁ DEVOLVERSE A IKEY
AUDIO PARA SOMETERLO A REVISIÓN Y REPARACIÓN.
Las entradas Canon y TRS (jack) están balanceadas.
La entrada RCA no está balanceada.
ENTRADA DE AUDIO
10K OHMIOS BALANCEADA
PIN 2 + PUNTA = VIVO
PIN 3 + ANILLO = RETORNO
PIN 1 + MANGA = TIERRA
El Subwoofer iKEY Audio incluye un crossover y un amplificador incorpo-
rado, de modo que sólo necesitará los cables para integrarlo en su sis-
tema de monitorización existente. En primer lugar, necesitará conectar un
par de cables de las salidas para monitor estéreo de su consola o mesa
de mezclas a las entradas Canon o jack del subwoofer.
A continuación, si está utilizando el filtro interno de paso alto de 80 z
que el subwoofer lleva incorporado para los monitores de rango com-
pleto (la mayoría de los usuarios lo hacen), lleve un cable de las conex-
iones jack de salida del subwoofer a las entradas de nivel de línea de
los altavoces de rango completo.
Si, por otro lado, utiliza monitores
pasivos (no autoamplificados) que
requieren una etapa de potencia
externa, conecte las dos salidas del
subwoofer a las entradas del
amplificador estéreo de los monitores. Normalmente, éstas son también
de tipo Canon. Conecte entonces la etapa de potencia a los altavoces
de forma normal.
NO CONECTE LA SALIDA PARA ALTAVOCES DEL AMPLIFICADOR A
LA ENTRADA DEL SUBWOOFER. CORRE EL RIESGO DE PROVOCAR
GRAVES DAÑOS AL EQUIPO.
Encendido
1
Cambio de voltaje
2
Entradas de Audio
3
Integración del Subwoofer
4Cableado
5
Ajustes Típicos
Ajustes Pasivos
5
All manuals and user guides at all-guides.com
all-guides.com

CONTROL DEL SISTEMA/
DISPOSICIÓN DE LOS ALTAVOCES
La sensibilidad de la entrada se ajusta a través del control de ganancia
localizado en el panel trasero (en sentido contrario a las agujas del
reloj, se reduce sensibilidad). El rango de ajuste va de -80dB a +6dB, lo
cual debería ser suficiente para la mayoría de las condiciones. Este con-
trol se usaría, por ejemplo, en un sistema surround en el que se tuvieran
que equilibrar niveles o cuando la señal que se le envía es excesiva e
inmodificable.
El Ajuste de Altas Frecuencias es un selector de cuatro posiciones ubica-
do también en el panel trasero. El rango del control es de +1dB, plano
(flat), -1dB o -2dB, para frecuencias superiores a 2khz. El monitor iKEY
Audio viene de fábrica ajustado a “plano” (selector en posición 0dB). La
acústica de la sala determinará el tipo de ajuste necesario para lograr
una respuesta plana del monitor.
Este control ajusta la frecuencia lindar del crossover variable
octavas/24dB integrado. El lindar del crossover puede ajustarse entre
50 y 110 z. Las frecuencias inferiores a este umbral se envían al sub-
woofer, mientras que las que superan este valor se desvían a las SALI-
DAS LEFT (izquierda) y RIG T (derecha), que estarán conectados a los
altavoces satélite principales. Configure la frecuencia de crossover al
valor más bajo que ofrezcan los altavoces satélite principales.
Este selector invierte la polaridad de la señal dirigida al amplificador
del subwoofer. Esta función no tiene efecto alguno sobre la señal de las
salidas izquierda y derecha del subwoofer, ni sobre la salida máster
(MASTER OUT). No hay posición correcta ni equivocada para este selec-
tor. Sólo escuche cómo suena el subwoofer con respecto al resto del sis-
tema y quédese con la selección que proporcione el mejor sonido.
Si se sitúa en la posición AUTO, el subwoofer pasará a modo STANDBY
(silencio) si permanece inactivo durante más de 45 minutos, y se reactiva
en cuanto recibe nueva señal de sonido. Si se deja en ON permanecerá
encendido constantemente. La posición OFF es la que permite encender-
los manualmente a través del interruptor.
El LED de pico (peak) se iluminará siempre que los canales de entrada
sufran una sobrecarga.
Posicionar correctamente los monitores de su estudio es fundamental
para obtener el mejor rendimiento. Normalmente, deben colocarse de
forma que la posición de escucha esté totalmente “cubierta”, con todos
los altavoces situados en el mismo plano horizontal. Una buena manera
de probar un monitor es reproduciendo un CD o DVD que esté grabado
en acústico y en estéreo. Recomendamos la música acústica porque rep-
resenta el espectro del sonido. Puede ajustar el ángulo de cada monitor
buscando zonas muertas. Recuerde que cambiar el ángulo o la posición
de un monitor alterará el sonido.
Volumen del Sistema
6
Ajuste HF (alta frecuencia)
7
Crossover
8
Fase
9
Autoencendido
10
LED de pico
11
Disposición de los altavoces
6
All manuals and user guides at all-guides.com
PROBLEMA: SI NO LLEGA CORRIENTE AL MONITOR, COMPRUEBE...
• Que el cable de corriente está conectado en sus dos extremos, es
decir, tanto al enchufe de la pared como a la entrada de corriente de
la unidad.
• Que el voltaje del recinto coincide con el que está seleccionado en la
unidad (véase Cambio de Voltaje en la página 5). Si el voltaje del edi-
ficio es superior al seleccionado en el monitor iKEY AUDIO, es posible
que funda un fusible y tenga que reemplazarlo (véase Cambio de
Fusibles en la página 5).
• Que la luz de encendido está iluminada en el panel frontal del iKEY
Audio. Si no es así, coloque el botón de encendido en OFF y compruebe
los fusibles. ¡NUNCA USE UNOS FUSIBLES DE UN AMPERAJE MAYOR AL
ESPECIFICADO! Vuelva a encender el aparato. La luz de encendido
debería iluminarse.
• Si ha sido necesario cambiar un fusible o dos, y al encender la unidad,
éstos vuelven a fundirse, deberá llevar el monitor al distribuidor autor-
izado donde lo adquirió para someterlo a una revisión exhaustiva.
PROBLEMA: SI NO PERCIBE NINGÚN SONIDO...
• Repita los pasos de los puntos anteriores antes de proceder con los
siguientes.
• Compruebe que el enchufe de la pared tiene corriente enchufando
otros aparatos.
• ASEGÚRESE DE QUE:
• El cable que proporciona el sonido está conectado tanto a la salida de
la fuente de audio como a la entrada del monitor.
• El selector de ganancia está en el valor máximo (+6 dB).
• La fuente de la señal (P.ej. mesa de mezclas, ordenador, lector de CD,
etc.) está encendida y fijada a un nivel que pueda enviar señal correc-
tamente a los monitores.
• Si uno de los monitores funciona, intercambie el cable de entrada de
sonido de la unidad que no funciona a la que sí funciona. Esto determi-
nará si el fallo se encuentra en el monitor, en el cable o en otro punto
de la cadena.
• Si el monitor sigue sin responder, debería llevarse al distribuidor auto-
rizado para su reparación.
PROBLEMA: SI EL MONITOR SE DETIENE REPENTINAMENTE...
• Baje el volumen al mínimo.
• Repita los pasos de los puntos anteriores antes de proceder con los
siguientes.
• Compruebe con cuidado si la tapa posterior del amplificador está
caliente (puede quemar). Si el monitor ha estado funcionando a su máxi-
ma potencia durante mucho tiempo, podría suceder que la unidad se
haya sobrecalentado y los circuitos de protección hayan apagado el
aparato momentáneamente. El monitor IKEY Audio posee la máxima
protección frente a subidas de tensión, sobrecargas y sobrecalentamien-
tos de los amplificadores. Deberá apagar completamente el monitor y
esperar 30 minutos para permitir que la tapa del amplificador se
enfríe. Vuelva a encender la unidad.
• Vuelva a subir el volumen a su intensidad normal como comprobación.
• Si el monitor sigue sin responder,
deberá llevarlo al distribuidor iKEY
Audio para su revisión.
PROBLEMA: HA CAMBIADO LA
CALIDAD DE SONIDO.
• Repita los pasos de los puntos anteriores antes de proceder con los
siguientes.
• Desconecte el cable de señal de sonido de la entrada del monitor. Con
la unidad encendida, coloque su oído cerca de cada cono (tweeter, o
altavoz de agudos/woofer, o altavoz de graves) y compruebe si oye
algún ruido (un suave siseo o soplo). Si no oye ningún ruido en absoluto,
podría deberse a que uno o más conos emisores falla (el woofer, el
tweeter o ambos). También es posible que el problema se encuentre en
la parte electrónica.
• Reproduzca algo de música no distorsionada a un volumen bajo. Cubra
el tweeter para bloquear su sonido, con cuidado de no tocar el diafrag-
ma. ¿Produce el woofer un sonido claro? Si éste no ofrece una calidad
clara o permanece en silencio, probablemente deberá cambiarse el
woofer.
• Cubra el woofer para bloquear su sonido, con cuidado de no tocar el
diafragma. ¿Produce el tweeter un sonido claro? En caso negativo, prob-
ablemente deberá cambiarse el tweeter.
• Ahora que ya tiene alguna pista de dónde puede estar el fallo, llá-
menos y contacte con un operador del servicio técnico, quien le ayudará
a determinar la mejor solución para sus monitores.
PROBLEMA: EL MONITOR SISEA, SOPLA O HACE ALGÚN RUIDO
EXTRAÑO.
A continuación se ofrecen algunas sugerencias sobre cómo eliminar estos
ruidos indeseables:
• Asegúrese de que el cable de corriente está bien conectado al
enchufe y a la entrada de corriente del monitor.
• Compruebe las conexiones entre la fuente de señal y el monitor. Los
conectores Canon y jack del iKEY Audio están totalmente balanceados.
Si conecta una fuente no balanceada al monitor, asegúrese que usa el
pivote 2 (PIN 2) para la señal y que los pivotes 1 y 3 están unidos en el
extremo del cable.
• Consulte la sección de Conexión del Sistema en la página 4 de este
manual para asegurarse de que el voltaje del edificio coincide con el
seleccionado en la unidad.
• Todos los equipos de sonido deben utilizar la misma toma de tierra.
Compruebe otros aparatos que usan la misma fuente de corriente del
edificio, como dimmers, rótulos de neón, pantallas de TV y monitores de
ordenador. Estos aparatos no deberían usar el mismo circuito eléctrico.
SOLUCIÓN DE PROBLEMAS
7
All manuals and user guides at all-guides.com
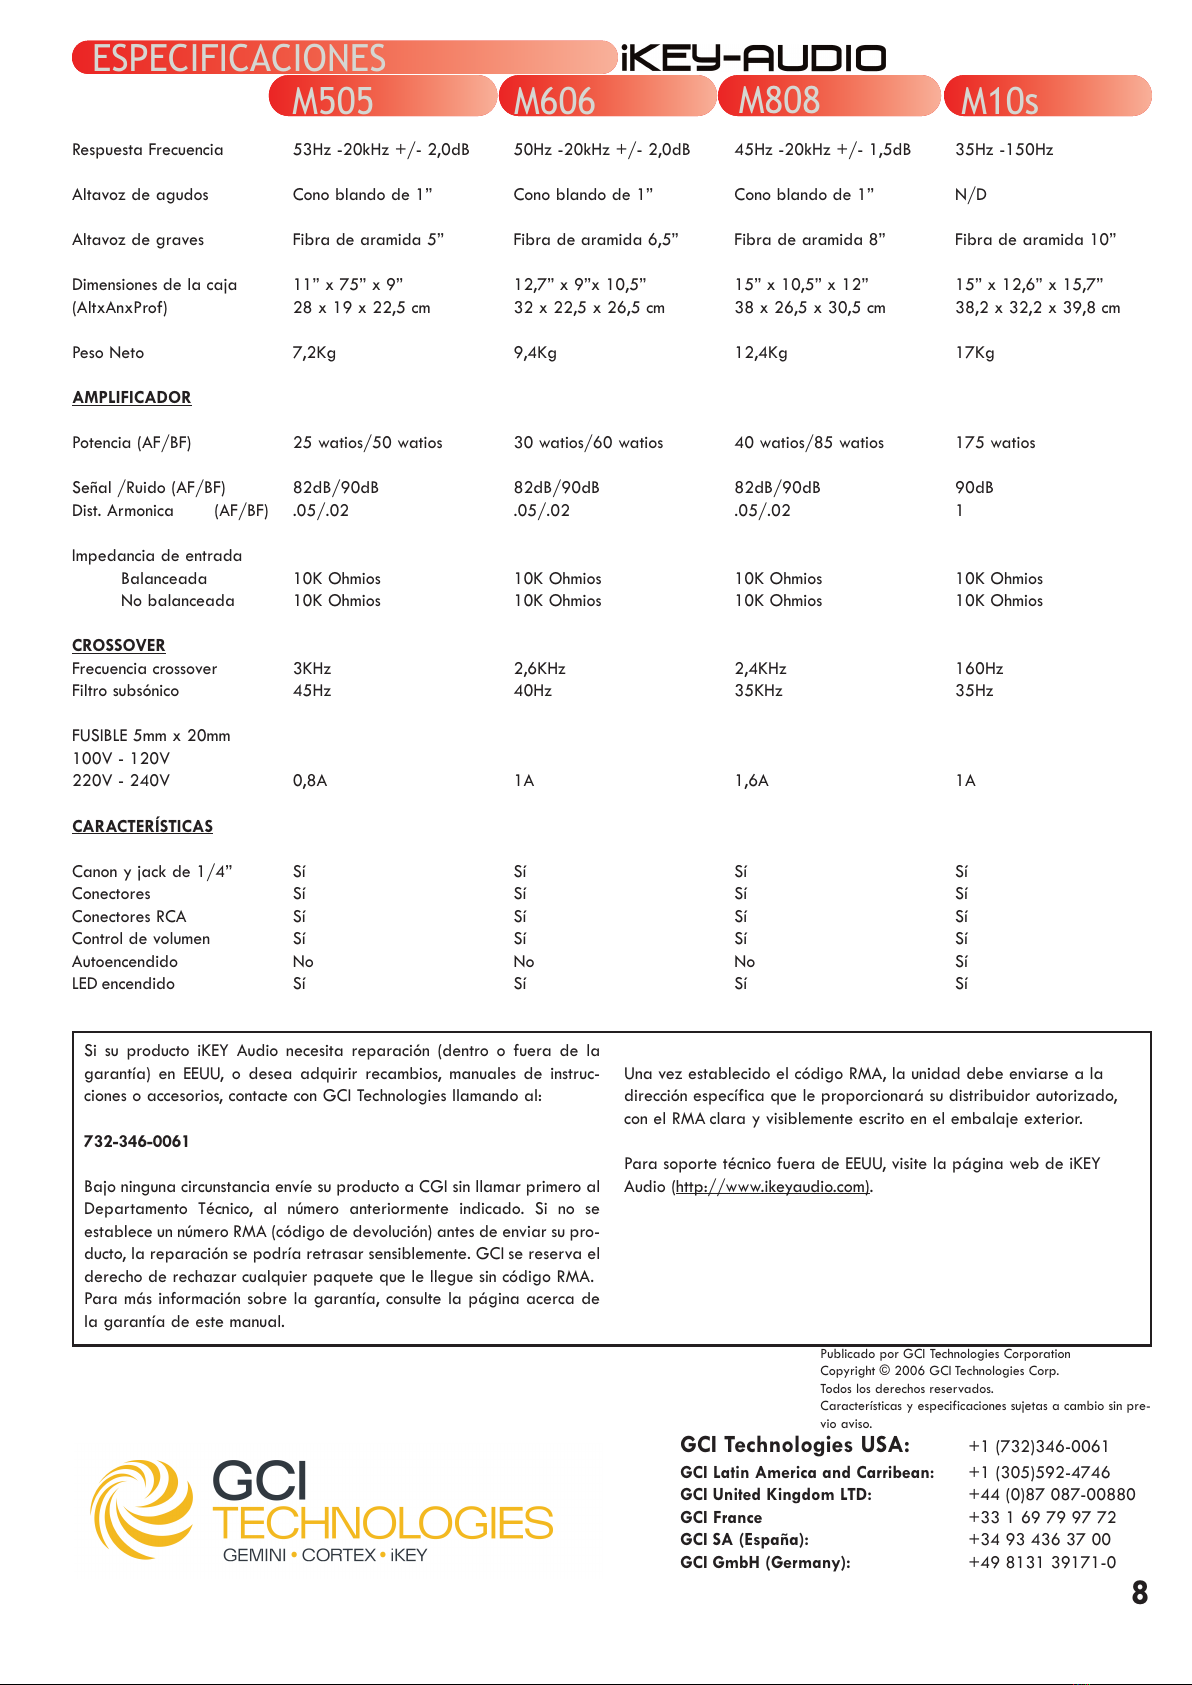
Respuesta Frecuencia
Altavoz de agudos
Altavoz de graves
Dimensiones de la caja
(AltxAnxProf)
Peso Neto
AMPLIFICADOR
Potencia (AF/BF)
Señal /Ruido (AF/BF)
Dist. Armonica (AF/BF)
Impedancia de entrada
Balanceada
No balanceada
CROSSOVER
Frecuencia crossover
Filtro subsónico
FUSIBLE 5mm x 20mm
100V - 120V
220V - 240V
CARACTERÍSTICAS
Canon y jack de 1/4”
Conectores
Conectores RCA
Control de volumen
Autoencendido
LED encendido
53 z -20k z +/- 2,0dB
Cono blando de 1”
Fibra de aramida 5”
11” x 75” x 9”
28 x 19 x 22,5 cm
7,2Kg
25 watios/50 watios
82dB/90dB
.05/.02
10K Ohmios
10K Ohmios
3K z
45 z
0,8A
Sí
Sí
Sí
Sí
No
Sí
50 z -20k z +/- 2,0dB
Cono blando de 1”
Fibra de aramida 6,5”
12,7” x 9”x 10,5”
32 x 22,5 x 26,5 cm
9,4Kg
30 watios/60 watios
82dB/90dB
.05/.02
10K Ohmios
10K Ohmios
2,6K z
40 z
1A
Sí
Sí
Sí
Sí
No
Sí
45 z -20k z +/- 1,5dB
Cono blando de 1”
Fibra de aramida 8”
15” x 10,5” x 12”
38 x 26,5 x 30,5 cm
12,4Kg
40 watios/85 watios
82dB/90dB
.05/.02
10K Ohmios
10K Ohmios
2,4K z
35K z
1,6A
Sí
Sí
Sí
Sí
No
Sí
35 z -150 z
N/D
Fibra de aramida 10”
15” x 12,6” x 15,7”
38,2 x 32,2 x 39,8 cm
17Kg
175 watios
90dB
1
10K Ohmios
10K Ohmios
160 z
35 z
1A
Sí
Sí
Sí
Sí
Sí
Sí
GCI Technologies USA: +1 (732)346-0061
GCI Latin America and Carribean: +1 (305)592-4746
GCI United Kingdom LTD: +44 (0)87 087-00880
GCI France +33 1 69 79 97 72
GCI SA (España): +34 93 436 37 00
GCI GmbH (Germany): +49 8131 39171-0
Si su producto iKEY Audio necesita reparación (dentro o fuera de la
garantía) en EEUU, o desea adquirir recambios, manuales de instruc-
ciones o accesorios, contacte con GCI Technologies llamando al:
732-346-0061
Bajo ninguna circunstancia envíe su producto a CGI sin llamar primero al
Departamento Técnico, al número anteriormente indicado. Si no se
establece un número RMA (código de devolución) antes de enviar su pro-
ducto, la reparación se podría retrasar sensiblemente. GCI se reserva el
derecho de rechazar cualquier paquete que le llegue sin código RMA.
Para más información sobre la garantía, consulte la página acerca de
la garantía de este manual.
Una vez establecido el código RMA, la unidad debe enviarse a la
dirección específica que le proporcionará su distribuidor autorizado,
con el RMA clara y visiblemente escrito en el embalaje exterior.
Para soporte técnico fuera de EEUU, visite la página web de iKEY
Audio (http://www.ikeyaudio.com).
Publicado por GCI Technologies Corporation
Copyright © 2006 GCI Technologies Corp.
Todos los derechos reservados.
Características y especificaciones sujetas a cambio sin pre-
vio aviso.
ESPECIFICACIONES
M505 M606 M808 M10s
8
All manuals and user guides at all-guides.com
Los productos iKEY Audio están diseñados y fabricados cumpliendo con los estándares más elevados del audio
profesional. Con el cuidado y el mantenimiento adecuados, su producto le proporcionará años de funcionamiento
fiable. Por favor, registre su producto online en http://www.ikeyaudio.com
Garantía limitada:
En EEUU, iKEY Audio garantiza sus productos frente a defectos de fabricación durante el periodo de un (1) año*
a partir de la fecha de compra.
Esta garantía limitada no cubre los daños o fallos causados por abuso, mal uso, instalación inadecuada, mantenimiento inadecuado o cualquier
reparación distinta a la proporcionada por un centro de servicio técnico autorizado.
No existe la obligación de fiabilidad por parte de CGI, iKEY Audio o cualquiera de sus minoristas, sobre daños colaterales que puedan producirse
relacionados con el uso o rendimiento del producto, u otros daños indirectos relacionados con la pérdida de la propiedad, ingresos, beneficios o costes
de desinstalación, instalación o reinstalación. Todas las garantías implicadas por GCI están limitadas a un (1) año de duración, a partir de la fecha
de compra, a menos que la legislación local lo estipule de otra forma.
Devolver el producto para su reparación:
En EEUU, llame al Servicio de Atención al Cliente (732) 346-0061, cuyos operadores se complacerán en ofrecerle un código de autorización de
devolución de mercancía (RMA), así como la dirección del centro de servicio técnico autorizado más cercano.
Tras recibir el RMA, incluya una copia del recibo de venta original, con el producto defectuoso, así como una descripción del defecto. Efectúe el envío
certificado a GCI Technologies Corporation, a la dirección que le proporcionó el representante del servicio técnico. ¡El código RMA debe estar escrito
en el exterior del embalaje, de lo contrario el procesado puede retrasarse indefinidamente! GCI se reserva el derecho de rechazar cualquier
paquete que le llegue sin un número RMA claramente escrito en el exterior.
El servicio cubierto por la garantía lo pagará GCI y le será devuelto sin coste. Para productos sin garantía, GCI reparará la unidad una vez pagado
el servicio. Los cargos por reparación no incluyen los portes del envío de regreso a su domicilio.
Su garantía sólo es válida en el país donde se ha comprado la unidad. Las reparaciones realizadas fuera del país de compra se considerarán fuera
de la garantía.
Con respecto a las reparaciones en garantía, usted pagará el envío de la unidad a GCI; nosotros pagamos el envío de vuelta dentro de los esta-
dos continentales de EEUU. Alaska, awai, Puerto Rico, Canadá, Bahamas y las Islas Vírgenes tendrán un recargo por el envío.
Concédanos 2-4 semanas para que le devolvamos el producto. En circunstancias normales, su producto no tiene por qué estar más de 10 días hábiles
en las instalaciones de GCI. No respondemos del tiempo de los envíos.
Para reparaciones e información sobre la garantía fuera de EEUU, llame al distribuidor GCI más cercano a su domicilio, siguiendo la lista de teléfonos
de la página de especificaciones de este manual (página 8), o visite la web de iKEY Audio en http://www.ikeyaudio.com.
Nº de serie producto:
Fecha de compra:
Nombre de la tienda:
Por favor, registre su garantía online en http://www.ikeyaudio.com
GARANTÍA EN EEUU E INFORMACIÓN
9
All manuals and user guides at all-guides.com
This manual suits for next models
4
Table of contents
Languages:
Other iKEY-AUDIO Speakers manuals


