iknowvations iKnowBot1 User manual

iknowvations
How to make IR Remote Controlled Robot-iKnowBot1
2
April 2014
1/9
iknowvations.in
Robotics is a very interesting hobby. You get knowledge of so many subjects like
Mechanics, Electronics, Physics, Biology etc.
Today we will see how we can make a small Robot which can be controlled by Infrared Remote.
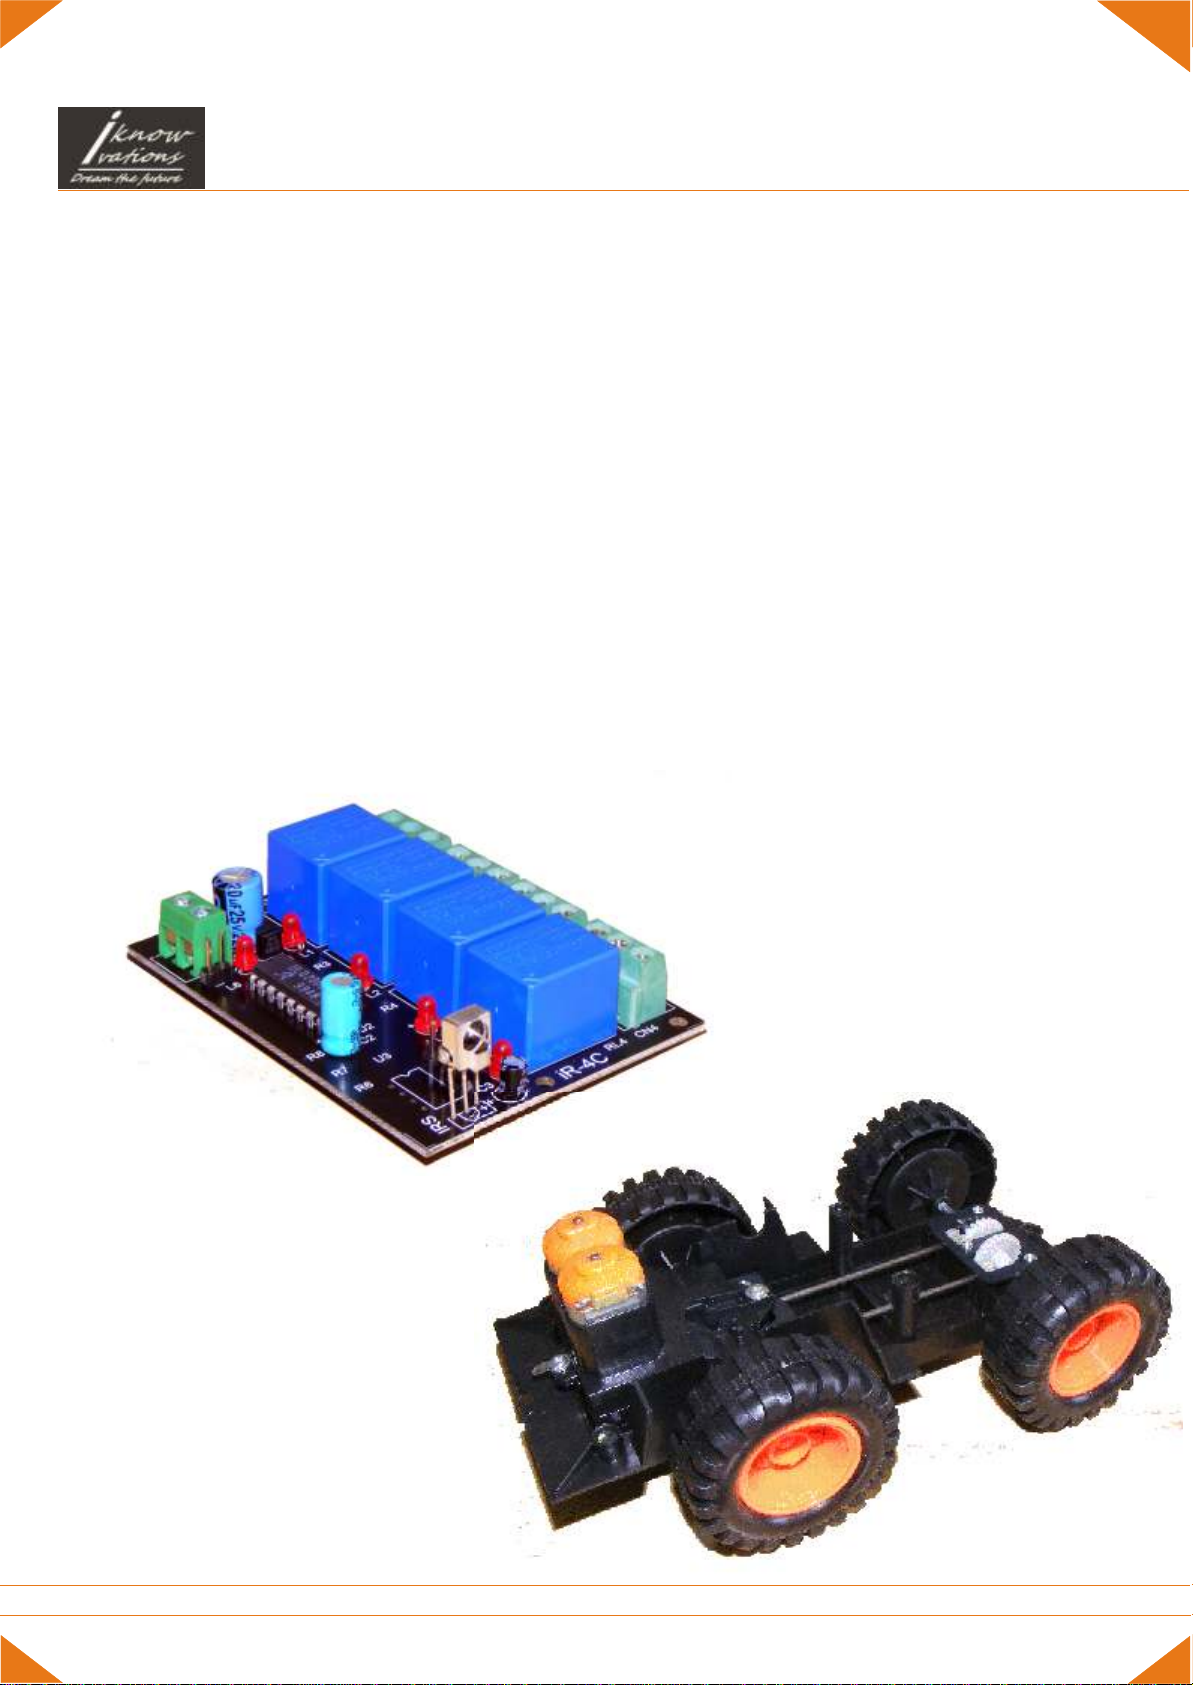
You will need mainly following 2 main components along with other usual tools like Multimeter,
Screwdriver, Soldering Iron, Cutter and some wires etc.
1. IR-4C-M board from iKnowvations.in
2. Robot base from iKnowvations.in or any similar Robot plate form having inbuilt 2 dc motors
and wheels.
Robot Base
IR-4C-M board.
Doc-iKnowBot1-Rev1.0
iknowvations
User manual
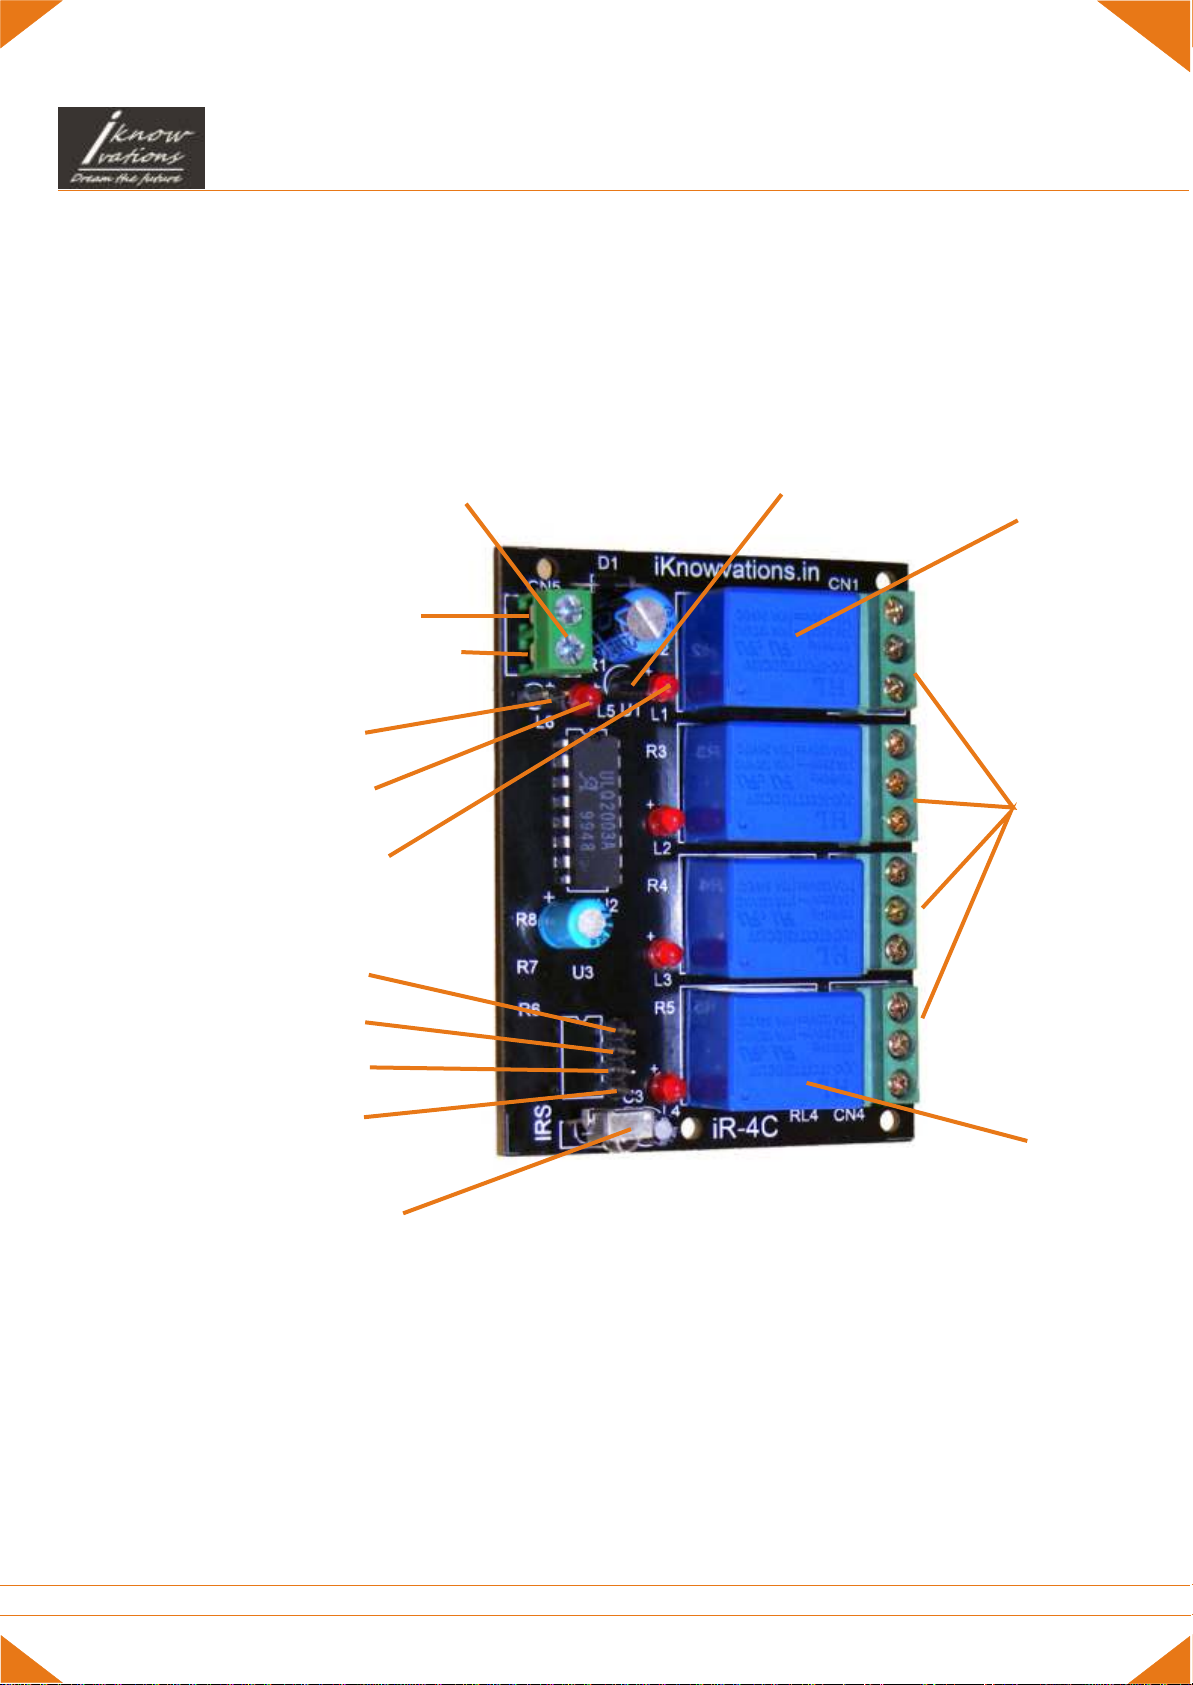
Power connector - 12 V dc
IR sensor
Relay 1
Momentary/Toggle
jumper
Relay 4
Power LED
5 V Regulator
Relay
output
connectors
3
Relay ON LEDs
12V +ve
12V -ve /Gnd
IN1
IN2
IN3
IN4
April 2014
3/9
iknowvations.in
IR-4C-M card detail.
IR-4C-M is a special board tailor made for Robotics and DC motor applications. Let us first understand
features of this card. This will help us to take advantage of all features of the card for our Robotics
project.
On the upper left hand side you can see the power connector where you have to supply power
( 12 V DC) to the board. On right hand side there are connectors for relay outputs. These
connectors are used to connect your DC motors for the robot.
On lower left part you can see the IR sensor, which receives the Infrared signals and provides
output to main IC of the board. Also seen are 4 input pins that can be used to connect limit switches
or stop switches. These switches are used for obstacle detection for the robot.
For more technical information please download iR-4C-M User manual from download section
at http://iknowvations.in/downloads/.
How to make IR Remote Controlled Robot-iKnowBot1
Doc-iKnowBot1-Rev1.0

iknowvations
All On
All Off
Relay 1 to 9
Relay 10
Relay 11
Relay 12
All On
All Off
Relay 1 to 9
Relay 10
Relay 11
Relay 12
Other options are available when you want to operate two
or more 4 channel boards in same room and you want to operate
them with same remote at a time. You have to specify at the time
of placing order if you want to have more than one option.
Please note that Remote handset design may change from time to time but functions will
remain same.
4
Left Forward
Forward
Emergency Stop
Left Reverse
Reverse
Right Reverse
Right Forward
April 2014
4/9
iknowvations.in
Now let us see how Remote handset is used to control various movements of the robot. Refer
to below figure to understand the detail of buttons to be used with robot.
How to make IR Remote Controlled Robot-iKnowBot1
Doc-iKnowBot1-Rev1.0

iknowvations
5
Relay 2 NC
C
NO
Relay 3 NC
C
NO
Relay 4 NC
C
NO
Right
Actuator/ dc motor
-Ve
+Ve
A
B
Relay 1 NC
C
NO
Left
Actuator/ dc motor
A
B
We here assume that when A & C terminals are +ve and B & D terminals are -Ve the
respective motors/actuators will move Forward or Clock wise. The Voltage applied will be
as per motor/actuator’s specifications.
Forward
Reverse
Right
Forward
Left
Forward
Right
Reverse
Left
Reverse
Left
Motor
Right
Motor
Robot Base
Robot direction Left Motor Right Motor
Forward Forward Forward
Reverse Reverse Reverse
Right Forward Forward Off
Left Forward Off Forward
Right Reverse Reverse Off
Left Reverse Off Reverse
Table-1
Fig -1.
Fig -2.
Leaf Switch 1 Leaf Switch 2
Leaf Switch 3 Leaf Switch 4
April 2014
5/9
iknowvations.in
This is the connection diagram of how 2 dc motors can be connected to the iR-4C-M board
for the robot.
How to make IR Remote Controlled Robot-iKnowBot1
Doc-iKnowBot1-Rev1.0
iknowvations
6
Robot direction Relay 1
Forward OFF
Reverse ON
Right Forward OFF
Left Forward ON
Right Reverse ON
Left Reverse OFF
Table-2
Relay 2
OFF
ON
ON
OFF
OFF
ON
Relay 3
OFF
ON
OFF
OFF
ON
ON
Relay 4
ON
OFF
ON
ON
OFF
OFF
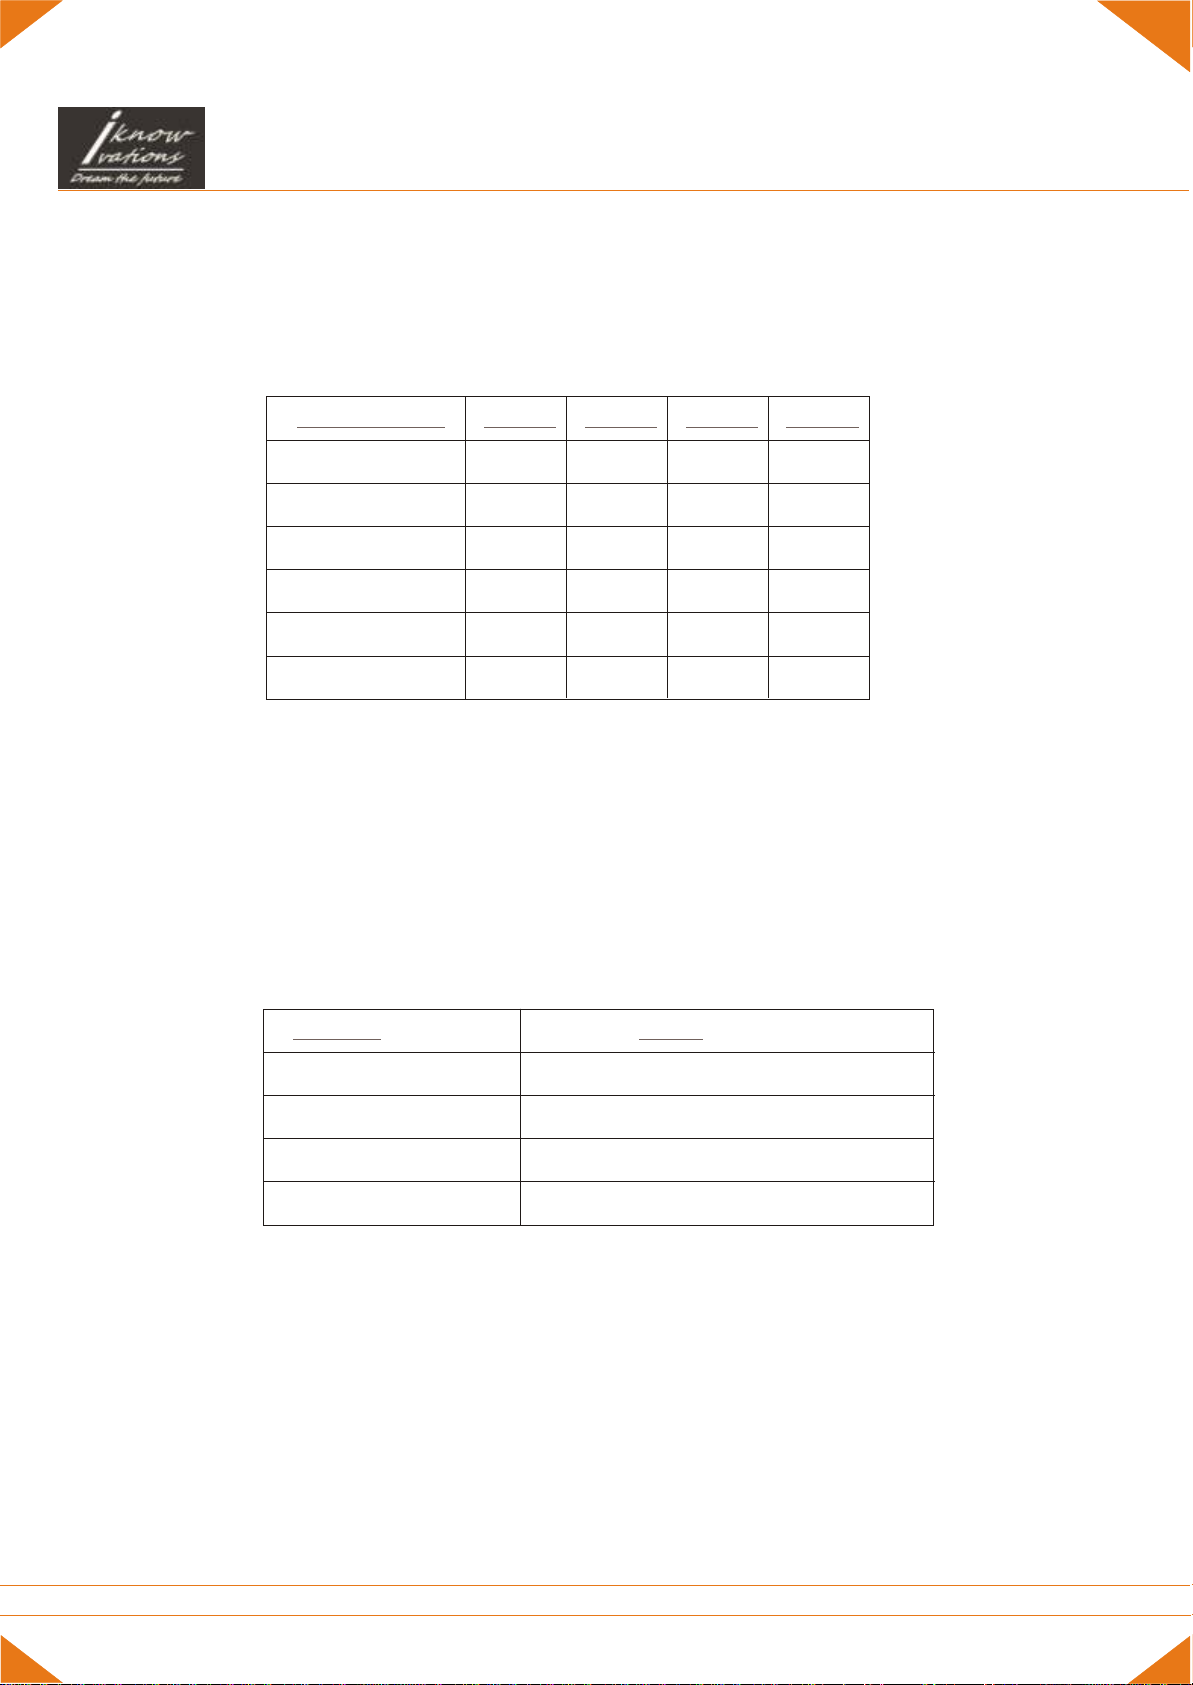
There are 4 input pins on the card. IN1 to IN4. These inputs can be used to connect leaf switches
on Robot board. Closing of these switches will prevent further movement in that direction but it will
be possible to move to other directions. These inputs can also be used as limit switches for Forward
or Reverse movement in case of actuators.
Following table shows effect of each switch closer. Switch closer makes the respective input pin 0 or
low. You can use any Push to ON switches.
Input Pins :-
Input Pin Effect
Switch closure on IN1
Table-3.
Stops Forward & Forward Left movement
Switch closure on IN2 Stops Forward & Forward Right movement
Switch closure on IN3 Stops Reverse & Reverse Left movement
Switch closure on IN4 Stops Reverse & Reverse Right movement
Following table shows Relay Status of respective Robot direction movement.
Toggle or Momentary action.
This action is selected by closing or keeping open the respective Jumper Pins. Please refer
to the figure on page 2. Toggle action ( pressing button once will start that operation and
pressing again the same button will stop that operation) can be selected by keeping jumper
open. While connecting the jumper pins will make it for Momentary. Momentary means the
action will be performed till any particular button is kept pressed.
April 2014
6/9
iknowvations.in
How to make IR Remote Controlled Robot-iKnowBot1
Doc-iKnowBot1-Rev1.0

iknowvations
7
April 2014
7/9
iknowvations.in
Construction details-
Now let us see how we can build this robot. It is very easy.
1. Provide interlink connections to relay output connectors as shown in Fig-1 on page 5.
2. If your DC motor operates on 12 Vdc then you have to provide 12Vdc to both - board as
well as to DC motors. Please check rotating direction as described below Fig-1.
3. If DC motors are using different power say 5 or 6 V dc then you have to connect 5 or 6 V
regulator along with large capacitor to make power supply for the motors.
4. Provide connections to DC motors and place the card on robot platform. Secure it will screws or
double sided tape.
5. Also place power source ( 12 V battery) on robot platform if you have one or you can also
supply power from your bench power supply using long cords.
6. For initial testing, place the whole assembly on some base which supports the middle portion
of the robot and does not obstruct the movement of wheels.
7. Apply power and test the rotating of the wheels as shown in Table-2 on page 7 when operated
with IR remote.
8. If everything is ok, place the robot on floor & test its operation.
9. Working ok ? Fine. Congratulations !!
You have just made IR remote controlled Robot yourself ! Enjoy !
If the robot is not functioning properly, check your all steps again. Try to find out the problems.
You can do it.
If you need any technical help, we are there to short out your problems. Do write to us
How to make IR Remote Controlled Robot-iKnowBot1
Doc-iKnowBot1-Rev1.0

If you have any questions, want any assistance, want us to develop any special products for you
We have other products also that might interest you like -
U452 is an USB based Relay Card having 4 relays, up to 16
I/O channels & 8 ADC channels. The ADC resolution
is 8/10/12 bits user selectable.
Ethernet based DAQ & I/O card.
6 digit 7 segment Multipurpose LED Counter
For more information visit - www.iknowvations.in
6 channel IR Remote control Board - AZ6CR-03
iknowvations
R242 is an RS232 based Relay Card having 4 relays,
up to 9 I/O channels & 4 ADC channels. The ADC
resolution is 10 bits.
8
12 channel IR Remote control Board - iR-12C
April 2014
8/9
iknowvations.in
How to make IR Remote Controlled Robot-iKnowBot1
Doc-iKnowBot1-Rev1.0

Information in this document is provided solely in connection with Iknowvations products. Iknowvations reserrve the right to make
changes, corrections, modifications or improvements, to this document, and the products and services described herein at
anytime, without notice.
All Iknowvations products are sold pursuant to Iknowvations terms and conditions of sale.
Purchasers are solely responsible for the choice, selection and use of the Iknowvations products and services described herein,
and Iknowvations assumes no liability whatsoever relating to the choice, selection or use of the Iknowvations products and services
described herein.
No license, express or implied, by estoppel or otherwise, to any intellectual property rights is granted under this document.
If any part of this document refers to any third party products or services it shall not be deemed a license grant by Iknowvations for
the use of such third party products or services, or any intellectual property contained therein or considered as a warranty
covering the use in any manner whatsoever of such third party products or services or any intellectual property contained
therein.
UNLESS OTHERWISE SET FORTH IN IKNOWVATIONS’S TERMS AND CONDITIONS OF SALE IKNOWVATIONS DISCLAIMS
ANY EXPRESS OR IMPLIED WARRANTY WITH RESPECT TO THE USE AND/OR SALE OF IKNOWVATIONS PRODUCTS
INCLUDING WITHOUT LIMITATION IMPLIED WARRANTIES OF MERCHANTABILITY, FITNESS FOR A PARTICULAR PURPOSE
(AND THEIR EQUIVALENTS UNDER THE LAWS OF ANY JURISDICTION), OR INFRINGEMENT OF ANY PATENT,
COPYRIGHT OR OTHER INTELLECTUAL PROPERTY RIGHT.
UNLESS EXPRESSLY APPROVED IN WRITING IKNOWVATIONS PRODUCTS ARE NOT RECOMMENDED, AUTHORIZED OR
WARRANTED FOR USE IN MILITARY, AIR CRAFT, SPACE, LIFE SAVING, OR LIFE SUSTAINING APPLICATIONS, NOR IN
PRODUCTS OR SYSTEMS WHERE FAILURE OR MALFUNCTION MAY RESULT IN PERSONAL INJURY, DEATH, OR SEVERE
PROPERTY OR ENVIRONMENTAL DAMAGE.
Resale of IKNOWVATIONS products with provisions different from the statements and/or technical features set forth in this document
shall immediately void any warranty granted by Iknowvations for the Iknowvations product or service described herein and shall not create
or extend in any manner whatsoever, any liability of Iknowvations.
Please Read Carefully
www.iknowvations.in
Manufactured by -
Iknowvations
Rajivnagar,Vidyanagar
Hubli - 580031
India.
iknowvations
9
Contacts -
Web - iknowvations.in
Buy online at our Shoppee -
http://shoppee.iknowvations.in
April 2014
9/9
iknowvations.in
How to make IR Remote Controlled Robot-iKnowBot1
Doc-iKnowBot1-Rev1.0
Table of contents
Popular Motorized Toy Car manuals by other brands

Jamara
Jamara 460205 instructions

Associated Electrics
Associated Electrics RC10 B4.2 Assembly manual

Kyosho
Kyosho SCORPION XXL VE instruction manual

Vaterra
Vaterra 1967 Ford Mustang owner's manual

Kyosho
Kyosho EVOLVA Conversion Kit instruction manual

Dorel
Dorel Pacific Cycle Kid Trax GT Coupe KT1566WM owner's manual


