iLink iTIVO-HD User manual

iTIVO-HD/iTIVO-HD4K
Quick Start Guide
Packing List
1. iTIVO-HD/4K x 1
2. Universal 12V Adapter x 1
3. RJ45 Pigtail Cable (default) x 1
or RJ5-DB9 Cable x 1
Connection
Installing the iTIVO-HD/4K
1. Connect VIDEO IN to video camera
2. Connect VIDEO OUT to TV monitor or digital video recorder (DVR)
3. Plug in the supplied RJ-45-DB9 cable to ECR/POS port and connect the cable to ECR, POS or PC
serial port. If the cable is too short, use a standard DB9 male-female extension cable (not supplied) to
extend the length.
NOTE 1: If the connector of your ECR/POS serial port is not DB9, you may have to make your own
cable or modify the supplied cable. Refer to Connection section for pinout of iTIVO-HD/4K.
NOTE 2: The supplied cable has DB9 pin2 assigned to TX (of iTIVO-HD/4K), pin3 to RX (of iTIVO-
HD/4K) and pin5 to GND. If your cash machine is having standard serial port pinout (a.k.a DTE
pinout), then it should be no problem connecting your cash machine directly to the iTIVO-HD/4K.
Please check your cash machine’s hardware manual before you make any connection.
4. Plug in the supplied adapter DC jack and turn on the adapter power. Upon power on, iTIVO-HD/4K gives
a short beep and briefly displays the current firmware version on TV monitor.
Connecting iTIVO-HD/4K to ECR/POS
PROG/COM2 Port
PC programming or event logging /
networking port. This port can be
configured as RS232 or RS485 by
internal RS232/485 jumper setting
PIN1
Power
on LED
Communication
Activity LED
Alarm/Video Loss LED
Clear Alarm Button
Front
View
Rear
View
RESET
TX
RX
PROG/COM2
GND
8 7 6 5 4 3 2 1
RTS
TX
RX
ECR-POS/COM1
8 7 6 5 4 3 2 1
CTS
OUT
IN
GND
GND
Pinout
Video In
Connect to Camera
ECR-POS/COM1 Port
Connect to ECR/POS
serial port. Use the
supplied RJ45-DB9 cable
for cable conversion
Video Out
Connect to DVR
or Monitor
Important Note
This package does not contain application software,
user menu, and other supporting documents. Please
download the latest software and documents here:
http://www.iLinkPro.com
DC Power Jack
Connect to supplied
12VDC adapter
iTIVO-HD/iTIVO-HD4K
There are few ways of connecting the iTIVO-HD to your cash register. Here are some examples
1. Direct connection: This is the most common and straight forward method if there is a serial port
available on your ECR/POS that can be configured as transaction data output port. Check your
ECR/POS’s manual to find out this possibility.
2. Printer/Pole display Emulation: This method is similar to 1 (direct connection) except that you have to
short the TX jumper of iTIVO-HD/4K (see Jumper section of iTIVO-HD/4K User’s Manual). iTIVO-
HD/4K can understand most ESC commands (or printer ESC commands) and can respond to them
accordingly. In this way, the iTIVO-HD/4K is actually emulating a “printer”or a “pole display”
device. Select a pole display or printer (e.g. TM-88II) model that you would like iTIVO-HD/4K to
emulate in your ECR/POS’s printer/pole display configuration (refer to relevant manual) and
ensure that you can disable all hardware flow-control of the selected device in your ECR/POS. If
not, you may have to make a cable, or modify the supplied cable, similar to the figure shown in
RJ45-DB9 Cable Configuration section (serial cable with flow control loopback).
3. Pole display tapping: This method taps the serial TX and GND lines of a pole display that is already
connected to your ECR/POS.
4. External printer tapping: This method taps the serial TX and GND lines of an external printer that is
already connected to your ECR/POS.
5. Internal journal/receipt printer tapping: This method taps directly from the internal printer. It requires a
special PI4ECR converter card to be installed in your ECR. Ask your local distributor about this
converter card if you need more information.
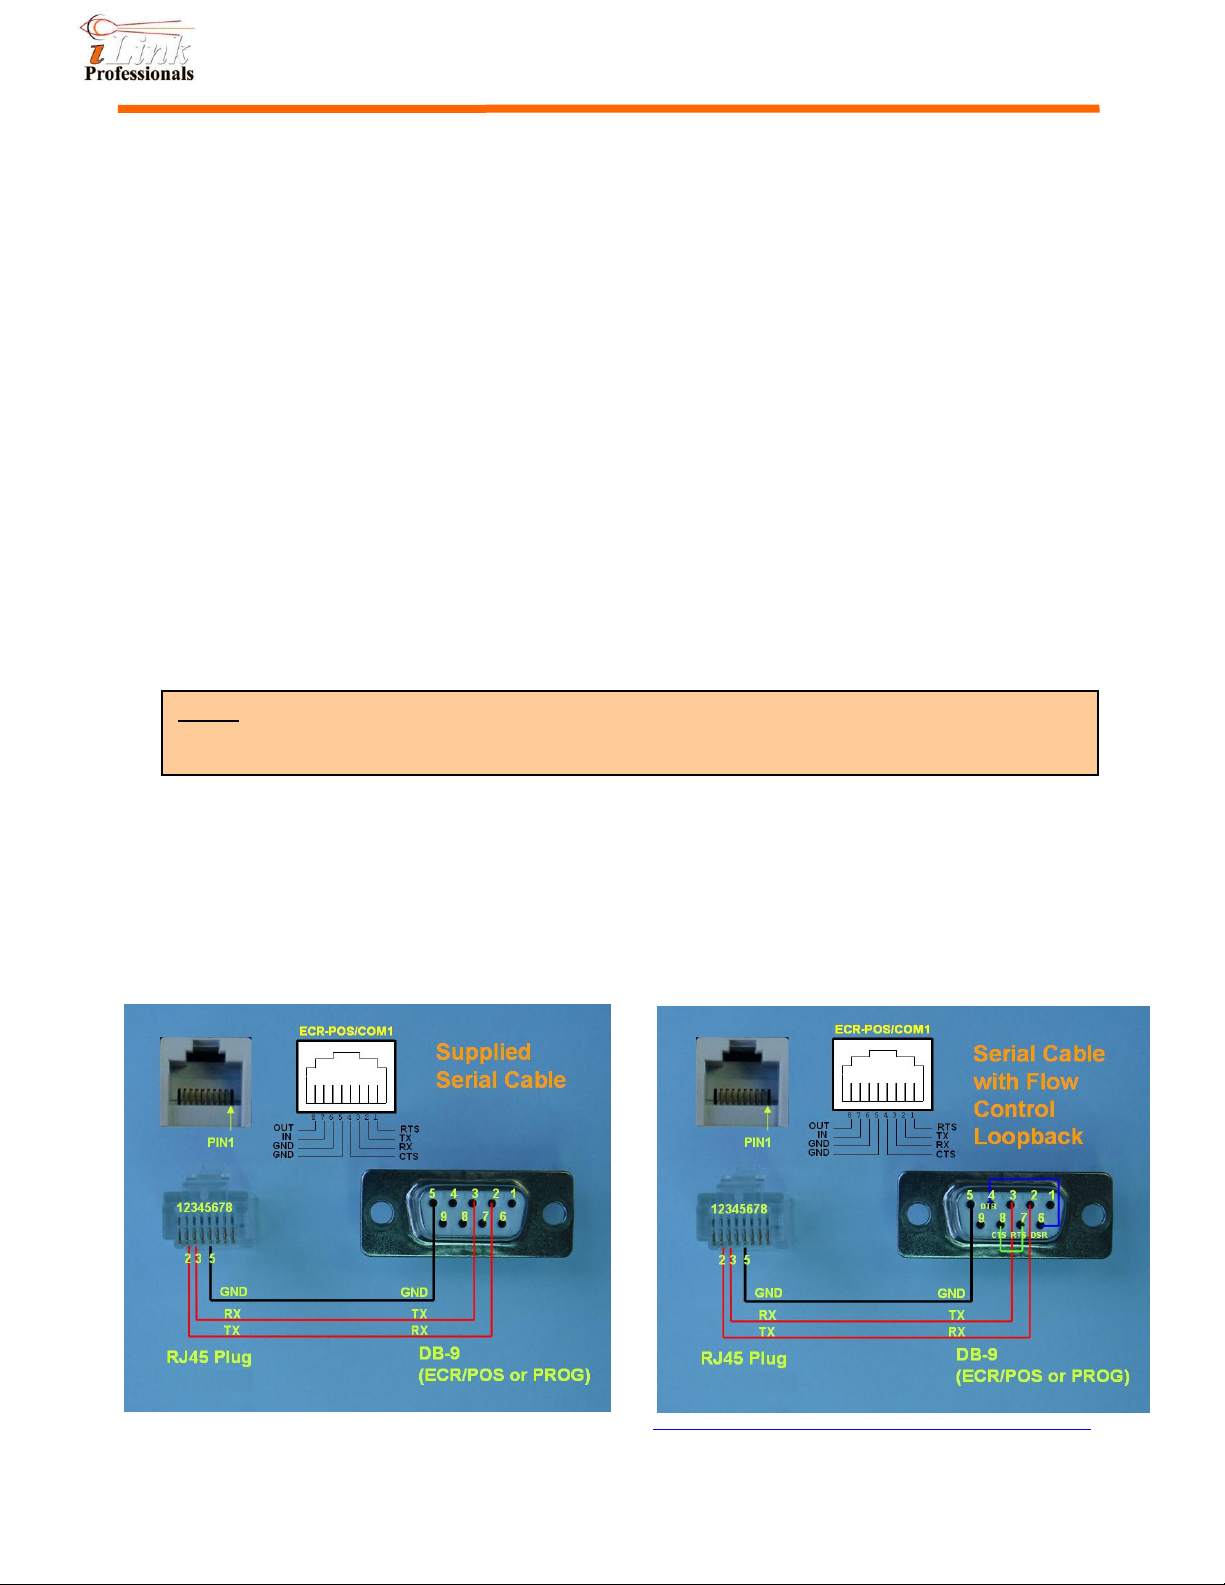
RJ45-DB9 Cable Configuration
The supplied RJ45-DB9 cable can be used for either ECR/POS connection or PC programming. This cable
only has pin2, pin3 and pin5 of DB9 connected. For printer emulation, TX jumper has to be shorted. Refer to
Connecting iTIVO-HD/4K to ECR/POS section and iTIVO-HD/4K User’s Manual about printer emulation and
jumper location. The figure on the left shows the electrical connection of the supplied cable. The figure on
the right is a typical connection with hardware flow control loopback, which is sometimes required in
emulating a printer/pole display if hardware flow control is mandatory, depending on the model of an
ECR/POS being used. Refer to iTIVO-HD/4K User’s Manual for more cabling options.
For more information and other product documents, please go to http://www.ilinkpro.com/proddetail.php?prod=iTIVO-HD
NOTE: The default RS232 setting of iTIVO-HD/4K is 9600 baud, 8 data bits, no parity bit and 1
stop bit. No flow control. Set your ECR/POS or PC to match this setting. Otherwise, this
setting must be changed through PC programming (refer to iTIVO-HDUser’s Manual).
Other manuals for iTIVO-HD
2
This manual suits for next models
1


