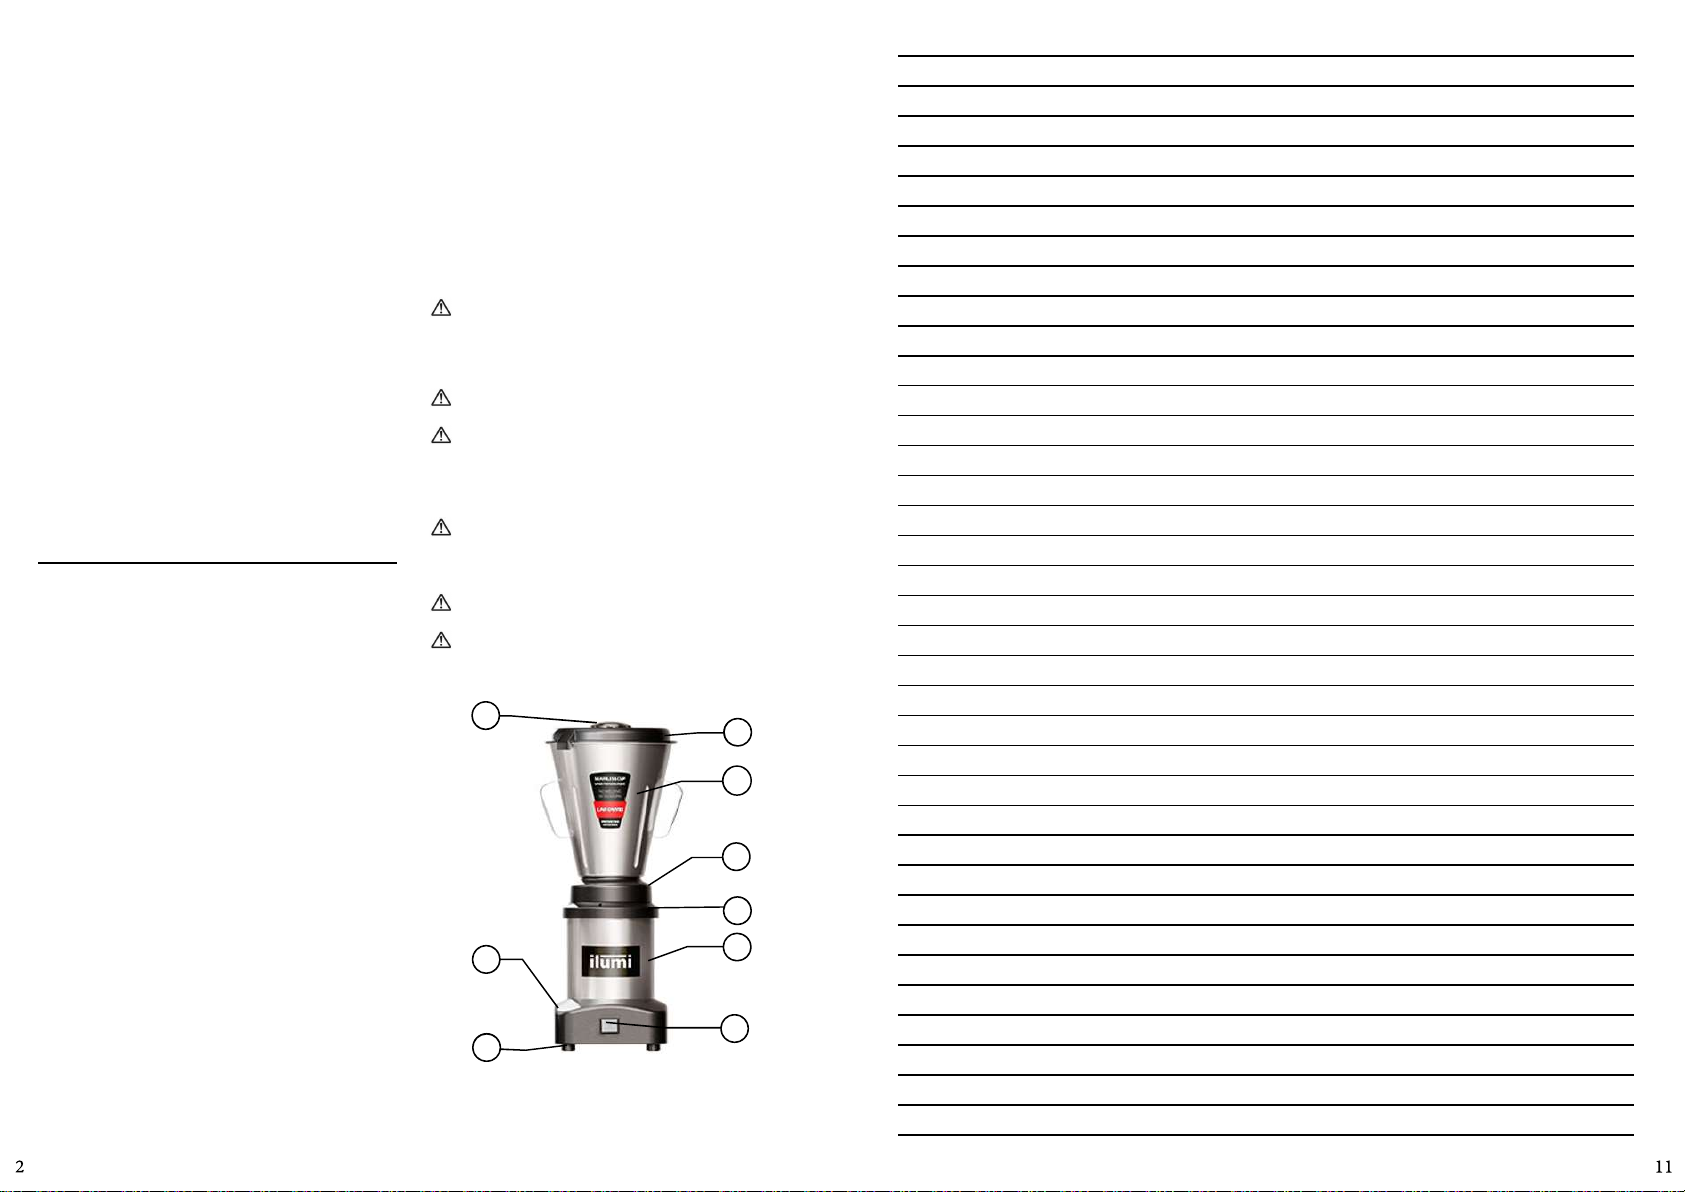
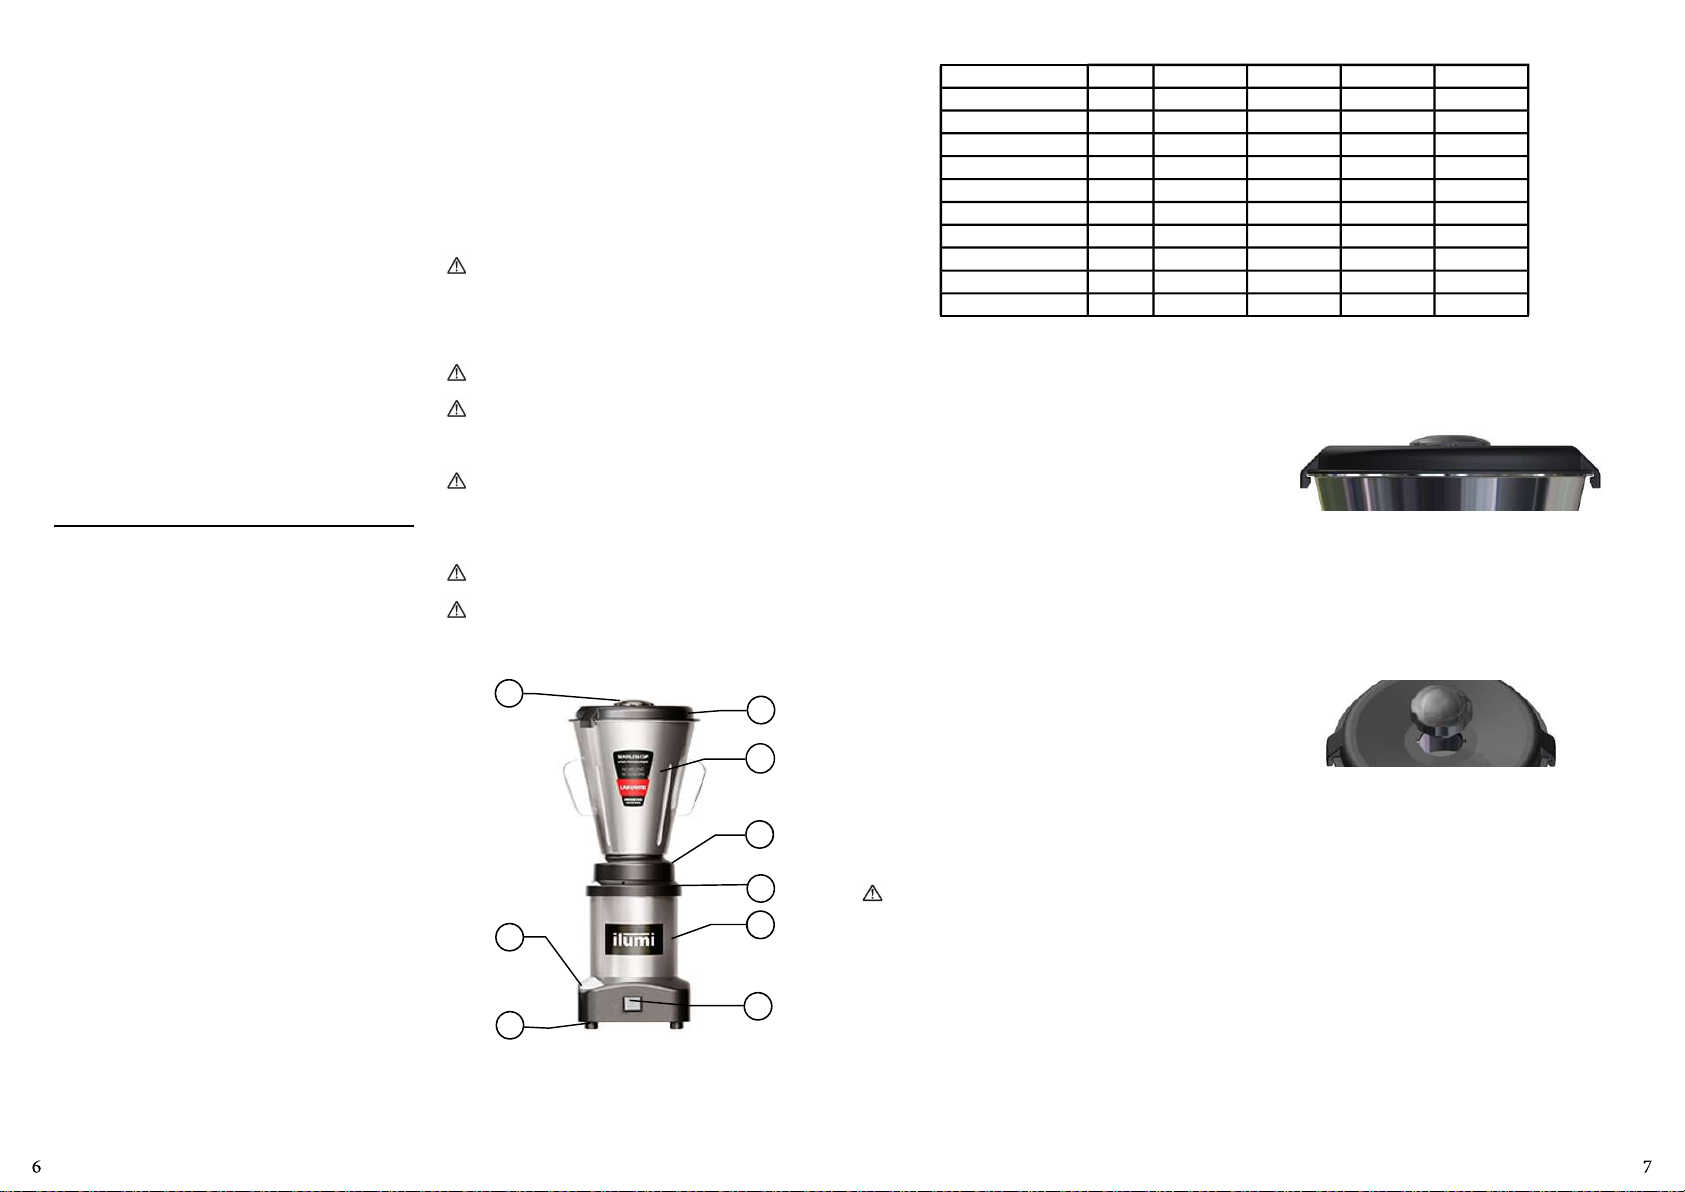
iLumi LIC-04LT User manual

COMMERCIAL BLENDER, STAINLESS STEEL, SEAMLESS CUP
LICUADORA COMERCIAL, INOXIDABLE, VASO MONOBLOQUE
MODEL/MODELO
LIC-04LT / LIC-06LT /
LIC-08LT / LIC-10LT
EQUIPAMIENTO ILUMI S.A.C. (RUC: 20611336561)
Av. Primavera nr. 517 Of. 503 - San Borja
Lima - Perú
hps://ilumiperu.com
Servicio técnico
LIMA
Teléfonos: 955 148 298 / 989 656 386
Correos: jcanales@acvaholding.pe /
mavila@acvaholding.pe
PROVINCIA
Teléfonos: 945 064 431 / 950 075 580
Correos: kmora@acvaholding.pe /
rrobertson@acvaholding.pe
69425.5 - ENGLISH/ESPAÑOL
Data de Revisão: 20/01/2024
INSTRUCTIONS MANUAL
MANUAL DE INSTRUCCIONES
DUE TO THE CONSTANT IMPROVEMENTS INTRODUCED TO OUR EQUIPMENTS, THE INFORMATIONS CONTAINED HERE MAY BE
MODIFIED WITHOUT PREVIOUS NOTICE.

01 - Lid
02 - Cup
03 - Cup Flange
04 - Motor Support Flange
05 - Housing
06 - Base
07 - Foot
08 - ON Switch
09 - OFF Switch
10 - Cap
2. COMPONENTS AND TECHNICAL CHARACTERISTICS
PICTURE 01
SUMMARY
1. INTRODUCTION .............................2
1.1 Safety ......................................................2
2. COMPONENTS AND TECHNICAL
CHARACTERISTICS .............................2
3. INSTALLATION AND PRE-OPERATION
..........................................................3
3.1 Posioning ...............................................3
3.2 Electrical Installaon ................................3
3.4 Pre-operaon ..........................................3
4. OPERATION....................................3
4.1 Starng the appliance ..............................3
4.2 Operaon Procedures ..............................3
5. CLEANING ......................................4
6. MAINTENANCE ..............................4
7. PROBLEMS SOLVING ......................4
8. ELECTRICAL DIAGRAMS ..................5
1. INTRODUCTION
This product was developed to be used in comercial kitchens.
It is used, for example, in restaurants, cafeterias, hospitals,
bakeries, and similar places.
This equipment is not recommended when:
- The producon process is done in a connuous industrial
scale;
- The workplace is in a corrosive, explosive, contaminated
with vapor, powder or gas atmosphere.
1.1 Safety
To avoid accidents, injuries and harm to the equipment,
follow the instrucons below:
1.1.1 Never use it with wet clothes or shoes and/or standing
on wet floors. Do not plunge it into water nor any other
liquid, do not spray water directly to the equipment.
1.1.2 If the equipment falls, has been damaged in any way,
or simply does not work, take it to Technical Assistance to
check.
1.1.3 Do not use any accessories that are not recommended
by the manufacturer.
1.1.4 Keep the hands or any other object away from moving
parts while the equipment is in operaon.
1.1.5 During operaon, do not wear loose clothes with wide
sleeves principally around the wrists.
1.1.6 Make sure that the voltage of Equipment and of the
local electrical supply where the unit is going to be used
match and are adequate to this kind of equipment. Also
make sure that the equipment is properly grounded.
1.1.7 Never operate the blender without the lid correctly
placed.
1.1.8 Pay aenon to the Cup when the Blender is working.
If the Cup gets disconnected, switch off the appliance
immediately.
1.1.9 When using the Blender to process hot liquids, remove
the Cap and keep the hands away from the lid hole.
1.2.0 Do not use the appliance outdoors.
1.2.1 When the equipment is in operaon the operator shall
supervise it, principally when children might be near.
1.2.2 Never touch the blades when the appliance is working.
1.2.3 When installing the electric equipment, connect the
grounding wire according to the safety standards.
1.2.4 For your own safety all the products shouldn´t have a
temperature higher than 40°C.
This equipment shall not be used by children or any
person with reduced physical or mental capacity, lack of
experience or knowledge, unless they are under supervision
or have received from the person responsible for safety,
proper instrucons on how to use the equipment.
We recommend children to be watched to not allow
them to play with the machine.
Always disconnect the Equipment from the power
supply when: It is not being used, before realizing any
cleaning or maintenance, before you place or take out any
accessories, before you realize any kind of procedure or
service with the unit.
Make sure the cord is in perfect working condions,
if not, change it for one in accordance to the local safety
standards. Such change shall be made by qualified
professional following the local safety standards.
In case of emergency, unplug the appliance from wall
electrical outlet immediately.
Never wash the appliance with direct intense water
jets.
10 01
04
03
05
08
07
06
02

3. INSTALLATION AND PRE-OPERATION
3.1 Posioning
Your appliance must be posioned and leveled on a dry and
firm surface with 850 mm of height.
3.2 Electrical Installaon
The power plug has 3 (three) pins, and the central one is
for the grounding. It´s mandatory that all three spots are
properly connected.
This appliance is not BIVOLT. Aer unpacking it, check the
voltage informed on the tag placed at the electrical cord.
3.4 Pre-operaon
• Check if the appliance is firm in its workplace.
• Before using it, all the parts that are in contact with
the products to be processed should be washed with
water and mild detergent.
3.4.1 Cup Posioning
The Cup has a versale lng system which enables the Cup
to be lted in a simple, quick and safe way.
To remove or to place the Cup #02 (Pic.01) just li it using
the handle. Do always use the handle with a firm hold to
remove or to place the Cup.
Never move the Cup when the appliance is on.
3.4.2 Lid Posioning
The Lid was developed with non-toxic rubber and provides
effi cient sealing during process. Check if the Lid is properly
posi oned on the Cup edge. See the picture 02:
PICTURE 02
3.4.3 Filler Cap Posi oning
The Filler Cap is used to follow the process and also to add
more product to be processed.
To remove the Upper lid, just turn in clockwise so that it
releases, pulling it up.
PICTURE 03
4. OPERATION
4.1 Starng the appliance
- Connect the appliance to a power outlet.
- To turn on the appliance, press ON Switch No. 08 (Pic. 01).
- To turn off the appliance, press OFF Switch No. 08 (Pic. 01).
CHARACTERISTICS UNIT LIC-04LT LIC-06LT LIC-08LT LIC-10LT
Cup Capacity L 4 6 8 10
Voltage V 220 220 220 220
Frequency Hz 60 60 60 60
Motor Power CV 0,5 0,5 0,5 0,5
Rotaon RPM 3500 3500 3500 3500
Height mm 630 720 750 780
Width mm 275 310 330 340
Depth mm 260 300 320 330
Net Weight Kg 9,50 9,60 9,80 10,00
Gross Weight Kg 10,80 11,10 11,40 11,70

Wash all the components with water and neutral detergent.
- To wash the inside of the Cup, fill the Cup to half its capacity
with water and add a small dose of neutral detergent.
- Put on the lid and turn on the blender for 30 seconds.
- Remove contents and rinse the Cup.
- If necessary use a brush with handle and nylon bristles to
assist in the removal of materials impregnated in it.
PROBLEMS CAUSES SOLUTIONS
- The appliance
does not
switch on.
- Lack of electric
power.
- Problems in the
electrical circuit.
- Check if plug is
connected to its
socket and do as
explained in item
3.1 Starng.
- Call technical
assistance.
- Smoke or
burnt smell.
- Problems in the
internal and external
electrical circuit.
- Call technical
assistance.
- The appliance
switch on
but when the
product is
placed it stops
or the blades
turn slowly.
- Problems with the
motor.
- Call technical
assistance.
- Damaged
cord.
- Failure during
transport of product.
- Call technical
assistance.
7. PROBLEMS SOLVING
5. CLEANING
Remove the plug from the socket before starng the
cleaning process.
The Equipment must be completely cleaned and sanized:
- Before using it for the first me;
- Every day before closing the work shi;
- Always when it has not been in use for a long me;
- Before using aer it has not been in use for a long me.
Some parts of the equipment may be removed to be
cleaned:
-Lid #01 (Pic. 01);
-Cup #02 (Pic. 01);
-Cap #10 (Pic. 01).
Do not use water jet directly on the equipment.
6. MAINTENANCE
The maintenance must be a group of procedures that have
the objec ve of keeping the appliance in its best condi on of
opera on and increasing its life expectancy and safety.
* Cleaning – Check the item 5 Cleaning of this Manual.
* Electrical wiring – Check all the cables to avoid deterio-
ra on and all the electrical contacts about their ghtening
and corrosion
* Contacts – ON and OFF Switch, emergency switch, reset
bu on, eletric circuits, etc. Check the appliance so that all
the components are working correctly and that the opera-
on is working normally
* Installa on – Check the installa on of your appliance ac-
cording to the item 2.1 Installa on of this manual.
1 – Items to be verifi ed and implemented monthly:
- Check the electrical installa on;
- Check the outlet tension;
- Measure the opera ng current and compare it to the no-
minal one;
- Check all the eletrical terminal ghtening of the appliance,
to avoid bad contact;
- Check the possible clearance of the shi of the electric
motor;
- Check the wiring and the electric cable to avoid its overhea-
ng, defi cient isola on and mechanical breakdown.
2 - Items to be verifi ed and implemented every 3 months:
- Check the electric components as ON/OFF switch, emer-
gency bu on, reset bu on, and eletric circuit related to
overhea ng, defi cient isola on and mechanical breakdown.
- Check possible loosens in the bearings
- Check retainers, o´rings, v´rings and other sealing systems.
Use Your QR Code Reader to access
more informaon regarding the cares
and aenon needed when handling
stainless Steel.
Use your QR Code Reader to access
more informaon regarding safety and
maintenance.
The processing me changes for each product. Solid
products should not be processed without a liquid, because
overheang may occur and therefore damage the Cup seal.
Never turn on the Appliance when empty, because it
can cause irreparable damages.
4.2 Operaon Procedures
Remove the Lid with the Filler Cap.
First, fi ll the Cup with liquid products and a er that, prod-
ucts with more consistency.
Do not use this blender to process dense products, like
the dessert known as “acai cream”.
Cut the product in small pieces approximately 3.5 cm
wide, it will help to reduce the blending me par cularly
with frozen products. When processing ice, it is obligatory
to add some water.
Place the Lid with the Filler Cap as described before in Items
3.4.2 and 3.4.3 and turn on the appliance.
8. DIAGRAMA ELÉCTRICO
RED ELÉCTRICA
220V / 60Hz
PRENDE/APAGA
NOTA: PARA INVERTIR EL SENTIDO DE ROTACIÓN DEL MOTOR, SUSTITUYA EL CABLE T5 POR EL
CABLE T8

Lave todas las partes con agua y jabón neutro.
- Para lavar el interior del vaso, llene el vaso hasta la mitad
de su capacidad con agua y agregue una pequeña dosis de
detergente neutro.
- Coloque la tapa y encienda la licuadora durante 30
segundos.
- Rere el contenido y enjuague la taza.
- Si es necesario, u lice un cepillo con mango y cerdas de
nylon para ayudar a eliminar los materiales impregnados.
PROBLEMAS CAUSAS SOLUCIONES
- El equipo no
enciende.
- Falta de energía
eléctrica.
- Problema en el
circuito eléctrico
interno o externo de
la máquina.
- Verifique si
existe Energía
Eléctrica y
proceda según
el ítem 3.1
Accionamiento.
- Llame al
Servicio Técnico.
- Olor a
quemado e/o
humo.
- Problema en el
circuito eléctrico
interno o externo de
la máquina.
- Llame al
Servicio Técnico.
- La máquina
enciende,
pero al colocar
el producto
dentro, para
de funcionar
o gira en baja
rotación.
- Problemas con el
Motor Eléctrico.
- Llame al
Servicio Técnico.
- Cable
eléctrico
dañado.
- Falla en el trasporte
del producto.
- Llame al
Servicio Técnico.
7. RESOLUCIÓN DE PROBLEMAS
5. LIMPIEZA
Para hacer la limpieza saque el enchufe del soquete.
El equipo debe ser totalmente limpio y higienizado:
- Antes de ser usado por la primera vez;
- Al terminar un día de trabajo;
- Siempre que no haya sido usado por un largo periodo;
- Antes de ponerlo en operación después de un largo empo
sin uso.
Lave todas las partes con agua y jabón neutro:
- Tapa N° 01;
- Vaso N° 02;
- Sobre Tapa N° 10.
No use chorro de agua directamente sobre el equipo.
6. MANUTENCIÓN
La manutención comprende un conjunto de procedimientos
con el objevo de mantener el aparato en las mejores
condiciones de funcionamiento, permiendo el aumento
de su vida úl y de la seguridad.
* Limpieza – Verificar el ítem 3.4 “Limpieza” de este manual.
* Cableado – Revise todos los cables para corroborar
posible deteriorización y todos los contactos (terminales)
eléctricos para verificar posibles aplastados y corrosión.
* Contactos – Interruptor Encendido / Apagado, botón de
emergencia, botón reset/restablecer, circuitos electrónicos,
etc. Verifique el equipo para que todos los componentes
funcionen correctamente y que la operación del aparato sea
normal.
* Instalación – Verifique la instalación de su aparato según el
ítem 2.1 “Instalación” de este manual.
1 - Ítems a verificar y ejecutar mensualmente:
- Verificar la instalación eléctrica;
- Medir a tensão da tomada;
- Medir la tensión del tomacorriente;
- Medir la corriente de funcionamiento y comparar con la
nominal;
- Verificar aprietes de todos los terminales eléctricos del
aparato a fin de evitar posibles malos contactos;
- Verificar posibles holguras del eje del motor eléctrico;
- Chequear el cableado y el cable eléctrico cuando haya
señales de supercalentamiento, aislación deficiente o
avería mecánica.
2 - Ítems a verificar o ejecutar a cada 3 meses:
- Verifi car componentes eléctricos como el Interruptor En-
cendido / Apagado, botón de emergencia, botón reset/
reinicio y circuito electrónicos cuando haya señales de su-
percalentamiento, aislación defi ciente o avería mecánica.
- Verifi car posibles holguras en los cojinetes y rodamientos.
- Verifi car retenes, anillos o’rings, anillos v’rings y demás sis-
temas de sellamiento.
Pase el lector de QR Code para obtener
informaciones sobre seguridad y
mantenimiento.
Pase el lector de QR Code para obtener
informaciones sobre cuidados con los
aceros inoxidables.
01) primero los productos en estado LIQUIDO de la receta,
y en seguida coloque los productos de mayor consistencia.
No usar la licuadora para procesar alimentos con textu-
ra gruesa, como ejemplo “CREMA DE AÇAÍ”.
Corte los ingredientes en trozos pequeños de aproxi-
madamente 3,5 cm, eso reducirá el empo de procesa-
miento principalmente con ingredientes congelados. Para
procesamiento de hielo recomendase la adicción de un
poco de agua.
Coloque la Tapa con el Tapón según detallado anteriormente
en los ítems 3.4.2 y 3.4.3. Luego, encienda la máquina.
El empo de licuado varia para cada producto. No se
recomienda procesar productos sólidos sin el auxilio de
algún líquido porque podría ocurrir un sobrecalentamiento,
y en consecuencia daños al sistema de vedamiento.
Nunca prenda la maquina sin carga, pues podrán
ocurrir daños irreparables.
8. ELECTRICAL DIAGRAMS
ELECTRIC NETWORK
220V / 60Hz
ON/OFF
NOTE: TO REVERSE THE DIRECTION OF ROTATION OF THE MOTOR, REPLACE THE T5 WIRE FOR THE
T8 WIRE

INDICE
01 - Tapa
02 - Vaso
03 - Anillo del Vaso
04 - Anillo Soporte del
Motor
05 - Gabinete
06 - Base
07 - Pies
08 - Interruptor Encendido
09 - Interruptor Apagado
10 - Tapón de la tapa
2. COMPONENTES Y CARACTERÍSTICAS TÉCNICAS
FIGURA 01
1. INTRODUCCIÓN
Este producto fue desarrollado para el uso en cocinas
comerciales. Se uliza en, por ejemplo, restaurantes,
cannas, hospitales, panaderías, carnicerías y similares.
La ulización de esta máquina no es recomendada cuando:
- El proceso de producción sea de forma connua en escala
industrial;
- El local de trabajo sea un ambiente con atmósfera corrosiva,
explosiva, contaminada con vapor, polvo o gas.
1.1 Seguridad
Para evitar accidentes, lesiones graves o daños a la máquina,
se deberán tener en cuenta las siguientes instrucciones:
1.1.1 Nunca ulice la máquina con ropas o pies mojados y/o
sobre superficies húmedas o mojadas. Jamás la sumerja en
agua ni direccione chorro de agua hacia la misma.
1.1.2 Si la máquina ha sufrido una caída, está abollada,
dañada o no enciende, es necesario llevarla a un Servicio
Técnico Autorizado – ATA para revisión, reparación o ajuste.
1.1.3 La ulización de accesorios no recomendados por el
fabricante pueden ocasionar lesiones en el usuario.
1.1.4 Mantenga las manos o cualquier utensilio alejados de
las partes en movimiento.
1.1.5 Nunca use ropas con mangas anchas, principalmente
en los puños, durante la operación.
1.1.6 Verifique que la tensión de la máquina sea igual a la de
la red eléctrica y que la misma esté debidamente conectada
a la descarga a erra.
1.1.7 Siempre coloque la Tapa de la licuadora antes de
encenderla.
1.1.8 Esté atento al vaso mientras la licuadora esté en
funcionamiento. Si se suelta, apague inmediatamente la
máquina.
1.1.9 Al mezclar líquidos calientes, remueva el Tapón de la
Tapa y mantenga las manos alejadas del orificio.
1.2.0 No use la máquina al aire libre.
1.2.1 No deje su licuadora funcionando sin supervisión.
1.2.2 Nunca toque las Cuchillas si la máquina está
funcionando.
1.2.3 Al realizar la instalación eléctrica de la máquina,
conecte el cable a erra según las normas de seguridad
locales.
1.2.4 Para su seguridad la temperatura de los productos
procesados no debe ser superior a los 40 grados C.
Esta máquina no es apta para ser ulizada por niños
ni personas con discapacidad sica, sensorial o psíquica,
o que carezcan de la experiencia y los conocimientos
necesarios; excepto cuando lo hagan bajo la supervisión de
una persona responsable de su seguridad o que hayan sido
instruidos en el manejo.
Recomendamos que se vigile a los niños para no
permirles jugar con la máquina.
Desconecte el equipamiento de la red eléctrica cuando:
no esté en uso, antes de limpiarlo, al sacar o colocar
accesorios, antes del servicio de mantenimiento o antes de
cualquier po de servicio.
No use el equipo cuando tenga el cable o el enchufe
damnificado. Si el enchufe estuviera damnificado,
sustuya el cable damnificado por otro que respete
lasespecificaciones técnicas y de seguridad. Esta sustución
deberá ser hecha por un profesional calificado.
En caso de emergencia, rere el enchufe del
tomacorriente.
Nunca use chorros de agua directamente sobre la
máquina.
1. INTRODUCCIÓN .............................7
1.1 Seguridad ................................................7
2. COMPONENTES Y CARACTERÍSTICAS
TÉCNICAS ..........................................7
3. INSTALACCIÓN Y PRÉ-OPERACIÓN ..8
3.1 Posicionamiento ..........................8
3.2 Instalación Electrica .................................8
3.4 Pre-operación ..........................................8
4. OPERACIÓN ...................................8
4.1 Accionamiento .........................................8
4.2 Procedimiento para Operación ................8
5. LIMPIEZA .......................................9
6. MANUTENCIÓN .............................9
7. RESOLUCIÓN DE PROBLEMAS ........9
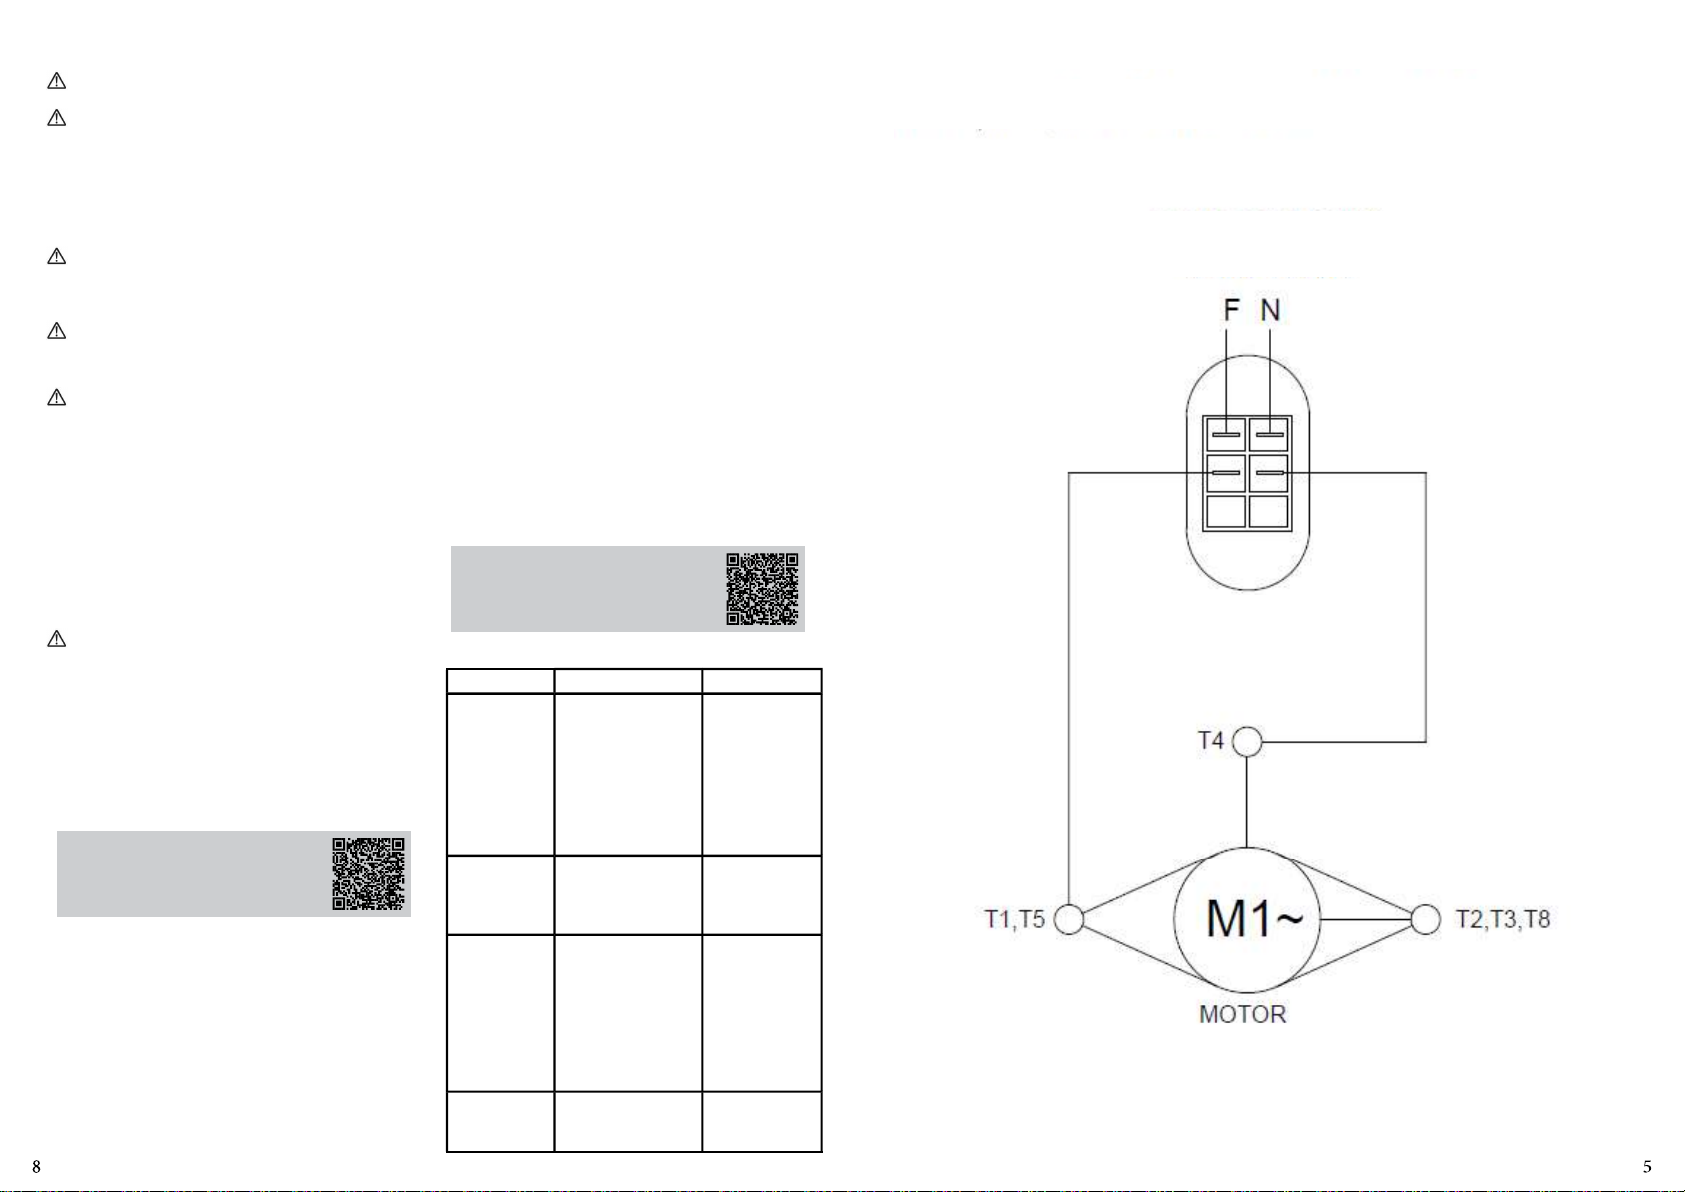
8. DIAGRAMA ELÉCTRICO ..................10
10 01
04
03
05
08
07
06
02
3. INSTALACCIÓN Y PRÉ-OPERACIÓN
3.1 Posicionamiento
Su equipamiento deberá estar posicionado y nivelado arriba
de una superficie seca, firme y con 850mm de altura.
3.2 Instalación Electrica
El enchufe de este aparato posee dos clavijas para
alimentación y una central para la toma a erra. Es obligatorio
que los tres puntos estén debidamente conectados antes de
poner en marcha el aparato.
Cuando recibir el equipamiento, verifique la tensión eléctrica
informada en la equeta ubicada en el cable eléctrico.
3.4 Pre-operación
• Verifique si el equipamiento está firme en la mesada.
• Antes de ulizar el aparato, limpie con agua y jabón
neutro todas las partes que entrarán en contacto con
el producto a procesar (lea el ítem 5 Limpieza).
3.4.1 Colocando el Vaso
El Vaso Nº 02 (Fig. 01) posee un sistema simples permiendo
una fácil y segura colocación. Para remover y recolocar basta
rarlo vercalmente para arriba por los manipulos.
Siempre remueva ó recoloque el vaso agarrándolo con
firmeza por sus manipulos.
Nunca re re ó coloque el Vaso con la licuadora pren-
dida.
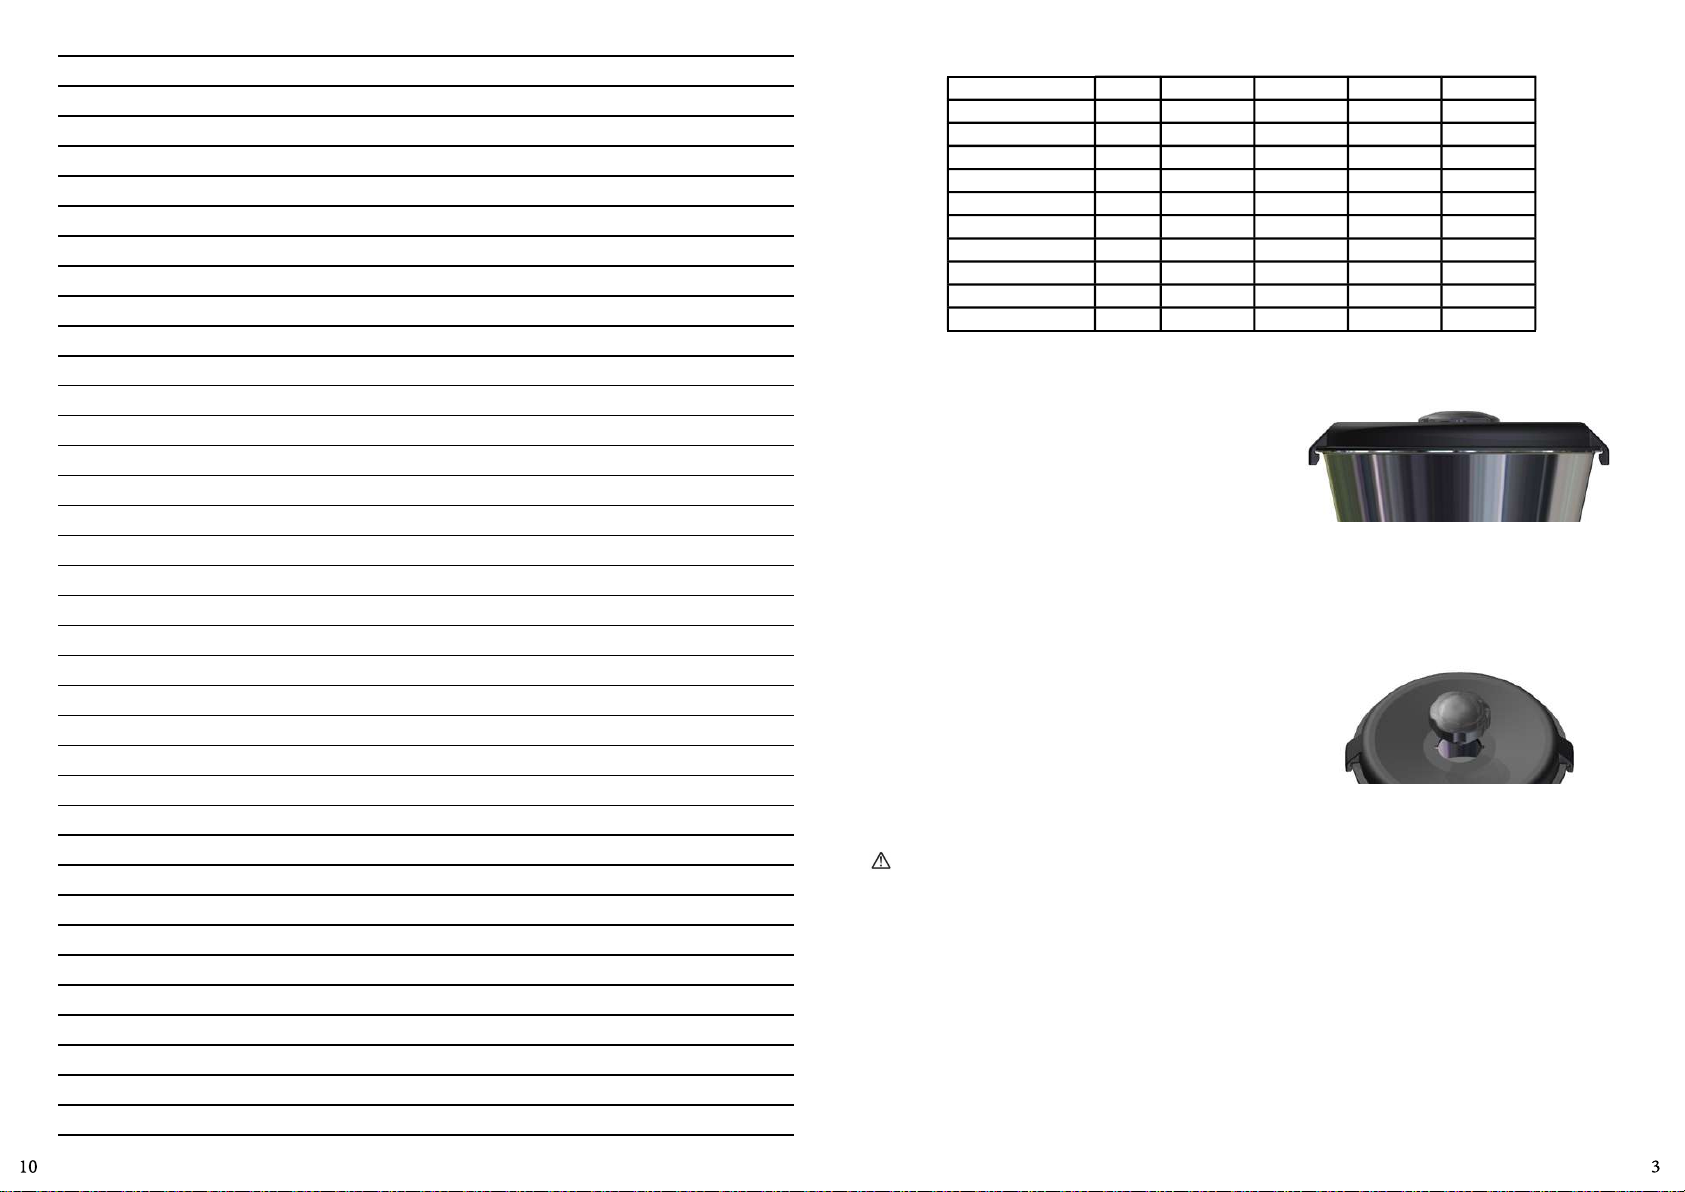
3.4.2 Colocando la Tapa
El Vaso Nº 02 (Fig. 01) ene una tapa Nº 01 (Fig. 01) hecha
de goma atoxica que asegura un eficiente vedamiento
durante la operación.
3.4.3 Colocando la Sobre Tampa
La Sobre Tapa Nº 10 (Fig. 01) puede ser usada sea para
observar el procesamiento, sea para añadir ingredientes.
Para rerarla gírela en el sendo horario hasta que se suelte,
y después levántela, vea Figura abajo.
4. OPERACIÓN
4.1 Accionamiento
- Introduzca la enchufe en la toma.
- Para prender el equipo presione la llave Prender / Apagar
#08 (Fig.01) en la posición “I”.
- Para apagar el equipo presione la llave Prender / Apagar
#08 (Fig.01) en la posición “O”.
4.2 Procedimiento para Operación
Rere la Tapa del Vaso No 01 con su Sobre Tapa Nº 10 (Fig.
01). Con el equipo desligado coloque en el Vaso Nº 02 (Fig.
FIGURA 02
FIGURA 03
CARACTERÍSTICAS UNIDAD LIC-04LT LIC-06LT LIC-08LT LIC-10LT
Capacidad del Vaso L 4 6 8 10
Tensión V 220 220 220 220
Frecuencia Hz 60 60 60 60
Potencia del Motor CV 0,5 0,5 0,5 0,5
Rotación RPM 3500 3500 3500 3500
Altura mm 630 720 750 780
Ancho mm 275 310 330 340
Profundidad mm 260 300 320 330
Peso Neto Kg 9,50 9,60 9,80 10,00
Peso Bruto Kg 10,80 11,10 11,40 11,70
Tenga cuidado para que la Tapa esté debidamente colocada
sobre el Vaso. Vea la figura abajo.
This manual suits for next models
3
Table of contents
Languages:
Popular Blender manuals by other brands

Scarlett
Scarlett SC-1049 instruction manual

Optimum
Optimum RK-2016 operating instructions

Hamilton Beach
Hamilton Beach HBH950 Series Operation manual

Bosch
Bosch MMBC5 CN Series instruction manual

AMERICANA
AMERICANA EPB-6050R instruction manual

Breville
Breville Wizz Stick Professional BSB600 Instructions for use