Imperial Typewriter Good Companion User manual

‘
h
l
‘
"a
"
‘
:1
y
w
~'
’
‘PK
‘
A
\
\\\
imperial
‘
53’
_
Good
Companion’
Standard
Model
Portable
Typewriter
Imperial
Typewriter
Co.
Ltd.
Head
OHicc
and
Works:
LEICESTER,
ENGLAND
Telephone:
67801
(5
Ens)
Telegram:
“Typewriter,
Leicester"
London
Office
and
Showrooms:
85
Kingsway,
W.C.2
t
Telephone:
Holborn
7354
(41im5)
Telcgrzms:“lmpcritypc.Phonc,Londou"
Service
Depot:
and
Agents
in
all
principal
cities
throughout
the
world
we.»
h,
INSTRUCTNN
BOOK
3%
'7
PRINTED
m
ENGLAND
w
,,
n
~'
em:
A complimentary Copy from
Mr & Mrs Vintage Typewriters
For More Visit www.MrMrsVintageTypewriters.com

{.Inallt‘mx
Foreword
Diagram,
showing
parts
with
numhcrs
Details
of
Features
Removing
the
Cover
Unlocking
the
Carriage
Inserting
the
Paper
.
Adjusting
the
Paper
Fixing
the
Margin
Line
Spacing
Writing
on
Lines
The
Bell
Releasing
the
Carriage
Space
Bar
Back
Spacer
The
Keyboard
Shift
Key
and
Lock
To
rule
horizontal
or
vertical
lines
Two—Colour
Ribbon
Stcncilling
Cleaning
and
Oiling
Replacing
the
Cover
How
to
fit
a
new
Ribbon
The
Ribbon
Reverse
How
to
fit
a
new
Ribbon
(Diagrams)
A
Few
Useful
Reminders
Page
2
I’lI'QU
A
\O\O\O\OODQ)\]\]O\O\O\UI
v—‘y—ny—AHHHH
AwNNHHHZZ’SB
mm
<
m1
This
booklet
is
written
with
the
express
purpose
of
assisting
users
of
the
Imperial
‘Good
Companion’
to
obtain
the
best
possible
results
from
their
machines.
We
advise
you
to
read
it
through
carefully
and
carry
out
the
instructions
for
the
care
and
maintenance
of
the
machine,
thus
ensuring
many
years
ofrcally
good
service.
We
want
you
to
consider
the
Imperial
Typewriter
Company
Ltd.
always
at
your
service,
and
should
you
experience
any
difficulty
in
connection
With
cithcr
the
operation
of
the
machine
or
service,
please
be
good
enough
to
write
to
us,
When
WC
will
give
immediate
attentlon
to
your
rcqulrements.

Fig.
I
Page
4
Hvlailx
ml
I’k‘.11lll'\‘\
referral
to
in
the
Follnwing
instructions
(lnrringc
Knob
Paper
Supporting
Arm
Platcn
Knob
Paper
Table
Auxiliary
Paper
Feed
Auxiliary
Paper
Lever
Carriage
Release
Lever
Paper
Release
Lever
Margin
Stop—lcft—hand
Margin
Stop—right—hand
Margin
Stop
Rod
with
Numbered
Scale
Platcn
Ratchet
Release
Lever
Line
Space
Lever
Line
Space
Adjusting
Lever
Line
Indicator
and
Card
Holder
Margin
Release
Shift
Key—left—hand
Shift
Lock
Shift
Key—right-hand
Back
Spacer
Space
Bar
Colour
Change
and
Stencil
Lever
Left
and
Right
Ribbon
Spools
Left
and
Right
Ribbon
Spool
Levers
Left
and
Right
Ribbon
Guide
Ribbon
Centre
Guide
Ribbon
Reversing
Stud
Type
Bar
Guide
Page
5

HOW’
TO
USE
THE
Imperial
Good
Companion
PORTABLE
TYPEW’RITER
R
EM(
)VING
rHE
COVER
Place
the
machine
flat
upon
the
table,
unlock
the
case,
lift
catch
and
push
knob
to
the
right,
then
lift
top
of
case,
slightly
tilting
it
back—
wards.
LYNLUCKING
THE
CARRIAGE
Latch
No.
1,
Fig.
I,
engages
in
the
left—hand
side
of
the
carriage.
By
drawing
this
latch
towards
you
the
carriage
will
be
freed.
Before
replacing
the
machine
in
the
case
the
carriage
should
again
be‘
locked
by
engaging
this
latch.
As
a
precaution
against
damage
in
transit
the
carriage
on
all
machines
leaving
the
factory
is
also
locked
with
a
carriage
locking
pin.
This
is
marked
with
a
small
green
ticket
and
must
be
pulled
out.
It
need
not
be
used
again
as
the
latch
previously
mentioned
is
quite
sufficient
in
ordinary
use.
INSERTING
THE
PAPEI{
Place
the
paper
in
a
central
position
on
the
paper
table
No.
4,
Fig.
I.
Turn
platen
knob
No.
3,
Fig.
l,
away
from
you
and
the
paper
will
feed
through.
Release
auxiliary
paper
feed
No.
5,
Fig.
1,
by
depressing
lever
No.
6,
Fig.
I,
so
that
the
paper
feeds
underneath:
then
tum
the
platen
knob
to
the
desired
starting
point.
Page
6
Fig.
2
ADJUSTING
THE
PA
PER
If
the
paper
has
not
been
fed
through
correctly,
it
can
be
adjusted
by
drawing
forward
the
paper
release
lever
No.
8,
Fig.
I.
When
the
paper
has
been
adjusted
push back
the
paper
release
lever
and
the
paper
is
held
ready
for
typing.
The
use
of
the
paper
supporting
arm
No.
2,
Fig.
I,
will
be
found
extremely
helpful.
FIXING
THE
lVIARGIN
Stops
9
and
9A,
Fig.
3,
control
the
length
of
the
writing-line,
and
it
is
necessary
to
set
these
in
appropriate
positions
in
accordance
with
the
width
of
paper,
envelope,
etc.,
that
is
being
used.
By
pressing
the
top
of
the
margin
stops
Nos.
9
and
9A
they
will
move
freely
along
the
rod
to
the
desired
position
and
Will
automatically
lock
when
released.
Page
7
A complimentary Copy from Mr & Mrs Vintage Typewriters
For More Visit www.MrMrsVintageTypewriters.com

\\\
\\\\\HW////////i///\~¢
Just
chotc
you
reach
the
end
of
the
line
the
bell
will
ring.
This
p//\\\\\\\x
1),!W%/¢
Hui
lilil
[A
mums
that
you
have
seven
more
spaces
to
go
before
the
kcv—Ievcrs
automatically
lock.
If
you
depress
the
margin
release
No.
15,
Fig.
1,
it
wil]
enable
you
to
type
additional
letters
to
finish
a
word,
dependent
upon
the
position
of
the
margin
stop.
.mJ»
"
W—L‘ZJI
RELEASING
THE
CARRIAGE
MANUVACYUREU
“Y
T":
IMDERIAL
TVC‘Eg‘WlVl’lTEn
C(‘
L70
LILhCERTSR.
ENGLAND
When
you
desire
to
move
the
carriage
freely
to
any
position,
the
carriage
release
lever
and
the
paper
release
lever
(Nos.
7
and
8,
Fig.
I)
are
pressed
together
with
thumb
and
forefinger.
It
is
important
Fin
3
D'
.
.
.
.
that
the
carriage
should
again
be
stationary
before
releasmg
these
levers.
LINE
SPACING
On
the
left—hand
side
of
the
carriage
is
the
line
space
lever
No.
12,
Fig.
2.
This
serves
the
dual
purpose
of
returning
the
carriage
to
the
starting
point
and
‘of
turning
the
paper
ready
for
the
next
line
of
B
d
.
h
,
..
writing.
The
space
between
each
line
can
be
regulated
to
either
y
epressmgt
espacebarNo.20,Fig.1,
the
carnage
W111
move
one
single
or
double
spacing.
This
is
done
bymoving
line
space
adjusting
space
from
RIGHT
to
LEFT'
lever
N
o.
13,
Fig.
2,
to
the
indicated
number
one
or
two.
SPACE
BAR
BACK
SPACER
WRITING
ON
LINES
On
the
keyboard
there
is
a
key
No.
19,
Fig.
I,
marked
‘Back
Spacer’
This
can
be
done
by
pushing
the
ratchet
release
lever
No.
11,
Fig.
2,
which
when
depressed
will
return
the
carriage
by
the
space
of
one
backwards
and
by
turning
the
platen
knob
until
the
line
to
be
typed
is
visible
over
the
edge
of
the
line
indicator
No.
14,
Fig.
1.
letter
each
time
it
is
operated.
Page
8
Page
9

Hi}
KLYBUAR
l)
The
Imperial
‘Good
Companion’
is
fitted
With
a
standard
4—bank
keyboard
with
the
addition
ofa
plus
sign,
asterisk,
equals
sign
and
flgure
nought,
making
88
characters
in
all.
511““!
KlY
AN!)
U)(IK
To
obtain
capitals,
one
of
the
shift
keys
N0.
16
or
18,
Fig.
1,
on
left
or
right—hand
side
of
the
keyboard
must
be
held
down.
When
it
is
desired
to
write
2111
in
capitals,
the
key
can
be
locked
in
that
position
by
depressing
the
shift
lock
No.
17,
Fig.
I.
To
release
this
lock,
depress
left
shift
key
No.
16,
Fig.
1.
Page
10
H)
mm:
1|()R1[()N'l‘/\l,
UR
Viiuricm
141N135
()11
(11c
top
edge
ofthe
Linc
Indicator
No.
14,
are
two
small
recesses.
To
rule
horizontal
lines
place
pencil
point
in
one
of
these
recesses
and
move
carriage
cndways,
to
rule
vertical
lines
turn
platen
with
turning
knob.
'I'W’O—(X
UR
R
[B
BUN
The
Imperial
‘Good
Companion’
is
fitted
with
a
two—colour
ribbon
device
No.
21,
Fig.
I,
which
enables
you
to
type
in
one
of
two
colours;
for
example,
black—red,
purple-red,
green-brown,
etc.
By
moving
this
lever
the
required
colour
can
be
obtained.
STENCILLING
By
moving
lever
No.
21,
Fig.
1,
to
the
centre
position
it
will
dis-
engage
the
ribbon
and
allow
the
type
to
strike
directly
on
to
the
stencil
it
is
required
to
cut.
CLEANING
AN
D
011
G
It
is
not
advisable
to
oil
the
machine
too
frequently
as
this
tends
to
collect
dust
and
actually
does
more harm
than
good.
We
suggest
that
you
take
your
machine
at
least
once
a
year
to
an
Imperial
Agent
or
Service
Depot
for
it
to
be
thoroughly
cleaned
and
oiled.
REPLACING
THE
COVER
Maize
sure
that
the
slsz-L’ey
is
unlocked.
When
replacing
cover,
tilt
lid
slightly
back,
drop
front,
and
the
Catch
will
snap
fast.
Page
11
H
H
W"
T
D
F
T
T
A
N
[i
\X/
R
T
B
B
U
N
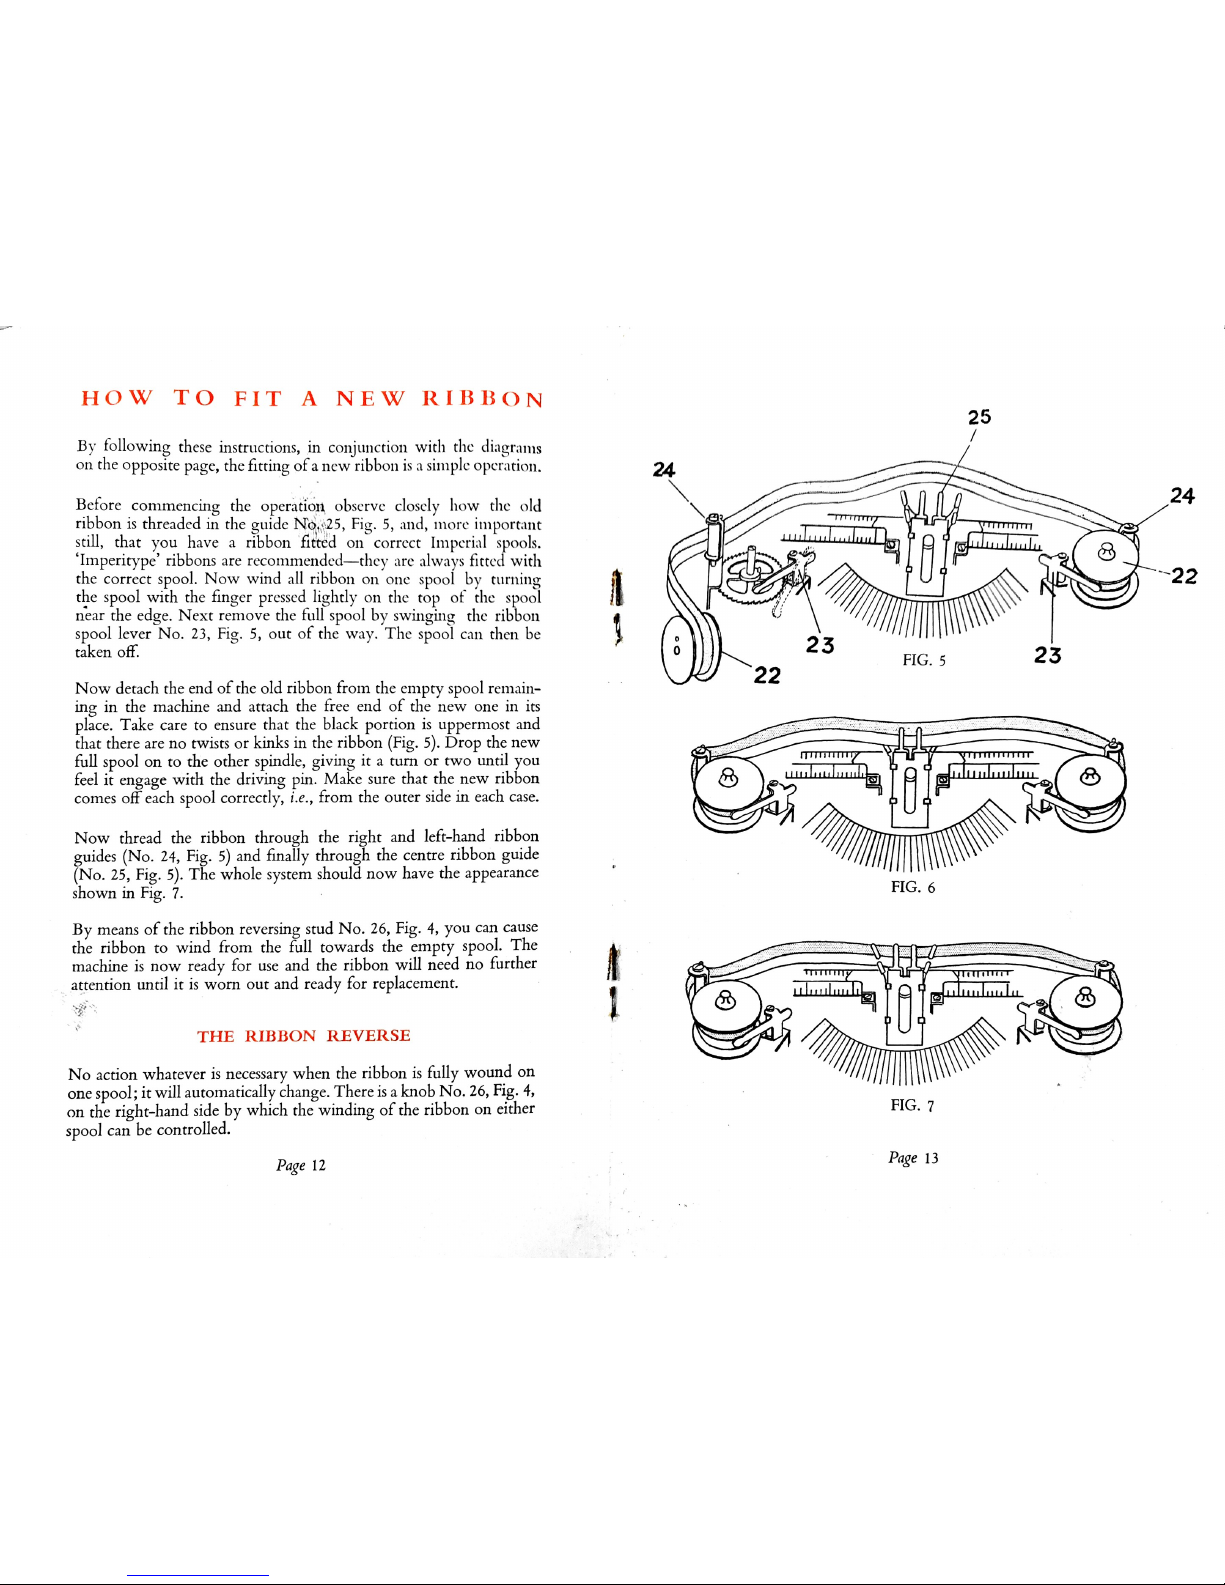
By
following
these
instructions,
in
conjunction
with
the.
diagrams
on
the
opposne
page,
the
fitting
ofa
new
ribbon
is
:1
simple
operation.
Before
commencing
the
operation
observe
closely
how
the.
old
ribbon
is
threaded
in
the
guide
Nq,y;.25,
Fig.
5,
and,
more
important
still,
that
you
have
a
ribbon
fitted
on
correct
Imperial
spools.
‘Imperitype’
ribbons
are
tecommended—they
are
always
fitted
with
the
correct
spool.
Now
Wind
all
ribbon
on
one
spool
by
turning
the
spool
with
the
finger
pressed
lightly
on
the
top
of.
the
spool
near
the
edge.
Next
remove
the
full
spool
by
swinging
the
ribbon
spool
lever
No.
23,
Fig.
5,
out
of
the
way.
The
spool
can
then
be
taken
of.
N
ow
detach
the
end
of
the
old
ribbon
from
the
empty
spool
remain-
ing
in
the
machine
and
attach
the
free
end
of
the
new
one
in
its
place.
Take
care
to
ensure
that
the
black
portion
is
uppermost
and
that
there
are
no
twists
or
kinks
in
the
ribbon
(Fig.
5).
Drop
the
new
full
spool
on
to
the
other
spindle,
giving
it
a
turn
or
two
until
you
feel
it
engage
with
the
driving
pin.
Make
sure
that
the
new
ribbon
comes
01?
each
spool
correctly,
i.e.,
from
the
outer
side
in
each
case.
Now
thread
the
ribbon
through
the
right
and
left—hand
ribbon
guides
(No.
24,
Fig.
5)
and
finally
through
the
centre
ribbon
guide
(No.
25,
Fig.
5).
The
whole
system
should
now
have
the
appearance
shown
in
Fig.
7.
By
means
of
the
ribbon
reversing
stud
No.
26,
Fig.
4,
you
can
cause
the
ribbon
to
wind
from
the
full
towards
the
empty
spool.
The
machine
is
now
ready
for use
and
the
ribbon
Will
need
no
further
attention
until
it
is
Worn
out
and
ready
for
replacement.
THE
R
US
BUN
REVERSE
No
action
whatever
is
necessary
when
the
ribbon
is
fully
wound
on
one
spool;
it
Will
automatically
change.
There
is
a
knob
N
o.
26,
Fig.
4,
on
the
right—hand
side
by
Which
the
winding
of
the
ribbon
on
either
spool
can
be
controlled.
Page
12
11
FIG.
6
FIG.
7
Page
13

A
low
useful
rmnindcrs
[hr
the
cure
ul‘
Vour
Imperial
Good
Companion
Do
not
expose
the
Imperial
to
extremes
of
heat
or
cold,
dryness
or
damp.
Clean
the
machine
at
least
once
a
week.
Use
a
dusting
brush
for
the
moving
parts
and
a
soft
cloth
for
the
enamelling
and
plating.
Clean
the
type
each
morning
as
a
matter
of
routine,
and
ALWAYS
before
and
after
cutting
a
stencil.
Lay
a
duster
over
the
segment
slots
and
brush
the
type
from
front
to
back—NOT
sideways.
Should
you
oil
the
machine
yourself,
be
careful
not
to
allow
the
oil
to
get
on
the
ribbon
or
come
into
contact
with
any
rubber
parts.
Never
in
any
Circumstances
oil
the
type-bars.
Diagrams
and
instructions
in
this
book
should
be
foHOWCd
carefully,
particularly
When
changing
ribbons.
Never
erase
above
the
type—bar
segment;
move
the
carriage
to
the
extreme
right
or
left,
and
blow
dust
away
from
the
machine.
Do
not
attempt
to
make
any
mechanical
adjustments,
and
always
keep
the
machine
covered
when
not
1n
use.
One
final
word:
The
Imperial
Typewriter
Company
Ltd.
and
their
Agents
are
at
your
service.
If
you
have
any
diHiculty
with
your
“Good
Companion”
get
into
touch
With
them
at
once;
they
will
be
glad
to
help
you.
Page
14
Always
remember
that
there
is
an
Imperial
Agent
within
easy
reach—in
most
cases
you’ll
fmd
him
under
‘Imperial’
in
your
telephone
directory.
He
will
always
be
pleased
to
give
you
expert
advice
on
your
machines
and
has
factory
trained
mechanics
to
give
the
most
efi‘icient
service.
In
the
following
pages
Will
be
found
a
list
of
Imperial
Agents
in
all
principal
cities
and
towns
throughout
the
world.
Imperial
THE
MOST
COMPLETE
TYPEWRITER
SERVICE
Page
15
A complimentary Copy from Mr & Mrs Vintage Typewriters
For More Visit www.MrMrsVintageTypewriters.com
You can always call
Us :) Mr and Mrs Vintage
Typewriters. you can find our
Contact details on
our website


