INDUSTEX PAINT ZOOM EXTRA User manual

International patents pending. All imitations will be prosecuted.
PAINT ZOOM EXTRA®is a registered EU/CTM trade mark.


ENGLISH
CONTENTS
A. GENERAL SAFETY WARNINGS 7
B. PARTS DETAIL 10
C. GETTING STARTED 10
D. BREAKS 11
E. AFTER USE 11
F. MAINTENANCE 10
G. STORAGE 12
H. ASSEMBLY 12
I. TECHNICAL SPECIFICATIONS 12
ESPAÑOL
INDICE
A. INDICACIONES
GENERALES DE SEGURIDAD 14
B. DETALLE PIEZAS 17
C. PUESTA EN SERVICIO 18
D. INTERRUPCIÓN DE SERVICIO 19
E. PUESTA FUERA DE SERVICIO 19
F. MANTENIMIENTO 20
G. ALMACENAMIENTO 20
H. MONTAJE 20
I. ESPECIFICACIONES TÉCNICAS 21
FRANÇAIS
INDEX
A. INDICATIONS GÉNÉRALES DE
SÉCURITÉ 22
B. LISTE DE PIÈCES 26
C. MISE EN SERVICE 26
D. INTERRUPTION DE SERVICE 28
E. MISE HORS SERVICE 28
F. ENTRETIEN 28
G. RANGEMENT 28
H. MONTAGE 28
I. CARACTÉRISTIQUES
TECHNIQUES 29
DEUTSCH
INHALTSVERZEICHNIS
A. ALLGEMEINE
SICHERHEITSHINWEISE 31
B. DETAILS ZU DEN TEILEN 35
C. INBETRIEBNAHME 35
D. BETRIEBSUNTERBRECHUNG 37
E. AUSSERBETRIEBSETZUNG 37
F. WARTUNG 37
G. LAGERUNG 37
H. ZUSAMMENBAU 38
I. TECHNISCHE DATEN 38
ITALIANO
INDICE
A.INDICAZIONI GENERALI DI
SICUREZZA 40
B. DETTAGLIO PEZZI 43
C. MESSA IN SERVIZIO 44
D. INTERRUZIONI 45
E. MESSA FUORI SERVIZIO 45
F. MANUTENZIONE 46
G. STOCCAGGIO 46
H. MONTAGGIO 46
I. SPECIFICHE TECNICHE 46
PORTUGUÊS
ÍNDICE
A. INDICAÇÕES GERAIS DE
SEGURANÇA 48
B. DETALHE PEÇAS 51
C. COLOCAÇÃO EM SERVIÇO 52
D. INTERRUPÇÃO DO SERVIÇO 53
E. COLOCAÇÃO FORA
DE SERVIÇO 53
F. MANUTENÇÃO 54
G. ARMAZENAGEM 54
H. MONTAGEM 54
I. ESPECIFICAÇÕES TÉCNICAS 55
NEDERLANDS
INHOUDSOPGAVE
A. ALGEMENE
VEILIGHEIDSAANWIJZINGEN 56
B. OVERZICHT ONDERDELEN 60
C. INBEDRIJFSTELLING 60
D. HET GEBRUIK ONDERBREKEN 62
E. BUITEN BEDRIJF STELLEN 62
F. ONDERHOUD 62
G. OPBERGEN 62
H. MONTAGE 62
I. TECHNISCHE KENMERKEN 64

3


5
6

English
Thank you for purchasing the Paint Zoom
Extra® spray gun. Before you start using
it, please resad the instructions for use
and all the safety warnings carefully. Keep
this manual on hand for future use.
NOTE: TRANSLATION OF THE ORIGI-
NAL INSTRUCTIONS
General Safety Warnings
Errors resulting from failure to adhere to
the following instructions may lead to elec-
tric shock, re and even severe injury. The
substances used with this spray gun (sol-
vents, paint, etc.) may contain hazardous,
harmful, explosive or corrosive materials.
WARNING
Read all sa fety warnings
and all instructions. Failure
to follow the warnings
and instructions may result
in electric shock, fire and/or
serious injury.
Save all warnings and ins-
tructions for future referen-
ce.
The term “power tool” in
the warnings refers to your
mains-operated (corded)
power tool or battery-ope-
rated (cordless) power tool.
1) Work area safety
a) Keep work area clean
and well lit. Cluttered or
dark areas invite accidents.
b) Do not operate power
tools in explosive atmos-
pheres, such as in the
presence of flammable
liquids, gases or dust.
Power tools create sparks
which may ignite the
dust or fumes.
c) Keep children and bys-
tanders away while opera-
ting a power tool. Distrac-
tions can cause you to lose
control.
2) Electrical safety
a) Power tool plugs must
match the outlet. Never
modify the plug in any way.
Do not use any adapter
plugs with earthed (groun-
ded) power tools. Unmodi-
fied plugs and
matching outlets will reduce
risk of electric shock.
b) Avoid body contact with
earthed or grounded surfa-
ces, such as pipes, radia-
tors, ranges and refrigera-
tors. There is an increased
risk of electric shock if your
body is earthed or groun-
ded.
c) Do not expose power
tools to rain or wet con-
ditions. Water entering a
power tool will increase the
risk of electric shock.
d) Do not abuse the cord.
Never use the cord for ca-
rrying, pulling or unplug-
ging the power tool. Keep
cord away from heat, oil,
sharp edges or moving
parts. Damaged or entan-
gled cords increase the risk
of electric shock.
e) When operating a power
tool outdoors, use an ex-
tension cord suitable for
outdoor use. Use of a cord
7

English
suitable for outdoor use
reduces the risk of electric
shock.
f) If operating a power
tool in a damp location is
unavoidable, use a resi-
dual current device (RCD)
protected supply. Use of
an RCD reduces the risk of
electric shock.
NOTE The term “residual
current device (RCD)” may
be replaced by the term
“ground fault circuit inte-
rrupter (GFCI)” or “ear-
th leakage circuit breaker
(ELCB)”.
3) Personal safety
a) Stay alert, watch what
you are doing and use
common sense when ope-
rating a power tool. Do not
use a power tool while you
are tired or under the in-
fluence of drugs, alcohol or
medication. A moment of
inattention while operating
power tools may result in
serious personal injury.
b) Use personal protective
equipment. Always wear
eye protection. Protective
equipment such as dust
mask, non-skid safety
shoes, hard hat, or hearing
protection used for appro-
priate conditions will reduce
personal injuries.
c) Prevent unintentional
starting. Ensure the switch
is in the off-position before
connecting to power sour-
ce and/or battery pack, pic-
king up or carrying the tool.
Carrying power tools with
your finger on the switch or
energising power tools that
have
the switch on invites acci-
dents.
d) Remove any adjusting
key or wrench before tur-
ning the power tool on. A
wrench or a key left atta-
ched to a rotating part of
the power tool may result in
personal injury.
e) Do not overreach. Keep
proper footing and balance
at all times. This enables
better control of the power
tool in unexpected situa-
tions.
f) Dress properly. Do not
wear loose clothing or
jewellery. Keep your hair,
clothing and gloves away
from moving parts. Loose
clothes, jewellery or long
hair can be caught in mo-
ving parts.
g) If devices are provided
for the connection of dust
extraction and collection
facilities, ensure these are
connected and properly
used. Use of dust collection
can reduce dust-related ha-
zards.
4) Power tool use and care
8

English
a) Do not force the power
tool. Use the correct power
tool for your application.
The correct power tool will
do the job better and safer
at the rate for which it was
designed.
b) Do not use the power
tool if the switch does
not turn it on and off. Any
power tool that cannot be
controlled with the switch
is dangerous and must be
repaired.
c) Disconnect the plug from
the power source and/or
the battery pack from the
power tool before making
any adjustments, changing
accessories, or storing
power tools. Such preven-
tive safety measures reduce
the risk of starting the power
tool accidentally.
d) Store idle power tools
out of the reach of children
and do not allow persons
unfamiliar with the power
tool or these instructions to
operate the power tool.
Power tools are dangerous
in the hands of untrained
users.
e) Maintain power tools.
Check for misalignment or
binding of moving parts,
breakage of parts and any
other condition that may
affect the power tool’s
operation. If damaged,
have the power tool repai-
red before use. Many acci-
dents are caused by poorly
maintained power tools.
f) Keep cutting tools sharp
and clean. Properly main-
tained cutting tools with
sharp cutting edges are less
likely to bind and are easier
to control.
g) Use the power tool, ac-
cessories and tool bits
etc. in accordance with
these instructions, taking
into account the working
conditions and the work to
be performed. Use of the
power tool for operations
different from those inten-
ded could
result in a hazardous situa-
tion.
- Not to use guns to spray
flammable materials
- Be aware of any hazards
presented by material being
sprayed and please, consult
the markings on the con-
tainer or the information
supplied by manufacturer of
the material to be sprayed
- Not spray any material
where the hazard is not
known
- Not clean the gun with
flammable solvents
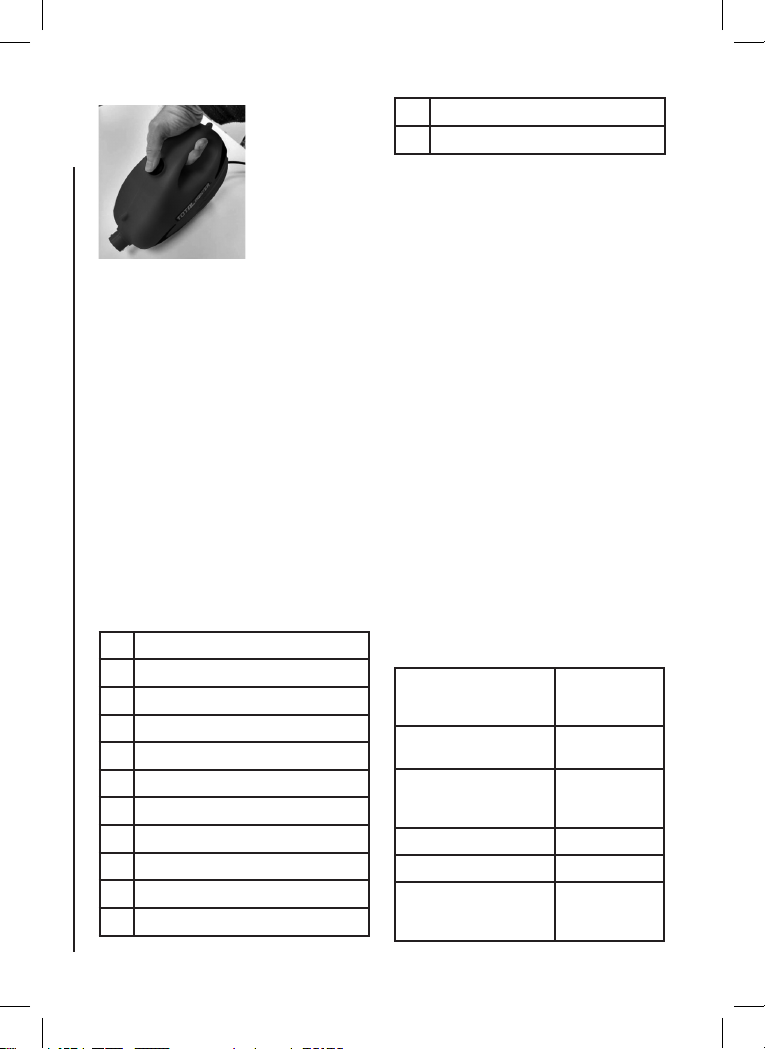
Please, handle the unit du-
ring use always as below
picture:
9
English
5) Service
a) Have your power tool
serviced by a qualified
repair person using only
identical replacement
parts. This will ens
ure that
the safety of the power tool is
maintained.
If the supply cord of this power
tool is damaged, it must be re-
placed by a specially prepared
cord available through the ser-
vice organization.
PARTS DETAIL
(See Figure 1)
1Nozzle
2Nozzle adjuster ring
3 Spray gun body
4 Trigger
5Flow-adjustment screw
6 Air hose
7Valve
8 Paint tank
9 Hose
10 Carry strap
11 ON/OFF Switch button
12 Plug
13 Viscosity cup
MATERIAL TYPES:
Use materials recommended for use with a
spray gun.
Preparation of the spray material
Total Painter can be used to spray undiluted
or slightly diluted paint, lacquer and varnish.
If the paint needs to be diluted, start with a
dilution of 10%. Do this by lling a 1-litre con-
tainer with the paint to be used. The viscosity
cup holds one decilitre, so cover the hole and
ll it with the required thinner. Add the thinner
to the paint and stir thoroughly. Then measu-
re the viscosity using the guidelines provided
below. If the paint needs to be thinned further,
dilute it by a further 5% (half the capacity of
the viscosity cup) and measure the viscosity
again. If the paint has still not reached the
recommended viscosity, repeat the previous
step until the right viscosity is obtained.
This spray gun can be used with products
with a viscosity of 25 DIN/sec to a maximum
of 50 DIN/sec. Submerge the viscosity cup
in the material and ll it. Then time how long
it takes for the cup to empty (Figure 2). This
time is known as “DIN/sec”. Apart from these
guidelines, you should also see the material
manufacturer’s instructions, as a guide to de-
termine whether the material requires further
thinning.
Guidelines:
Example of material Approximate
DIN
values
Water-based paint and
emulsions 25-50 DIN/sec
Gloss paint, water-soluble
or solvent-based coloured
lacquers
45-50 DIN/sec
Varnishes undiluted
Primers 45-50 DIN/sec
Wood impregnators,
stains, oils, disinfectants,
phytosanitary products
undiluted
10

English
Follow the instructions provided in this manual
only if the material you wish to use does not
have its own instructions for use. Otherwise,
follow the instructions provided with the ma-
terial.
GETTING STARTED
Before connecting the device to the mains
power supply, please ensure that the mains
voltage matches the data shown on the Paint
Zoom Extra® product rating plate.
- Begin by attaching the carry strap to the de-
vice.
- Unscrew the tank from the spray gun.
- Align the uid hose (Figure 3). With the uid
hose in the correct position, the contents of the
tank can be sprayed with almost no residue.
To paint or for work on horizontal objects, bend
the uid hose forward (Figure 3A). For work
on objects above head height, bend the uid
hose backward (Figure 3B).
- Place the tank on a paper-covered surface
and ll with the spray material.
- Attach the exible air hose to the connector
on the device and the spray-gun handle (Fi-
gure 4).
- The exible air hose should be connected to
the spray gun. Make sure it is rmly attached.
The hose does not have to be completely in-
serted, but it must be rmly in place.
- Place the device on a clean, at surface to
prevent it from sucking in dust, etc.
- Hang the device from the carry strap.
- Aim the spray gun at the object to be spra-
yed.
- Carry out a test on a piece of cardboard or
on a surface similar to the one to be sprayed.
This will allow you to determine the amount of
material and the type of spray.
- Activate the “ON/OFF” button and start using
Paint Zoom Extra®.
Choosing the Spray Pattern
The spray has three different patterns:
1. Vertical fan, recommended for horizontal
surfaces (Figure 5A)
2. Horizontal fan, recommended for vertical
surfaces (Figure 5B)
3. Round stream, recommended for corners
and hard-to-access surfaces (Figure 5C)
Adjusting the Spray
With the nozzle adjuster ring slightly loosened,
turn the air cap to the desired spray position
(Figure 6). Then tighten the nozzle adjuster
ring again.
Never press the spray-gun trigger while adjus-
ting the air cap.
Adjusting the Material Flow
To adjust the material ow, turn the adjustment
screw on the spray-gun trigger:
- for less material, turn to the left.
- for more material, turn to the right (Figure 7)
Spraying Techniques
- To ensure optimum results, the surface to be
sprayed must be completely clean and smooth
before being sprayed. We recommend carefu-
lly preparing the surface beforehand.
- Cover all surfaces that you do not want to
spray, including screws and nuts.
- Perform a spray test on a piece of cardboard
or on a similar surface before starting to use
the product; this will allow you safely adjust
the spray gun. You should also begin spraying
away from the surface and avoid breaks while
spraying on the surface to be sprayed.
- The spraying movement should be from the
arm rather than from the wrist in order to ensu-
re a constant distance between the spray gun
and the surface. Choose a distance of bet-
ween 5 and 15 cm, depending on the desired
width of the spray stream. Figure 8A shows
the correct position, in which the distance to
the object is constant; Figure 8B shows the
incorrect position, as the irregular distance
produces an uneven spray.
- Move the spray gun evenly from side to side
or up and down, depending on the spray-
pattern setting.
- Even movement of the spray gun will produ-
ce a surface with uniform quality.
- If the spray material accumulates in the
nozzle and the air cap, clean both parts with
solvent or water.
BREAKS
If you need to stop using the device for 4 hours
or less:
- Turn off the device.
- When using two-component lacquers, the
device must be cleaned immediately.
11

English
AFTER USE
For the device to work correctly, it must be
cleaned properly. We recommend the fo-
llowing:
- Unplug the device. During long breaks and
after nishing work, release the air from the
tanks. Do this by opening the tank for a short
period of time and closing it again or by pres-
sing the trigger of the spray gun and emptying
the paint into its original container.
- Disassemble the spray gun.
- Unscrew the tank. Empty the remaining
spray material back into its container.
- Clean the tank and the uid hose using a
brush.
- Fill the tank with solvent or water and screw
it to the spray gun. Only solvents with a ash
point above 21ºC can be used.
- Reassemble the spray gun (Figure 9).
- Plug the power cord into the mains, turn on
the device and spray the solvent or water into
a container or cloth.
- Turn off and unplug the device.
- Unscrew the tank and empty it. Remove the
uid hose and tank seal.
- Pull the air hose (Figure 9A-12) above the
spray-gun body. Unscrew the valve cover (Fi-
gure 9A-13) and remove the membrane (Figu-
re 9A-14). Carefully clean all the parts.
- Unscrew the nozzle adjuster ring and remove
the air cap and the nozzle. Clean the air cap,
the nozzle seal and the nozzle with a brush
and solvent or water. Do not use sharp metal
objects to clean the seals, the membrane and
the nozzle orices or air-drain valves of the
spray gun.
- Clean the outside of the spray gun using a
cloth soaked in solvent or water.
- Reassemble the parts.
Maintenance
Air cap/nozzle - Remove the air cap and the
nozzle from the spray gun and submerge in
clean solvent. Dry using compressed air. If the
small orices become blocked, also submerge
the air cap in solvent. If it is necessary to scra-
pe the orices, use a toothpick or straw or any
other material that is not too hard.
Do not clean the orices using wire, nails or
other hard objects. Failure to follow these ins-
tructions may cause permanent damage to
the cap, producing larger spray streams and
resulting in defective spraying results.
The set includes a cleaning pin. This tool can
be used to clean and eliminate paint remains
from the small orices on the spray gun. If you
cannot completely eliminate paint remains,
use this tool by following the detailed mainte-
nance instructions provided.
Storage
Store the spray gun with a little solvent in the
air cap and nozzle to prevent the gun needle
from drying out or breaking, thereby causing
potential loss of air or liquid.
ASSEMBLY
The device should only be used with the mem-
brane intact (Figure 9A-14). Place the mem-
brane with the stem facing up on the lower part
of the valve. See also the mark on the body of
the spray gun. Place the valve cover carefully
and screw tightly. Insert the air hose into the
valve cover and the connector into the body of
the spray gun. Correctly position the nozzle so
that it engages with the notches on the spray
gun (Figure 9B).
Insert the nozzle into the body of the spray gun
and turn it to the correct position. Fit the air cap
onto the nozzle and tighten it with the nozzle
adjuster ring.
Finally, insert the tank seal under the uid
hose and slide up to the join. To do this, twist
the tank seal slightly and insert the uid hose
with the tank seal into the body of the spray
gun.
SET INCLUDES:
- Main device
-Hose
-Carry strap
-Viscosity cup
-Spray gun
-Paint tank
-Cleaning pin
TECHNICAL SPECIFICATIONS
VOLTAGE: 220-240 V; 50 Hz
MAXIMUM INPUT POWER: 900 W
FLOW: 800 mL/min (spray water)
TANK CAPACITY: 800 ml
LENGTH OF HOSE: 1.5 m
MAXIMUM VISCOSITY: 45 DIN/sec
MOTOR SPEED: 36,000 rpm
WEIGHT: 1.9 kg
Noise data: LpA=82.1dB(A) ; LwA=93.1dB(A)
K=3
12
English
Vibration data: 2,180m/s2 K=1.5
- The declared vibration total value has been
measured in accordance with a standard test
method and may be used por comparing one
tool with another;
- The declared vibration total value may also
be used in a preliminary assessment of exo-
posure.
A warning:
- that the vibration emission during actual use
of the power tool can differ from the declared
total value depending on the ways in which the
tool is used; and
-of the need to indentify safety measures
to protect the operator that are based on an
estimation of exposure in the actual conditios
of use (taking account of all parts of the ope-
rating cycle such as the times when the tool
is switched off and when it is running idle in
addition to the trigger time)
Quality Warranty
This product is covered by a warranty against
manufacturing defects subject to the time pe-
riods stipulated by the legislation in force in
each country.
This warranty does not cover damages resul-
ting from inadequate use, negligent commer-
cial use, abnormal wear and tear, accidents or
imp
roper handling.
Australia & New Zealand only
This product has the benet of certain Con-
sumer Guarantees. These are prescribed
by the Australian Consumer Law & the
New Zealand Consumer Guarantees Act
1993 both of which provide protection for
consumers. There is no express warranty
for this product in Australia or New Zea-
land. The above paragraph refers to other
countries.
ATTENTION
Disposal of materials
A symbol of a crossed-out wheeled
bin means you should nd out about and
follow local regulations about disposing of
this kind of product.
Do not dispose of this product as you
would other household
waste.
Dispose of this device in accordance with
the corresponding local regulations.
Electrical and electronic devices contain
hazardous substances that can have
harmful effects on the environment and/
or human health and should be recycled
properly.
This appliance is double insulated;
therefore, no earth wire is required.
Always check that the mains volta-
ge corresponds to the voltage on the pro-
duct rating plate.
WARNING - To reduce the risk of
injury, user must read instruction
manual.
Declaration of Conformity
We declare under our sole responsibility
that this VBRVACIND0001
900W ELECTRIC SPRAY GUN is in con-
formity with the following standard or stan-
dardized documents.
EC directives 2006/42/EC
Low voltage Directive 2006/95/EC (until
April 19th, 2016)
2014/35/EU (from April 20th, 2016)
Electromagnetic Compatibility Directive
2014/30/EU
ROSH directive :
2011/65/EU and (EU)2015/863
and conforms with the norms
EN 55014-1:2017
EN 55014-2:2015
EN IEC 61000-3-2:2019
EN 6100-3-3:2013/A1:2019
ATTENTION
Declaration of Conformity of this product
available in
https://www.industex.com/products
INDUSTEX S.L
ADD:AV. P.CATALANES 34 8A PLANTA
08950 ESPLUGAS DE LLOBREGAT
(BARCELONA) SPAIN
Made in China
13

Español
Gracias por la compra de su pistola de
pulverización Paint Zoom Extra®. Antes
de empezar a utilizarla, le rogamos leer
atentamente a fondo las instrucciones
de uso, así como todas las indicaciones
de seguridad. Guarde el manual en un
lugar accesible para su uso futuro.
INDICACIONES GENERALES DE
SEGURIDAD
Los errores cometidos por no observar
las siguientes instruc- ciones pueden
causar descarga eléctrica, fuego o in-
cluso graves lesiones. Las substancias
que se utilizan con esta pistola de pul-
verización (disolventes, pinturas, etc.)
pueden contener materiales peligrosos,
dañinos, explosivos o corrosivos.
ADVERTENCIA
Lea todas las instruccio-
nes y advertencias de se-
guridad.
El incumplimiento de las ad-
vertencias e instrucciones
puede tener como resultado
descargas eléctricas, incen-
dios y/o lesiones graves.
Guarde todas las adver-
tencias e instrucciones
para su futura referencia.
El término «herramienta
eléctrica» utilizado en las
advertencias hace referen-
cia a herramientas eléctri-
cas con conexión a la red
(mediante un cable de ali-
mentación) y a herramien-
tas eléctricas con batería
(inalámbricas).
1)Seguridad en la zona de
trabajo
a) Mantenga la zona de
trabajo limpia y bien ilu-
minada. Las zonas de
trabajo oscuras o desor-
denadas propician los acci-
dentes.
b)No utilice herramientas
eléctricas en atmósferas
explosivas, como en lu-
gares con presencia de
líquidos, gases o polvos
inflamables. Las herra-
mientas eléctricas generan
chispas que podrían hacer
que el polvo o los vapores
prendiesen.
c) Manténgase alejado
de niños y otras personas
al utilizar herramientas
eléctricas. Las distraccio-
nes pueden provocar una
pérdida de control.
2)Seguridad eléctrica
a) El enchufe de la he-
rramienta eléctrica debe
coincidir con la toma de
corriente. Nunca modifi-
que el enchufe en modo
alguno. No utilice adap-
tador con herramientas
eléctricas con toma de
tierra. El uso de enchufes
originales y tomas de co-
rriente adecuadas dismi-
nuye el riesgo de descarga
eléctrica.
b)Evite que su cuerpo en-
tre en contacto con super-
ficies con toma de tierra,
tales como tuberías, ra-
14

Español
diadores, fogones o ne-
veras, ya que el riesgo de
descarga eléctrica aumenta
si su cuerpo está conecta-
do a tierra.
c) No exponga las herra-
mientas eléctricas a la
lluvia ni a condiciones de
humedad. La entrada de
agua en una herramienta
eléctrica aumenta el riesgo
de descarga eléctrica.
d)Manipule el cable con
cuidado. No transporte,
arrastre ni desenchufe la
herramienta tirando del
cable. Mantenga el cable
alejado del calor, el acei-
te, los bordes afilados o
piezas móviles. Los ca-
bles dañados o enredados
aumentan el riesgo de des-
carga eléctrica.
e) Cuando trabaje con una
herramienta eléctrica al
aire libre, utilice exclusi-
vamente alargadores ade-
cuados para su uso en ex-
teriores. Utilizar un cable
adecuado para su uso en
exteriores reduce el riesgo
de descarga eléctrica.
f) Si resulta inevitable
trabajar con la herramien-
ta eléctrica en un lugar
húmedo, utilice siempre
una toma protegida con
interruptor diferencial
(RCD), ya que su uso re-
duce el riesgo de descarga
eléctrica.
NOTA: El término «inte-
rruptor diferencial» (RCD)
puede ser sustituido por
los términos «interruptor
de circuito por falla de co-
nexión a tierra (GFCI)» o
«disyuntor de fuga a tierra
(ELCB)».
3)Seguridad para las per-
sonas
a) Manténgase alerta,
preste atención a lo que
está haciendo y tenga
sentido común al usar una
herramienta eléctrica. No
la utilice si se siente can-
sado o está bajo el efecto
de drogas, alcohol o me-
dicamentos. Un momento
de descuido con una herra-
mienta eléctrica puede pro-
vocar graves lesiones.
b)Utilice un equipo de
protección personal y lle-
ve siempre gafas protec-
toras. Llevar un equipo
de protección, como por
ejemplo una mascarilla an-
tipolvo, calzado antidesli-
zante, casco de seguridad
o protector auditivo en las
condiciones adecuadas re-
duce el riesgo de lesiones
personales.
c) Evite que la herramien-
ta eléctrica se encienda
accidentalmente. Ase-
gúrese de que el inte-
15

Español
rruptor está en posición
OFF (apagado) antes de
conectarla a la fuente de
alimentación y/o batería
recargable, levantarla o
transportarla. Transportar
herramientas con el dedo
en el interruptor o enchu-
farlas a la corriente con el
interruptor en posición ON
(encendido) puede ocasio-
nar accidentes.
d)Retire las llaves mecá-
nicas y de ajuste antes de
encender la herramienta
eléctrica. Una llave mecá-
nica o de ajuste colocada
en una pieza rotatoria de
una herramienta eléctrica
puede provocar lesiones.
e) No se extralimite.
Adopte una buena postu-
ra sobre una base sólida
y mantenga el equilibrio
en todo momento. De
esta manera, será más fá-
cil mantener el control de
la herramienta eléctrica en
caso de imprevisto.
f)
Utilice ropa adecuada.
No lleve ropa ancha ni jo-
yas. Mantenga el cabello,
la ropa y los guantes lejos
de las piezas móviles. La
ropa ancha, las joyas y el
cabello largo pueden engan-
charse en las piezas móviles.
g)Si hay dispositivos de
extracción y recogida de
polvo, asegúrese de que
están conectados y se
utilizan correctamente. El
uso de dispositivos de ex-
tracción de polvo reduce el
riesgo de accidentes rela-
cionados con el polvo.
4)Uso y cuidado de las
herramientas eléctricas
a) No fuerce la herramien-
ta eléctrica. Utilice la he-
rramienta eléctrica ade-
cuada para el trabajo en
cuestión. Una herramienta
eléctrica adecuada le permi-
tirá hacer un mejor trabajo
y con mayor seguridad a la
potencia para la que fue di-
señada.
b)No utilice la herramien-
ta eléctrica si el interrup-
tor no funciona. Una he-
rramienta que no pueda
controlarse desde el inte-
rruptor es peligrosa y debe
repararse.
c) Desconecte el enchufe
de la toma de corriente y/o
saque la batería recarga-
ble antes de realizar ajus-
tes, cambiar accesorios o
guardar la herramienta.
Esas medidas preventivas
reducen el riesgo de encen-
dido accidental.
d)Guarde las herramientas
que no esté utilizando fue-
ra del alcance de los niños
y no deje que las usen per-
sonas que desconozcan su
funcionamiento o no hayan
16

Español
leído las instrucciones.
Las herramientas eléctricas
son peligrosas en manos de
usuarios sin la preparación
adecuada.
e) Cuide sus herramien-
tas eléctricas. Comprue-
be que las piezas móviles
no estén desalineadas ni
se atasquen; que no haya
piezas rotas o dañadas ni
ninguna otra situación que
pueda afectar al funciona-
miento de la herramienta
eléctrica. Si presenta da-
ños, llévela a reparar an-
tes de utilizarla. Muchos
accidentes se producen a
causa de un mantenimiento
deficiente de las herramien-
tas eléctricas.
f) Mantenga las herra-
mientas de corte limpias
y afiladas. Las herramien-
tas con piezas de corte bien
cuidadas y afiladas no se
atascan tanto y son más fá-
ciles de controlar.
g)Util
ice la herramienta
eléctrica, los accesorios,
los utensilios de trabajo,
etc. conforme a estas ins-
trucciones, teniendo en
cuenta las condiciones de
trabajo y la tarea a realizar.
Utilizar herramientas eléctri-
cas para usos distintos de
los previstos puede derivar
en situaciones peligrosas. No
utilice la pistola para pulveri-
zar materiales inflamables.
- Tenga en cuenta los riesgos
asociados al material que se
esté pulverizando y consulte
las indicaciones de su envase
o la información proporcio-
nada por el fabricante.
- No pulverice ningún mate-
rial si desconoce los riesgos
asociados.
- No limpie la pistola de pul-
verización con disolventes
inflamables.
Durante el uso, maneje la
pistola tal como se muestra
en la imagen siguiente:
5)Mantenimiento
a) Lleve a reparar su he-
rramienta eléctrica por
personal cualificado que
use solo piezas de repues-
to idénticas. Así garantiza-
rá que la herramienta siga
siendo segura.
Si el cable de alimentación
está dañado debe ser susti-
tuido por un cable especial
por parte de un servicio
técnico adecuado.
DETALLE PIEZAS
(Véase gura 1)
17

Español
1 Boquilla
2 Anillo boquilla
3 Cuerpo pistola
4 Gatillo
5Tornillo regulador del uido
6 Tubo de aire
7válvula
8Depósito pintura
9 Manguera
10 Correa de transporte
11 Botón de encendido / apagado
12 Enchufe
13 Cubeta de viscosidad
TIPOS DE MATERIALES
Use material recomendado para uso en
pistola.
Preparación del material de recubri-
miento
Con Paint Zoom Extra® pueden pulve-
rizarse pinturas, lacas y barnices, sin
diluir o ligeramente diluidos.
Si la pintura necesita dilución, empiece
con una dilución de un 10% de la pin-
tura. Hágalo llenando un recipiente de
un litro con la pintura a utilizar. Tenga en
cuenta que la cubeta de viscosidad tiene
capacidad para un decilitro así que, tape
el agujero y llénelo con el diluente ne-
cesario. Añádalo a la pintura y remueva
bien. Luego, mida la viscosidad siguien-
do la información recomendada a con-
tinuación. En el caso de que la pintura
necesite más dilución, dilúyala otro 5%
(la mitad de la capacidad de la cubeta)
y mida la viscosidad. Si la pintura aún
no se encuentra en la viscosidad reco-
mendada repita el paso anterior hasta
obtener la viscosidad adecuada.
Esta pistola se puede usar con produc-
tos con una viscosidad de un índice de
25 seg-DIN hasta un máximo de 50 seg-
DIN. Sumerja la cubeta de viscosidad
en el material y llénelo. Luego, crono-
metre cuanto tiempo tarda en vaciarse
la cubeta (gura 2). A este tiempo se lo
denomina “segundos DIN (seg-DIN)”. A
parte de estas recomendaciones, debe-
rá consultar también las instrucciones
del fabricante del material, como guía
para determinar si el material necesita
más dilución.
Recomendaciones:
Ejemplo de material Valores orientati-
vos DIN
Pintura al agua y emul-
siones 25-50 sec-DIN
Esmaltes, lacas de color
con disolvente o solubles
en agua
45-50 sec-DIN
Barnices sin diluir
Imprimaciones 45-50 sec-DIN
Impregnantes para ma-
dera, colorantes, aceites,
desinfectantes, produc-
tos tosanitarios
sin diluir
Utilice las instrucciones facilitadas con
este manual únicamente si el material
que desea utilizar no está acompañado
de instrucciones de uso. En caso con-
trario, siga las instrucciones proporcio-
nadas con el material.
PUESTA EN SERVICIO
Antes de conectar el aparato a la red de
alimentación, asegúrese de que la ten-
sión de la red coincida con los datos in-
dicados en la etiqueta de características
técnicas del Paint Zoom Extra®.
- Empiece por instalar la correa de trans-
porte en el aparato
- Desenroscar el depósito de la pistola
de pulverización.
- Alinear el tubo de subida (gura 3).
Con el tubo de subida en correcta po-
sición, el contenido del depósito puede
pulverizarse casi sin resto. Para pintar
o tratar supercies horizontales deberá
girar el tubo de subida hacia delante (-
gura 3A). Para trabajos de pulverización
en objetos por en cima de la cabeza de-
18

Español
berá girar el tubo de subida hacía atrás
(gura 3B).
- Poner el depósito sobre una base de
papel y llenar con el material de pulve-
rización.
- Montar el tubo exible de aire en el
empalme del equipo y del mango de la
pistola (gura 4).
- El tubo exible de aire debe conectar-
se a la pistola a presión; asegúrese que
queda bien sujeto; no es necesario que
el tubo entre del todo, basta con que
quede bien jado.
- Colocar el equipo sobre una supercie
lisa y limpia ya que de otro modo podrá
aspirar polvo, etc.
- Colgar el aparato con la correa de
transporte.
- Dirigir la pistola al objeto a pulverizar.
- Se recomienda hacer una prueba de
pulverización sobre un cartón o sobre
un fondo semejante al que desea pulve-
rizar. Así podrá determinar la cantidad
de material y la proyección del pulveri-
zado.
- Accione el botón “ON/OFF” y empiece
a utilizar el Paint Zoom Extra®.
Selección proyección pulverizado
Existen tres formas diferentes de chorro
de pulverizado:
1. chorro en abanico vertical, indicado
para supercies horizontales (gura 5A)
2. chorro en abanico horizontal, indicado
para supercies verticales (gura 5B)
3. chorro redondo, indicado para esquinas
y supercies de difícil acceso (gura 5C)
Ajuste proyección pulverizado
Con el anillo boquilla ligeramente ao-
jado, gire la tapa de aire a la posición
de proyección del pulverizado deseada
(gura 6). Luego vuelva a apretar de
nuevo el anillo boquilla.
Nunca apretar el gatillo de la pistola du-
rante el ajuste de la tapa de aire.
Ajuste de la cantidad de material
Para ajustar la cantidad de material, gire
el elemento regulador en el gatillo de la
pistola:
-para menos cantidad de material, giro
a la izquierda
-para más cantidad de material, giro a la
derecha (gura 7)
Técnicas de pulverización
- Para asegurar un buen resultado, es
esencial que la supercie esté completa-
mente limpia y lisa antes de la pulveriza-
ción. Se aconseja someter la supercie
a un cuidadoso tratamiento previo.
- Cubrir todas las supercies que no
desea pulverizar, incluyendo roscas y
tornillos.
- Realizar una prueba de pulverización
sobre cartón o sobre un fondo semejan-
te antes de empezar a utilizar el produc-
to, de esta forma podrá determinar con
más seguridad el ajuste adecuado de la
pistola. Igualmente se recomienda em-
pezar con el pulverizado fuera de la su-
percie y evitar siempre interrupciones
dentro de la supercie de pulverización.
- El desplazamiento del pulverizado no
deberá provenir de la muñeca sino del
brazo, de esta manera se asegura siem-
pre la misma distancia entre la pistola
y la supercie. Elija una distancia de
5-15cm, según la anchura deseada del
chorro de pulverizado. La (gura 8A)
indica la posición correcta, en la cual
la distancia al objeto es uniforme; en
cambio la (gura 8B) enseña la posición
incorrecta ya que la distancia desigual
da lugar a un laqueado irregular.
- Dirija la pistola de pulverización unifor-
memente en sentido transversal o arriba
y abajo, según el ajuste de la proyección
del pulverizado.
-Una conducción uniforme de la pistola
de pulverización tiene como resultado
una supercie de calidad uniforme.
- Si el material de recubrimiento se acu-
mula en la boquilla y la tapa de aire,
limpiar ambas partes con disolvente o
agua.
INTERRUPCIÓN DE SERVICIO
Si necesita interrumpir el uso del apara-
to por un período de tiempo no superior
a 4h:
- Apagar el equipo.
- En el procesamiento de lacas bicom-
ponentes el equipo se tiene que limpiar
inmediatamente.
19

Español
PUESTA FUERA DE SERVICIO
Para el correcto funcionamiento del apa-
rato, es esencial una limpieza apropia-
da. Le aconsejamos:
- Extraer la clavija de red. Durante
pausas prolongadas y después de ter-
minado el trabajo, purgar el aire de los
depósitos. Para tal, abra el depósito por
corto período de tiempo y volviéndolo a
cerrar, o apretando el gatillo de la pistola
y vaciando la pintura al envase original.
- Desmontar la pistola.
- Desenroscar el recipiente. Vaciar el
resto del material de recubrimiento de
vuelta al envase.
- Limpiar con un pincel el depósito y el
tubo de subida.
- Llenar disolvente o agua en el recipiente
y enroscarlo. Se pueden procesar única-
mente disolventes con un punto de ina-
mación por encima de 21ºC.
- Volver a montar la pistola (gura 9).
- Enchufar la clavija de red, encender el
equipo y pulverizar disolvente o agua en
un recipiente o un paño.
- Apagar el equipo y extraer la clavija de red.
- Desenroscar el depósito y vaciarlo. Sa-
car el tubo de subida con junta de depó-
sito.
- Tirar el tubo de ventilación (gura 9A-12)
arriba del cuerpo de pistola. Desenroscar
la tapa de válvula (gura 9A-13) y sacar
la membrana (gura 9A-14). Limpiar cui-
dadosamente todas las partes.
- Desenroscar el anillo boquilla, quitar la
tapa de aire y la boquilla. Limpiar con un
pincel y disolvente, o agua, la tapa de
aire, la junta de boquilla y la boquilla. No
es aconsejable limpiar las juntas, la mem-
brana y los oricios de boquillas o tala-
dros de aire de la pistola de pulverización
con objetos de metal puntiagudos.
- Limpiar exteriormente la pistola de pul-
verización con un paño empapado con
disolvente o agua.
- Montar de nuevo las partes.
Mantenimiento
Tapa de aire / Boquilla – Retire la tapa de
aire y la boquilla de la pistola y sumérja-
la en disolvente limpio. Séquela con aire
comprimido. Si se obstruyen los peque-
ños oricios, introduzca también la tapa
de aire en disolvente. Si fuese necesario
escariar los oricios, use un palillo, una
caña o cualquier otro material que no sea
muy duro.
No limpie los oricios con cables, clavos
ni ningún objeto de dureza similar. Si no
sigue estas indicaciones, se podría dañar
la tapa de forma permanente, haciendo
más grandes los chorros y el resultado
de la pulverización podría ser defectuoso.
En el set se incluye un clip de limpieza;
este utensilio sirve para limpiar y eliminar
los restos de pintura de los oricios más
pequeños de la pistola de pintura; Utilice
este utensilio si no ha podido eliminar to-
talmente los restos de pintura siguiendo
los pasos de mantenimiento detallados
anteriormente.
Almacenamiento
Guarde la pistola de pulverización con
un poco de disolvente en la tapa de aire
y la boquilla para evitar que la aguja de
la pistola se seque o se rompa, lo que
conllevaría posibles pérdidas de aire o de
líquidos.
MONTAJE
El equipo debe utilizarse únicamente con
la membrana intacta (gura 9A -14). Co-
locar la membrana con la espiga hacia
arriba sobre la parte inferior de la válvu-
la. Véase también la marca en el cuerpo
de pistola. Poner la tapa de válvula con
cuidado y enroscar apretando. Insertar el
tubo de ventilación en la tapa de válvula
y el racor en el cuerpo de pistola. Colocar
correctamente la boquilla para que enca-
je con las muescas de la pistola (gura
9B).
Insertar la boquilla en el cuerpo de pistola
y mediante giro localizar la posición co-
rrecta. Calar la tapa de aire en la boquilla
y apretarla con el anillo boquilla.
Por n, introducir la junta de depósito por
abajo al tubo de subida y deslizarla hasta
la unión. Para ello, girar ligeramente la
junta de depósito e insertar el tubo de
subida con junta de depósito en el cuerpo
de pistola.
SET INCLUYE
- Unidad principal
- Tubo
- Correa de transporte
- Vaso medidor viscosidad
- Pistola de pulverización
- Depósito de pintura
- Clip de limpieza
20
Table of contents
Languages:
Popular Paint Sprayer manuals by other brands


Graco
Graco EcoQuip2 EQm Operation, repair, and parts

Central Pneumatic Professional
Central Pneumatic Professional 92126 Assembly and operating instructions

Romus
Romus TOTAL-7 manual

Graco
Graco 231-034 Instructions and parts list

Dynalabs
Dynalabs DYN-PM-100 product manual

WAGNER
WAGNER Control Stainer 150 owner's manual


