Ingo DVC User manual

DVC Camcorder

Digital Video Camera
User’s Manual
Please, read this manual carefully before using this unit and keep it for future
reference.
Please, keep the product’s packaging for future reference. It contains important
information.

1
TECHNICAL SPECIFICATIONS
Sensor 1.3 MegaPixels CMOS,
Display 1.44" TFT Color LCD
Focus range 150cm ~ infinity
Aperture F3.0, Fixed Focus
Shutter Electronic Shutter: 1/2000 ~ 1/2sec.
Resolution StillImage: 2592X1944(5M by interpolation)、2048X1536(3M
by interpolation)、1280X960(1.3M)、800X600(SVGA)、
640X480(VGA)
Video: 1280X 720,720X480, 640x480,320 x 240
Sensitivity Auto
White balance Auto / Daylight / Cloudy / Fluorescent / Bulb
Exposure control -2EV to +2EV in 0.3 step
Burst 3 consecutive shots captured
Photo effect Normal/ B&W/ Sepia / Negative/ Red/ Green/ Blue
Self-timer 2 or 10 second time delay options
Storage External memory card slot: Accepts up to 8GB SD / SDHC
card

2
TV system NTSC / PAL
Power Supply 2 * AA (alkaline/ 1.5V) batteries
Ambient
temperature
Operating: 0° C to 40° C
Storage: -20 to 60° C
Microphone Built-in
Speaker Built-in
PRODUCT SUPPORT
There is a dedicated help line for this product if you have problems. For help and
advice ring:
UK 0207 704 2598 SPAIN 902 023 951
Please have your receipt ready when you call. You can also contact us via email:
3
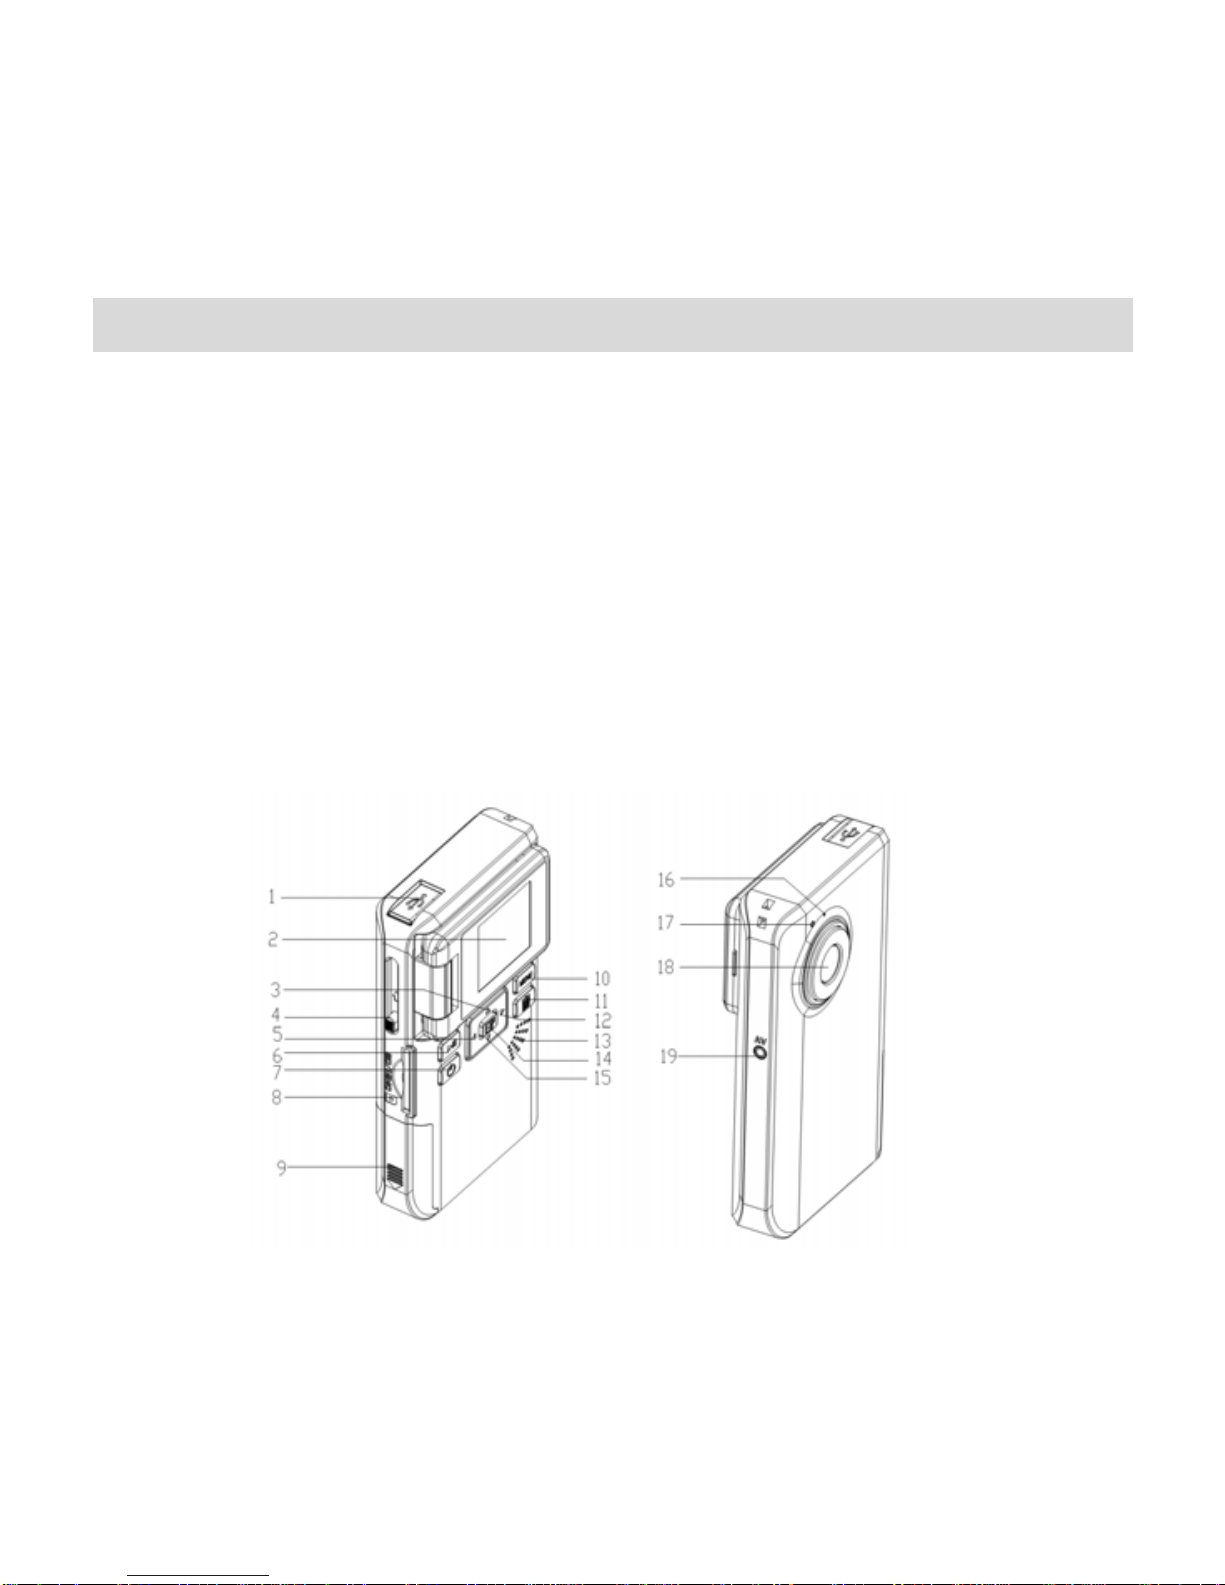
PARTS OF THE VIDEO CAMERA
1:USB jack
2:LCD screen
3:Up button
4:USB switch
5:Left/Self-timer button
6:MODE button
7:Power button
8:SD card slot
9:Battery cover
10:Menu button
11:Delete button
12:Rightbutton
13:Speaker
14:Shutter/OKbutton
15:Down button
16:Microphone
17:Power LED
18:Lens
19: AV out jack
4
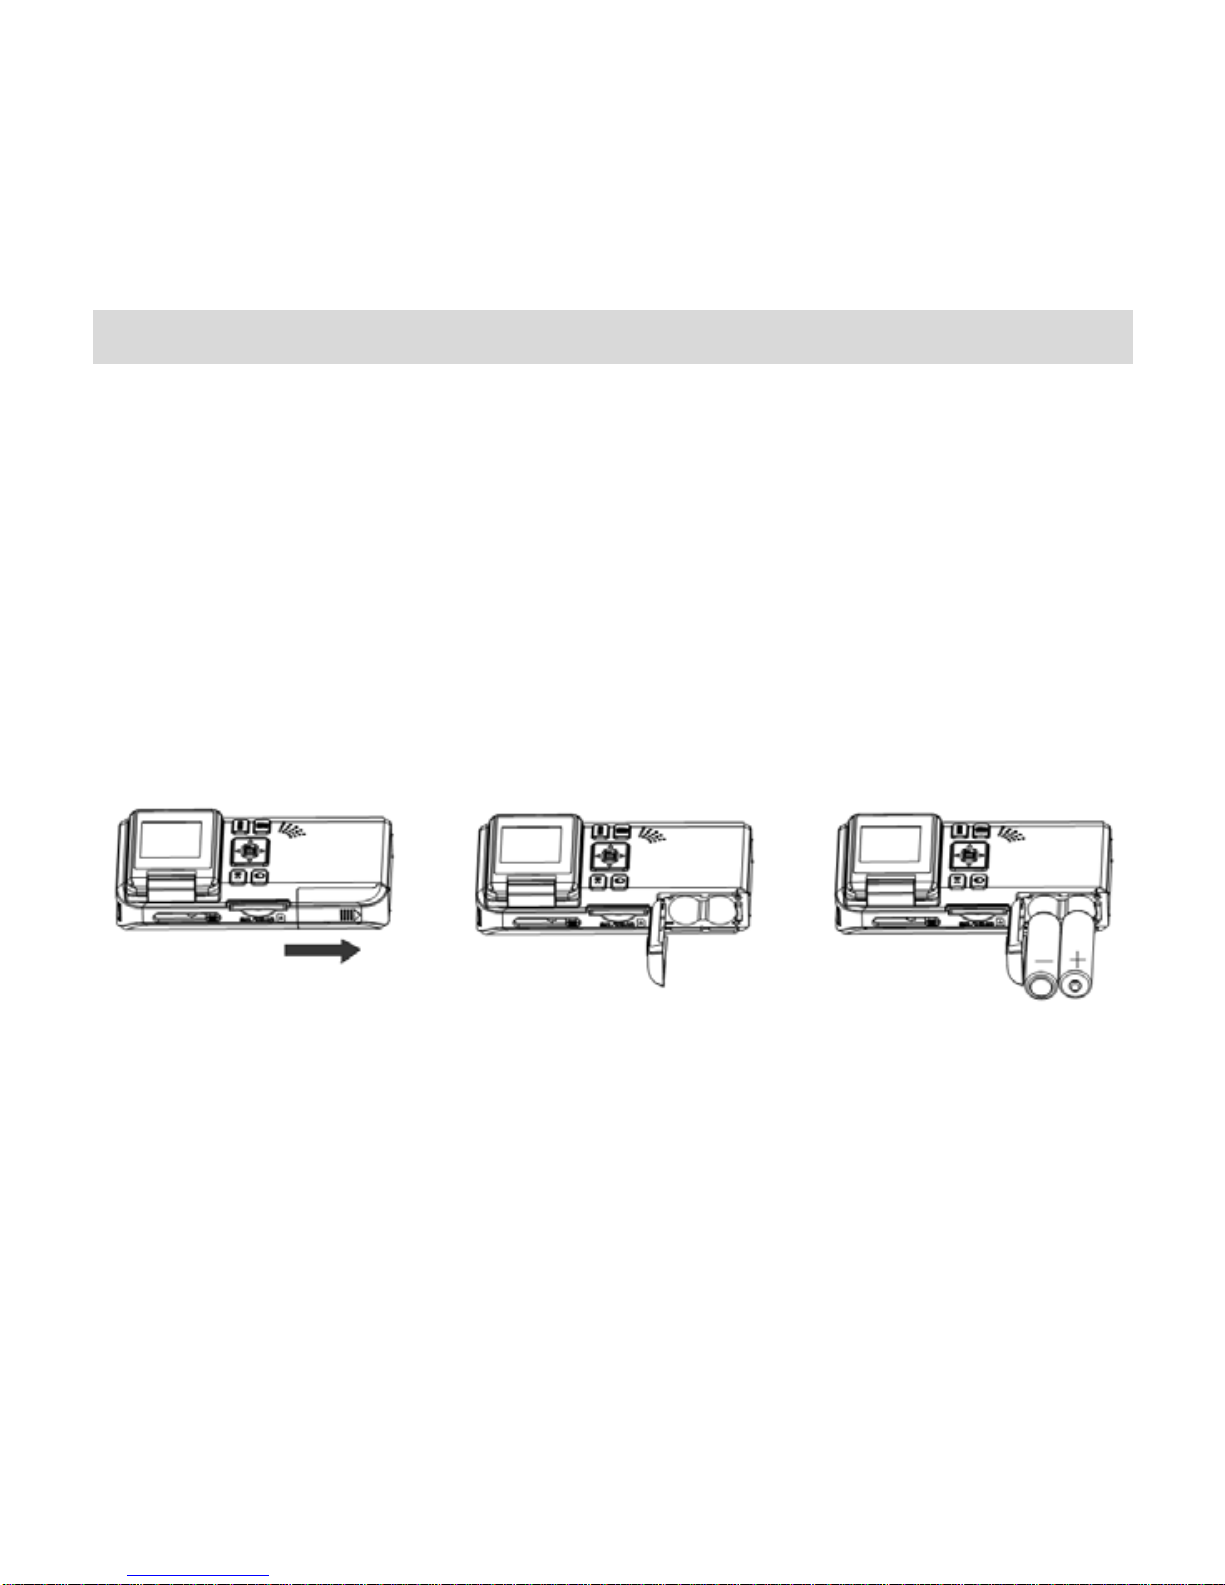
PREPARING FOR USING
Installing the Battery
1. Open the video camera battery door.
2. Insert two AA-size batteries with the positive (+) and negative (-) poles matching
the directions indicated on the battery cover.
3. Close the battery door .
Inserting the Memory Card
Turn off the camera before inserting or removing the memory card. Be sure to orient
the card correctly when inserting it. Never try to force the memory card into the slot

5
when you feel resistance. The memory card has a write protect switch, which used to
protect data from accidental deletion. Therefore, whenever you want to record,
format or delete files in the SD card, disable the write protection beforehand.
1. Turn off the video camera.
2. Find the SD card slot;
3. Make the frontispiece of the card upward, and then insert the card inside softly.
• Never insert any other object which is not a SD/MMC card into the
camera’s SD card slot. Doing so will cerate the risk of damaging to the
camera and the card.
• Never remove the SD card from the camera while the camera is powered on.
Doing so can cause failure to the picture recording operation, and even
damage the memory card.
Format the memory card
All data will be deleted including protected files. Be sure to download important files
to your computer before formatting.
1: Turn the power on, and set the video camera to the Setup Menu.
6
2: Press the UP or DOWN button to select [Format] then press the SHUTTER/OK
button to launch the submenu.
3: Press the UP or DOWN button to select the item [YES] and then press the
SHUTTER/OK button to erase all data.
Setting the Language
When using the video camera for the first time after purchasing it, be sure to choose
a language and set the date & time before using the video camera.
1: Turn the power on, and set the video camera to the Setup Menu.
2: Press the UP or DOWN button to select [Language] then press the SHUTTER/OK
button to launch the submenu.
3: Press the UP or DOWN button to select the desired language and then press the
SHUTTER/OK button to confirm the setting.
4: Press the MENU button to close the menu.
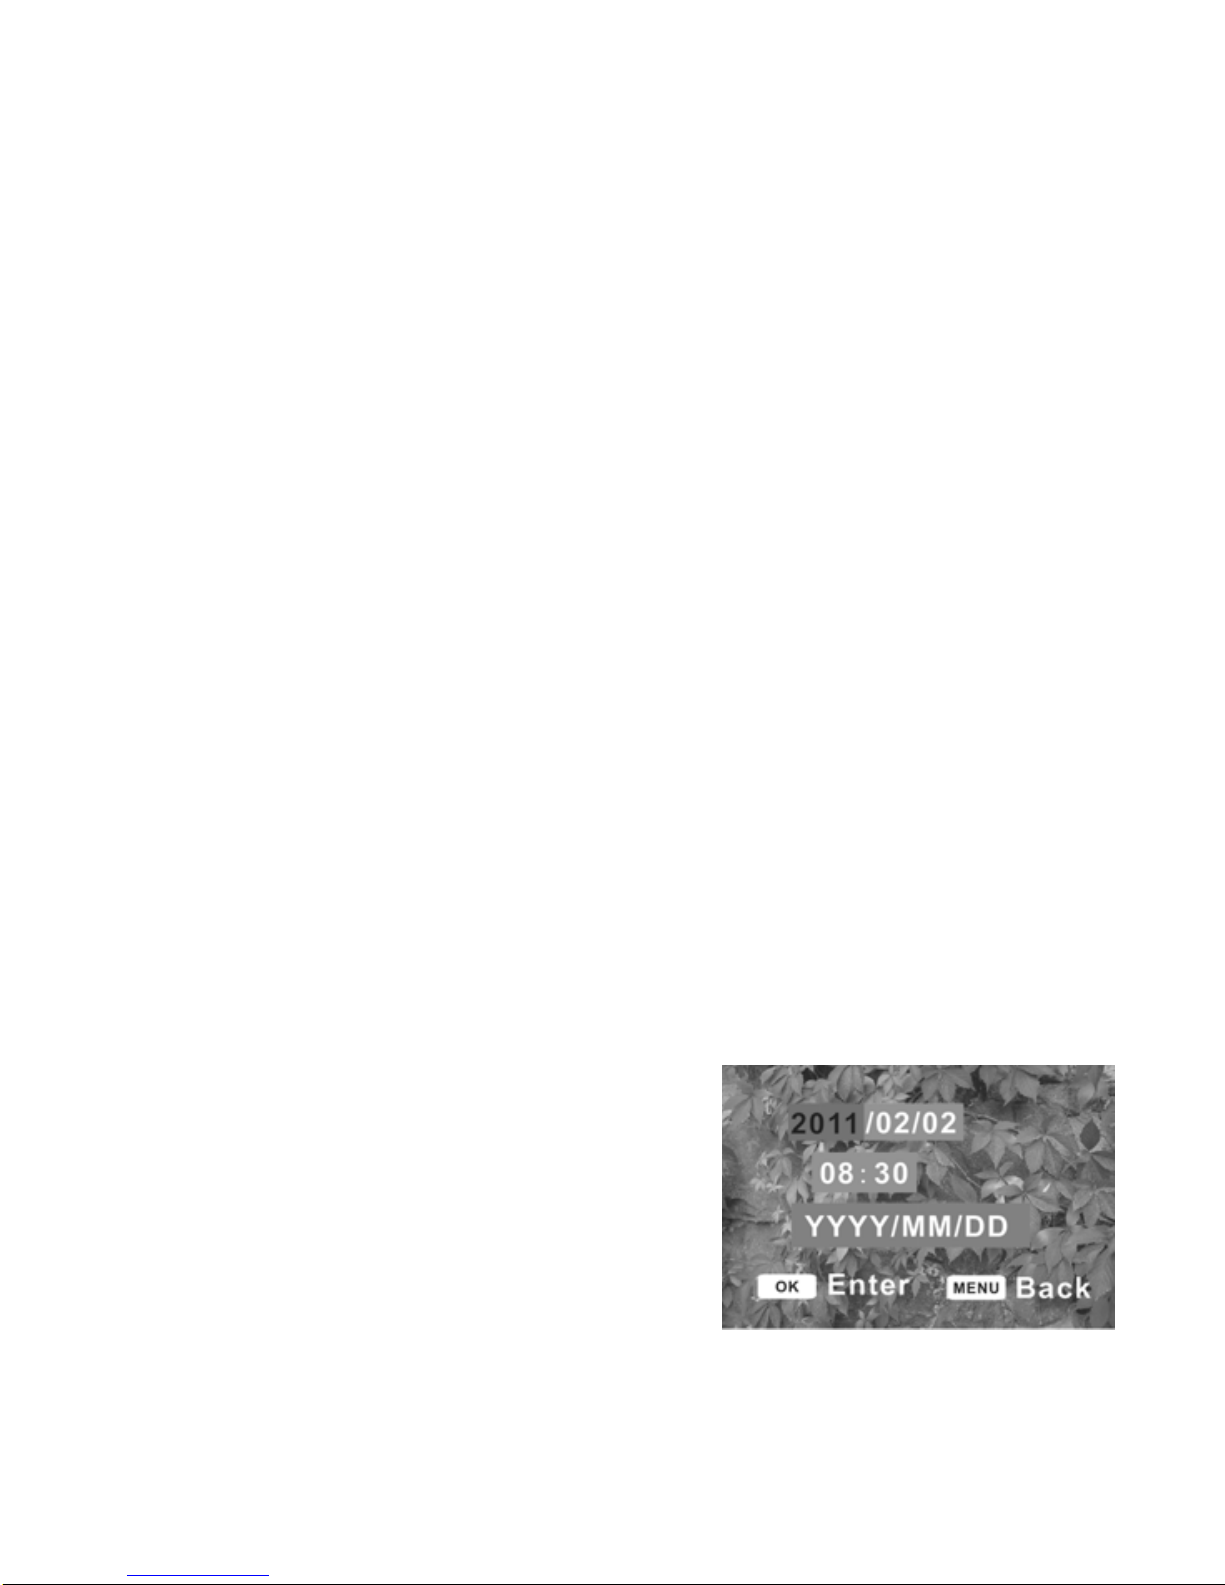
Setting the date and time
1: Turn the power on, and set the video camera
to the Setup Menu.

7
2: Press the UP or DOWN button to select [Date & Time] then press the
SHUTTER/OK button to launch the submenu.
3: Press the UP or DOWN button to change the highlighted value. Press the LEFT or
RIGHT button to move the cursor between settings.
4: Press the SHUTTER/OK button to confirm the setting.
5: Press the MENU button to close the menu.

8
Monitor screen display
Capture mode
Table of contents
Popular Camcorder manuals by other brands


Panasonic
Panasonic AG-HMC152EN operating instructions

Insignia
Insignia NS-DCC5HB09 - Camcorder - 720p user guide

MYDLINK
MYDLINK DCS-6100LH Quick installation guide

Sony
Sony video Hi8 Handycam CCD-TR555 operating instructions

SECURECOM
SECURECOM V-5014B installation guide

Panasonic
Panasonic HDC-SD100 operating instructions


