Inrico I-10 User manual


使用前须知请仔细阅读以下内容,使用者对使用本机的一般危险性的了解和认识非常重要。● 请勿在易燃易爆环境如煤气,粉尘,蒸汽等情况下使用本机或对电
池进行充电。
● 在加油或停车于加油站时,请关闭本机。
● 请勿在任何情况下擅自改装或调整本机。
● 请勿让本机受到长时间阳光直射或放置于加热器具附近。
● 请勿将本机放在极度多尘,潮湿,水溅,以及不平稳的表面上。
● 请勿自行拆装,维修仅限专业技术人员。般危险性的了解和认识非
常重要。
本指南仅供参考,不构成任何形式的承诺,产品请以实物为准。

开箱和装置检查.............................................................随机附件........................................................................操作安全说明.................................................................电池安全说明................................................................. 使用前充电.................................................................... 电池长时间保存.............................................................. 锂电池的特性................................................................. 对电池进行充电..............................................................熟悉本机........................................................................功能说明........................................................................配件安装......................................................................... 安装SIM卡..................................................................... 安装带夹........................................................................ 安装肩夹........................................................................ 安装电池........................................................................基本功能........................................................................ 开机/关机....................................................................... 用户登录........................................................................ 呼叫使用........................................................................ 夜视模式........................................................................指示灯状态说明.............................................................操作说明........................................................................ 界面操作........................................................................ 连接网络....................................................................... 连接无线网络................................................................ 连接移动网络................................................................ 非系统性APP停止运行.....................................................简单故障排除.................................................................规格参数.........................................................................0101020303030303050708080809091010101010101112121212121314目录开箱和设备检查01
请小心从包装箱中取出对讲机。我们建议您在废弃包装材料之前确认一下箱内是否有下表列出的物品。若有任何物品在搬运中丢失或损坏,请与我们的经销商联系确认。

※ 请不要将电池放入微波炉和高压容器电池可能会过热和冒烟爆裂或突然起火。
如果电池泄漏或发出刺鼻的气味,立即将其远离易燃区
域。电池泄漏的电解液容易起火,可能会导致电池冒烟
或突然起火。
※ 请不要让破裂并泄漏的电池靠近火源如果电池发出刺鼻的气味,颜色看上去不同,变形或者
因任何原因而表现异常,请将电池从充电器或操作装置
上取下不要使用。
※ 请不要使用异常电池充电器是专门为该型号设备所设计的,对本机电池的充
电更为科学合理,安全可靠。
※ 请使用专用充电器操作安全说明
※ 请不要对电池充电时间过长如果对电池的充电在规定时间内仍未完成,请停止充电。电池可能会过热和冒烟爆裂或突然起火。 02 03
在使用之前先对电池充电为尽量减少电池放电,请不使用电池时将电池从装置上取下来,并保存在阴凉干燥处。
在长时间存放电池时请从设备上拆卸电池● 如果10天或更长时间不使用电池,则需将电池放电至 40%-65%,以延长电池寿命。● 当电池闲置超过10天时,需将电池放电到65%以下存储,防止电池鼓包。● 将电池存放在阴凉干燥处(温度低于25摄氏度)。
锂电池的特性● 电池经反复充电、放电,其容量逐渐减少。● 即使电池从不使用也会老化。● 在较阴凉处对锂电池充电,所需的时间较长。● 在较热处对电池充电会缩短其使用寿命。在较热处存放电池时,电池老化的更快。请不要将电池留在车内和放在加热具附近。● 如果电池使用时间变短,即使已经满电,也请更换电池。继续对电池进行充电和放电,将导致电解液泄漏。座充充电设备通过充电器接通电源后,红色指示灯亮代表接触良好,绿色指示灯亮代表充电完成,在充电过程中如果温度超过使用范围,或电池损坏、接触不良,指示灯不亮。电池安全说明

USB 线充电将 micro USB 线对准设备端接口插入,另一端 USB 线接口连接适配器,适配器通电后,LED 指示灯亮为充电状态。熟悉本机4
1
2
3
5
6
789
10 13
11 12
04 05

15
17
16
18
15
14
23
21
22
20
19
25
24
26
27
28
1
2
3
4
5
6
7
8
9
10
11
12
14
13
15
16
17
18
19
20
21
22
23
24
25
26
27
28
耳机/USB 接口
PTT
拍照键
电源键
前摄像头
显示屏
充电接口
支架旋钮
录像键
喇叭
红外灯
激光灯
求救信号键
状态指示灯
状态指示灯
后摄像头
电池扣
麦克风
录像键
麦克风
光感
手电筒
广角摄像头
警示灯
录音/音控-键
音控+
灯光键
SIM卡 功能说明06 07
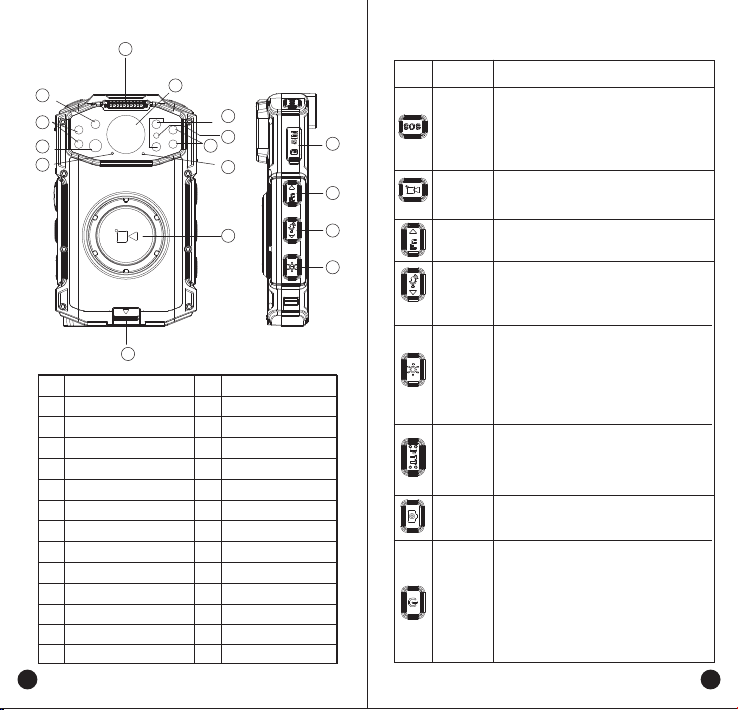
按键名称 功能PTT键 录像键求救信号键录音键音控键电源键拍照键灯光键● 电源键关机状态下长按2/s开机,开机状态按一下提示关机、重启选项。● 长按8/s设备进行强制重启。短按一下进行相机拍照,长按进入手电筒。PTT键按下说话进行对讲松开发送语音并接收其它设备发送的对讲语音,此功能需要指挥中心开启权限实现实时对讲功能。● 灯光键长按启动警灯闪烁,再次长按关闭警灯闪烁。● 快速按两下启动激光灯,再次快速按两下关闭激光灯。● 短按开启和关闭夜间拍摄。● 录音键短按启动录音功能,再次长按停止录音。● 短按一下进行音量减。录像键按一下会进行执法视频录制状态,录像中短按一下停止录像。● 长按一下预警到指挥中心,视频会上传到服务器。4短按一下标记视频为重要文件。音控键短按一下增加音量。

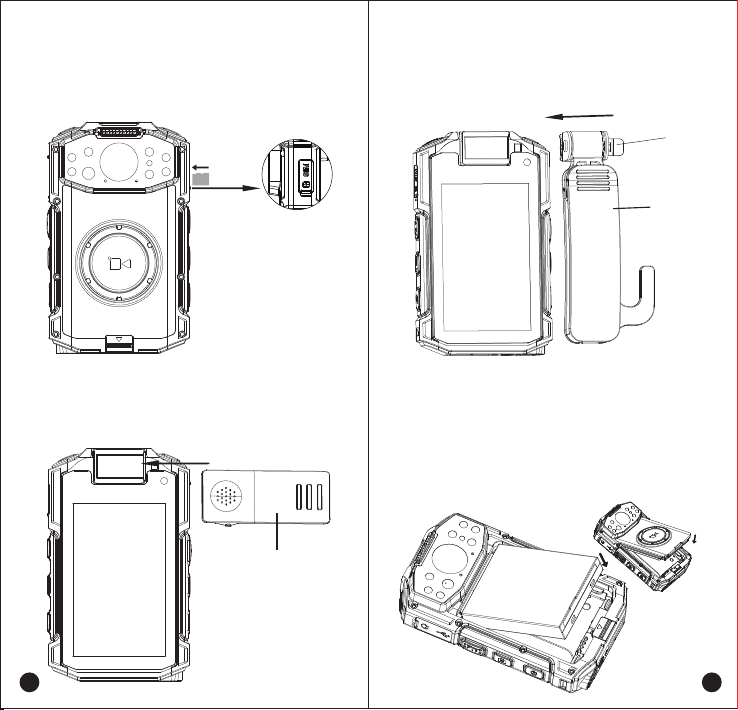
配件安装2.安装/拆卸带夹卸下带夹:将带夹对准卡槽定位,插入扣紧,顺时针旋转90°。卸下带夹:按逆时针90°方向将背夹拔出。1.安装SIM卡。设备支持NANO大小的SIM卡。您可以通过设备左侧的SIM卡槽安装SIM卡。08 09
肩夹弹片3.安装/拆卸肩夹安装带夹:背夹对准卡槽定位,插入扣紧。卸下背夹:触动弹片抬起即可拔出。4.安装电池(a) 打开电池盖:打开电池盖卡扣,然后可以轻松取出电池盖。 (b) 将带有金属触点的一端插入电池槽底部。(c) 向下按压电池另一端。(d) 密合电池盖:将电池盖装好,锁上电池盖卡扣。

基本功能● 开机长按开机键3s等待开机等待程序启动。● 关机长按开机键3s关机 。如果此时设备处于充电状态,设备亮红灯并显示当前电量。● 用戸登录用户登陆成功后,播报当前用户信息。● 呼叫使用指示灯状态说明序号工作状态LED指示灯123456呼叫状态(对讲)接听(对讲)充电状态充电状态⸺充满电正常待机状态极低电(低于15%)颜色 红色红色红色绿色绿色红色持续时长长亮长亮长亮长亮长亮闪烁(3秒1次)● 红外线模式当红外模式打开的情况下,设备进入录像、视频直播或摄像模式时,设备会根据设备所处的照明环境自动判断摄像机是否需要进入红外模式。按下PTT键,即可开始对讲。设备处于呼叫状态,led灯长亮红灯;如果设备处于接听状态,LED灯长亮红灯;设备属于空闲状态为绿灯;每次毎人最长通话时间限制在60秒内,如果超过60秒,则自动释放话权(可以APP设置成1-60s )。10 11
界面操作多媒体回放,可以查看视频、图片和录音设置菜单可以对GPS\WIFI\蓝牙、语言、时间日期、红外开关等功能进行设置主界面中有6个功能菜单,点击相应菜单可进入相关功能预览界面:设备开机进入预览界面,该界面按返回虚拟键可进入主界面操作说明摄像媒体参数集群对讲回放应用程序系统设置
25.3G
08-05 15:26
1080P
test
当前日期时间存储卡容量返回键电池电量视频音频图片IMP320235462445.mp4IMP320235462446.mp4IMP320235462447.mp4IMP320235462448.mp4IMP320235462449.mp4IMP320235462450.mp4IMP320235462451.mp4IMP320235462452.mp4系统设置红外开关定位声音时间无线网络蓝牙语言

连接网络1、连接无线网络打开设备点击“设置(Settings)”图标后, 找到 图标点击进入复选框,选择一个想要连接的无线网点击该无线网,输入该无线网的密码即可。2、连接移动数据网络点开对讲机下拉菜单,点击移动数据,找到移动网络打开,即可选择需要的网络类型。非系统性APP停止运行设置 > 应用程序 > 选择要停止运行的 APP> 停止运行
Setting红外开关定位声音时间无线网络蓝牙语言HHA2Honor V9inroco-LCPinroco_5G
21:28
100%安全WPA/WPA2 PSK密码inroco-LCP显示密码高级选项WLAN
21:16
100%应用信息PTT
已安装应用通知停用强行停止取消连接开启已连接
21:16
100%流量使用情况流量警告 2.15 GB 流量节省程序关闭移动移动数据移动数据用量8月1日82日期间已使用 0 B
21:19
100%在设置中搜索显示NFC
蓝牙,投射,NFC应用和通知权限,默认应用100%Battery
摄像媒体参数系统设置
21:16
100%电话 只能拨打24
在线8月25周三12 13
简单故障排除
无法开机● 电池接触, 清洁电池触点或更换电池触点电池。● 电池可能因脏或损坏而接触不良。● 电池可能没电了。充电或更换电池。● 电池可能安装错误。拆卸并重新接上电池。终端死机按键无反应显示屏白屏● 按键可能无法正常工作暂时的,重新启动终端。● 按键坏了,请与经销商或本公司联系客户服务。● 显示屏可能无法正常工作暂时的, 重新启动终端。● 显示屏坏了, 客户服务请与经销商或本公司联系。
无法连接网络
● 手机网络未启用,打开SIM卡网络,联系运营商启用蜂窝网络。现象解决方案
连接有回音或者噪音无法检测到SIM卡无法定位电池无法充电待机时间缩短● 环境原因, 高温环境下电池寿命变短,更换新电池。● 电源适配器插头可能损坏或接触不良,拔出并重新插入适配器。● 数据线缆连接器可能损坏或接触不良,拔出并重新插入电缆。● 位置信号弱,终端可能无法接收信号。搬到开阔平坦的地方,再试一次。● 运营商有关,信号微弱地区耗电增加,请暂时将对讲机关闭。● SIM卡可能安装不正确, 拆卸并重新连接SIM卡。● SIM卡可金属触点脏或损坏造成的触点, 清洁金属触点。● 通信信号可能较弱, 确保终端在网络覆盖范围内。● 扬声器可能被挡住,清洁扬声器表面。● SIM卡无法正常工作或无法使用, SIM有无欠费,确认SIM卡余额使用或付费。● 程序运行过多,强制停止一些正在运行的应用程序或重新启动终端。

14
规格参数Android 8.1频段CPU操作系统GSM:850/900/1800/1900WCDMA:850/900/1900/2100/1700FDD:B1/B2/B3/B4/B5/B7/B8/B17/B20/B28ABTDD:B34/B38/B39/B40/B41MT6762 八核2.0GHz处理器内存工作电压屏幕尺寸摄像头视角RAM 2GB+ROM 16GB 3.8V3.1英寸 480x800(屏幕分辨率)前置500万 后置1300万 广角摄像头400万 117 °-40℃ ~ +70℃支持WIFI BT NFC存储温度北斗 GPS AGPS GLOONASS 尺寸102.7*62.4*26.5mm重量≈ 175g (不含背夹)工作温度-20°C +55°C
Specification
Android 8.1
Frequency
CPU
OS
GSM:850/900/1800/1900
WCDMA:850/900/1900/2100/1700
FDD:B1/B2/B3/B4/B5/B7/B8/B17/B20/B28AB
TDD:B34/B38/B39/B40/B41
MT6762 Octa-core 2.0GHz processor
Memory
Working Voltage
Display
Camera
Viewing Angle
RAM 2GB+ROM 16GB(ROM)
3.8
3.1inch, 480x800
Front Camera: 5.0MP
Rear Camera: 13.0MP
Wide-angle Camera: 4.0MP
117 °
-40°C ~ +70°C
Support
WIFI BT NFC LTE
Storage
Temperature
BDS GPS AGPS GLOONASS
Dimension
(H*W*D) 102.7*62.4*26.5mm
Weight ≈ 175g (without belt clip)
Working
Temperature -20°C +55°C
Can’t Connect
to Network
The SIM card cannot work properly or cannot be used.
- Make sure the SIM card has a balance instead of arrears.
In areas with poor signal, out of network service, or SIM card is
not effective.
- Remove the SIM cards, and reinsert them properly, or change
another one. Move to somewhere with better network signal or
go to the window if you are in the building.
The mobile network not available.
- Select SIM card network, and contact the operator to activate
the cellular network.
14

12 13
Solutions
Unable to
Power On
Buttons Not
Working
Terminal
Crash
Echo or
Noise
During
Connecting
Unable to
Locate
Problems
The battery maybe incorrectly installed.
- Re-attaching the battery.
The battery maybe out of power.
- Charge or replace the battery.
The battery may be in poor contact due to dirty or damage.
- Clean the electrical contact or replace it.
Too much APPS on processing.
- Force some programs to quit or restart the terminal.
The buttons may not work temporarily, restart the terminal.
The buttons is broken, contact the dealer or our company.
White Screen
Error
Display screen may not work temporarily, restart the device.
The display screen is damaged, contact the dealer or our company.
The speaker may be covered, clean the speaker surface.
Unable to
Detect
SIM Card
The SIM card may be incorrectly installed.
- Remove and re-insert the SIM card.
Poor
Reception
The SIM card may be not working due to dirt or damage.
- Clean the electrical contact or replace it.
Unable to
Charge
The power adapter plug may be damaged or poor contacting.
- Pull out and re-plug the adapter.
The charging cable connectors may be damaged or poor contact.
- Pull out and re-insert the cable.
Shorter
Standby Time
The battery life becomes shorter in high temperature environment.
- Replace a new qualified battery.
Power consumption increased in areas with weak signal.
- Please temporarily turn off the device.
The signal is weak and the radio can’t receive the signal.
- Move to open and flat area and try again.
Less Duration The duration mostly depends on network service provider settings.
The signal may be weak, make sure the terminal is within network
coverage.
- Restart the radio and it’ll automatically search for better
available network.
Localized poor coverage due to basement, blocking buildings or
destructive interference, and geographical distance from
obstacles between your radio and the nearest cell tower.
- Please move to somewhere with improved signal.
Localized network is busy during rush hours.
- Please wait for a while before another attempt or try to avoid
using in rush hours.
Basic Troubleshooting
If your device shows following problem during operating,
please check the instruction as below. If problems can’t
be solved, please contact local authorized service.
Open “Settings”, tap on ‘Cellular Network’, select the one
that you need to connect.
2.Cellular Network Connecting
Select “Settings” → Apps → Confirm the APP required→
FORCE STOP
Stop Running Non-systematic APP
Network Connecting
1.WIFI Connecting
Turn on the device, click “Settings ”, touch and hold ,
make sure Wi-Fi is turned on. Select the wireless network
and enter the password to connect.
HHA2Honor V9inroco-LCPinroco_5G
21:28
100%SecurityWPA/WPA2 PSKPasswordinroco-LCPShow passwordAdvanced options
21:16
100%Data usage
2.15 GB Data warning
Data sayer
Off
Mobile
Mobile data
VideoMediasettingSetting
21:16
100%NO SERVICE
UU
online
Wed, Jul 28
21:16
100%APP info
PTT
Installed
App notiflcations
DISABLE FORCE STOP
21:19
100%Search settings
Network & Internet
Wi-Fi,mobile,data us...
NFC
Bluetooth,Cast,NFC
Apps¬ifications
Permissions,default
Battery
SettingIR switchlocstionsounddateWiFibluetoothlanguage

10 11
Operating Instructions
Operation Interface
Preview Interface: Turn on the device and show the
preview interface. Press the “return virtual-key” to enter the
main interface.
Function Menus: There are 6 function menus in the main
interface, click the corresponding menu to access related
functions.
Setting: GPS, WIFI, Bluetooth, Language, Time and Date,
Night Vision Mode, etc.
Multimedia Playback: view videos, pictures and recordings.
VideoMediasettingPTTPlaybackApplicationeSetting
25.3G
08-05 15:26
1080P
test
Current TimeStorageRetuenBattery LevelVIDEOAUDIOPICIMP320235462445.mp4IMP320235462446.mp4IMP320235462447.mp4IMP320235462448.mp4IMP320235462449.mp4IMP320235462450.mp4IMP320235462451.mp4IMP320235462452.mp4SettingIR switchLocationSoundDateWiFiBluetoothLanguageBasic functions
Status Indicators
1.Powering Up and Powering Off the Device
●
Power On: Long press the power button for 3 seconds
and the program will start.
●
Power Off: Long press the power button for 3 seconds.
If the device is on charging, indicators will be in red and
display the current battery level.
3.Initiate a Call
●
Press PTT button and start to talk.
●
The LED light is solid red during transmitting and
receiving.
●
The LED light is solid green during idle state.
●
The call ends automatically once it lasts more than 60
seconds, which could be set to 1-60 seconds by APP.
2.User Log-in
After the user log in successfully, user ID will be broadcast.
2.Night Vision Mode
Night mode automatically turns on when the camera detects
a low-light environment.
Fully charged
Working Status
Blinking Red
Solid Red
Solid Green
LED Indicator Remark
Flash 3S/timeLow power less than 15%
The device is transmitting.
The device is calling.
The device is charging.
Normal standby
08 09
Accessories Installation
1.Insert NANO-size SIM card.
Insert SIM card to the the SIM card slot on the left of the
device.
2.Attaching/ Removing the Belt Clip
●
Align the belt clip with the grooves on the device,
insert, rotate 90°clockwise and tighten it.
●
Rotate 90°counterclockwise to remove the belt clip.
Belt clip
Shoulder Clip
Plectrum
3.Attaching/ Removing the Shoulder Clip
●
Align the shoulder clip with the grooves on the device,
press it downwards until it clicks.
●
Touch the plectrum to pull out the shoulder clip.
4.Attaching/ Removing the Shoulder Clip
●
Touch the cover plectrum and remove the battery cover
buckle.
●
Align the electrical contact of the battery with the bottom
rails.
●
Press the battery firmly, make sure the electrical
connection touch with the bottom.
●
Close the battery cover and lock the battery cover
buckle.
Basic Functions
Button NameDescriptionPTTButton
Video
Record
Button
SOS
Button
Audio
Recording/
Volume-
Button
Volume+
Button
Power
Button
Camera
Button
Light
Button
●
When the device is power off, long press 2s to start.
●
When the device is power on, press to select shutdown or restart options as prompted.
●
Long press 8s to restart the system forcibly.
●
Short press to take a picture.
●
Long press to turn on flashlight.Press the PTT button to call and release it to listen. Remark: This function requires the permission from the command center.
●
Long press to start alarm light flashing, long press again to turn it off.
●
Double-click quickly to start the laser lamp, double click again to turn it off.
●
Short press to turn on or turn off night shooting.
●
Press the recording button to start recording, and long press to stop.
●
Short press to reduce the volume.Press the video button to record video, short press to stop during recording.
●
Long press to notify the command center and upload video to the server automatically.
●
Short press to mark the video as important.Press volume+ button to increase the volume.06 07
1
2
3
4
5
6
7
8
9
10
11
12
14
13
15
16
17
18
19
20
21
22
23
24
25
26
27
28
Infrared Light
Status Indicator
Rear Camera
Battery Fixed Buckle
Earpiece/ USB Interface
PTT
Take Photo Button
Power Button
Front Camera
Screen
Charging Interface
Rotary Knob
Video Record Button
Speaker
Laser Light
SOS Button
Status Indicator
Microphone
Video Record Button
MIC
Light Sensor
Flashlight
Wide-angle Camera
Warning Light
Recording/ Volume-
Volume+
Light
SIM Card
15
17
16
18
15
14
23
21
22
20
19
25
24
26
27
28

4
1
2
3
5
6
789
10 13
11 12
Product Overview
04
05
USB Charging
Align the micro USB cable with the device and insert to the
power adaptor. The LED indicator will light up during charging.

Battery Care
Fully Charge Battery Before Initial Use
●Do preserve battery life by switching off a device and
removing the batteries when it's not being used, and is not
expected to be used for extended periods of time.
●Do practice proper battery storage by keeping batteries in a
cool, dry place at normal room temperature.
Properly Store Batteries
●Remove the battery from the device.
●Charge and discharge the battery to 40%-65% if it will not be
used for 10 days or more. This can greatly extend the battery
life.
●The battery should drop below 65% when it is idle for more
than 10 days to prevent it from swelling.
d. Store the battery in cool and dry environment that’s less
than 25
°C
.
Features of Lithium Battery
●Battery capacity will reduce after multiple charging cycles.
●The battery capacity drops gradually even without being
used.
●Longer charging time is required in shady place.
●Charging and storing Lithium battery in warm condition will
short its lifespan. Please do not leave them inside the vehicle
or near the heater.
e.If the battery working time has reduced significantly,
please
replace the battery immediately in avoidance of fluid leakage.
Lithium Battery Charging
●Connect the device with an AC adapter, power on, the LED
turns to red.
●The LED shows green of fully charged.
●The LED is off under high operating temperature, poor
contact, or battery damage.
Charging
Desktop Charger
●When using the charger, please place it on a flat surface
away from flammable materials.
●Please put it into the desktop charger port as to the
instruction diagram, and make sure the device is safe during
charging.
●Please do not place it into the desktop charger when not
charging.
03
Handling Precautions
※ Do not overcharge the battery
Please stop charging if it can’t be fully charge within
required time. The battery probably overheats, smokes,
bursts or suddenly be on fire due to abnormal charging
process.
※ Do not discard battery in a fire, microwave or
high pressure container.
The battery probably overheats, smokes, bursts or suddenly
be on fire.
※ Do not expose damaged battery near any fire.
If the battery is broken, leaking or with an abnormal odor,
please remove it from flammable areas immediately. The
fluid in the battery is flammable, which may cause smoke
and fire.
※ Do not use abnormal battery
If the battery is with odd smelly, discolored, deformed, etc.,
please stop charging immediately.
※ Please use authorized power adaptor
To comply with warranty terms and avoid damages, charge
the battery using a specified charger for best performance.
※ Desktop charging
The desktop charger must be away from the flammable
places. Please make sure the radio working properly and
without any damage while charging, do not put the radio
into the charger’s socket if no need of charging.
02

01
Unpacking and Device Checking
Please unbox and take out the device and all accessories
carefully, and ensure all lists have been gotten before
discarding the cardboard box. If any items are lost or damaged
in transit, please contact with our distributors.
Items Number
Body Worn Camera
Lithium Battery
Power Adaptor
USB Charging Cable
Shoulder Clip
Belt Clip
Charger
User Manual
1
1
1
1
1
1
1
1
Contents
01
01
02
03
03
03
03
05
07
08
08
09
09
10
10
10
10
10
10
11
12
12
12
12
12
13
14
Unboxing and Device Checking
..........................................
Handling Precautions
.............................................................
Battery Care
.............................................................................
Fully Charge Battery Before Initial Use
...............................
Properly Store Batteries
.......................................................
Features of Lithium Battery.
.................................................
Lithium Battery Charging
......................................................
Product Overview
...................................................................
Accessories Installation
.........................................................
Insert SIM Card
.....................................................................
Attaching the Belt Clip
..........................................................
Attaching the Shoulder Clip
.................................................
Attaching the Battery
............................................................
Basic Functions
.......................................................................
Powering Up and Powering Off
...........................................
User Log-in
............................................................................
Initiate a Call
..........................................................................
Night Vision Mode
.................................................................
Status Indicators
.....................................................................
Operating Instructions
............................................................
Operation Interface
...............................................................
Network Connecting
.............................................................
Wireless Network Connecting
............................................
Cellular Network Connecting
.............................................
Stop Running Non-systematic APP
.....................................
Basic Troubleshooting
...........................................................
Specification
............................................................................

This guide is for reference only and the information in this
document is carefully examined, and is believed to be entirely
reliable. However, no responsibility is assumed for
inaccuracies. Furthermore, Inrico reserves the right to make
changes to any products herein to improve readability,
function, or design. Inrico does not assume any liability arising
out of the applications or use of any product or circuit
described herein; nor does it cover any license under its patent
rights, nor the rights of others.
Disclaimer
Please read the following content carefully. It is very important
for radio users to gain general knowledge and risks.
●
Do not use the device or charging the battery in any
hazardous areas such as gas, dust, steam, etc.
●
Please turn off the device while refueling or parking at the
gas station.
●
Do not disassemble your radio.
●
Avoid prolonged time in the sun or placing it near heating
appliance.
● Avoid excessive exposure to the extreme dusty, damp and
splashing place, or leave it on unstable surface.
● Changes or modifications made to this device, not expressly
approved by Inrico, could void the user's authority to operate
this equipment.
● Reparation by professional technicians, do not disassemble
by yourself.
Notes Before Using

particular installation. If this equipment does cause
harmful interference to radio or television reception, which
can be determined by turning the equipment off and on,
the user is encouraged to try to correct the interference by
one or more of the following measures:
—Reorient or relocate the receiving antenna.
—Increase the separation between the equipment and
receiver.
—Connect the equipment into an outlet on a circuit
different from that to which the receiver is connected.
—Consult the dealer or an experienced radio/TV
technician for help.
FCC Radiation Exposure Statement:
The device has been tested and comply with FCC SAR limits
Any Changes or modifications not expressly approved
by the party responsible for compliance could void the
user's authority to operate the equipment.
This device complies with part 15 of the FCC Rules.
Operation is subject to the following two conditions:
(1) This device may not cause harmful interference,
and (2) this device must accept any interference
received, including interference that may cause
undesired operation.
FCC Caution:
IMPORTANT NOTE:
Note: This equipment has been tested and found to
comply with the limits for a Class B digital device,
pursuant to part 15 of the FCC Rules. These limits are
designed to provide reasonable protection against
harmful interference in a residential installation. This
equipment generates, uses and can radiate radio
frequency energy and, if not installed and used in
accordance with the instructions, may cause harmful
interference to radio communications. However, there is
no guarantee that interference will not occur in a

Body-worn operating
This device was tested for typical body-worn with belt-clips operations. To comply with RF
exposure requirements, a minimum separation distance of 1.0 cm must be maintained between
the user’s body and the other side of product.
Table of contents
Popular Digital Camera manuals by other brands

Sony
Sony Cyber-Shot DSC-J10 Service manual

Leica
Leica V-Lux 30 Specifications

Oceanled
Oceanled EYES HD GEN2 Installation & operation manual

Polaroid
Polaroid Cameras I Basic operation gude

Astrel Instruments
Astrel Instruments AST183X Getting started

Photron
Photron FASTCAM Mini GigabitEthernet Interface Connection manual


