manuals.online logo
Brands
  1. Home
  2. •
  3. Brands
  4. •
  5. Integra
  6. •
  7. Boiler
  8. •
  9. Integra Xmart HEAT MASTER User manual

Integra Xmart HEAT MASTER User manual

HEAT MASTER
ENGLISH
1. Introduction
HEAT MASTER is exclusively designed for electronically controlled boilers and home heaters that contains
electronic control circuitry and electric water pump. Featuring with dynamic voltage regulator, this device can
ensure stable power to connected loads as utility. Equipped with LCD digital display, it provides real-time system
vitals to users. The built-in DC start function enables the HEAT MASTER to be started up without a supply of AC
power. The main features of this HEAT MASTER are listed below:
 Microprocessor control guarantees high reliability
 Built-in enhanced boost & buck AVR
 Fast charger
 Green power function for energy saving
 Auto restart during AC recovery
 Comprehensive LCD display
 External battery connection available for long-term operation
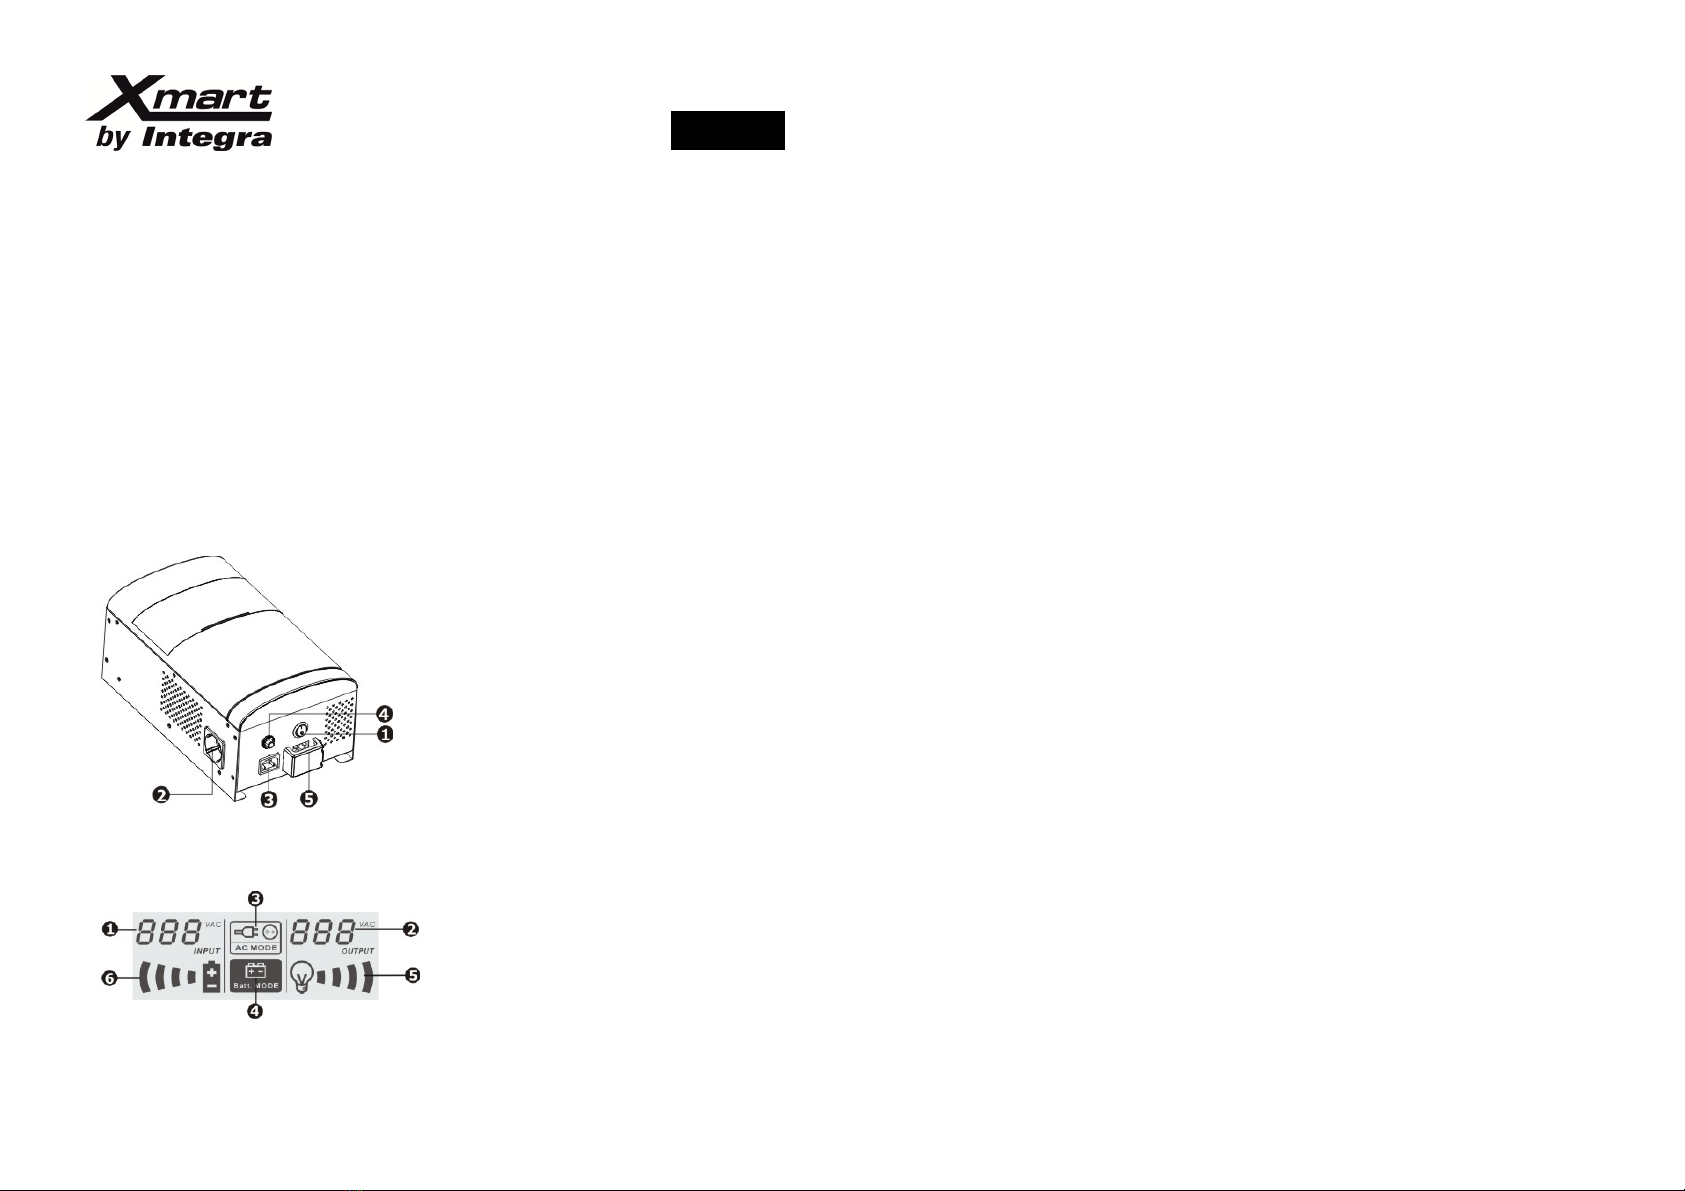
2. Product Overview
LCD Panel:
1Inputvoltage 4 Battery mode indicator
2Outputvoltage 5 Load level indicator, flashing indicates overload
3 AC mode indicator 6 Battery capacity indicator, flashing indicates low battery
 Power switch
 Output receptacles
 AC input
 Circuit breaker
 External battery connector
3. Important Safety Warning (SAVE THESE INSTRUCTIONS)
CAUTION! To prevent the risk of fire or electric shock, install in a temperature and humidity controlled indoor area
free of conductive contaminants. (See the specifications for the acceptable temperature and humidity range.) To
reduce the risk of overheating the HEAT MASTER, do not cover the HEAT MASTER cooling vents and avoid
exposing the unit to direct sunlight or installing the unit near heat emitting appliances such as space heaters or
furnaces. Do not allow liquids or any foreign object to enter the HEAT MASTER. Do not place beverages or any
other liquid-containing vessels on or near the unit.
CAUTION! Do not plug the HEAT MASTER input into its own output. Connection to any other type of receptacle
other than a two-pole, three-wire grounded receptacle may result in shock hazard.
CAUTION! In the event of an emergency, press the “OFF” button and disconnect the power cord from the AC power
supply to properly disable the HEAT MASTER.
Attention hazardous through electric shock. Also with disconnection of this unit from the mains, hazardous voltage
still may be accessible through supply from battery. The battery supply should be therefore disconnected in the
plus and minus pole at the quick connectors of the battery when maintenance or service work inside the HEAT
MASTER is necessary.
CAUTION! Servicing of batteries should be performed or supervised by personnel knowledgeable of batteries and
the required precautions. Keep unauthorized personnel away from batteries.
CAUTION! Internal battery voltage is 12VDC. Its technology is sealed, free-maintenance, lead-acid battery.
CAUTION! Do not dispose of batteries in a fire. The battery may explode. Do not open or mutilate the battery or
batteries. Released electrolyte is harmful to the skin and eyes.
CAUTION! Unplug the HEAT MASTER prior to cleaning and do not use liquid or spray detergent. It does not require
internal cleaning.
4. Installation and Initial Startup
Placement Conditions
Install the HEAT MASTER in a protected area that is free of excessive dust and has adequate air flow. Do not place
the HEAT MASTER below other equipment can drop water over it. Do NOT operate the HEAT MASTER where the
temperature and humidity is outside the specific limits. (Please check the specs for the limitations.)
Wall Mount the Unit
The unit can be mounted to a wall surface.
1. Refer to Chart 1 to mark 6 black dot on the wall.
2. Use a sharp nail to puncture the center of each black dot.
3. Mount the unit by positioning the key-hole slots over the mounting nails. (see chart 2)
Connect to Utility and Charging
Plug in AC input cord to the wall outlet. The unit charges its battery while connecting to the utility.
Connect the Loads
Simply plug in the motor-typed load to output receptacles on the side of the HEAT MASTER. Simply turn on the
power switch of HEAT MASTER unit. Then, the device connected to the HEAT MASTER will be protected by HEAT
MASTER unit.
Turn On/Off the Unit
Turn on the HEAT MASTER unit by pressing the power switch. Turn off the HEAT MASTER unit by pressing again
the power switch.
Connect to External Battery Bank
If additional runtime is required connect Heat Master to external battery pack.
WARNING!!!!: Battery connection does not accept reverse polarity.
 Left terminal (+) in Heat Master must be connected to left terminal (+) in Ext. Battery
 Right terminal (-) in Heat Master must be connected to right terminal (-) in Ext. Battery
Chart 1 Chart 2
5. Trouble Shooting
Problem Possible Cause Solutions
HEAT MASTER cannot be turned on
after pressing the power switch.
Low battery. Charge at least 4-6 hours.
Battery defect. Replace the battery with the same type
LCD flashes and alarm beeps
continuously when utility power is
normal.
The HEAT MASTER is overload. Remove some loads first. Before
reconnecting equipment, please verify
that the load matches capacity
specified in the specs.
Circuit breaker trip. Reset the breaker.
Battery defect. Replace the battery with the same type
of battery.
When power fails, back-up time is
shorten.
It is overload. Remove some critical load.
Battery voltage is too low. Charge it at least 4-6 hours.
Battery defect. It might be due to
high temperature operation
environment, or improper operation
to battery.
Replace the battery with the same type
of battery.
The mains is normal but it is battery
mode.
Power cord is loose. Reconnect the power cord properly.
6. Specifications
HEAT MASTER
Rated Output Capacity / Capacidad Nominal
Peak Capacity / Capacidad Pico 800 VA / 640 W (< 6 s)
Input - Entrada
Voltage / Voltaje - Frequency / Frecuencia
Output - Salida
Voltage / Voltaje - Frequency / Frecuencia
Auto-restart / Auto-arranque Yes / Si
Internal Batteries - Baterías Internas
Type / Tipo
Backup Time / Autonomía (*) Heater Mode: Domestic hot water
"ON" (80W)
Central heating
circuit "ON" (120W)
Heat Master: 75min 60min
Heat Master + 1 EXBATT: 260min 180min
Recharge Time / Tiempo de Recarga
Protections / Protecciones
Overloads / Sobre-Cargas
Surge/Spikes Protection / Protección contra Picos
Product Features / Características del Producto
Power Outlets / Tomas
Product Size-Weight / Dimensiones-Peso Producto
Operating / Condiciones de Operación
(*) Backup tests based on gas boiler: "ROCA SARA 24/24" dual domestic hot water & central heating functions (20.700Kcal/h ; 24KW max.)
(*) Autonomía con una caldera ROCA SARA 24/24 en modo de agua caliente y calefacción central (20.700Kcal/h ; 24KW max.)
MOV protection L-N / Protección MOV entre L-N
1 x FRENCH or 1 x SCHUKO (CEE 7/4)
319 x 190 x 150 - (9 Kg)
< 95% RH (non condensing) / < 40 dB / 0-40ºC
Technical specs can be modified to comply with special project requirements / Las especificaciones se pueden ajustar para proyectos.
Specifications may change without further notice / Las especificaciones pueden cambiar sin previo aviso.
250 VA / 200 W
230V (162-268 Vac) - 50Hz
230V (+/- 10'%) - 50Hz
Maintenance Free VRLA-AGM / Sellada Sin Mantenimiento
4-6 hours to 90% capacity / 4-6 Horas hasta 90%
Circuit Breaker with Manual Reset / Disyuntor Rearmable

Popular Boiler manuals by other brands

Ferroli DOMINA 102 DGT Installation, servicing and user instructions

Ferroli

Ferroli DOMINA 102 DGT Installation, servicing and user instructions

Rinnai RCB301AN user manual

Rinnai

Rinnai RCB301AN user manual

ECR International B Series Installation, operation and maintenance manual

ECR International

ECR International B Series Installation, operation and maintenance manual

Immergas EOLO Mini manual

Immergas

Immergas EOLO Mini manual

Zenith Hydroboil Series Installation and operating instructions

Zenith

Zenith Hydroboil Series Installation and operating instructions

Sime Ecomfort Plus User instructions

Sime

Sime Ecomfort Plus User instructions

Sime ECOMFORT PLUS 25 HE User instructions

Sime

Sime ECOMFORT PLUS 25 HE User instructions

Nibe NIBE VVM 300 Installation and maintenance instructions

Nibe

Nibe NIBE VVM 300 Installation and maintenance instructions

Gorenje OTG80SLSIM Instructions for use

Gorenje

Gorenje OTG80SLSIM Instructions for use

Truma BOA operating instructions

Truma

Truma BOA operating instructions

Marco Ecoboiler WMT3 (p/n 1000670) installation instructions

Marco

Marco Ecoboiler WMT3 (p/n 1000670) installation instructions

Kospel EKCO.M3 Assembly and operating instructions

Kospel

Kospel EKCO.M3 Assembly and operating instructions

Bosch Worcester Greenstar Danesmoor Installation, user instructions & customer care guide

Bosch

Bosch Worcester Greenstar Danesmoor Installation, user instructions & customer care guide

Myson Apollo 15/30 Si Installation and servicing instructions

Myson

Myson Apollo 15/30 Si Installation and servicing instructions

Ferroli divaproject C24 Instructions for use, installation & maintenance

Ferroli

Ferroli divaproject C24 Instructions for use, installation & maintenance

MHG Heating EcoStar 500 Installation and operating manual

MHG Heating

MHG Heating EcoStar 500 Installation and operating manual

LK Systems 11-n Assembly instructions

LK Systems

LK Systems 11-n Assembly instructions

Indol W381A+ user manual

Indol

Indol W381A+ user manual

manuals.online logo
manuals.online logoBrands
  • About & Mission
  • Contact us
  • Privacy Policy
  • Terms and Conditions

Copyright 2025 Manuals.Online. All Rights Reserved.