IPSO -LSG MICRO 9 User manual

IPSO MICRO 9
1234567890123456789012
1
23456789012345678901
2
1
23456789012345678901
2
1
23456789012345678901
2
1
23456789012345678901
2
1
23456789012345678901
2
1
23456789012345678901
2
1
23456789012345678901
2
1
23456789012345678901
2
1
23456789012345678901
2
1
23456789012345678901
2
1
23456789012345678901
2
1
23456789012345678901
2
1
23456789012345678901
2
1
23456789012345678901
2
1
23456789012345678901
2
1
23456789012345678901
2
1
23456789012345678901
2
1
23456789012345678901
2
1
23456789012345678901
2
1
23456789012345678901
2
1
23456789012345678901
2
1
23456789012345678901
2
1
23456789012345678901
2
1
23456789012345678901
2
1
23456789012345678901
2
1
23456789012345678901
2
1
23456789012345678901
2
1
23456789012345678901
2
1
23456789012345678901
2
1
23456789012345678901
2
1
23456789012345678901
2
1
23456789012345678901
2
1
23456789012345678901
2
1
23456789012345678901
2
1
23456789012345678901
2
1
23456789012345678901
2
1
23456789012345678901
2
1
23456789012345678901
2
1
23456789012345678901
2
1
23456789012345678901
2
1
23456789012345678901
2
1
23456789012345678901
2
1
23456789012345678901
2
1
23456789012345678901
2
1
23456789012345678901
2
1
23456789012345678901
2
1
23456789012345678901
2
1
23456789012345678901
2
1
23456789012345678901
2
1
23456789012345678901
2
1
23456789012345678901
2
1
23456789012345678901
2
1
23456789012345678901
2
1
23456789012345678901
2
1
23456789012345678901
2
1
23456789012345678901
2
1
23456789012345678901
2
1
23456789012345678901
2
1
23456789012345678901
2
1
23456789012345678901
2
1
23456789012345678901
2
1
23456789012345678901
2
1
23456789012345678901
2
1
23456789012345678901
2
1
23456789012345678901
2
1
23456789012345678901
2
1
23456789012345678901
2
1
23456789012345678901
2
1
23456789012345678901
2
1
23456789012345678901
2
1
23456789012345678901
2
1
23456789012345678901
2
1
23456789012345678901
2
1
23456789012345678901
2
1
23456789012345678901
2
1
23456789012345678901
2
1
23456789012345678901
2
1
23456789012345678901
2
1
23456789012345678901
2
1
23456789012345678901
2
1
23456789012345678901
2
1
23456789012345678901
2
1
23456789012345678901
2
1
23456789012345678901
2
1
23456789012345678901
2
1
23456789012345678901
2
1
23456789012345678901
2
1
23456789012345678901
2
1
23456789012345678901
2
1
23456789012345678901
2
1
23456789012345678901
2
1
23456789012345678901
2
1
23456789012345678901
2
1
23456789012345678901
2
1
23456789012345678901
2
1
23456789012345678901
2
1
23456789012345678901
2
1
23456789012345678901
2
1
23456789012345678901
2
1
23456789012345678901
2
1
23456789012345678901
2
1
23456789012345678901
2
1
23456789012345678901
2
1
23456789012345678901
2
1
23456789012345678901
2
1
23456789012345678901
2
1
23456789012345678901
2
1
23456789012345678901
2
1
23456789012345678901
2
1
23456789012345678901
2
1
23456789012345678901
2
1
23456789012345678901
2
1
23456789012345678901
2
1
23456789012345678901
2
1
23456789012345678901
2
1
23456789012345678901
2
1
23456789012345678901
2
1
23456789012345678901
2
1
23456789012345678901
2
1
23456789012345678901
2
1
23456789012345678901
2
1
23456789012345678901
2
1
23456789012345678901
2
1
23456789012345678901
2
1
23456789012345678901
2
1
23456789012345678901
2
1
23456789012345678901
2
1
23456789012345678901
2
1
23456789012345678901
2
1
23456789012345678901
2
1
23456789012345678901
2
1
23456789012345678901
2
1
23456789012345678901
2
1
23456789012345678901
2
1
23456789012345678901
2
1
23456789012345678901
2
1
23456789012345678901
2
1234567890123456789012
IPSO - LSG n.v.
To prograù and change wash
programs
Nieuwstraat 146 - B-8560 Wevelgem (Belgium)
Tel. 056/41 20 54 - Fax 056/41 86 74
Part No. D1051

Contents
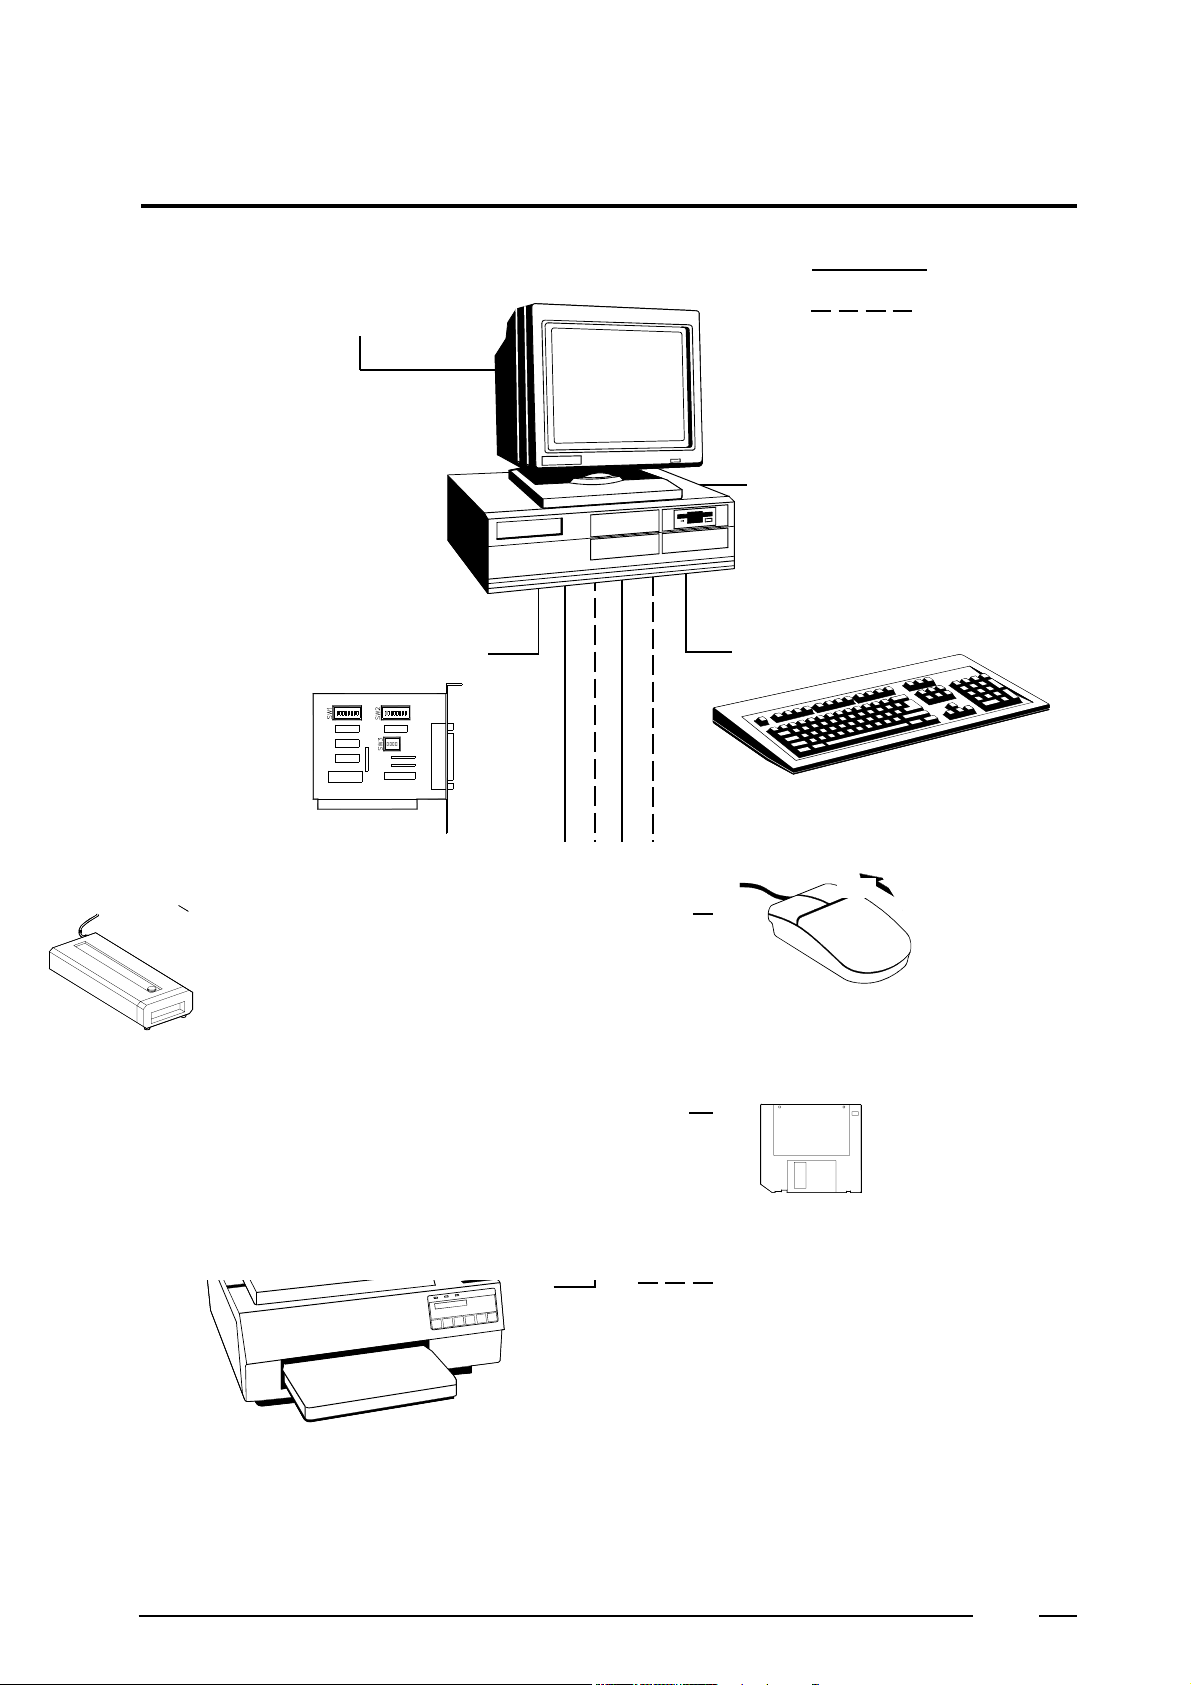
0 Hardware setting ................................................................................ 5
1 Installation hardware 'eprom programmer' ...................................... 6
General ........................................................................................... 6
Installation adapter card .................................................................. 6
Installation 'eprom programmer' ....................................................... 7
2 Installation software 'eprom programmer' ....................................... 8
General ........................................................................................... 8
Installation software ........................................................................ 8
3 Installation software 'to program wash programs' ........................... 14
General ........................................................................................... 14
Installation software ........................................................................ 14
4 Programmation ten wash programs ................................................. 15
General ........................................................................................... 15
To start up the program ................................................................... 16
Programming the configuration menu of the machine ...................... 17
Programmation of the wash programs ............................................. 24
5 To save and change data .................................................................. 34
Saving data ..................................................................................... 34
Creating a BIN-file ........................................................................... 35
Loading data ................................................................................... 36
Printing out data .............................................................................. 36
Splitting up 'systeemsoft' from 'datasoft' (decompose) ..................... 37
List with files under DIR "MICRO9" ................................................. 37
Converting to DOS .......................................................................... 38
Deleting BIN and DAT-files ............................................................. 38
Programming with mouse ................................................................ 38
6 Programmation eprom ...................................................................... 39
General ........................................................................................... 39
Programmation eprom ..................................................................... 39
To read in and change old eproms .................................................. 41
7 Deleting eproms ................................................................................ 43
Code: 249/00073/01
22/02/01

5
0
Computer : PC 386 or larger
Control system :
IBM compatible MS-DOS
with hard disk
Hardware setting
Printer :
to print out the programs
Eprom programmer
Type eprom : 27C 256A 12.5V
Adapter card SAC 201:
to be built in the PC
Screen type VGA colour
: necessary
:option
Luminous source ultraviolet light :
to delete the programmed eproms
Drive 5 1/4" DISKS A
Drive 3 1/2" DISKS B
Mouse
Keyboard

6
1
Installation hardware 'eprom programmer'
The computer has to be disconnected during the execution of
the following acts. Ignoring this instruction can lead to physical
injury (electrocution) ; damage of the SAC 201 card or damage
of the eprom programmer.
General
❺
❺
❺
❺
The SAC 201 adapter card as well as the 'eprom programmer' have to be
installed in order to program the desired wash programs on the eproms.
Disconnect the computer, pull the plug out of the plug switch .
Remove the cover of the computer .
Check the position of the DIP-switches on the adapter card :
SW1: all switches 'OFF'
SW2: switch 7 'ON'
other switches 'OFF'
SW3: switch 2 'ON'
other switches 'OFF'
Put the SAC 201 card carefully in the computer. Use the supplied screw to
lock it.
Installation of the adapter card

7
1
Installation of the 'eprom programmer'
Close the cover of the computer .
Make a connection between the port of the SAC 201 card and the 'eprom
programmer' with the supplied cable.
❺
❺
Switch on the computer. When the connections are correct, the led 'ON' of
the eprom programmer lights. The led 'BUSY' stays extinguished.
❺
Eprom programmer
Card port
Computer

8
2
EPROMP
MD
CD EPROMP
EPP8M1
A:\*.* C:\EPROMP
COPY
Installation software 'eprom programmer'
General
Used symbols
: space bar
: return
: cursor control keys
Installation of the software
Create a directory on the hardware of the PC, named 'EPROMP':
type
press
type
Start directory 'EPROMP' :
press
press
type
Put supplied disks in the computer drive
Copy the files of the supplied software to directory 'EPROMP'
A: drive of supplied disks
C: hard disk
The nomation of the drives (A or B) depends on the available drivestations
of the computer.
press
type
the menu appears on the display
to confirm
to confirm
to confirm
This software has to be installed in order to use the 'eprom programmer'.
❺
❺
❺
❺

9
2
Y
BUFFSIZE:256K GANG SIZE: 1
BUFFSTART: 00000 I/O ADDR:2EOH
BUFF END: 01FFF
PROMSTART:00000COUNTER:00000
PROM END:01FFF
CHECK SUM:48F7
Mfr:27/27C GeneralEPROM
TYPE:X256A VPP:12.5V
SPEED:Intelligent
File Edit Setup Mfr Type Quit le menu
Help Blank Read Verify Program Auto Compare Display
press
Step 1:
to go to 'Quit' of the menu bar
press
press
Check all data on the display. When everything corresponds with below data
(in defined frame), go on with step 1. If the data are different, go to step 2.
to leave the program
Step 2:
When Mfr. (manufacturer) is not equal to '27 / 27 C GENERAL
EPROM':
to go to Mfr of the menu bar
the different Mfr. possibilities appear
to confirm
press
press
❺
❺

10
2
1
❺
press to go to '27 / 27 C General EPROM'
press to confirm
'Type' of the menu bar is automatically activated.
(*) press the different eprom types appear
press to select 'X256A 12.5V'
press to confirm
When 'TYPE' is not equal to 'X256A12.5V':
❺
to go to 'Type' of the menu bar
press
press to go to 'Setup' of the menu bar
When 'SPEED' (program speed) is not equal to 'Intelligent':
❺
Follow the instructions mentioned above (*).
press the different speed possibilities appear
to go to 'Speed select'
press
the different speeds appear
press
to select 'Intelligent'
type
to confirm
press
Opmerking:
When on the EPROM next to the type specification F1 is menotioted, 'Quick Pulse' can be chosen
instead of 'Intelligent'

11
2
00000
01FFF
00000
When 'BUFFER START' is not equal to 00000
'BUFFER END' is not equal to 07FFF
'CHIP START' is not equal to 00000:
❺
to go to 'Setup' of the menu barpress
press the different buffer possibilities appear
press to go to 'Modify buffer'
'Buffer start address' appears on the display:
type
press to confirm
'Buffer end address' appears on the display:
type
press to confirm
'Chip start address' appears on the display:
type
press to confirm
If the SAC 201 card is programmed according to the instructions on pg. 2, then
'I/O ADDR'has to be equal to '2EOH'.
When 'I/O ADDR' is not equal to '2EOH':
❺
to go to 'Setup' of the menu barpress
press the different setup possibilities appear

12
2
E
Y
press to go to 'I/O select'
press
type which corresponds with '2EO'
to confirm
press
When the following message appears on the display:
'error identification on hardware'
This means that in the computer a card has been put with the same I/O
address as the SAC 201 card.
Act as follows:
❺
press
press to go to 'Quit' of the menu bar
Disconnect the computer, pull the plug out of the plug switch.
Remove the cover of the computer.
Remove the SAC 201 card from the computer.
Change the position of the DIP-switches:
❺
type to leave the program
the list of addresses appears on the display
to confirm
press
SW1: select one switch 'ON'
other switches 'OFF'
SW2: switch 7 'OFF'
select one switch 'ON' when SW1 is completely 'OFF'
others 'OFF'
SW3: switch 2 ALWAYS 'ON'
❺
❺
❺

13
2
Read the I/O address next to the switch you just pressed.
Repeat the acts as of pg. 2 Chapter 1.
Change the I/O address in the computer.
Example:
It is possible that these acts have to be repeated several times before a not-
used I/O address is found.
❺
❺
❺
Suppose SW2: switch 8 is 'ON'
other switches are 'OFF'
Then the I/O address is equal to 2FO
In the computer you select '2FOH'
❺

14
3
MICRO9
MD
B:\MICRO9*.* C:\MICRO9COPY
Installation software
' to program wash programs'
General This software has to be installed in order to progam the wash programs.
Used symbols
Installation of the software
type
Put the supplied disks in the drive of the computer. This disk contains 4 files:
1 - EHF55.EXE:the program soft for the execution of the programma-
tion.
2 - EHF55_00.PRG: the system soft, which guarantees the operating
of the machine .
3 - xxxxxxxx.DAT: the standard wash programs (option).
❺
press
❺
: space bar
: return
to confirm
❺
type
press to confirm
4 - xxxxxxxx.BIN: the standard file to program the eprom (option).
Copy the program soft to directory MICRO9
A : drive of supplied disk with the program soft
C : hard disk
The nomation of the drives depends on the available drive-stations in the
computer.
Create a directory on the hard disk of the PC, named 'MICRO 9' ( no
longer necessary if this directory has been made earlier).

15
4
K
Esc
: space bar - spatie
: return
: one line downwards
Programming the ten wash programs
General
Used symbols
: letters of keyboard
: numbers of keyboard
Used symbols at the programmation
Space bar
Each time the space bar is pressed, the fixed options appears on the display.
Press the return button to confirm your selection.
Escape button
Press escape button when you want to return from the CONFIG.MENU to
the general program card. This button is also used to leave the program.
Remark :
If your PC-system is equipped with a mouse : see pg. 36 “ To program with a mouse”.
❺
Return button
When no certain options are available, a certain value needs to be filled in. By
pressing return button, a white text block appears. Fill in the wished value
through the keyboard. Press return button again to confirm the value, filled in.
Cursor control keys
On the keyboard, there are 4 cursor control keys. By pressing them, the cursor
moves in horizontal or vertical direction (depends on the used key).

16
4
MICRO9
typ CD MICRO9
A
D
BC
2 - 57 - 4 - 3
WARMSOFT
To start up a program
press
Press
type
type
❺
❺
to confirm
IPSO-logo appears on display.
press Program card 0 appears on display.
Start the program:
Go to directory ‘MICRO 9’:

17
Programming the configuration menu of the machine
press F4
In the configuration menu, you can initialize the machine according to its own technical characteristics (e.g.
machine with valve or pump, heating, value of the coin meter, etc...). Also the options such as level control,
visualising the temperature etc... need to be entered here.
The cursor is now pointing to "INLET TYPE" of the config. menu.
INLET TYPE:
The waterinletsystem of the machine needs to be chosen here.
Select one of the following waterinletsystems:
press
Configuration
When the machine is equipped with soap pumps for automatic soapinjec-
tion, the corresponding inlets need to be selected.
4
Access to the
configuration
menu
A B C A B C
D
7 - 4 2 - 5 4 - 6 7 - 4 - 2 3 - 6
SOFT HARD
A B C
DD
SOFT SOFT WARM HARDWARM
7 - 4 - 3 2 - 5

18
A
C
B
4
How to select the soap inlets...
A B C
D
SOFT WARM
press
and/or
and/or
7 - 4 - 3 2 - 5
The selected waterinlets will turn into yel-
low.
LEVEL STOP:
You can choose to stop the program time when the machine is being filled with
water.
to toggle between:
Y (Yes) - N(No)
press
press
press
NO COIN:
Here the coin or token operation can be chosen and set.
COIN 1 :for machines equipped with a coinmeter;
COIN 2 :for machines equipped with a double coinmeter
COIN 1 START BUTTON :for machines controlled by a central panel.
COIN 2 REMOTE START
TOKEN 1 :for machines equipped with a tokenmeter;
TOKEN 2 :for machines equipped with a double tokenmeter;
NO COIN :for machines that do not operate with coins or token; NO
COIN
press
HEAT STOP:
You can choose for to stop the program time when the water in the tub is being
heated.
to toggle between:
Y(Yes) - N (No)
press
press

19
When NO COIN... or COIN 1 START BUTTON... has been selected:
to go to DECIMAL (see further on).
When TOKEN 1... or COIN 1... has been selected:
the value of the token or coin in the white text block
a white text block appears
to confirm
❺
❺
repeat the previous steps for TOKEN 2 or COIN 2.
For machines with a double coin- or tokenmeter, COIN 1 (or TOKEN
1) represents the left and COIN 2 (or TOKEN 2) the right slot.
press
Example:
insertion 1 = 0.25 $
insertion 2 = 1$
Fill in the CONFIG.MENU:
COIN 1: 25
COIN 2: 100
DECIMAL: 0.00
4
Please keep in mind that defining the price for each program has to be
done on the machine itself. See "Instruction manual HF55" chapter 6.
press
press
type
press
press 2x
press
Attention!
DECIMAL:
Gives the oppertunity to work with decimal numbers.
to toggle between:
000. - 00.0 - 0.00

20
4
press
COIN -COUNT:
Here you can make the number of insertions for COIN 1 and COIN 2 appear
on the display of the machine.
to toggle between:
Y(Yes) - N(No)
press
DATE:
The date is filled in automatically from the moment that the wash programs
are being programmed. The date cannot be adapted by the user.
press
press
press
ECO:
To define the function of the ECO-button (E).
to select between:
Level
When the ECO-button (E) on the fascia panel of the HF55 is pressed, all
baths and rinses are carried out at a lower water level.
This saves an average of 23% of water and electricity.
No wash 1
When the ECO-button (E) is pressed (before starting the program), the
prewash will be skipped.
press
press
DEGREES:
To determine the desired degrees scale.
to select between:
Celcius : degrees centigrade/ appears on display
Fahrenheit : degrees fahrenheit/ appears on display
C no display : degrees centigrade/ does not appear on display
F no display : degrees fahrenheit / does not appear on display
C selected : the programmed temperature is shown on the
display and not the real temperature (degrees
centigrade).
During 'Cooldown' and spinning, the real
temperature is displayed.
F selected : see above, but now for degrees fahrenheit.

21
4
Remark:
press
press
press
press
The Eco-functions 'Level' en 'No wash1' cannot be selected for a
coin-machine.
Level/default
The Eco-function 'Level' (see above) will automatically be activated when
the machine is started and the LED will light up. When the ECO-button (E)
is pressed, the function will be canceled and the LED will extinguish.
No wash1/default
The Eco-function 'No wash 1' will automatically be activated when the
machine is started and the LED will light up.When the ECO-button (E) is
pressed, the function will be canceled and the LED will extinguish.
Level/default/led
The Eco-function 'Level' will automatically be activated when the machine
is started and the LED will not light up. When the ECO-button (E) is
pressed, the function will be canceled and the LED will light up.
No wash1/default/led
The Eco-function 'No Wash1' will automatically be activated when the
machine is started and the LED will not light up. When the ECO-button (E)
is pressed, the function will be canceled and the LED will light up.
DRAIN:
To determine the water drain system which the machine is equipped with.
to select:
Valve : the machine is equipped with a drain valve
Pump : the machine is equipped with a pump
TIME CORRECTION:
With this function the washcycle time, which appears on the display, can be
corrected, taking the fill- and heating periods from the previous cycle into
account.
to toggle between:
Y(Yes) - N(No)

22
4
K
ESC
press
press
press a white text block appears
the name of the customer
type
press
to confirm
The name of the customer can be programmed.
CUSTOMER:
to return to main menu
DEFAULT STARTUP:
You can enter a program number that automatically will be selected after
your wash program is terminated. When you, for example, had entered a '0',
the machine will automatically select program 0 after either one of the wash
programs has ended (but it will not start up). For safety reasons, a 'cold' wash
program should be selected.
a white text block appears
a program number (0 - 9)
If you don't wish to activate 'Default startup' you can enter 'N' (No):
'N' appears in the white text block
to confirm
press
type
press
press
press
Table of contents