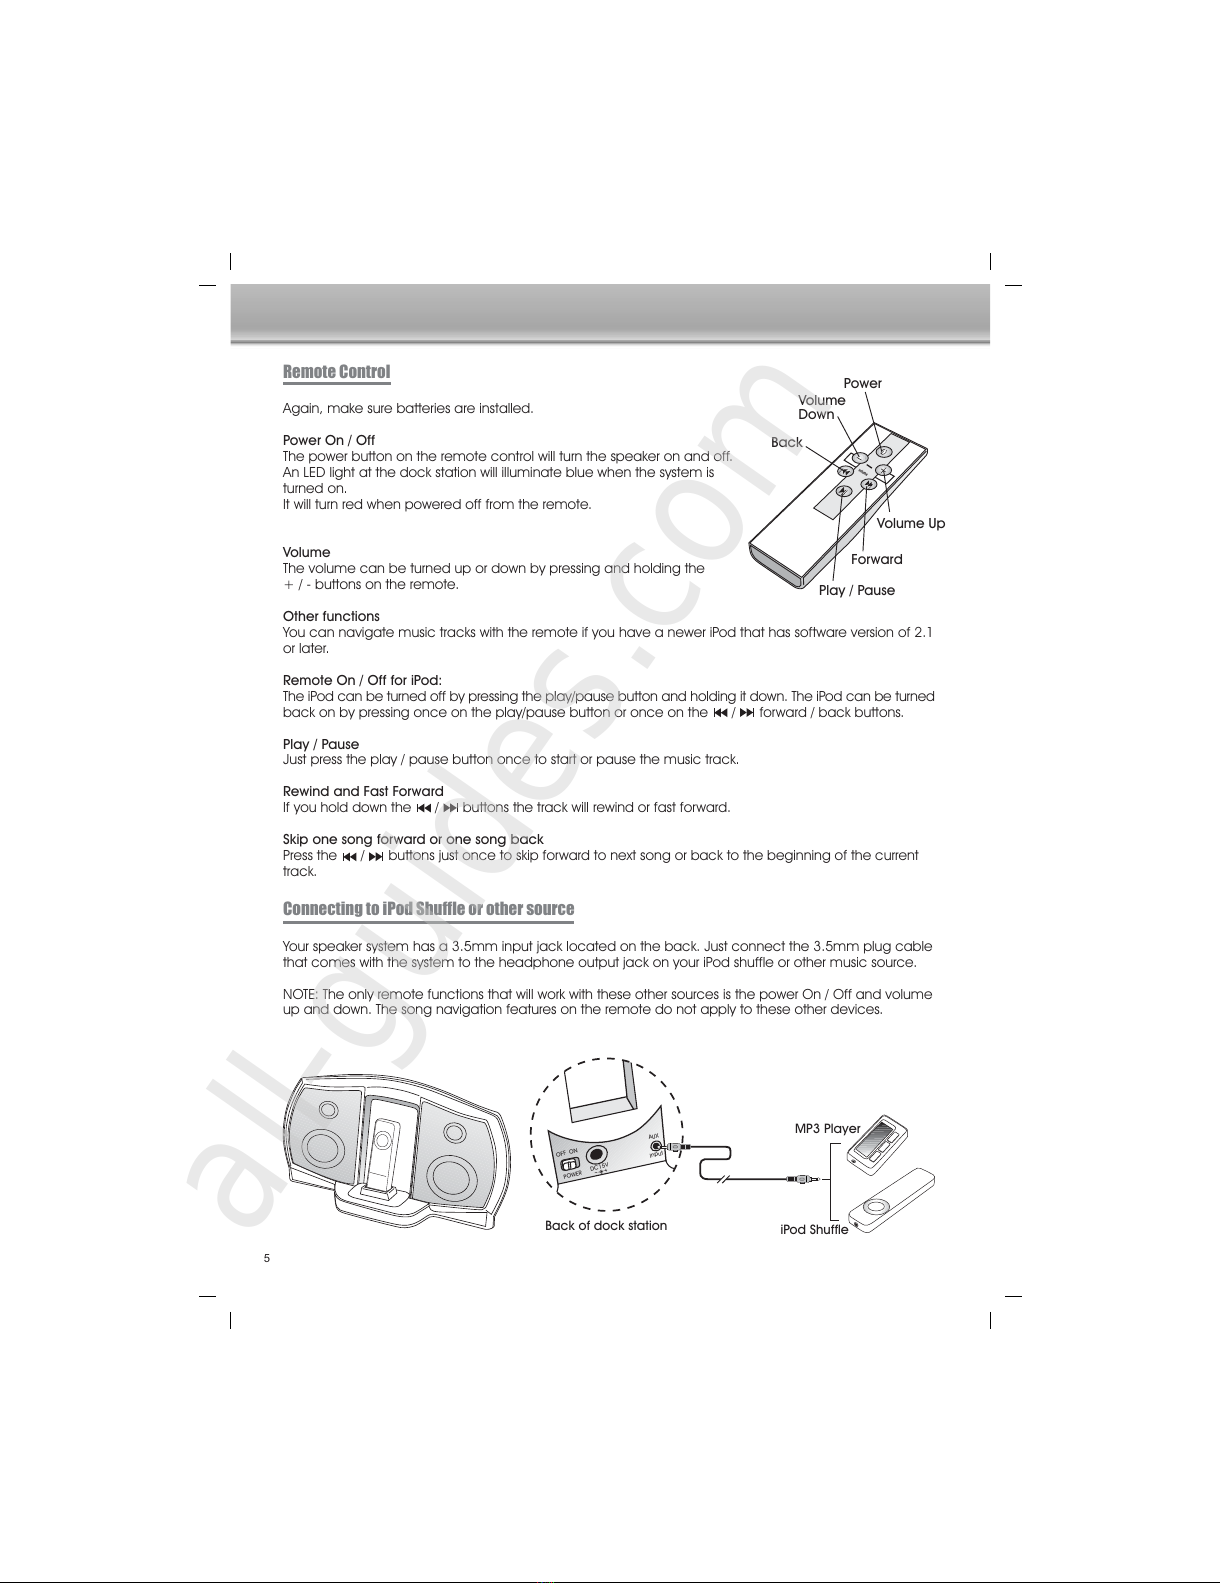
iRhythms A303 User manual

All manuals and user guides at all-guides.com
all-guides.com

This unit complies with the interference limits relative to a Class B digital device, applicable under Part 15
of the FCC Rules regarding installation in a residential environment. f the unit is not installed in accordance
with these instructions, it could cause harmful interference to audio or television reception. f this condition
persists after corrective action, consult your dealer or experienced installation facility.
1
FCC Regulations
Cet appareil est conforme aux normes d'interference des appareils digitaux de Classe B, conformement
a l'article 15 du Reglement de la FCC, pour une installation domestique. Si l'appareil n'est pas installe
conformement aux instructions, il peut causer des interferences nuisibles a la reception audio ou televisuelle.
Si cette situation persiste malgre les actions correctives, consultez votre revendeur ou installateur agree.
Reglement FCC
All manuals and user guides at all-guides.com

CAUTION:
TO PREVENT ELECTRIC SHOCK, MATCH
WIDE BLADE OF PLUG TO WIDE SLOT,
FULLY INSERT.
ATTENTION:
POUR ÉVITER LES CHOC ÉLECTRIQUES,
INTRODUIRE LA LAME LA PLUS LARGE DE
LA FICHE DANS LA BORNE
CORRESPONDANTE DE LA PRISES ET
POUSSER JUSQUAU FOND.
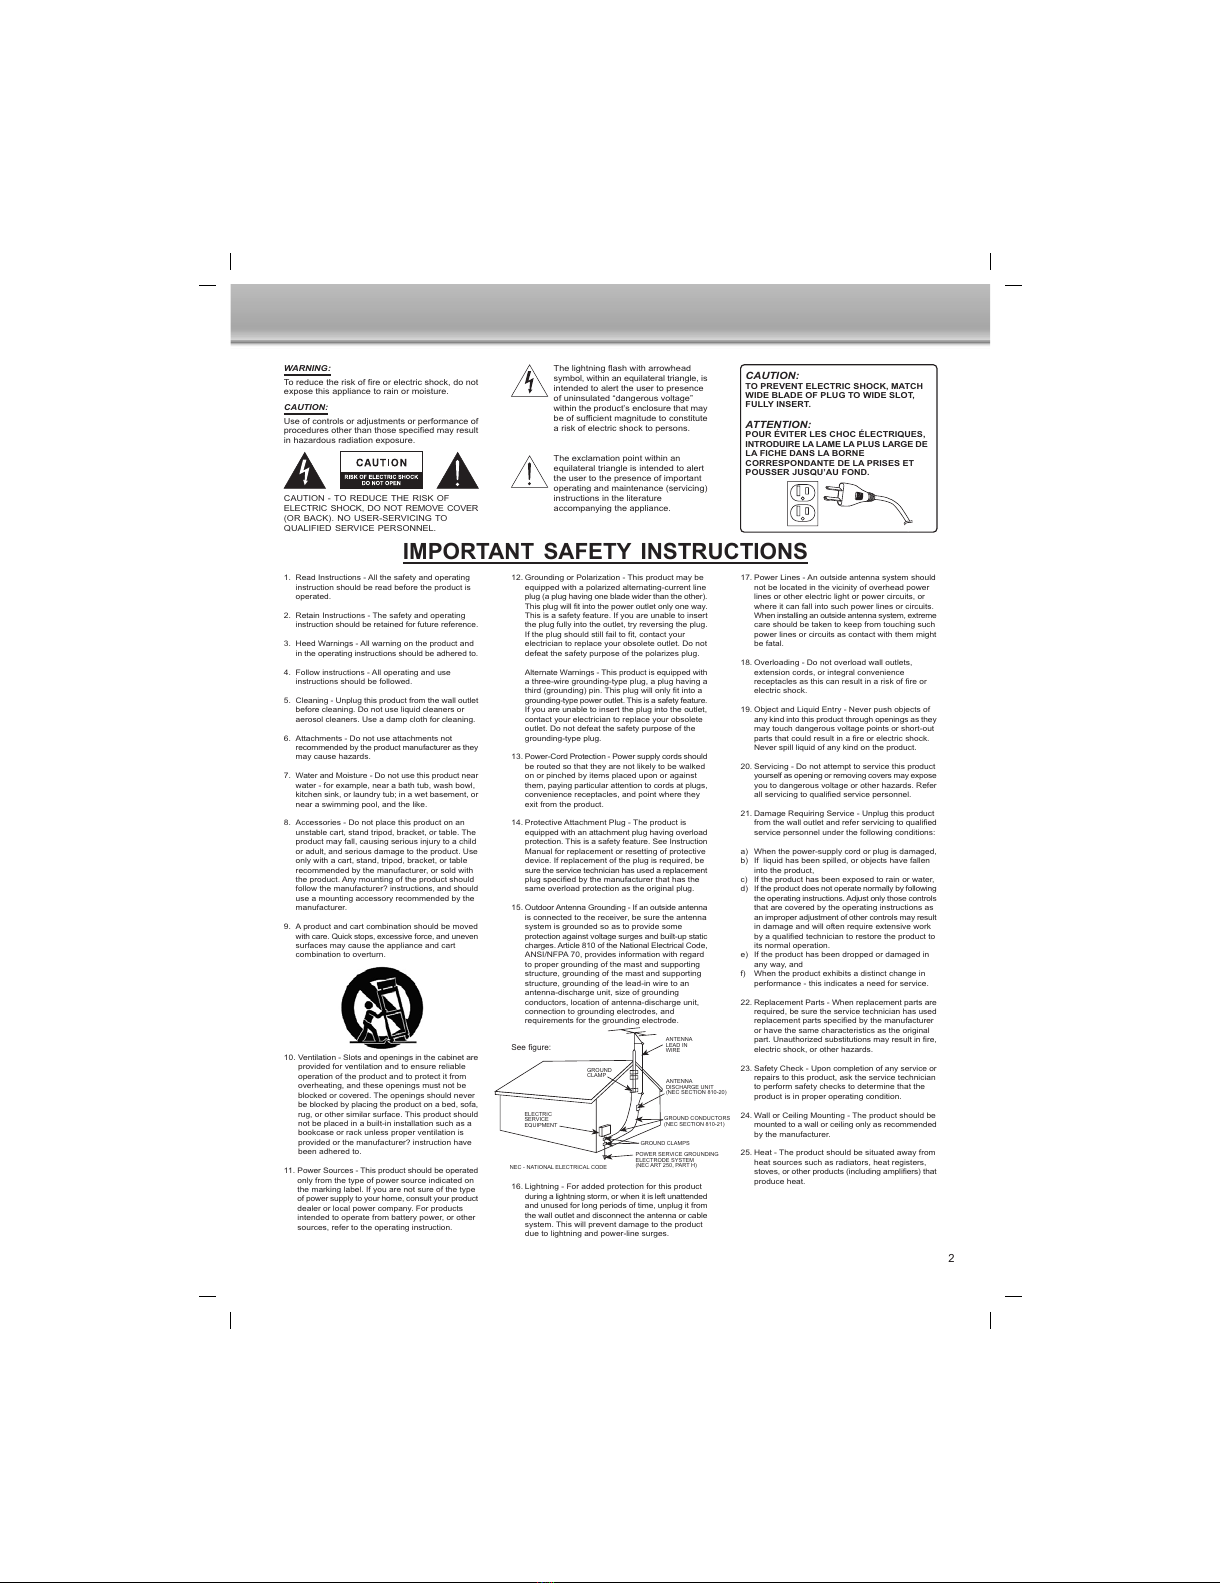
GROUND
CLAMP
ELECTRIC
SERVICE
EQUIPMENT
ANTENNA
LEAD IN
WIRE
ANTENNA
DISCHARGE UNIT
(NEC SECTION 810-20)
GROUND CLAMPS
GROUND CONDUCTORS
(NEC SECTION 810-21)
POWER SERVICE GROUNDING
ELECTRODE SYSTEM
(NEC ART 250, PART H)
NEC - NATIONAL ELECTRICAL CODE
WARNING:
To educe the isk of fi e o elect ic shock, do not
expose this appliance to ain o moistu e.
CAUTION:
Use of cont ols o adjustments o pe fo mance of
p ocedu es othe than those specified may esult
in haza dous adiation exposu e.
CAUTION - TO REDUCE THE RISK OF
ELECTRIC SHOCK, DO NOT REMOVE COVER
(OR BACK). NO USER-SERVICING TO
QUALIFIED SERVICE PERSONNEL.
The lightning flash with a owhead
symbol, within an equilate al t iangle, is
intended to ale t the use to p esence
of uninsulated dange ous voltage
within the p oducts enclosu e that may
be of sufficient magnitude to constitute
a isk of elect ic shock to pe sons.
The exclamation point within an
equilate al t iangle is intended to ale t
the use to the p esence of impo tant
ope ating and maintenance (se vicing)
inst uctions in the lite atu e
accompanying the appliance.
IMPORTANT SAFETY INSTRUCTIONS
1. Read Inst uctions - All the safety and ope ating
inst uction should be ead befo e the p oduct is
ope ated.
2. Retain Inst uctions - The safety and ope ating
inst uction should be etained fo futu e efe ence.
3. Heed Wa nings - All wa ning on the p oduct and
in the ope ating inst uctions should be adhe ed to.
4. Follow inst uctions - All ope ating and use
inst uctions should be followed.
5. Cleaning - Unplug this p oduct f om the wall outlet
befo e cleaning. Do not use liquid cleane s o
ae osol cleane s. Use a damp cloth fo cleaning.
6. Attachments - Do not use attachments not
ecommended by the p oduct manufactu e as they
may cause haza ds.
7. Wate and Moistu e - Do not use this p oduct nea
wate - fo example, nea a bath tub, wash bowl,
kitchen sink, o laund y tub; in a wet basement, o
nea a swimming pool, and the like.
8. Accesso ies - Do not place this p oduct on an
unstable ca t, stand t ipod, b acket, o table. The
p oduct may fall, causing se ious inju y to a child
o adult, and se ious damage to the p oduct. Use
only with a ca t, stand, t ipod, b acket, o table
ecommended by the manufactu e , o sold with
the p oduct. Any mounting of the p oduct should
follow the manufactu e ? inst uctions, and should
use a mounting accesso y ecommended by the
manufactu e .
9. A p oduct and ca t combination should be moved
with ca e. Quick stops, excessive fo ce, and uneven
su faces may cause the appliance and ca t
combination to ove tu n.
12. G ounding o Pola ization - This p oduct may be
equipped with a pola ized alte nating-cu ent line
plug (a plug having one blade wide than the othe ).
This plug will fit into the powe outlet only one way.
This is a safety featu e. If you a e unable to inse t
the plug fully into the outlet, t y eve sing the plug.
If the plug should still fail to fit, contact you
elect ician to eplace you obsolete outlet. Do not
defeat the safety pu pose of the pola izes plug.
Alte nate Wa nings - This p oduct is equipped with
a th ee-wi e g ounding-type plug, a plug having a
thi d (g ounding) pin. This plug will only fit into a
g ounding-type powe outlet. This is a safety featu e.
If you a e unable to inse t the plug into the outlet,
contact you elect ician to eplace you obsolete
outlet. Do not defeat the safety pu pose of the
g ounding-type plug.
13. Powe -Co d P otection - Powe supply co ds should
be outed so that they a e not likely to be walked
on o pinched by items placed upon o against
them, paying pa ticula attention to co ds at plugs,
convenience eceptacles, and point whe e they
exit f om the p oduct.
14. P otective Attachment Plug - The p oduct is
equipped with an attachment plug having ove load
p otection. This is a safety featu e. See Inst uction
Manual fo eplacement o esetting of p otective
device. If eplacement of the plug is equi ed, be
su e the se vice technician has used a eplacement
plug specified by the manufactu e that has the
same ove load p otection as the o iginal plug.
15. Outdoo Antenna G ounding - If an outside antenna
is connected to the eceive , be su e the antenna
system is g ounded so as to p ovide some
p otection against voltage su ges and built-up static
cha ges. A ticle 810 of the National Elect ical Code,
ANSI/NFPA 70, p ovides info mation with ega d
to p ope g ounding of the mast and suppo ting
st uctu e, g ounding of the mast and suppo ting
st uctu e, g ounding of the lead-in wi e to an
antenna-discha ge unit, size of g ounding
conducto s, location of antenna-discha ge unit,
connection to g ounding elect odes, and
equi ements fo the g ounding elect ode.
17. Powe Lines - An outside antenna system should
not be located in the vicinity of ove head powe
lines o othe elect ic light o powe ci cuits, o
whe e it can fall into such powe lines o ci cuits.
When installing an outside antenna system, ext eme
ca e should be taken to keep f om touching such
powe lines o ci cuits as contact with them might
be fatal.
18. Ove loading - Do not ove load wall outlets,
extension co ds, o integ al convenience
eceptacles as this can esult in a isk of fi e o
elect ic shock.
19. Object and Liquid Ent y - Neve push objects of
any kind into this p oduct th ough openings as they
may touch dange ous voltage points o sho t-out
pa ts that could esult in a fi e o elect ic shock.
Neve spill liquid of any kind on the p oduct.
20. Se vicing - Do not attempt to se vice this p oduct
you self as opening o emoving cove s may expose
you to dange ous voltage o othe haza ds. Refe
all se vicing to qualified se vice pe sonnel.
21. Damage Requi ing Se vice - Unplug this p oduct
f om the wall outlet and efe se vicing to qualified
se vice pe sonnel unde the following conditions:
a) When the powe -supply co d o plug is damaged,
b) If liquid has been spilled, o objects have fallen
into the p oduct,
c) If the p oduct has been exposed to ain o wate ,
d) If the p oduct does not ope ate no mally by following
the ope ating inst uctions. Adjust only those cont ols
that a e cove ed by the ope ating inst uctions as
an imp ope adjustment of othe cont ols may esult
in damage and will often equi e extensive wo k
by a qualified technician to esto e the p oduct to
its no mal ope ation.
e) If the p oduct has been d opped o damaged in
any way, and
f) When the p oduct exhibits a distinct change in
pe fo mance - this indicates a need fo se vice.
22. Replacement Pa ts - When eplacement pa ts a e
equi ed, be su e the se vice technician has used
eplacement pa ts specified by the manufactu e
o have the same cha acte istics as the o iginal
pa t. Unautho ized substitutions may esult in fi e,
elect ic shock, o othe haza ds.
23. Safety Check - Upon completion of any se vice o
epai s to this p oduct, ask the se vice technician
to pe fo m safety checks to dete mine that the
p oduct is in p ope ope ating condition.
24. Wall o Ceiling Mounting - The p oduct should be
mounted to a wall o ceiling only as ecommended
by the manufactu e .
25. Heat - The p oduct should be situated away f om
heat sou ces such as adiato s, heat egiste s,
stoves, o othe p oducts (including amplifie s) that
p oduce heat.
10. Ventilation - Slots and openings in the cabinet a e
p ovided fo ventilation and to ensu e eliable
ope ation of the p oduct and to p otect it f om
ove heating, and these openings must not be
blocked o cove ed. The openings should neve
be blocked by placing the p oduct on a bed, sofa,
ug, o othe simila su face. This p oduct should
not be placed in a built-in installation such as a
bookcase o ack unless p ope ventilation is
p ovided o the manufactu e ? inst uction have
been adhe ed to.
11. Powe Sou ces - This p oduct should be ope ated
only f om the type of powe sou ce indicated on
the ma king label. If you a e not su e of the type
of powe supply to you home, consult you p oduct
deale o local powe company. Fo p oducts
intended to ope ate f om batte y powe , o othe
sou ces, efe to the ope ating inst uction.
16. Lightning - Fo added p otection fo this p oduct
du ing a lightning sto m, o when it is left unattended
and unused fo long pe iods of time, unplug it f om
the wall outlet and disconnect the antenna o cable
system. This will p event damage to the p oduct
due to lightning and powe -line su ges.
See figu e:
2
All manuals and user guides at all-guides.com

Congratulations on your choice of the iRhythms A-303 speaker system. This self contained desktop speaker
system is made for 3rd Generation iPod touch wheel with buttons, 4th Generation iPod with Click Wheel,
iPod mini, iPod photo, iPod shuffle and other portable audio sources. The A-303 is powerful enough to fill
the room with quality audio performance yet small enough to travel. Enjoy!
3
Introduction
The Package
Yes, get ready to enjoy!
Place the system on a firm flat surface.
The drivers in your
iRhythms
system are shielded and therefore limits the possibility of interference to video
and computer monitors. However, it is a good idea to leave a reasonable distance between the speaker
system and these devices.
Your next step is to install the proper insert into the universal dock located on the front bottom portion
of the system. Each insert is marked so choose one which fits your iPod. To install the insert simply let it
snap into the connector well.
Get Ready
Contents of this system include:
Remote Control
Power Cord Power Supply
Dock Inserts
3.5mm cable
Note:
iPod nano and ipod video come with thei
own inse ts that also fit into this unive sal well.
To emove inse t guide
the sc ew d ive into the
inse t slot and gently p y
it upwa ds
Docking Well
3 d Gene ation iPod
with touch wheel and
buttons (10GB, 15GB
and 20GB)
4th Gene ation iPod
with Click Wheel
(20GB and 30GB)
3 d Gene ation
iPod with touch
wheel and
buttons (30GB
and 40GB)
4th Gene ation
iPod with Click
Wheel (40GB)
iPod photo
iPod shuffleiPod miniiPod nanoiPod with video
(30G)
iPod with video
(60G)
Digital Docking Speaker
TM
All manuals and user guides at all-guides.com

P WER
FF N
DC15V Input
Place the enclosed AAA batteries in to remote control battery compartment. Follow the battery indicators
( + / - ) to make sure they are put in correctly.
Before your speaker will function the main power switch on the back of the speaker system has to be
turned on. After this switch is turned on the system can be turned on and off with the remote control. NOTE:
f the speaker will not be in use for long periods of time it is recommended to turn off the main power
switch in the back.
Using The System
4
Plug the power cord into the power supply. The barrel connector at the end of the power supply plugs
into the DC jack located at the back of the system. Now, plug the power cord into your AC wall socket
or surge protector.
Once again, make sure the correct insert for your iPod is in the universal dock. Plug your iPod into the
connector pin that comes through the well/insert.
Connections
Your iPod can be on or off when you place it into the dock connector. f your iPod is on and a music track
is playing you should hear sound immediately. f you dont hear anything recheck that the track is playing
and the volume on the system is turned up slightly. The volume can be turned up or down using the
remote or the volume + / - buttons on the front of the speaker.
NOTE: To avoid a popping sound make sure the iPod is already turned on when inserting
it into the dock connector.
Power n / ff
switch
Signal input jack
Two Way Stereo
Speaker System
Volume Up
Volume Down
Insert Docking Well
volume down
volume up
Rear panel
AC/DC
power supply
Rear panel
DC15V Input
DC input
AUX
P WER
FF N
All manuals and user guides at all-guides.com

Again, make sure batteries are installed.
Power n / ff
The power button on the remote control will turn the speaker on and off.
An LED light at the dock station will illuminate blue when the system is
turned on.
t will turn red when powered off from the remote.
Volume
The volume can be turned up or down by pressing and holding the
+ / - buttons on the remote.
ther functions
You can navigate music tracks with the remote if you have a newer iPod that has software version of 2.1
or later.
Remote n / ff for iPod:
The iPod can be turned off by pressing the play/pause button and holding it down. The iPod can be turned
back on by pressing once on the play/pause button or once on the / forward / back buttons.
Play / Pause
Just press the play / pause button once to start or pause the music track.
Rewind and Fast Forward
f you hold down the / buttons the track will rewind or fast forward.
Skip one song forward or one song back
Press the / buttons just once to skip forward to next song or back to the beginning of the current
track.
Remote Control
Your speaker system has a 3.5mm input jack located on the back. Just connect the 3.5mm plug cable
that comes with the system to the headphone output jack on your iPod shuffle or other music source.
NOTE: The only remote functions that will work with these other sources is the power On / Off and volume
up and down. The song navigation features on the remote do not apply to these other devices.
Connecting to iPod Shuffle or other source
iPod Shuffle
MP3 Player
Power
Volume Up
Back
Volume
Down
Play / Pause
Forward
Back of dock station
5
PWER
FFN
DC15VInput
AUX
All manuals and user guides at all-guides.com
all-guides.com

6
No Power
Main power switch on the back is not turned on.
Power button on the front of the speaker or the remote hasnt been turned on.
AC power supply is not connected to the power cord or the wall socket.
No Sound
iPod is not docked properly. Make sure you are using the proper insert that best fits your iPod.
Volume is turned down.
Music track on your iPod is not playing. Check the music isnt paused or in between tracks.
Check and make sure your iPod is running the proper software. 2.1 or later version.
Not Charging and No Sound
Make sure the iPod is seated properly in the insert / dock and that it is getting good contact
to the connector pin.
Remote functions do not work
Make sure you are using good batteries.
Make sure batteries are seated properly.
f some of the navigation functions do not work it may be because you havent updated your iPod
software. These functions are designed for software version 2.1 or newer.
Trouble Shooting
iRhythms warrants to the purchaser that this product shall be free from defects in materials or workmanship
for a period of one year from original purchase date. Proof of purchase is required. Please retain your
receipt. The warranty registration card should also be filled out completely and immediately returned to
iRhythms.
During the warranty period, if this product is found to be defective under normal use and service, iRhythms
shall at its option repair or replace it with new or reconditioned product.
This warranty does not cover defects resulting from accidents, abuse, misuse, or unauthorized service.
This warranty gives you specific rights. You may have other legal rights which vary from state to state.
To obtain warranty service, return the product with shipping prepaid to iRhythms. iRhythms reserves the
right to replace any discontinued product with one of equal value.
Note:
1) For technical support and questions, please contact iRhythms
Tel: 360-823-4100 / Fax: 360-883-4888
2) You can now register your iRhythms product on line through our web site in
lieu of filling out and mailing this card: www.irhythms.com
Warranty
All manuals and user guides at all-guides.com

Wir gratulieren hnen zum Kauf des A-303 Lautsprechersystems von iRhythms. Dieses unabhängige
Lautsprechersystem für den Desktop ist für iPods der 3. Generation mit Touch Wheel und Steuertasten,
iPods der 4. Generation mit Click Wheel, iPods Mini, iPods Photo, iPod Shuffle und andere, portable
Audiogeräte geschaffen. Das A-303 Lautsprechersystem ist leistungsstark genug, um ein Zimmer mit
hochqualitativer Musikwiedergabe zu erfüllen, und doch klein genug, um Sie auf der Reise zu begleiten.
Genießen Sie!
7
Einfuhrung
Packungsinhalt
So bereiten Sie das Gerät für den Einsatz vor!
Stellen Sie das System auf einer stabilen, ebenen Oberfläche auf.
Die leistungsstarken Lautsprecher-Treibermagnete hres iRhythms Systems sind magnetisch abgeschirmt, und
das Auftreten von Störungen beim Betrieb in der Nähe von Video- und Computer-Monitoren wird dadurch
verringert. Wir raten hnen trotzdem eine ausreichende Distanz zwischen diesen Geräten und dem
Lautsprechersystem einzuhalten.
Als nächsten Schritt müssen Sie den korrekten Adapter in der "Universal-Dock" an der Vorderseite im unteren
Teil des Systems installieren. Jeder Adapter ist markiert, und Sie sollten den Adapter für hr jeweiliges iPod-
Modell auswählen. Zur nstallation lassen Sie den Adapter einfach in die Vertiefung des Anschlussdocks fallen.
orbereitung zum Einsatz
Dieses System besteht aus den folgenden Komponenten:
Fernbedienung
Netzkabel Netzadapter
Anschlussadapter
3,5mm Kabel
Zum He ausnehmen
fuh en Sie einen Sch aubenziehe
in den Schlitz ein, und d ucken
Sie den Adapte vo sichtig nach oben.
Anschlusbuchse
Hinweis:
iPod nano und iPod video we den mit
speziellen Einsätzen ausgeliefe t, und passen
in diese Unive albuchse.
Digital Docking Speaker
TM
iPod de 3.
Gene ation
mit Touch Wheel
und Bedientasten.
(10GB, 15GB und
20GB)
iPod de 4.
Gene ation
mit Click Wheel
(20GB und 30GB)
iPod de 3.
Gene ation
mit Touch Wheel
und
Bedientasten
(30GB und 40GB)
iPod de 4.
Gene ation
mit Click Wheel
(40GB)
iPod photo
iPod shuffleiPod miniiPod nanoiPod with video
(30G)
iPod with video
(60G)
All manuals and user guides at all-guides.com

DC15V Input
Legen Sie die mitgelieferten Batterien der Größe "AAA" in das Batteriefach der Fernbedienung ein. Beachten
Sie die Polarisierungsangaben (+/-), und stellen Sie sicher, dass diese korrekt ausgerichtet sind.
hr Lautsprechersystem ist einsatzbereit sobald Sie das Gerät mittels des Hauptschalters an der Rückseite
eingeschaltet haben. Nachdem Sie das System mittels dieses Schalters eingeschaltet haben, könne Sie
das Gerät mittels der Fernbedienung ein- und ausschalten. H NWE S: Wenn das Lautsprechersystem
voraussichtlich längere Zeit nicht im Betrieb sein wird, empfehlen wir das Gerät mittels des Hauptschalters
an der Rückseite auszuschalten.
Der Einsatz des Systems
8
Verbinden Sie das Netzkabels mit der Netzstromversorgung. Der Klinkenstecker am Ende des Adapterkabels
muss an der DC-Buchse an der Rückseite des Systems angeschlossen werden. Verbinden Sie nun den
Stecker des Netzkabels mit einer AC-Wandsteckdose oder einer geschützten Steckerleiste.
Überprüfen Sie nochmals, ob der korrekte Adapter für hren iPod in die "Universal-Dock" eingeführt wurde.
Schließen Sie hren iPod an den Kontaktstiften an, die an der Anschlussseite des Adapters/der Buchse
sichtbar sind.
Anschlüsse
hr iPod kann beim Anschluss an der Verbindungsbuchse ein- oder ausgeschaltet sein. Wenn hr iPod
eingeschaltet ist und ein Musiktitel abspielt, dann sollten Sie sofort die Wiedergabe über die Lautsprecher
hören. Falls Sie keine Wiedergabe hören, dann sollten Sie überprüfen, ob ein Titel abspielt, und es kann
sein, dass Sie die Lautstärke etwas aufwärts einstellen müssen. Die Lautstärke kann mittels der Fernbedienung
oder dem "+/- "Lautstärkeregler an der Vorderseite des Systems aufwärts oder abwärts eingestellt werden.
HINWEI : Um zu verhindern, dass Lautstärkespitzen auftreten, sollten ie sicher stellen,
dass Ihr iPod bereits eingeschaltet ist, bevor ie das Gerät an der Anschlussbuchse
anschließen.
Hauptschalter
Ein/Aus
Anschlussbuchse fur externe Signalquelle
2-Wege Stereo-Lautsprec
hersystem
Lautstärke Aufwärts
Lautstärke Abwärts
Adapter Anschlussbuchse
volume down
volume up
Rückseite
AC/DC-
Netzadapter
Rückseite
DC15V Input
DC-Anschlussbuchse
AUX
P WER
FF N
P WER
FF N
All manuals and user guides at all-guides.com

Bitte stellen Sie sicher, dass die Batterien eingelegt wurden.
Hauptschalter "Ein/Aus"
Der Hauptschalter an der Fernbedienung schaltet das Lautsprechersystem
"ein" und "aus". Ein LED- ndikator am Lautsprechersystem leuchtet "Blau",
und zeigt an, dass das Gerät eingeschaltet ist.
Der ndikator leuchtet "Rot", wenn das Gerät mittels der Fernbedienung
ausgeschaltet wird.
Lautstärke
Die Lautstärke kann aufwärts/abwärts eingestellt werden, indem Sie die
"+/-"Tasten an der Fernbedienung gedrückt halten.
Andere Funktionen
Sie können die Musiktitel mittels der Fernbedienung auswählen, wenn Sie ein neueres iPod-Modell mit der
Software-Version 2.1 oder später besitzen.
Fernbedienung "Ein/Aus" fur iPod:
hr iPod kann eingeschaltet werden, indem Sie die "Wiedergabe/Pause"-Taste gedrückt halten. hr iPod
kann wieder eingeschaltet werden, indem Sie die "Wiedergabe/Pause"-Taste oder die / "Schnell
Vorwärts"-Tasten einmal betätigen.
Wiedergabe/Pause
Betätigen Sie einfach die "Wiedergabe/Pause"-Taste einmal, um die Wiedergabe eines Titels zu beginnen
oder zu pausieren.
Schnell Rückwärts oder Vorwärts
Wenn Sie die / -Tasten gedrückt halten, dann wird eine Stelle in einem Titel vorwärts oder rückwärts
aufgesucht.
Einen Titel vorwärts oder rückwärts springen
Betätigen Sie die / -Taste einmal, um vorwärts an den Anfang des nächsten Titels, oder rückwärts
an den Anfang des abspielenden Titels zu springen.
Fernbedienung
hr Lautsprechersystem besitzt an der Rückseite eine 3,5mm Anschlussbuchse. Schließen Sie das mit dem
System ausgelieferte 3,5mm Klinkensteckerkabel an der Kopfhörerbuchse hres "iPod Shuffle" oder einer
anderen Signalquelle an.
H NWE S: Die Funktionen der Fernbedienung, die beim Anschluss dieser anderen Signalquellen funktioniert,
sind der "Ein/Aus"-Hauptschalter und der "Auf/Ab"-Lautstärkeregler. Die Navigationsfunktionen der Fernbedienung
für die Titelsuche und den Titelsprung können für diese anderen Geräte nicht eingesetzt werden.
Anschließen an iPod Shuffle oder andere Signalquellen
iPod Shuffle
MP3 Player
Hauptschalter
Lautstärke
Aufwärts
Rückwärts
Lautstärke
Abwärts
Wiedergabe/Pause
Vorwärts
Rückseite des Lautsprechersystems
9
DC15VInput
AUX
P WER
FF N
All manuals and user guides at all-guides.com

10
Kein Strom
Hauptschalter an der Rückseite ist nicht eingeschaltet.
Der Schalter an der Vorderseite des Lautsprechersystems oder an der Fernbedienung wurde nicht
betätigt.
AC-Netzadapter ist nicht an der Anschlussbuchse oder an der Wandsteckdose angeschlossen.
Kein Ton
hr iPod ist nicht korrekt an der Adapterbuchse angeschlossen. Stellen Sie sicher, dass Sie den korrekten
Adapter für hren iPod verwenden.
Lautstärke ist zu niedrig eingestellt.
KKein Titel spielt auf hrem iPod ab. Prüfen Sie ob die Wiedergabe im Pause-Modus funktioniert, oder
ob ein Titelsprung ausgeführt wird.
Stellen Sie sicher, dass die korrekte Software der Version 2.1 oder später auf hrem iPod installiert ist.
Kein Aufladen und kein Ton
Überprüfen Sie, ob hr iPod korrekt an der Buchse/dem Adapter angeschlossen ist, und der Kontakt
mit den Verbindungsstiften sichergestellt ist.
Fernbedienung funktioniert nicht
Stellen Sie sicher, dass Sie neue Batterien eingelegt haben.
Stellen Sie sicher, dass die Batterien mit korrekter Ausrichtung eingelegt wurden.
Wenn einige der Navigationsfunktionen nicht anwendbar sind, dann haben Sie möglicherweise hre
iPod-Software nicht aktualisiert. Die Funktionen dieses Gerätes sind ab Version 2.1 oder später
anwendbar.
Störungssuche
iRhythms garantiert dem Erstkäufer für einen Zeitraum von einem Jahr, beginnend mit dem Erstkaufdatum,
dass dieses Produkt frei von Material- oder Verarbeitungsfehlern ist. Das Kaufdatum muss durch den
Erstkaufbeleg nachgewiesen werden. Bitte bewahren Sie hren Kaufbeleg auf. Die Garantiekarte sollte
vollständig ausgefüllt und unverzüglich an iRhythms eingesandt werden.
Falls während der Garantiezeit im normalen Gebrauch und Einsatz des Gerätes Schäden festgestellt
werden, dann gewährleistet iRhythms nach Ermessen, das Gerät entweder zu reparieren, oder durch ein
neues Gerät oder ein repariertes Gerät zu ersetzen.
Diese Garantie deckt Schäden nicht ab, die durch Unfall, Missbrauch, Fehlbrauch oder unzulässige
Wartungsarbeiten entstanden sind. Diese Garantie gewährt hnen spezifische Rechte. Es kann sein, dass
von Staat zu Staat noch andere Rechte bestehen.
Senden Sie das Produkt portofrei an iRhythms ein, um Garantieleistungen in Anspruch zu nehmen. iRhythms
behält sich das Recht vor, ausgelaufene Geräte durch Modelle gleichen Funktionsumfangs zu ersetzen.
Note:
1) Für technische Unterstützung und Fragen treten Sie bitte mit iRhythms in Verbindung wie folgt:
wie folgt: Tel: 360-823-4100/Fax: 360-883-4888
2) Sie können hr iRhythms Produkt nun ersatzweise für die Einsendung der Registrierkarte auch über das
nternet auf unserer Webseite registrieren: www.irhythms.com
Garantie
All manuals and user guides at all-guides.com
all-guides.com

Félicitations d'avoir choisi ce système d'enceintes A-303 d'iRhythms. Ce système d'enceintes de bureau
autonome est conçu pour fonctionner avec l'iPod 3e génération avec molette tactile et touches, l'iPod
4e génération avec molette cliquable, l' pod mini, l'iPod photo, l'iPod shuffle et d'autres sources audio
portables. Le système A-303 est à la fois assez puissant pour produire une performance audio de haute
qualité et assez compact pour le voyage. Amusez-vous !
Introduction
Le Pack
Êtes-vous prêt ?
Placez le système sur une surface solide et plane.
Les moteurs de votre système
iRhythms
sont blindés, ce qui limite les chances d'interférences avec les
écrans vidéo et d'ordinateur. Cependant, il est préférable de laisser une distance adéquate entre le
système d'enceintes et ces appareils.
Ensuite, placez l'insert approprié dans la cavité de la station d'accueil située sur la façade du système.
Chaque insert est marqué ; choisissez celui qui convient à votre iPod. Pour l'insérer, laissez-le tomber dans
la cavité.
A vos marques !
Le contenu du système comprend :
Télécommande
Cordon d'alimentation Bloc d'alimentation
Inserts pour station
d'accueil
Cordon 3,5 mm
Pou le eti e , glissez un
tou nevis dans la fente de
l'inse t, puis le degage
delicatement
11 Station d'Accueil
Rema que : les iPod nano et
iPod video sont également
fou nis avec leu s p op es
inse ts pouvant se connecte
à cette station d'accueil.
Digital Docking Speaker
TM
iPod 3e géné ation
avec molette tactile
et touches
(10 GB, 15 GB
et 20 GB)
iPod 4e géné ation
avecmolette
cliquable
(20 GB, et 30 GB)
iPod 3e géné ation
avec molette tactile
et touches
(30 GB et 40 GB)
iPod 4e géné ation
avec molette
cliquable
(40 GB)
iPod photo
iPod shuffleiPod miniiPod nanoiPod with video
(30G)
iPod with video
(60G)
All manuals and user guides at all-guides.com

12
P WER
FF N
DC15V Input
Placez les piles AAA fournies dans le compartiment à piles de la télécommande en respectant la polarité
(+ / -) indiquée.
Avant d'utiliser votre système, vous devez actionner l'interrupteur marche/arrêt principal situé à l'arrière du
système. Une fois mis sous tension, vous pouvez allumer et éteindre le système à l'aide de la télécommande.
REMARQUE : Si le système reste longtemps hors service, il est conseillé de le mettre hors tension à l'aide
de l'interrupteur principal.
Utilisation
Branchez le cordon sur le bloc d'alimentation. Branchez la fiche cylindrique du cordon du bloc d'alimentation
dans la prise DC située à l'arrière du système. Ensuite, branchez le cordon d'alimentation sur un prise
murale AC ou parasurtenseur.
Vérifiez que vous avez inséré l'insert correspondant à votre iPod dans la cavité. Branchez votre iPod sur
les connecteurs qui apparaissent à travers l'insert.
Connexions
Lorsque vous placez votre iPod sur la station d'accueil, celui-ci peut être soit allumé soit éteint. Si l'iPod
est allumé et une piste est en lecture, vous devrez entendre le son de suite. Si ce n'est pas le cas, vérifiez
que la piste est en lecture et le volume réglé normalement. Le volume peut être ajusté à l'aide de la
télécommande ou des touches + / - situées sur la façade.
REMARQUE : Pour éviter tout souffle, assurez-vous que l'iPod est allumé lorsque vous
le posez sur la station d'accueil.
Interrupteur
marche/arrêt
principal
Prise d'entrée de signal
Système d'enceintes
à deux voies
Volume (+)
Volume (-)
Insert Cavité de la
station d'accueil
Volume (-)
Volume (+)
Face arrière
Bloc d'alimentation
AC/DC
Face arrière
P WER
FF N
DC15V Input
Marche/arrêt
DC entrée
AUX
All manuals and user guides at all-guides.com

Assurez-vous que les piles sont installées.
Ma che / a êt
La touche ma che/a êt de la télécommande allume et
éteint le système. Lo sque le système est allumé, un
voyant LED bleu s'allume su la station d'accueil.
Lo sque vous éteignez le système avec la télécommande,
le voyant passe au ouge.
Volume
Le volume peut êt e églé en appuyant su la touche +
télécommande.
Aut es fonctions
Avec les de nie s iPod muni de la ve sion 2.1 du logiciel ou plus écent, vous pouvez navigue pa mi
les pistes avec la télécommande.
Ma che/a êt du iPod à distance :
L'iPod peut êt e éteint en maintenant enfoncée la touche lectu e/pause. Il peut êt e allumé en
appuyant une fois su la touche lectu e/pause, etou ou avance apides.
Lectu e/pause
Appuyez su la touche lectu e/pause pou li e la piste ou inte omp e sa lectu e.
Retou et avance apides
Maintenez enfoncée la touche ou pou eveni en a ie e ou avance apidement.
Saut de piste avant ou a iè e
Appuyez momentanément su la touche ou pou eveni au début de la piste en lectu e ou
saute au début de la piste suivante.
Télécommande
Votre système d'enceintes dispose d'une prise 3,5mm située à l'arrière de l'unité. l suffit de brancher le
cordon 3,5 mm fourni sur la prise casque de votre iPod Shuffle ou de tout autre source audio.
REMARQUE : Les seules fonctions disponibles avec ces autres sources audio sont marche/arrêt et réglage
du volume. Les fonctionnalités de navigation via la télécommande ne s'appliquent pas à ces autres
appareils.
Connexion du iPod Shuffle ou d'autre source audio
iPod Shuffle
Lecteur MP3
Marche/arrêt
Volume +
Retour rapide
Volume -
Lecture / Pause
Avance rapide
Face arrière de l'unité
PWER
FFN
DC15VInput
AUX
13
All manuals and user guides at all-guides.com

14
Pas d'alimentation
L'interrupteur marche/arrêt principal est éteint.
La touche marche/arrêt sur la façade du système ou de la télécommande est éteinte.
Le bloc d'alimentation AC n'est pas branché sur le cordon d'alimentation ou la prise murale.
Ni rechargement ni son
L'iPod est mal enclenché sur la station d'accueil. Vérifiez que l'insert correspond à votre iPod.
Le volume est trop bas.
La piste sur votre iPod n'est pas en lecture. Vérifiez que la lecture n'est pas sur pause ou entre deux
pistes.
Vérifiez que votre iPod dispose du logiciel approprié : version 2.1 ou plus récent.
Ni rechargement ni son
Vérifiez le bon enclenchement de l'iPod dans l'insert/ la station et le contact avec les broches.
Aucune commande à distance
Assurez-vous que les piles utilisées sont neuves.
Vérifiez le bon positionnement des piles.
Si certaines fonctions de navigation ne fonctionnent pas, il se peut que le logiciel iPod ne soit pas
à jour. Ces fonctions sont conçues pour fonctionner avec la version 2.1 du logiciel ou plus récent.
Dépistage des Pannes
iRhythms garantit ce produit contre tout défaut de matières ou de fabrication pour une période d'un an
suivant la date d'achat initiale. Un justificatif d'achat est nécessaire, donc veuillez conserver votre ticket
de caisse. La fiche de garantie doit être complétée et renvoyée immédiatement à iRhythms.
Si, pendant la période de garantie et au cours d'un usage normal, un défaut du produit est constaté,
le produit sera soit réparé soit remplacé par un produit neuf ou reconditionné, à la seule discrétion
d'iRhythms.
Cette garantie ne couvre pas les défauts résultant d'accidents, d'un usage abusif ou incorrect ni d'une
intervention non autorisée. Cette garantie vous confère certains droits. Vous pouvez bénéficier d'autres
droits qui varient selon les états.
Pour toute intervention sous garantie, renvoyez le produit à iRhythms en port dû. iRhythms se réserve le
droit de remplacer un produit en fin de série par un autre de valeur égale.
Remarques :
1) Pour toute question ou support technique, appelez iRhythms
Tel. : 360-823-4100 / Fax : 360-883-4888
2) Au lieu de renvoyer cette fiche, vous pouvez enregistrer votre produit iRhythms en ligne
sur le site web : www.irhythms.com
Garantie
All manuals and user guides at all-guides.com

Complimenti per la vostra scelta di acquistare il sistema di diffusione acustica A-303 iRhythms. Questo
sistema desktop autonomo è realizzato per iPod Wheel di 3ª Generazione, iPod Click Wheel di 4ª
Generazione, iPod Mini, iPod Photo e iPod Shuffle ed altre sorgenti audio portatili. A-303 è sufficientemente
potente da offrire una riproduzione audio di elevata qualità in tutta la stanza e, nel contempo, piccolo
abbastanza per essere trasportato ovunque. Buon divertimento!
15
Introduzione
La confezione
Sì, preparatevi al divertimento!
Posizionare il sistema su una superficie stabile e piana.
drivers del sistema
iRhythms
sono schermati e limitano pertanto la possibilità di interferenze ai monitor
di televisori e computer. Tuttavia è buona norma lasciare una distanza ragionevole tra il sistema di
diffusione e tali dispositivi.
l passo successivo è l'installazione dei corretti inserti nell'incavo di connessione situato nella base del lato
anteriore del sistema. Ogni inserto è contrassegnato per facilitare la selezione di quello che meglio si
addice all'iPod in uso. Per installare l'inserto, infilarlo semplicemente nella presa di connessione.
Preparativi
l contenuto della confezione include:
Telecomando
Cavo di alimentazione Alimentatore
Inserti Dock
Cavo da 3.5mm
Pe imuove e l'inse to,
basta infila e la punta di
un cacciavite nella fessu a
dell'inse to e applica e una
leva legge a pe solleva lo
Dock
Nota: iPod nano e iPod
video vengono fo niti di
se ie con i ispettivi inse ti
che sono anche adatti pe
questo dock unive sale.
Digital Docking Speaker
TM
iPod di 3a
Gene azione
con Touch
Wheel e pulsanti
(10GB, 15GB e
20GB)
iPod di 4a
Gene azione
con Click Wheel
(20GB, e 30GB)
iPod di 3a
Gene azione
con Touch Wheel
e pulsanti
(30GB e 40GB)
iPod di 4a
Gene azione
con Click Wheel
(40GB)
iPod photo
iPod shuffleiPod miniiPod nanoiPod with video
(30G)
iPod with video
(60G)
All manuals and user guides at all-guides.com
all-guides.com

DC15V Input
nserire le pile ministilo (in dotazione) nel vano batterie del telecomando, osservando le corrette polarità
(+ / -).
Accertarsi che l'interruttore di alimentazione principale sul retro del sistema di diffusione sia acceso. Fatto
ciò, il sistema potrà essere attivato o disattivato tramite il telecomando.
NOTA: se si prevede di non utilizzare il diffusore per lunghi periodi di tempo, si consiglia di spegnere
l'interruttore principale sul retro dell'unità.
Utilizzo del sistema
16
Collegare il cavo di alimentazione alla sorgente di alimentazione. l connettore all'estremità dell'alimentatore
si collega alla presa CC situata sul retro del sistema. A questo punto, collegare il cavo di alimentazione
alla presa a muro CA o al dispositivo di protezione da sovracorrenti.
Assicurarsi ancora una volta che l'inserto corretto per il vostro iPod sia installato nell'incavo di connessione.
Collegare l'iPod ai piedini di connessione che emergono dall'inserto/incavo.
Connessioni
Quando viene inserito nel dock di connessione, l'iPod può essere spento o acceso. Se è acceso e il brano
è in fase di riproduzione, si dovrebbe sentire immediatamente l'audio. Se non si sente nulla, controllare
nuovamente che il brano sia in fase di riproduzione e che il volume sia aumentato leggermente. A questo
fine, usare i pulsanti di volume + / - sul lato anteriore del diffusore.
NOTA: per evitare un suono schioccante, accertarsi che l'iPod sia già acceso nel
momento in cui viene inserito nel dock di connessione.
Interruttore di
accensione/
spegnimento
Presa ingresso segnale
Sistema di diffusione
stereo a 2 vie
Aumento volume
Riduzione volume
Inserto Dock
Riduzione volume
Aumento volume
Pannello posteriore
Alimentazione
CA/CC
Pannello posteriore
DC15V Input
ngresso CC
AUX
P WER
FF N
P WER
FF N
All manuals and user guides at all-guides.com

Assicurarsi che le pile siano inserite.
Accensione/spegnimento
l pulsante di alimentazione del telecomando consente di accendere
o spegnere il diffusore. L'accensione del sistema è segnalata da un LED
blu, mentre lo spegnimento è indicato da un LED rosso.
Volume
Si puo aumentare o ridurre il volume tenendo premuto i pulsanti + / -
sul telecomando.
Altre funzioni
l telecomando consente di "navigare" tra i brani se si dispone di un iPod piu recente con versione software
2.1 o superiore.
n / ff remoto per iPod:
Si puo spegnere l'iPod tenendo premuto il pulsante play/pause. Per riaccenderlo, premere una volta il
pulsante play/pause o i pulsanti di avanzamento/indietreggiamento / .
Play/Pause
Questo pulsante consente di avviare o interrompere l'esecuzione di un brano.
Arretramento e Avanzamento rapido
Per far avanzare o indietreggiare un brano, tenere premuti i pulsanti / .
Salto di un brano in avanti o indietro
Premere i pulsanti / una volta per accedere direttamente al brano successivo o tornare all'inizio
del brano corrente.
Telecomando
Sul retro del sistema di diffusione è situata una presa d'ingresso da 3.5mm. Collegare semplicemente il
cavo da 3.5mm fornito con il sistema alla presa di uscita cuffie dell'iPod Shuffle o altra sorgente musicale.
NOTA: le uniche funzioni telecomandate che operano con altre sorgenti musicali sono
Accensione/Spegnimento e Volume Su/Giù. Le funzioni di navigazione tra i brani del telecomando non
sono applicabili a tali sorgenti.
Collegamento a iPod Shuffle o altra sorgente
iPod Shuffle
Lettore MP3
Accensione
Aumento
volume
Indietro
Riduzione
volume
Play/Pausa
Avanti
Retro della dock station
DC15VInput
AUX
P WER
FF N
17
All manuals and user guides at all-guides.com

Assenza di alimentazione
L'interruttore di alimentazione principale sul retro dell'unità non è acceso.
l pulsante di accensione sul lato anteriore del diffusore o sul telecomando non è stato acceso.
L'alimentatore CA non e collegato al cavo di alimentazione o alla presa a muro.
Assenza di audio
iPod non è posizionato correttamente sul dock. Accertarsi di utilizzare l'inserto adatto all'iPod in uso.
l volume è al minimo..
l brano selezionato non viene riprodotto. Controllare che non sia in corso una pausa o un intervallo
tra due brani.
Controllare che l'iPod stia utilizzando il corretto software (versione 2.1 o superiore).
Mancato caricamento e/o assenza di audio
Accertarsi che l'iPod sia correttamente posizionato nell'inserto/dock e che faccia contatto corretto
con i piedini di connessione.
Mancato funzionamento dei comandi a distanza
Accertarsi che le pile siano in buono stato.
Accertarsi che le pile siano posizionate correttamente in sede.
Se alcune delle funzioni di navigazione vengono meno, è possibile che il software dell'iPod non sia
stato aggiornato. Tali funzioni necessitano della versione 2.1 o superiore del software.
Diagnostica
iRhythms garantisce all'acquirente che il presente prodotto è privo di difetti di materiali o fabbricazione
per un periodo di un anno dalla data di acquisto originale. È richiesta la prova di acquisto, per cui si
raccomanda vivamente di conservare la ricevuta. Occorre inoltre compilare per intero la scheda di
registrazione della garanzia ed inviarla quanto prima a iRhythms.
Se nel corso del periodo di garanzia il prodotto presenta difetti durante il normale utilizzo, iRhythms
provvederà a propria discrezione a ripararlo o a sostituirlo con un prodotto nuovo o rimesso a nuovo.
La presente garanzia non copre difetti derivanti da incidenti, abuso, uso improprio o riparazione non
autorizzata e conferisce diritti specifici all'utente. Quest'ultimo può eventualmente vantare ulteriori diritti
legali che possono variare da stato a stato.
Per ricevere il servizio previsto dalla garanzia, restituire questo prodotto a iRhythms con prepagamento
delle spese di spedizione. iRhythms si riserva il diritto di sostituire un eventuale prodotto discontinuato con
un prodotto di eguale valore.
Nota:
1) Per eventuali quesiti e assistenza tecnica, contattare iRhythms
Tel: 360-823-4100 / Fax: 360-883-4888
2) nvece di compilare ed inviare la suddetta scheda, è ora possibile registrare il prodotto
iRhythms online tramite il nostro sito web www.irhythms.com.
Garanzia
18
All manuals and user guides at all-guides.com

Le felicitamos por haber escogido el sistema de altavoces A-303 de iRhythms. Este sistema compacto
de altavoces de sobremesa está preparado para funcionar con iPods de 3ª generación con rueda
giratoria y botones, iPods de 4º generación con rueda selector, iPod mini, iPod Photo y iPod shuffle y otras
fuentes de audio portátiles. El A-303 tiene potencia suficiente para llenar una habitación con calidad
de alta fidelidad y al mismo tiempo es suficientemente pequeño como para poder viajar con él. Disfrute!
Introducción
Contenido
Sí, prepárese para disfrutar!
Coloque el sistema sobre una superficie firme.
Los controladores en su Sistema
iRhythms
están protegidos y por lo tanto se limita la posibilidad de
interferencias a monitores de vídeo y ordenadores. No obstante, es una buena idea dejar una distancia
razonable entre el sistema de altavoces y estos aparatos.
El paso siguiente es instalar la pieza de inserción correcta en el Base Dock Universal, localizado en la
parte inferior delantera del sistema. Cada pieza de inserción está marcada para escoger la que se
adecua a su iPod. Para insertar, simplemente insértela directamente en el conector.
Preparación
Este sistema incluye:
Control Remoto
Cable de Alimentación Transformador
Piezas de Inserción
del Cargador
Cable de 3.5mm
Pa a eti a , guie el
desto nillado hacia la
ape tu a y ti e suavemente
hacia a iba
Ca gado
19
Digital Docking Speaker
TM
iPod de 3a
gene acion con
ueda gi ato ia
y botones
(10GB, 15GB
y 20GB)
iPod de 4o
gene acion con
ueda selecto
(20GB y 30GB)
iPod de 3a
gene acion
con ueda gi ato ia
y botones
(30GB y 40GB)
iPod de 4o
gene acion con
ueda selecto
(40GB)
iPod photo
iPod shuffleiPod miniiPod nanoiPod with video
(30G)
iPod with video
(60G)
Nota:
Los modelos iPod nano y iPod video
vienen con sus p opias conexiones
que se inse tan co ectamente en
esta base unive sal.
All manuals and user guides at all-guides.com
Other manuals for A303
1
Table of contents
Languages:
Other iRhythms Docking Speakers manuals