ISEEKA WT10 User manual

Base Unit - BU10
Wrist Tag - WT10

Content PageContent Page
Table of Contents
1: General Information……………………………………………… 1
1.1 Standard Package Contents…………………………………….. 1
1.2 Display Indicators and Icons…………………………………….. 1
1.3 Summary of Tag and Base LED and Alert …………………….. 2
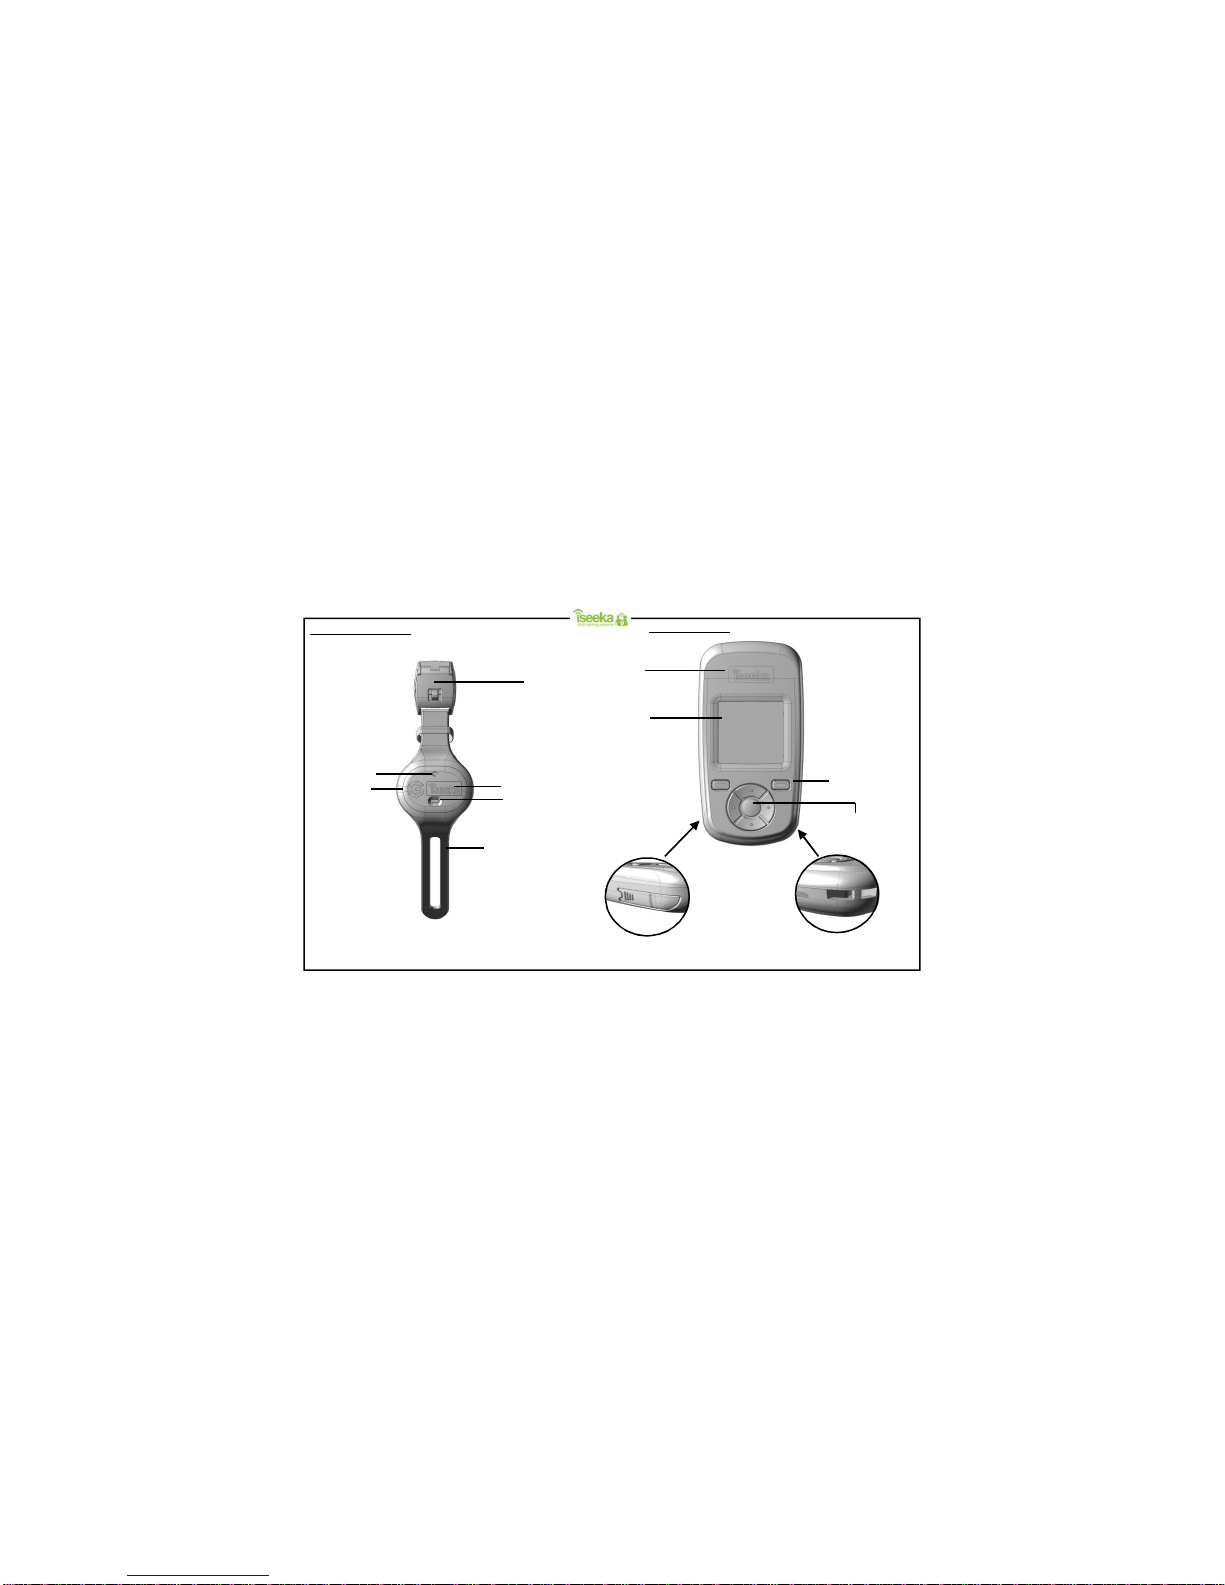
1.4 WristTag Features……………………………………………….. 3
1.5 Base Features…………………………………………………….. 3
2: Getting Started…………………………………………………… 4
2.1 Installing and Removing the Battery on the WristTag……... 4
2.2 Attaching and Detaching the WristTag……………………….. 5
2.3 Installing and Removing the Batteries on the Base Unit……... 6
2.4 SwitchingOn/Off………………………………………………….. 7
2.5 Register Tag to Base (Association Mode)……………………... 8
3: General Functions……………………………………………….. 9
3.1 Keypad Lock………………………………………………………. 9
3.2 Main Menu………………………………………………………… 10
3.3 Viewing the Tag…………………………………………………... 10
3.4 Finding the Tag…………………………………………………… 11
3.5 Renaming the Tag………………………………………………... 11
3.6 Unregistering the Tag……………………………………………. 12
3.7 Return to Base……………………………………………………. 12
3.8 Tag Power Saver………………………………………….………. 13
3.9 Setting Comfort Zone …………………………………………….. 14
4: Understanding the Monitoring Mode…………………………. 15
4.1 Main Screen (Monitoring Mode)………………………………… 15
5: Understanding the Find Mode…………………………………. 16
5.1 Find Mode Screen………………………………………..……..… 16
6: Alerts……………………………………………………………….. 17
6.1 Panic Alert…………………………………………………………. 17
6.2 Outside Comfort Zone Alert……………………………………… 18
6.3 Out of Range (OOR) Alert……………………………………….. 19
6.4 Tag Low Battery Alert……………………………………………. 20
6.5 Base Low Battery Alert…………………………………………… 21
6.6 Flat Battery Alert………………………………………….……..… 21
7: Advance Settings for Base………………………….…………. 22
7.1 Tag Alert…………………………………………………………… 22
7.2 Base Alert………………………………………………………….. 23
7.3 RF Channel………………………………………………………... 24
8: Trouble Shooting Guide…………………………………………. 25
Support Information…………………………………………………... 26
Product Guarantee……………………………………………………. 27
FCC Statement…………………………………………………………..28

1: General Information
1.1 Standard Package Contents
Package Contents:
1: WristTag with WristStrap X 1
2: Base Unit x 1
3: Spare Latch Key (to unlock Wrist Tag) X 1
4: CR 2032 Coin Cell Battery X 1
5: AAAAlkaline Battery X 2
6: User’s Manual X 1
Icon Description Remark
Displays in Main Screen and Find Mode Screen
Comfort zone alert enabled icon
Comfort zone alert disabled icon
Displays in Main Screen and Find Mode Screen
Displays in Main Screen and Find Mode ScreenLow battery indicator
Battery gauge
(3 bars, 2 bars, 1 bar)
Displays in View Tag ScreenTag Low Battery Alert Icon
Tag Comfort Zone Alert Icon
Tag Panic Alert Icon
Search Icon Displays in Register Tag, Unregister Tag and Tag Power Saver Screen
Displays in View Tag Screen
1.2 Display Indicators and Icons
Page1
Welcome
Welcometo Iseeka, a simple and innovative way to monitoryour children.
Please take a few minutes to familiariseyourself with the system. You will
find all of the components to be extremely easy to operate. When you have
becomefamiliarwith their operation, we suggest that you practice with the
units by playing a game of hide-n-seek.
Ifyou have questions please call us at 0844 543 63 63

Normal Silent
Association Mode Blinks once every 15 sec 2 chirps 2 chirps No alert No alert
Monitoring Mode No alert No alert No alert No alert
Outside Comfort Zone 1 chirp every
second No alert 1chirp
(with vibration)
every second
3 short vibrations
Return to base 1chirp every
second No alert No alert No alert
Tag Lowbattery 3 chirps No alert 3 chirps
(with vibration) 1 short vibration
Tag Gone BatteryShutdown LED Continuously on No alert No alert NA NA
Panic Button Blinks once when
panic signal is sent 1 chirp every
second No alert 1chirp
(with vibration)
every second 3 short vibrations
Find Mode Blinks every 0.5 sec 1 chirp every
second No alert
Ascending &
descending beeps
dependant on the
distance / direction
from the Tag.
No alert
Out of Range
Blinks once every 1 second
for 15 mins
1 chirp every
2 seconds for
5 minutes No alert 1 chirp
(with vibration)
every second 3 short vibrations
Idle Mode Blink once every 30 sec No alert No alert No alert No alert
Sleep Mode LED off No alert No alert No alert No alert
Base Battery Low
Base Gone BatteryShutdown NA NA NA 3 chirps (without
vibration) 1 short vibration
Blinks once every 2 sec
Tag Base
SilentNormalLED Alert
Page2
1.3 Summary of Tag and Base LED and Alert

Press to activate
panic mode
AlertLED (red)
Speaker
Hole
Rubber Strap
Strap Lock
Logo
1.5 Base Features
1.5” LCD
2 x Soft Keys
Multi-directionalkeypad.
Logo
On the bottom left: Latch Key On the bottom right: Lanyard Loop
Page3
1.4 Wrist Tag Features

Step 1:
To insert the battery, slide the
battery under the contact spring
bar as shown and ensure that the
rubber seal is in place.
Step 2:
Click the two housings together until
you hear a snap. Ensure that it is
properly closed in all directions.
Step 1:
Stretch and pull the rubber strap apart
and eject the tag out by pushing it from
the bottom.
Step 2:
With a coin, slot it in between the
housing flaps and twist to remove the
battery door.
Step 3:
Use the pointed edge of the latch key
and insert it into the slot (as shown in
the figure in Step 3) and lift.
Step 4:
The battery will be lifted out
of its compartment.
To remove the battery
To install the battery
2: Getting Started
2.1 Installingand Removing the Battery on the Wrist Tag (battery’s positive polarity faces upwards)
Step 3:
Align the flange of the tag to the wrist strap’s rubber
groove and slide one side in first. Next, stretch the
rubber strap and slide the other end of the tag into
the other rubber groove. Page4

2.2 Attaching and Detaching the Wrist Tag
Step 1:
With thelatch key (located on the
bottom left of the handheld unit), insert
the key into the latch as shown, using
the forked edge push the metal pin
forward and lift the door open.
Step 3:
With thedesired length, flip the latch
back until it locks in place.
Step 2:
Slide the other end of the rubber strap
through the latch.
Page5
1
2
3

2.3 Installingand Removing the Batteries on the Base Unit
Step 1:
Push the battery door down where the
arrow indicator is then slide outwards to
remove the battery door.
Step 2:
Following the directions on the casing
firmly insert 2 X AAA batteries.
Step 3:
Once the batteries are firmly placed, slide the battery door until it clicks in place. Page6

2.4 Switching On/Off
The Base will turn on when new batteries are inserted.
To turn off the Base:
The base will stop communicating tothe Tag/Tags and display the power down screen before it turns off.
Power Up Screen
To turn on the Base:
Upon power up, the Base will emit a chirp and display the power up screen. Thereafter, the screen will enter monitoring mode.
Power Down Screen
Press and hold the key for 2
seconds in the main screen
(Monitoring Mode).
Press and hold the key
for 2 seconds
when the screen is off.
Page7

2.5 Register Tag to Base (Association Mode)
Step1: Insert battery into the Base.
Step 2: Select Yes to enter associationmode to register Tags. Alternatively, you can register the Tag from the
Main Menu > select Register Tag.
Or
Select No to return to the main screen.
Step 4: After the Tag is successfullyassociated with the Base, it would emit an alert (2 chirps).
Step 5: Select Done to return to the main screen and start monitoring the Tag on the Base.
Note: 1. The Tag can only associate with the Base unit when it is within 6 Metres of the Base.
2. The Tag cannot be monitoreduntil it is associated with a Base.
3. Tags need to be re-associated every time a battery is replaced.
4. The Base does not need to be re-associated with the Tag/Tags when batteries are replaced.
First Screen (without association)
Ifthe Base has not been associated with any Tag, it will display the following screen for 5 seconds
after it is powered up.
Register Tag Menu
New Tags are stored in a first-in first-out order and corresponds to Tag 1 to Tag 16 in the memory.
Page8
First Screen
Step3: Insert battery into the Tag.

Page9
Keypad Unlocked Confirmation Screen
The Base will display a messagefor 2 seconds for you to confirm that the keypad is
unlocked by selecting OK.
To Unlock the Keypad:
Step 1: Select Unlock.
Step 2: Select OK immediately to unlock the Keypad.
3: General Functions
3.1 Keypad Lock
You can lock or unlock the keypad. The Base will unlock the keypad automatically in the event of panic alert, comfort zone alert and out of range
alert.
To Lock the Keypad:
Press and hold the key for
1 second in the main screen
(Monitoring Mode).

3.2 Main Menu
You can access following sections from the main menu:
• View Tag
• Find Tag
• Rename Tag
• Register Tag
• Unregister Tag
• Comfort Zone
• Return to Base
• Tag Power Saver
• Advance Settings
Main Menu Screen
The user has the option to select any of the menu items.
Or
Select Back to return to the main screen.
Page10
3.3 Viewing the Tag
You can view and clear the alert status of individual or all of the Tags. This includes the alert status for low battery,panic button and tags outside
the comfortzone.
Step 1: From the Main Menu > Select View Tag.
Step 2: Select the specific Tag that you want to clear the alert status of and press .
Or
Select All to clear the alert status of all the associatedTags.
Step 3: Select Back to return to the main menu.
t
Note: The alert status of individual Tag(s) will be cleared when the Base battery is replaced.

Page11
3.4 Finding the Tag
You will be able to select a single Tag and locate it.
Step 1: From the Main Menu > Select Find Tag
Step2: Select the Tag which you would like to locate and enter find mode (Go to Find Mode Screen).
Or
Select Back to return to the main menu without making any changes.
3.5 Renaming the Tag
Afterthe Tags have been associated with theBase, you can edit the names of each Tag (3-8 alphanumeric characters).
Step 1: From the Main Menu > select Rename Tag.
Step2: Select the specific Tag to edit the name. You can press to request the Tag to emit an alert and identify it.
Or
Select Back to return to the previous screen.
Step3: Edit the name of the Tag (3-8 alphanumeric characters).
Step 4: Select OK to confirm the name of the Tag and return to the previous screen.
Step 5: Once the Tag is successfullyrenamed, the Tag will alert (2 chirps).
Step 6: Select Back to return to the main menu.
Select and to change the letters or numbers.
Select and to move the cursor left and right.
Select to switch between ABC,abc and 123 Mode.

3.6 Unregistering the Tag
You can disassociate/ unregister all Tags from the Base.
Step 1: From the Main Menu > select Unregister Tag.
Step 2: Select Yes to confirm youroption to unregister all the Tags.
Or
Select No to return to the previous screen.
Unregister All Tags Screen
Display shows the name of Tag/Tags found that can be unregistered.
Step 3: Select Done to stop searching for Tag/Tags; unregister all tags and return to the main screen.
Note: Please ensure that Tags which are out of range are properly unregistered by removing the battery.
Page12
3.7 Return to Base
You can send an alert using the Base to one or all Tags to 'Return to Base'.
This will cause the selected Tags to alarm (1 chirp every second), indicating to the Tag wearer that the Base is requesting attention.
This alert will stop when the Tag returns to within 6 Metres of the Base.
Step 1: From the Main Menu > select Return to Base
Step 2: Select the specific Tag that you want to send an alert to and press .
Or
Select All to send return to base alert to all the associated Tags.
Return toBase Menu
Step 3: Select Back to return to the main menu.

Page13
3.8 Tag Power Saver
You can place all Tags into sleep mode to conserve the Tag battery life when they are not in-use for a period of time.
Step 1: From the Main Menu > Select Tag Power Saver.
Step 3: Select Done to stop searching for Tag/Tags and return to the mainscreen.
Note: Please note that Tags which are out of range are not set to sleep mode by the Base.
To wake the Tag from sleep mode.
Press the panic button on the Tag when the Base is in Monitoring Mode (the tagwill appear on the screen).
Step 2: Select Yes to confirm to proceed to place all tags into sleep mode.
Or
Select No to return to previous screen without making any changes.
Tag Power Saver Screen
Display shows the names of the Tag/Tags found, that have been set to sleep mode.

3.9 Setting Comfort Zone
You will be able to set a level that represents a comfort zone (in distance) for all Tags or individual Tags. The Base will monitor the comfort
zone for the Tags in monitoring mode.
From the Main Menu > selectComfort Zone.
The followingoption for comfort zone settings are supported:
All Tags: To set a comfortzone for all Tags.
Individual Tag: To set a different comfort zone for each individual Tag.
To set Comfort Zone for all Tags
Step 1: From the Comfort Zone Menu > select All Tags to set a comfort zone for all Tags.
Step2: Set a level for the comfortzone for all Tags by pressing and to move the line up and down
and select OK to confirm the settings and return to the main screen
Or
Select Back to return to previous screen without making any changes.
To set Comfort Zone for an individual Tag
Step 1: From the Comfort Zone Menu > select Individual Tag to set a comfortzone for each individual Tag.
Step 2: Select the specific Tag that you want to set the comfort zone for and press .
Step3: Set a level for the comfortzone by pressing and to move the line up and down
Or
Select Back to return to previous screen without making any changes.
Step 4: Select OK to confirm the settings and return to the comfortzone (individual tag) menu to set a comfort
zone level for another Tag.
Step 5: Select Done to save the settings of the individual Tag/Tags and return to the main menu.
Page14
Comfort Zone Screen
The comfort zone range is represented by 10 divisions. This ranges from approx 50 Metres to up to ¼ Mile with a clear line of sight.
The default range is at division 9.
Note: The Tag Alert setting (Normal Alert) on the Base would specify if the Tag will sound an alarm when it is outside the Comfort Zone.

4: Understanding the Monitoring Mode
When the Base is turned on, it will automatically enter monitoring mode (Maximum 16 Tags).
During monitoring mode, the Base will search for all associated Tags, and indicate their approximate distance on the screen.
Main Screen (No Association)
This is the main screen in which the Base is not associated with any Tag.
4.1 Main Screen (Monitoring Mode)
When the Tags are associated with the Base, it will be displayed on the main screen when it is powered up.
Tags willbe assigned an individual lane to move up and down according to their distance away from thebase (full distance: ¼Mile).
User will be able to set a level that represents a comfort zone (in distance) for all Tags via the comfort zone menu. (See Comfort Zone)
SelectMenu to display Main Menu.
Distance of Tag away from the Base
N: Near
M:Middle
F: Far
Page15
Select Menu to display Main Menu.
Select Alert toenable or disable the outside comfort zone alert for all associated Tags.
(Comfort zone line will only appear ifthe optionAll Tags is chosenin comfort zone menu)
Select and to navigate between Tags.
Select to display Find Mode to locate highlighted Tag.
Comfort Zone for All Tags selected
Select and to move comfortzone line up and down.
Comfort Zone for individual Tag selected
Select and to go to comfort zone menu.
Note: In Monitoring Mode, you may notice that a Tag has disappeared. This could be due to environmental conditions. You should be able to find
the Tag again by rotating through a 360 degree angle as long as it is within range.
Example:

5: Understanding the Find Mode
Whenusing the find mode, the base will only search for one Tag and stop monitoring the rest of the associated Tags.
The Tag name will be shown at the bottom of the screen.
The screen shows how close the Base is to the Tag with audible beeps. Whenthe Base is getting nearer to the Tag, it will indicate a stronger
signal level and generate faster audible beeps.
Select Mute to mute the audible sound. Select Unmute to resume the audible sound.
Or
Select Exit to return to the main screen and exit find mode.
Distance of Tag away
from the Base
N: Near
M:Middle
F: Far
Page16
To Find Tag
Hold the Base and sweep it in a circle to find the direction and move toward the direction that gives the strongest signal level and fastestaudible
beeps.
Signallevel of Tag
Higher number and larger signal level
: Shorter distance between Tag and Base
Lower number and smaller signal level
: Further distance between Tag and Base
Middle and Far Range Near Range
5.1 Find Mode Screen

6: Alerts
6.1 Panic Alert
When the panic button of any Tag is pressed, the Tag and the Base will send out apanic alert.
The Base will also display a message to indicate which Tag activated the alert. Any key pressed on the Base will stop the panic alert in the Tag.
The Tag panic alert is:
• 1 chirp every second under normal mode.
• No alert under silent mode.
The Base panic alert is:
• 1 chirp (with vibration) every second under normal mode.
• 3 short vibration under silent mode.
Find Mode:
The Base will stop the find mode alert temporarily, emit alert (2 chirps), display a message for 2 seconds and
then revert to find mode operation.
Monitoring Mode:
The Base will display a messageand send out apanic alert.
The Tag which sent outthe alert willblink on the screen.
Select Mute to silent the alert on the Base. (Only applicable in normal mode)
Select Exit to dismiss the alert and return to the main screen without locating the Tag.
Select and to navigate to the blinkingTag.
Select to mute the alert and go to find mode to locate the Tag.
Page17

6.2 Outside Comfort Zone Alert
The Base will sound an alarm when Tag/Tags are out of the predetermined comfort zone.
The Tag comfort zone alert is:
• 1 chirp every second under normal mode.
• No alert under silent mode.
The Base comfort zone alert is:
• 1 chirp (with vibration) every second under normal mode
• 3 short vibrationsunder silent mode.
Monitoring Mode:
This message and the alert will be dismissedif the Tag is back in the comfort zone.
Find Mode:
The Base will stop the find mode alert temporarily, emit alert (2 chirps), display a message for 2 seconds and
then revert to find mode operation.
Page18
Select Mute to silent the alert on the Base. (Only applicable in normal mode)
Select Exit to dismiss the alert and return to the main screen.
Select and to navigate to the Tag.
Select to request the Tag to emit aReturn to Base alert.
This manual suits for next models
1
Table of contents
Popular GPS manuals by other brands

Spy Tec
Spy Tec Wireless Charging Weatherproof user manual

Global Sat
Global Sat EM-406a user manual

Global Sat
Global Sat TR-151 quick start guide

LiveView GPS
LiveView GPS G5 install guide

Road Mate
Road Mate The Personal Motorcycle Navigator user manual

CalAmp
CalAmp LMU-2x30 Hardware and installation guide

TK-STAR
TK-STAR MINI GPS TRACKER user manual

Global Sat
Global Sat BR-355 Product user manual

Ublox
Ublox LEA-4R System Integration Manual and Reference Design

BLOO LOC
BLOO LOC yB-010050-WT user manual

Global Sat
Global Sat USB GPS Dongle ND-100 quick start guide

Global Sat
Global Sat Globalsat BT-359 user guide