Tuning
It is possible to tune both incoming and outgoing
clicks, to a certain extent. For these adjustments,
you will need to disassemble your reel.
2. If you nd that your reel is too loud on the
outgoing click, push the clicker spring [2] in the
direction indicated by [B], Figure 7. Do not push
spring more than a few degrees, as pushing too
far will remove the outgoing click altogether.
3. If you nd that your reel is too quiet on the
incoming click, push the pawl spring [4] in the
direction indicated by [C], Figure 8.
4. If you nd that your reel is too loud on the
incoming click, push the pawl spring [4] in the
direction indicated by [D], Figure 8. Do not push
this spring more than a degree.
Figure 8
C) For louder
incomming click
4) Pawl Spring
3) Pawl D) For a quieter
incoming click
1) Clicker
A) For a louder
outgoing click
Figure 7
2) Clicker Spring
B) For a quieter
outgoing click
1. If you nd that your reel is too quiet on
the outgoing click, push the clicker spring
in the direction indicated by [A], Figure
7. Push the spring until the clicker [1] is
pointing directly at the bearing on the
rear of the spool.
How To Disassemble Your Reel
1. Remove the retaining screw by turning
it counter-clockwise, using a snug-tting
at bladed screw driver or coin. (It is
important that whichever tool you
choose to use ts well, as one that is too
small may damage the retaining screw.)
2. Remove the dragknob by turning it
counter-clockwise until it is loose.
Underneath the dragknob there will be
a stainless steel washer. It will either be
stuck to the bottom of the dragknob or
to the top of the dragspring.
3. Grasp the outside of the frame with one
hand and the spool with the other, and
pull the frame and spool apart. On the
back of the spool you may notice that
the clutch is stuck to the back of the
spool. You can remove this by grasping
the teeth of the clutch and pulling.
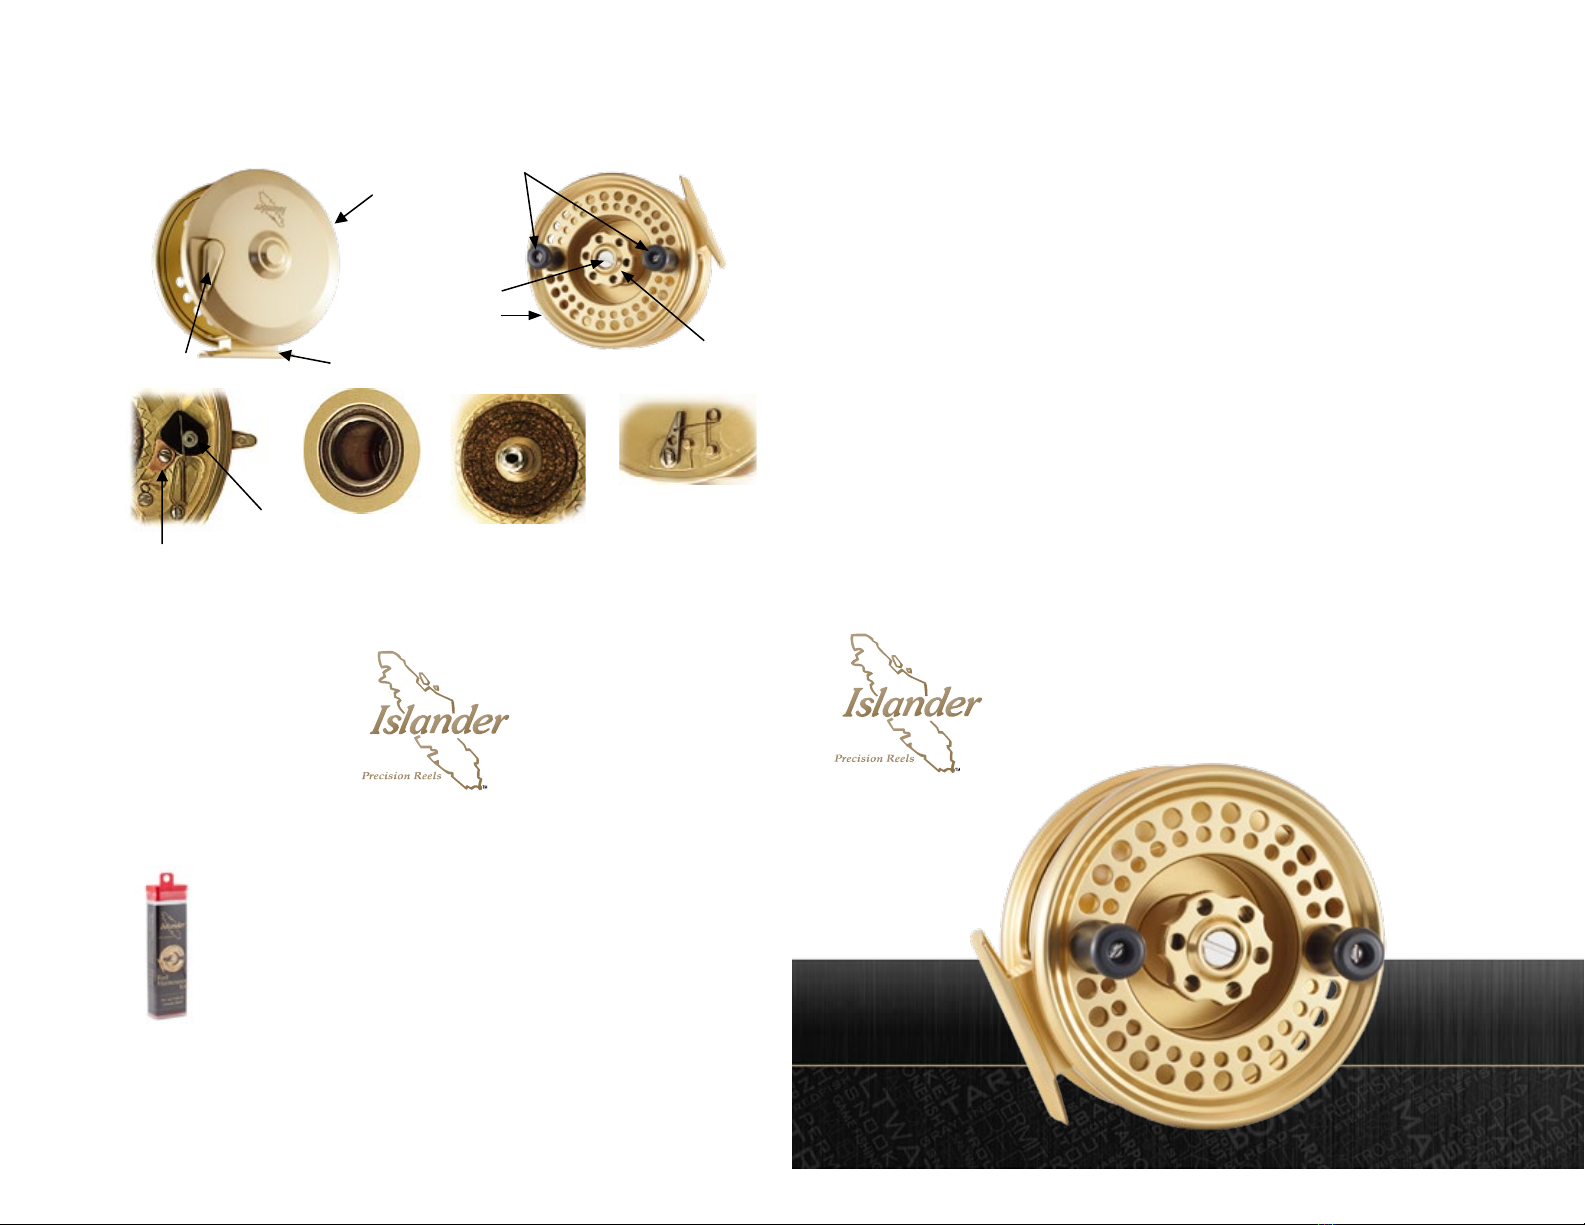
At this point there should be 7 free assemblies: Retaining Screw, Dragknob,
Dragknob Washer, Dragspring, Clutch, Spool, and Frame.
(B) Dragknob Figure 1
(A) Retaining Screw
Cleaning and Lubricating Your Reel
1. Disassemble your reel as shown above.
2. Remove the clutch assembly [1] .
3. Clean the clutch assembly. Remove old grease and
grit using a soft cloth.
4. Clean the base of the spindle, [2]. Remove any old
grease and grit from using a soft cloth.
5. Clean the pawl/cam assembly [A] and [B]. Remove
any old oil and grit using a brush or swab.
6. Oil and grease all indicated locations.
7. After lubrication, work the Draglever [3] back
a forth a few times to work the lubrication
through the cam and pawl assemblies.
8. With the Draglever [3] in the “disengaged”
position, lower the clutch back into position,
cork side up. Re-engage the Draglever [3] .
A) Oil Pawl
B) Oil Cam
C) Grease
Cam
2) Spindle
1) Clutch
Assembly
Figure 2
Figure 3
F) Grease Bearing
Under Clutch
3) Draglever
D) Grease
Teeth of
Clutch
E) Oil Clutch
Cork
Your reel comes from the factory lubricated. Periodic lubrication is recommended to maintain
optimum performance.
F) Oil Clicker
Assembly
Figure 4 Figure 5 - Drag Spring
G) Grease Bearings
(front of spool and
rear of spool)
Figure 6 -
Handle Assembly
9. Remove old oil from the around the
clicker assembly using a brush or swab.
10. Remove old grease from the surface
of the bearings. One bearing is located
at [G], while the other bearing is on the
other side of the spool. If the dragspring
[Figure 5] has not been removed, please
do so to clean and lubricate this bearing.
11. The dragspring does not require any
lubrication. Just wipe the dragspring off
with a soft cloth.
12. The handle assembly need not be lubricated. Simply remove the screw holding the
handle with a at bladed screw driver and clean thoroughly with warm, soapy water.
This level of cleaning or lubrication should be carried out once every 3-4 shing trips.
Because of the conditions that this style of reel is used under (saltwater), it is important
that the reel be rinsed off under a warm water stream after each trip. While the reel is saltwater safe,
the quick rinse will help your reel perform better in the long run. Avoid immersing the spool in water,
because moisture will be retained by the backing.