JACS TD0301 User manual

TD0301 User Manual
Interface
Key Button
Key
Illustrate
Power
On/Off, power on after press 3 seconds; power off after press 3 seconds
WPS
On/Off, enable/disable the WPS function of Wi-Fi after press 3 seconds
Reset
Software reset after short click
Reload to default settings after press 6 seconds
Hardware reset after press 12 seconds
LED Indication
Indicator
Working status
WiFi LED
Blue light active for Wi-Fi enabled
Blue light flash quickly for the WPS function is enabled
Off for Wi-Fi disabled
Signal LED
Blue light active for 2G/3G/4G network registered
Red light active for 2G/3G/4G network not registered
Blue light flash slowly for data connection established
Battery LED
Red light active for battery low without charging
Purple light flash for battery charging
Blue light flash for battery changing full
Blue light active for battery normal state

Installation
Follow the diagram to install the SIM card.
Tips: Always switch the device off and disconnect the charger before removing the SIM card.
1. Remove the back cover.
2. Insert the SIM card. Ensure that the contact area on the card is facing down and that the beveled
corner on the card is facing the beveled corner on the holder.
3. Finally cover the back.
Charge
Your battery has been partially charged at the factory. If the device indicates a low charge, do the
following:
1. Connect the charger to an outlet.
2. Connect the USB charger plug to your device‟s USBport.
3. When the device indicates a full charge, disconnect the charger from the device, then from the
outlet.
One:Using charge adapter

Two:Using USB port
TD0301 Usage
TD0301 supports 4G/3G/2G networks. Insert the SIM card, Wi-Fi devices and the computers can
access the Internet through TD0301, enjoy high-speed network services. Smart phones, tablet
computers, game consoles and other Wi-Fi devices can be connected with the TD0301 Wi-Fi
connection for Internet access.
Computers & laptops etc. may be connected to the TD0301 via USB cable for Internet Access.
TD0301 connectsto computer via a USB cable for the first time, you need to follow the
prompts.
Wi-Fi wireless Internet access

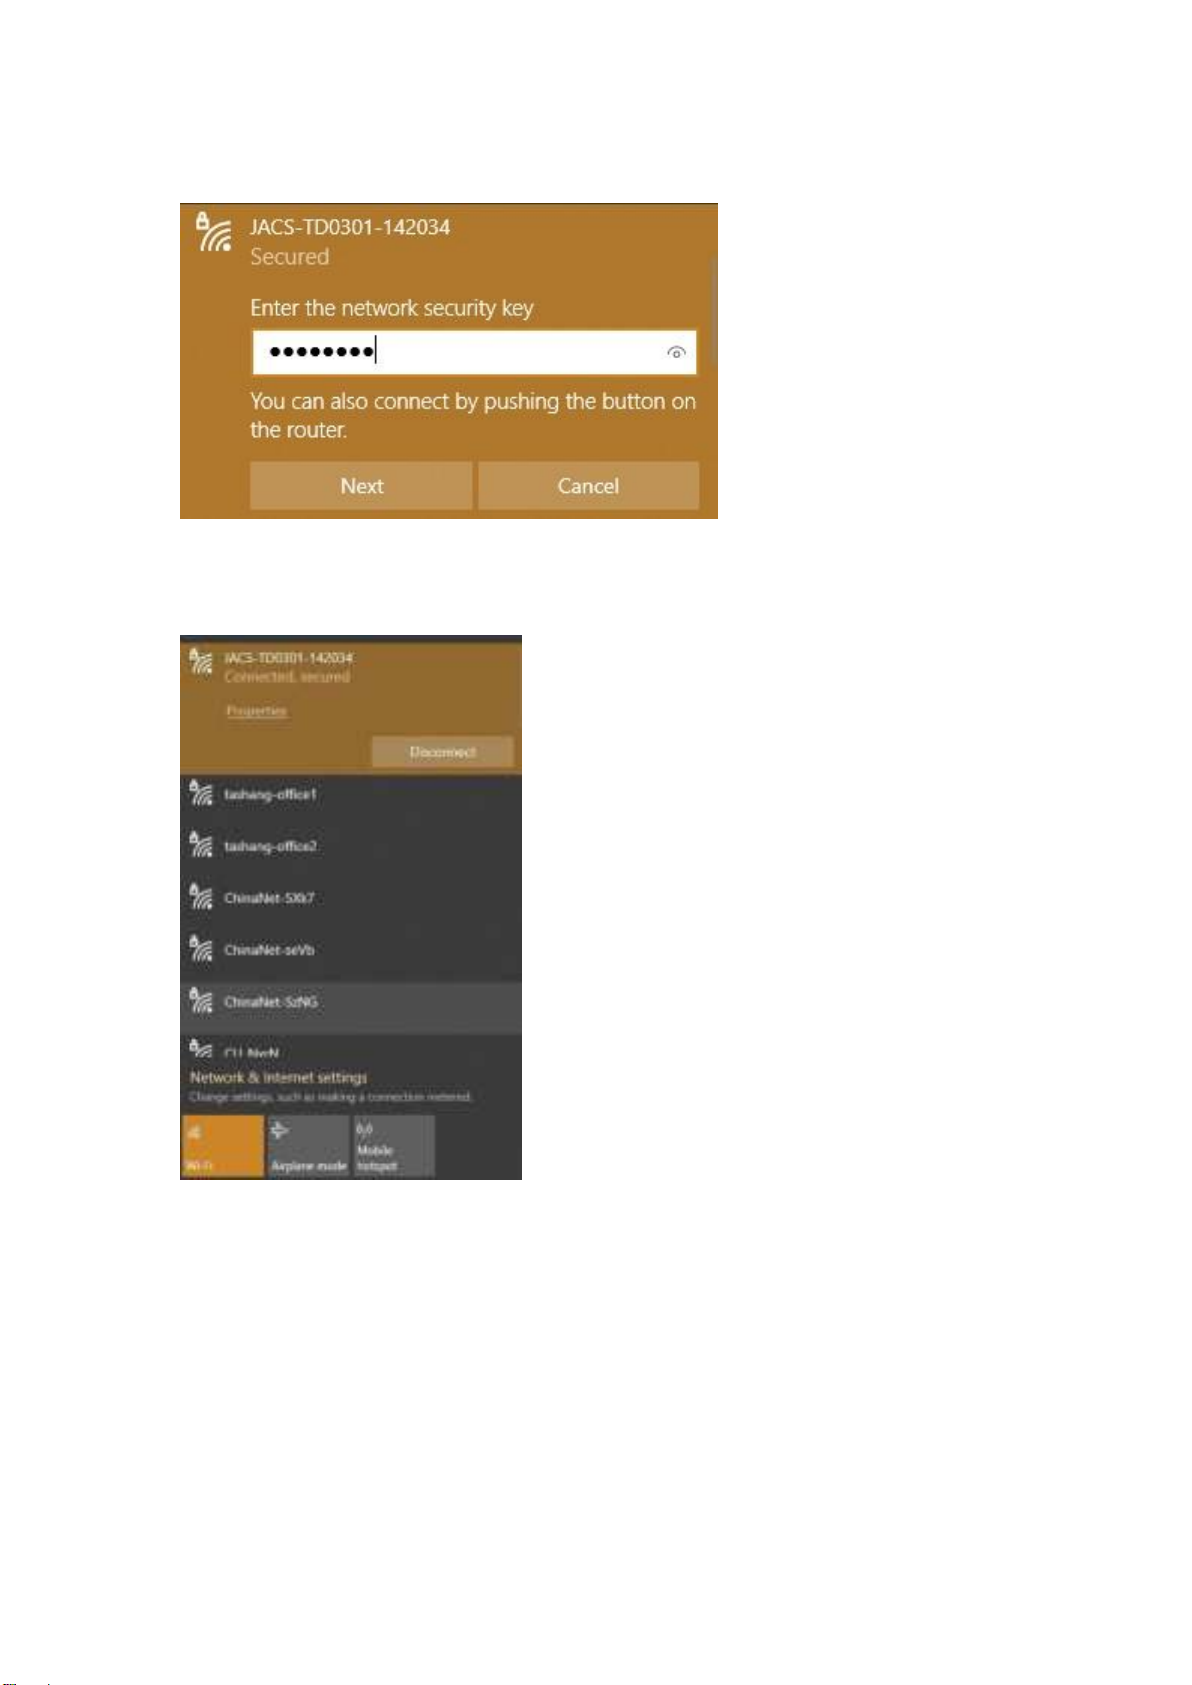
In order for a Wi-Fi device to establish a connection with the TD0301 for the first time, you will
need to select the TD0301SSID (Wi-Fi name) & enter the relevant Wi-Fi password, which you
may find them in the following ways:
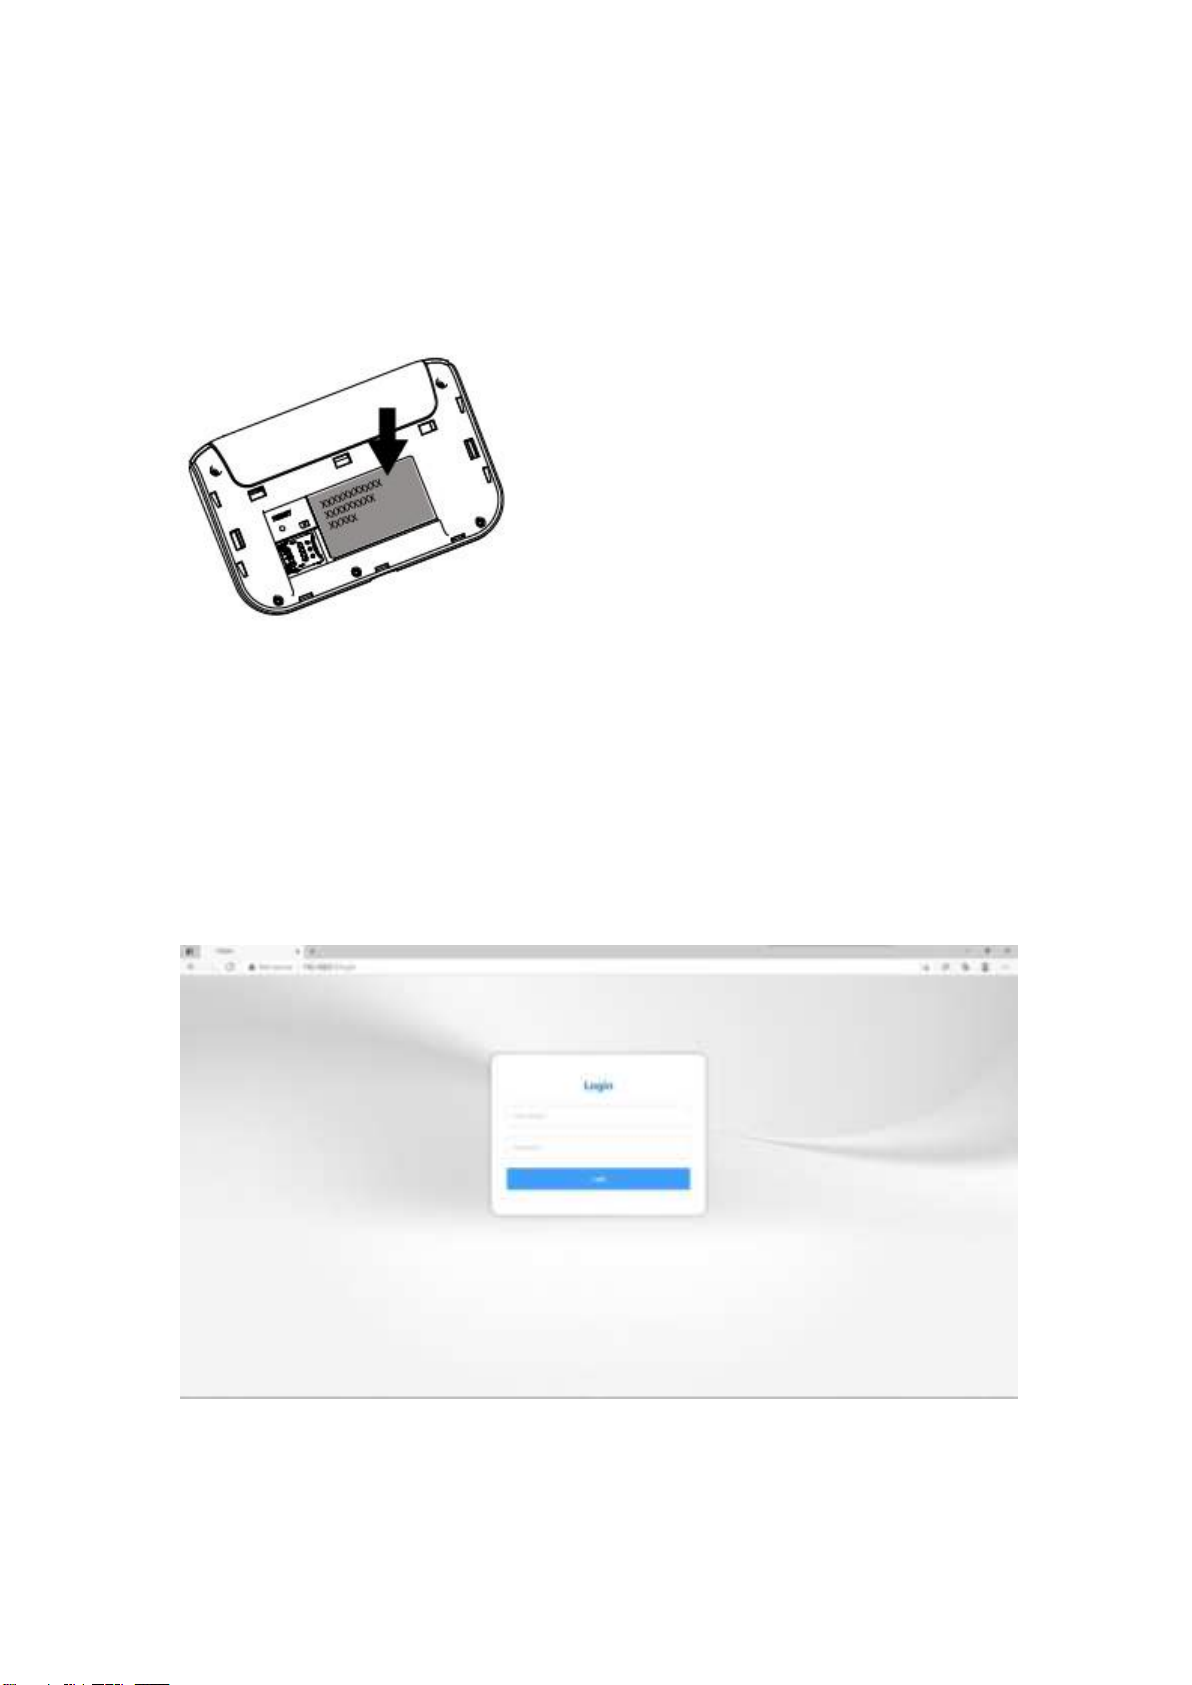
Method one: on the nameplate view the default SSID and Wi-Fi password
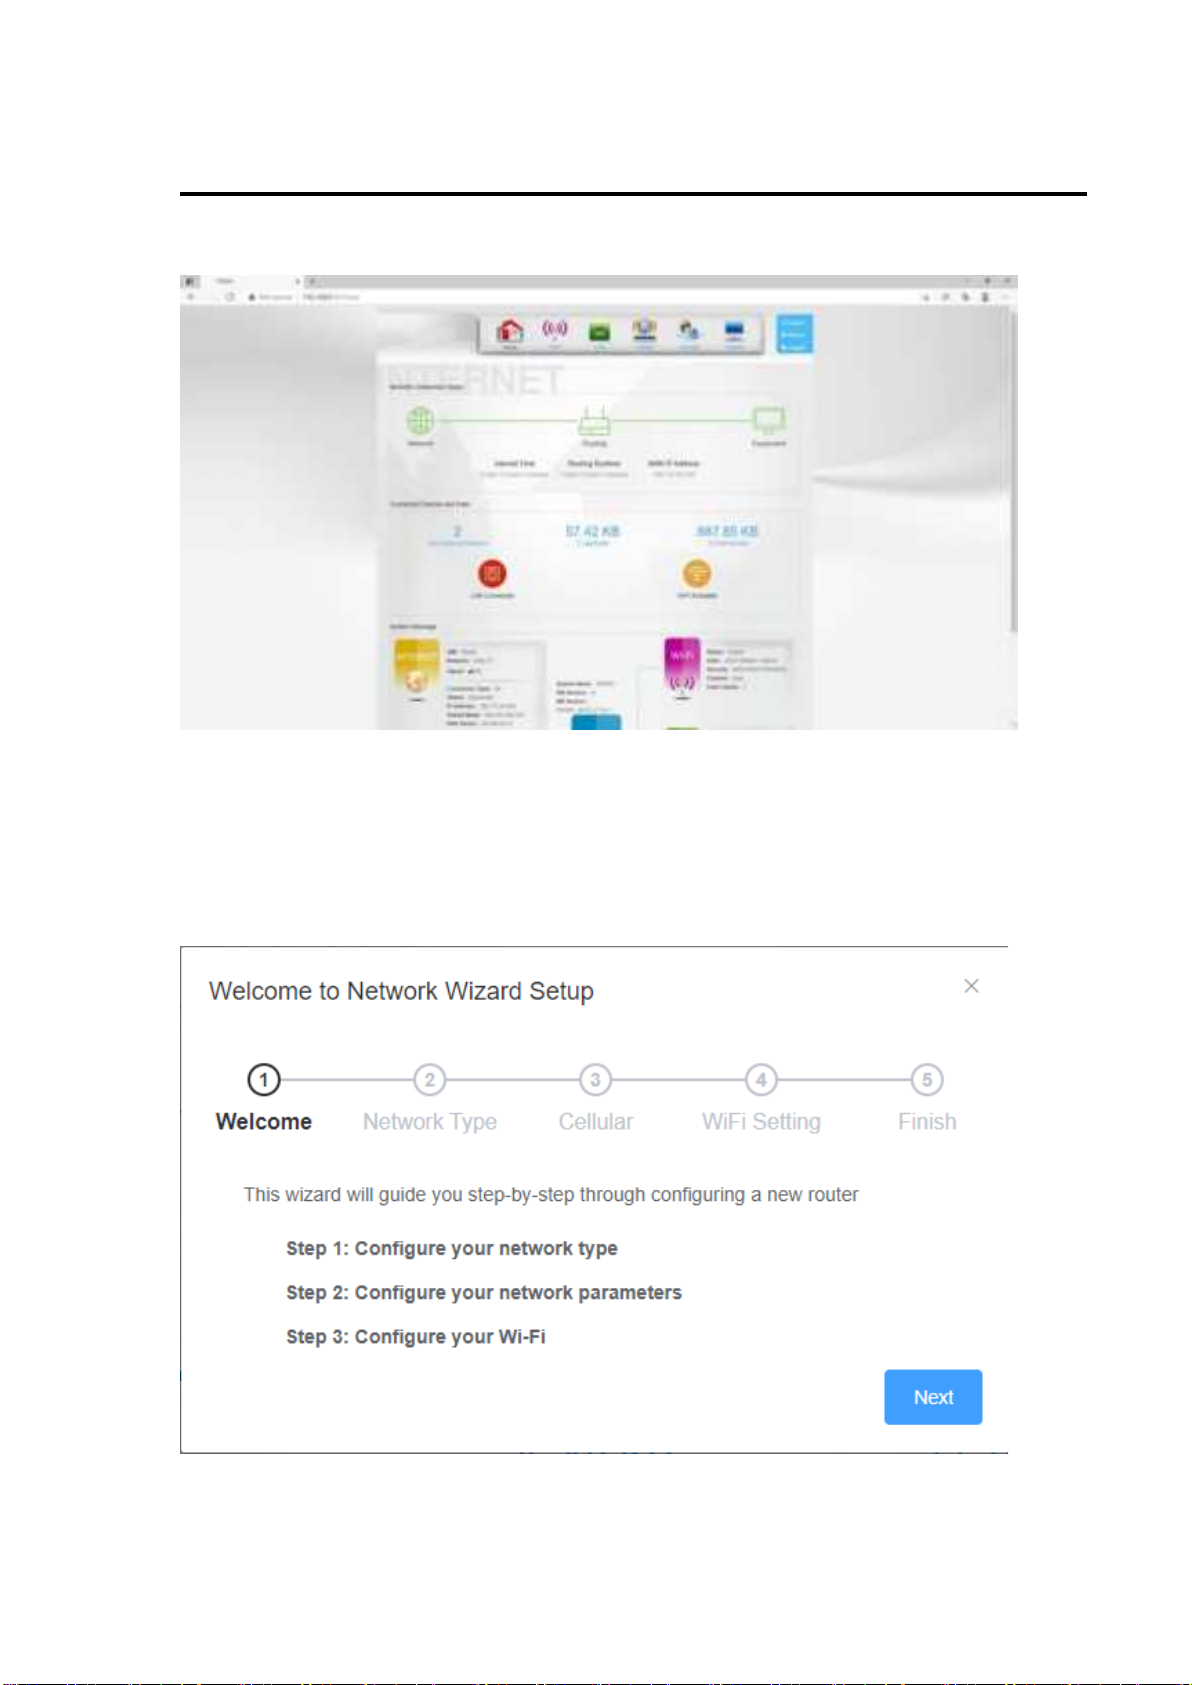
Method Two: Login management page view
1. On computer, open your browser, input http://192.168.0.1 and enter.
●The default Account is admin
●The default Password isadmin
Enter the Account and Password, login the administration pages
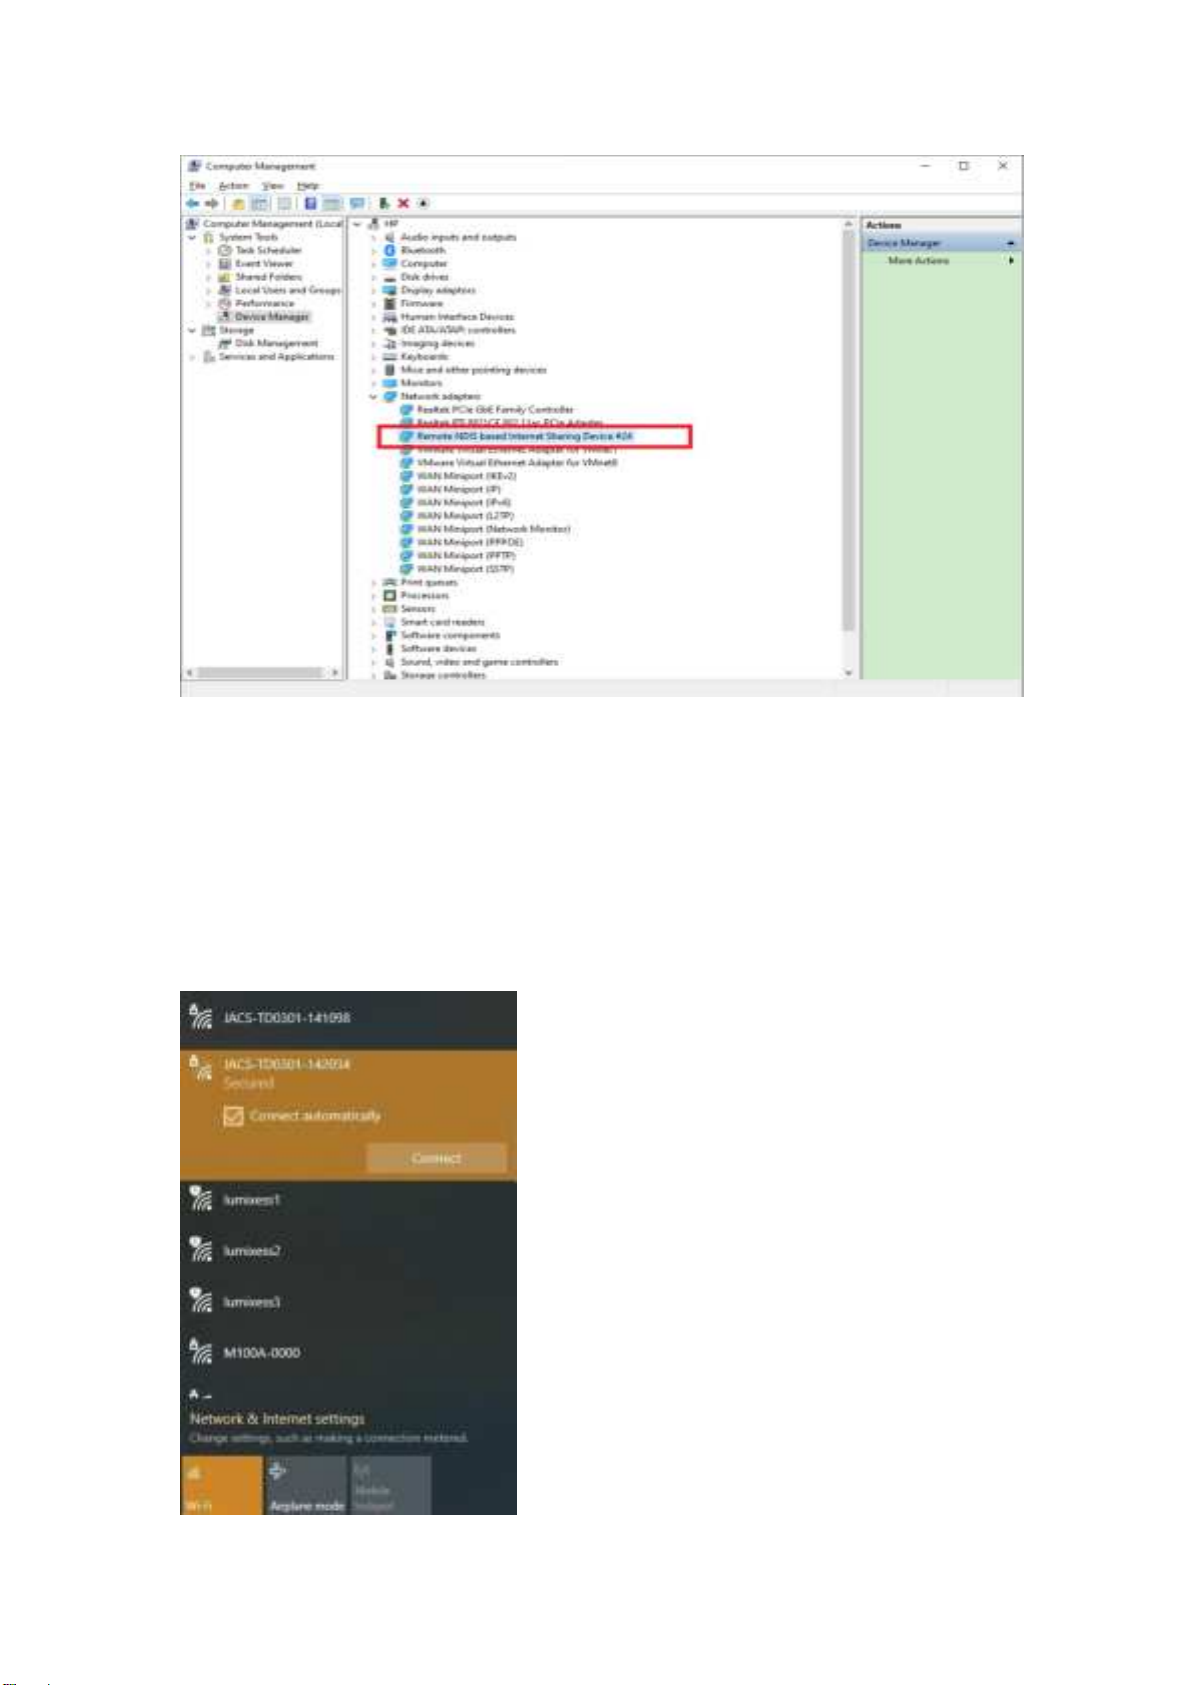
2.Enter the Wi-Fi menu, view the default SSID and Wi-Fi password

★Recommend that you start using TD0301 administration pages after setting a convenient
landing memorizing SSID and a higher safety factor Wi-Fi passwords.
Install the driver and connecting the device
USB Connection:Windows 10 for example
1. Keep TD0301 powering on, Plug the device into your computer,it will install the default
RNDIS driver automatically.
2. Check the network card is installed correctly,like the followingpictures

Establish Wi-Fi connection:you must ensure that the computer equipped with a wireless
network card. If the computer showed the presence of Wi-Fi connectivity, the wireless LAN
is available. Otherwise, you need to check your wireless network card is working properly.
In the Wi-Fi list, select the SSID consistent with TD0301 Wi-Fi, click Connect. Then enter the
correct Wi-Fi password, click ok. A moment later, Wi-Fi connection is displayed next to the name,
Wi-Fi connection is successful.

1. Enter the correct Wi-Fi password, click Next
2. After a moment, the prompt “Connected” is displayed below the name, it means the
connection is established.

WebUI
●Home
First part of the main display network connection status, connected devices and data, system
message, such as IPaddress, system run time, traffic statistics, SIM card status, type and quality of
the network signal, whether it is roaming, with or without a new message, and so on.
●Wizard


You can quickly set network type, parameters and Wi-Fi settings through the wizard function.

●Wi-Fi
1. General
You can setup the Wi-Fi related information in this page,such as SSID, password, B/G/N
mode,Channeland so on.
2. WPS
WPS (Wi-Fi Protected Setup) provides easy and secure establishment of a wireless network. You
can configure WPS here via the PIN code or the WPS button,premise is your wireless card support
WPS function.
TD0301 supports three kinds of WPS authentication:AP PIN, WPS Buttonand Client PIN Code.
Default is WPS Button.

●AP PIN authentication:
You can click button “Generate New PIN “to get a PIN, then share it to your wireless client to
connect TD0301.
●WPS Buttonauthentication:
The first scenario: Please click the WPS button on this interface (or press the physical WPS
button on the router), then press the WPS button on the wireless client and wait for about 2
minutes to make the connection.
The second scenario: When you find the SSID of the router (Win10 for example), it prompts as
below:

Youcan press the WPS button on theTD0301 until the Wi-Fi light flash quickly, to activate the
WPS, then you can see connecting process.
●Client PIN Code:
Start the client WPS process and get the client PIN code. Enter the client's PIN code on the Client
PIN code field and click Start. Please check the user manual of your wireless client to see if it
supports the WPS function.

3. Wi-FiMAC Filter
Wireless MAC filter allows you to control packets from devices with specified MAC address in
your Wireless LAN.
You can enable or disable this function onthis page.
●Accept Mode:It only allows the devices in the list to connect to the router.
●Reject Mode: The devices which mac addressin the filter list will be prohibited connect to the
TD0301.
4. ClientList
This page displays the currently connected clients and their respective MAC addresses in the list.

●LAN
1.LAN IP
This section allows you to configure the local network settings of your router.
●IP Address: The IP address of router.
●Subnet Mask:The subnet mask for router.
●Domain Name: You can specify a domain name for router to instead of IP address to login this
management UI.
2.DHCP Server
DHCP (Dynamic Host Configuration Protocol) is a protocol for the automatic configuration used
on IP networks. The DHCP server can assign each client an IP address and informs the client of
the of DNS server IP and default gateway IP.
If this function is enabled, you can assign the range of IP pool and lease time for client, and the
DNS server address.
You also can assign the IP address for client manually.

3. Client List
This page displays the currently connected clients and their respective MAC addresses in the list.
●Cellular
1.Connection
Set up the cellular network related information.

Cellular:You can customize the network configuration or manually add the new APN and set
default APN.
ConnectionSetting:You can set allow data roaming or not.
And you also can set Connection Mode.
●AutoMode: When you turn on TD0301 without additional operations, the device will connect to
the networkautomatically.
●Manual Mode:You need to connect to the network manually after opening theTD0301
management page.
2.Network

●Preferred Network:You can set preferred networkonthis page, the default is Auto, and other
options are GSM, WCDMA, and LTE.
●PLMN: Default is Auto. If you select Manual, you should click button Searchto get available
networks and choose one to register by manual.
3. PIN Management
When you enable the PIN function of your SIM card, if you reboot the device, you need to login
management page,and the page will promptyou to enter the correct PIN code, then you can use the
SIM card.
If you input wrong PIN code more than 3 times, it will prompt you to enter PUKcode to unlock
your SIM card.
PIN / PUK code supplied with the SIM card provided by your carrier, please consult your carrier.
Attention: If you use the wrong PUK code to try more than 10 times, your SIM card will be
blocked permanently.
4. SMS
Display all messages stored on the SIM card. Select a message to display its contents in the SMS
window. After reading it, you can delete it or reply to the sender.

You can send to no more than 5 numbers and 10 text messages at same time, the phone number is
separated by „,‟.
Also you can setting the SMS center, storage location of messages, and so on.
5. USSD
Unstructured Supplementary Service Data (USSD) allows ISP-specific applications to be
activated with an SMS message

●Firewall
1.General
Enable the firewall to protect your local area network against attacks from hackers. The firewall
filters the incoming and outgoing packets based on the filter rules.
●Enable Firewall: You can enable or disable the firewall function. Default is disable. Also you
can setting the matching packets rule to receive or reject.
●Enable Ping From WAN:Enable or disable ping function for WAN. Default is disable.
2. URL Filter
Key in the keywords for the sites that you want to block. For example, enter "XXX" in the list The
URL filter will block the http://www.abcXXX.com, http://www.XXXbbb.com and so on.
Table of contents