Jacto PR-40 User manual

CAUTION: IT IS MANDATORY
TO READ ANDTHOROUGHLY
UNDERSTAND THE OPERATOR’S
MANUAL BEFORE USINGTHE
EQUIPMENT.
BATTERY PRUNNER
Operator’s Manual - English
Edition 06/16 nº 1235504
49/69
1. Descripción y Características Princi-
pales
1.1. Introducción
Este manual describe el funcionamiento, normas de manteni-
miento y piezas de repuesto del Podador a Batería PR-40, tam-
bién citado en este manual como“Podador”.
El podador fue diseñado y producido para la poda de cualquier
tipo de cultivo, especialmente viñedos, cipreses, árboles fruta-
les, olivos y la jardinería, viveros y la poda de árboles urbanos.
Ellos sólo deben utilizarse en materiales de madera y no con
cualquier otro material.
Este manual es esencial para el podador, ya que dene su pro-
pósito de uso y contiene toda la información necesaria para el
uso correcto y seguro.
La operación continua del equipo depende del uso correcto
y el mantenimiento adecuado: Por lo tanto, es recomendable
seguir estas instrucciones con cuidado para evitar cualquier
situación que pudiera poner en peligro el funcionamiento y
la durabilidad de este equipo. También es importante seguir
lo que se describe en este manual ya que el fabricante decli-
na cualquier responsabilidad resultante de la negligencia del
cumplimiento de las instrucciones, ya que esto daría lugar a la
invalidación de la garantía.
Es necesario garantizar en el momento de la entrega que las
piezas del podados están completas. Todas las quejas deben
ser presentadas por escrito dentro de los ocho (8) días siguien-
tes a la recepción de los equipos. Sin embargo, el fabricante
puede contactar en cualquier momento para la asistencia téc-
nica inmediata y la necesidad de mejorar el funcionamiento y
mejorar el rendimiento del equipo.
Al recibir el producto, lea el manual de instrucciones y siga las
instrucciones en el mismo.
1.2. Los recursos, la validez y actualizaciones
en el manual
Todo el material técnico o descripción contenida en este ma-
nual es de propiedad exclusiva de los fabricantes, que prohíbe
la reproducción total o parcial de la misma, salvo con su apro-
bación por escrito ha sido emitida por el fabricante.
Los datos, ilustraciones y descripciones de este manual no pue-
den considerarse vinculantes. El fabricante se reserva el dere-
cho de hacer cambios en cualquier momento que considere
que son adecuados para la mejora o por exigencia constructiva
o comercial.
1.3. Manual de mantenimiento
El manual debe ser guardado cuidadosamente en un área ade-
cuada para garantizar su integridad física; debe ser fácilmente
accesible por cualquier persona autorizada para consultarla. El
manual es un documento importante que debe acompañar a
la podadora y todos los usuarios deben ser responsables de su
protección.
Los podadores se fabrican de acuerdo con las disposiciones
de la Directiva 2006/42 / CE. Por lo tanto, está equipado con la
marca CE y acompañada de la declaración CE de conformidad.
1.4. Garantía
La MÁQUINAS AGRÍCOLAS JACTO S.A. garantiza el equipo iden-
ticado en este manual, obligándose a reparar o sustituir piezas
y componentes que, en funcionamiento normal y trabajando, de
acuerdo con las recomendaciones técnicas, presenten DEFEC-
TOS DE FABRICACIÓN O DE MATERIA PRIMA, sujeto a las siguien-
tes reglas descritas en la garantía.
Esta garantía es reparar o reemplazar las partes que son defec-
tuosas, hechas después de un cuidadoso examen por el depar-
tamento técnico del fabricante, importador o asistencia técnica
autorizada.
La garantía se limita solamente a defectos en los materiales y es
nula si las piezas defectuosas han sido alteradas o removidas por
personas no autorizadas.
En caso de intervención de la garantía, el podador debe ser en-
viado al fabricante en su caja original equipado con todos los
accesorios correspondientes (ver Fig. 1).
Para solicitar la garantía, el equipo debe ir acompañado de for-
mulario de registro completo y documento de compra (factura
El fabricante, importador o distribuidor se
exime de toda responsabilidad por los daños
causados por la podadora para las personas,
animalesocosasqueresultandelusodiferente
al indicado en este manual, o debido a la
negligencia o daños causados por no seguir
las instrucciones de este manual.
El manual en cuestión es una parte integrante
delproductoydebeseralmacenadoconcuida-
do,precisamenteparamantenersuintegridad
y puede ser consultado en varias ocasiones
durante el tiempo de uso del podador.
LA EMPRESA SE RESERVA EL DERECHO DE LA PROPIEDAD
DEL PRESENTE MANUAL. Y PROHIBE CUALESQUIERA PER-
SONAS DE REPODUZIRLO O COMUNICARLO A TERCEROS SIN
PERMISSO DEL PROPIETARIO.
Este manual reeja el estado de las técnicas en el momento de
la comercialización de la podadora y no puede ser considera-
da inadecuada si se utiliza en una fecha posterior debido a los
cambios de las disposiciones legales relacionadas.

Edição 06/16 nº 1235504
Manual de Instruções - Português
ATENÇÃO: É OBRIGATÓRIO LER
O MANUAL DE INSTRUÇÕES
ANTES DE UTILIZAR O
EQUIPAMENTO
Operator’s Manual - English (24)
Manual de Instrucciones - Español (47)

TABLA DE CONTENIDO
1. Descripción y Características Principales 49
1.1. Introducción 49
1.2. Los recursos, la validez y actualizaciones en el manual 49
1.3. Manual de mantenimiento 49
1.4. Garantía 49
1.4.1. Exclusiones de la garantía 50
1.5. Descripción del podador a batería 51
1.6. Utilización prevista 52
1.6.1. Utilización permitida 52
1.6.2. No se permite usar 52
1.7. Identificación 52
1.8. Datos técnicos 52
1.9. Nivel de sonido 53
1.10. Nivel de vibración 53
1.11. Marca CE de los podadores 53
2. Segurança Geral e Normas de Prevenção de Acidentes 54
2.1. Grado de peligrosidad 54
2.2. Terminología 54
2.3. Los signos de peligro y de advertencia 55
2.4. Traje y EPI 55
2.5. Medio ambiente y la contaminación 55
2.5.1. Eliminación y desmantelamiento 56
2.5.2. Período de inactividad 56
2.6. Utilización segura 56
2.7. Mantenimiento seguro 57
3. Instrucciones de Uso 58
3.1. Transporte 58
3.2. Conectar y operar la podadora 58
3.3. Control del corte progresivo 58
3.4. Cambio de la apertura 58
3.5. En espera / Apagado 58
3.6. La repetición de cortes 59
3.7. Instrucciones de uso 59
3.8. Sistema de protección de corte 60
3.9. Almacenamiento del podador 60
3.10. Observaciones 60
3.11. Fuente de alimentación de la batería 60
3.11.1. El uso seguro de la batería 61
3.11.2. Procedimiento de recarga 61
3.11.3. Precauciones con el cargador 62
3.11.4. Almacenamiento de la batería 62
4. Mantenimiento 62
4.1. Mantenimiento y afilamiento de cuchillas 62
4.2. Lubricación 63
4.2.1. Información sobre el producto para la limpieza de las cuchillas 64
4.3. Sustitución de la cuchilla 65
5. Soluciones de Problemas 66
6. Piezas de Repuesto 67
6.1. Tipo de enchufe 69
SUMMARY
1. Description And Main Characteristics 26
1.1. Introduction 26
1.2. Features, validity and updates to the manual 26
1.3. Keeping the manual 26
1.4. Statement of limited warranty 26
1.4.1. Exclusions from the warranty 27
1.5. Shears description 28
1.6. Intended use 29
1.6.1. Allowed uses 29
1.6.2. Improper uses 29
1.7. Identification 29
1.8. Technical data 29
1.9. Sound level 30
1.10. Vibration level 30
1.11. EC marking of the shears 30
2. General Safety And Accident Prevention Standards 31
2.1. Level of danger 31
2.2. Terminology 31
2.3. Danger plates and warning 32
2.4. Clothing and PPE 32
2.5. Ecology and pollution 32
2.5.1. Demolition and decommissioning 32
2.5.2. Making idle 33
2.6. Safe use 33
2.7. Safe maintenance 34
3. Usage Instructions 34
3.1. Transport 34
3.2. Start-up and operation of shears 35
3.3. Progressive cutting control 35
3.4. Change of program 35
3.5. Standby mode and switching off 35
3.6. Repeated attempts to cut 36
3.7. Form of use 36
3.8. Protection system in the cutting cycle 36
3.9. Storage shears 37
3.10. Observations 37
3.11. Power supply batteries 37
3.11.1. Safe use of the battery 38
3.11.2. Battery charging procedure 38
3.11.3. Charger precautions 39
3.11.4 Storage batteries 39
4. Maintenance 39
4.1. Maintenance and sharpening 39
4.2. Lubrication 40
4.2.1. Information about the product to clean the blades 40
4.3. Replacing the blade 42
5. Troubleshooting 43
6. Spare parts 44
6.1. Plug type 46

26/69
1.3. Keeping the manual
The manual should be carefully stored in a suitable area to
guarantee its physical integrity; it should be easy to access by
anyone authorized to consult it. The manual is an important
document that should accompany the Shears and all users
should be held responsible for safeguarding it.
The Shears are manufactured to conform to the provisions con-
tained in Directive 2006/42/EC. It is therefore equipped with
EC marking and accompanied by the following EC conformity
declaration.
1.4. Statement of limited warranty
MÁQUINAS AGRÍCOLAS JACTO S.A. shall warrant the equipment
described in this manual and shall repair or replace parts and
components which, under normal operation and wear, in accor-
dance with technical recommendations, show DEFECTS IN MA-
TERIAL OR WORKMANSHIP, based on the following conditions.
This warranty consists in the repair or replacement free of
charge of those parts that should turn out to be faulty after
careful examination by the Manufacturer’s Technical Depart-
ment or importer.
The warranty is limited only to defects in materials and ceas-
es to have eect should the damaged parts turn out to have
been tampered with or otherwise removed by unauthorised
personnel.
In the event of warranty service, the Shears shall be delivered
to the manufacturer in their original case equipped with all rel-
evant accessories (see Fig. 1).
For a warranty request, the equipment must be accompanied
by the completed registration card and proof of purchase (in-
voice or tax receipt).
• Manufacturer’swarranty:1year(limitedto800,000cuts
with average consumption 6Ah);
• The warranty starts from the date when the dealer’s sales
invoice is issued (it is understood that during the battery
The manufacturer, importer or dealer decline
any and all liability for damages caused by
the Shears to persons, animals or property,
resulting from use other than that described
in this manual, or due to damage caused by
negligenceorbynotobservingtheinstructions
contained in this manual.
The following manual is an integral part of
the product and must be stored carefully, in
order that it keeps its integrity and can be
consulted repeatedly throughout the entire
life of the Shears.
THE COMPANY BELOW RESERVES THE RIGHT OF PROPERTY
OF THE FOLLOWING BOOKLET, PROHIBITS ANYONE FROM
REPRODUCING IT OR COMMUNICATING IT TO THIRD PAR-
TIES WITHOUT AUTHORISATION FROM THE OWNER.
1. Description And Main Characteristics
1.1. Introduction
This manual describes the operating and maintenance rules
and supplied spare parts of PR-40 Electronic pruning shears,
hereinafter simply referred to as“Shears”.
The Shears have been designed and produced for pruning any
type of cultivation, especially vineyards, r trees, fruit trees, ol-
ive trees and for gardening, nurseries and street tree pruning.
They must only be used for wooden materials and not for other
materials.
This manual is integral to the Shears, denes the purpose for
which it was built and contains all the information required for
proper and safe use.
Regular machine operation depends on its correct use and ad-
equate maintenance: it is advisable, therefore, to follow these
instructions carefully to prevent any situation that could com-
promise the machine’s operation and durability. It is also im-
portant to follow that which is described in this manual since
the manufacturer declines any liability resulting from negli-
gence from not observing these norms, since it would result in
the warranty being annulled.
It is mandatory to ensure upon delivery that the Shears are in-
tegral and complete in all parts. Any complaints must be pre-
sented in written within 8 (eight) days from receiving the ma-
chine.The manufacturer can however be contacted at any time
for immediate and precise technical assistance and anything
required for optimum operation and maximum performance
of the equipment.
Upon receiving the product, carefully read the manual and
carefully follow the instructions contained in it.
1.2. Features, validity and updates to the
manual
All technical material or description in this manual is exclusive-
ly owned by the manufacturer who prohibits the complete or
partial reproduction of the same unless written approval has
been issued by the manufacturer.
Data, illustrations and descriptions in the manual cannot be
considered binding. The manufacturer reserves the right to
make changes at any time that it considers to be suitable for
improvement or for a constructive or commercial requirement.
This manual reects the state of techniques at the time of
marketing the Shears and cannot be considered inadequate if
updated at a later date due to modications of related legal
provisions.
Manual de Instrucciones - Español
ATENCIÓN: ES OBLIGATORIO
LEER EL MANUAL DE
INSTRUCCIONES ANTES DE
UTILIZAR EL PRODUCTO.
TIJERA PODADORA
A BATERÍA
Edición 06/16 nº 1235504

46/69
6.1. Plug type
Type B
Type C
Type I
Type L
Type N
27/69
storageperiodthedealershallrechargeitevery3months);
• Thewarranty shall be automaticallyforfeited in the event
of tampering, misuse or failure to carry out maintenance;
• The warranty excludes all parts subject to wear (blade,
counter-blade, connecting cord, blade pin).
1.4.1. Exclusions from the warranty
Upon delivery it is required to ensure the Shears were not dam-
aged during transportation and that supplied accessories are
intact and all present.
The warranty does not cover expenses relating to inspection,
dismantling/ re-assembly and transport due to intervention by
a manufacturer authorised technicians requested by the cus-
tomer in the event of faults or damage not attributable to the
manufacturer.
Nor does the warranty include all expenses related to any
custom duties for goods shipped abroad, and anything else
related.
The warranty does not apply to parts subject to normal wear
(such as: blade and counter-blade, pinion and gears in general)
and for electrical and electronic parts.
For parts, units and accessories not produced by us, the suppli-
er’s warranty is applied within the extent to which it is obtained
by the manufacturer.
The replacements or repairs of materials under warranty shall
not in any case extend the terms of the warranty.
The warranty is also forfeited when:
• Theoperatormakesanerrorinmanoeuvringthemachine.
• Repairs are carried out by the user without obtaining the
consent by the manufacturer;
• If non original spare parts have been used;
• If the damage can be attributed to insucient main-
tenance;
• If the instructions contained in this manual are not
followed;
• If the product is arbitrarily tampered with and changed
without authorisation by the manufacturer.
The warranty shall not include liability for direct and indi-
rect damages caused to persons, animals or property due
to the machine’s fault or malfunctioning.
The purchaser may assert their rights on the warranty only if
they have complied with the conditions relating to the provi-
sion of the warranty, set out in the instruction manual.

28/69
1.5. Shears description
The Shears are electronically operated equipment, battery
powered, designed and produced exclusively for pruning any
type of cultivation, especially vineyards, r trees, fruit trees,
olive trees and for gardening, nurseries and street tree prun-
ing. Progressive servo control of the cutting enables users to
control the position of the blade at all times in the process of
cutting and when opening. The Shears are mainly character-
ized by their speed, low consumption and cutting stability. The
complete kit consists of the components listed below and illus-
trated in Figure 1.
Any dierent use should be considered improper and there-
fore potentially dangerous to the safety of the operator and
any exposed persons.
Fig. 1
A PROGRESSIVE PRUNING SHEARS
B FULL HARNESS
C BATTERY
D CONNECTION CABLE SHEARS
E BATTERY CHARGER
F CASE
G SHEAR CASE
H TOOLS KIT
I BLADE
L OPERATOR’S MANUAL
1 CUTTING TRIGGER
2 COMFORTABLE HANDLE
3 ON/OFF BUTTON PROGRAM CHANGE
4 BATTERY INDICATOR DISPLAY
5 BATTERY CHARGER INDICATOR LED
6 BATTERY CONNECTION CABLE
7 SHEARS CONNECTION CABLE
8CONNECTION BATTERY BATTERY
CHARGER
g
Edição 06/16 nº 1235504
Manual de Instruções
AssistênciaTécnica: Rua Dr. Luiz Mi-
randa, 1650, 17580-000 – Pompeia
– SP – Brasil.
Telefone:14 3405 2113. Email:
Horário de Atendimento:Segunda a
sexta das 7:00 às 11:30 e das 13:00
às 17:18.
Importado por: MÁQUINAS AGRÍCOLAS
JACTOS.A.
Rua Dr.Luiz Miranda, 1650
17580-000 - Pompeia - SP - Brasil
Telefone:+55 (14) 3405-2100
Fax:+55 (14) 3452-1012
Email: [email protected]
Site: www.jacto.com.br
ATENÇÃO:É OBRIGA-
TÓRIOLER O MANUAL
DE INSTRUÇÕESANTES
DE UTILIZAR O EQUIPA-
MENTO
Operator’s Manual - English (23)
Manual de Instrucciones - Español (45)
45/69
Nº Code Description Qty.
1 1236448 BATTERY RUBBER COVER CHARGER 1
2 1236449 SWITCH 1
3 1236450 LIION 5,8AH PACK 1
4* 1236452 *CHARGER SEE ITEM 7. PLUG TYPE 1
5 1236454 INTERNAL CABLE W/ CONNECTOR 1
6 1236455 DIGITAL DISPLAY 1
7 1236456 SCREW TCIC D4X25 6
8 1236457 ELETRONIC BOARD W/ BMS & INVERTER 1
9 1236458 DISPLAY CABLE KIT 1
10 1236459 BATTERY RUBBER COVER 1
77
10
3
7
1
6
89
2
5
4*

44/69
5
10
8
9
8
6
4
7
1
12
12
7
2
3
13
11
14
Nº Code Description Qty.
1 1236423 SHEAR BLADE BOLT 1
2 1236425 BLADE L1 1
3 1236426 COUNTER BLADE CL1 1
4 1236428 GEAR RACK 1
5 1236429 ALUMINIUM MECHANIC FRAME 1
6 1236430 BLADE NUT 1
7 1236431 SCREW TSPEI M3X8 2
8 1236433 SCREW TCIC M4X6 2
9 1236435 NUT LOCK 1
10 1236438 INTERNAL ELETR BOARD W/CABLE & PLUG 1
11 1236440 CONNECTING CABLE 1
12 1236442 SCREW TCBIC D.3X20 2
13 1236445 MOTOR AND GEAR REDUCTOR KIT 1
14 1236446 GREASE SYRINGE 1
6. Spare parts
Orders for spare parts must be placed with an authorized dealer.
To request any particular spare part, rst specify the data related
to the machine, found printed on the identication plate, and
therefore:
• Machine type.
• Machine model.
• Serial number of the machine.
• Year of construction.
To this, add information regarding the part being requested that
is contained in the spare parts table and indicate:
• Part code number.
• Part description.
• Quantity requested.
Finally, specify the required shipping method for the parts.
29/69
With reference to Figure 1, Shears operation is based on a
two-lever system that aids and speeds up cutting wooden
materials. Cutting takes place in perpendicular direction to
the bers and leaves a smooth cutting surface free of shred-
ding. The Shears are supported by the operator with one hand
only on the suitable handle (2). The Shears structurally consist
of 2 blades (one called “cutter” and the other “beater”), one of
which is xed and the other mobile.
The mobile blade (“cutter”) (I) has the rotation fulcrum on the
xed blade (“beater”) which allows it to rotate by about 50°.
The movement of the mobile blade is provided by an electric
motor enclosed within the handle (2) powered by a low volt-
age battery (C) which is carried by the operator by means of
a special backpack (B) through an electric cord (D). The com-
mand is given by pressing with one nger the trigger (1) of the
Shears tted on the handle.
1.6. Intended use
1.6.1. Allowed uses
The Shears have been designed and constructed to be used
professionally in the agricultural sector exclusively to prune
wooden materials whose diameter does not exceed 40 mm.
When the Shears works it guarantees the required level of safe-
ty even in the presence of an insignicant malfunction of its
components or hazardous operating conditions.
With reference to the above, the following are considered al-
lowed uses:
• Use of the Shears for cutting shrubs and branches whose
diameter is less than 40 mm.
1.6.2. Improper uses
The Shears, due to its typical construction, may also be suitable
for uses other than from those foreseen by the manufacturer.
For this reason the manufacturer has selected, as non exhaus-
tive examples, a series of improper uses that can be reasonably
foreseen, which are:
• Use of the Shears for cutting shrubs and branches whose
diameter is more than 40 mm.
• Use of the Shears for cutting materials other than wood.
The uses listed above and those not specically indicated in
this manual, including reasonably foreseeable improper uses,
are peremptorily prohibited.
1.7. Identification
The Shears are tted with 2 plates (see Fig. 2), one for the shears
and one for the battery supplied, applied on the case that con-
tains the equipment. The plate is made in metal-colour, resis-
tant adhesive material with the data screen-printed in a legible
and indelible manner.
Each plate features in order the following identication data:
• EC Marking.
• Importer marking.
• Serial number of the machine.
The equipment’s serial number is laser etched on the handle
of the Shears in order to pair it unequivocally to its own case.
A second plate like one of those applied on the case is also af-
xed on the structure of the supplied battery.
The serial number of the Shears must always be indicated in
the requests for servicing or supply of parts. The data provided
identify the Shears and their features with certainty, certifying
compliance with regulations in force. For this reason they must
always be legible and comprehensible.
Fig. 2
Description Unit of
measure
Value
Shears PR-40
Mass g 860
Maximum cutting diameter mm 40
Total cutting time s 0.35
Maximum cutting torque Nm 200
Blade progressive response - YES
Motor power W 90
Power supply voltage motor V 48
Cutting blade material - Special steel
1.8. Technical data
TheShearsmustnotbeusedforpurposesother
than those described in this manual.
Mat.
206014701142289
Mat. 1040085011402346

30/69
Description Unit of
measure
Value
Battery
Type - Li-Ion rechargeable
Battery voltage V 50,4
Battery capacity mAh 4400
Battery weight g 2800
Cutting autonomy - max 2 days
Battery charging time h 6
Electronic protections - Overexertion and
short-circuit
Time auto power-o for
inactivity min (after) 10 min
Thermal protection - Overheating
Technical data battery: In order to certify the conformity of the machine with the pro-
visions of Directive 2006/42/EC, before placing the product on
the market, the manufacturer applied the procedure described
in Art. 5. In this sense, the manufacturer has provided for: com-
pliance with the relevant safety requirements; availability of
the technical le as stipulated in Annex VI; implementation of
all the tests and inspections required by the reference stan-
dards and compliance with the essential health and safety
requirements indicated in Annex I of the Directive itself. The
construction technical le, which contains the basic project in-
formation and all the characteristics related to machine safety,
was drafted in accordance with the provisions of Annex VI-Part
A, and can be made available by the individual indicated in the
CE Declaration of Conformity for any verication carried out
by the supervisory authorities, following a justied request, as
provided for by the relevant laws in force.
Once the manufacturer has veried that the machine has been
designed and built in accordance with the provisions of Direc-
tive 2006/42/EC and that it can be used safely in the service
conditions specied in this manual, it places the Shears on the
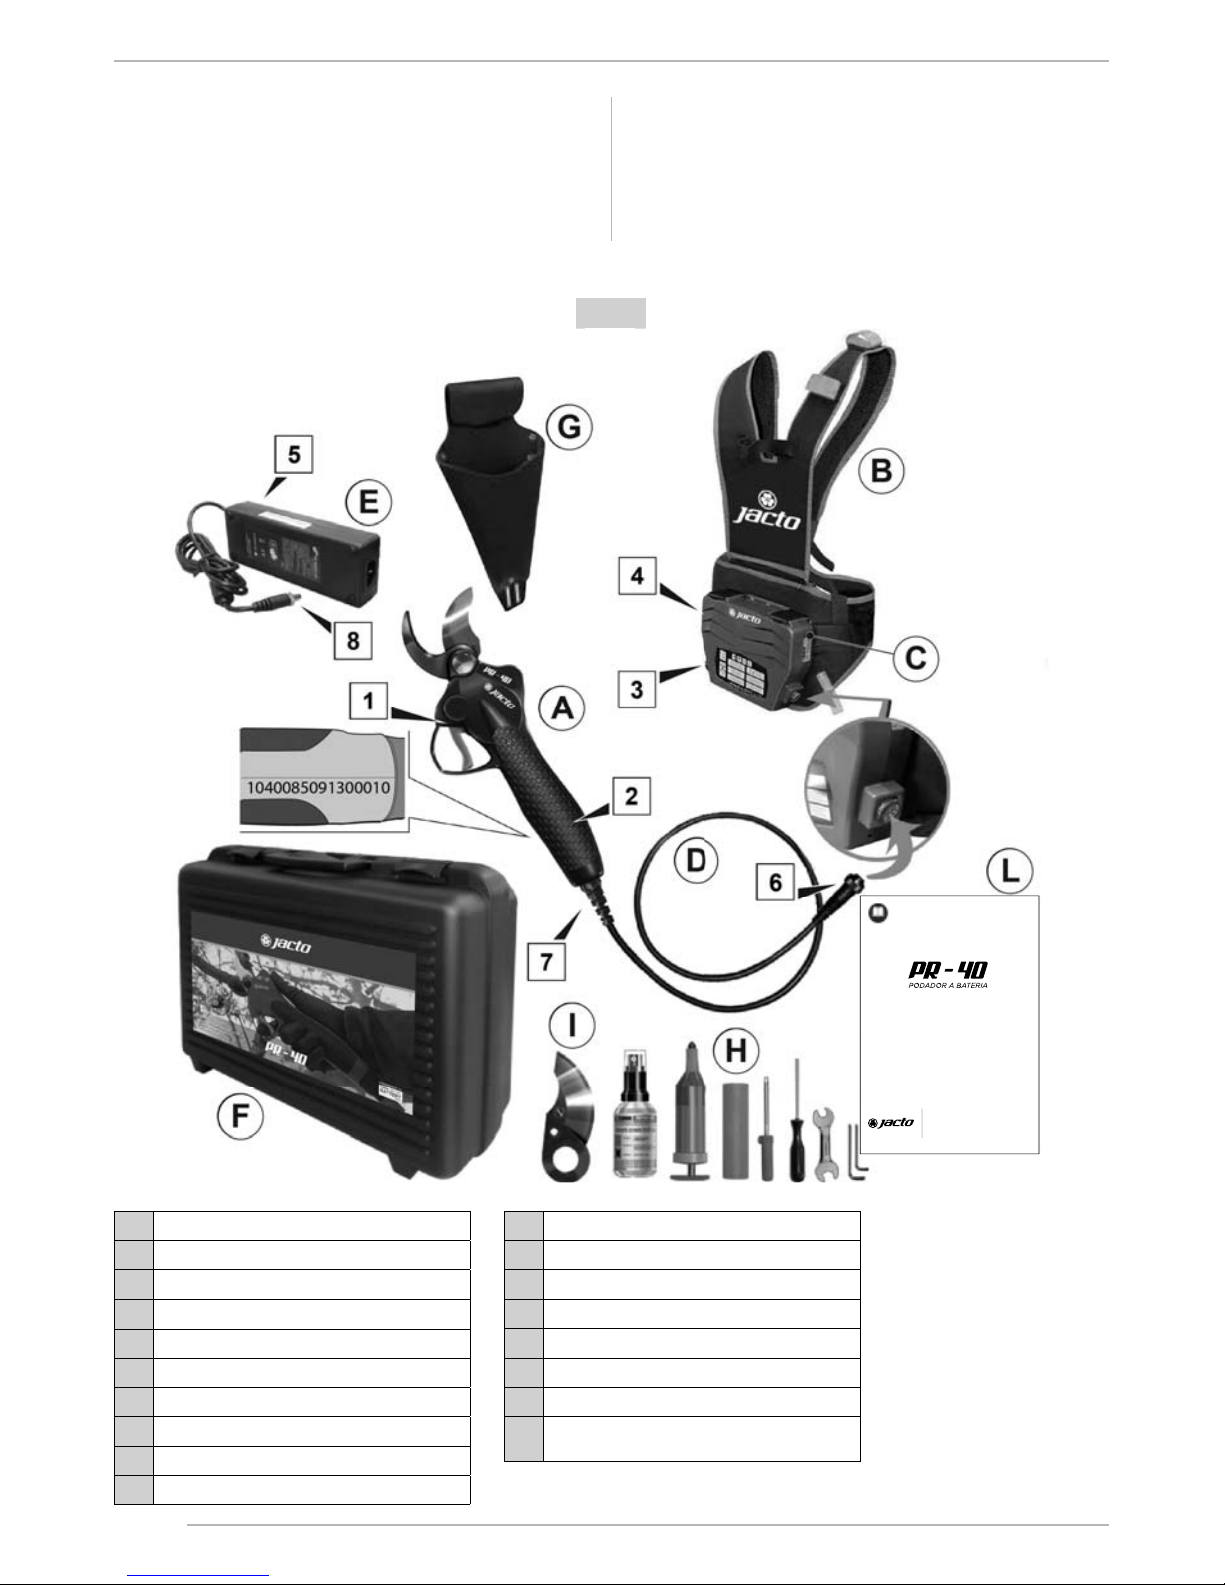
market and accompanies the machine with:
• Usage instructions booklet (User manual)
• EC Declaration of conformity
• EC Marking
In designing and manufacturing the Shears, the manufacturer
has complied with obligations resulting from applying related
European legislative provisions and precisely the following Eu-
ropean provisions:
• Directive 2006/42/CE (Machinery safety).
• Directive 2004/108/EC (Electromagnetic compatibility).
• Directive 2006/95/EC - (Low voltage).
For verication of conformity to European legislative provi-
sions indicated above, the manufacturer applied the following
European standards and technical rules:
EN 349:1993+A1:2008: MACHINERY SAFETY - Minimum dis-
tance to keep from crushing human body parts.
• EN1037:1995+A1:2008:MACHINERYSAFETY-Prevent-
ing unexpected start-up.
• ENISO3746:2010: ACOUSTICS - Determining the sound
power levels of sources using sound pressure - Control
method on a reecting surface by measuring an envel-
oping surface.
• ISO7000:2012:GRAPHICALSYMBOLFORUSEONEQUIP-
MENT - Registered symbols.
• EN ISO 11202:2010: ACOUSTICS - Noise emitted by
machinery and equipment - Determination of emission
sound pressure levels at a work station and at other
specied positions - Site control method.
• ENISO12100:2010:MACHINERYSAFETY-Basicconcepts,
general principles for design.
• EN ISO 13524:2009: Machines for road maintenance -
1.9. Sound level
The air noise level created by the Shears under operating con-
ditions was detected using a sound level meter with integrator.
The measurements were carried out in accordance with EN ISO
3746-2010. Tests performed under the conditions indicated by
the standard produced the following results:
• Equivalentweightedsoundpressureaveragelevel:LpAm
= 60,2 dB(A).
• Sound power level: LwA = 71,8 dB(A).
• Soundpressurelevelatoperator’sstation:LpA=60,6dB(A).
1.10. Vibration level
The level of vibrations transmitted to the operator’s hand-
arm system by the Shears in operating conditions has been
measured, in compliance with standard EN ISO 20643:2008/
A1:2012.
The tests have given the following results:
• No-loadoperation:weightedRMSvaluemeasuredonthe
handle of the shears: a = 0.53 m/s².
• Load operation: weighted RMS value measured on the
handle of the shears: a = 1.55 m/s².
1.11. EC marking of the shears
Directive 2006/42/EC species the minimum conditions with
which a machine can be placed on the EU market. All machines
can only be marketed and put into service if the health and
safety of persons, domestic animals or property are not aect-
ed. The Shears does not fall under one of the machine cate-
gories indicated in the list set out in Annex IV of the Directive
(particularly dangerous machinery).
heq
heq
43/69
5. Troubleshooting
In the event of malfunctioning of the Shears, look for the causes in the following way:
ACOUSTIC SIGNALS
Action Acoustic signal State of the tool
Startup Press the button (3) for 1 second
3 beeps Battery on (device still not recognised)
1 beep Battery on (device recognised)
Opening operation Cutting trigger (1) pressed for 3
seconds 1 short beep Blade opening (Shears ready for use)
Cutting cycle
Cutting trigger (1) pressed + button
(3) for 0.5 seconds with blade
closed)
1 beep Blade opening change
Close stop
Cutting trigger (1) pressed twice in
quick succession, then held down
with the blades closed
1 beep Shears in standby (blades closed position)
Warning During the work
1 beep Excessive strain (b par. 3.8)
4 beeps Alarm (c par. 3.8)
Charging * Connect to the battery charger 3 beeps Shears disabled
Auto power o - 3 beeps O
INCIDENT DIAGNOSIS
Problem Cause Possible solution **
The battery does not turn on The battery is low Re-charge
The Shears have stopped in work Overexertion (stop in cutting) (“a”,“b”, “c”
paragraph 3.8)
The Shears have an overdue is in limit to protect the
equipment. In the case of overexertion, the Shears stop
automatically. Perform less heavy-duty cutting cycles.
The Shears do not work
The Shears are not properly connected
to the battery Make sure the Shears are properly connected to the battery
The battery charge is very low Make sure the batteries are charged
The device connection cable is faulty Replace the connection cable
Hardware fault Contact the Service Centre
The Shears have little cutting power
or cut badly
The cutting blade is very worn or
notched Keep the blade sharpened at all times
The counter blade is highly worn Check and change if necessary
The Shears heat up excessively
The cutting blade is highly worn or
notched Check and change if necessary or sharpen
The counter blade is highly worn Check and change if necessary or sharpen
The battery does not last long
Kept the cutting blade is highly worn
or notched Keep the blade well sharpened at all times
The counter blade is highly worn Check and change if necessary or sharpen
The charger does not work Check the state of the charger.
*For proper safety, charge the battery only with the device disconnected.
** lf the problem is not solved, you must go to your distributor and/or nearest Authorized Technical Service.

42/69
4.3. Replacing the blade
When replacing the blade proceed as follows:
• Disconnectthe cable(D)(Fig.1)connector(7)connecting
the Shears to the battery, even if it is switched o;
• Unscrew the screws (10) (Fig. 13) and remove the pro-
tective cover;
• Using the Allen wrench supplied with the kit (H) (Fig. 1),
unscrew the screw (11) (Fig. 15) on the blade nut (12) and
the screw (13) on the stop gear (14);
• Manually unscrew the blade nut (12) and remove the pin
(15) on the opposite side;
• Separate the blade (17) from its support (16);
Once replacement is complete, assemble the components in
reverse order compared to removal. The blade nut (12) MUST
always be tightened by hand.
10
13
14
17
11
15
12
16
Fig. 15
31/69
Safety requirements.
• EN ISO 13849-1:2008: MACHINERY SAFETY - Safety-re-
lated parts of control systems - Part 1: General principles
for design.
• EN 60204-1:2006-06: MACHINERY SAFETY - Electrical
equipment of machines - Part 1: General rules.
• EN ISO 14982:1998: AGRICULTURAL AND FORESTRY
MACHINES-Electromagneticcompatibility-Testmethods
and acceptance criteria.
• ENISO20643:2008+A1:2012:MECHANICALVIBRATIONS
- Hand-held and hand-guided machinery - Principles for
evaluation of vibration emission.
• EN 60745-1:2009: Safety of hand-held motor power
tools - Part 1: General requirements.
2.2. Terminology
The danger levels indicated refer to specic risk situations that
may occur during use of the Shears and that may involve the
equipment, as well as the operator and any exposed persons
(according to Directive 2006/42/EC). With the purpose of high-
lighting situations or operations that may result in risks, the
meanings of terms used in this manual are indicated here:
• HAZARDOUSAREA:Anyareainand/oraroundamachine
where the presence of an exposed person constitutes a
risk to the health and safety of said person. (Attachment
I, Point 1.1.1., Letter b), Directive 2006/42/EC).
• EXPOSED PERSON: A person fully or partly in a hazard-
ous area (Attachment I, Point 1.1.1., Letter c), Directive
2006/42/EC).
• OPERATOR: The person or personnel in charge of the
installation,theoperation,theadjusting,thecleaning,the
repairing and the moving of the machine. (Attachment I,
Point 1.1.1., Letter d), Directive 2006/42/EC).
• USER: the person, entity or company, who purchased or
rentedthe machine andintendstouseit accordingto the
intended use foreseen by the manufacturer.
• SPECIALIZED PERSONNEL: any person specifically
trained and approved to carry out maintenance or re-
pair interventions that require particular knowledge of
the machine, its operation, the installed safety devices,
intervention modes. It must be capable of recognizing
dangerpresentontheactualmachine,thereforeavoiding
at risk situations.
• RISK: a combination of the probability and seriousness
of injury or damage to health which can arise in a dan-
gerous situation.
• GUARD: a part of the machine that is used to specically
guarantee protection by way of a material barrier.
• PROTECTION DEVICE: a device that reduces risk (unlike
the guard) either on its own or together with the guard.
• INTENDEDUSE:theuseofthemachineinaccordancewith
the information provided in the operating instructions.
• REASONABLE FORESEEABLE MISUSE: the use of the
machine dierent to the information provided in the
operator’s instructions,which may be the resultof readily
predictable human behavior.
• AUTHORIZED ASSISTANCE CENTER: The Authorized
AssistanceCentre,legallyauthorizedbytheManufacturer
or Importer, is formed by specialized sta able to carry
out all types of assistance, maintenance and repair work,
even of a certain complexity, required to maintain the
machine in perfect working order.
2. General Safety And Accident Preven-
tion Standards
2.1. Level of danger
The safety of the operator and exposed persons is the main
concern of the designer and the manufacturer of the machine.
When designing a new machine, one tries to plan for all pos-
sible danger situations and risks connected to using the ma-
chine, adopting the steps necessary to make the equipment
as safe as possible. It is recommended to carefully read this
manual and this section in particular, regarding safety
standards, avoiding behavior that is inappropriate or in
contrast with the instructions contained in this manual.
Pay attention to the following danger signal contained in this
manual and follow safety instructions.
SAFETY GUIDELINES – DEFINITIONS
It is important for you to read and understand this manual. The infor-
mation it contains relates to protecting YOUR SAFETY and PREVENTING
PROBLEMS. The symbols below are used to help you recognize this in-
formation.
NOTE: Used without the safety alert symbol indicates a potentially haz-
ardous situation which, if not avoided, may result in property damage.
DANGER!
Indicates an imminently hazardous situation
which, if not avoided, will result in death or
serious injury.
WARNING!
Indicates a potentially hazardous situation
which, if not avoided, could result in death
or serious injury.
CAUTION!
Indicates a potentially hazardous situation
which, if not avoided, may result in minor or
moderate injury.

32/69
WARNING!
Carefullyreadthefollowingrules.Iftheinstruc-
tions described are not followed, a situation
may arise which causes irreparable damage
to the machine or property, or injury - even
severe - to people or animals.
The manufacturer and importer decline all
responsibility for damage caused by not
complying with the safety and injury pre-
vention regulations described below. The
manufacturer and importer also decline any
responsibilityfordamagecausedbyimproper
use of the machine and/or as a result of mod-
ications made without authorization by the
manufacturer.
2.3. Danger plates and warning
The Shears are equipped with pictograms (labels) warning
about residual risks present on the machine that it were not
possible to eliminate. Figure 3 species the meaning of sym-
bols contained in the pictograms.The operator must memorize
the meaning of the symbols.
Due to the small size of the product, it has not been possible to
apply directly on the Shears the pictographs that warn against
residual risks. For that reason the decals with the pictographs
are axed on the inside cover of the case (F) (Fig. 1) with which
the Shears are delivered.
The labels should always be kept clean and replaced immedi-
ately if they are fully or partially detached or damaged.
The meanings of the symbols shown in the pictographs are
specied below, together with their identication number.
1. Carefully read the instructions contained in the manual
prior to start operating with the machine.
2. Disconnect the power source prior to performing the
maintenance operations described in the manual.
3. Itismandatorytoshieldone’sface,handsandeyesduring
workoperationsandtoprotectone’shearingbywearing
protectivemus,handsbywearinganti-vibrationgloves,
eyes by wearing a protective goggles or visor and cap.
1
3
2
Fig. 3
2.4. Clothing and PPE
In general it is necessary to wear suitable clothing for the work
to be carried out. In particular, as far as Shears use, obey the
following provisions:
• It is mandatory to use clothing which is as suitable as
possible,meaningnottoolooseandwithoutanyprotrud-
ing or moving parts (for example ties or necklaces). Do
not wear belts, rings and chains. Always use sturdy safety
footwear. Long hair must be tied using a specic cap.
• It is mandatoryto use protective goggles or visor before
starting the work to protect one’s face and eyes from
the plant fragments that might detach from the tree
during work.
• It is mandatory to use protective mus in order to
safeguard hearing from noise from the equipment
during work.
• It is mandatory to wear anti-vibration gloves to reduce
thevibrationstresstheoperatorisexposedtoduringwork.
2.5. Ecology and pollution
• It is mandatory to comply with the laws in force in the
country where the Shears are used, concerning the use
and disposal of products used for cleaning and washing
the parts, adhering to the recommendations of the
manufacturer of said products.
• If replacing worn parts or during demolition, one must
follow anti-pollution laws foreseen in the country where
the Shears are used.
• It is prohibited to pour products used for cleaning or
polluting substances into the sewerage drain, on the
ground, in watercourses, or into the environment.
• It is mandatory to collect products used for cleaning
and polluting substances in appropriate containers,
store them and deliver them to companies authorized
for their disposal.
2.5.1. Demolition and decommissioning
Should one decide not to use the Shears any longer, it is recom-
mended to take some precautions to prevent environmental
pollution hazards in compliance with the local legislation.The
various parts of the machine must be treated as if they were
special waste. One must proceed by taking apart the equip-
ment, grouping the various parts and components in similar
parts (rubber, metal, plastic, etc.), providing for disposal of
these parts separately, according to existing anti-pollution
laws of the Country where the machine was used.
Disposal of used shear and batteries must be made at appro-
41/69
PRODUCT INFORMATION
Name: PULISOL
Type of the product and use: Universal alkaline cleaner for
cleaning oil grease from washable surfaces.
HAZARDS IDENTIFICATION
Mixture classication: The mixture is classied as corrosive.
Physical/chemical risks: The mixture does not present specif-
ic risks related to physical/chemical properties.
Health risks: The mixture causes burns.
Environmental risks: Under normal conditions of use and in
the form in which it is presented, the mixture has no dangerous
eects for the environment.

40/69
WARNING!
Maintenance must be carried out by an
Authorized Technical Assistance Service,
according to the instructions provided by
the manufacturer. If this is not the case, the
warranty is null and void.
4.2. Lubrication
Every day, lubricate the blade pin (see Figure 13). To do so, it is
mandatory to comply with the following procedure:
• Disconnectthe cable(D)(Fig.1)connector(7)connecting
the Shears to the battery, even if it is switched o;
• Usingthe Allen wrench supplied withthe kit(H), unscrew
the screw (11) (Fig. 13) on the blade pin;
• Placetherecommendedamount(6gr,2pumps)ofgrease
(RETINAX HD2) in the pump and lubricate the pin as
shown in the Figure 13.
Correct maintenance of the connectors, ensuring that they are
clean and correctly tted in the housings, taking care of the
threads and connection points, will make it easier to start up
on the next working day.
At the end of the cutting season, it is best to take the Shears to
the ocial technical servicing dealer for annual maintenance.
The servicing dealer will check the state of the batteries, the
motor and all of its components.
Fig. 13
Fig. 14
Every 50 hours, lubricate the blade gears (see Figure 14) as giv-
en below:
• Disconnectthe cable(D)(Fig.1)connector(7)connecting
the Shears to the battery, even if it is switched o;
• Unscrew the screws (10) (Fig. 12) and remove the pro-
tective cover;
• Lubricate the point shown in Fig. 14 with a small amount
of grease (RETINAX HD2).
WARNING!
• Theschedule isforinformationpurposes
only and depends on normal operation
conditions. Conditions can in fact
change depending on the service, the
environment and on frequency of use.
If conditions are particularly harsh, the
frequency of maintenance operations
should be amended accordingly.
• Prior to any maintenance it is mandatory
to ensure that the power supply plug
of the Shears is disconnected from the
battery.
• After maintenance, always restore any
safety devices that may have been re-
moved, so that they are in place before
new work is started.
4.2.1. Information about the product to
clean the blades
The blades of the Shears may be cleaned with the product
supplied.
WARNING!
Wearglovesandeyeprotectionwhenusingthe
cleaner.AVOIDCONTACTWITHSKINANDEYES.
• Any repair and/or maintenance should be carried out
by an operator with suitable physical and intellectual
requirements;
• Extraordinary maintenance or repair operations must be
performed by a professional mechanical maintenance
technician;
• All maintenance operations not specied in this manual
must be performed in Authorized Service Centers.
10
11
10
33/69
priate points and approved for receiving such material. If a re-
cycling center is not available in your area please contact CUS-
TOMER SERVICE: Dr. Luiz Miranda Street, 1650 CEP 17580-000
- Pompeia - SP - Phone: +55 (14) 3405-2113 - email: assistencia.
tecnicajsfs@jacto.com.br - Opening Hours: Monday to Friday
from 07h00 am to 11h30 am and from 13h00 pm to 17h18 pm.
2.5.2. Making idle
If the machine is to be set aside for a long period, it is recom-
mended to:
• Treat the Shears according to the instructions contained
in the“Safe maintenance”paragraph;
• Checkthemachineandhaveanydamagedpartsreplaced;
• Accurately clean the Shears, spreading a thin layer of oil
on blade and counter-blade to prevent oxidation;
• Close the blades by holding down the trigger (1) (Fig. 1)
andturnothebatterybypressingthesuitablebutton(3);
• Store the Shears and relevant supply batteries in the
proper spaces of the standard supplied case in order
to protect them from excessive humidity and changes
in temperature;
• StorethecasecontainingtheShearsinadryandprotected
room, away from the reach of persons not in charge of
use the equipment.
If these operations are carried out properly, the user will nd
the Shears in perfect condition when it is required again.
If the Shears are to be dismantled, comply with the relative an-
ti-pollution legislation of the Country of use.
It should not be forgotten that the Manufacturer is always
available if you require any assistance or spare parts.
2.6. Safe use
To assure safe use of the Shears it is mandatory to comply with
the following requirements:
The Shears have been exclusively designed for pruning shrubs
and branches with diameter less than 40 mm; any other use of
the equipment not indicated in this manual is considered as
misuse, hence strictly forbidden.
The cutting ability is also aected by the hardness of the wood.
• It is forbidden to use the Shears to shear materials other
than wood, such as plasticized items, metals, glass etc.
• It is forbidden to operate or have the Shears operated
by personnel that are unsuitably trained, unauthorized
or in poor health.
• It is forbidden to operate with the Shears using ladders
or supports that do not assure stable balance.
• It is forbidden to operate in areas where potentially ex-
plosiveatmospheresmightoccur(Directive1999/92/EC).
• It is forbidden to alter, tamper with or bypass the safety
devices provided by the manufacturer.
• Itisforbiddento operate when the labels insidethecase
indicating the warning signs are missing or damaged.
Havethemimmediatelyreplacedwithotherlabelshaving
the same meaning.
• It is forbidden to touch in any way moving parts during
work.
• Itisforbiddentotamperwith,remove,damageorbypass
any part of the Shears.
• It is forbidden to place pieces of iron or other foreign
bodies under the cutting blade while the equipment
is in operation
• It is forbidden to carry the Shears while holding them
by the power supply cord.
• Itis forbiddento use thepowersupplycordforpurposes
other than the intended ones.
• It is forbidden to place the power supply cord close to
heat sources, oil or sharp edges.
• Damaged cords increase the risk of occurrence of elec-
trocution.
• It is forbidden to leave the Shears unattended: the ma-
chine must be under one’s control at all times.
• It is forbidden to use the Shears when atmospheric con-
ditions are unfavorable: the Shears have been designed
andconstructedtooperateindryenvironment,protected
from the weather.
• Donotuseintheeventof rain or high degreeofhumidity.
• It is forbidden to place the Shears on the ground: Short
circuit hazard.
• It is forbidden to touch the battery charger while
charging. Danger of burns.
• It is forbidden to place the battery charger close to
sources of ignition or ammable products.
• It is forbidden to tamper with the battery backpack
powering the Shears.
• Electrocution hazard. The battery kit opening is elec-
tronically controlled and any opening is recorded on an
electronic board.
• It is mandatory to strictly comply with all accident-pre-
vention measures recommended and described in this
manual.
• It is mandatory to check that all the safety devices of
the Shears are intact and functional before using them.
• It is mandatory to ensure, prior to connecting the
equipment to the power supply, that the battery switch
is in the“0”position (o).
• It is mandatory for the environment where the Shears
areoperatedto beadequatelylit. Insucient or excessive
lighting may pose a risk to the operator.
• It is mandatory to keep the Shears away from children
and animals.
• It is mandatory to familiarize yourself with the control
devices and their functions prior to starting work.
• It is mandatory to use suitable clothing. Strictly avoid
long or loose clothing that might be caught in any way
by rotating or moving parts.
• Wear suitable helmets, glasses, gloves, footwear, etc.
• It is mandatory to constantly ensure one is in a safe
position with respect to the operating machine and in
the right balance.
• It is mandatory to ensure the ground where one is

34/69
working is free from impediments that might hinder
the operator.
• It is mandatory to keep the blades and moving parts of
theShearsawayfromone’sfaceandanyexposedpersons.
• ItismandatorytoperiodicallycleantheShearsfollowing
the schedule and methods set out in this Instructions
Manual.
• It is mandatory to disconnect the power cord of the
Shears from the supply battery prior to starting any
maintenance operation.
• It is mandatory for the servicing and adjustments to
always be performed with the Shears disconnected from
the power supply.
• It is mandatory to stop the Shears and inspect them in
the event any abnormal vibration should be observed or
havetheminspectedbypersonnelappointedbytheman-
ufacturer until the causes are identied and eliminated.
• It is mandatory to contact a dealer if the Shears stop
during operation or a component breaks.
• It is mandatory to comply with the laws in force in the
country of installation on use and disposal of the prod-
ucts used for cleaning and performing maintenance on
the Shears, adhering to the recommendations of the
manufacturer of said products.
• ItismandatoryformaintenanceontheShears toonly be
performed by skilled and specialized personnel, in strict
compliance with the instructions in this manual, and for
any worn or damaged parts to be replaced.
• It is mandatory to always use original spare parts when
carrying out repairs and maintenance.
• It is mandatory when work is completed to place the
Shears and relevant batteries in their case and store the
whole in a safe place protected from the weather.
DANGER!
It is recommended the Shears be used by
the same person for a short time during
the day, alternating one hour of work and
one hour of rest.
Continued use of the Shears may cause a
strong feeling of fatigue for the operator.
• It is recommended to familiarize yourself
withthecontroldevicesandtheirfunctions
prior to starting work.
The Shears has been designed and built in
accordance with current safety regulations.
Special maintenance (repairs) must only be
performedbyqualiedpersonnelandoriginal
spare parts must be used.
2.7. Safe maintenance
In order to guarantee safe maintenance of the Shears it is nec-
essary to respect the following provisions:
• It is prohibited to remove or tamper with the safety
devices.
• It is forbidden to touch the battery charger while
charging. Danger of burns.
• Itismandatoryperiodicallychecksafetydeviceintegrity
and operation.
• It is mandatory to periodically check (1 hour) the blade’s
cutting edge and if required to sharpen it with the wet-
stone supplied.
• Cuttingperformedwiththebladenotperfectlysharpened
decreases duration of the battery and increases the me-
chanical strain of cutting at the expense of performance
as well as integrity of the product
• It is mandatory to periodically check the state of pres-
ervation of the power supply cord.
• It must not show any cuts or visible marks of abrasion,
otherwise replace it immediately.
• It is mandatory to disconnect the power cord of the
Shears from the supply battery prior to performing any
cleaning, lubrication or maintenance operation.
• It is mandatory to strictly perform maintenance on the
Shears according to the instructions in this manual and
replace the damaged or worn parts with original spare
parts only.
• It is mandatory for maintenance on the Shears to only
be performed by skilled and specialized personnel, in
strict compliance with the instructions in this manual.
• It is mandatory to always use original spare parts when
performingrepairsandmaintenanceontheShears.Using
non-originalpartsimmediately rendersthe warrantynull
andvoidandcancompromisethedurabilityandreliability
of the machine.
• The dangers are shown on the cover inside the case by
pictographs (decals). These signs must always be kept
clean and immediately replaced when removed, even
partially,ordamaged:itisprohibitedtooperatetheShears
when even one of these signs is missing from the spot
where it was installed by the Manufacturer.
• It is mandatory to save and keep this manual for the
entire life of the Shears.
3. Usage Instructions
Before starting to use the Shears it is mandatory to read and
perfectly understand the instructions contained below.
3.1. Transport
The Shears are delivered ready for use contained in a plastic
material case, which also houses the battery and the backpack
for transport and all accessories required for correct operation.
WARNING!
Prior to using the Shears the first time,
check integrity of the supply, comparing the
equipment with that shown in Figure 1 of this
Instructions Manual.
39/69
WARNING!
All failure to carry out this maintenance
seriously aects the capacity and operation
of the batteries and signicantly reduces the
cutting autonomy, counselling and leaving
the guarantee without eect.
WARNING!
Always disconnect the battery charger from
the batteries upon completing charge
At the end of its service life, do not discard the battery in com-
mon waste but dispose of it according to the regulations in
force in your country, following the instructions in the previous
paragraph“Demolition and decommissioning”.
3.11.3. Charger precautions
Clean with a dry cloth, without liquids and never when the
equipment is connected to the electrical grid or the batteries.
When charging, chargers give o heat, do not touch.
The charger must be moved away from all ammable products
or sources of ignition.
Do not open. Risk of the electrical discharge.
Connect to a socket tted with earthing connection and in
closed premises.
Charge at a minimum room temperature of +5°C (+41°F).
3.11.4 Storage batteries
For long storage/hibernation after the cutting season, the bat-
teries must be completely recharged. This must be repeated
every 3 MONTHS.
The harness with the batteries must be kept in a cool, dry place
inside the case. The harness must be kept with the battery volt-
age cable, disconnected from the electronic box.
The lack of autonomy is caused by poor maintenance on
the part of the user. The batteries are guaranteed for twelve
months from the date of purchase.
Routine maintenance operations are listed below. Extraordi-
nary maintenance operations (repairs of parts or components)
can be carried out by specialized personnel authorized by the
manufacturer.
4. Maintenance
Fig. 12
WARNING!
The sharpening operation must always be
carried out with the Shears o and the con-
nection cable disconnected.
WARNING!
Thecleaningoperationmustalwaysbecarried
out with the Shears o and always before any
sharpening cycles.
Connect the Shears once again to the battery and switch back
on to continue work.
The cleaning spray (standard) will be used when the remains
of the resin and waste from the cutting adhere to the blade or
counter blade. We will eliminate these remains by applying the
cleaner, thus enhancing the operation of the Shears.
4.1. Maintenance and sharpening
During the normal use of the Shears, check the cutting blade to
ensure that it is sharp and clean.
With reference to Figure 12, a sharpening stone (P) is supplied
with the Shears to sharpen the cutting blade whenever neces-
sary. With the blade at maximum opening, switch o the bat-
tery kit and disconnect the connector (6) of the cable (D) that
connects the Shear to the battery.
Check the edge of the cutting blade approximately every hour
and re-sharpen if necessary. Remember that cutting with a
poorly sharpened or notched blade reduces the useful life of
the battery and increases the mechanical force of the cutting
to the detriment of the life of the product.
D
C
6
P
35°

38/69
WARNING!
Recharge the batteries before use. Batteries
must be charged at room temperature of be-
tween0ºC(32ºF)and45ºC(113ºF).Ifcharging
isnotcarriedoutbetweenthesetemperatures,
itcannot be assuredto havebeen correct, and
the battery capacity may be reduced.
Fig. 9
Fig. 10
The battery charge kit display (Fig. 10) identies:
Battery charger characteristics
Display
indicator
Charging in progress
(Flashing bar)
Battery charged
To charge the battery, insert the power jack into the battery
and the battery charger plug into the 100-240V (50-60 Hz)
power socket of the installation premises.
When charging is completed, disconnect the battery charger
plug from the 100-240V (50-60 Hz) socket then extract the jack
from the battery.
3.11.1. Safe use of the battery
In using the battery it is important to comply with the follow-
ing safety requirements:
• It is forbidden to touch the battery or battery charger
with wet hands.
• It is forbidden to leave the battery near heat sources
or under direct or indirect sunlight (such as in the car).
• In the event of incorrect use of the batteries, liquid might
leak out of them.
• Strictly avoid any contact with it.
• In the event of accidental contact accurately rinse with
water.
• Immediatelyseekmedicalattentionintheeventtheliquid
should come into contact with your eyes.
• The liquid from the rechargeable battery may cause skin
irritation or burns.
• It is mandatory to keep the battery and battery charger
away from the reach of children.
• It is mandatory to only and exclusively use the battery
charger supplied for charging the battery.
3.11.2. Battery charging procedure
Any change in the indicated order in the battery recharging
instructions may cause irreparable damage to the charger or
batteries.
• With reference to Figure 11, connect the socket (9) of the
battery charger (E) to a 100-240V (50-60 Hz) power mains
outlet of the installation premises.
• It is recommended for the socket to be tted with
earthing terminal.
• The LED (5) of the battery charger lights up steady in
green simply to signal that power is on.
• Connect the connector (8) to the relevant connection on
the battery; after a few seconds the display (4) shows the
charging progress.
• The batteries are being charged.
• Once the batteries have been charged, disconnect the
connector (8) from the battery.
lf the batteries are totally discharged, the charging time will
be approximately 6 hours. For optimal charging, the batteries
should be charged at the room temperature of between 0º
C (32º F) and 45º C (113º F). At lower or higher temperatures,
the battery charging capacity is not completed 100%, and the
economy is reduced.
For a longer useful battery life, it is recommendable to work un-
til the batteries completely discharged at least once a month
during the cutting campaign.
For long storage/hibernation after the cutting season, the bat-
teries must be completely recharged. This must be repeated
every 3 MONTHS, and failure to do so will result in the warranty
being voided.
Fig. 11
E
9
8
4
5
C
35/69
3.2. Start-up and operation of shears
After having unpacked the product and ascertained that it has
suered no damage and veried the presence of seals, proceed
as indicated:
• extract the Shears from the case together with the bat-
tery backpack and the battery; make a full recharge of
the batteries before use as explained in the paragraph
“Battery charging procedure”;
• with reference to Figure 1, connect the connector (6) of
the cable (D) to the battery (C). Connect the connector
(7) of the cable (D) to the Shears (A);
With reference to Figure 4, turn on the battery by pressing the
button (3): when started, the battery emits 3 beeps; after a few
seconds, the battery beeps and the display (4) shows “PR-40”
and then the number of cuts made and the charge status of
the battery itself.
Hold down the Shear trigger (1) for 3 seconds. The battery
beeps once and the Shear blades open. Release the trigger. At
this point, the Shears are ready to start work.
Fig. 4
It is recommended to use the supplied power
cord only. If the cord is shortened or length-
ened in fact, the calibration values change
and proper machine operation is not assured.
3.3. Progressive cutting control
The Shears are provided with a double opening servo progres-
Complete blade opening Middle blade opening
To return to full opening, carry out the same operation holding
the trigger for 5 seconds.
Fig. 5
3.5. Standby mode and switching off
This mode allows you to disable the Shears with the blades
closed (e.g. for storage in the sheath while travelling).
With reference to Figure 5, Press the trigger (1) twice in quick
succession, then keeping it held down. One beep indicates that
the Shears are disabled.
To resume work, press the trigger (1) and release quickly. The
blade will move to the open position (as previous to closing)
and it will be possible to perform a new cutting cycle.
N.B.: The blades are closed in standby position.
The electronics are however equipped with an auto power o
device which, after 10 minutes of inactivity, switches o the
entire system. At that point, restart the battery (see paragraph
“Start-up and operation of Shears”).
To switch o the system (battery-Shear), put the Shear in
standby position and, only at this point, press the battery unit
button (3) until a beep is emitted.
N.B.: Once nished, put the Shears away with the blades closed
(see Figure 6).
DANGER!
The manufacturer cannot be held liable for
damage to persons, animals or property,
causedbynon-compliancewiththesafetyand
accidentpreventionregulationsoroperations
which do not conform to the information
provided in the use manual.
sive work program. This program enables full control of the
position of the cutting blade, as this position is proportional
to the position of the cutting trigger. The cutting blade moves
forwards or backwards to the desired point with a speed pro-
portional to the trigger operation speed, enabling optimum
accessibility and perfect cut control. With reference to Figure
4, if the trigger (1) is released, the cutting blade will automati-
cally open and the cutting cycle cannot be restarted until it is
pressed again.The reopening speed of the blade is proportion-
al to the closing speed. Therefore, if cuts are made at reduced
speed, the reopening will occur at the same speed.
3.4. Change of program
With reference to Figure 5, to change the blade opening, hoId
down the cutting trigger (1) for 5 seconds. The cutting blade
will be closed and the tool will emit 1 beep. When the trigger is
released, the blade will remain “HALF OPEN”as shown in gure
5.
1
4
3
C
1
ø 40 ø 20

36/69
3.6. Repeated attempts to cut
The Shears are provided with a cutting reattempt program.
If the force required to make the cut exceeds the capacity of
the Shears, the blade will lock. If the trigger (1) is kept held
down in this condition, the Shears will attempt to complete the
cut. If this attempt is once again unsuccessful, the Shears will
make a third attempt. lf it is not possible, the blade will move
to the open position.
At any time, if the trigger is released, the cutting blade will
move into the open position. At this point, it will be possible to
start another cutting cycle.
Fig. 6
WARNING!
Do not over-straining movements in leverage
(see paragraph“Form of use”).
3.7. Form of use
Grasp the Shears rmly as shown in Figure 7 and press on the
cutting trigger with your index nger.
When the pressure is released the blade opens and the cutting
speed is proportional to the nger movement (progressive and
servo-assisted cutting system).
Fig. 7
Fig. 8
WARNING!
Avoid overexertion. This cutting equipment
has been designed to do the work of manual
shears; NOT trimmers for two hands or other
cutting equipment such as saws, power saws,
etc.Ifthebladecannotcutthebranchbecause
ofitsexcessivediameterorthehardnessofthe
wood, do not cut and do not for any reason
force it upward, downward (A) or laterally (B)
during the cutting cycle (Figure 8).
Before starting working, arrange the harness which, with mul-
tiple adjustments, is easily adapted to user needs. The braces,
the belt and the breastplate can be adjusted using the special
buckles.
The harness is made of completely waterproof fabric and is
equipped with a scabbard for storing the Shears when not in
Vertical
Horizontal
use.
After connecting the Shears and adjusting the harness, you can
begin the startup cycle and the device will be ready to begin
work.
Forcing the machine like a lever or cam during the cutting pro-
cess, as shown in the attached pictures, causes an overreaching
in the head that can cause serious damage:
• By exing the cutting head, it can be damage the teeth
of the pinion and the conic sector;
• It may cause high-frequency vibrations that can damage
the motor beyond repair;
• Alterations to the wire of the cutting blade, the counter
blade and the metal frame.
These faults and others caused by repeated forcing, are not
due to manufacturing faults, but rather to poor or undue use
by the user of the cutting equipment.
3.8. Protection system in the cutting cycle
The Shears are equipped with protective electronic controls
to avoid overstressing the system during work. The conditions
that must occur in order for these controls to intervene, block-
ing the cutting cycle, are as follows:
B
A
NO
NO
B
A
a
l
37/69
WARNING!
• Insistenceonthesamecuttingpointwith
consecutiveoverexertionisharmfultothe
Shears. Serious faults can be caused that
aecttheShear operation.Thesekindsof
faultswill notbecoveredbythe warranty
or guarantee.
• The Shears are designed exclusively for
cutting wooden material. Any use to cut
materials other than wood may damage
the Shears and their cutting blade. This
damage will not be covered by the war-
ranty or guarantee.
• The use of the Shears is unadvisable in
the event of rain or excessive dew in
the crops in which the Shears are to be
used.TheShearshaveprotectionagainst
dampness,buttheiruseintherainorwith
excessivehumidityisnotguaranteedand
can cause damage to the Shears.
• The Shears are not waterproof.
• All operation and safety events are
recorded by the Shears’ electronic ma-
nagement system.
a. If excessive strain occurs during cutting (Overexer-
tion). The blade is blocked because it has reached the
maximum absorption limit. While holding down the
trigger, the system will attempt to completethe cut twice
more. If the third attempt does not complete the cut,
the system will re-open the blade automatically. When
the trigger is released, the Shears are ready to start a
new cutting cycle.
b. Ifongoingstrainis experienced(energy balance).The
blade is blocked as the motor has repeatedly reached the
maximumoutputpower.Thecuttingbladeisautomatical-
ly returned to the open position without further cutting
attempts, even if the trigger remains pressed, emitting
1 beep. After 2 sec. of inactivity, the Shear emits another
beep and is ready for a new re-start cycle.
c. If ongoing strain is experienced over a long period
of time. The system is in an alarm state. The blade is
blocked and it will no longer be possible to perform
other cutting cycles until the system has been returned
to safe conditions.
d. Over temperature. The blade is blocked and remains in
position until the system temperature goes below 55°C
(131°F). This protection comes into function over 60°C
(140°F) and emits 4 beeps and displays system status.
If the user performs lever or cam movements in dierent di-
rections, it causes mechanical overexertion beyond the limits
and protections for which the equipment has been designed.
The electronic control systems do not cover all possible faults
caused by poor or undue use.
3.9. Storage shears
The Shears should be stored clean, with the blades closed,
together with the batteries in their carrying case, protected
from moisture, cold and excessive heat. Take care to protect
the blade and counter blade with a small amount of oil to pre-
vent oxidation and after performing maintenance at the end
of work.
3.10. Observations
The Shears have an energy-saving system that turns o the
power supply from the Shears after 10 minutes of inactivity.
The Shears memorize the cuts made, average consumption
and working hours, in order to generate an activity log.
The Shears are equipped with a safety system to prevent over-
exertion. When the user tries to make the cut that is excessive
for the Shears, they will make 3 reattempts, and if cutting is not
possible the Shears will automatically return to their complete
open position. Three series of reattempts will cause the equip-
ment to stop.
lf there is insistence on cutting at the same point, the Shears
may perform a safety block (see paragraph “Protection system
in the cutting cycle”).
Not all types of wood oer the same resistance to cutting; this
3.11. Power supply batteries
The Shears are powered by a motor operating at 48 volt DC.
The current required for operation is supplied by an external
battery to be placed in the suitable pocket in the backpack
supplied.
To charge the battery only use the standard dedicated battery
charger which is supplied with the battery pack kit.
To charge the battery is not necessary that it is completely dis-
charged.
The manufacturer does not accept responsibility for any dam-
age to the battery charger caused by use other than described.
The LED on the battery charger (Fig. 9) identies the presence
of 100-240V (50-60 Hz) main voltage only and does not provide
any information about the charge status of the battery itself.
aects the cutting diameter or section. The maximum admis-
sible diameter for the cut will be approximately 40 mm. For
harder woods, such as orange wood, olive or similar, the maxi-
mum diameter will be that allowed by the power of the Shears
themselves.

38/69
WARNING!
Recharge the batteries before use. Batteries
must be charged at room temperature of be-
tween0ºC(32ºF)and45ºC(113ºF).Ifcharging
isnotcarriedoutbetweenthesetemperatures,
itcannot be assuredto havebeen correct, and
the battery capacity may be reduced.
Fig. 9
Fig. 10
The battery charge kit display (Fig. 10) identies:
Battery charger characteristics
Display
indicator
Charging in progress
(Flashing bar)
Battery charged
To charge the battery, insert the power jack into the battery
and the battery charger plug into the 100-240V (50-60 Hz)
power socket of the installation premises.
When charging is completed, disconnect the battery charger
plug from the 100-240V (50-60 Hz) socket then extract the jack
from the battery.
3.11.1. Safe use of the battery
In using the battery it is important to comply with the follow-
ing safety requirements:
• It is forbidden to touch the battery or battery charger
with wet hands.
• It is forbidden to leave the battery near heat sources
or under direct or indirect sunlight (such as in the car).
• In the event of incorrect use of the batteries, liquid might
leak out of them.
• Strictly avoid any contact with it.
• In the event of accidental contact accurately rinse with
water.
• Immediatelyseekmedicalattentionintheeventtheliquid
should come into contact with your eyes.
• The liquid from the rechargeable battery may cause skin
irritation or burns.
• It is mandatory to keep the battery and battery charger
away from the reach of children.
• It is mandatory to only and exclusively use the battery
charger supplied for charging the battery.
3.11.2. Battery charging procedure
Any change in the indicated order in the battery recharging
instructions may cause irreparable damage to the charger or
batteries.
• With reference to Figure 11, connect the socket (9) of the
battery charger (E) to a 100-240V (50-60 Hz) power mains
outlet of the installation premises.
• It is recommended for the socket to be tted with
earthing terminal.
• The LED (5) of the battery charger lights up steady in
green simply to signal that power is on.
• Connect the connector (8) to the relevant connection on
the battery; after a few seconds the display (4) shows the
charging progress.
• The batteries are being charged.
• Once the batteries have been charged, disconnect the
connector (8) from the battery.
lf the batteries are totally discharged, the charging time will
be approximately 6 hours. For optimal charging, the batteries
should be charged at the room temperature of between 0º
C (32º F) and 45º C (113º F). At lower or higher temperatures,
the battery charging capacity is not completed 100%, and the
economy is reduced.
For a longer useful battery life, it is recommendable to work un-
til the batteries completely discharged at least once a month
during the cutting campaign.
For long storage/hibernation after the cutting season, the bat-
teries must be completely recharged. This must be repeated
every 3 MONTHS, and failure to do so will result in the warranty
being voided.
Fig. 11
E
9
8
4
5
C
35/69
3.2. Start-up and operation of shears
After having unpacked the product and ascertained that it has
suered no damage and veried the presence of seals, proceed
as indicated:
• extract the Shears from the case together with the bat-
tery backpack and the battery; make a full recharge of
the batteries before use as explained in the paragraph
“Battery charging procedure”;
• with reference to Figure 1, connect the connector (6) of
the cable (D) to the battery (C). Connect the connector
(7) of the cable (D) to the Shears (A);
With reference to Figure 4, turn on the battery by pressing the
button (3): when started, the battery emits 3 beeps; after a few
seconds, the battery beeps and the display (4) shows “PR-40”
and then the number of cuts made and the charge status of
the battery itself.
Hold down the Shear trigger (1) for 3 seconds. The battery
beeps once and the Shear blades open. Release the trigger. At
this point, the Shears are ready to start work.
Fig. 4
It is recommended to use the supplied power
cord only. If the cord is shortened or length-
ened in fact, the calibration values change
and proper machine operation is not assured.
3.3. Progressive cutting control
The Shears are provided with a double opening servo progres-
Complete blade opening Middle blade opening
To return to full opening, carry out the same operation holding
the trigger for 5 seconds.
Fig. 5
3.5. Standby mode and switching off
This mode allows you to disable the Shears with the blades
closed (e.g. for storage in the sheath while travelling).
With reference to Figure 5, Press the trigger (1) twice in quick
succession, then keeping it held down. One beep indicates that
the Shears are disabled.
To resume work, press the trigger (1) and release quickly. The
blade will move to the open position (as previous to closing)
and it will be possible to perform a new cutting cycle.
N.B.: The blades are closed in standby position.
The electronics are however equipped with an auto power o
device which, after 10 minutes of inactivity, switches o the
entire system. At that point, restart the battery (see paragraph
“Start-up and operation of Shears”).
To switch o the system (battery-Shear), put the Shear in
standby position and, only at this point, press the battery unit
button (3) until a beep is emitted.
N.B.: Once nished, put the Shears away with the blades closed
(see Figure 6).
DANGER!
The manufacturer cannot be held liable for
damage to persons, animals or property,
causedbynon-compliancewiththesafetyand
accidentpreventionregulationsoroperations
which do not conform to the information
provided in the use manual.
sive work program. This program enables full control of the
position of the cutting blade, as this position is proportional
to the position of the cutting trigger. The cutting blade moves
forwards or backwards to the desired point with a speed pro-
portional to the trigger operation speed, enabling optimum
accessibility and perfect cut control. With reference to Figure
4, if the trigger (1) is released, the cutting blade will automati-
cally open and the cutting cycle cannot be restarted until it is
pressed again.The reopening speed of the blade is proportion-
al to the closing speed. Therefore, if cuts are made at reduced
speed, the reopening will occur at the same speed.
3.4. Change of program
With reference to Figure 5, to change the blade opening, hoId
down the cutting trigger (1) for 5 seconds. The cutting blade
will be closed and the tool will emit 1 beep. When the trigger is
released, the blade will remain “HALF OPEN”as shown in gure
5.
1
4
3
C
1
ø 40 ø 20

34/69
working is free from impediments that might hinder
the operator.
• It is mandatory to keep the blades and moving parts of
theShearsawayfromone’sfaceandanyexposedpersons.
• ItismandatorytoperiodicallycleantheShearsfollowing
the schedule and methods set out in this Instructions
Manual.
• It is mandatory to disconnect the power cord of the
Shears from the supply battery prior to starting any
maintenance operation.
• It is mandatory for the servicing and adjustments to
always be performed with the Shears disconnected from
the power supply.
• It is mandatory to stop the Shears and inspect them in
the event any abnormal vibration should be observed or
havetheminspectedbypersonnelappointedbytheman-
ufacturer until the causes are identied and eliminated.
• It is mandatory to contact a dealer if the Shears stop
during operation or a component breaks.
• It is mandatory to comply with the laws in force in the
country of installation on use and disposal of the prod-
ucts used for cleaning and performing maintenance on
the Shears, adhering to the recommendations of the
manufacturer of said products.
• ItismandatoryformaintenanceontheShears toonly be
performed by skilled and specialized personnel, in strict
compliance with the instructions in this manual, and for
any worn or damaged parts to be replaced.
• It is mandatory to always use original spare parts when
carrying out repairs and maintenance.
• It is mandatory when work is completed to place the
Shears and relevant batteries in their case and store the
whole in a safe place protected from the weather.
DANGER!
It is recommended the Shears be used by
the same person for a short time during
the day, alternating one hour of work and
one hour of rest.
Continued use of the Shears may cause a
strong feeling of fatigue for the operator.
• It is recommended to familiarize yourself
withthecontroldevicesandtheirfunctions
prior to starting work.
The Shears has been designed and built in
accordance with current safety regulations.
Special maintenance (repairs) must only be
performedbyqualiedpersonnelandoriginal
spare parts must be used.
2.7. Safe maintenance
In order to guarantee safe maintenance of the Shears it is nec-
essary to respect the following provisions:
• It is prohibited to remove or tamper with the safety
devices.
• It is forbidden to touch the battery charger while
charging. Danger of burns.
• Itismandatoryperiodicallychecksafetydeviceintegrity
and operation.
• It is mandatory to periodically check (1 hour) the blade’s
cutting edge and if required to sharpen it with the wet-
stone supplied.
• Cuttingperformedwiththebladenotperfectlysharpened
decreases duration of the battery and increases the me-
chanical strain of cutting at the expense of performance
as well as integrity of the product
• It is mandatory to periodically check the state of pres-
ervation of the power supply cord.
• It must not show any cuts or visible marks of abrasion,
otherwise replace it immediately.
• It is mandatory to disconnect the power cord of the
Shears from the supply battery prior to performing any
cleaning, lubrication or maintenance operation.
• It is mandatory to strictly perform maintenance on the
Shears according to the instructions in this manual and
replace the damaged or worn parts with original spare
parts only.
• It is mandatory for maintenance on the Shears to only
be performed by skilled and specialized personnel, in
strict compliance with the instructions in this manual.
• It is mandatory to always use original spare parts when
performingrepairsandmaintenanceontheShears.Using
non-originalpartsimmediately rendersthe warrantynull
andvoidandcancompromisethedurabilityandreliability
of the machine.
• The dangers are shown on the cover inside the case by
pictographs (decals). These signs must always be kept
clean and immediately replaced when removed, even
partially,ordamaged:itisprohibitedtooperatetheShears
when even one of these signs is missing from the spot
where it was installed by the Manufacturer.
• It is mandatory to save and keep this manual for the
entire life of the Shears.
3. Usage Instructions
Before starting to use the Shears it is mandatory to read and
perfectly understand the instructions contained below.
3.1. Transport
The Shears are delivered ready for use contained in a plastic
material case, which also houses the battery and the backpack
for transport and all accessories required for correct operation.
WARNING!
Prior to using the Shears the first time,
check integrity of the supply, comparing the
equipment with that shown in Figure 1 of this
Instructions Manual.
39/69
WARNING!
All failure to carry out this maintenance
seriously aects the capacity and operation
of the batteries and signicantly reduces the
cutting autonomy, counselling and leaving
the guarantee without eect.
WARNING!
Always disconnect the battery charger from
the batteries upon completing charge
At the end of its service life, do not discard the battery in com-
mon waste but dispose of it according to the regulations in
force in your country, following the instructions in the previous
paragraph“Demolition and decommissioning”.
3.11.3. Charger precautions
Clean with a dry cloth, without liquids and never when the
equipment is connected to the electrical grid or the batteries.
When charging, chargers give o heat, do not touch.
The charger must be moved away from all ammable products
or sources of ignition.
Do not open. Risk of the electrical discharge.
Connect to a socket tted with earthing connection and in
closed premises.
Charge at a minimum room temperature of +5°C (+41°F).
3.11.4 Storage batteries
For long storage/hibernation after the cutting season, the bat-
teries must be completely recharged. This must be repeated
every 3 MONTHS.
The harness with the batteries must be kept in a cool, dry place
inside the case. The harness must be kept with the battery volt-
age cable, disconnected from the electronic box.
The lack of autonomy is caused by poor maintenance on
the part of the user. The batteries are guaranteed for twelve
months from the date of purchase.
Routine maintenance operations are listed below. Extraordi-
nary maintenance operations (repairs of parts or components)
can be carried out by specialized personnel authorized by the
manufacturer.
4. Maintenance
Fig. 12
WARNING!
The sharpening operation must always be
carried out with the Shears o and the con-
nection cable disconnected.
WARNING!
Thecleaningoperationmustalwaysbecarried
out with the Shears o and always before any
sharpening cycles.
Connect the Shears once again to the battery and switch back
on to continue work.
The cleaning spray (standard) will be used when the remains
of the resin and waste from the cutting adhere to the blade or
counter blade. We will eliminate these remains by applying the
cleaner, thus enhancing the operation of the Shears.
4.1. Maintenance and sharpening
During the normal use of the Shears, check the cutting blade to
ensure that it is sharp and clean.
With reference to Figure 12, a sharpening stone (P) is supplied
with the Shears to sharpen the cutting blade whenever neces-
sary. With the blade at maximum opening, switch o the bat-
tery kit and disconnect the connector (6) of the cable (D) that
connects the Shear to the battery.
Check the edge of the cutting blade approximately every hour
and re-sharpen if necessary. Remember that cutting with a
poorly sharpened or notched blade reduces the useful life of
the battery and increases the mechanical force of the cutting
to the detriment of the life of the product.
D
C
6
P
35°

40/69
WARNING!
Maintenance must be carried out by an
Authorized Technical Assistance Service,
according to the instructions provided by
the manufacturer. If this is not the case, the
warranty is null and void.
4.2. Lubrication
Every day, lubricate the blade pin (see Figure 13). To do so, it is
mandatory to comply with the following procedure:
• Disconnectthe cable(D)(Fig.1)connector(7)connecting
the Shears to the battery, even if it is switched o;
• Usingthe Allen wrench supplied withthe kit(H), unscrew
the screw (11) (Fig. 13) on the blade pin;
• Placetherecommendedamount(6gr,2pumps)ofgrease
(RETINAX HD2) in the pump and lubricate the pin as
shown in the Figure 13.
Correct maintenance of the connectors, ensuring that they are
clean and correctly tted in the housings, taking care of the
threads and connection points, will make it easier to start up
on the next working day.
At the end of the cutting season, it is best to take the Shears to
the ocial technical servicing dealer for annual maintenance.
The servicing dealer will check the state of the batteries, the
motor and all of its components.
Fig. 13
Fig. 14
Every 50 hours, lubricate the blade gears (see Figure 14) as giv-
en below:
• Disconnectthe cable(D)(Fig.1)connector(7)connecting
the Shears to the battery, even if it is switched o;
• Unscrew the screws (10) (Fig. 12) and remove the pro-
tective cover;
• Lubricate the point shown in Fig. 14 with a small amount
of grease (RETINAX HD2).
WARNING!
• Theschedule isforinformationpurposes
only and depends on normal operation
conditions. Conditions can in fact
change depending on the service, the
environment and on frequency of use.
If conditions are particularly harsh, the
frequency of maintenance operations
should be amended accordingly.
• Prior to any maintenance it is mandatory
to ensure that the power supply plug
of the Shears is disconnected from the
battery.
• After maintenance, always restore any
safety devices that may have been re-
moved, so that they are in place before
new work is started.
4.2.1. Information about the product to
clean the blades
The blades of the Shears may be cleaned with the product
supplied.
WARNING!
Wearglovesandeyeprotectionwhenusingthe
cleaner.AVOIDCONTACTWITHSKINANDEYES.
• Any repair and/or maintenance should be carried out
by an operator with suitable physical and intellectual
requirements;
• Extraordinary maintenance or repair operations must be
performed by a professional mechanical maintenance
technician;
• All maintenance operations not specied in this manual
must be performed in Authorized Service Centers.
10
11
10
33/69
priate points and approved for receiving such material. If a re-
cycling center is not available in your area please contact CUS-
TOMER SERVICE: Dr. Luiz Miranda Street, 1650 CEP 17580-000
- Pompeia - SP - Phone: +55 (14) 3405-2113 - email: assistencia.
tecnicajsfs@jacto.com.br - Opening Hours: Monday to Friday
from 07h00 am to 11h30 am and from 13h00 pm to 17h18 pm.
2.5.2. Making idle
If the machine is to be set aside for a long period, it is recom-
mended to:
• Treat the Shears according to the instructions contained
in the“Safe maintenance”paragraph;
• Checkthemachineandhaveanydamagedpartsreplaced;
• Accurately clean the Shears, spreading a thin layer of oil
on blade and counter-blade to prevent oxidation;
• Close the blades by holding down the trigger (1) (Fig. 1)
andturnothebatterybypressingthesuitablebutton(3);
• Store the Shears and relevant supply batteries in the
proper spaces of the standard supplied case in order
to protect them from excessive humidity and changes
in temperature;
• StorethecasecontainingtheShearsinadryandprotected
room, away from the reach of persons not in charge of
use the equipment.
If these operations are carried out properly, the user will nd
the Shears in perfect condition when it is required again.
If the Shears are to be dismantled, comply with the relative an-
ti-pollution legislation of the Country of use.
It should not be forgotten that the Manufacturer is always
available if you require any assistance or spare parts.
2.6. Safe use
To assure safe use of the Shears it is mandatory to comply with
the following requirements:
The Shears have been exclusively designed for pruning shrubs
and branches with diameter less than 40 mm; any other use of
the equipment not indicated in this manual is considered as
misuse, hence strictly forbidden.
The cutting ability is also aected by the hardness of the wood.
• It is forbidden to use the Shears to shear materials other
than wood, such as plasticized items, metals, glass etc.
• It is forbidden to operate or have the Shears operated
by personnel that are unsuitably trained, unauthorized
or in poor health.
• It is forbidden to operate with the Shears using ladders
or supports that do not assure stable balance.
• It is forbidden to operate in areas where potentially ex-
plosiveatmospheresmightoccur(Directive1999/92/EC).
• It is forbidden to alter, tamper with or bypass the safety
devices provided by the manufacturer.
• Itisforbiddento operate when the labels insidethecase
indicating the warning signs are missing or damaged.
Havethemimmediatelyreplacedwithotherlabelshaving
the same meaning.
• It is forbidden to touch in any way moving parts during
work.
• Itisforbiddentotamperwith,remove,damageorbypass
any part of the Shears.
• It is forbidden to place pieces of iron or other foreign
bodies under the cutting blade while the equipment
is in operation
• It is forbidden to carry the Shears while holding them
by the power supply cord.
• Itis forbiddento use thepowersupplycordforpurposes
other than the intended ones.
• It is forbidden to place the power supply cord close to
heat sources, oil or sharp edges.
• Damaged cords increase the risk of occurrence of elec-
trocution.
• It is forbidden to leave the Shears unattended: the ma-
chine must be under one’s control at all times.
• It is forbidden to use the Shears when atmospheric con-
ditions are unfavorable: the Shears have been designed
andconstructedtooperateindryenvironment,protected
from the weather.
• Donotuseintheeventof rain or high degreeofhumidity.
• It is forbidden to place the Shears on the ground: Short
circuit hazard.
• It is forbidden to touch the battery charger while
charging. Danger of burns.
• It is forbidden to place the battery charger close to
sources of ignition or ammable products.
• It is forbidden to tamper with the battery backpack
powering the Shears.
• Electrocution hazard. The battery kit opening is elec-
tronically controlled and any opening is recorded on an
electronic board.
• It is mandatory to strictly comply with all accident-pre-
vention measures recommended and described in this
manual.
• It is mandatory to check that all the safety devices of
the Shears are intact and functional before using them.
• It is mandatory to ensure, prior to connecting the
equipment to the power supply, that the battery switch
is in the“0”position (o).
• It is mandatory for the environment where the Shears
areoperatedto beadequatelylit. Insucient or excessive
lighting may pose a risk to the operator.
• It is mandatory to keep the Shears away from children
and animals.
• It is mandatory to familiarize yourself with the control
devices and their functions prior to starting work.
• It is mandatory to use suitable clothing. Strictly avoid
long or loose clothing that might be caught in any way
by rotating or moving parts.
• Wear suitable helmets, glasses, gloves, footwear, etc.
• It is mandatory to constantly ensure one is in a safe
position with respect to the operating machine and in
the right balance.
• It is mandatory to ensure the ground where one is

32/69
WARNING!
Carefullyreadthefollowingrules.Iftheinstruc-
tions described are not followed, a situation
may arise which causes irreparable damage
to the machine or property, or injury - even
severe - to people or animals.
The manufacturer and importer decline all
responsibility for damage caused by not
complying with the safety and injury pre-
vention regulations described below. The
manufacturer and importer also decline any
responsibilityfordamagecausedbyimproper
use of the machine and/or as a result of mod-
ications made without authorization by the
manufacturer.
2.3. Danger plates and warning
The Shears are equipped with pictograms (labels) warning
about residual risks present on the machine that it were not
possible to eliminate. Figure 3 species the meaning of sym-
bols contained in the pictograms.The operator must memorize
the meaning of the symbols.
Due to the small size of the product, it has not been possible to
apply directly on the Shears the pictographs that warn against
residual risks. For that reason the decals with the pictographs
are axed on the inside cover of the case (F) (Fig. 1) with which
the Shears are delivered.
The labels should always be kept clean and replaced immedi-
ately if they are fully or partially detached or damaged.
The meanings of the symbols shown in the pictographs are
specied below, together with their identication number.
1. Carefully read the instructions contained in the manual
prior to start operating with the machine.
2. Disconnect the power source prior to performing the
maintenance operations described in the manual.
3. Itismandatorytoshieldone’sface,handsandeyesduring
workoperationsandtoprotectone’shearingbywearing
protectivemus,handsbywearinganti-vibrationgloves,
eyes by wearing a protective goggles or visor and cap.
1
3
2
Fig. 3
2.4. Clothing and PPE
In general it is necessary to wear suitable clothing for the work
to be carried out. In particular, as far as Shears use, obey the
following provisions:
• It is mandatory to use clothing which is as suitable as
possible,meaningnottoolooseandwithoutanyprotrud-
ing or moving parts (for example ties or necklaces). Do
not wear belts, rings and chains. Always use sturdy safety
footwear. Long hair must be tied using a specic cap.
• It is mandatoryto use protective goggles or visor before
starting the work to protect one’s face and eyes from
the plant fragments that might detach from the tree
during work.
• It is mandatory to use protective mus in order to
safeguard hearing from noise from the equipment
during work.
• It is mandatory to wear anti-vibration gloves to reduce
thevibrationstresstheoperatorisexposedtoduringwork.
2.5. Ecology and pollution
• It is mandatory to comply with the laws in force in the
country where the Shears are used, concerning the use
and disposal of products used for cleaning and washing
the parts, adhering to the recommendations of the
manufacturer of said products.
• If replacing worn parts or during demolition, one must
follow anti-pollution laws foreseen in the country where
the Shears are used.
• It is prohibited to pour products used for cleaning or
polluting substances into the sewerage drain, on the
ground, in watercourses, or into the environment.
• It is mandatory to collect products used for cleaning
and polluting substances in appropriate containers,
store them and deliver them to companies authorized
for their disposal.
2.5.1. Demolition and decommissioning
Should one decide not to use the Shears any longer, it is recom-
mended to take some precautions to prevent environmental
pollution hazards in compliance with the local legislation.The
various parts of the machine must be treated as if they were
special waste. One must proceed by taking apart the equip-
ment, grouping the various parts and components in similar
parts (rubber, metal, plastic, etc.), providing for disposal of
these parts separately, according to existing anti-pollution
laws of the Country where the machine was used.
Disposal of used shear and batteries must be made at appro-
41/69
PRODUCT INFORMATION
Name: PULISOL
Type of the product and use: Universal alkaline cleaner for
cleaning oil grease from washable surfaces.
HAZARDS IDENTIFICATION
Mixture classication: The mixture is classied as corrosive.
Physical/chemical risks: The mixture does not present specif-
ic risks related to physical/chemical properties.
Health risks: The mixture causes burns.
Environmental risks: Under normal conditions of use and in
the form in which it is presented, the mixture has no dangerous
eects for the environment.

42/69
4.3. Replacing the blade
When replacing the blade proceed as follows:
• Disconnectthe cable(D)(Fig.1)connector(7)connecting
the Shears to the battery, even if it is switched o;
• Unscrew the screws (10) (Fig. 13) and remove the pro-
tective cover;
• Using the Allen wrench supplied with the kit (H) (Fig. 1),
unscrew the screw (11) (Fig. 15) on the blade nut (12) and
the screw (13) on the stop gear (14);
• Manually unscrew the blade nut (12) and remove the pin
(15) on the opposite side;
• Separate the blade (17) from its support (16);
Once replacement is complete, assemble the components in
reverse order compared to removal. The blade nut (12) MUST
always be tightened by hand.
10
13
14
17
11
15
12
16
Fig. 15
31/69
Safety requirements.
• EN ISO 13849-1:2008: MACHINERY SAFETY - Safety-re-
lated parts of control systems - Part 1: General principles
for design.
• EN 60204-1:2006-06: MACHINERY SAFETY - Electrical
equipment of machines - Part 1: General rules.
• EN ISO 14982:1998: AGRICULTURAL AND FORESTRY
MACHINES-Electromagneticcompatibility-Testmethods
and acceptance criteria.
• ENISO20643:2008+A1:2012:MECHANICALVIBRATIONS
- Hand-held and hand-guided machinery - Principles for
evaluation of vibration emission.
• EN 60745-1:2009: Safety of hand-held motor power
tools - Part 1: General requirements.
2.2. Terminology
The danger levels indicated refer to specic risk situations that
may occur during use of the Shears and that may involve the
equipment, as well as the operator and any exposed persons
(according to Directive 2006/42/EC). With the purpose of high-
lighting situations or operations that may result in risks, the
meanings of terms used in this manual are indicated here:
• HAZARDOUSAREA:Anyareainand/oraroundamachine
where the presence of an exposed person constitutes a
risk to the health and safety of said person. (Attachment
I, Point 1.1.1., Letter b), Directive 2006/42/EC).
• EXPOSED PERSON: A person fully or partly in a hazard-
ous area (Attachment I, Point 1.1.1., Letter c), Directive
2006/42/EC).
• OPERATOR: The person or personnel in charge of the
installation,theoperation,theadjusting,thecleaning,the
repairing and the moving of the machine. (Attachment I,
Point 1.1.1., Letter d), Directive 2006/42/EC).
• USER: the person, entity or company, who purchased or
rentedthe machine andintendstouseit accordingto the
intended use foreseen by the manufacturer.
• SPECIALIZED PERSONNEL: any person specifically
trained and approved to carry out maintenance or re-
pair interventions that require particular knowledge of
the machine, its operation, the installed safety devices,
intervention modes. It must be capable of recognizing
dangerpresentontheactualmachine,thereforeavoiding
at risk situations.
• RISK: a combination of the probability and seriousness
of injury or damage to health which can arise in a dan-
gerous situation.
• GUARD: a part of the machine that is used to specically
guarantee protection by way of a material barrier.
• PROTECTION DEVICE: a device that reduces risk (unlike
the guard) either on its own or together with the guard.
• INTENDEDUSE:theuseofthemachineinaccordancewith
the information provided in the operating instructions.
• REASONABLE FORESEEABLE MISUSE: the use of the
machine dierent to the information provided in the
operator’s instructions,which may be the resultof readily
predictable human behavior.
• AUTHORIZED ASSISTANCE CENTER: The Authorized
AssistanceCentre,legallyauthorizedbytheManufacturer
or Importer, is formed by specialized sta able to carry
out all types of assistance, maintenance and repair work,
even of a certain complexity, required to maintain the
machine in perfect working order.
2. General Safety And Accident Preven-
tion Standards
2.1. Level of danger
The safety of the operator and exposed persons is the main
concern of the designer and the manufacturer of the machine.
When designing a new machine, one tries to plan for all pos-
sible danger situations and risks connected to using the ma-
chine, adopting the steps necessary to make the equipment
as safe as possible. It is recommended to carefully read this
manual and this section in particular, regarding safety
standards, avoiding behavior that is inappropriate or in
contrast with the instructions contained in this manual.
Pay attention to the following danger signal contained in this
manual and follow safety instructions.
SAFETY GUIDELINES – DEFINITIONS
It is important for you to read and understand this manual. The infor-
mation it contains relates to protecting YOUR SAFETY and PREVENTING
PROBLEMS. The symbols below are used to help you recognize this in-
formation.
NOTE: Used without the safety alert symbol indicates a potentially haz-
ardous situation which, if not avoided, may result in property damage.
DANGER!
Indicates an imminently hazardous situation
which, if not avoided, will result in death or
serious injury.
WARNING!
Indicates a potentially hazardous situation
which, if not avoided, could result in death
or serious injury.
CAUTION!
Indicates a potentially hazardous situation
which, if not avoided, may result in minor or
moderate injury.
Other manuals for PR-40
1
Table of contents
Languages:
Popular Pole Saw manuals by other brands

CAMPAGNOLA
CAMPAGNOLA KRONOS Use and maintenance manual

Active
Active Lion Cut Operation and maintenance manual

Echo
Echo PPT-260 - PARTS CATALOG SERIAL NUMBERS... parts catalog

Worx
Worx WA0222 instruction manual

Shindaiwa
Shindaiwa 62888-94013 Owner's/operator's manual

Parkside
Parkside PAAS 20-Li A1 Original instructions