JAKO-O 140-334 User manual

mobile soundanlage led
Jako-o GmbH
August-Grosch-Str. 28-38
96476 Bad Rodach/Germany
www.jako-o.com
Sound system / Système audio mobile /
Mobiele geluidsinstallatie / Impianto audio mobile
140-334
Anleitung / Instructions / Instruction /
Werkinstructie / Istruzioni
WICHTIG! SORGFÄLTIG LESEN UND AUFBEWAHREN!

DE
BLUETOOTH
Kopplung (Pairing) mit einem Bluetooth-Gerät und Audiowiedergabe
1. Drücken Sie auf SOURCE (Quelle) und wählen Sie bt. Die Bluetooth-Anzeige leuchtet auf.
2. Drücken und halten Sie die Taste PAIR (Kopplung/Wiedergabe/Pause) gedrückt, um mit dem Koppeln zu beginnen.
Das bt in der LED-Anzeige beginnt schnell zu blinken. Bleiben Sie beim Koppeln innerhalb eines Abstands von 90 cm zu der Soundanlage.
3. Suchen Sie mit den Bedienelementen Ihres Bluetooth-Geräts „MA113“ in Ihren Bluetooth-Einstellungen und wählen Sie diesen Eintrag zum Koppeln. Wenn Ihr
Bluetooth-Gerät ein Passwort anfordert, geben Sie das Standardpasswort 0 0 0 0 ein. Folgen Sie den Hinweisen in der Bedienungsanleitung für Ihr Bluetooth-Gerät,
wie Sie Bluetooth-Geräte koppeln und verbinden.
4. Wenn die Geräte erfolgreich gekoppelt sind, hört das „bt“ in der LED-Anzeige auf zu blinken. Der Lautsprecher gibt ein melodisches Tonsignal aus.
5. Wählen Sie über die Bedienelemente des verbundenen Bluetooth-Geräts einen Audiotrack.
6. Audiowiedergaben, die mit dem verbundenen Bluetooth-Gerät abgespielt werden, sind jetzt über den Lautsprecher zu hören.
Wiedergabe, Pausen und die Lautstärke können Sie mit den Bedienelementen der Soundanlage oder Ihres Bluetooth-Geräts regeln.
Nach der anfänglichen Kopplung bleibt die Soundanlage gekoppelt, bis die Kopplung manuell vom Benutzer aufgehoben oder durch ein Zurücksetzen (Reset)
des Bluetooth-Geräts gelöscht wird. Wenn die Kopplung Ihres Bluetooth-Geräts aufgehoben wurde oder Sie feststellen, dass sich das Bluetooth-Gerät nicht
verbinden lässt, wiederholen Sie die oben beschriebenen Schritte.
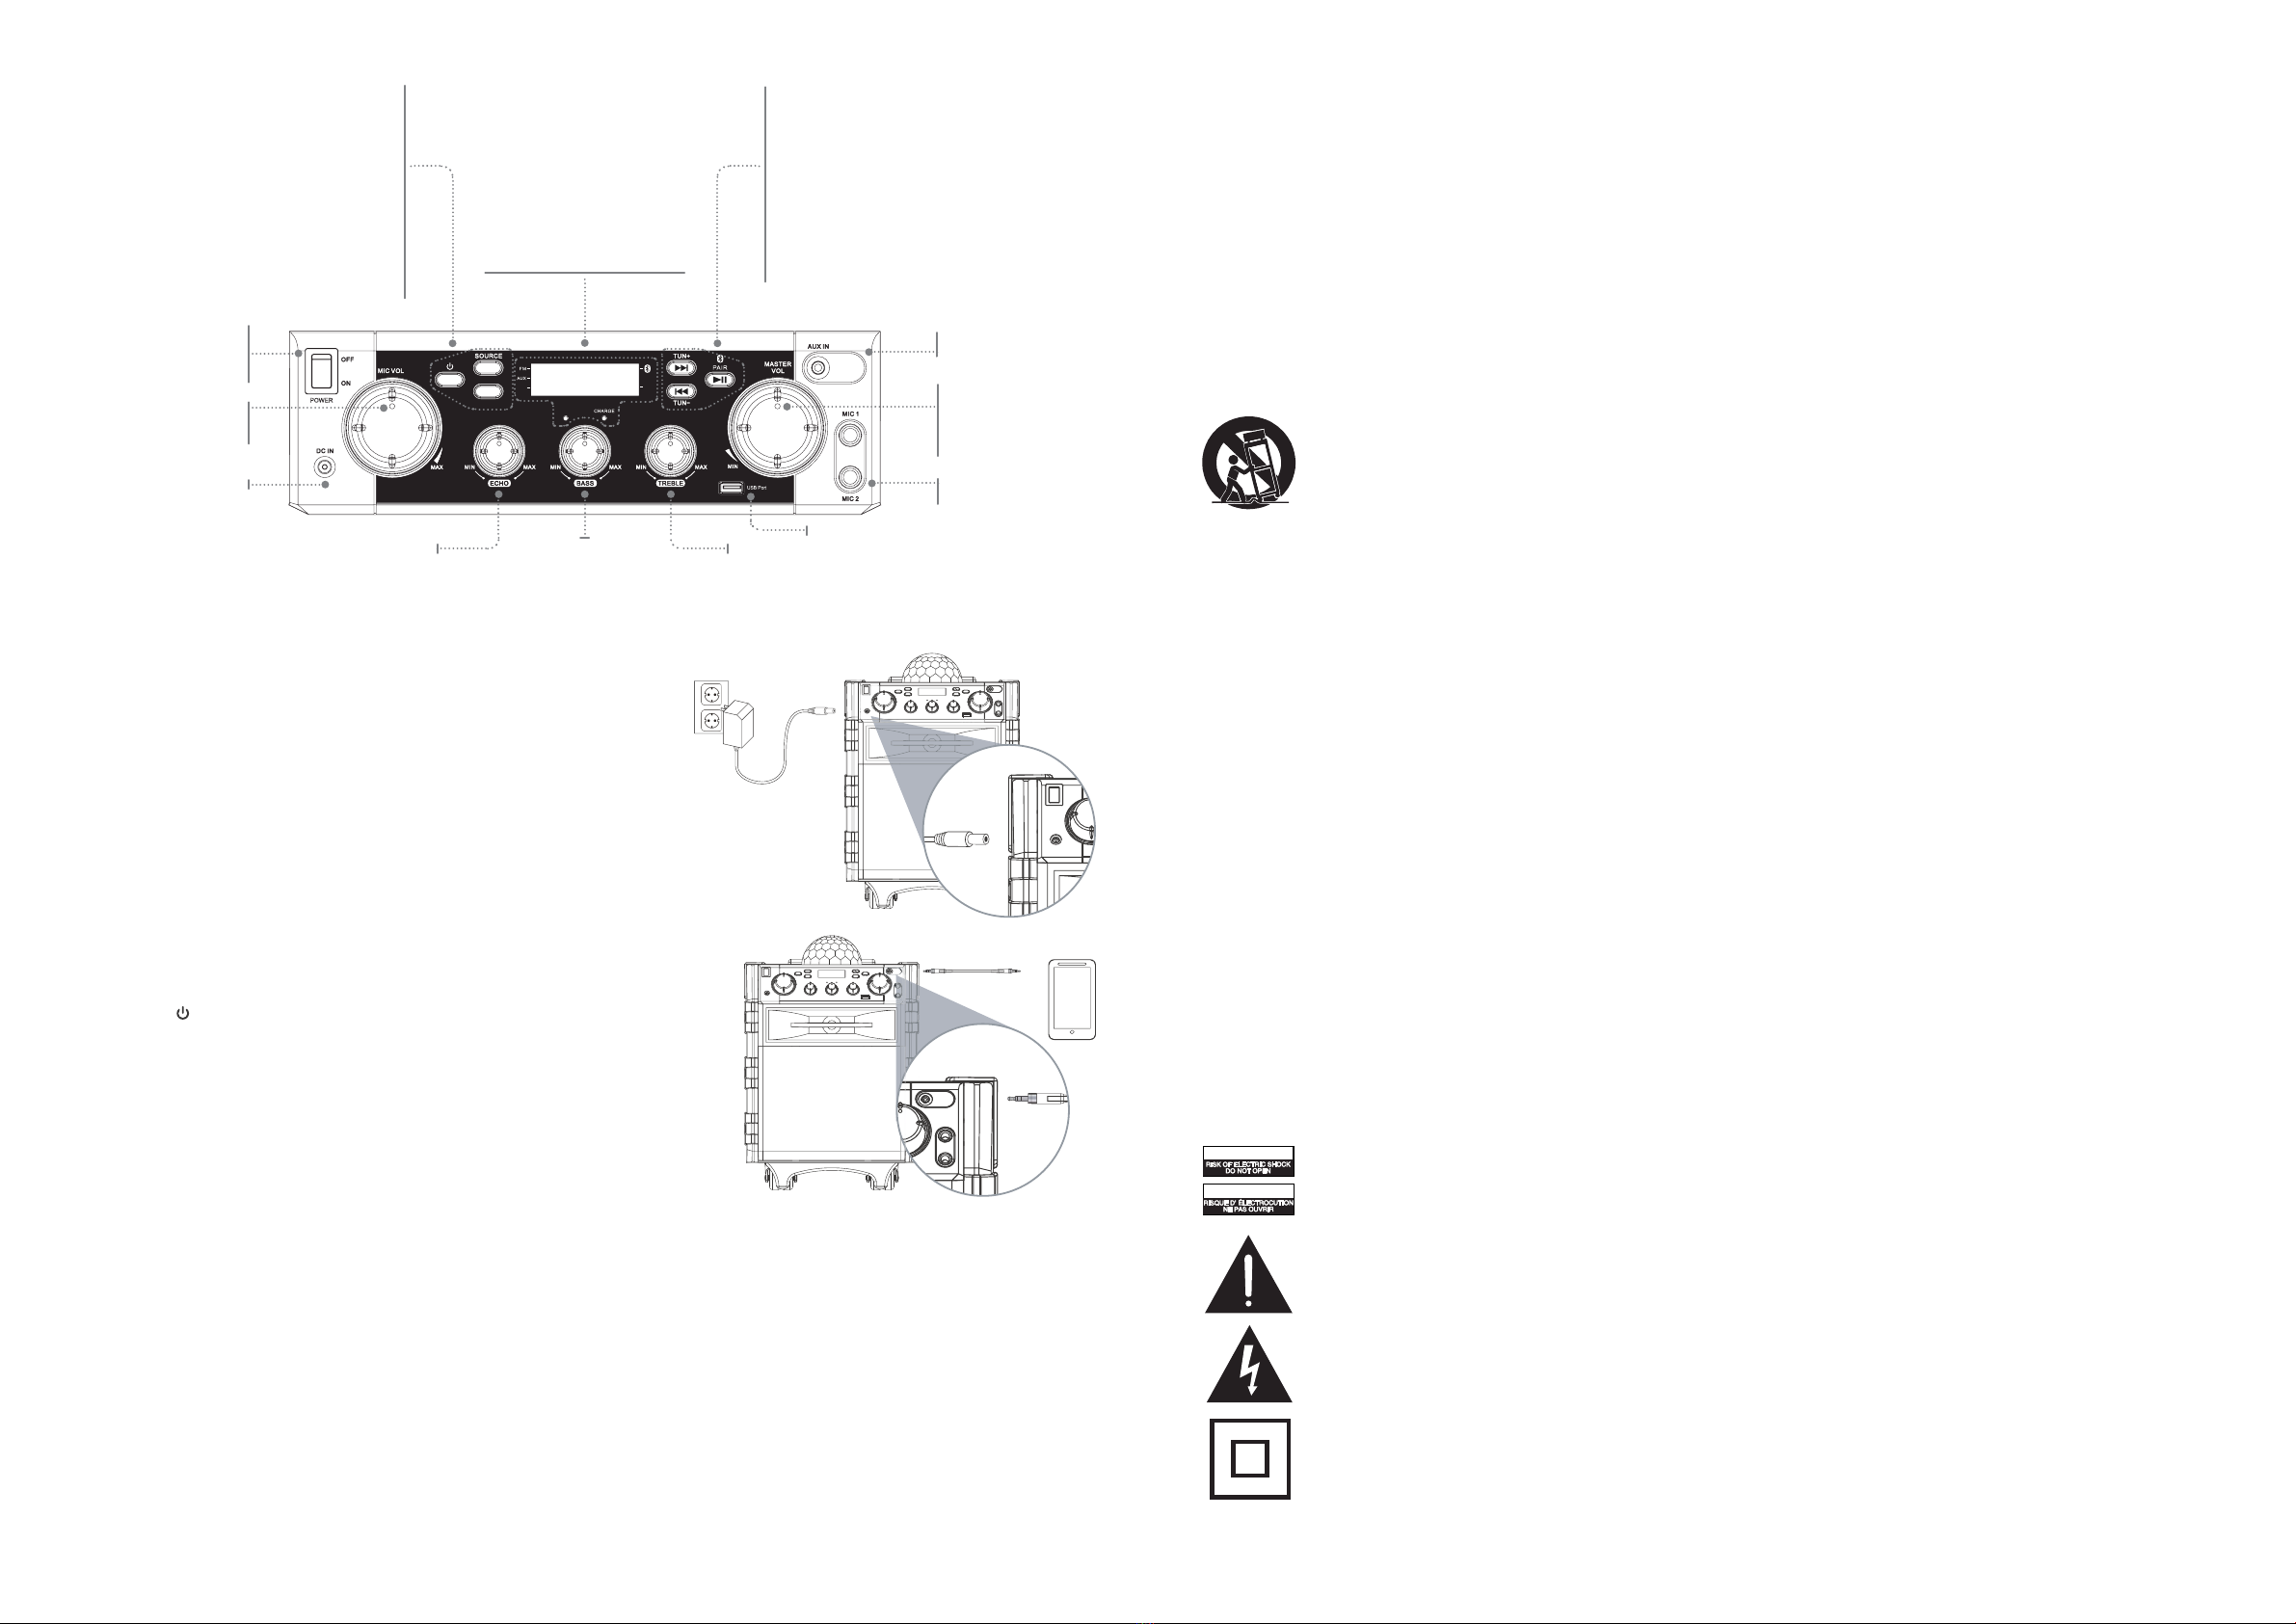
AUX-EINGANG
Verwendung des AUX-Eingangs (3,5-mm-Audioeingang)
Hierfür wird ein 3,5-mm-Audiokabel benötigt (nicht im Lieferumfang enthalten).
1. Schließen Sie ein 3,5-mm-Audiokabel am AUX-Eingang (AUX IN) der Soundanlage und am
2. Schalten Sie den Lautsprecher ein, drücken Sie die Taste SOURCE (Quelle) und wählen Sie AUX.
3. Wählen Sie über die Bedienelemente des angeschlossenen Geräts einen Audiotrack und starten Sie die
Wiedergabe.
STROMVERSORGUNG & LADEN
Hierfür wird ein Netzteil benötigt (im Lieferumfang enthalten).
Stecken Sie das im Lieferumfang enthaltene Netzteil an einer normalen Wandsteckdose und an dem
Gleichstromeingang (DC IN) der Soundanlage an.
Wenn der Akku geladen wird, leuchtet die Ladeanzeige (CHARGE) unterhalb der LED-Anzeige rot.
Ist der Akku voll geladen, ändert sich die Ladeanzeige in Grün.
Bei niedriger Akkuspannung blinkt die Ladeanzeige rot.
EINSCHALTEN
Drücken Sie den Netzschalter (POWER), um die Stromversorgung der Soundanlage einzuschalten.
Die Soundanlage startet im STANDBY-Betrieb. Wenn sich die Soundanlage im STANDBY-Betrieb
befindet, drücken Sie , um ihn einzuschalten.
MIKROFONE
Im Lieferumfang sind 2 Mikrofone enthalten, für die sich am Gerät 2 Mikrofoneingänge befinden.
1. Stecken Sie den Mikrofon-Klinkenstecker (6,3 mm) in die Mikrofonbuchse.
2. Drehen Sie den Regler für die Lautsprecherlautstärke mindestens auf Minimum. Das Mikrofon ist jetzt einsatzbereit.
3. Über den Regler für die Mikrofonlautstärke können Sie das Mikrofon lauter und leiser einstellen.
4. Auf Wunsch lässt sich am Echoregler die Echofunktion zuschalten und einstellen.
An den Mikrofoneingängen können auch E-Gitarren mit 6,3 mm Klinkenstecker angeschlossen
werden. Bedienung und Lautstärkeeinstellung erfolgt hier genauso wie für Mikrofone beschrieben.
Bitte achten Sie bei der Nutzung mit E-Gitarren darauf, die Lautstärke nur vorsichtig zu erhöhen.
Bedienfeld (vorn)
SOURCE/LIGHT (Quelle / Licht)
Drücken Sie diese Taste, um eine Quelle zu wählen: BT,
FM oder Aux. Drücken und halten Sie diese Taste zwei +
Sekunden gedrückt, um das Licht ein- bzw. auszuschalten.
10+/REPEAT (10+ / Wiederholen)
Im USB-Betrieb springen Sie durch Drücken dieser Taste
zehn Tracks nach vorn. Drücken und halten Sie diese Taste im
USB-Betrieb zwei Sekunden gedrückt, um für den aktuellen
Track „Repeat 1“ (Wiederholen 1), „All“ (Alle) oder
„Normal“einzustellen.
STANDBY
Drücken Sie diese Taste nach dem Einschalten des
Netzschalters, um das Gerät einzuschalten.
POWER (Netzschalter)
Mit diesem Schalter schalten
Sie die Stromversorgung des
Geräts ein bzw. aus.
MIC VOL (Mikrofonlautstärke)
Zum Einstellen der
Mikrofonlautstärke drehen.
DC IN (Gleichstromeingang)
AUX IN (AUX-Eingang)
(3,5-mm-Audioeingang)
MASTER VOL
(Lautsprecherlautstärke)
Zum Hoch- oder Herun-
terregeln der Lautstärke
drehen.
MIC 1, 2
(Mikrofoneingang 1, 2)
LED-ANZEIGE
STANDBY
TREBLE (Höhenregler)
USB Port
TUN +/− (Springen/Suchen/Einstellen)
Durch Drücken dieser Taste springen Sie zwischen
Tracks. Im FM-Betrieb schalten Sie mit dieser Taste
der Reihe nach durch die Senderspeicherplätze.
PAIR/SCAN (Kopplung/Wiedergabe/Pause/
Sendersuchlauf)
Diese Taste drücken Sie zum Wiedergeben/Pausieren
eines Audiotracks. Im BT-Betrieb drücken und halten
Sie diese Taste zwei Sekunden gedrückt, um mit dem
Koppeln zu beginnen.
Im FM-Betrieb drücken und halten Sie diese Taste
gedrückt, um einen Suchlauf nach allen verfügbaren
Sendern durchzuführen.
ECHO (Echoregler für Mikrofon) Bass (Tiefenregler)
POWER
LIGHT
REPEAT
SCAN
USB REPEAT
STANDBY
10+
Wichtige Sicherheitshinweise
• Lesen Sie diese Anleitung.
• Bewahren Sie diese Anleitung auf.
• Beachten Sie alle Warnhinweise.
• Befolgen Sie alle Anweisungen.
• Benutzen Sie dieses Gerät nicht in der Nähe von Wasser.
• Verwenden Sie zum Reinigen nur ein trockenes Tuch.
• Blockieren Sie nicht die Lüftungsöffnungen. Schließen Sie das Gerät gemäß den Anweisungen des Herstellers an.
• Schließen Sie das Gerät nicht in der Nähe von Wärmequellen wie Heizkörpern, Heizauslässen,
Öfen oder anderen wärmeerzeugenden Geräten (einschließlich Verstärkern) an.
• Verlegen Sie das Kabel so, dass niemand darauf tritt und es – insbesondere an den Steckern,
den Anschlussbuchsen und der Stelle, wo es aus dem Gerät austritt – nicht geknickt wird.
• Verwenden Sie nur die vom Hersteller angegebenen Anbau-/Zubehörteile.
• Trennen Sie dieses Gerät bei Gewitter oder wenn es länger nicht benutzt wird vom Netz.
• Lassen Sie alle Wartungsarbeiten von Fachpersonal durchführen. Wartungsarbeiten sind erforderlich,
wenn das Gerät beschädigt wurde, z. B. wenn das Netzkabel oder der Netzstecker beschädigt ist,
Flüssigkeit verschüttet wurde oder Fremdkörper in das Gerät gelangt sind, das Gerät Regen
oder Feuchtigkeit ausgesetzt war, nicht normal funktioniert oder heruntergefallen ist.
• Verwenden Sie das Gerät nur mit einem vom Hersteller angegebenen oder mit dem Gerät
verkauften Trolley-Gestell. Bei Benutzung eines Wagens bewegen Sie den Wagen mit dem
Gerät darauf vorsichtig, um Verletzungen durch ein Umkippen zu vermeiden.
Zusätzliche Warnhinweise und Sicherheitsmaßnahmen
•VORSICHT: UM EINEN STROMSCHLAG ZU VERMEIDEN, RICHTEN SIE DEN BREITEN KONTAKT DES STECKERS
AUF DIE BREITE ÖFFNUNG IN DER STECKDOSE AUS UND FÜHREN SIE DIE KONTAKTE VOLLSTÄNDIG EIN.
•WARNUNG: Um die Brand- oder Stromschlaggefahr zu verringern, setzen Sie dieses Gerät keinem Regen, Feuchtigkeit, Tropf- oder Spritzwasser aus.
•VORSICHT: Werden Bedienelemente oder Einstellungen anders als angegeben verwendet oder werden andere als die
angegebenen Verfahren durchgeführt, dann kann dies zum Austreten einer gesundheitsgefährdenden Strahlung führen.
•WARNUNG: Bei Änderungen oder Modifizierungen dieses Geräts, die nicht ausdrücklich von der für die Konformität
verantwortlichen Stelle genehmigt wurden, könnte die Berechtigung des Benutzers zum Betreiben des Geräts erlöschen.
•WARNUNG: Stellen Sie dieses Gerät nicht direkt auf Möbel mit einer weichen, porösen oder empfindlichen Oberfläche. Wie bei jeder Gummi-
mischung, die Öle enthält, könnten die Füße dort, wo sie aufstehen, Marken oder Verfärbungen hinterlassen. Wir empfehlen die Verwendung einer
Schutzbarriere wie z. B. eines Stücks Stoff oder Glas zwischen dem Gerät und der Möbeloberfläche, um die Gefahr einer Beschädigung und/ oder
Verfärbung zu verringern.
•WARNUNG: Wird dieses Gerät in der Nähe von Leuchtstofflampen eingesetzt, dann kann dies die Fernbedienung stören. Wenn das Gerät
unzuverlässig reagiert, stellen Sie es an einer Stelle auf, an der es nicht durch Leuchtstofflampen gestört wird, da dies die Ursache sein kann.
•WARNUNG: Stromschlaggefahr – nicht öffnen.
•Die Sicherheitshinweise und die Kennzeichnung befinden sich hinten oder unten am Gerät.
•Gegenstände mit Flüssigkeiten wie z. B. Vasen dürfen nicht auf das Gerät gestellt werden.
•Der Netzstecker dient zur Unterbrechung der Stromversorgung und hat während der beabsichtigten Benutzung jederzeit zugänglich zu sein.
Um das Gerät ganz vom Netz zu trennen, ist der Netzstecker vollständig aus der Netzsteckdose zu ziehen.
•Der Akku darf keiner übermäßigen Wärme wie z. B. Sonneneinstrahlung, Feuer o. Ä. ausgesetzt werden. Der Akku ist nicht austauschbar!
SENDERSPEICHERPLATZ EINSTELLEN
1. Drücken Sie die Taste TUN+ oder TUN− und wählen Sie von P01 bis P20.
MANUELL EINSTELLEN
1. Um einen bestimmten Sender einzustellen, drücken Sie einmal auf SCAN. Die Anzeige beginnt zu blinken.
2. Drücken Sie auf TUN+ oder TUN− und stellen Sie den Sender manuell ein.
USB PLAYER
1. Drücken Sie auf SOURCE (Quelle) und wählen Sie USB. Die USB-Anzeige leuchtet auf.
2. Stecken Sie den USB-Stick in den USB-Port an der Vorderseite der Soundanlage. Der USB-Stick wird automatisch abgespielt.
3. Drücken Sie während der USB-Wiedergabe die Taste PAIR/SCAN (Kopplung/ Sendersuchlauf/Wiedergabe/Pause), um die USB-Wiedergabe zu pausieren.
Um die Wiedergabe wieder zu starten, drücken Sie die Taste erneut.
4. Durch Drücken der Taste >>| / TUN+ oder |<< /TUN- springen Sie zum nächsten bzw. zum vorhergehenden Track.
5. Um innerhalb eines Tracks schnell nach einer bestimmten Passage zu suchen, drücken und halten Sie die Taste >>| / TUN+ bzw. |<< /TUN- gedrückt.
WARNUNG: Um die Stromschlaggefahr zu verringern, öffnen Sie nicht die Abdeckung (oder Rückseite). In dem Gerät befinden sich keine
Teile, die vom Benutzer gewartet werden können. Lassen Sie Wartungsarbeiten von Fachpersonal durchführen.
Das Ausrufezeichen in einem gleichseitigen Dreieck soll den Benutzer auf wichtige Bedien- und Wartungshinweise in der Begleitliteratur zu
dem Gerät aufmerksam machen.
Der Blitz mit Pfeilspitze in einem gleichseitigen Dreieck soll den Benutzer vor einer nicht isolierten „gefährlichen Spannung“ im Gehäuse des
Produkts warnen, die so hoch sein kann, dass sie eine Stromschlaggefahr für Menschen darstellt.
Dieses Symbol zeigt an, dass dieses Produkt eine doppelte Isolierung zwischen gefährlichen Hochspannungsteilen und den für den Benutzer
zugänglichen Teilen aufweist.
ATTENTION
CAUTION
FM-RADIO/ SENDERSUCHLAUF/ SENDERSPEICHERPLÄTZE
Diese Soundanlage ist mit einer internen FM-Radioantenne ausgestattet. Zur Verbesserung des Radioempfangs richten Sie die Position der Soundanlage entsprechend aus. Hiermit bestätigt Jako-o GmbH, dass sich dieses Bluetooth Gerät in Übereinstimmung mit den grundlegenden Anforderungen und anderen relevanten Bestimmungen der
Richtlinie 2014/ 53/EG befindet. Eine Kopie der Konformitätserklärung kann unter folgender Adresse bezogen werden: Jako-o GmbH, August-Grosch-Str. 28-38, 96476 Bad
Rodach/Germany
SENDER SPEICHERN
1. Drücken Sie auf SOURCE (Quelle) und wählen Sie den FM-Betrieb.
2. Drücken und halten Sie SCAN (Sendersuchlauf) zwei bis drei Sekunden gedrückt. Die Soundanlage sucht und speichert automatisch alle verfügbaren Sender (P01-P20).

BLUETOOTH
Pairing to a Device and Playing Audio
1. Press Source to select bt, Bluetooth Indicator will light up.
2. Press and hold the Pair/Play/Pause button to begin pairing. The bt on the LED display will begin flashing quickly. When pairing, remain within 3 feet of the unit.
3. Using the controls on your Bluetooth device, scan for and select MA113 in your Bluetooth settings to pair. If your device requests a password, enter the default
password 0 0 0 0. Refer to the user’s manual for your specific device for instructions on pairing and connecting Bluetooth devices.
4. When successfully paired, the bt on the LED display will stop flashing and an audible chime will sound through the speaker.
5. Use the controls on the connected device to select an audio track.
6. Audio played through the connected Bluetooth device will now be heard through the speaker.
Use controls on the unit or your device to play, pause, and change the volume.
After initial pairing, the unit will stay paired unless unpaired manually by the user or erased due to a reset of the device.
If your device should become unpaired or you find it is unable to connect, repeat the above steps.
AUX IN
Using Aux In (3.5mm Audio Input)
Requires a 3.5mm audio cable (not included).
1. Connect a 3.5mm audio cable to the AUX In on the unit and the
audio output/headphone jack on a media player.
2. Power on the unit and press the Source button to select AUX.
3. Use the controls on the connected device to select and play audio.
GB Control Panel (front)
Source / Light
Press to select source between BT, FM and Aux.
Press and hold 2sec to turn on or off light.
10+ / Repeat
In USB mode, press this button will skip forward
10 tracks. In USB mode, press and hold this button
2sec to set current track to Repeat 1, All or normal.
STANDBY
After main Power on, press this to switch the device on.
Power
Press to power the
unit on or off.
Mic Volume
Press to adjust the
microfone volume.
DC Power Input
Aux In
(3.5 mm Audio Input)
Master Volume
Turn to adjust the
volume up or down.
Mic Input 1, 2
LED Display
STANDBY
Echo (microphone) Bass Treble
USB Port
Skip/Search/Tun +/−
Press to skip between tracks.
In FM mode, press to cycle
through memory presets.
Pair/Play/Pause/Scan
Press to Play/ Pause an audio track.
At BT mode, press and hold 2sec to begin pairing.
At FM mode, press and hold to search
all available station.
MICROPHONE
Includes 2 microphones. There are 2 microphone inputs on the device for the microphones.
1. Insert the microphone jack (6.3mm) into the microphone socket.
2. Turn the speaker volume control at least to minimum. The microphone is now ready for use.
3. You can make the microphone louder or quieter using the microphone volume control.
4. You can switch on and adjust the echo function, if required, using the echo control.
E-guitars with a 6.3 mm jack can also be connected to the microphone inputs.
Operation and volume control are the same as described for the microphone.
Please remember to increase the volume gradually when using e-guitars.
POWER
LIGHT
REPEAT
SCAN
USB REPEAT
STANDBY
10+
POWER & CHARGING
Requires an AC/DC power adapter (included).
Using the included power adapter, plug the adapter into a standard
wall outlet and the DC Power Input on the speaker.
When the battery is charging, the Charging Indicator on the front of the unit will display solid red.
When the battery is fully charged, the Charging Indicator will turn green.
When battery power is low, the Charging Indicator will flash red.
START
Press the Power switch to power the unit on, unit start at STANDBY mode.
When the unit is in STANDBY MODE, press to start the unit.
Important Safety Instructions
• Read these Instructions.
• Keep these Instructions.
• Heed all Warnings.
• Follow all instructions.
• Do not use this apparatus near water.
• Clean only with a dry cloth.
• Do not block any ventilation openings. Install in accordance with the manufacturer’s instructions.
• Do not install near any heat sources such as radiators, heat registers, stoves, or other apparatus (including amplifiers that produce heat.
• Do not defeat the safety purpose of the polarized or grounding - type plug. A polarized plug has two blades with one wider than the other.
A grounding type plug has two blades and a third grounding prong. The wide blade or the third prong are provided for your safety.
When the provided plug does not into your outlet, consult an electrician for replacement of the obsolete outlet.
• Protect the power cord from being walked on or pinched particularly at plugs, convenience receptacles,
and the point where they exit from the apparatus.
• Only use attachments/accessories specified by the manufacturer.
• Unplug this apparatus during lightning storms or when unused for long periods of time.
• Refer all servicing to service personnel. Servicing is required when the apparatus has been damaged in any way, such as power-supply cord or plug
is damaged, liquid has been spilled or objects have fallen into the apparatus, the apparatus has been exposed to rain or moisture, does not operate
normally, or has been dropped.
• Use only with a cart, stand, tripod, bracket, or table specified by the manufacturer, or sold with the apparatus.
When a cart is used, use caution when moving the cart / apparatus combination to avoid injury from tip-over.
Additional Warnings and Precautions
•CAUTION: TO PREVENT ELECTRIC SHOCK, MATCH WIDE BLADE OF PLUG TO WIDE SLOT, FULLY INSERT.
•WARNING: To reduce the risk of fire or electric shock, do not expose this apparatus to rain, moisture, dripping, or splashing.
•CAUTION: Use of controls or adjustments or performance of procedures other than those specified may result in hazardous radiation exposure.
•WARNING: Changes or modifications to this unit not expressly approved by the party responsible for compliance could void the user’s authority
to operate the equipment.
•WARNING: Do not place this unit directly onto furniture surfaces with any type of soft porous, or sensitive finish. As with any rubber compound made
with oils, the feet could cause marks or staining where the feet reside. We recommend using a protective barrier such as a cloth or a piece of glass
between the unit and the surface to reduce the risk of damage and/or staining.
•WARNING: Use of this unit near fluorescent lighting may cause interference regarding use of the remote.
If the unit is displaying erratic behavior move away from any fluorescent lighting, as it may be the cause.
•WARNING: Shock hazard - Do Not Open.
•Caution and marking information is located at the rear or bottom of the apparatus.
•Objects filled with liquids, such as vases, shall not be placed on the apparatus.
•Mains plug is used as disconnect device and it should remain readily operable during intended use. In order to disconnect
the apparatus from the mains completely, the mains plug should be disconnected form the mains socket outlet completely.
•Battery shall not be exposed to excessive heat such as sunshine, fire or the like.
•Keep new and used batteries away from children. If the battery compartment does not close securely,
stop using the product and keep it away from children.
FM RADIO/SCAN/MEMORY PRESETS
This unit features an internal FM radio antenna. To improve radio reception, adjust the position of the unit.
STORING MEMORY PRESETS
1. Press Source to select FM mode.
2. Press & Hold Scan for 2 to 3 seconds. The unit will automatically search and store all available stations (P01-P20).
USB PLAYER OPERATIONS
1. Press Source to select USB, USB indicator will light up.
2. Plug the USB flash drive into the USB port on the front of the unit. The USB will playing automatically.
3. During USB playback, press the PAIR/SCAN/PLAY/PAUSE button to pause USB play and press again to resume.
4. Press >>| / TUN+or |<< /TUN- or buttons to jump to next or previous track.
5. Press and hold >>| / TUN+or |<< /TUN- or buttons to search rapidly within a track to locate a specific passage.
WARNING: To reduce the risk of electric shock, do not remove cover (or back). No user-serviceable parts inside.
Refer servicing to service personnel.
The exclamation point within an equilateral triangle is intended to alert the user to the presence of important
operating and maintenance (servicing) instructions in the literature accompanying the appliance.
The lightning flash with arrowhead symbol, within an equilateral triangle, is intended to alert the user to the presence of uninsulated
“dangerous voltage” within the product’s enclosure that may be of sufficient magnitude to constitute a risk of electric shock to persons.
This symbol indicates that this product incorporates double insulation between hazardous mains voltage and user accessible parts.
ATTENTION
CAUTION
TUNING TO A MEMORY PRESET
1. Press the Tun +/− buttons to select from P01 to P20.
TUNING MANUALLY
1. To tune a specific station, press Scan once. The display will begin flashing.
2. Press Tun +/− to tune the station manually.
Hereby, Jako-o GmbH, declares that this Bluetooth device is in compliance with the essential requirements and other relevant provisions of Directive 2014/53/EG. A copy of
the Declaration of Conformity may be obtained at the following location: Jako-o GmbH, August-Grosch-Str. 28-38, 96476 Bad Rodach/Germany

FR
BLUETOOTH
Couplage (pairing) avec un appareil Bluetooth et reproduction audio
1. Appuyez sur SOURCE et sélectionnez bt. Le voyant Bluetooth s’allume.
2. Appuyez sur la touche PAIR et maintenez-la enfoncée (couplage/reproduction/ pause) pour commencer le couplage.
Le bt du voyant à LED commence à clignoter rapidement. Lors du couplage, restez à une distance de 90 cm du haut-parleur.
3. Avec les éléments de commande de votre appareil Bluetooth MA113 , recherchez les paramètres Bluetooth et sélectionnez cette entrée à coupler. Si votre appareil
Bluetooth demande un mot de passe, insérez le mot de passe par défaut 0 0 0 0. Suivez les consignes du manuel d’utilisation de votre appareil Bluetooth pour
le coupler et le connecter.
4. Une fois les appareils couplés avec succès, le voyant LED bt s’arrête de clignoter. Le haut-parleur émet un signal sonore mélodieux.
5. Sélectionnez une piste audio avec les éléments de commande de l’appareil Bluetooth raccordé.
6. Les reproductions audio lues par l’appareil Bluetooth raccordé passent maintenant par le haut-parleur. Vous pouvez réguler la lecture,
les pauses et le volume avec les éléments de commande du système audio ou de votre appareil Bluetooth.
Après le couplage préalable, le système audio reste couplé jusqu’à ce que l’utilisa teur l’annule manuellement ou jusqu’à la réinitialisation (Reset) de l’appareil
Bluetooth. Lorsque le couplage de votre appareil Bluetooth a été annulé ou si vous constatez que l’appareil Bluetooth ne se connecte pas, répétez les
étapes décrites ci-dessus.
ENTRÉE AUX
Utilisation de l’entrée AUX (3,5 mm entrée audio)
Un câble audio 3,5 mm est nécessaire (non inclus dans le volume de livraison).
1. Raccordez un câble audio 3,5 mm sur AUX IN du système audio et sur la sortie
audio ou sur la prise du casque audio d’un lecteur multimédia (media player).
2. Démarrez le haut-parleur, appuyez sur la touche SOURCE et sélectionnez AUX.
3. Avec les éléments de commande de l’appareil connecté, sélectionnez une piste
audio et lancez la lecture.
Panneau de commande (avant)
SOURCE/LIGHT (source/éclairage)
Appuyez sur cette touche pour choisir une source: BT,
FM ou Aux. Appuyez sur cette touche et maintenez-la
enfoncée pendant deux secondes pour activer ou
désactiver l’éclairage.
10+/REPEAT (10+/répéter)
In En mode USB, sautez 10 pistes en avant en
appuyant sur cette touche. Appuyez sur cette touche et
maintenez-la enfoncée pendant deux secondes en
mode USB pour régler la piste actuelle sur «Repeat 1»
(répéter), « All » (toutes) ou «Normal».
STANDBY
Appuyez sur cette touche après l’activation de
l’interrupteur d’alimentation pour démarrer l’appareil.
POWER
(interrupteur d’alimentation)
Press to power the unit on or off
MIC VOL (volume microphone)
PTournez le volume du
microphone pour le régler.
DC IN (entrée courant continu)
AUX IN (entrée AUX)
(Entrée audio 3,5 mm) )
MASTER VOL
(volume haut-parleur)
Tournez pour augmenter
ou réduire le volume.
MIC 1, 2 (entrées
microphone 1, 2)
VOYANT À LED
STANDBY
TUN+/− (suivant/rechercher/régler)
Cette touche permet de passer d’une piste à l’autre.
En mode FM, elle permet de faire défiler les empla-
cements de stations dans l’ordre.
PAIR/SCAN
(couplage/lecture/pause/recherche de stations)
Appuyez sur cette touche pour lire/interrompre une
piste audio. En mode BT, appuyez sur cette touche
et maintenez-la enfoncée pendant deux secondes
pour commencer le couplage. En mode FM, en-
foncez cette touche et maintenez-la enfoncée pour
exécuter une recherche parmi toutes les stations
disponibles.
TREBLE
(contrôleur de hauteurs)
Port USB
ECHO (contrôleur
d’écho microphone) BASS
(module de basses)
ALIMENTATION ÉLECTRIQUE ET CHARGEMENT
Un bloc d’alimentation est requis à cette fin (inclus dans le volume de livraison).
Branchez le bloc d’alimentation inclus dans le volume de livraison à une prise de courant
normale et au courant continu (DC IN) du système audio. Lorsque la batterie est en cours
de chargement, le voyant de charge (CHARGE) rouge sous l‘affichage à LED est allumé.
Une fois la batterie rechargée complètement, le voyant de charge passe au vert.
En cas de faible tension de batterie, le voyant clignote en rouge.
DÉMARRER
Appuyez sur l’interrupteur d’alimentation (POWER) pour activer l’alimentation électrique du
système audio. Le système audio démarre en mode STANDBY. Lorsque le système audio est
en mode STANDBY, appuyez sur pour le démarrer.
MICROPHONES
La livraison comprend 2 microphones. L’appareil est équipé de 2 entrées de microphone appropriées.
1. Insérez le connecteur du microphone (6,3 mm) dans la douille.
2. Tournez le régulateur pour le volume du haut-parleur au moins sur le volume minimum.
Le microphone est maintenant opérationnel.
3. Le régulateur de volume du haut-parleur permet d’augmenter ou de réduire le son du microphone.
4. Le régulateur d’écho permet d’activer et de régler la fonction écho si vous le souhaitez.
Les entrées de microphone permettent également de raccorder des guitares électriques équipées
de connecteurs 6,3 mm. L’utilisation et le réglage du volume fonctionnent exactement comme pour
les microphones. Lors de l’utilisation de guitares électriques, veillez à augmenter le volume avec
prudence.
POWER
LIGHT
REPEAT
SCAN
USB REPEAT
STANDBY
10+
RADIO FM/RECHERCHE DE STATIONS/MÉMOIRE DE STATIONS
Ce système audio est équipé d’une antenne FM interne. Pour améliorer la réception de la station, orientez la position du système audio en circonstance.
LECTEUR USB
1. Appuyez sur SOURCE et sélectionnez USB. Le voyant USB s’allume.
2. Insérez la clé USB dans le port USB sur la face avant du système audio. La lecture de la clé USB est automatique.
3. Pendant la lecture de la clé USB, appuyez sur la touche PAIR/SCAN (couplage/recherche de station/lecture/pause) pour mettre la lecture en pause.
Pour relancer la lecture, appuyez de nouveau sur la touche.
4. En appuyant sur la touche >>| / TUN+ ou |<< /TUN-, passez à la piste suivante ou précédente.
5. Pour rechercher rapidement un passage précis sur une piste, appuyez sur la touche >>| / TUN+ ou |<< /TUN- et maintenez-la enfoncée.
Consignes de sécurité importantes
• Lisez ce manuel.
• Conservez ce manuel.
• Respectez toutes les consignes de sécurité.
• Suivez toutes les instructions.
• N’utilisez pas cet appareil à proximité de l’eau.
• Utilisez uniquement un chiffon sec pour le nettoyage.
• Ne bloquez pas les ouvertures d’aération. Raccordez l’appareil conformément aux consignes du fabricant.
• Ne branchez pas l’appareil à proximité de sources de chaleur comme des radiateurs, des sorties de chaleur,
de fours ou autres appareils qui génèrent de la chaleur (y compris les amplificateurs).
• Posez le câble de telle sorte que personne ne puisse marcher dessus et qu’il ne puisse pas se plier,
en particulier au niveau de la fiche, du raccord et de la sortie de l’appareil.
• Utilisez uniquement les composants et accessoires du fabricant.
• Débranchez cet appareil en cas d’orage ou si vous ne l’utilisez pas pour une durée prolongée.
• Laissez un spécialiste réaliser les travaux de maintenance. Des travaux de maintenance sont nécessaires lorsque l’appareil a été endommagé, par ex.
si le câble ou le bloc d’alimentation est endommagé, si du liquide s’est renversée ou si un corps étranger se trouve dans l’appareil, si l’appareil a été
exposé à la pluie ou à l’humidité, s’il ne fonctionne pas normalement ou s’il est tombé.
• Utilisez l’appareil uniquement avec un appareil indiqué par le fabricant ou avec le châssis vendu avec l’appareil. En cas d’utilisation d’un chariot,
déplacez ce dernier avec l’appareil avec précaution afin d’éviter les blessures.
Avertissements supplémentaires et mesures de sécurité
• PRUDENCE : POUR ÉVITER UNE ÉLECTROCUTION, ORIENTEZ LE CONTACT LARGE DE LA FICHE SUR
L’OUVERTURE LARGE DANS LA PRISE DE COURANT ET INSÉREZ LES CONTACTS ENTIÈREMENT.
• AVERTISSEMENT : Afin de réduire le risque d’incendie ou d’électrocution, n’exposez pas
l’appareil à la pluie, à l’humidité, aux gouttes d’eau ou aux éclaboussures.
•PRUDENCE : Si des éléments de commande ou réglages ne sont pas utilisés comme indiqué
ou exécuté d’une autre manière, l’utilisation risque de provoquer des radiations nocives.
•AVERTISSEMENT : Toute modification de l’appareil non autorisée explicitement par l’organisme
responsable de la conformité risque d’annuler l’autorisation d’exploitation de l’appareil pour l’utilisateur.
•AVERTISSEMENT : Ne posez pas l’appareil directement sur un meuble ou sur une surface souple, poreuse ou sensible. Comme pour tous les
mélan- ges de caoutchouc contenant de l’huile, les pieds peuvent laisser des marques ou des colorations là où ils sont posés. Nous recommandons
l’utilisation d’une barrière de protection comme, par ex. un morceau de tissu ou de verre entre l’appareil et la surface du meuble afin d’éviter le risque
de dommage et/ou de coloration.
•AVERTISSEMENT : Si cet appareil est posé à proximité de lampes fluorescentes, la télécommande risque d’en être altérée.
Si les réactions de l’appareil deviennent peu fiables, posez-le dans un endroit sans lampes fluorescentes car elles peuvent en être la cause.
•AVERTISSEMENT : Risque d’électrocution - ne pas ouvrir.
•Les consignes de sécurité et le marquage se situent à l’arrière ou sous l’appareil.
•Les objets avec des liquides comme des vases ne doivent pas être posés sur l’appareil.
•Le connecteur sert à interrompre l’alimentation électrique et doit être accessibles à tout moment pour l’utilisateur pendant l’utilisation
prévue. Pour séparer l’appareil du réseau, débranchez complètement le connecteur de la prise de courant.
• La batterie ne doit pas être exposée à une chaleur excessive comme, par ex. aux rayons du soleil, à du feu ou autre.
La batterie n’est pas interchangeable !
AVERTISSEMENT : Pour réduire le risque d’électrocution, n’ouvrez pas le couvercle (ou le dos de l’appareil). L’appareil ne contient
aucune pièce dont l’utilisateur peut assurer la maintenance. Laisser un spécialiste réaliser les travaux de maintenance.
Le point d’exclamation inscrit dans un triangle vise à attirer l’attention de l’utilisateur sur des consignes d’utilisation
et de maintenance importantes précisées dans la documentation qui accompagne l’appareil.
L’éclair avec la pointe fléchée dans un triangle équilatéral doit avertir l’utilisateur de la présence d’une « tension dangereuse » non isolée
dans le boitier du produit. Cette tension peut être suffisamment élevée pour présenter un risque d’électrocution pour l’utilisateur.
Ce symbole indique que cet appareil présente une double isolation entre les pièces sous haute tension et les pièces accessibles à l’utilisateur.
ATTENTION
CAUTION
ENREGISTRER UNE STATION
1. Appuyez sur SOURCE et sélectionnez le mode FM.
2. Appuyez sur la touche SCAN (recherche de station) et maintenez-la enfoncée pendant deux à trois secondes.
Le système audio recherche et enregistre automatiquement toutes les stations disponibles (P01-P20).
ENREGISTRER L’EMPLACEMENT D’UNE STATION
1. Appuyez sur la touche TUN+ ou TUN− et sélectionnez entre P01 et P20.
RÉGLAGE MANUEL
1. Pour régler une certaine station, appuyez encore une fois sur SCAN. L’affichage commence à clignoter.
2. Appuyez sur TUN+ ou TUN− et réglez la station manuellement.
Par la présente Jako-o GmbH, déclare que cet appareil Bluetooth est conforme aux exigences principales et autres clauses applicables de la Directive 2014/53/EG. Vous
pouvez demander de recevoir une copie de la déclaration de conformité en écrivant, à l‘adresse suivante: Jako-o GmbH, August-Grosch-Str. 28-38, 96476 Bad Rodach/
Germany

ATTENTION
CAUTION
Belangrijke veiligheidsinstructies
• Lees de handleiding.
• Bewaar deze handleiding goed.
• Neem alle waarschuwingen in acht.
• Volg alle instructies op.
• Gebruik het toestel nooit in de buurt van water.
• Gebruik een droge doek voor de reiniging.
• Blokkeer nooit de ventilatieopeningen. Sluit het toestel aan volgens de aanwijzingen van de fabrikant.
• Sluit het toestel niet aan in de buurt van warmtebronnen zoals radiatoren, warmteuitlaten,
kachels of andere apparaten die warmte afgeven (inclusief versterkers).
• Leg de kabel zodanig dat niemand erop kan gaan staan en hij – vooral bij de stekkers,
de aansluitbussen en de plaats waar hij uit het toestel komt – niet kan worden geknikt.
• Gebruik alleen de / het door de fabrikant aangegeven aanbouwonderdelen /-toebehoren.
• Onderbreek bij onweer of vóór een langere gebruikspauze de stroomtoe- voer naar het toestel.
• Laat alle reparatiewerkzaamheden alléén uitvoeren door vakpersoneel. Onderhoud/reparatie is vereist als het toestel beschadigd is geraakt, de netkabel
of -stekker beschadigd is, vloeistof werd gemorst of vreemde voorwerpen in het toestel terecht zijn gekomen, het toestel heeft blootgestaan aan regen of
vocht, niet normaal werkt of gevallen is.
• Gebruik het toestel alleen met de door de fabrikant aangegeven of bij het toestel verkochte trolley. Bij het gebruik van een wagens dient u de
wagen met het toestel erop voorzichtig te bewegen om letsel door kantelen te voorkomen.
Aanvullende waarschuwingen en veiligheidsmaatregelen
•VOORZICHTIG: VOORKOM ELEKTRISCHE SCHOKKEN EN RICHT HET BREDE CONTACT VAN DE STEKKER OP DE BREDE OPENING IN DE
CONTACTDOOS EN DRUK DE CONTACTEN VOLLEDIG IN DE CONTACTDOOS.
•WAARSCHUWING! Voorkom gevaar voor brand of elektrische schokken en stel dit toestel niet bloot aan regen, vocht, druppel- of spatwater.
•VOORZICHTIG: Door het verkeerd gebruiken of instellen van bedieningselementen of een ander gebruik dan in de handleiding beschreven staat,
kan een gezondheidsbedreigende straling vrijkomen.
•WAARSCHUWING! Bij wijzigingen of aanpassingen aan dit toestel die niet uitdrukkelijk zijn goedgekeurd door de voor de conformiteit verantwoor
de- lijke instantie kan het gebruiksrecht voor het toestel komen te vervallen.
•WAARSCHUWING! Plaats het toestel nooit direct op meubels met een zacht, poreus of gevoelig oppervlak. Op de plaats waar de voetjes op het
oppervlak staan, kunnen zij vanwege de olie die zich in elk rubbermengsel bevindt, kringen of verkleuringen veroorzaken. Wij adviseren het gebruik
van een beschermende laag van bijv. stof of glas tussen het toestel en het meubeloppervlak om beschadiging of verkleuring te voorkomen.
•WAARSCHUWING! Als dit toestel in de buurt van TL-verlichting wordt geplaatst, kan daardoor de ontvangst worden gestoord. Zet het toestel,
als het niet naar tevredenheid functioneert, op een andere plaats waar het niet kan worden gestoord door TL-verlichting, omdat dat de oorzaak zou
kunnen zijn.
•WAARSCHUWING! Gevaar voor elektrische schokken – niet openen.
• De veiligheidsinstructies en de kenmerking bevinden zich achter op of onder het toestel.
• Plaats nooit voorwerpen met vloeistof, bijv. vazen, op het toestel.
• De netstekker is bedoeld voor het in- en uitschakelen van de stroom- toevoer en moet tijdens het gebruik altijd toegankelijk zijn.
Voor de onderbreking van de stroomtoevoer moet de stekker altijd helemaal uit de contactdoos worden getrokken.
• De accu mag niet worden blootgesteld aan overmatige warmte, bijv. door zonnestraling, vuur e.d. De accu kan niet worden vervangen!
BLUETOOTH
Koppeling (pairing) met een Bluetooth-toestel en audioweergave
1. Druk op SOURCE (bron) en selecteer BT. De Bluetooth-indicator brandt.
2. Houd de PAIR-toets (koppeling/weergave/pauze) ingedrukt om met de koppeling te beginnen. BT in de ledindicator begint snel te knipperen.
Blijf bij het koppelen binnen een afstand van maximaal 90 cm van de luidspreker.
3. Zoek met de bedieningselementen van uw Bluetooth-toestel ‚MA113‘ in uw Bluetooth-instellingen en selecteer deze om te koppelen. Wanneer uw Bluetooth-toestel
om een wachtwoord vraagt, voert u het standaard wachtwoord. 0 0 0 0 in. Volg de aanwijzingen in de handleiding van uw Bluetooth-toestel voor het koppelen
van Bluetooth-toestellen.
4. Zodra de apparaten correct gekoppeld zijn, knippert BT in de ledindicator niet meer. De luidspreker genereert een melodieus geluidssignaal.
5. Selecteer een audiotrack via de bedieningselementen van het verbonden Bluetooth-toestel.
6. Nu kunt u de audioweergave die met het verbonden Bluetooth-toestel worden afgespeeld, horen via de luidspreker. Met de bedieningselementen van uw
geluidsinstallatie of uw Bluetooth-toestel kunt u weergave, pauze en geluidssterkte regelen. Na de uitgevoerde koppeling blijft de geluidsinstallatie gekoppeld totdat
de koppeling handmatig opgeheven of door terugzetten (reset) van het Bluetooth- toestel gewist wordt. Als de koppeling werd opgeheven of u constateert dat het
Bluetooth-toestel zich niet laat verbinden, herhaalt u de hierboven beschreven stappen.
AUX-INGANG
Gebruik van de AUX-ingang (3,5mm-audio-ingang)
Hiervoor hebt u een 3,5mm-audiokabel nodig (niet bij de levering inbegrepen).
1. Sluit een 3,5mm-audiokabel aan op de AUX-ingang (AUX IN) van de geluidsinstallatie
en op de audio-uitgang of de hoofdtelefoonbus van een mediaplayer.
2. Schakel de luidspreker in, druk op SOURCE (bron) en kies AUX.
3. Kies een audio track via de bedieningselementen van het aangesloten apparaat en start de weergave.
FM-RADIO/ZENDERZOEKFUNCTIE/ZENDERGEHEUGEN
Deze geluidsinstallatie is uitgerust met een interne FM-radioantenne. Pas de positie van uw geluidsinstallatie aan ter verbetering van de radio-ontvangst.
USB-PLAYER
1. Druk op SOURCE (bron) en selecteer ‚USB‘. De USB-indicator licht op.
2. Plaats de USB-stick in de USB-port aan de voorzijde van de geluidsinstallatie. De inhoud van de USB-stick wordt automatisch afgespeeld.
3. Druk tijdens de weergave van de USB-inhoud op de toets PAIR/SCAN (koppeling/zenderzoekfunctie/weergave/pauze) om de USB-weergave te pauzeren.
Druk de toets opnieuw in om de weergave weer te starten.
4. Door het indrukken van de toets >>| / TUN+ of |<< /TUN- springt u naar de eerstvolgende of vorige track.
5. Om binnen een track snel naar een bepaalde passage te zoeken, drukt u op de toets >>| / TUN+ of |<< /TUN- en houdt deze ingedrukt.
WAARSCHUWING! Voorkom elektrische schokken en open nooit de afdekking (of de achterzijde). Dit toestel bevat geen onderdelen die
door de gebruiker kunnen worden onderhouden. Laat onderhoudswerkzaamheden alléén uitvoeren door vakpersoneel.
Het uitroepteken in een gelijkzijdige driehoek wijst de gebruiker op belangrijke bedienings- en onderhoudsinstructies in de documentatie bij
het toestel.
De bliksemschicht in een gelijkzijdige driehoek waarschuwt de gebruiker voor niet-geïsoleerde, gevaarlijke spanning in de behuizing van het
toestel. Deze kan namelijk zo hoog zijn dat zij voor mensen gevaarlijke elektrische schokken kan veroorzaken.
Dit symbool geeft aan dat dit toestel een dubbele isolatie heeft tussen gevaarlijke hoogspanningsonderdelen en de voor de gebruiker
toegankelijke onderdelen.
POWER
LIGHT
REPEAT
SCAN
USB REPEAT
STANDBY
10+
Bedieningspaneel (voorzijde)
SOURCE/LIGHT (bron/licht)
Om een bron te selecteren, drukt u op: BT, FM of AUX.
Houd deze toets twee seconden lang ingedrukt om
het licht in of uit te schakelen.
10+/REPEAT (10+/herhalen)
In de USB-modus springt u door het indrukken
van deze toets tien tracks vooruit. Houd deze toets
in de USB-modus twee seconden ingedrukt om
voor de actuele track ‚Repeat 1‘ (herhalen 1),
‚All‘ (alle) of ‚normaal‘ in te stellen.
STAND-BY
Druk na het inschakelen van de netschakelaar
deze toets in om het toestel in te schakelen.
POWER (netschakelaar)
Met deze schakelaar schakelt
u de stroomtoevoer naar het
toestel in of uit.
MIC VOL
(geluidssterkte microfoon)
Draai aan de toets om de
geluidssterkte van de
microfoon te regelen.
DC IN (gelijkstroomingang)
AUX IN (AUX-ingang)
(3,5mm-audio-ingang)
MASTER VOL (geluids-
sterkte luidspreker)
Draaien om de geluids-
sterkte te verhogen of te
verminderen.
MIC 1, 2
(microfooningang 1, 2)
LEDINDICATOR
STAND-BY
USB-port
TUN+/− (springen/zoeken/instellen)
Door het indrukken van deze toets springt u tussen
tracks. In de FM-modus schakelt u met deze toets in
volgorde door het zendergeheugen.
PAIR/SCAN (koppeling/weergave/pauze/
zenderzoekfunctie)
Druk deze toets in om een audiotrack weer te
geven/ te pauzeren. In de BT-modus houdt u deze
toets twee seconden lang ingedrukt om met het
koppelen te beginnen. In de FM-modus houdt u
deze toets ingedrukt om naar alle beschikbare
zenders te zoeken.
TREBLE
(hoogteregelaar)
ECHO
(echoregelaar microfoon)
BASS
(diepteregelaar)
MICROFOONS
Bij de levering zijn 2 microfoons inbegrepen. Daarvoor bevinden zich aan het apparaat 2 microfoon-ingangen.
1. Sluit de klinkstekker van de microfoon (6,3 mm) aan op de microfoonbus.
2. Draai de regelaar voor de geluidssterkte naar minstens het minimum.
De microfoon is nu gereed voor gebruik.
3. Via de regelaar voor de geluidssterkte van de microfoon
kunt u de microfoon harder of zachter instellen.
4. Desgewenst kunt u de echofunctie via de echoregelaar inschakelen en instellen.
Op de microfoon-ingangen kunnen ook e-gitaren met een 6,3 mm klinkstekker worden aangesloten.
De bediening en de regeling van de geluidssterkte is identiek aan die voor de microfoons.
Denk er bij het gebruik van e-gitaren wel aan om de geluidssterkte slechts heel voorzichtig te verhogen.
Jako-o GmbH verklaart hierbij dat dit Bluetooth apparaat in overeenkomst is met de essentiële vereisten en andere relevante bepalingen van de Richtlijn 2014/53/EG.
Er kan een kopie van de Conformiteitsverklaring worden verkregen op de volgende locatie: Jako-o GmbH, August-Grosch-Str. 28-38, 96476 Bad Rodach/Germany
NL ZENDERS OPSLAAN
1. Druk op SOURCE (bron) en selecteer de FM-modus.
2. Houd de toets SCAN (zender zoeken) twee tot drie seconden lang ingedrukt.
De geluidsinstallatie zoekt nu automatisch alle beschikbare zenders (P01-P20) en slaat deze op.
GEHEUGENPLAATS INSTELLEN
1. Druk op de toets TUN+ of TUN− en kies een geheugenplaats tussen P01 en P20.
HANDMATIG INSTELLEN
1. Voor het instellen van een bepaalde zender drukt u eenmaal op SCAN. De weergave begint te knipperen.
2. Druk op TUN+ of TUN− en stel de zender handmatig in.
STROOMVOORZIENING EN LADEN VAN DE ACCU
Hiervoor hebt u een netadapter nodig (bij de levering inbegrepen).
Sluit de bij de levering inbegrepen netadapter aan op een normale wandcontactdoos
en op de gelijkstroomingang (DC IN) van de geluidsinstallatie.
Het laadlampje (CHARGE) onder de ledindicator brandt rood tijdens het laden van de accu.
Zodra de accu volledig is opgeladen, verandert de kleur in groen.
Bij lage accuspanning knippert het laadlampje rood.
INSCHAKELEN
Druk op de netschakelaar (POWER) om de stroomtoevoer naar de geluidsinstallatie in te schakelen.
De geluidsinstallatie start op in de STAND-BY-modus.
Zodra de geluidsinstallatie op STAND BY staat, drukt u op om haar in te schakelen.

POWER
LIGHT
REPEAT
SCAN
USB REPEAT
STANDBY
10+
IT
BLUETOOTH
Accoppiamento (pairing) con un dispositivo Bluetooth e riproduzione audio.
1. Premete SOURCE (sorgente) e selezionate bt. L‘indicatore Bluetooth si illumina.
2. Per avviare l‘accoppiamento, premete e tenete premuto il tasto PAIR (accoppiamento/riproduzione/pausa). Bt nell‘indicatore a LED
comincia a lampeggiare velocemente. Durante l‘accoppiamento mantenetevi a una distanza di 90 cm dall‘altoparlante.
3. Con i comandi del vostro dispositivo Bluetooth cercate „MA113“ fra le impostazi - oni e selezionatelo per effettuare l‘accoppiamento. Se il vostro dispositivo Bluetooth
richiede una password, inserite la password standard 0 0 0 0. Seguite le indicazioni contenute nelle istruzioni per l‘uso del vostro dispositivo. Bluetooth su come
accoppiare e collegare i dispositivi Bluetooth.
4. Se i dispositivi sono stati accoppiati, „bt“ nell‘indicatore a LED smette di l ampeggiare. L‘altoparlante emette un segnale sonoro.
5. Selezionate una traccia audio utilizzando i comandi del dispositivo Bluetooth collegato.
6. Le riproduzioni audio che vengono effettuate con il dispositivo Bluetooth collegato adesso possono essere ascoltate attraverso l‘altoparlante. Riproduzione, pause e
volume possono essere regolati con i comandi dell‘impianto audio o con quelli del vostro dispositivo Bluetooth. Dopo l‘accoppiamento iniziale l‘impianto audio rimane
accoppiato finché l‘accop- piamento non viene annullato manualmente dall‘utente oppure finché il dispositivo Bluetooth non viene cancellato resettando (Reset). Se l‘ac-
coppiamento del vostro dispositivo Bluetooth è stato annullato o se verificate che il dispositivo Bluetooth non si è collegato, ripetete i passaggi sopra descritti.
INGRESSO AUX
Utilizzo dell‘ingresso AUX (ingresso audio 3,5 mm)
È necessario un cavo audio da 3,5 mm (non compreso nella fornitura).
1. Collegate un cavo audio da 3,5 mm all‘ingresso AUX (AUX IN) dell‘impianto audio e
all‘uscita audio o alla presa delle cuffie di un lettore multimediale (Media Players).
2. Accendete l‘altoparlante premendo il tasto SOURCE (sorgente) e selezionate AUX.
3. Utilizzando i comandi del dispositivo collegato selezionate una traccia audio e cominciate la riproduzione.
Pannello di controllo (davanti)
SOURCE/LIGHT (sorgente/luce)
Premete questo tasto per scegliere
una sorgente: BT, FM oppure Aux.
Per accendere o spegnere la luce, premete e
tenete premuto questo tasto per due secondi.
10+/REPEAT (10+/ripetere)
Nella modalità USB premendo questo
tasto saltate di dieci tracce in avanti.
Nella modalità USB premete e tenete premuto questo
tasto per due secondi per impostare la traccia su
„Repeat 1“ (ripetere 1“), „All“ (tutto“) o „Normal“.
STANDBY
Dopo l‘avvio dell‘interruttore di rete, premete
questo tasto per accendere l‘apparecchio.
POWER (interruttore di rete)
Con questo interruttore avviate
o interrompete l‘erogazione di
corrente all‘apparecchio.
MIC VOL
(volume del microfono)
Girare per regolare il
volume del microfono.
DC IN (ingresso a
corrente continua)
AUX IN (entrata AUX)
(entrata audio 3,5 mm)
MASTER VOL
(volume altoparlante)
Girare per aumentare o
diminuire il volume.
MIC 1, 2 (ingresso
microfono 1, 2)
INDICATORE A LED
STANDBY
Porta USB
TUN+/− (saltare/cercare/sintonizzare)
Premendo questo tasto saltate fra le tracce.
In modalità FM con questo tasto scorrete fra le
stazioni radio preselezionate.
PAIR/SCAN (accoppiamento/riproduzione/
pausa/ricerca stazioni radio)
Premete questo tasto per riprodurre/
mettere in pausa una traccia audio.
In modalità BT premete e tenete premuto questo
tasto per due secondi per iniziare l‘accoppiamento.
In modalità FM premete e tenete premuto questo
tasto per cercare tutte le stazioni radio disponibili.
EROGAZIONE DI CORRENTE E CARICA
È necessario un alimentatore (compreso nella fornitura).
UInserite l‘alimentatore compreso nella fornitura in una normale presa
a muro e nell‘ingresso a corrente continua (DC IN) dell‘impianto audio.
Quando la batteria è in carica, l‘indicatore di carica (CHARGE) al di sotto dell‘indicatore a LED si
illumina di rosso. Quando la batteria è completamente carica, l‘indicatore di carica diventa verde.
In caso di batteria poco carica, l‘indicatore di carica lampeggia di rosso.
ACCENSIONE
Per avviare l‘alimentazione di corrente dell‘impianto audio, premete l‘interruttore di rete (POWER).
L‘impianto audio viene avviato in modalità STANDBY. Se l‘impianto audio si trova in modalità STANDBY,
per accenderlo premete .
TREBLE
(regolazione dei toni alti)
ECHO
(regolazione eco microfono) BASS
(regolazione dei toni bassi)
IT
MICROFONI
Nella fornitura sono inclusi 2 microfoni, ai quali sono destinati 2 ingressi sull‘apparecchio.
1. Inserite il jack del microfono (6,3 mm) nella presa del microfono.
2. Girate il regolatore dell‘audio degli altoparlanti almeno sul minimo. Ora il microfono è pronto all‘uso.
3. Utilizzando il regolatore dell‘audio del microfono potete regolare
il volume del microfono a un livello più alto o più basso.
4. A scelta è possibile attivare e regolare la funzione eco attraverso il regolatore dell‘eco.
Alle entrate dei microfoni possono anche essere collegate delle chitarre elettriche con un jack da 6,3 mm. Il
funzionamento e la regolazione dell‘audio avvengono come descritto per i microfoni. In caso di utilizzo con
chitarre elettriche vi preghiamo di aumentare il volume con cautela.
Jako-o GmbH attesta che questo dispositivo Bluetooth è conforme ai requisiti essenziali e alle altre disposizioni pertinenti della direttiva 2014/53/CE. Una copia della
dichiarazione di conformità è disponibile al seguente indirizzo: Jako-o GmbH, August-Grosch-Str. 28-38, 96476 Bad Rodach/Germany
Importanti indicazioni relative alla sicurezza
• Leggete queste istruzioni.
• Conservate queste istruzioni.
• Rispettate tutte le avvertenze.
• Seguite tutte le istruzioni.
• Non utilizzate questo apparecchio vicino all‘acqua.
• Per pulirlo utilizzate solo un panno asciutto.
• Non bloccate le aperture di ventilazione. Collegate il prodotto in conformità alle istruzioni del produttore.
• Non collegate il prodotto nei pressi di fonti di calore come caloriferi, griglie di aerazione, stufe o altri
dispositivi che producono calore (inclusi gli amplificatori).
• Disponete il cavo così che nessuno lo possa calpestare e in modo che non si pieghi – in particolare nei pressi di spine,
connettori e nel punto in cui esce dall‘apparecchio.
• Utilizzate solo componenti/accessori forniti dal produttore.
• In caso di temporale o se non lo utilizzate per un lungo periodo di tempo staccate questo apparecchio dalla rete.
• Fate eseguire tutti i lavori di manutenzione da personale specializzato. I lavori di manutenzione sono necessari se l‘apparecchio è stato danneggi- ato,
ad es. se il cavo di rete o la spina sono danneggiati, se vi è stato versato un liquido o se un corpo estraneo è entrato nell‘apparecchio, se‘ l‘apparecchio
è stato esposto a pioggia o umidità, se non funziona normalmente o se è caduto.
• Utilizzate l‘apparecchio solo con una base trolley indicata dal produttore o con quella venduta con l‘apparecchio. In caso di utilizzo di un carrello
muovete quest‘ultimo e l‘apparecchio con cautela per evitare lesioni causate da ribaltamento.
Altre avvertenze e misure di sicurezza
•ATTENZIONE: PER EVITARE SCOSSE ELETTRICHE, DISPONETE IL CONTATTO LARGO DELLA SPINA
SULL‘APERTURA LARGA NELLA PRESA DI CORRENTE E INSERITE COMPLETAMENTE I CONTATTI.
•AVVERTENZA: Per diminuire il rischio di incendio o scossa elettrica, non esponete questo prodotto
a pioggia, umidità, gocciolamento o spruzzi d‘acqua.
•ATTENZIONE: Se i comandi o le impostazioni vengono utilizzati diversamente da come indicato o se vengono
utilizzate procedure diverse da quelle specificate, può verificarsi l‘emissione di un‘irradiazione pericolosa per la salute.
•AVVERTENZA: In caso di cambiamenti o modifiche apportate a questo apparecchio non espressamente autorizzate
dall‘autorità responsabile per la conformità, il diritto dell‘utente di utilizzare l‘apparecchio potrebbe decadere.
•AVVERTENZA: Non posizionate questo apparecchio direttamente su un mobile con una superficie morbida, porosa o delicata. Come ogni composto
di gomma contente oli, i piedini potrebbero lasciare segni o macchie di colore sulla superficie su cui sono appoggiati. Consigliamo dunque di disporre
una barriera protettiva, come ad es. un pezzo di stoffa o di vetro, fra l‘apparecchio e la superficie del mobile al fine di ridurre il rischio di
danneggiamento e/o macchie di colore.
•AVVERTENZA: Se questo prodotto viene collocato nelle vicinanze di lampade fluorescenti, il comando a distanza può risultare disturbato.
Se il prodotto reagisce in modo impreciso ai comandi a distanza, collocatelo in un luogo dove non sia disturbato da lampade fluorescenti,
poiché queste possono essere la causa di tale disguido.
•AVVERTENZA: Pericolo di scossa elettrica – non aprire.
•Le avvertenze relative alla sicurezza e l‘etichettatura si trovano dietro o sotto l‘apparecchio.
• Oggetti con liquidi come ad es. vasi non devono essere collocati sull‘apparecchio.
• La spina serve per interrompere l‘erogazione di corrente e durante l‘utilizzo deve essere sempre accessibile.
Per scollegare del tutto l‘apparecchio dalla rete, la spina deve essere completamente staccata dalla presa elettrica.
• La batteria non deve essere esposta a calore eccessivo come ad es. raggi solari, fuoco o altro. La batteria non è scambiabile!
RADIO FM/RICERCA STAZIONI RADIO/DOVE MEMORIZZARE LE STAZIONI RADIO
Questo impianto audio è dotato di un‘antenna radio FM interna. Per migliorare la ricezione radio modificate la posizione dell‘impianto audio.
USB PLAYER
1. Premete SOURCE (sorgente) e selezionate USB. L‘indicatore USB si illumina.
2. Infilate la chiavetta USB nella porta USB posta sul lato anteriore dell‘impianto audio. La chiavetta USB viene riprodotta automaticamente.
3. Per mettere in pausa la riproduzione della chiavetta USB, durante la riproduzione della stessa premete il tasto PAIR/SCAN (accoppiamento/
ricerca stazioni radio/ riproduzione/pausa). Per riprendere la riproduzione, premete nuovamente il tasto.
4. Premendo il tasto >>| / TUN+ oppure |<< /TUN- potete passare alla traccia successiva o a quella precedente.
5. Se desiderate cercare un particolare passaggio di una traccia, premente e tenete premuto il tasto >>| / TUN+ o |<< /TUN-.
AVVERTENZA: Per diminuire il rischio di scossa elettrica, non aprite la copertura (o il retro). Nell‘apparecchio non si trovano
parti che possono essere aggiustate dall‘utente. Fate eseguire i lavori di manutenzione da personale specializzato.
Il punto esclamativo in un triangolo equilatero deve attirare l‘attenzione dell‘utente su importanti avvertenze relative all‘uso e
alla manutenzione presenti nella documentazione dell‘apparecchio.
Il fulmine con la punta a forma di freccia in un triangolo equilatero deve avvertire l‘utente della presenza nell‘alloggiamento del prodotto
di una „tensione pericolosa“ non isolata. Essa può essere tanto alta da costituire un pericolo di folgorazione per le persone.
Questo simbolo indica che questo prodotto presenta un doppio isolamento fra parti pericolose sottoposte ad alta tensione e le parti
accessibili all‘utente.
ATTENTION
CAUTION
MEMORIZZARE LE STAZIONI RADIO
1. Premete SOURCE (sorgente) e selezionate la modalità FM.
2. Premete e tenete premuto per due/tre secondi SCAN (ricerca stazioni radio). L‘impianto audio cerca e memorizza automaticamente tutte le stazioni radio disponibili (P01-P20).
SINTONIZZARE UNA STAZIONE RADIO MEMORIZZATA
1. Premete il tasto TUN+ o TUN− e selezionate da P01 a P20.
SINTONIZZARE MANUALMENTE
1. Per sintonizzare una particolare stazione radio, premete SCAN una volta. L‘indicatore comincia a lampeggiare.
2. Premete TUN+ o TUN− e sintonizzate la stazione radio manualmente.

Die Montage- und Installationsanleitung für spätere Verwendung aufbewahren
Information to keep the assembly and installation instructions for further reference
Conserver les instructions de montage et d‘installation pour les consulter ultérieurement
Bewaar de montage- en installatiehandleiding om deze, zo nodig, later nog te kunnen raadplegen
Conservare le istruzioni di montaggio e installazione per riferimento future
Förvara monterings- och bruksanvisning för senare tillfälle
Instrukcję montażu i instalacji należy zachować
Made in China
Other manuals for 140-334
1
Table of contents
Languages:
Other JAKO-O Speakers System manuals
Popular Speakers System manuals by other brands

Aiwa
Aiwa TS-W45 operating instructions

Electro-Voice
Electro-Voice S-60A Specification sheet

Definitive Technology
Definitive Technology ProCenter 1000 owner's manual

Creative
Creative Inspire T7700 quick start guide

Canton
Canton Digital Movie DM 90.2 operating instructions

Electro-Voice
Electro-Voice TL15-1XS Brochure & specs