JamHub BedRoom User manual

Owner’s Manual
TourBus
GreenRoom
BedRoom
Remember to visit JamHub.com for the latest news and updates.

3
Owner’s Manual Introduction
Thanks for buying the JamHub™ silent rehearsal studio. And congratulations because now you and your band can jam anywhere,
anytime you want without disturbing the peace.
The JamHub team is made up of musicians and non-musicians who are equally passionate about making great quality products and
servicing them well.
To learn more about our products or the JamHub story, check out www.JamHub.com. While there, you can connect with other
musicians who own JamHubs or anyone on the JamHub team, including the inventor. Plus, you’ll learn plenty of tips and tricks for
getting the most out of this unique piece of gear.
At JamHub, we want to do everything possible to inspire you to play more music, create more music, and have more fun doing it.
Isn’t that what being a musician is all about?
Owner’s Manual: a new approach
Owners’ manuals are funny things. They are oen written for -and by- “le brain” analytical types. Yet they most benefit “right
brain” creative people who usually disregard them. So we decided to try something dierent. Since musicians are le and right brain
individuals, why not design a manual that will satisfy both.
Le Brain: analytical, verbal, numeric Right Brain: creative, visual, emotional
On this side of the page you’ll find things On this side of the page you’ll find things
that are more le brain targeted, like: that are more right brain targeted, like:
• Numbers • Feature benefits
• Specs • Tips and tricks
• Feature descriptions • Connecting to other gear
• Cold hard facts
How to make the most of this document
Le and Right Brain: Read the JamHub Quick Start Guide twice and you’ll be 90% of the way there. You should also thoroughly
understand the “Connections” and “Setting the Levels” sections. If you know this stu cold, you’ll always have a great jam session.
If you don’t, you could be frustrated at times. All musicians need to understand setting levels. You’ll need it for recording, live
performances and for JamHub rehearsals. It’s easy stu and essential to having a great jam
session. So please learn it.
GreenRoom
model shown
JamHub®Studio Safety Guide
This Safety Guide contains important safety and handling information for JamHub.
Handling JamHub and Using Power Supply Cord
Do not bend, drop, crush, puncture, incinerate or open JamHub. Power supply cords should be routed so that they are not likely
to be walked on or pinched by items placed upon or against them.
Water and Moisture JamHub should not be used near water (e.g. near a bathtub, washbowl, kitchen sink,
laundry tub, in a wet basement, or near a swimming pool, etc.). Do not use JamHub in rain.
Take care not to spill any food or liquid into or onto JamHub.
Non-use Periods The power cord of the JamHub should be unplugged from the outlet when le unused for a long
period of time.
Use of Power Adapter The JamHub Power Adapter may become warm during normal use. Always allow adequate
ventilation around the JamHub Power Adapter and use care when handling. Unplug the JamHub
Power Adapter if any of the following conditions exist:
• The power cord or plug has become frayed or damaged.
• The adapter is exposed to rain, liquids, or excessive moisture.
• The adapter case has become damaged.
• You suspect the adapter needs service or repair.
• You want to clean the adapter.
Avoiding hearing damage Permanent hearing loss may occur if headphones are used at high volume. If you experience ringing
in your ears or muled speech, stop listening and have your hearing checked. The louder the volume,
the less time is required before your hearing could be aected. Hearing experts suggest that
to protect your hearing you should limit the amount of time you use headphones at high volume.
Heat and Ventilation JamHub should be situated away from heat sources such as radiators, heat registers, stoves,
or other appliances (including amplifiers) that produce heat, and in a manner that allows for
proper ventilation.
Cleaning JamHub should be cleaned with a so, damp cloth.
Damage requiring service Never attempt to repair JamHub yourself. JamHub does not contain any user-serviceable parts.
For service information, go to www.JamHub.com. JamHub should be serviced by qualified service
personnel when:
• the power cord or the plug has been damaged; or
• objects have fallen, or liquid has been spilled into JamHub; or
• JamHub has been exposed to rain or moisture; or
• JamHub does not appear to operate normally or exhibits a marked change
in performance; or
• JamHub has been dropped, or the enclosure has been damaged.
Read all safety information below and operating instructions before using JamHub to avoid
injury. For detailed operating instructions, see the User Guide that follows this Safety Guide.
Failure to follow these safety instructions could result in fire,
electric shock, or other injury or damage.
WARNING:
2

4 5
Table of Contents
Contents
Safety Warning...............................................................................................................................................................................2
Introduction ..................................................................................................................................................................................3
a new approach..................................................................................................................................................................3
How to Make the Most of this Document.....................................................................................................................................3
What is it?.......................................................................................................................................................................................4
Getting Started: an overview........................................................................................................................................................ 6
Step 1: turn down knobs............................................................................................................................................................... 6
Step 2: connections.......................................................................................................................................................................7
Step 3: setting trim levels .............................................................................................................................................................8
Step 4: using stage control............................................................................................................................................................8
Step 5: adjusting headphone volume ..........................................................................................................................................9
Step 6: using the SoleMix™ control section.............................................................................................................................9,10
Step 7: setting up the SoleMix remote .......................................................................................................................................11
SoleMix controls: a closer look................................................................................................................................................... 12
What’s up with the “R” section........................................................................................................................................12
Using the 1-R switch ........................................................................................................................................................13
Eects engine and settings..............................................................................................................................................13
Guide to the eects engine..............................................................................................................................................14
JamHub Model Comparisons ..................................................................................................................................................... 15
Useful Diagrams .....................................................................................................................................................................15,16
Hook-up diagrams ........................................................................................................................................................... 15
Ins and Outs diagrams..................................................................................................................................................... 16
Trim Controls: a detailed review.................................................................................................................................................17
Additional GreenRoom and TourBus Features
Phantom Power ...............................................................................................................................................................17
Additional TourBus Features: Recording ................................................................................................................................... 18
Menu Structure and So Keys.........................................................................................................................................18
Home Menu ...................................................................................................................................................................... 19
Metronome Functions......................................................................................................................................................19
UTIL Menu.........................................................................................................................................................................19
Directory........................................................................................................................................................................... 20
Mark and Delete Mark Functions.....................................................................................................................................20
Summary .....................................................................................................................................................................................20
FAQs ............................................................................................................................................................................21,22
Other things to know ....................................................................................................................................................... 22
Warranty ......................................................................................................................................................................................23
JamHub – What is it?
Left Brain:
The Table of Contents below will help guide you through
each section of the manual and get you to things quickly and
eiciently.
Right Brain:
The Table of Contents below is probably not necessary
because we know you’re just going to flip through the
manual until you find the picture you think best answers your
question. That’s why we included so many illustrations.
Le Brain:
A JamHub is a multi-input device designed specifically
to allow musicians to jam or rehearse quietly and play more
oen. This can have many benefits, like improving the band’s
skills very quickly. Scientific studies show that
better quality practicing leads to faster skills development.
So why not make it the best rehearsal possible.
Simply plug in your practice gear, like a modeling amp,
a keyboard with a headphone jack, your microphone, and your
headphones. Have your bandmates do the same.
Once everyone sets their own mix, you’re ready to go.
You’ll find with JamHub that you can play longer without
disturbing others and without burning out your ears
(as long as you keep the headphones at a reasonable level).
Most importantly, because there aren’t several loud amps in a
small room muddying up the music, the clarity of your jam is
greatly enhanced and rehearsals much more productive.
Lastly, with the JamHub’s SoleMix™ controls, you control what
you hear. So volume wars are a thing of the past.
Bass player too loud? Just reach over to your JamHub section
and turn him/her down. And the bass player can turn up the
drums and turn down your guitar so he/she can lock into the
groove. Everyone hears what they want and need
to hear to improve faster.
Right Brain:
A JamHub lets you jam with your band or other
bands anywhere, anytime in virtual silence. And the
experience rocks. Each musician picks a color section and
plugs in their instruments, mics and headphones, then,
using their section’s SoleMix controls, creates
their own perfect mix. For the first time ever, you’ll hear
yourself with amazing new clarity and no more volume
wars. So, not only will you be jamming more oen, but you’ll
also be getting better faster and working out totally new
arrangements to the same old songs.

6 7
Step 2: Connections
1. Plug in the power adapter. The blue LED light tells you when the JamHub is ready.
2. Pick a section to call your own.
3. Plug in your instrument with a Stereo (TRS) cable. Use your instrument’s or amp’s headphone jack for best sounding results.
4. Plug in a microphone.
5. Plug in your headphones.
6. Tell your bandmates to follow steps 2 through 5.
7. OK, you’re almost ready to rock. But first some very important info:
IMPORTANT! Connect your instruments with a stereo instrument cable or stereo adapter!
When hooking up your instrument it’s important to use a stereo cable. The JamHub is a stereo environment, just like the real
world, where you use two ears every day. Because your instrument’s output oen includes reverb and other stereo eects,
we designed the JamHub to take that signal and make the listening experience great for each musician. If you use a mono cable,
like a standard guitar cable, you’ll be 100% in the le ear because of the way a mono cable works with a stereo jack. You can use
the included mono 1/4” female to stereo 1/4” male adapter if you need to use a mono cable.
Getting Started
Step 1: Turn down all knobs
instrument input headphone input
mic input
Mono
Stereo
SoleMix™
controls
instrument
input
power
connector
remote
connector
remote
connector
USB
connector*
phantom
power switch*
SD RAM
card slot**
R section
instrument jack
R section
mic jack
R section
headphone jack
mic input
mic input
trim control
input trim
LED
eects
return control
headphone
volume control
eect type
selector
phantom
power LED*
stage
control
power LED
headphone
jack
instrument input
trim control
Left Brain:
Turn all the knobs on the JamHub to zero (100%
counterclockwise) to protect the device and your
headphones from grounding and connection pops.
Right Brain:
Protect your ears and your gear: turn all knobs down on every
section of the JamHub before putting on the headphones.
Okay, do this NOW.
*GreeRoom and TourBus models only
**TourBus only

8 9
Step 5: Turn up the headphone volume
(A plea from the JamHub inventor: Please be careful with your hearing. Burning out your ears is dumb. It’s kind of like a guitar
player clipping o his fingers little by little. They can’t grow back. And trust us, you’re going to want to keep playing for a long,
long time.)
Step 3: Setting the trim levels
1. Use the double knob called “trim” to set your input gain (note: you don’t need to put on headphones to do this step). Use the light
under the dual trim knobs to get this right.
2. Speak into the mic and turn the outer/bottom knob up (clockwise) until the LED turns yellow. Then turn it back a little.
3. Play your instrument and turn the inner/top knob up (clockwise) until the LED turns yellow. Then turn it back a little.
4. Watch your trim settings throughout the jam session. Sometimes input levels can change as the band gets warmed up. Use the table
below as your guide.
In summary
Step 4: Pick a virtual location with the stage control
Left Brain:
Start with the headphone output control at zero (100%
counterclockwise) and slowly turn it up. Because every
section of the JamHub has its own individual mix, output
levels will vary even before they get to the headphone amps.
So start low and turn up slowly. Also remember headphones
have a wide variety of impedances. While JamHub is designed
to handle them all, the setting of each headphone volume
knob is going to be dierent.
Right Brain:
Don’t burn out your ears. Bring the volume up s-l-o-w-l-y.
Also, while the JamHub does work with most headphones,
it can’t make cheap or poor quality ones sound better.
Sorry, we’re gear makers not miracle workers.
Left Brain:
green = signal
yellow = near clipping (-6dB)
red = preamp clipping (+6dB)
Right Brain:
green = good
yellow = caution
red = bad
Left Brain:
The stage control is simply a pan or balance control to help
ensure that musicians don’t crowd the mix. Because our
hearing system has two receptors separated by about 6 inches
(your ears) we have the ability to perceive sounds coming
from dierent locations. Great audio engineers have known
for a long time that by “moving” things sonically to their own
location, our hearing system is optimized and we experience
greater clarity. (There’s a great article on Wikipedia about this
amazing property of our hearing system. Read all about it
@ http://en.wikipedia.org/wiki/Cocktail_party_eect)
Right Brain:
Does everyone in your band stand in the middle of the stage
when jamming? Of course not. So spread out sonically with
the Stage Control. The experience will be similar to what
happens when you’re playing live. You’ll hear things with
greater clarity and the jams will be more enjoyable. If you
want to understand why great recordings have instruments
panned to different locations, check out this article at
Wikipedia @http://en.wikipedia.org/wiki/Cocktail_party_
eect. Learning to spread out will help you as a band in the
studio as well.
trim
stage for
section 3
stage for
section 4
light

Step 6: Using the SoleMix control section
See the “Eects Section” for more information
10 11
Step 7: SoleMix remote setup
All JamHub models allow you to add a SoleMix remote. If you purchased a JamHub
GreenRoom or TourBus model, it is included. The BedRoom model has 1 SoleMix remote
connector. GreenRoom and TourBus both have 4. If you want to add one or more SoleMix
remotes to your JamHub system, they are available at your local authorized JamHub
dealer.
The SoleMix remote lets you create a unique mix for the output jack on the remote. Each
remote has its own headphone jack so you can have complete control over your mix and
output level with one cable from the JamHub main unit.
The SoleMix remote was created so that drummers, keyboard players and musicians who
are “stuck” behind their gear can make mix changes without moving to the JamHub main
unit. The remote acts just like the SoleMix section on the JamHub minus the input section
(input trims, jacks and stage control). Below is an illustration of a remote setup option.
You should now know enough to start jamming. But we encourage you to read the full manual. There are still a few things about your
JamHub that need to be explained. And don’t forget to visit the “Community” section at www.JamHub.com to let us know you’re out
there and learn about other JamHub owner experiences.
JamHub GreenRoom
JamHub
SoleMix Remote
Left Brain:
The SoleMix remote is its own output section that taps all
of the input busses. For example, a JamHub GreenRoom has
7 SoleMix sections on the main unit, plus one remote.
So there are 8 possible unique mixes right out of the box.
Should you buy three additional remotes, and maximize the
output capability of the GreenRoom model, you’ll have
7 output sections on the unit and 4 output sections via
remotes for a grand total of 11 potential mixes from one
JamHub. We believe that this capability will allow for a wide
array of setup options, giving you a lot of choices and capacity
for years to come.
Right Brain:
The SoleMix remote is like adding another “output mixer”
to the system; it’s a mixer without any inputs. And, you can
add a remote to any system.
(Note: Even though the SoleMix remote has 7 mix
controls like GreenRoom and TourBus, it works just
as well with BedRoom; audio controls 5 and 6 are
simply inactive.)
Eects return is located
under the headphone
volume on each
SoleMix section of the
JamHub’s main unit.
It’s also its own knob
on the SoleMix remote.
Want to hear less of the musician
in section 4? Turn down the #4 knob.
Want to hear more of the musician
in section 3? Turn up the #3 knob.
Left Brain:
Each SoleMix control section allows you to tap the many
stereo busses located within your JamHub, giving you an
exceptional level of control over what each musician hears
as their output mix.
Right Brain:
Each SoleMix control section is like an individual mixer.
You get to create the mix that’s right for you while the other
band members do the same. Think of the JamHub‘s output
controls as many mixers put together in one portable,
aordable unit. Each person controls their own mix and their
own creative space.
Want to hear more or less eects?
Turn the eects return knob up or down.

The 1 - R switch for auditing your recording mix
The 1 - R switch is for listening to the mixes coming from section 1 and the R section.
If you’re the person responsible for the recording mix, you’ll need to hear both the
R mix as well as your own mix on channel 1. So we designed the JamHub with
a handy little switch that allows you to quickly flip back and forth between these
two sections.
Eects engine and settings
The eects engine in your JamHub silent rehearsal studio allows you to create
a “room” inside the unit and decide how much of it you want to hear. Or, you can
try one of the pure eects like flanger or phaser for something a little dierent.
Each section, and each remote, can decide how much of the eects engine they
would like in their mix. It’s part of the SoleMix controls so that each player can decide
how much they want to “wet out” the vocals.
The eects engine is connected to the mic inputs only. We did this because most
modeling amps, keyboards and electronic drums have their own built-in eects.
If you’ve ever heard one reverb put on top of another reverb, you understand why
we avoided mixing the two.
12 13
Diving into the SoleMix controls
The SoleMix controls found on each JamHub section and on
the SoleMix remote are easy to understand and use once you
know the basic layout and design
of a JamHub system.
First, look at your JamHub from the top. You’ll see that there
are 4 or 6 numbered sections and they are color-coded. (We’ll
get to the “R” section in a minute, so hang in there.)
Typically you’ll want to use one section per musician. If you
are the guitar player, you connect your mic and amp modeling
device into section 1. Now everyone in the band can use their
SoleMix controls to balance your sound in their headphones
by simply turning up or down the control marked “1” on their
SoleMix section. The same applies to the “2”, “3” and “4”
controls.
And don’t forget about the eects return knob. This allows
you to decide how much of the eects engine you want to
hear. The “dry” signal comes through each person’s numbered
SoleMix controls and the “wet” signal comes through the “FX”
control (under the headphone volume).
What’s cool about a JamHub is that once you know one section
of the product, you know all the sections of the product.
Pretty easy, huh?
What’s up with the “R” section?
Here’s a little secret. The R section (for “rear” or “recording”) functions exactly the same as all the other SoleMix sections. While it may
look a little dierent, take a closer look. You’ll see that all the knobs are the same. The only dierence is how they are laid out on the
JamHub.
Want to jam along with your favorite tune, or need to learn a new song? Plug your MP3 player into the R section. Then each musician
can decide how much of the song to hear by turning up (or down) the R knob in their SoleMix section.
The R section is also designed for recording. Just like one musician’s mix is dierent from another’s, a recording mix is unique.
Can you use it for another musician? Sure! Remember, it is simply another section of the JamHub. But instead
of a number on the label, we put an R.
Just set up a computer or a portable recorder and create a mix for recording. Make sure whoever you want in charge of the recorded
mix is also plugged into section 1. Read on to find out why.
Left Brain:
The stereo eects engine is coupled to a set of 24-bit 48kHz
audio codecs to ensure great sound quality. The eects engine
has 16 preset algorithms which cover all of your basic needs
and a few unusual eects thrown in for fun. The codecs are
wide bandwidth (100dB) and low noise (s/n of 105dB).
Right Brain:
The eects options cover a variety of styles and lets each
musician use the eects knob to control how much or how
little of them they want to hear.
Left Brain:
This switch takes the output of the R section and redirects
it to section 1 headphone jack. When the switch is in the
1 position, the SoleMix output for section 1 is sent to the
headphone jack that is part of section 1. When the switch
is in the R position, the output that is being sent to the
R headphone jack is rerouted to the headphone jack in
section 1.
Right Brain:
If you’re in charge of the recording mix, you need to hear your
mix for playing and the mix for recording. To do this, you can
disconnect your headphones from your section’s headphone
jack and plug them into the R section’s headphone jack to
hear the recording mix. Or, make section 1 your mix, leave
your headphones plugged in, and use the 1—R switch to
quickly alternate between your mix and the recording mix.
“R” section layout SoleMix section layout

14 15
Model Comparisons
Feature BedRoom GreenRoom TourBus
Audio channels 15 total – 5 stereo, 5 mic 21 total – 7 stereo, 7 mic 21 total – 7 stereo, 7 mic
Outputs 5 headphone 7 headphone
1 USB
7 headphone
1 USB
SoleMix remotes included None One Two
SoleMix remote connectors One Four Four
Phantom power No Yes Yes
Recording Analog via 1/4” jack Analog via 1/4” jack or
digital via USB
Analog via 1/4” jack or
digital via USB or
integrated recorder
Useful hook-up diagrams to review
(GreenRoom model shown)
Here’s the guide to the eects engine
in your JamHub silent rehearsal studio
Eects table
Dial Location Name of eect Description Le Brain Right Brain
A Slap D Slap-back Delay A delay that represents
a room with a hard wall at the
opposite end.
For that Rock-a-billy sound.
B Ping D Ping Pong Delay Your JamHub is a full stereo
device and this ping pong
delay takes advantage
of that.
Delays in stereo, very nice. Listen
to it with both ears.
C Big Big Ambiance A big room with a fair amount
of reflections.
This one has ambiance
in the name. Hearing
is believing.
D Early Early Reflections A delay with a series of early
reflections.
A small, dead room with walls
close by.
E Chorus Chorus Pitch and time modulation to
create a sound that is some-
times called “larger” than the
dry signal.
A phaser and a flanger together
gives you a chorus like eect.
Check it out.
F Echo Echo A repeat of the original signal. Echo, echo, echo…
G Flanger Classic flanger eect Essentially a sweeping comb
filter where the original signal
is mixed with a time changing
original signal.
Flangers sound like a jet flyby. Try
it, you might
like it. But again, let’s
keep it limited to a song
or two, okay?
H Phaser Classic phase shiing eect Modulated peaks and
troughs.
(just like the classics)
Phaser eect for you vocals. Try it,
but only once in a while for eect.
I Spring Reverb Spring
(2.0 seconds)
2.0 seconds of reverb from a
spring reverb tank.
Spring reverbs on a mic? Why not?
And it won’t
crash the tank if you knock your
JamHub while using this setting.
J Chapel Reverb Chapel
(3.0 seconds)
3.0 seconds of reverb with
plenty of late reflections.
Reverb that’s between a church
and a big hall.
K Gated Reverb Gated
(0.8 seconds)
A gated reverb that’s 0.8
seconds long.
Adds a little bit of reverb without
making things sound too cluttered.
LReverse Reverb Reverse
(1.2 seconds)
A reverse reverb with 1.2
seconds of reverb time.
What? Reverse reverb? Okay, let’s
give it a try!
M Church Reverb Church
(7.0 seconds)
7.0 seconds of reverb with
a lot of late reflections.
Making music at church has never
been this easy.
N Med Reverb Room
(1.8 seconds)
1.8 seconds of reverb with
short early reflections.
Like playing a small room with
hard surfaces and more reflections.
O Hall Reverb Big Hall
(2.8 seconds)
2.8 seconds of reverb with
later reflections.
Like playing in a room that fits
300~500 people.
P Small Reverb Small Hall
(1.5 seconds)
1.5 seconds of reverb with
early reflections.
Like playing in a room that fits 100
people.
Musician #1
Section #1
Musician #2
Section #2
Musician #3
Section #5
Musician #4
Section #6
Musician #1
Section #1
Musician #2
Section #2
Musician #3
Sections #3 + #4
Musician #5
Section #6
Musician #4
Section #5
4 musicians
5 musicians
Note: for more control musician
#3 has split
instrument and vocals over two input sections.

A more detailed review of setting trim controls
A simple analogy for trim and headroom
Let’s think of music as a person bouncing up and down on a trampoline. They can bounce a small amount or a large amount.
This is “dynamics.” Sometimes we bounce low, sometimes high. Most musicians are always changing the “bounce” because most
songs have both so parts and loud parts.
Now let’s move that trampoline into a room with a ceiling. Ever heard of the term “headroom?” Well, headroom is the distance
between our head and the ceiling in our trampoline room. The ceiling isn’t moving, but we can raise and lower the trampoline
to give us more headroom, right? If our music is not very dynamic, that is our bounces are small, we need less headroom. If some
of our bounces are big, we’d better make sure the trampoline is far enough below the ceiling that when we bounce hard we don’t hit
our head and run out of headroom.
So how do we move the trampoline up or down? With the “trim” control. The trim control sets the trampoline higher or lower.
We can see how close we are getting to the ceiling by watching the LEDs: green = ok, yellow = getting close, red = bumping our heads.
Clipping is the term engineers use to describe when the amp is out of room (when our heads are bumping on the ceiling). It describes
what’s happening to the electrical signal. Our ears perceive clipping when we hear a sound that has been distorted or compressed.
With a guitar, distortion can sound good, but with vocals it usually does not sound good.
Signal to noise is the ratio of good stu to bad stu in your system. Signal is music. Noise is stu you don’t want. If we don’t get the
trim turned up as high as possible, then the noise that is in the atmosphere will start to be as loud as the music. Think of the noise as
the floor in our trampoline room. We want to be as far o the floor as possible, so we can really bounce high. If the trampoline is too
close to the floor, we’ll limit the quality of our jumps because our feet will hit the floor.
When setting up your trim levels, there are a few things to keep in mind. First, leave plenty of headroom so that as you get
going you won’t get distortion from the system. Ideally, when you set the maximum trim control, you should be playing at the loudest
volume. For example, a singer should not whisper in the mic to set the trim control, but sing as loud as possible. If they whisper, we’ll
set the trim (trampoline height) too high and run out of headroom the first time they yell “HEY”. Conversely, if they yell too loudly in
the mic, the trim control will be set too low. Then when our singer whispers, we won’t hear her above the rest of the instruments.
If you’re setting the trim for an instrument, leave room for solos. Your solo volume should be solid green with a little yellow in the LED.
Then turn yourself down a bit with your device’s foot pedal or volume control. That will leave room for you to jump to the top of the
mix when it’s time for a solo.
For a vocal mic, you can simply move away from the mic, or “back o” the mic, to lower the volume. You see the pros do this all the
time. It’s a great technique to know and is easy to learn, especially with a JamHub silent rehearsal studio.
We hope this section helped with the mystery of setting trim control. Over the years we’ve heard some crazy things about trim controls
like, “always set it to 9:00”.; “Keep it as low as possible”; “Set all inputs the same”; And worse. The truth is, there is no “magic setting”.
Every mic, instrument and piece of gear is dierent and needs its own unique setting. And even if your band has the exact same mic for
two singers, their individual voices are dierent. So they’ll need their own unique trim settings. Just follow the LED’s guidance, watch
the trim levels throughout the jam and you will be fine.
Additional GreenRoom and TourBus Features: Phantom Power
The GreenRoom and TourBus models both provide +48V phantom power for condenser mics. To turn it on, simply push on the button
found on the back of the unit and the red +48V LED will illuminate red.
What if only one person uses a condenser mic? No problem. Phantom power is for condenser mics, yet won’t damage dynamic mics.
Check out the Wikipedia.org article on how phantom power works if you want to learn more
@ http://en.wikipedia.org/wiki/Phantom_power.
16 17
For instrument connections please use a stereo cable or the
included mono-to-stereo adapter.
Left Brain:
As with other equipment (mixers, recording interfaces, some
old tube amps, etc.) getting the trim right matters. So we’ve
simplified things by using a familiar structure: green = signal,
yellow = warning, red = clipping. We believe it’s important to
understand gain structure and get it right every time. And it’s
applicable to nearly every piece of music gear you’ll own.
Right Brain:
Read below, this is just good stu to know for recording, live
sound and getting great sound into and out of your JamHub
silent rehearsal studio.
JamHub BedRoom
JamHub GreenRoom
JamHub TourBus
Stereo Adapter Mono Cable (acoustic guitar, mono bass, etc.)
Musician #1
Section #1
Musician #2
Section #2
Musician #3
Sections #4 + #5
Musician #4
Section #6
4 musicians
Note: this musician is playing guitar
and keyboard and uses two sections
Rear views

18 19
Home menu:
STOP @ or jam001.wav = current state of the recording device is “stop” at the time shown in the counter or the device shows
the filename of the current song, for example, jam007.wav
00:00:00 = the counter shows the current playback location in hours:minutes:seconds for the current song
Met -- metronome menu so key
Util -- utility menu so key
Dir -- directory menu so key
Mark or DelM -- mark a location while recording or “DelM” allows you to delete a marker
Metronome
Let’s go through the Metronome functions. Hit the lemost so key below “Met”.
The display now looks like this:
BPM=100 – This is the default tempo. You can change the tempo by pressing the so keys under the BPM indicator. The +key will
increase the tempo and the –key will decrease the tempo. The tempo range is 30 BPM to 240 BPM (just for you crazy
speed metal bands). If you hold the button down, the BPM advances faster. Or click the button to change the BPM
one increment at a time.
4/4 – This is the type of beat. You can change it to another type by hitting the “More” key. We’ll go into this in more
detail below.
More – This key is where you can change the beat type or you can tap in a tempo.
Tap – This button allows you to tap the tempo the metronome will follow. Simply tap in a tempo and the
JamHub metronome follows your lead and displays the current BPM. Hit the Esc button to return to
the Met main menu where you can fine tune the BPM using the +and –key.
Type – Hitting this key changes the beat type. There are 9 types of tempos in the JamHub metronome: 1/4, 2/4, 3/4, 4/4,
5/4(23), 5/4(32), 7/8(223), 7/8(232) and 7/8(322) where the numbers in the parenthesis disclose the accent beats
locations. Keep hitting Type to scroll through the options.
Esc – Takes you back to the prior menu.
Utility
Tread carefully here. You’ve got power in the Util menu, so use it wisely. There are three functions in the Util menu:
Format SD Card, Show Capacity and LCD Contrast. You can switch between them by using the +and –keys. Hit OK to enter the
selected function or Esc to exit.
Format SD Card – Use this function to rewrite an SD memory card that’s been damaged. This will wipe out all data on the
card and in the process may fix a card that has been damaged by a cell phone or magnet. Some damage
is irreparable, but the JamHub will do it’s best to fix the card if possible. Hit OK to reformat the card or Esc
to leave the Util menu.
Show Capacity – This function shows how much room is le on the SD card in Gigabytes and percentage used.
LCD Contrast – Hit the +and –key to change the contrast level of the LCD.
Additional TourBus features: recording functions
The JamHub TourBus model has the ability to record your jam sessions directly onto a removable SD RAM card. Once you’re done
jamming, you can play the recording back right from the TourBus, or simply take the SD RAM card to your computer and move the
files for sharing and reviewing with the band (or others). The TourBus recordings are stereo and written in CD quality audio (16-bit
44.1kHz).
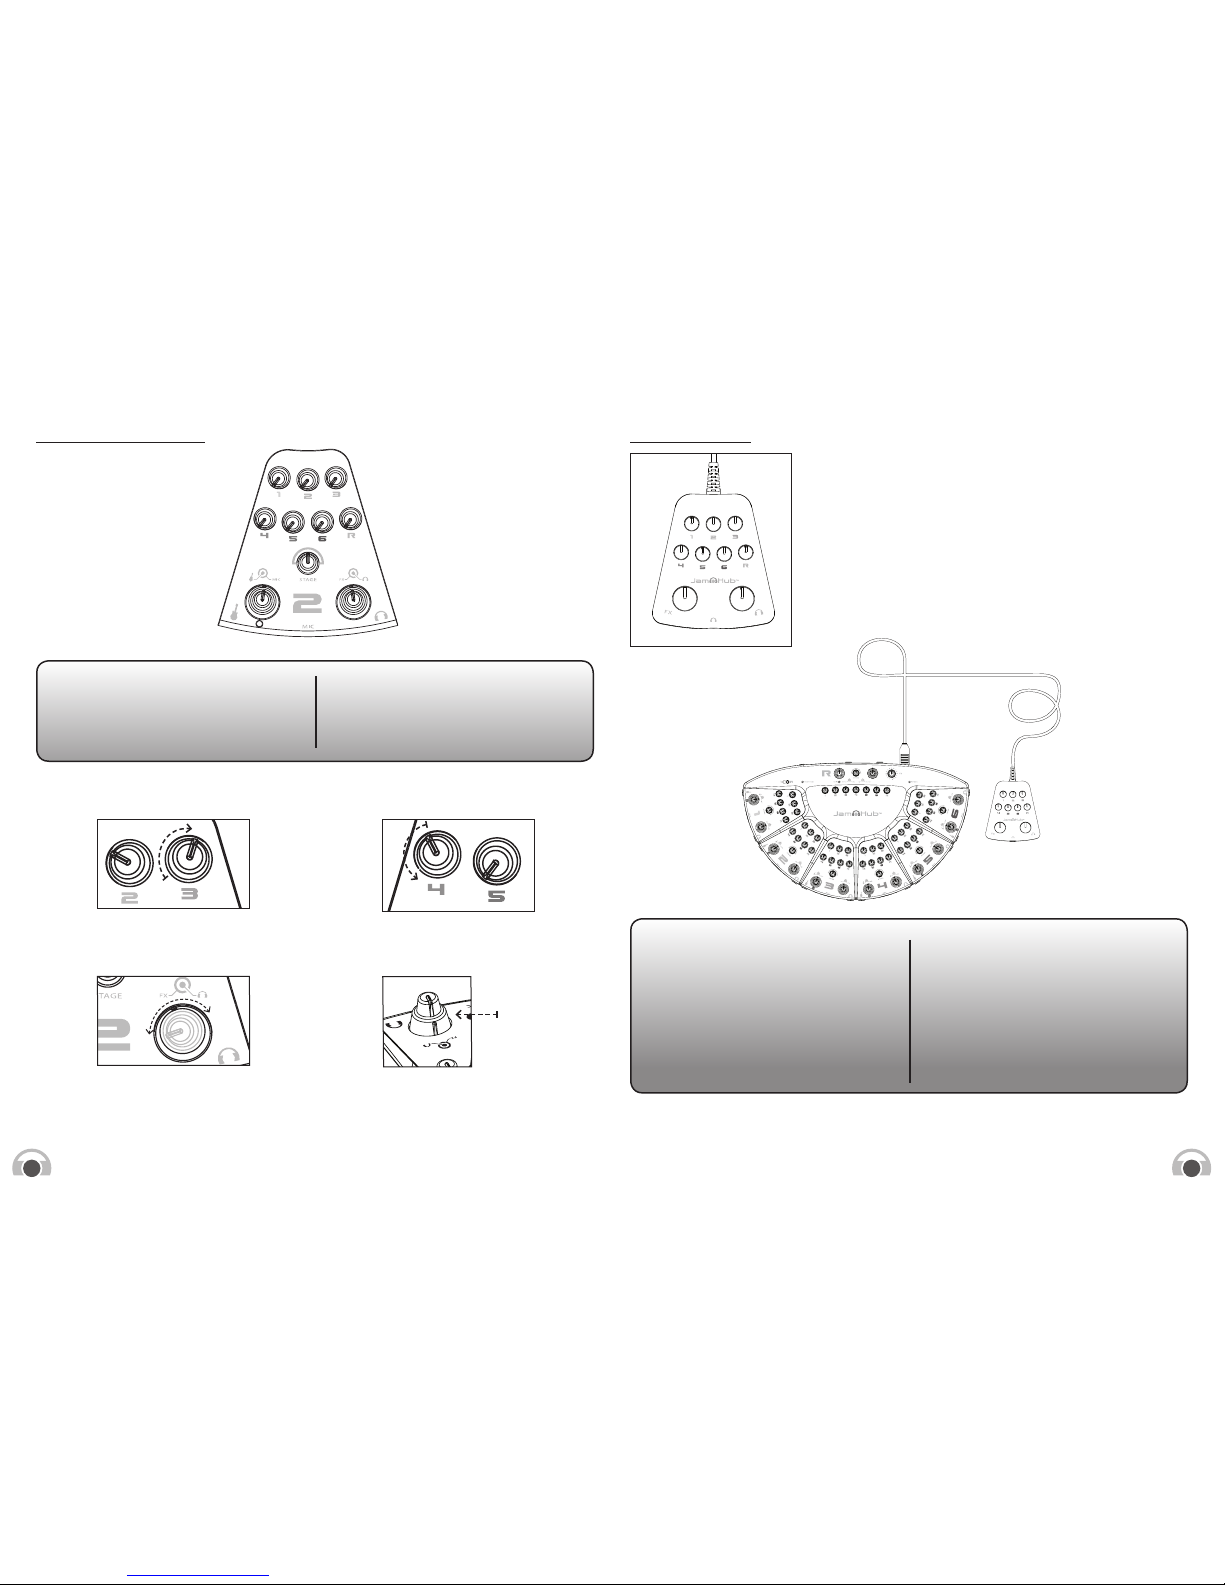
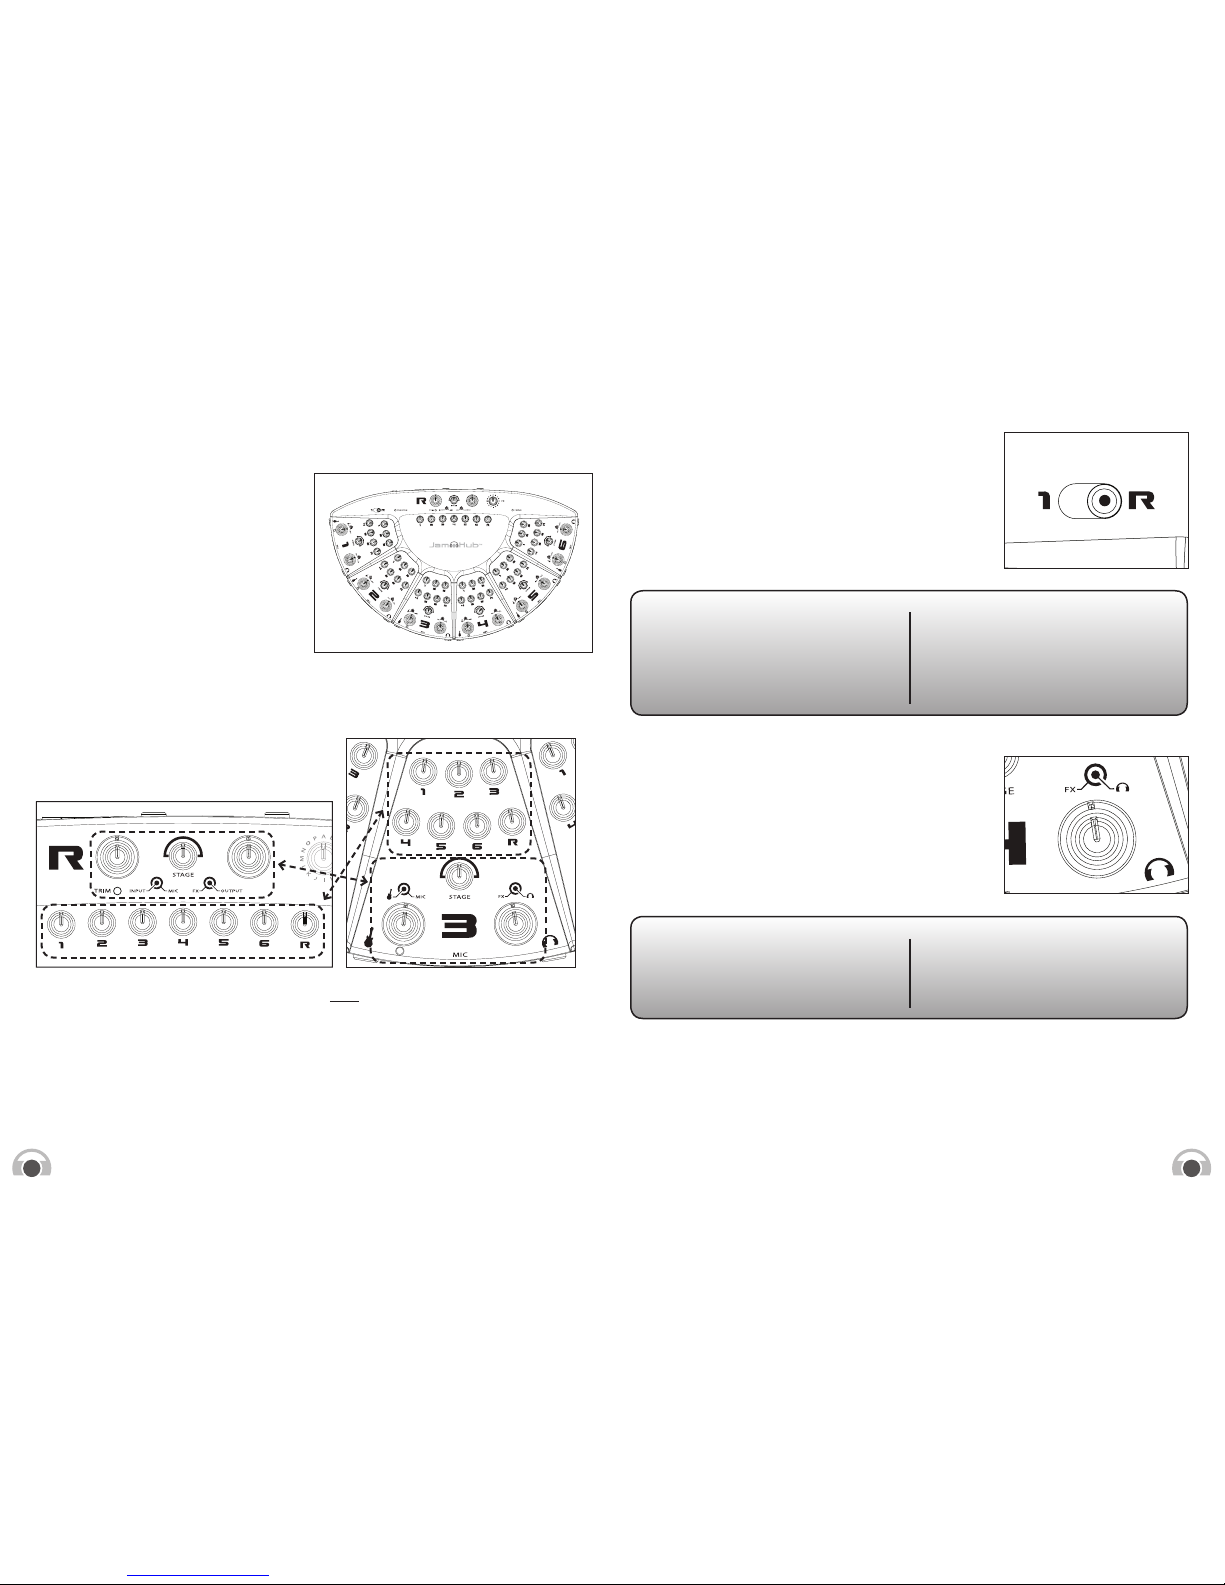
There are just a few things you need to know about the recording capability of the TourBus to get started. First, the R section’s
SoleMix controls are where you’ll create the mix for recording. If the person who’s going to manage the recorded mix is also one of the
musicians, they should connect their headphones into section 1 and use the 1–R switch to quickly flip back and forth between their own
mix and the recording mix (R). See the 1–R switch section on page 13 or more details.
Menu Structure and So Keys
The so keys are not so to the touch, but are
soware dependent. That is, their functions
change as you are using JamHub’s recording
capabilities. This is similar to so keys on your
phone or computer screen. Just watch the LCD
for clues as to what the keys do.
Transport (recording) functions:
The transport functions are designed like those
you’ve probably used before with a few special
capabilities to make your recordings easier. Let’s
go through them one at a time.
Rewind key: Hit once and the device
rewinds the current song at 5 seconds per
second. Double click the button and the device
rewinds at a fast speed (10 times faster).
Triple click the button and it takes you to the
beginning of the current song. Triple click within
the first 3 seconds of a song and you will be
taken to the prior song.
Fast Forward key: Hit once and the device
advances through the current song at 5 seconds
per second. Double click the button and the
device advances at a fast speed (10 times faster).
Triple click the button and it takes you to the
next song.
Stop: This key stops the play, recording, fast forward and rewind functions.
Play: This key is used for playback of what’s been recorded.
Record: This key is used to arm the JamHub to record.
When you hit the record key once, you’ll see the button’s outer ring starts to blink red. The LCD will say “Standby”. This means the
JamHub is ready to record. Hit the Record key again and you’ll see the red outer ring changes to solid red. This tells you that the
JamHub is recording. Hit the Stop button to stop the recording process. The LED will turn o indicating that it is no longer armed
for recording.
When you hit the Stop button your TourBus will ask you if you want to keep the recording. Hit the so key button under the word
“YES” to keep the file and hit the “NO” so key to disregard the recording
When you are recording you will see “New” over the third so key button. To start a new song, simply hit “New” and the TourBus will
save your existing recording and start a new file. This helps you find the songs aer you are finished with your jam. Having many small
files is easier to manage than one massive file to listen through so use this button oen.
The red ring around the Record button is designed to be viewable from a distance. Simply look over at the JamHub while you’re
playing to know if it’s recording your jam. If there is a solid red light, you’re recording. If the light is blinking or o, you’re not recording.
LCD Screen
So Keys
Transport Keys
Left Brain:
Recording to the built-in recorder creates a stereo recording
with a bit depth of 16-bit and a sample rate of 44.1kHz, known
as “CD Quality” recording. Today’s studio standards are
around 24bit/96kHz (some go up to 192kHz). So we’re giving
you a very high quality “sketch pad” for recording. A JamHub
is not the right piece of gear for creating your next album.
A studio with a great engineer is the right place for that.
But using a JamHub to get the songs right and tight first is the
best way to prepare you for the studio.
Right Brain:
The JamHub records a stereo mix that is the same quality
as a CD. If you’re into creating music you realize that songs,
not sample rates, equal success. So focus on writing great
songs and practice them using your JamHub silent rehearsal
studio. Once you and the band have the songs where you
want them, you’re ready to head to the recording studio, and
with the help of a great recording engineer, build an album
you’ll be proud of.
jam001.wav 00:00:00
Met Util Dir Mark

2120
FAQs
An updated list of FAQs can be found on our web site, www.JamHub.com. And for help with those “not so frequently asked” questions,
come to the JamHub community section of our website where there are musicians, engineers and tech support folks answering
questions that have come up since we printed the manual.
No questions? Great, we’ve done a good job but please come by our community section, who knows, maybe you can help someone
else with their JamHub.
Q: Can I use a JamHub with acoustic drums?
A: Yes! In fact, things still sound clear and controlled. Just hang a mic or two above the drum kit and plug that into the JamHub.
Or, use a small mixer and three mics to create a great stereo drum sound and connect that mix to your JamHub. We recommend
a mic near the snare, one near the toms/ride and a kick drum. Pan the two area mics le and right, put the kick down the middle
and send the stereo mix into one of the JamHub channels. Sweet.
Q: If I use acoustic drums, will the JamHub make them quiet?
A: No. You’ll still have to deal with loud drums, but you can still keep the overall volume lower if there isn’t a loud bass amp, guitar
amp(s), keyboard amp and PA speakers. So while this isn’t as quiet as electronic drums, you can still prevent that next level
of volume that comes with amps competing with each other in a room.
Q: How do I use an acoustic guitar with a JamHub?
A: Does it have a pickup? If no, put a microphone in front of the guitar and plug the microphone into an open mic input on the
JamHub studio.
A: Does it have a pickup? If yes, and you want to go direct, grab a mono-to-stereo jack and plug it into the guitar end of your stereo
cable. You might find that with one of the new “for acoustics” Direct Inject (DI) boxes or floor pedals, that you like the sound and
control of the acoustic better. There are a lot of engineering reasons for this (impedance matching is the biggest of them) and that’s
why DI boxes are used by the pros. If you’re going to play an acoustic, you’re going to need a DI box someday.
Q: What instruments do not work with a JamHub?A
A: We don’t know of any yet. There may be some out there, but we haven’t found them. Some companies have dedicated their
existence to creating instruments that can be played anywhere and anytime...some even have an electronic accordion line
(not just one model, but an entire line of them!!!). Horn players can use silent practice inserts and cases to quiet horns and create
a headphone signal that you can send to your JamHub. Guitars, bass, drums, hand percussion, keyboards, accordions, wind
instruments, even a thermine will work! Just look for a headphone jack on the gear and you’re ready to start jamming quietly with
your JamHub studio.
Q: Do you have any tips for new users?
A: Yes. JamHubs are completely new. That’s because we introduced them just this year. And since we invented them, we know a lot
about how to make it easy to get started. Here are our top tips:
1. Use good TRS (Stereo) cables and plug the cable going to the JamHub instrument jack directly into your headphone output
on your modeling amp, keyboard or electronic drums.
2. Get headphone cable extensions so you can move around as much as you want
3. Use good headphones for good listening. The JamHub is acoustically transparent. It won’t change your sound. So if your
headphones lack quality, the JamHub can’t fix it.
4. Get a microphone for each player, even if you don’t sing. Once you put on the headphones, it’s easier to communicate
if everyone has a mic.
5. Guitarists: a modeling amp with a foot pedal allows you to control the volume of your sound so you can turn up for leads.
Keyboard player: use your instrument’s volume control to do the same.
Directory
The Dir functions allow you to load songs to play back. Hit the Dir button and you can use the two le so keys to scroll through the
directories. Hit OK to select a directory or Esc to exit.
Once you’ve selected a directory, like the default “REC” directory, you can navigate from song to song by hitting the two le so keys.
Note, to fast scroll through the songs press and hold the so key. This is especially useful for larger RAM cards.
Mark and Delete Mark functions
The Mark and Delete Mark (DelM) functions allow you to navigate your recordings faster. By placing marks in a recording you can
“jump” from one part of the recording to another and loop playback between two marks so that you can learn faster.
Mark – Hit Play and listen to the recording. When you want to add a marker hit the Mark button. Keep listening and adding Marks
as the song plays.
DelM – Deletes the Mark you are currently located at.
+ – Move to the next mark. Stop playback by hitting the Stop key. Hit the Stop and Fast Forward keys simultaneously
to advance forward from mark to mark. Note: The stop location is given a temporary mark so you can go back to that
location.
+ – Move to the prior mark. Stop playback by hitting the Stop key. Hit the Stop and Rewind key simultaneously to rewind
to the prior mark.
+ – Loop function. Mark two locations that you want to use as your loop start and stop marks. At the second (stop) mark hit the
Rewind and Fast Forward keys at the same time and playback will loop between the two marked times. The display
will show (~) showing that the JamHub TourBus is looping between two marks. To stop looping hit the Stop button.
[Note: Looping can be intiated anywhere in the loop region aer the first marker. For example, if you have a mark at 7 seconds
and one at 17 seconds you can initaite looping at 10 seconds.]
Summary
Thanks for reading all the way to the end of the JamHub Owner’s Manual. We hope that you feel like you’ve mastered your new
silent rehearsal studio and that you can help others should they need some guidance. Aer all, one of the best things about being
a musician is getting together with other musicians and creating something new.
We invite you to visit our forum at www.JamHub.com. There you can connect with the JamHub team; share your JamHub stories;
enter in some just-for-fun contests; and get on our eNewsletter list. If you’re touring, drop us a note and tell us about all the crazy
places you’re finding to jam now that you have the freedom to play anywhere, anytime.
So enjoy. And keep making more music!

22 23
Q: How come there aren’t any EQ knobs?
A: A JamHub is not designed to alter your sound, but to distribute it and give you more mix control. You should have a good sound
before sending your signal to the JamHub, then use the JamHub to share it with your bandmates.
Q: Why are the files .WAV files? Why doesn’t the JamHub TourBus model encode to MP3?
A: Anytime you compress audio you lose information and quality can suer. With the very low cost of RAM we decided to keep the files
in a .WAV format, even though they take a lot more room. If you want to encode your files in an MP3 format, simply download one of
the many free MP3 encoders, like iTunes, and convert away. You’ll do so knowing that you’ve got great quality files to start from.
Please read
Exposure to extremely high noise levels may cause a permanent hearing loss. Individuals vary considerably in susceptibility to noise
induced hearing loss, but nearly everyone will lose some hearing if exposed to suiciently intense noise for a suicient time. The U.S.
Government’s Occupational Safety and Health Administration (OSHA) has specified the following permissible noise level exposures.
According to OSHA, any exposure in excess of the above permissible limits could result in some hearing loss. To ensure against
potentially dangerous exposure to high sound pressure levels, it is recommended that all persons exposed to equipment capable
of producing high sound pressure levels use hearing protectors while this unit is in operation. Ear plugs or protectors in the ear canals
or over the ears must be worn when operating the equipment in order to prevent a permanent hearing loss if exposure is in excess
of the limits as set forth above.
Duration Per Day Sound Level dBA.
In Hours Slow Response
8 90
6 92
4 95
3 97
2 100
1-1/2 102
1 105
1/2 110
1/4 or less 115
LIMITED WARRANTY – JAMHUB™ SILENT REHERSAL STUDIO
GENERAL TERMS: JamHub Corp. (“JamHub”) warrants to the original consumer/purchaser (“Buyer”) that |the products
it manufactures are free from defects in materials and workmanship at the time of purchase.This limited warranty
extends under normal use for two (2) years from the date of original purchase and covers parts and labor. Buyer
must provide written notice to JamHub within the limited warranty period of any defective product. JamHub or its
authorized representative shall, at JamHub’s option, either repair or replace such defective product in accordance with
this limited warranty. This limited warranty does not apply to expendable parts. This limited warranty does not extend
to any product from which the serial number has been removed or tampered with, or any product that has been damaged
or rendered defective (a) as a result of accident,misuse, abuse, negligence, or other external cause, (b) by the use of parts
not manufactured or sold by JamHub, or (c) by modification or service by anyone other than (i) JamHub, or (ii) a
JamHub authorized service provider. JamHub is not responsible for damage that occurs as a result of Buyer’s failure
to follow the instructions that come with the product or by operation outside the usage parameters stated in the
user documentation that shipped with the product. No credit shall be allowed for repair work performed by Buyer or
unauthorized parties. Out-of-warranty repairs will be invoiced at the current JamHub hourly rate plus the cost of parts,
shipping and handling. JamHub reserves the right to elect, at its discretion, to give Buyer a refund of Buyer’s purchase
price instead of a repair or replacement. This limited warranty shall be Buyer’s sole remedy in the event of a defective
product.
JamHub products are manufactured using new materials or new and used materials equivalent to new in performance and
reliability. Spare parts may be new or equivalent to new. Spare parts are warranted to be free from defects in material or
workmanship for thirty (30) days or the remainder of the two (2) year limited warranty period for the product in which they
are installed, whichever is longer.
LIMITATIONS: EXCEPT AS EXPRESSLY SET FORTH IN THIS LIMITED WARRANTY, JAMHUB MAKES NO OTHER WARRANTIES,
EXPRESS OR IMPLIED, INCLUDING ANY IMPLIED WARRANTIES OF MERCHANTABILITY OR FITNESS FOR A PARTICULAR
PURPOSE. IMPLIED WARRANTIES THAT MAY BE IMPOSED BY LAW ARE LIMITED IN DURATION TO THE LIMITED WARRANTY
PERIOD SET FORTH HEREIN. BUYER PURCHASES AND ACCEPTS JAMHUB’S PRODUCTS SOLELY ON THE BASIS OF THE LIMITED
WARRANTY EXPRESSED HEREIN. UNDER NO CIRCUMSTANCES SHALL JAMHUB BE LIABLE BY VIRTUE OF THIS LIMITED
WARRANTY OR OTHERWISE FOR ANY SPECIAL, INDIRECT, SECONDARY, INCIDENTAL OR CONSEQUENTIAL DAMAGES TO ANY
PERSON OR PROPERTY ARISING OUT OF THE USE OR INABILITY TO USE THE PRODUCT. SOME STATES AND COUNTRIES
DO NOT ALLOW THE EXCLUSION OR LIMITATION OF INCIDENTAL OR CONSEQUENTIAL DAMAGES, SO THE ABOVE LIMITATION
OR EXCLUSION MAY NOT APPLY TO YOU.
PROCEDURES FOR REPAIRING OR REPLACING PRODUCT: Buyer may obtain the repair or replacement of any defective product
covered under this limited warranty through JamHub or its authorized representatives only. JamHub is responsible for all
shipping and handling charges in connection with the performance of this limited warranty. A return authorization number
assigned by JamHub and dated proof of purchase must accompany all products submitted for repair or replacement. Please
indicate the product’s serial number in all correspondence; an authorization number will not be issued in the absence of a
serial number. This limited warranty is void without a return authorization number and dated proof of purchase, and items
delivered to JamHub without a return authorization number and dated proof of purchase will be refused. Please contact
JamHub at the address, phone number or website indicated below to receive a return authorization number and to arrange
for the repair or replacement of a defective product covered by this limited warranty. Arrangements will be made and
communicated to you at that time for the return of the product directly to JamHub or to an authorized service center,
as appropriate.
This limited warranty gives you specific legal rights. You may have other rights that vary from state to state or country to country.
If there’s ever a problem with your JamHub that your retailer can’t fix, please give us the opportunity to try and make it right.
JamHub Corp.
One Main Street
Whitinsville, MA 01588 USA
(877) JAM-HUBS (USA)
Other manuals for BedRoom
1
This manual suits for next models
2
Table of contents
Other JamHub Music Mixer manuals
Popular Music Mixer manuals by other brands

SoundCraft
SoundCraft Spirit Digital 328 v2 Setup guide

Pioneer
Pioneer DJM-600 operating instructions

Tubbutec
Tubbutec LPZW 6m0d6 user manual

Beyerdynamic
Beyerdynamic Interpreter Console SID 202 Specification sheet

Euphonix
Euphonix System 5 installation guide

Toshiba
Toshiba Strata CTX Quick reference guide