45
1. Read these instructions.
2. Keep these instructions.
3. Heed all warnings.
4. Follow all instructions.
5. Do not use this apparatus near water.
6. Clean only with a damp cloth.
7. Do not block any of the ventilation openings. Install in accordance with the
manufacturer's instructions.
8. Do not install near any heat sources such as radiators, heat registers, stoves, or other
apparatus including amplifiers) that produce heat.
9. Do not defeat the safety purpose of the polarized-type plug.A polarized plug has two
blades with one wider than the other. The wide blade is provided for your safety. When
the provided plug does not fit into your outlet, consult an electrician for replacement of
the obsolete outlet.
10. Protect the power cord from being walked on or pinched particularly at plug,
convenience receptacles, and the point where they exit from the apparatus.
11. Only use attachments/accessories specified by the manufacturer.
12. Unplug this apparatus during lighting storms or when unused for long periods of time.
13. Refer all servicing to qualified service personal. Servicing is required when the
apparatus has been damaged in any way, such as when the power-supply cord or plug
is damaged, liquid has been spilled or objects have fallen into the apparatus, the
apparatus has been exposed to rain or moisture, does not operate normally, or has
been dropped.
14. Use only with a cart, stand, tripod, bracket, or table specified by the manufacturer or
sold with the apparatus. When a cart is used, use caution when moving the
cart/apparatus combination to avoid injury from tip-over.
15. The apparatus shall not be exposed to dripping or splashing and that no objects filled
with liquids, such as vases, shall be placed on the apparatus.
16. The MAINS plug is used as the disconnect device and shall remain readily operable.
17. Changes or modifications are not expressly approved by the
manufacturer could void the user's authority to operate the
equipment. Changes or modifications to the device may void
FCC and CE compliance. In frequently used radio links should
be tested regularly to protect against undetected interference
or fault.
Important Safety Instruction
Outdoor use or wet location applications:
An apparatus that does not comply with the requirements (Outdoor Use and Wet
Location Apparatus) shall be marked or the instruction manual packed with the word
"WARNING" and the following or equivalent. To reduce the risk of fine or electric shock,
do not expose this apparatus to rain or moisture.A Class II APPARATUS shall be
permanently marked with the words "DOUBLE INSULATION" or "Double Insulated"
and "When servicing use only identical replacement parts."
Table of Contents Accessories
FCC Statements
This equipment has been tested and found to comply with the limits for a Class B digital
device, pursuant to Part 15 of the FCC Rules. These limits are designed to provide
reasonable protection against harmful interference in a residential installation. This
equipment generates uses and can radiate radio frequency energy and, if not installed
and used in accordance with the instructions, may cause harmful interference to radio
communications. However, there is no guarantee that interference will not occur in a
particular installation. If this equipment does cause harmful interference to radio or
television reception, which can be determined by turning the equipment off and on, the
user is encouraged to try to correct the interference by one or more of the following
measures:Reorient or relocate the receiving antenna. Increase the separation between
the equipment and receiver. Connect the equipment into an outlet on a circuit different
from that to which the receiver is connected. Consult the dealer or an experienced
radio/TV technician for help. FCC Caution: Any changes or modifications not expressly
approved by the party responsible for compliance could void the user's authority to
operate this equipment. This device complies with Part 15 of the FCC Rules. Operation is
subjectto the following two conditions: (1) This device may not cause harmful
interference, and (2) this device must accept any interference received, including
interference that may cause undesired operation.
Radiation Exposure Statement
This equipment complies with FCC/IC radiation exposure limits set forth for an
uncontrolled environment. This equipment should be installed and operated with
minimum distance 20cm between the radiator & your body. This transmitter must not be
co-located or operating in conjunction with any other antenna or transmitter.
IC Statements
IC Regulations:This device complies with Industry Canada license-exempt RSS
standard(s). Operation is subject to the following two conditions:
(1) this device may not cause interference, and
(2) this device must accept any interference, including interference that may cause
undesired operation of the device.
Le présentappareilestconformeaux CNR d'IndustrieCanada applicablesaux
appareilsradio exempts de licence. L'exploitationestautoriséeaux deuxconditions
suivantes:
(1) l'appareilne doitpas produirede brouillage, et
(2) l'utilisateurde l'appareildoitaccepter tout brouillageradioélectriquesubi, mêmesile
brouillageestsusceptible d'encompromettrele fonctionnement.
This Class B digital apparatus complies with Canadian ICES-003.
Cetappareilnumériquede la classeB estconformeàla normeNMB-003 du Canada. This
Category II radiocommunicationdevice complies with Industry Canada Standard RSS-
310. Cedispositifde radiocommunicationde catégorieII respectela normeCNR-310
d’IndustrieCanada.
IMPORTANT NOTE:
IC Radiation Exposure Statement This device and its antenna(s)
must not be co-located or operating in conjunction with any other antenna or
transmitter.
L'appareil et son antenne ne doivent pas être co-localisées ou opérant en conjonction
avec une autre antenne ou transmetteur.
●
● Remote control (1)
● Audio cable – RCA to 3.5mm stereo plug (1)
● 24V/2.5A Power adapter (1)
● EU plug power cord (2)
Operating instruction (1)
●
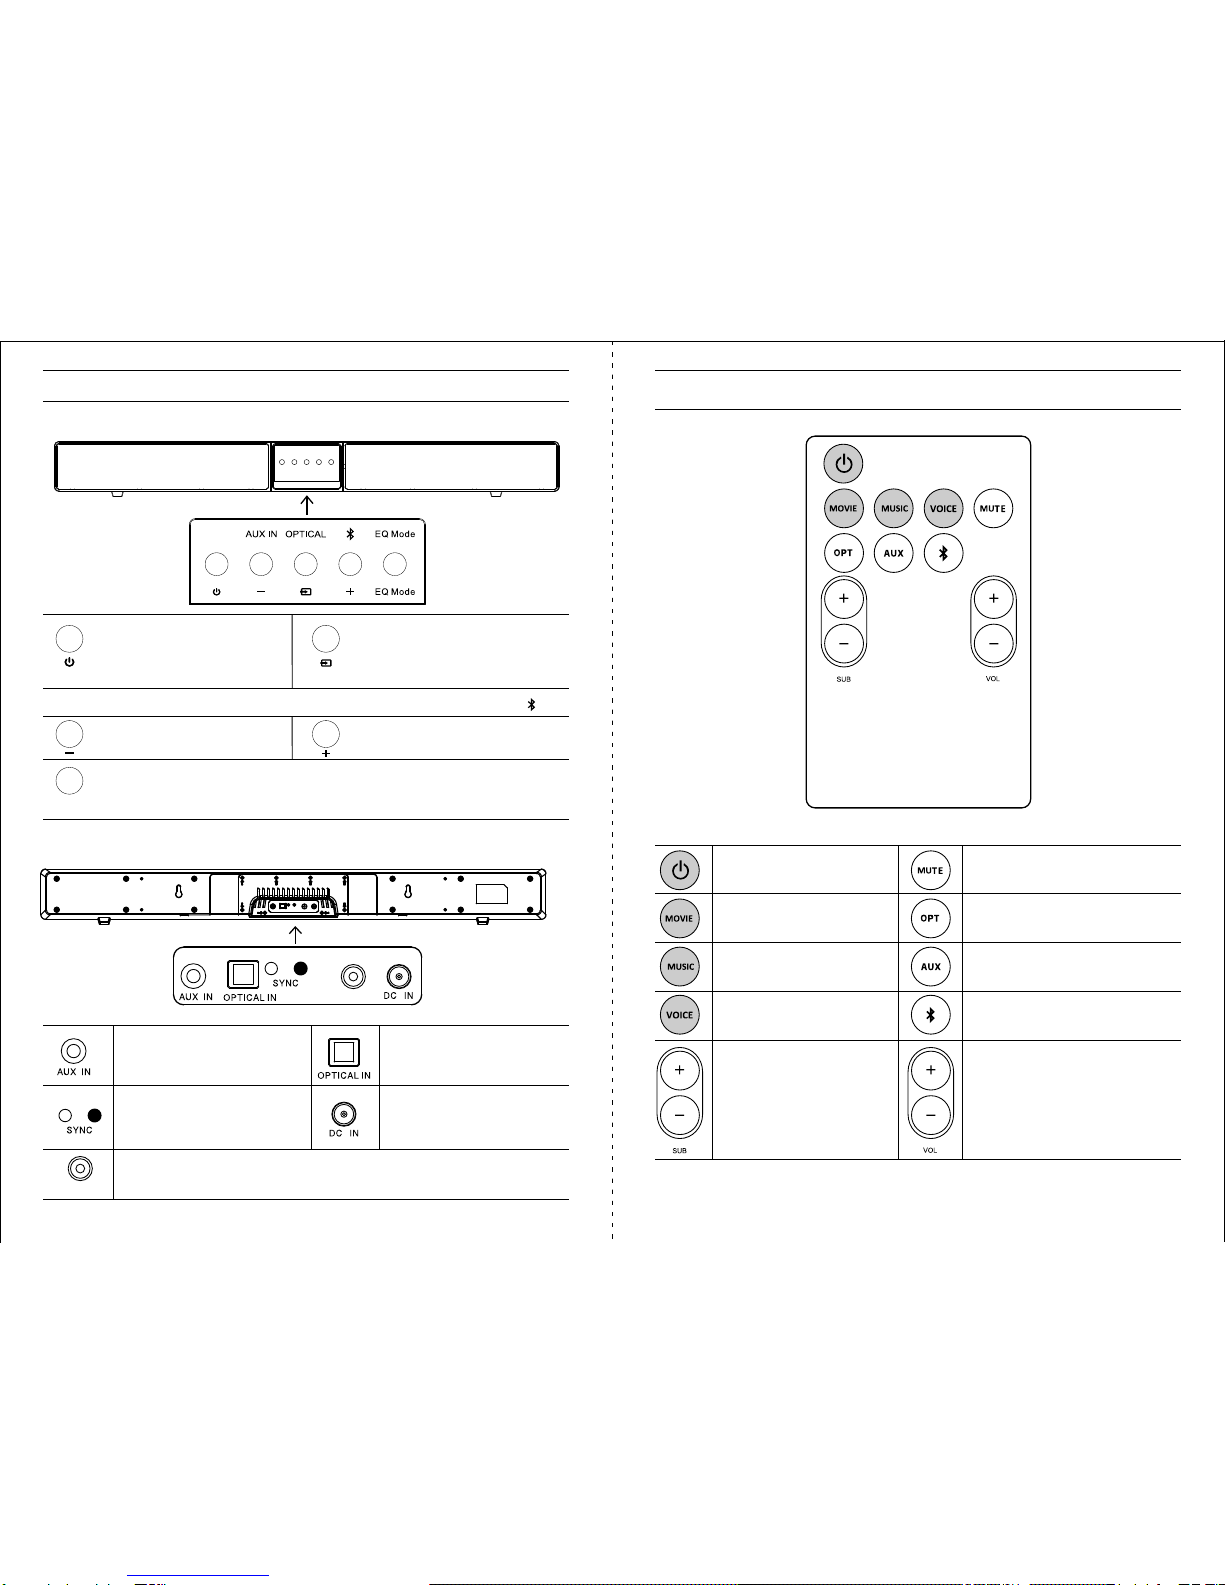
● Accessories
● Quick instruction – Units & Functions
● Precautions
● Product specification
Illustrations