jobmate 199-8594-6 User manual

Use and Care Guide
1-866-JOBMATE
(1-866-562-6283)
Contact us for assistance, we’re here to help.
Version no. 02
MIG/FLUX-CORE WIRE WELDER KIT
199-8594-6
1
2
WIRE FEED
ENTRAINEMENT
199-8594-6
SOUDEUSE A D VIDAGE
DE FIL- LECTRODE SOUS GAZ
MIG/FLUX-CORE WIRE FEED WELDER
INERTE OU A AME EN FLUX
1
2
3
4
567
8
WARNING/AVERTISSEMENT
.This welder isforuseon a20 Abranchcircuit.
DONOT REMOVE THIS LABEL / N’ENLEVEZPAS CETTE ÉTIQUETTE.
229683
.If connected to a circuit protected by fuses, use a time-delayedfusemarked “D”.
.Cette soudeuse requiert un circuitde 20 A.
.Selasoudeuse estbranchée á un circuit protégé par fusibles, utilisez un fusible
temporisé marqué<<D >>.
Congratulations on the purchase of your new MIG/Flux-Core Wire Welder. In
order to ensure you have the best possible experience please read through the
following instructions. If you require any help please contact the customer
service department at:

DANGER
Never plug in the power cord before the welder is fully assembled.
Quick Start Guide
STEP 3 Operation
Hold the torch in one hand and turn the wire speed dial with
the other hand to its maximum position. Pull the trigger (1)
on the torch to start an arc. Drag the torch towards the user
while simultaneously turning the wire speed dial counter-
clockwise.
STEP 1 Installing the wire
Remove the nozzle (1) and contact tip (2) from the end of the torch assembly.
Identify the leading end of the wire secured on the edge of the wire spool. Place
the spool on the hub with the wire passing from the bottom of spool into the drive
mechanism.
STEP 2 Setting the wire tension
Press the trigger on the gun.Turn the drive tension adjustment
knob (1) clockwise, and increase the drive tension until the
wire seems to feed smoothly without slipping.
JM-1998594-14
1
2
WIREFEED
ENTRAINEMENT
199-859 6
SOUDEUSE A D VIDAGE
DE FIL- LECTRODE SOUS GAZ
MIG/FLUX-CORE WIRE FEED WELDER
INERTE OU A AME EN FLUX
1
2
3
4
567
8
WARNING/AVERTISSEMENT
.Thiswelderisforuseon a 20Abranch circuit.
DONOTREMOVETHIS LABEL/N’ENLEVEZPASCETTEÉTIQUETTE.
.Ifconnectedtoacircuitprotectedbyfuses,usea time-delayedfusemarked“D”.
.Cettesoudeuserequiertuncircuit de20A.
.Selasoudeuseestbranchéeáuncircuitprotégéparfusibles,utilisez unfusible
temporisémarqué<<D>>.
1
1
2
WIREFEED
ENTRAINEMENT
199-8594-6
SOUDEUSE A D VIDAGE
DE FIL- LECTRODE SOUS GAZ
MIG/FLUX-CORE WIRE FEED WELDER
INERTE OUA AMEEN FLUX
1
2
3
4
567
8
WARNING/AVERTISSEMENT
.Thiswelderisforuseona20Abranchcircuit.
DONOTREMOVETHISLABEL/N’ENLEVEZPASCETTEÉTIQUETTE.
229683
.Ifconnectedtoacircuitprotectedbyfuses,useatime-delayedfusemarked“D”.
.Cettesoudeuserequiertuncircuitde20A.
.Selasoudeuseestbranchéeáuncircuitprotégéparfusibles,utilisezunfusible
temporisémarqué<<D>>.
1
2
3
4
5
6
7
8
JM-1998594-01
No. Description
1 MIN/MAX voltage setting
2 1/2 voltage setting
3 Wire speed adjustment knob
4 Power cable
5 Ground cable and clamp
6 MIG torch
7 ON/OFF switch
8 Thermal overload indicator
JM-1998594-20
1
JM-1998594-11
1
2
JM-1998594-14
1
2
WIREFEED
ENTRAINEMENT
199-859 6
SOUDEUSE A D VIDAGE
DE FIL- LECTRODE SOUS GAZ
MIG/FLUX-CORE WIRE FEED WELDER
INERTE OU A AME EN FLUX
1
2
3
4
567
8
WARNING/AVERTISSEMENT
.Thiswelderisforuseon a 20Abranch circuit.
DONOTREMOVETHIS LABEL/N’ENLEVEZPASCETTEÉTIQUETTE.
.Ifconnectedtoacircuitprotectedbyfuses,usea time-delayedfusemarked“D”.
.Cettesoudeuserequiertuncircuit de20A.
.Selasoudeuseestbranchéeáuncircuitprotégéparfusibles,utilisez unfusible
temporisémarqué<<D>>.
1

Quick Start Guide................................................................................................................................................... 2
1. Safety advice.................................................................................................................................................4–5
1.1 definitionS ......................................................................................................................................................................4
1.2 Safety warninGS...............................................................................................................................................................4
2. important information.....................................................................................................................................6–8
2.1 deScription .....................................................................................................................................................................6
2.2 GaS connection and Selection ..............................................................................................................................................7
2.3 wire drive compartment.....................................................................................................................................................8
3. Scope of delivery................................................................................................................................................ 9
3.1 unpackinG .......................................................................................................................................................................9
3.2 Scope of delivery ..............................................................................................................................................................9
4. key partS diaGram ........................................................................................................................................... 10
5. aSSembly inStructionS .................................................................................................................................11–14
5.1 inStallinG the handle.......................................................................................................................................................11
5.2 checkinG and SelectinG the appropriate drive roller ...............................................................................................................11
5.3 pre-adjuStmentS ............................................................................................................................................................12
5.4 SettinG the wire feed Speed ..............................................................................................................................................13
5.5 aSSemblinG the hand-held weldinG Shield ............................................................................................................................14
6. operatinG inStructionS ................................................................................................................................14–18
6.1 tuninG in the wire Speed ...................................................................................................................................................14
6.2 current overload button..................................................................................................................................................14
6.3 holdinG / uSinG the torch (miG Gun) .................................................................................................................................14
6.4 weldinG techniQueS.........................................................................................................................................................16
6.5 typeS of weldinG beadS ....................................................................................................................................................16
6.6 weldinG poSition ............................................................................................................................................................16
6.7 multiple paSS weldinG .....................................................................................................................................................17
6.8 Spot weldinG .................................................................................................................................................................18
7. maintenance.................................................................................................................................................... 19
8. technical SpecificationS...................................................................................................................................... 20
9. main circuit chart ........................................................................................................................................... 21
10. troubleShootinG ............................................................................................................................................. 22
11. warranty ..................................................................................................................................................... 23
12. exploded view................................................................................................................................................ 24
13. partS liSt ..................................................................................................................................................... 25
Table of Contents

4Safety Advice
1. Safety advice
IMPORTANT, RETAIN FOR FUTURE
REFERENCEANDREADCAREFULLY!
Do not attempt to install or operate this product until you
have read the safety instructions in this manual. Safety items
throughout this manual are labelled with Danger, Warning, or
Caution depending on the risk type.
Read and understand the operating manual and labels on the
product. Familiarize yourself with the application and limitations
and the specic potential hazards. Know the controls and their
proper use. It is important to know how to stop the product and
disengage the controls quickly.
1.1 Definitions
This is the safety alert symbol. It is used to alert you to
potential personal injury hazards. Obey all safety messages that
follow this symbol to avoid possible injury or death.
DANGER
Indicates an imminently hazardous situation which, if
not avoided, will result in serious injury or death.
WARNING
Indicates a potentially hazardous situation which, if
not avoided, could result in serious injury or death.
CAUTION
Indicates a potentially hazardous situation which, if
not avoided, could result in minor or moderate injury.
IMPORTANT
Installation, operation, or maintenance information
which is important but not hazard-related.
READ INSTRUCTION MANUAL
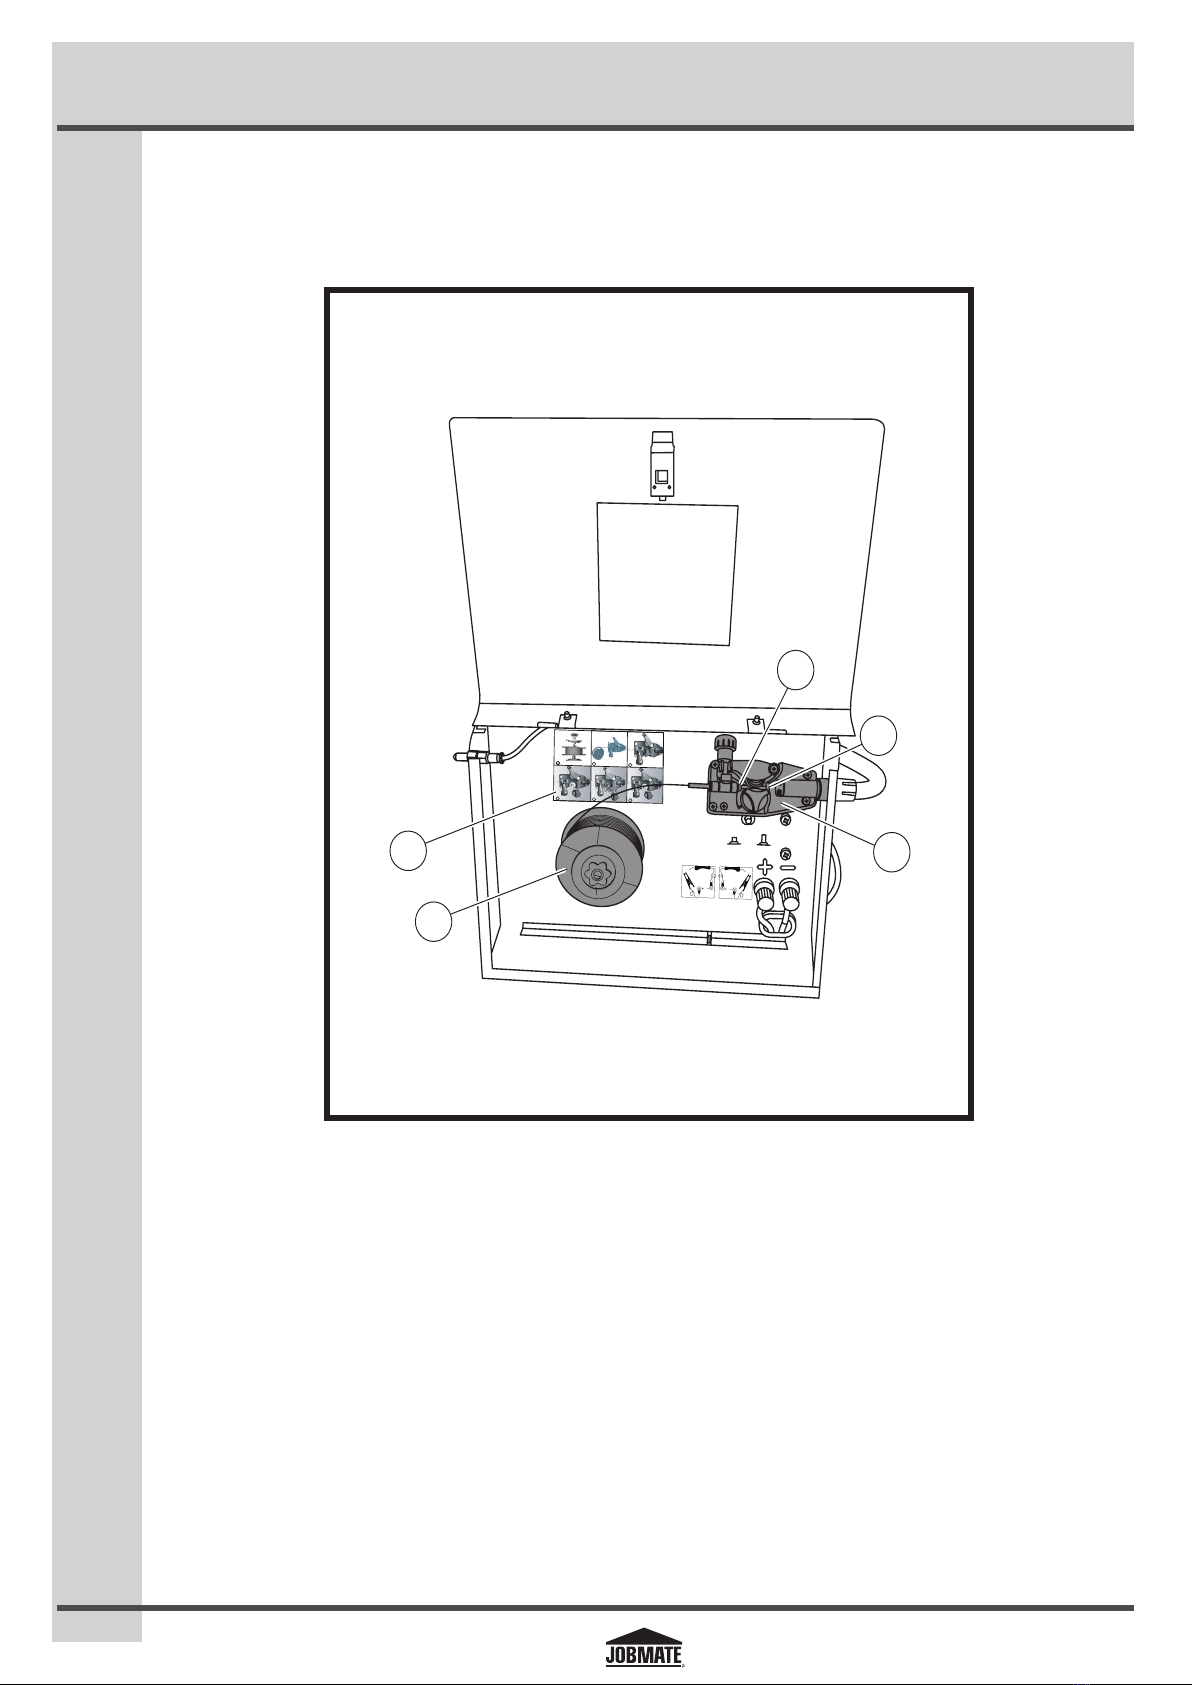
1.2 Safety warnings
RISK OF ELECTRIC SHOCK
Do not touch electrical live parts or metal components
connected to the welding wire, as doing so may cause fatal
shock and severe burns. Secure the ground lead before
welding. Wear dry protective apparel like coat, shirt, gloves,
and insulated footwear.
RISK FOR BREATHING
Never directly inhale the emission of harmful fumes when
welding on coated materials like galvanized, cadmium-plated
or containing zinc, mercury, or barium.
RISK OF FIRE
Do not weld on containers or pipes that contain ammable,
gaseous, or liquid combustibles. Remove all ammable
materials within 35 feet of the welding arc or tightly cover
the ammable materials with reproof covers. To prevent any
unintended arcs after welding, cut o the excess wire that
extends past the end of the nozzle more than ¼".
RISK OF BURNS
Do not touch the welded materials with bare hands, as the
welded materials are hot and can cause severe burns.
RISK OF EXPLOSION
Keep high pressure shielding gas cylinder away from welding
or electrical circuits. Do not touch the cylinder with MIG gun
and do not weld on the cylinder. Use proper regulators, gas
hoses, and ttings for the specic application.

5
Safety Advice
DO NOT EXPOSE TO RAIN
Do not expose the welder to rain.
RISK OF UV AND IR ARC RAYS
Do not look at the welding arc without proper eye protection,
as the welding arc produces ultraviolet (UV) and infrared (IR)
rays. Use screens or other barriers to protect other persons
from the rays.
PERSONAL SAFETY
DANGER!
Potential hazard that will result in serious injury or loss of
life.
•Keep children and other persons away from the work
area while welding. Do not allow children to handle the
welder.
•Do not use the welder in the presence of ammable
liquids or gases. Sparks that are created during use may
ignite gases
•Do not operate the welder in humid, wet, or poorly
ventilated areas.
•Use appropriate shield to prevent other personnel from
being aected by harmful rays.
•Always ensure that a re extinguisher is available within
an adequate distance of the welding environment.
•Do not repair or maintain the welder while the power is
on.
•Regularly check the power plug and power cord for
damage. If the supply cord is damaged, it must be
replaced by a special cord or assembly available from the
manufacturer or its service agent.
GENERAL SAFETY RULES
WARNING
DONOTUSETHEWELDERINTHEPRESENCEOFFLAMMABLE
LIQUIDS OR GASES. SPARKS THAT ARE CREATED DURING
USE MAY IGNITE GASES. DO NOT OPERATE THE WELDER IN
HUMID, WET, OR POORLY VENTILATED AREAS AND AVOID
ANY IGNITION SOURCES SUCH AS SMOKING AND OPEN
FLAMES.
•During welding operation, OPERATORS MUST USE SAFETY
GOGGLESANDAHAND-HELDWELDING SHIELD OR HELMET
EQUIPPED WITH A SUITABLE FILTER GLASS TO PROTECT
AGAINSTTHE INTENSE ULTRAVIOLET AND INFRARED RAYS.
•USE APPROPRIATE SHIELD to prevent other persons from
being aected by harmful rays.
•DO NOT ALLOW UNSKILLED OR UNTRAINED INDIVIDUALS
TO INSTALL AND OPERATE THIS WELDER.
•BEFORE OPERATING THE WELDER, CHECK THE INSULATION
OF THE GROUND CABLE, POWER CORD, AND WELDING
CABLE FOR DAMAGE. Replace or repair damaged
components before using the welder.
•KEEP HANDS AND FINGERS AWAY FROM MOVING PARTS
and stay away from the drive rolls while the welder is in
use.
•Do not allow any body part of the user to come in contact
with the welding wire while holding the welding gun.
•DO NOT ALLOW THE USER TO DRAPE CABLES OVER OR
AROUND THE BODY.
•DO NOT POINT THE MIG GUN TOWARDS THE USER OR
OTHER PERSONS.
•Do not allow a person to use electronic devices such as
pacemakers in the welding area.

6Important Information
2. important information
2.1 Description
This JOBMATE TM portable and gasless MIG/Flux-Core Wire
Welder Kit provides two heat settings, innite wire speed
control, current overload protection and thermal overload
protection. The welder can be used for welding mild steel 20
gauge to 5/32" using ux-core wire and mild steel 20 gauge
to 1/8" for gas metal arc welding (GMAW).
Guidelines for proper usage and description
ON/OFF switch
This switch is used to turn the power supply of the welder ON
and OFF through the main transformer and control circuit.
MIN/MAX 1/2 voltage setting
Two adjustment switches are provided on the front panel of
the welder kit, for setting the minimum and maximum values
of voltage and tension. Refer to the set up chart for initial
adjustment of the voltage setting.
Wire speed adjustment knob
This knob adjusts the wire feed speed.
Ground cable and clamp
The ground cable and the clamp are attached to the workpiece
to form a closed circuit which allows the ow of current needed
to weld.
Welding cable and MIG gun/torch
The welding wire is driven through the welding cable and the
MIG gun/torch to the workpiece. It is attached to the drive
system and the gun trigger activates the drive motor.
Thermal indicator
If the duty cycle of the welder exceeds the maximum level, the
internal temperature of the welder will exceed the allowable
operating range, which in turn makes the thermal overload
light glow and causes the welder to shut down automatically.
Allow the welder to cool down for 20 minutes until the thermal
overload light turns OFF automatically. The temperature of the
welder is then within the allowable operating range.
Power cord
The power cord connects the welder to the 120 V power supply.
Connect the 15 A plug into a 120 V/20 A receptacle to supply
power to the welder.
Hand-held welding shield
The welding shield is provided with a lter glass to protect
the face, eyes and gloved hands of the operator from radiated
heat, spark, intense ultraviolet and infrared rays during the
welding operation.
Chipping hammer / wire brush combination
The pointed chipping hammer side of the brush is used for
quick removal of the welding slag from the welding bead. The
wire brush is used for cleaning contaminants such as dust, dirt,
grease and welding slag from the base material.

7
Important Information
2.2 Gas connection and selection
Gas hoses, regulator and gas cylinder connections
•Connect one end of the gas hose (1) to the gas solenoid
valve on the back panel of the welder (2).
•Connect the other end of the gas hose to the regulator (3)
connected to the shielding gas cylinder (4).
JM-1998594-02
4
568
3
7
2
1
•Slowly open the cylinder valve (5) by turning it counter-
clockwise until the cylinder pressure gauge (6) displays a
xed cylinder pressure.
•Slowly turn the ow adjustment knob (7) of the gas ow
gauge (8) clockwise to increase gas ow to 20 cfm. Turn it
counter-clockwise to reduce the gas ow.
•Gas ow can be heard at the end of the gun when the
trigger is activated.
Note: If there is no gas ow, a harsh arc with excessive
spatter will result and a smooth weld bead will not be
obtained.
Polarity changing
Factory polarity setting (electrode negative) is for ux-core
welding (no shielding gas is required). In this process the RED
gun lead is connected to the negative ("-") polarity terminal
and the ground cable is connected to the positive ("+")
terminal.
For MIG welding (solid wire) using shielding gas, the RED gun
lead is connected to the positive ("+") and the ground cable is
connected to the negative ("-") terminal.
JM-1998594-03
NO
GAS GAS
Gas selection
Dierent materials require dierent shielding gas when
MIG welding. Refer to the set up chart inside the wire drive
compartment.
Mild steel: Use 75% argon and 25% CO2for reduced spatter
and reduced penetration for thinner materials. Use a higher
percentage of CO2fordeeper penetrationandincreased spatter.
Note: Do not use argon gas concentrations higher than
75% on steel. The result will be extremely poor penetration,
porosity, and brittleness of a weld.
Stainless steel: Use a mixed gas consisting of helium, argon,
and CO2.
Aluminium or bronze: Use 100% argon.

8Important Information
2.3 Wire drive compartment
The wire drive compartment has wire feed components such as wire spool (1), driving mechanism (2) and a set up chart (3). The
driving mechanism has an inlet guide tube (4) and an outlet guide tube (5) for guiding the wire across the drive roller.
JM-1998594-04
NORMAL
NORMAL OVER CURRENT
SURINTENSITEE
ATTENTION: LE
CA
DE SOUDAGE
NO
GAS GAS
123
465
3
1
2
4
5

9
Scope of Delivery
3. Scope of delivery
3.1 Unpacking
WARNING
•If any parts are damaged or missing, please call the Jobmate number 1-866-JOBMATE (1-866-562-6283). Please do NOT bring
the unit back to the store until you have called this number.
•If any parts are missing, do not operate this tool until the missing parts are replaced. Failure to do so could result in serious
personal injury.
•Do not attempt to modify this tool or create accessories not recommended for use with this tool. Any such alteration or
modication is deemed misuse and could result in a hazardous condition leading to possible serious personal injury.
•Do not connect this tool to the power supply until assembly is complete. Failure to comply could result in accidental starting and
serious personal injury.
•Carefully remove the tool and any accessories from the carton. Make sure that all items listed in the packaging contents are
included.
•Inspect the tool carefully to make sure no breakage or damage occurred during shipping.
•Do not discard the packaging material until you have carefully inspected and satisfactorily operated the tool.
Packaging materials are raw materials and can be re-used. Separate dierent packaging materials and take them to a
designated waste disposal facility. More information can be obtained from the appropriate authorities, service centre, or
Canadian Tire®.
Old power tools do not belong in your household garbage! Dispose of old power tools appropriately!We are all responsible
for the environment. The local authorities can inform you of collection locations and working hours.
3.2 Scope of delivery
PART DESCRIPTION QTY
Portable MIG welder 1 unit
Contact tip, 0.023" 0.030" 0.035" 1 pc
Sample spool ux-core wire, 0.030" 1 lb
Hand-held welding shield 1 pc
Chipping hammer/wire brush 1 pc
Handle 1 pc
Gas hose 1 pc
Hose clamp 2 pcs

10 Key Parts Diagram
4. Key partS diagram
1
2
WIREFEED
ENTRAINEMENT
199-8594-6
SOUDEUSE A D VIDAGE
DE FIL- LECTRODE SOUS GAZ
MIG/FLUX-CORE WIRE FEED WELDER
INERTE OUA AMEEN FLUX
1
2
3
4
567
8
WARNING/AVERTISSEMENT
.Thiswelderisforuseona20Abranchcircuit.
DONOTREMOVETHISLABEL/ N’ENLEVEZPASCETTEÉTIQUETTE.
229683
.Ifconnectedtoacircuitprotectedbyfuses,useatime-delayedfusemarked“D”.
.Cettesoudeuserequiertuncircuitde20A.
.Selasoudeuseestbranchéeáuncircuitprotégéparfusibles,utilisezunfusible
temporisémarqué<<D>>.
1
2
3
4
5
6
7
8
JM-1998594-01
No. Description No. Description
1 MIN/MAX voltage setting 5 Ground cable and clamp
2 1/2 voltage setting 6 MIG torch
3 Wire speed adjustment knob 7 ON/OFF switch
4 Power cable 8 Thermal overload indicator

11
Assembly Instructions
5. aSSembly inStructionS
WARNING
Never plug the power cord (D) into an electrical outlet before
the appliance is fully assembled.
5.1 Installing the handle
1. Line up the holes in the handle with the holes on the top of
the welder.
2. Place a lock washer (1) and a washer (2) onto the welder
handle holes.
3. Insert a screw (3) through the washers and the holes on
the handle and into the top of the welder, and tighten the
screw (g A).
fig A
JM-1998594-05
1
2
3
5.2 Checking and selecting the appropriate drive
roller
1. Open the wire drive compartment.
2. Loosen the drive tension adjusting knob (1) and lift the drive
tension arm (2) away from the drive roller (g B).
JM-1998594-06
fig B
2
1
3. Place the wire spool (1) over the spool hub (2). Place the
roller plate (3), spring (4) and wing nut (5) above the wire
spool one by one.Tighten the wing nut (g C).
JM-1998594-07
fig C
1
2
3
4
5
Note: The wire should be fed from the bottom of the wire spool
into the drive mechanism.
4. Put one end of the wire (1) from the wire spool into the hole
on the outside edges of the driving mechanism (2) (g D).
JM-1998594-08
fig D
1
2
Note: If the wire is already installed in the welder, roll the wire
back onto the wire spool by manually rotating the wire spool
clockwise. Do not allow the wire to come out of the rear end of
the inlet guide tube.
5. Rotate the drive roller cap (1) counter-clockwise and remove
it from the drive roller (2) (g E).
JM-1998594-09
fig E
1
2
Note: Check whether the roller groove of the existing drive
roller is suitable for the chosen wire diameter. If not, proceed to
step 6 or step 7.

12 Assembly Instructions
6. Pull the drive roller (1) away from the drive roller shaft (2)
(g F).
JM-1998594-10
fig F
1
2
Based on the wire diameter, select the drive roller with the
appropriate roller groove. Install the selected drive roller over the
drive roller shaft.
Note: When installing the drive roller, the number stamped on
the drive roller should face the user. Push the drive roller onto
the drive roller shaft.
7. Reinstall the drive roller cap and lock in place by turning it
clockwise. Close the wire drive compartment.
5.3 Pre-adjustments
WARNING
• ALWAYS SWITCH OFF THE POWER AND UNPLUG THE
POWER CORD FROM THE AC POWER SOURCE BEFORE
INSTALLING THE WIRE.
• REMOVE ANYWIRE OR WIRE SPOOL THAT IS RUSTY.
• DO NOT WELD METALTHINNERTHAN 18 GAUGE, AS DOING
SO MAY BURN THE METAL.
• BEFORE INSTALLING, REMOVE ANY OLD WIRE FROM THE
MIG GUN ASSEMBLY TO PREVENT THE WIRE FROM BEING
JAMMED INSIDE THE GUN LINER.
• USE EXTREME CAUTION WHEN REMOVING THE WELDING
NOZZLE, AS THE CONTACT TIP ON THE WELDER IS LIVE
WHENEVER THE TORCH TRIGGER IS PULLED.
Select the type of wire using the following table:
Wire type Availability
0.023" MIG wire Yes
0.03" MIG wire Yes
Flux-core wire 0.03" Yes
1. Remove the nozzle (1) and contact tip (2) from the end of
the torch assembly (g G).
fig G
JM-1998594-11
1
2
2. Ensure the drive roller with proper groove is in place for the
wire to be installed.
3. Identify the leading end of the wire secured on the edge of
the wire spool.
Note: Do not unhook it at this time.
4. Place the wire spool (1) on the hub with the wire passing
from the bottom of wire spool into the drive mechanism (2)
(g H).
fig H
JM-1998594-12
X
2
1
Note: The welder can use either 4" or 8" spool. The 8" spool
requires an adaptor. The wing nut controls the tension on the
spool.

13
Assembly Instructions
5. Setting the wire spool tension:
a. Turn the wire spool (1) with one hand (g I).
b. Increase the spool tension by tightening the wing nut (2)
while turning the spool. Turn the spool until it slows down
(g I).
JM-1998594-13
fig I
NORMAL
NORMAL OVER CURRENT
SURINTENSITEE
ATTENTION:LE
CA
DE SOUDAGE
NO
GAS GAS
123
4 65
1
2
c. Stop tightening the wing nut.
d. Repeat the above steps until proper spool tension is
achieved.
Note: If high tension is applied to the wire spool, the wire slips
away from the drive roller groove. If less tension is applied, the
wire spool unspools itself when the trigger is released. Use the
wing nut to adjust the spool tension high or low.
6. Disconnect the welder from the power source, and remove
the leading end of the wire from the spool.
7. Cut o any bent portion of the wire using a wire cutter.
8. Loosen the tension adjusting knob holding the drive
tension arm in place and lift the tension arm up o the
drive roller.
9. Insert the wire into the inlet guide tube, and feed about
six inches of it across the drive roller and into the torch
assembly.
10. Line up the wire with the correct groove in the drive roller.
11. Place the drive tension arm above the drive roller.
12. Tighten the drive tension adjusting knob until the tension
roller is applying enough force on the wire to prevent it
from slipping in the drive roller.
13. Plug in and turn the welder ON. Set the voltage switch to
the voltage setting recommended for the gauge of metal
that is to be welded. Refer to page 11 for set up chart on
the back side of the wire drive compartment.
14. Set the wire speed control. Straighten the MIG gun cable
and pull the trigger in the gun handle to feed the wire
through the torch assembly.
15. Turn the power switch to the OFF position. Select a contact
tip that has the same diameter as the wire being used.
Note: Due to inherent variances in ux-core welding wire, it is
necessary to use a larger-sized contact tip than the wire.
16. Slide the contact tip over the wire, thread the contact tip
into the end of the gun and tighten securely.
17. Install the nozzle onto the gun assembly, and cut o excess
wire that extends past the end of the nozzle.
WARNING
ENSURE THAT WIRE PASSING OUT OF THE END OF THE TORCH
DOES NOT CONTACT THE WORKPIECE, GROUND CLAMP OR ANY
GROUNDED MATERIAL DURING THE DRIVE TENSION SETTING
PROCESS, AS DOING SO MAY REDUCE THE RISK OF ARC FLASH.
5.4 Setting the wire feed speed
1. To set the wire feed speed, initiate the welding operation
using the scrap workpiece (1).
2. While welding the scrap workpiece, turn the wire speed
adjustment knob (2) clockwise, and increase the wire
speed until the wire seems to feed smoothly without
slipping (g J).
JM-1998594-14
1
2
WIREFEED
ENTRAINEMENT
199-859 6
SOUDEUSE A D VIDAGE
DE FIL- LECTRODE SOUS GAZ
MIG/FLUX-CORE WIRE FEED WELDER
INERTEOU A AME EN FLUX
1
2
3
4
567
8
WARNING/AVERTISSEMENT
.Thiswelderis for use on a 20 A branch circuit.
DONOTREMOVETHIS LABEL / N’ENLEVEZ PAS CETTEÉTIQUETTE.
.Ifconnectedto a circuit protectedby fuses, use a time-delayed fuse marked “D”.
.Cettesoudeuserequiert un circuitde 20 A.
.Selasoudeuse est branchée áun circuit protégé par fusibles, utilisez un fusible
temporisé marqué <<D >>.
1
fig J
2

14 Assembly / Operating Instructions
5.5 Assembling the hand-held welding shield
1. Fix two protruding tabs (1) of the handle (2) into the
corresponding slots (3) provided at the bottom end of the
protective cover (4) (g K).
JM-1998594-15
fig K
1
2
3
4
2. Insert the lter glass (1) into the two glass latches (2)
provided in the protective cover (g L).
JM-1998594-16
fig L
1
2
6. operating inStructionS
WARNING
• DURING WELDING OPERATION, OPERATORS MUST USE
SAFETY GOGGLES AND A HAND-HELD WELDING SHIELD
OR HELMET EQUIPPED WITH A SUITABLE FILTER GLASS
TO PROTECT AGAINST THE INTENSE ULTRAVIOLET AND
INFRARED RAYS.
• PROLONGED EXPOSURE TO THE WELDING ARC CAN CAUSE
BLINDNESS AND BURNS.
6.1 Tuning in the wire speed
•The wire speed should be tuned in before starting the
welding operation, and whenever the heat setting, wire
diameter, or wire type are changed.
6.2 Current overload button
•The overload button (1) is used to control the wire feed
speed when there is uctuation in the power supply. Under
normal conditions, the overload button should be pressed
in. Under overload conditions, the overload button should
be released (g M).
JM-1998594-17
NORMAL OVER CURRENT
1
fig M
WARNING
• NEVER STRIKE THE ARC OR START WELDING UNTIL THE
USER IS ADEQUATELY PROTECTED.
• WEAR FLAMEPROOF WELDING GLOVES, HEAVY LONG
SLEEVED SHIRT,TROUSERSWITH OUT CUFFS, HIGHTOPPED
SHOES. FAILURE TO COMPLY COULD RESULT IN SERIOUS
INJURY OR DEATH.
6.3 Holding / using the torch (MIG gun)
•Before starting the welding operation, nd a suitable
position for holding the torch.
•Hold the nozzle at a constant distance from the workpiece.
The distance between the nozzle and the workpiece should
not exceed ¼".

15
Operating Instructions
1. Connect the ground clamp to a scrap piece of the same
material as that of the workpiece to be welded.
Note: The thickness of the scrap piece should be equal to
or greater than the thickness of the actual workpiece, and
free of oil, paint, and rust.
2. Select the heat setting.
3. Hold the torch in one hand, and allow the nozzle to rest
on the edge of the workpiece farther from the user and
at a desired angle for welding. There are two angles of
the torch nozzle in relation to the workpiece that must be
considered when welding.
Angle A
60
fig N
JM-1998594-18
• Angle A can be varied, but in most cases the optimum
angle will be 60 degrees (the point at which the torch
handle is parallel to the workpiece). If angle A is
increased, penetration will increase, and if it is decreased
penetration will decrease (g N).
Angle B
30 45
fig O
JM-1998594-19
• Angle B can be varied to improve the visibility of the arc
in relation to the weld puddle and to direct the force of
the arc (g O).
4. Turn the wire speed adjustment knob with the other hand
to its maximum position and continue to hold onto the
knob.
5. Pull the trigger (1) on the torch to start an arc. Drag the
torch towards the user while simultaneously turning the
wire speed adjustment knob counter-clockwise (g P)
fig P
JM-1998594-20
1
6. When the wire speed decreases, the sound that the arc
makes will change from a sputtering sound to a high-
pitched buzzing sound. The correct setting is the point
where the high-pitched buzzing sound is achieved.
Use the wire feed control to slightly increase or decrease
the heat and penetration by selecting higher or lower wire
feed settings. Repeat this tune-in procedure if a new heat
setting, a dierent diameter wire, or a dierent type of
welding wire is selected.
Note: Clean the base material using chipping hammer/
wire brush combination (1) before you start welding and
between each welding pass to avoid contaminants that
lead to poor welds (g Q).
fig Q
JM-1998594-21
1

16 Operating Instructions
6.4 Welding techniques
WARNING
• PROLONGED EXPOSURE TO THE WELDING ARC CAN CAUSE
BLINDNESS AND BURNS.
• DO NOT PERFORM ANY WELDING WHILE STANDING,
KNEELING, OR LYING ON THE GROUNDED AREA. FAILURE
TO COMPLY COULD RESULT IN SERIOUS INJURY OR DEATH.
•Torch travel: The movement of the torch along the weld
joint. For a solid weld bead, the welding torch should be
moved steadily and at the right speed along the weld joint.
Moving the torch too fast, too slowly, or erratically prevents
proper fusion and creates a lumpy, uneven bead.
•Travel direction: The direction of the torch (1) moving
along the weld joint in relation to the weld puddle (2). The
torch is either pushed into the weld puddle or pulled away
from the weld puddle. For most welding jobs, pull the torch
along the weld joint for greater weld puddle visibility (g R).
fig R
JM-1998594-22
1
2
•Travel speed: The rate at which the torch is being pushed
or pulled along the weld joint. For a xed heat setting, if the
travel speed is faster, the penetration will be low and the
nished weld bead will be low and narrow. Likewise, if the
travel speed is slow, the penetration will be deep and the
nished weld bead will be high and wide.
6.5 Types of welding beads
Stringer bead
• The stringer bead (1) is formed by travelling with the
torch (2) in a straight line while keeping the wire and
nozzle centered over the weld joint (g S).
fig S
JM-1998594-23
2
1
Weave bead
• The weave bead (1) is made by weaving the wire from
side to side while moving with the torch (2) (g T).
fig T
JM-1998594-24
12
6.6 Welding position
1. Flat position: This position is easiest and most commonly
used. It is best to weld in the at position to achieve good
results (g U).
fig U
JM-1998594-25

17
Operating Instructions
2. Horizontal position: This position prevents the weld
puddle from running downward while allowing slower
rates of travel speed. For this position, angle B should be
about 30 degrees downward from being perpendicular to
the workpiece (g V).
fig V
JM-1998594-26
3. Vertical position: The torch can be easily pulled from
top to bottom in this position, though it is dicult to
prevent the puddle from running downward. Pushing the
torch from bottom to top provides better puddle control
and allows slower rates of travel speed to achieve deeper
penetration. For this position, angle B should be zero and
angle A will vary from 45 to 60 degrees to provide better
puddle control (g W).
fig W
JM-1998594-27
4. Overhead position: This is the most dicult welding
position. For this position, angle A should be maintained
at 60 degrees. Maintaining this angle will reduce falling
of molten metal into the nozzle (g X). Angle B should be
zero degrees so that the wire is aiming directly into the
weld joint. If excessive dripping of the weld puddle occurs,
select a lower heat setting.
fig X
JM-1998594-28
6.7 Multiple pass welding
•Butt weld joint: When butt welding thicker materials,
prepare the edges of the material to be joined by grinding a
bevel on the edges of the metal pieces being joined. When
this is done, a "V" is created between the two metal pieces.
In most cases, more than one pass or bead will need to be
laid into the joint to close the "V" (g Y).
fig Y
1
2
1
1
23
First or
Root Pass
Second
Pass
Third
Pass
Finished
Weld
JM-1998594-29
Note: When using a self-shielding ux-core wire, it is
necessary to thoroughly chip and brush the slag o each
completed weld bead before making another pass.

18 Operating Instructions
•Fillet weld joint: Most llet weld joints on metals of
moderate to heavy thickness will require multiple pass welds
to produce a strong joint. The sequence of lying multiple pass
beads into aT llet joint and a lap llet joint is shown below
(g Z).
fig Z
1
12
3
2
3
Lap Joint Welded
In Three Passes
T Join in
Three Passes
JM-1998594-30
6.8 Spot welding
There are three methods of spot welding:
1. Burn-through method: In this method, two overlapped
metal pieces are welded together by burning through the
top piece and into the bottom piece. The wire suitable for
this method is a 0.035 inch self-shielding, ux-core wire.
Always select the high heat setting for this method and tune
in the wire speed prior to making a spot weld (g a).
fig a
JM-1998594-31
Note: Do not use a 0.030 inch self-shielding ux-core
wire when using this method unless the metal is very
thin, or excessive ller metal and minimal penetration are
acceptable.
2. Punch and ll method: This method produces a weld
with the most nished appearance. In this method, a hole
is punched or drilled into the top piece of metal and the arc
is directed through the hole to penetrate into the bottom
piece.The puddle is allowed to ll up the hole leaving a spot
weld that is smooth and ush with the surface of the top
piece (g b).
fig b
JM-1998594-32
3. Lap spot method: The welding arc is directed to penetrate
the bottom and top pieces at the same time, and along each
side of the lap joint seam. Select the wire diameter, heat
setting, and tune in the wire speed so they are suitable for
welding the material with a continuous bead (g c).
fig c
JM-1998594-33
Spot welding procedure
1. Select the wire diameter and heat setting recommended
above for the intended method of spot welding.
2. Tune in the wire speed as if a continuous weld is to be
performed.
3. Hold the nozzle piece completely perpendicular to and about
¼ inch o the workpiece.
4. Pull the trigger on the torch and release it when the desired
penetration is achieved.
5. Make practice spot welds on scrap metal and vary how long
the trigger is held until a desired spot weld is made.
6. Makespotweldsontheactualworkpieceatdesiredlocations.

19
Maintenance
7. Maintenance
WARNING
• UNPLUG THE WELDER BEFORE PERFORMING ANY MAINTENANCE OR SERVICE.
• ONLY USE THE WELDER AFTER REPLACING OR REPAIRING ANY DAMAGED PARTS OR ACCESSORIES.
• USE ONLY RECOMMENDED AND PROPERLY-RATED REPLACEMENT PARTS. FAILURE TO COMPLY COULD LEADTO SERIOUS INJURY
OR DEATH.
Maintenance
required Description
Tools or
materials
required
Maximum service interval
Each use or
every 2 hrs Monthly As
needed
In-depth
inspection
Worn or
broken parts – – X X
Replace worn or
broken parts – – – – X
The welder needs regular maintenance as follows:
• Clean the dust, dirt, and grease periodically from the welder.
• Every six months, remove the front panel from the welder to clear the accumulated dust and dirt.
• Replace power cord, ground cable, ground clamp, or electrode assembly when damaged or worn.
• Repairs must be performed by a qualied service technician only.
Storage
• Store the welder in a clean and dry location away from corrosive gas and excess dust at a temperature of 10°F-120°F and
relative humidity of less than 90%.
• It is recommended to repack the welder when transporting or storing the welder after use.
• Cleaning is required before storage

Table of contents
Popular Welding System manuals by other brands

Thermal Arc
Thermal Arc 250GTSWSE operating manual

Lincoln Electric
Lincoln Electric Air Vantage 566X Hydraulic Operator's manual

Lincoln
Lincoln INVERTEC 170TX Operator's manual

Longevity
Longevity WeldMax 185i operating manual

Kühtreiber
Kühtreiber 150 TIG LA RS Instructions for use and maintenance

Migatronic
Migatronic Focus Tig 200 AC/DC quick guide