JOYEE M800 User manual

※請仔細閱讀此說明書,以確保您可以在最短時間內完成安裝。
Please read this instruction carefully to ensure the installation is completed.
Installation instruction
安裝說明書
※Reusable
※可重複使用
PEGASUS/TYPICAL/JOYEE
M800、M700、M952、MX5204、
2015.05 / 1.4
請接地線 以免觸電
Please connect ground wire. Avoid electric shock.
EX5214、GN2000、JY-B804、JY-B805

2PEGASUS / TYPICAL / JOYEE
(二)安裝電控箱、速度機座
Install the control box and speed unit
前言 PREFACE:
◎請依本說明書頁次按照順序安裝與調整,以確保您可以在最短時間內得到最佳運轉效果。
(三)安裝汽缸壓腳
(一)安裝氣動組
SW0909
M6x12
桔色Orange
藍色Blue
M6
M6x8 M4x6
(四)安裝切刀組
透明Clear
Install the foot lifter cylinder
6x4-700*1
∅6x4-700*1
∅
Install the cutter
4x2.5-800*1
∅
4x2.5-800*1
∅
4x2.5-900*1
∅
藍色Blue
桔色Orange
流量塞頭
plug of air-control
黑色Black
8x5-800*1
∅
BC
D
E
F
保險絲 Fuse
P.5
P.7
P.9
P.6
SW0939 SW0939
Install the pneumatic unit
使用方法見最後一頁
贈品
Please follow the instruction manual so that you get the best efficiency of the device.
See last page for the usage.
A
F R E E G I F T

3
PEGASUS / TYPICAL / JOYEE
(八)安裝380W直驅馬達
(九)安裝電眼座組
Install 380W Direct Drive servo motor
Install the sensor bracket
(五)安裝鬆線組 (六)安裝風管座
透明Clear
4x2.5-1000*1
∅
Install the thread tension regulator. Install the air tube bracket
流量塞頭
plug of air
-
control
H
P.12 P.15
P.22
P.25
(七)安裝吸棉屑組
6#X5/8
∅3分半x1.5-750*1
黑色Black
6x4-600*1
∅黑色Black
6x4-600*1
∅
Install the frame pipe and tube
K
J
P.17
萬用束帶300mm universal tie *2
萬用繩200mm universal tie *8
黑色Black
4x2.5-1000*2
∅
M4x8
M3x6
M4x12
或
or
M4x8
M3x6
M4x12
M4x8
用於M700和GN2000
Used to M700
and GN2000.
Only 6threads
六線才有
L
塑膠螺紋軟管
Plastic threaded hos
e
11x8-400*1
∅
塑膠螺紋軟管
Plastic threaded hose
I
SW0909
SW0105
G
M
EX5214 M800

4PEGASUS / TYPICAL / JOYEE
萬用束帶 Cable tie*10
※工具包
3mm 4mm
2.5mm 1.5mm
2mm
※六角華司木頭螺釘,建議使用工具。
約5mm
①先使用工具將螺絲完全鎖上桌板
②安裝氣動組時,將螺絲退到能與零件組裝的距離,約5mm
※其它組件安裝時直接將螺絲完全退出。
※其它組件安裝時
將螺絲完全退出
①
②
安裝氣動組
※It would be better to use the hexogen washer wooden screw by tools.
①Firstly tighten the screws completely under the table by tool.
②Loose the screw around 5mm to install the components for installing the pneumatic set.
※Need to be completely loosened.
Install the pneumatic set
桌板
Table
※Screws need to be completely loosened
for installing other components.
5mm
or
或
8mm
8mm
7mm
Tool bag
(A箱)(BOX A)
贈
品萬用束帶 Cable tie*3
5mm
DINO Lubricant Made
DINO 德製油精
in Germany.

5
PEGASUS / TYPICAL / JOYEE
貼緊桌邊
A
A
close to the
(一)安裝氣動組
SW0909
(B箱)(BOX B)
Install pneumatic unit
黑色Black
8x5-800*1
∅
(A).氣動組安裝方法
①②
Method of pneumatic installation
A
table

6PEGASUS / TYPICAL / JOYEE
90°
(二)安裝電控箱、速度機座
(A)將電控箱、速度機座鎖上桌板
(A箱)(BOX A) (B箱)(BOX B)
Install control box、speed unit
Fix the control box and speed unit on the table.
保險絲 Fuse SW0939
SW0939
a
b
沒此螺絲時
SW0939
Without this screw situation.
踩
Step 放開
Release
2. 組裝完後,踏板測試
Test the pedal after installation.
不可過緊
踩踏板時
Release the pedal
踏板放開時
Step the pedal
3. 檢查踏板靈活度,請檢測 1 及 2
1
2
1 . 檢查踏板是否被鎖太緊,會導致踏板卡住無法回復。
2 . 檢查角度是否過大。
Check the pedal whether it's too tight or not. If yes, it could cause the pedal stuck and unable to be back.
Check the angle whether it's too wide. The angle 90° is available.
Please check 1 and 2 firstly before check the flexibility of pedal.
注意!當放開踏板時要回歸。
1. 組裝方式 Installation measure
It has to be back once
release the pedal.
Caution!
it too close.
Do NOT keep
0
231
0
231

7
PEGASUS / TYPICAL / JOYEE
(三)安裝汽缸壓腳 M6x12
M6
先別鎖緊
(B箱)(BOX B)
桔色Orange
藍色Blue
Install the foot lifter cylinder
6x4-700*1
∅
6x4-700*1
∅
(A)卸下原廠零件
Disassemble the original part
(B)將汽缸壓腳鎖上先別鎖緊
Install the foot lifter cylinder and leave it loose for now.
Leave them loose for now.
M700、GN2000
先別鎖緊
Leave them loose for now.
機型
BC
JY-B804、JY-B805、M952
Model
M800、MX5204、EX5214、 機型
Model

※安裝注意事項 :
Caution:
調整壓腳高度:
8PEGASUS / TYPICAL / JOYEE
(D)將壓腳汽缸風管接上氣閥
約1mm
調整至按下壓桿時,壓腳抬起離彎針約1mm的
緩衝空間。
Connect the tube of foot lifter cylinder to the valves
(C)調整好後將螺絲鎖緊
Height adjustment of presser foot:
Make a space between the presser foot and looper
to 1mm after presser foot raised once press the rod.
彎針
looper
可微調高低
Height can be adjustable.
Tighten the screws after all adjustment is done.
Tighten the screws after adjusting the height
調整好壓腳高度後,將螺絲鎖緊
of presser foot.
藍色Blue
藍色Blue
桔色Orange
桔色Orange
B
B
C
C
B藍色Blue
6x4-700
∅
C桔色Orange
6x4-700
∅
(E)裝回原廠零件
Reinstall the original part.
(限定M700、GN2000)

9
PEGASUS / TYPICAL / JOYEE
M6x8 M4x6
(四)安裝切刀組
(A)先將原廠零件拆下。
Install the cutter
透明Clear
4x2.5-800*1
∅
4x2.5-800*1
∅
4x2.5-900*1
∅
藍色Blue
桔色Orange
Firsly disassemble the original parts.
流量塞頭
plug of air - control
D
E
F
使用附贈工具拆卸
Disassembled by our tools.
7mm
EX5214、MX5204、JY-B804、JY-B805需拆壓腳
For EX5214, MX5204, the presser foot needs to
be disassembled.
(A箱)(BOX A)
僅M800(4線),M952需拆針板及蓋子
For M800(4threads) and M952, the needle
plate and cover need to be disassembled.
請先鬆開此螺絲
Please loosen the screw first.

10 PEGASUS / TYPICAL / JOYEE
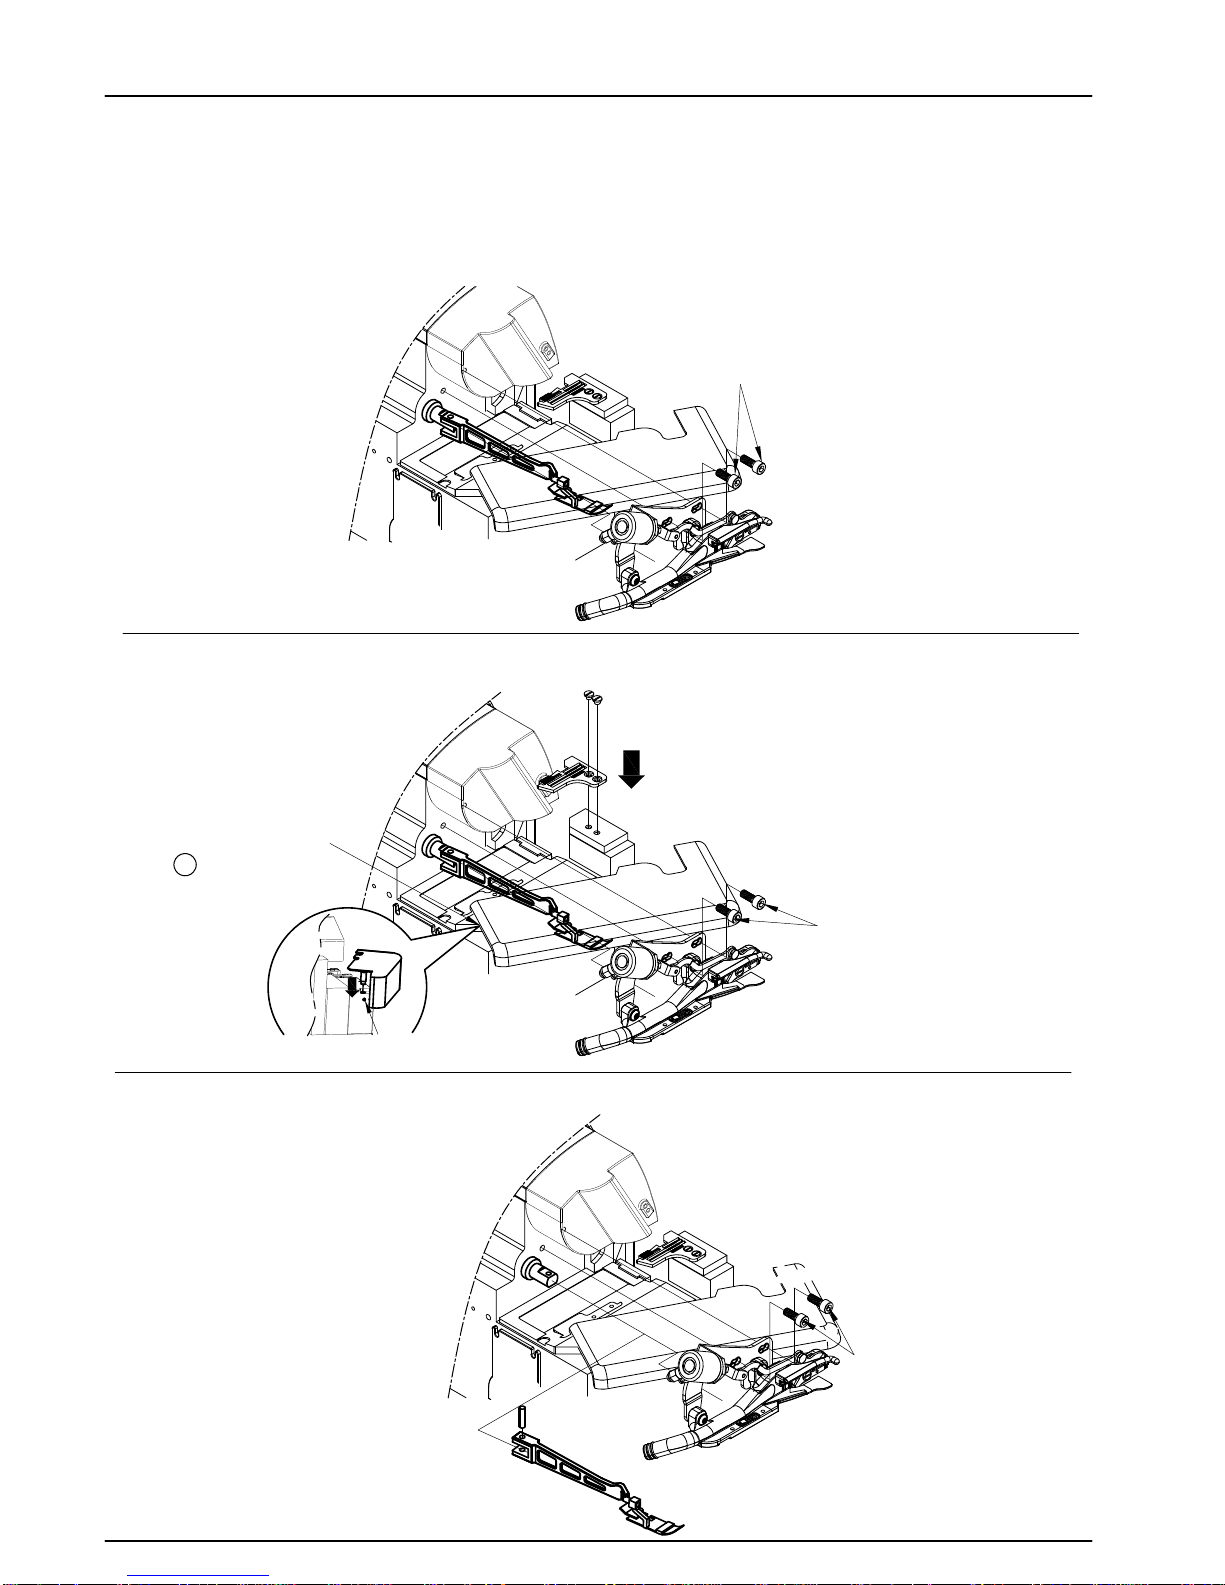
(B)先將切刀組鎖上再將原廠零件裝回
Firstly install the cutter then reinstall the original plate.
M6x8*2
②將針板裝上
①穿過壓腳裝上切刀組
Install the needle plate.
Across the presser foot then
install the cutter.
M6x8*2
①裝上切刀組
②裝回壓腳
Install the cutter.
Reinstall the presser foot.
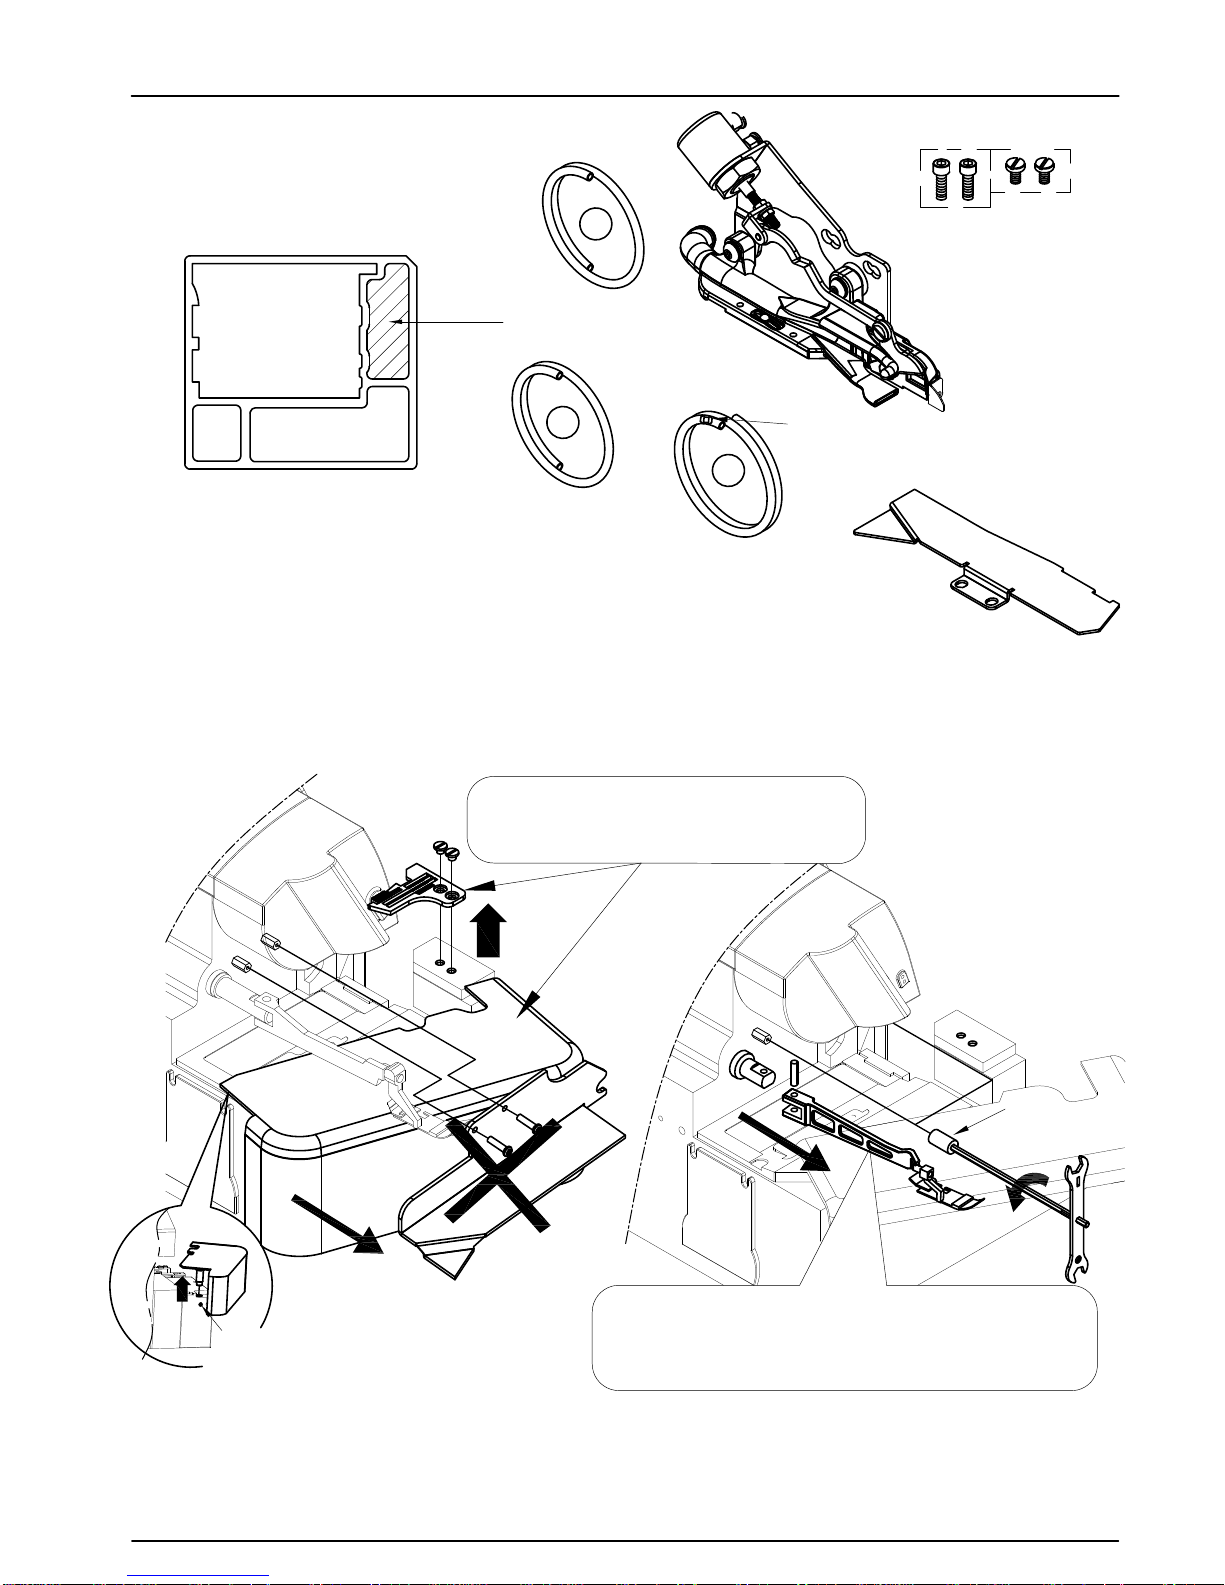
機型 Model:MX5204、EX5214、JY-B804、JY-B805
安裝步驟 The installation procedure :
M6x8*2
①穿過壓腳裝上切刀組
Across the presser foot then
install the cutter.
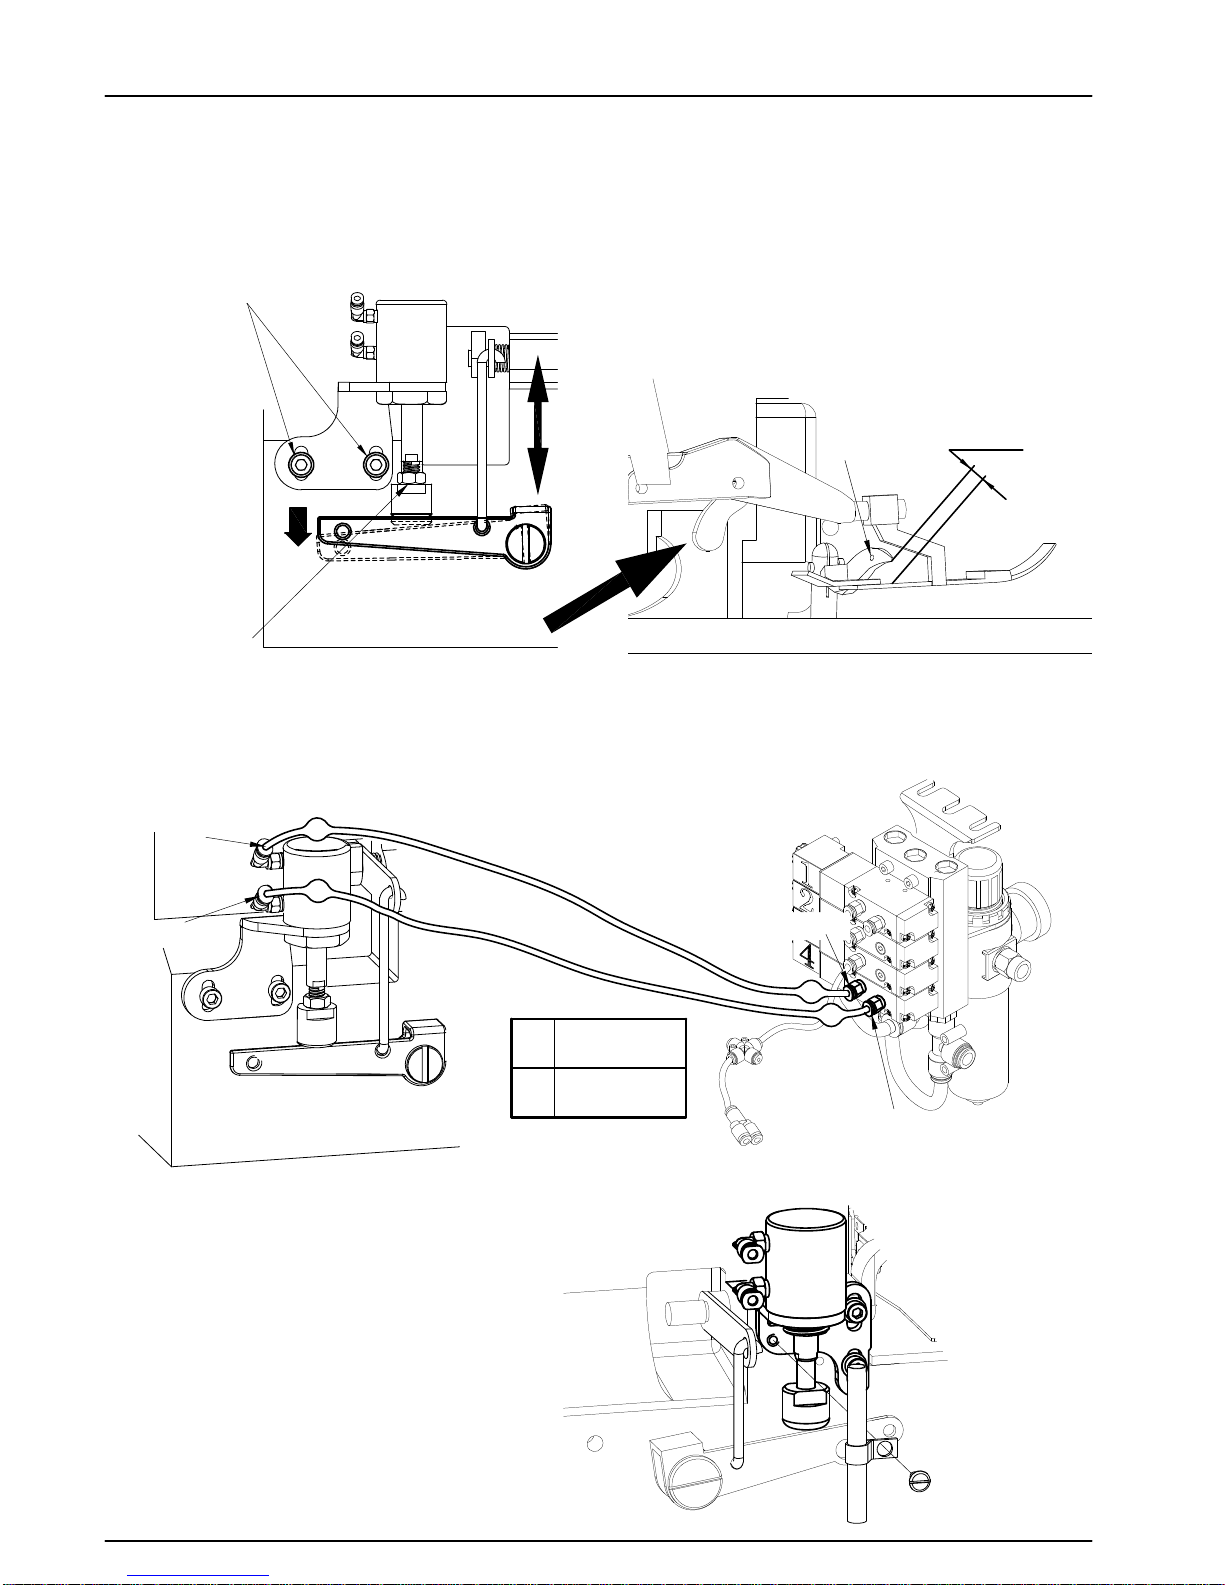
機型 Model:M800、M952 (4線 4threads )
3 將蓋子裝上
Install the cover.
放下蓋子後,鎖緊此螺絲
Fasten the screw after put down the cover.
機型 Model:M700、M800(5線 5threads)、GN2000

11
PEGASUS / TYPICAL / JOYEE
M4x6*2
(D)將切刀吸風組風管都接上氣閥
(C)將風管檔板鎖上
Install the tube plate.
The tube of cutter and vacuum all are connected to the valves.
桔色Orange
桔色Orange
藍色Blue
透明Clear
4x2.5-900*1
∅
藍色Blue
D
EE
D
D藍色Blue
4x2.5-800
∅
E桔色Orange
4x2.5-800
∅
F透明Clear
4x2.5-900
∅
F
F
橡膠可防檔板震動
Rubbers setting can be reduced plate vibration.
為了防止機械的錯誤動作或損傷,組裝後請確認如下圖示:
Please check following diagram after installation in order to prevent the malfunction and error
!
標準式壓腳
Two-piece presser foot ( denim exclusive)
左
Left
右
Right
Hole Normal presser foot
孔位 兩截式壓腳(牛仔布專用)
縫隙
position
gap
of machine operation.

12 PEGASUS / TYPICAL / JOYEE
1234
注意:拆一顆裝一顆
※墊圈凸點需插入鬆線墊圈孔
(A)將原廠夾線座拆下裝在本廠夾線座
(五)安裝鬆線組
Install the thread tension regulator
Disassemble the parts of original thread tensions regulator then install one of DINO made.
Note: Disassemble and
install one by one.
※The convex of washer needs to be
inserted into the hole of thread
DINO washer
本廠墊圈
12
4
3
(B)M700和GN2000需將原廠保護蓋拆下
For model M700 and GN200, the original safety cover need to be disassembled.
(B箱)(BOX B)
Only 6threads
六線才有
5
Only 6threads
六線才有
tension washer
黑色Black
4x2.5-1000*2
∅
G
M
EX5214 M800

13
PEGASUS / TYPICAL / JOYEE
(D)將本廠鬆線組裝上
Install our thread tension regulator.
Only 6threads
六線才有
(C)先拆下原廠油壺,加裝上油壺墊高片
M800 EX5214
一字半圓頭螺絲
英制螺絲
油壺墊高片
M4x6
11/64-40*6
Oil container spacer
油壺墊高片
Oil container spacer
Please take off oil container and install the oil container spacer.

14 PEGASUS / TYPICAL / JOYEE
(E)調整無頭螺絲至碰到機頭
將無頭螺絲轉至靠到機頭
(F)將鬆線風管接上氣閥
黑色Black
※鬆線上視圖
Adjust the headless screw till it touched the machine head.
Turn the headless screw till it touched the machine head.
Connect the air tube of thread tension regulator to the valves.
Vertical view of thread
tension regulator.
輕鎖
G
G黑色Black
4x2.5-1000
∅
Tighten it lightly
M黑色Black
4x2.5-1000
∅
M
G
M
注意風管所接的位置

(六)安裝風管座
(A)將原廠零件拆下
(B)將風管座裝上
7mm
①先將透明∅4x2.5-1000軟管裝上風管座
原廠螺絲
②將風管座鎖上
透明Clear
4x2.5-1000*1
∅
Install the air tube bracket
Disassemble the original parts.
Install the air tube bracket.
Original screw
Tighten the screw on the air tube bracket.
流量塞頭
plug of air-control
(A箱)(BOX A)
Firstly install the 4x2.5-1000
∅
clear color of air tube on the bracket.
H
原廠螺絲 / M700和GN2000使用本廠螺絲。
M4x8
用於M700和GN2000
Using for M700
and GN2000.
Original screw. Please use our screw if
it's for M700 and GN200.
I
11x8-400*1
∅
塑膠螺紋軟管
Plastic threaded hose
15
PEGASUS / TYPICAL / JOYEE

16 PEGASUS / TYPICAL / JOYEE
(C)將風管夾裝上
①M3x3螺絲風管夾,夾上機頭後鎖緊
②裁縫車運轉時不可觸碰到軟管
③將透明∅4x2.5-1000軟管
接上氣動組
(D)將風管插入,萬用繩固定
風管用萬用繩固定
將塑膠螺紋軟管∅11x8-400
放入圖面位置
Install the tube clip
Insert tube and fix by universal tie
Fix the air tube by the universal tie.
Connect 4x2.5-1000 clear
∅
color of air tube on the valve.
Install M3x3 screw tube clip on the
machine then tighten it.
Setting 11x8-400 Plastic threaded hose
∅
of air tube following the diagram.
將原廠零件裝回
(E)裝回原廠零件
Reinstall the original part.
①
②
約41mm
H
I
The tube do not touch the parts
as following point during operation.
※注意將熱縮套管那頭插入
Noticed: The heat shrinkable tube insert the pipe.

(七)安裝吸棉屑組
6#X5/8
建議使用電動工具
(A)先將漏斗安裝上
(B箱)(BOX B)(A箱)(BOX A)
Install the frame pipe and tube
黑色Black
6x4-600*1
∅
黑色Black
6x4-600*1
∅
Firstly install the funnel
JK
可依個人需求修剪其外型。
To trim exterior appearance according to
6#X5/8
萬用束帶200mm universal tie*8
萬用束帶300mm universal tie*2
L
personal demand.
∅3分半x1.5-750*1
塑膠螺紋軟管
Plastic threaded hose
Note: Use electric
tool to be better.
SW0909
SW0105
17
PEGASUS / TYPICAL / JOYEE

18 PEGASUS / TYPICAL / JOYEE
(B)將下風管安裝上
下風管用萬用束帶300mm固定
Install the lower pipe
Fasten the lower pipe by a 300mm universal tie.
1
2
3
4
(C)將Y型風管裝上下風管和轉接管
Connect Y-pipe with other tube.
(D)風管安裝位置可依個人需求調整
The position of air pipe is adjustable according to personal demand.
A
B
C
Y型風管須對齊定位柱,推到底部,旋轉即可固定。
Y-pipe is aligned to the location column and push to the bottom.
The Y-pipe fixed by turning.

19
PEGASUS / TYPICAL / JOYEE
12#x1
A黑色Black
8x5-800
∅
將束口布屑袋裝上風管
Put the drawstring bag on the pipe.
(F)將束口布屑袋裝上風管
Put the drawstring bag on the pipe.
(E)使用螺絲固定風管組
Fasten the air pipe by screw
A
※使用螺絲固定風管組
Keep it sloped.
保持斜度
內六角螺絲M4x8
M4x8
※Fasten the air pipe by screw
①

(G)將軟管都接上氣閥
Connect the tubes to the valves
H
J
A
I
L
L
A黑色Black
8x5-800
∅
H透明Clear
4x2.5-1000
∅
I螺紋軟管Threaded hose
11x8-400*1
∅
黑色Black
6x4-600
∅
K黑色Black
6x4-600
∅
L∅3分半x1.5-750
J
氣壓需達
Air pressure
60 Psi
must get to
K
螺紋軟管Threaded hose
A
20 PEGASUS / TYPICAL / JOYEE
H
KJ
This manual suits for next models
7
Table of contents
Other JOYEE Sewing Machine manuals