KaiCong SIP1016 User manual

IP Camera
(KaiCong IP camera SIP1016)
S
SI
IP
P1
10
01
16
6
SIP1016
U
Us
se
er
r
m
ma
an
nu
ua
al
l
2013-03-20 V1.0

Kaicong-Nothing important than safety!
Anything else ,please contanct me.
2
Index
1Introduction ...................................................................................................................... 4
1.1 The package includes ................................................................................................ 4
1.2 Function and Features ............................................................................................... 4
1.3 Technical Parameters................................................................................................. 5
2Appearance and interface............................................................................................... 6
2.1 SIP 1016..................................................................................................................... 6
3Visit IP Camera from LAN................................................................................................ 6
3.1 LAN Connection ......................................................................................................... 6
3.2 Search and set the IP address of IP camera.............................................................. 7
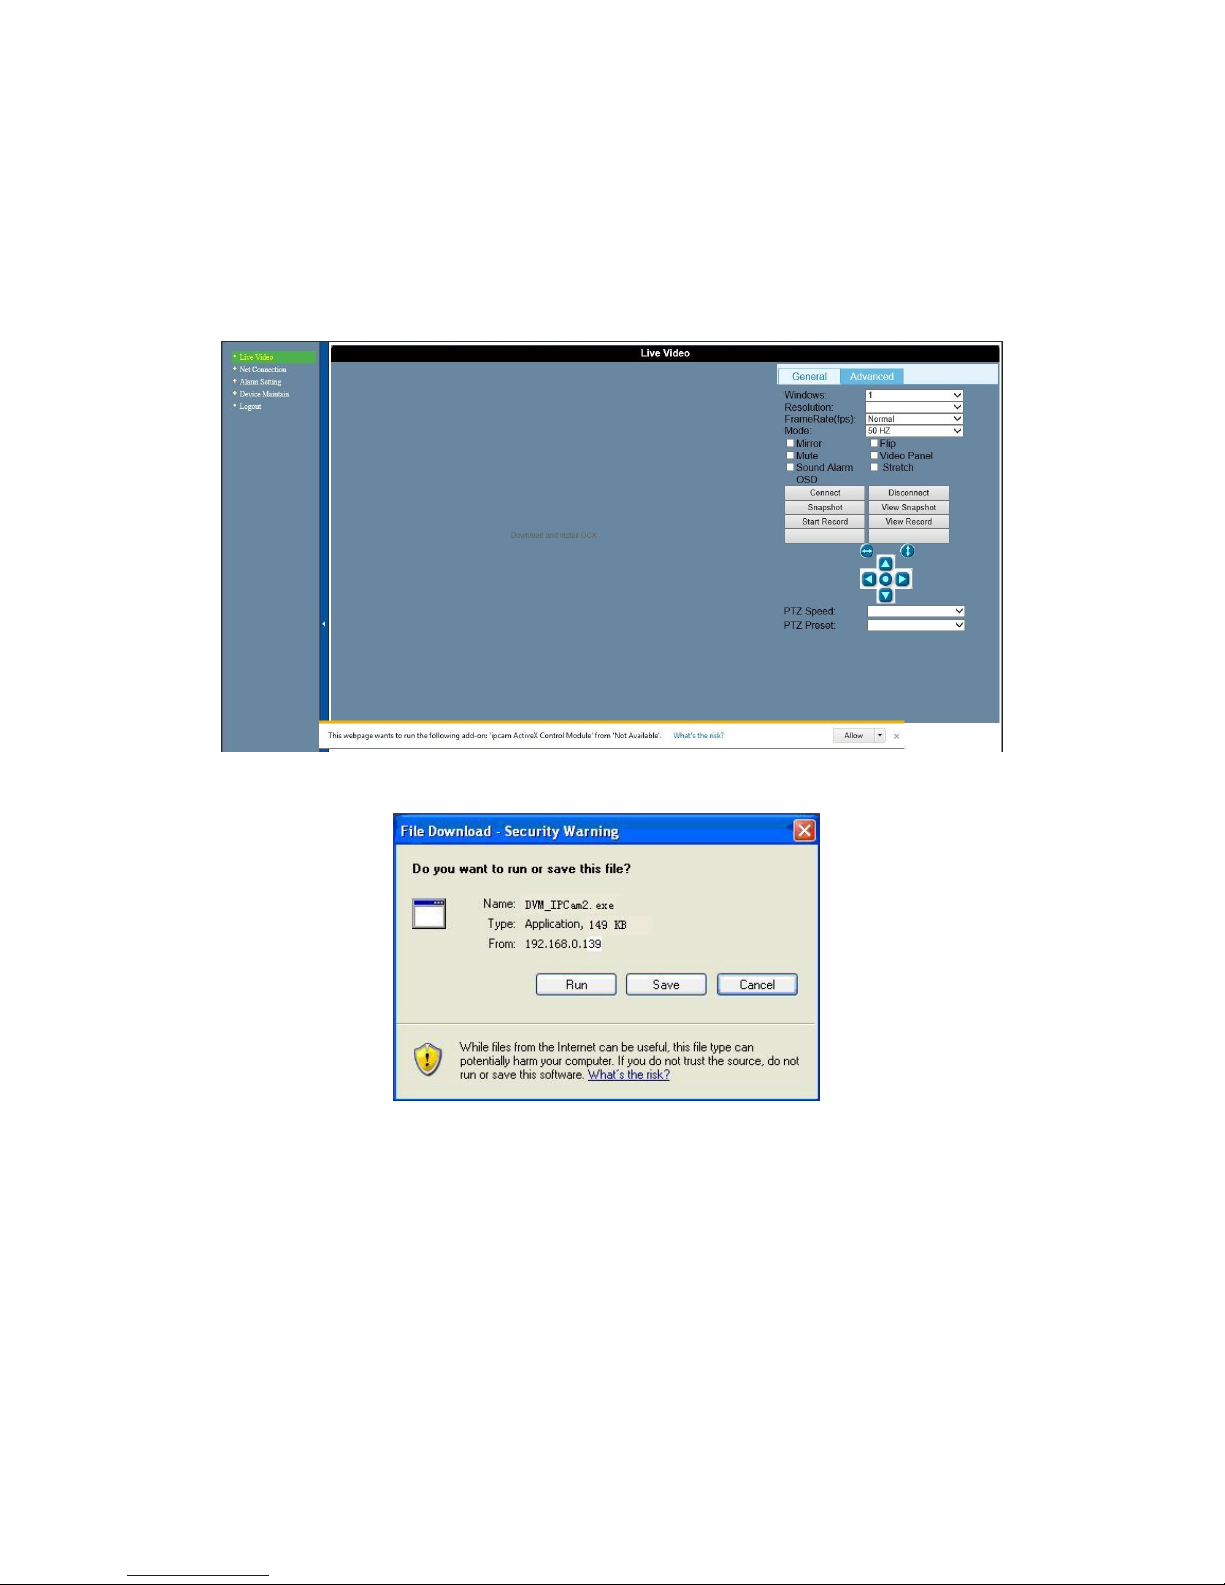
3.3 Visit IP Camera........................................................................................................... 9
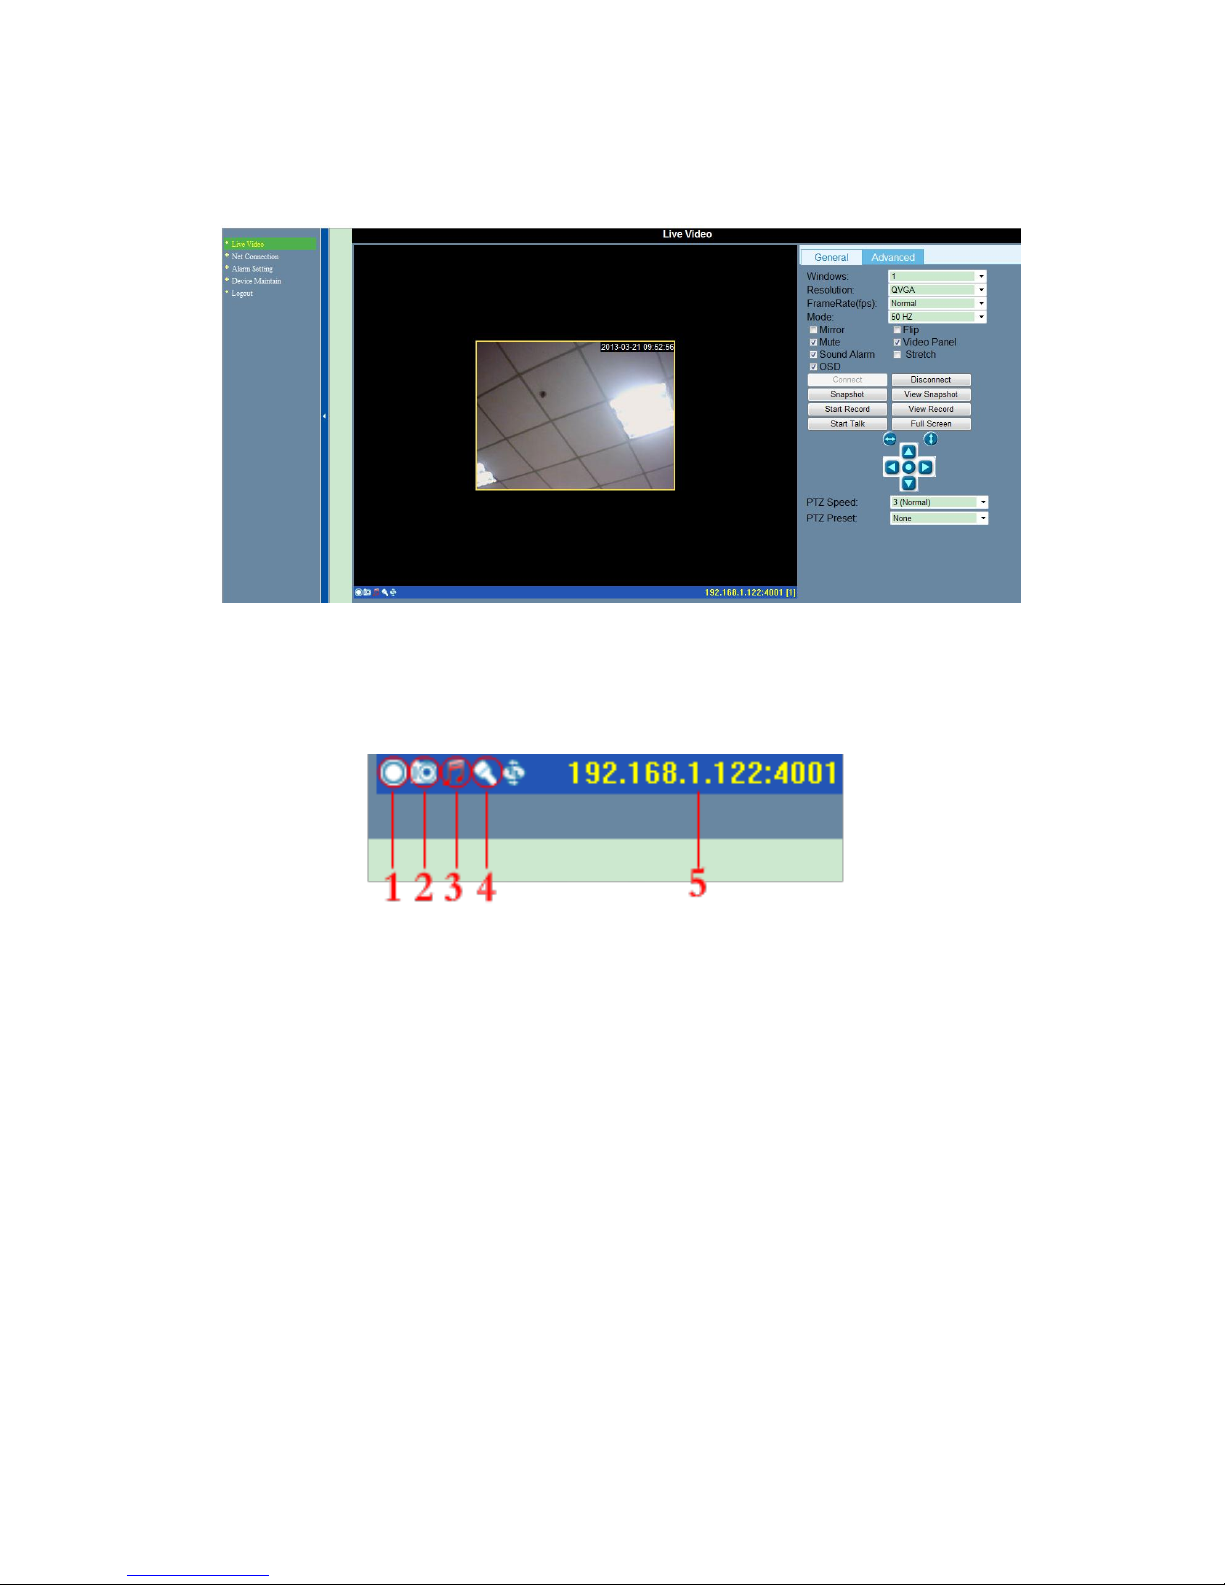
3.3.1 Video playing area................................................................................................ 10
4Visit IP Camera from WAN............................................................................................. 12
4.1 Wan connection........................................................................................................ 12
4.2 Port forwarding......................................................................................................... 13
4.3 DDNS ....................................................................................................................... 13
4.3.1 Manufacturer’s DDNS........................................................................................... 14
4.3.2 Third Party DDNS................................................................................................. 14
5Settings........................................................................................................................... 15
5.1 Network Setting........................................................................................................ 15
5.1.1 Basic Network Setting........................................................................................... 15
5.1.2 WIFI Setting.......................................................................................................... 15
5.1.3 UPnP Setting ........................................................................................................ 16
5.1.4 DDNS Setting ....................................................................................................... 16
5.1.5 MSN Setting.......................................................................................................... 17
5.2 Alarm Settings.......................................................................................................... 18
5.2.1 Motion Detect........................................................................................................ 18
5.2.2 Mail Service Setting.............................................................................................. 19
5.2.3 FTP Service Setting.............................................................................................. 19
5.3 Advanced.................................................................................................................. 20
5.3.1 Device Information................................................................................................ 20
5.3.2 Device name......................................................................................................... 20
5.3.3 User account......................................................................................................... 20
5.3.4 Change Password ................................................................................................ 21
5.3.5 Date and Time ...................................................................................................... 21
5.3.6 Outer Device......................................................................................................... 21
5.3.7 PTZ Setting........................................................................................................... 22
5.3.8 PTZ Preset............................................................................................................ 23

Kaicong-Nothing important than safety!
Anything else ,please contanct me.
3
5.3.9 Local Setting......................................................................................................... 23
5.3.10 Update Software................................................................................................... 24
5.3.11 Update WebPages................................................................................................ 24
5.3.12 Reboot Device ...................................................................................................... 24
5.3.13 Device Setting....................................................................................................... 25
5.3.14 Log........................................................................................................................ 25
6Centralization Control.................................................................................................... 26
7SeeSeeSee...................................................................................................................... 43
8FAQ.................................................................................................................................. 43

Kaicong-Nothing important than safety!
Anything else ,please contanct me.
4
1 Introduction
The IP Camera combines a high quality digital video camera with network connectivity
and a powerful web server to bring clear video to your desktop from anywhere on your
local network or over the Internet.
1.1 The package includes
IP Camera * 1
5V Power Adapter * 1
Stand of plastic * 1
IP Camera Utility CD * 1
Cable * 1
1.2 Function and Features
MJPEG Compression format, there are optional VGA/QVGA video resolutions.
User can change some parameters according to their demands to satisfy his own
individual preferences;
Built-in Microphone, it allows user to monitor the sound on the site. User can also
connect this equipment to the speaker, and it supports two-way intercom function;
Built-in pan/tilt function, horizontally 270°and vertically 120°. Its outlook is smart,
easy and convenient to install in many sites;
By the built-in WEB SERVER, support a variety of webpage browsers to watch
video and parameter settings, use one port to transfer all of the data, easy for the
user to do network settings
Support 802.11b/g/n protocol, can build up wireless monitoring;
Support UPNP, can automatically do port forwarding on router;
Motion detection and alarm pin can be connected to external sensors to detect
environmental situation;
Alarming record can be stored by email, FTP server;
Infrared LED for night vision covers 5m area, to realize 24 hours real-time
monitoring;
Support 3 level authority and camera can upgrade remotely;
Manufacturer attaches a label at the bottom of each IP Camera, providing free
DDNS. When IP Camera is connected to the internet, this DDNS can be used to
visit the device;
Manufacturer provides free software, support Multi-view, Long time recording,
video playback etc.

Kaicong-Nothing important than safety!
Anything else ,please contanct me.
5
1.3Technical Parameters
Item
Sub Item
Description
Image
Capture
Sensor
CMOS sensor
Total of pixel
300k
Minimum illumination
IR on,0 Lux
Lens
f=4.0 mm, F=2.0, Fixed Iris
Pan/Tilt
Pan Coverage
270°
Tilt Coverage
120°
Assistant
Lighting
11pcs 850nm Infrared LEDs, 5m distance
Lighting Control
Auto control
Video and
Audio
Resolution
640*480(VGA)/320*240(QVGA)
Compression
MJPEG
Frame rate
30fps
Bit rate
128kbps ~ 5Mbps
Image Rotation
Mirror /Flip
Audio Compression
ADPCM
Network
Basic Protocol
TCP/IP、UDP/IP、HTTP、SMTP、FTP、DHCP、
DDNS、UPNP、NTP
Other Protocol
802.11b/g/n
Other
Features
Video control
support
Dual way audio
support
Motion Detection
support
Triggered Actions
Email/FTP
User Setting
Three levels
Date/ Time Setting
support
Upgrade
Upgrade from network
DDNS
A free DDNS provided by manufacturer
Hardware
Interface
Ethernet
10Base-T/100base-TX
Audio In
Internal mic
Audio Out
Audio Line-out interface x 1
Physical
Index
Weight
245g
Main body
100mm(L)*99mm(W)*118mm(H)
Power
DC 5V
Power consumption
<6W
Operating temperature
-20℃~ 50℃
Operating humidity
10% ~ 80% non-condensing
Software(PC
Side)
OS Supported
Microsoft Windows XP/Windows 7 etc.
Browser
Internet Explorer6.0 and Above or Compatible
Browser, Firefox, Safari etc.
Application Software
IPCMonitor.exe

Kaicong-Nothing important than safety!
Anything else ,please contanct me.
6
2 Appearance and interface
2.1 SIP 1016
1、Audio output interface Audio In
2、Network Line Interface RJ45 Network
3、Wireless antenna interface Wireless Line
4、Alarm input / output interface Alarm I/O
5、5V DC power interface 5V1.5A DC
3 Visit IP Camera from LAN
3.1 LAN Connection
Figure 5 Multiple connected to the router

Kaicong-Nothing important than safety!
Anything else ,please contanct me.
7
3.2 Search and set the IP address of IP camera
The setting interface as figure 6
Figure 6 network settings interface diagram
Operation Steps:
1) Click “Search (F3)
2) Choose the device
3) On”IP Config”area, make sure IP address –Subnet Mask –Gateway –DNS, the
same as the”Local PC Information”–only the red circle is different.
4) Click “Update(F5)”
5) After successfully update, click “Search (F3)”, choose the device and click “Browse
(F4)”. Then you may view the IP camera, like figure 7.
NOTE:
1) On “Local PC Information”Area, if you PC have more than 1 network adapter,
please choose the one which you are using now.
2) If you have the firewall software in your PC, when run the B1Search_en.exe, it may

Kaicong-Nothing important than safety!
Anything else ,please contanct me.
8
pop up a window to say “whether you want to block this program or not”, then you
should choose not to block.
3) The default IP address is assigned by DHCP and default http port is 80.
Figure 7 Video access

Kaicong-Nothing important than safety!
Anything else ,please contanct me.
9
3.3Visit IP Camera
Click the "Login" to access the video, Suggest to use IE browser (which have more
function), but need to install video player. When first time use , in figure 8, click on the
link "Download and install OCX", will pop-up dialog box shown in Figure 9, Click run, the
player will automatically download and install.
Figure 8 Video viewing screen
Figure 9 The player controls download prompt box
After installation Controller, refresh to view.

Kaicong-Nothing important than safety!
Anything else ,please contanct me.
10
3.3.1 Video playing area
After installing the player controls, click on the figure 10 "Live video ", you can enter the
video viewing page:
Figure 10 Video viewing
1) Main menu
Main menu includes different sub menu settings, can be hidden and expanded.
2) Status bar
Figure 11 status bar
①Record button: click the button, the screen displays rapidly "start record" in the
lower right corner, and record icon becomes red, indicates the device is
recording, click it again, stop recording;
②Snapshot button : click the button, the screen displays rapidly " Snap ok " in the
lower right corner;
③Audio play button: click the button, play the audio collecting on your computer,
click again, turn off this feature;
④Audio transmit button: click the button, transmit audio collecting on your
computer into camera, and the camera can play audio via external speaker box,
click it again, turn off this feature;
⑤IP address for the current camera.

Kaicong-Nothing important than safety!
Anything else ,please contanct me.
11
3) The user can change some parameters according to their own preferences in
video control interface.
Figure 12 Video control
1)Windows: the user can add multiple external devices, and display in multiple
window;
2)Resolution: to adjust resolution in the current screen, generally VGA/QVGA
optional;
3)Frame rate: to adjust refresh image times per second;
4)Mode: to adjust video capture frequency of the camera ,so avoid ripple interference
caused by indoor lighting frequency;
5)Mirror:ticked it and the video screen will be flipped horizontally;
6)Flip:ticked it and the video screen will be flipped vertically;
7)Mute:When IPCAM transmitted audio to computer, If you ticked the mute, the
computer will not play the audio;
8)Video Panel:to hide and display the status bar located at the bottom of screen;
9)Sound Alarm:ticked the sound alarm, the computer will have voice prompt when the
device detects motion detection alarm;
10)Stretch:ticked it and stretch the current video image;
11)OSD:ticked it, the screen will be display the current date and time in the top right
corner, not ticked, and then hide date and time;
12)Connect/Disconnect:connect or disconnect the current network camera;
13)Snapshot/View snapshot:click the snapshot button, the device will take a picture,

Kaicong-Nothing important than safety!
Anything else ,please contanct me.
12
same as snapshot button in the status bar. click the view snapshot, can view the
pictures in the computer by path;
14)Start Record/view record:record same as record button in status bar; to view record,
it will be open the record file;
15)Start Talk:click the button, transmit audio collecting on your computer into camera,
and the camera can play audio via external speaker box, click it again, turn off this
feature;
16)Full Screen:display the current video by full screen;
17)PTZ control button: click these buttons can control the camera
move up, down, left and right; click the button can stop the movement of the
camera; click two buttons can move the camera a circle horizontal and
vertical directionsrespectively;
18)PTZ Speed:adjust the speed of PTZ control;
19)PTZ Preset:if set PTZ preset, when choosing a preset position, the console will run
to the present position, more details please view the subsequent chapters;
20)Advanced settings: can operate multiple images simultaneously. And can adjust
brightness, contrast, chromaticity and saturation of the image;
4 Visit IP Camera from WAN
4.1 Wan connection
Figure 13

Kaicong-Nothing important than safety!
Anything else ,please contanct me.
13
4.2 Port forwarding
If visit IP Camera from WAN, you must do port forwarding on the router. Take Netgear
router for example:
1) After logining the interface of the router,choose “Port Forwarding”;
2) Choose “Add custom Service”;
3) Input IP camera port;
4) Input IP camera IP address,click “Apply”.(the http port and ip address should be the
same as figure 4 which set by you own).
Figure 14 Router settings interface
After the port-forwarding is done, you could view the IP Camera from WAN using the
WAN IP now.
Note: Different routers have different settings for port-forwarding; please kindly
follow your router guide to do the port-forwarding.
4.3 DDNS
You could also use the manufacturer’s DDNS to view the device as long as your
port-forwarding succeed.

Kaicong-Nothing important than safety!
Anything else ,please contanct me.
14
4.3.1 Manufacturer’s DDNS
Device manufacturer has provided a free DDNS. User can find it from bottom of the
camera or below menu, like figure 15.
Figure 15 Manufacturer’s DDNS
Note: Please make sure, you already do the port forwarding succeed when you plan to
use manufacturer’DDNS.
4.3.2 Third Party DDNS
User can also use third part DDNS, such as www.3322.org User must apply a free
domain name from this website and fill the info into the blanks below (Figure 16) and
save the settings. Then the domain name can be used.
Note: Using the third party domain name, if the http port is not 80, the port number should
be adding to the domain name with colon. Example: http://btest.dyndns.biz:81.
While manufacturer DDNS is no need to add PORT.
Figure 16 Third party DDNS configuration example

Kaicong-Nothing important than safety!
Anything else ,please contanct me.
15
4.4 Network Setting
4.4.1 Basic Network Setting
The user can also enter the Basic Network Settings to set the IP address except using
the search software. See below Figure 17.
Figure 17 Basic network
4.4.2 WIFI Setting
WIFI setting page, as shown in Figure 18, the wireless network list will be listed in search
of wireless networks. Select one of the network, and then check "Enable" in the list below
the relevant parameters of the selected wireless network will be filled out automatically,
enter the key then click Save to complete the wireless network setting.
Figure 18 WIFI settings
Note1: When the device is connected both WIFI and wired, it will firstly connect to the
wired network, if it can’t connect to it, then it will change to connect to the wifi. The
IP address and port is the same, either wireless or wired network.

Kaicong-Nothing important than safety!
Anything else ,please contanct me.
16
Note2: Before you do the configuration of wireless as shown above; please make sure
the device is connected to the network via network cable. After settings succeed,
please unplug the cable and reboot the device, and then wireless function takes
effect.
4.4.3 UPnP Setting
If you enable UPNP, once the IP camera is connected into the LAN, it will connect to the
router in the LAN to do the port-forwarding automatically.
Below Figure 19, tick “Using UPNP to Map Port” and the setting are completed. It will
show the setting is successful or not.
Figure 19 UPnP settings
Before using UPNP function, please make sure the router’s UPNP function has been
triggered. Not all the routers support UPNP perfectly. Please test if the router works well
with the equipment, if not, we would suggest you to disable this function and do the
port-forwarding manually.
4.4.4 DDNS Setting
Please refer to the content

Kaicong-Nothing important than safety!
Anything else ,please contanct me.
17
4.4.5 MSN Setting
Figure 20 MSN settings
User needs to apply for a MSN account for this device first, for example:
test1@hotmail.com. Please put this MSN account and its password as above Figure 15.
Then put your MSN account, for example: friend1@hotmail.com, into the ‘MSN Friends
List. Then on your friend1@hotmail.com MSN list, you can see test1@hotmail.com is
online. You just send “url?” to test1@hotmail.com and you will get the WAN ip address of
this ip camera. But please make sure test1@hotmail.com and friend1@hotmail.com
should be MSN friends before you do the settings.

Kaicong-Nothing important than safety!
Anything else ,please contanct me.
18
4.5 Alarm Settings
4.5.1 Motion Detect
1)Motion Detect
Figure 21 Operation detection set sample
User can select the motion detection. If there is any motion, it will detect the motion and
trigger the alarm.
Sensitivity:in the motion detect sensibility, the larger the figure, the more sensitive.
Alarm Duration:After triggering the alarm, external alarm device sustains alarm duration
time;
2)Scheduler
Device will trigger alarm in scheduled time. User can set schedule time to be “Select All”.
Before you set “Schedule”, please go to ‘Date and Time’settings to set the correct time
for the item, as shown in figure 21.

Kaicong-Nothing important than safety!
Anything else ,please contanct me.
19
4.5.2 Mail Service Setting
Figure 22 Example of mail settings
The device will send alarm email to you. You only need to fill in the blanks with your email
address as shown in Figure 22. After the setting, please click save and test to check if it
works properly.
4.5.3 FTP Service Setting
Figure 23 FTP set sample
When alarming, device will snap and send the image to FTP server, please make sure
the FTP setting is correct. Above Figure 23 of FTP setting according to your reference,
the setting is finished.
After correct setting FTP server, you can use “upload Picture On Schedule” function.
Even no alarm, device can also send the snap image to FTP periodically.
In order to use FTP function, user should apply username and password on the FTP
server first. And please apply some storage and the authority to write and create
sub-category into it.

Kaicong-Nothing important than safety!
Anything else ,please contanct me.
20
4.6 Advanced
4.6.1 Device Information
Users can view the current device software version, web version, running time,
equipment time.
Figure 24 Device Information
4.6.2 Device name
The user can rename the device by himself according to needs。
Figure 25 Device name
4.6.3 User account
Users need administrative privileges to add three kinds of users (administrator, operator,
and guest).
Figure 26 User accout
Click "Create", the following dialog box pops up, enter user information.
Figure 27 Create user
Administrator’s default user name is admin, password: 123456.
Table of contents
Other KaiCong IP Camera manuals
Popular IP Camera manuals by other brands

ACT
ACT AC7990 Quick install

Planet Networking & Communication
Planet Networking & Communication ICA-1200 user manual

Clas Ohlson
Clas Ohlson RC8030 instruction manual

XtendLan
XtendLan XL-ICA-H662 Users guide for web management

Panasonic
Panasonic GP-VD131 operating instructions

Sony
Sony URZ0146 owner's manual