manuals.online logo
Brands
  1. Home
  2. •
  3. Brands
  4. •
  5. Kaiser
  6. •
  7. Washer
  8. •
  9. Kaiser W 34008 User manual

Kaiser W 34008 User manual

Other manuals for W 34008

1

This manual suits for next models

19

Other Kaiser Washer manuals

Kaiser WASHING MACHINE User manual

Kaiser

Kaiser WASHING MACHINE User manual

Kaiser W 34008 User manual

Kaiser

Kaiser W 34008 User manual

Kaiser WASHING MACHINE User manual

Kaiser

Kaiser WASHING MACHINE User manual

Popular Washer manuals by other brands

Zanussi ZWF 14080 W user manual

Zanussi

Zanussi ZWF 14080 W user manual

Zanussi FV 825 N Instruction booklet

Zanussi

Zanussi FV 825 N Instruction booklet

LG WM8000HVA Specifications

LG

LG WM8000HVA Specifications

Whirlpool 3RGSC9400 Use and care guide

Whirlpool

Whirlpool 3RGSC9400 Use and care guide

Zanussi TJ 1284 H instruction manual

Zanussi

Zanussi TJ 1284 H instruction manual

AEG KO-LAVAMAT 74740 User information

AEG

AEG KO-LAVAMAT 74740 User information

Beko WSRE7512PRA user manual

Beko

Beko WSRE7512PRA user manual

Whirlpool LA5OOOXP Use and care guide

Whirlpool

Whirlpool LA5OOOXP Use and care guide

Miele PW 6207 operating instructions

Miele

Miele PW 6207 operating instructions

GE GE Profile WWSE3160AAA Specifications

GE

GE GE Profile WWSE3160AAA Specifications

Bush WMNB712EB instruction manual

Bush

Bush WMNB712EB instruction manual

ALLIANCE UW60AV Information manual

ALLIANCE

ALLIANCE UW60AV Information manual

Bosch WAN280H3 User manual and installation instructions

Bosch

Bosch WAN280H3 User manual and installation instructions

Maytag MAT15MNAW installation instructions

Maytag

Maytag MAT15MNAW installation instructions

LG T2109VSAL owner's manual

LG

LG T2109VSAL owner's manual

Indesit IWC 61481 Instructions for use

Indesit

Indesit IWC 61481 Instructions for use

Electrolux EWF12843 user manual

Electrolux

Electrolux EWF12843 user manual

Indesit WIN 70 Instructions for use

Indesit

Indesit WIN 70 Instructions for use

manuals.online logo
manuals.online logoBrands
  • About & Mission
  • Contact us
  • Privacy Policy
  • Terms and Conditions

Copyright 2025 Manuals.Online. All Rights Reserved.

USER MANUAL
GEBRAUCHSANWEISUNG
ИНСТРУКЦИЯ ПО ОБСЛУЖИВАНИЮ И ЭКСПЛУАТАЦИИ
RU
EN
DE
BIO FERMENT WÄSCHE
WASHING MACHINE
WASCHMASCHINE
СТИРАЛЬНАЯ МАШИНА
DEAR CUSTOMERS,
OLAN-Haushaltsgeräte
Berlin Germany
We Inform you that our devices which are the object of the
present operating instructions are precertain exclusively for
the domestic use.
thank you for purchasing this Kaiser product.
We are convinced that you have made a right choice. You
have purchased a washing machine which satisfies the high
quality demands and corresponds to comprehensive
international standards.
Please read these instructions carefully before starting
operation to be sure to obtain optimum performance. The
following recommendations are aimed to protect you from
possible inconveniences which can occur as a result of the
wrong operation and, at the same time, reduce the
consumption of electric energy and water. Proper operation
and maintenance provide a longer service life of the unit.
The Kaiser washing machines fulfil the main norms of safety,
hygiene and environment protection in correspondence with
the EU directives and are certified according to EU norms
and standards (DIN ISO 9001, ISO 1400), standards of
Russia (Gosstandart) and the CIS.
The company's policy is aimed at constant improvement of
product quality. Modifications made to the design and
equipment result in exclusively positive changes in operating
qualities of the appliances. The right for changes in the
products is reserved by the manufacturer.
We wish you an effective use of the product of our firm.
Yours faithfully
EN
2
BIO FERMENT WÄSCHE
УВАЖАЕМЫЙ ПОКУПАТЕЛЬ,
благодарим Вас за приобретение нашей техники.
Мы уверены, что Вы сделали правильный выбор.
Передаем Вам в пользование стиральную машину,
удовлетворяющую самым высоким требованиям и
отвечающую мировым стандартам.
Просим Вас внимательно прочитать инструкцию по
обслуживанию и эксплуатации до пуска устройства.
Соблюдение содержащихся в ней рекомендаций
защитит Вас от возможных неприятностей при
неправильной эксплуатации стиральной машины, а
также позволит Вам уменьшить расход
электроэнергии и воды. Если эксплуатация стиральной
машины будет соответствовать настоящей
инструкции, наша стиральная машина будет радовать
Вас долгое время.
Наши стиральные машины полностью соответствует
основным требованиям безопасности, гигиены и
защиты окружающей среды, согласно директивам
Европейского Союза, что подтверждено
сертификатами DIN ISO 9001, ISO 1400, в
соответствии с настоящими нормами, действующими
на территории Европейского сообщества, a также
полностью отвечают всем требованиям Госстандарта
России и стандартов других стран СНГ, что
подтверждается сертификатами соответствия.
С мыслью о дальнейшем повышении технических и
эксплуатационных характеристик наших стиральных
машин мы оставляем за собой право на внесение
изменений в дизайн и устройство, влияющих только
положительно на потребительские качества и
свойства продукта.
Желаем Вам эффективного пользования продуктом
нашей фирмы.
Уважающий Вас
OLAN-Haushaltsgeräte
Berlin Germany
Информируем, что наши приборы, являющиеся
предметом настоящей Инструкции, предназначены
исключительно для домашнего пользования.
3
DE RU
LIEBE KUNDIN, LIEBER KUNDE,
wir danken Ihnen für den Erwerb unserer Technik.
Wir sind überzeugt, dass Sie eine richtige Wahl getroffen
haben. Wir übergeben Ihnen zum Gebrauch die
Waschmaschine, die die hohen Forderungen befriedigt und
den weltumfassenden Standards entspricht.
Bitte lesen Sie die Bedienungsanleitung vor Gebrauch
aufmerksam durch. Die Beachtung von Empfehlungen
schützt Sie von eventuellen Unannehmlichkeiten, die als
Folge der falschen Nutzung der Waschmaschine auftreten
können sowie ermöglicht Ihnen den Strom- und
Wasserverbrauch zu reduzieren. Die Waschmaschine bringt
Ihnen viel Vergnügen auf lange Zeit, wenn der Gebrauch der
vorliegenden Bedienungsanleitung entsprechen wird.
Unsere Waschmaschinen entsprechen den
Hauptforderungen der Sicherheit, der Hygiene und des
Umweltschutzes, laut den Direktiven der EU, was mit
Zertifikaten DIN ISO 9001, ISO 1400, entsprechend den im
Rahmen der EU geltenden Normen, bestätigt ist, und
genauso auch den Anforderungen von Gosstandart in
Russland und Standards anderer GUS Ländern, was durch
die Identifikationszertifikate bestätigt ist.
Mit den Gedanken der ständigen Verbesserung der Qualität
unserer Waschmaschinen sind Änderungen bei Design und
Einrichtung, die nur zu positiven Veränderungen der
technischen Eigenschaften führen, vom Hersteller
vorbehalten.
Wir wünschen Ihnen die effektive Nutzung des Produkts
unserer Firma.
Hochachtungsvoll
OLAN-Haushaltsgeräte
Berlin Germany
Wir informieren Sie, dass unsere Geräte, die der Gegenstand
der vorliegenden Bedienungsanleitung sind, sind
ausschließlich für den häuslichen Gebrauch vorbestimmt.
4
EN
CONTENTS
INSTALLATION INSTRUCTIONS 6
Levelling the washing machine 6
Connection to water supply
and sewerage network 8
Electrical connection 12
Safety conditions 14
BRIEF DESCRIPTION 20
Location drawing 20
Control panel 22
Programme and temperature selector 24
OPERATION 26
How to wash 26
Controls of the washing machines with display 30
Controls of the washing machines with LED
indication 34
Optional functions 40
WASHING HINTS 46
How to remove stamps 48
Detergents and additives 50
Programme/ temperature table 52
International clothing care symbols 55
CARE AND MAINTENANCE 56
Cleaning the detergent dispenser drawer 58
Cleaning the filter 58
Alternate inspection 60
What to do, if... 60
ERROR CODES 64
TECHNICAL SPECIFICATIONS 64
RESPECT FOR THE ENVIRONMENT 66
5
DE RU
ОГЛАВЛЕНИЕ
ИНСТРУКЦИЯ ПО МОНТАЖУ 7
Выравнивание машины по уровню 7
Подключение к сети водоснабжения и
канализации 9
Подключение к электросети 13
Условия безопасности 15
КРАТКОЕ ОПИСАНИЕ 21
Внешний вид 21
Панель управления 23
Переключатель выбора программ и
температурных режимов 25
ЭКСПЛУАТАЦИЯ 27
Стирка – основные действия 27
Органы управления стиральных машин с
дисплеем 31
Органы управления стиральных машин со
световой индикацией 35
Дополнительные функции 41
РЕКОМЕНДАЦИИ 47
Выведение пятен 49
Моющие средства и добавки 51
Таблица программ и температур 54
Международные символы на этикетках с
указаниями по стирке 55
ОБСЛУЖИВАНИЕ И УХОД 57
Чистка дозатора моющих средств 59
Очистка фильтра 59
Периодический осмотр 61
Что делать. если... 61
КОДЫ ОШИБОК 65
ТЕХНИЧЕСКИЕ ДАННЫЕ 65
ОХРАНА ОКРУЖАЮЩЕЙ СРЕДЫ 67
INHALTSVERZEICHNIS
FÜR DEN INSTALLATEUR 7
Waschmaschine waagerecht aufstellen 7
Anschluss ans Wassernetz 9
Stromnetzanschluss 13
Sicherheitsbedingungen 15
KURZBESCHREIBUNG 21
Gesamtansicht 21
Bedienblende 23
Programm-/ und Temperatur-Wahlschalter 25
INBETRIEBNAHME 27
Wäsche – Grundschritte 27
Bedienblende der Waschmaschinen mit
Display 31
Bedienblende der Waschmaschinen mit
Lichtanzeige 35
Sonderfunktionen 41
EMPFEHLUNGEN 47
Entfernung von Flecken 49
Waschmittel und Zusatzmittel 51
Programm/ Temperatur-Tabelle 53
Internationale Textilpflegesymbole 55
PFLEGE UND WARTUNG 57
Reinigung des Einspülbereichs 59
Reinigung des Filters 59
Periodische Besichtigung 61
Was ist, wenn... 61
FEHLERKODE 65
TECHNISCHE DATEN 65
UMWELTVERTRÄGLICHKEIT 67
22
1
1
3
4
5
INSTALLATION INSTRUCTIONS
The machine can be installed anywhere, provided the
temperature in the place of installation is not below +3º
C and the cables and hoses at the rear of the machine
are not crushed in any way.
For transport purposes the swinging unit in the machine
is blocked using 4 screws 1 with spacers 2. Before
starting the machine these spacers and lock screws
must be removed, and stored for use in the event of a
possible change of location.
Block off the holes with the plugs 3 provided, which can
be found in the bag containing the documents.
LEVELLING THE WASHING MACHINE
• After selecting a suitable position, level the
machine carefully using the adjustable feet 4.
• Particular care must be taken when selecting the
position, levelling the washing machine and
ensuring the safety of lock nuts 5.
If levelling is not carried out correctly, the washing
machine will be unstable and noisy during operation,
which may result in damage.
If the machine stands on a carpet floor, make sure that
air can circulate freely between the washing machine
and the floor itself.
Caution! If the spacers fall inside the machine,
open the rear panel, recover them and then place
the panel.
IMPORTANT!
Keep this brochure safe for further
using.
Before connecting the appliance
read these instructions carefully. Repairing the
failure arising from inappropriate connections or
use of the appliance is not covered by the
guarantee.
6
EN
ИНСТРУКЦИЯ ПО МОНТАЖУ
Машина может быть установлена в любом
помещении, минимальная температура в котором
составляет +3º С, при установке не допускайте
пережатия проводов и шлангов с задней стороны
машины.
Перед подключением машины, следует удалить 4
винта 1 и 4 распорки 2, установленных на время
транспортировки. Рекомендуется сохранить их на
случай возможной последующей перевозки
стиральной машины.
Закройте отверстия специальными заглушками 3,
находящимися в пакете с документацией.
ВЫРАВНИВАНИЕ МАШИНЫ ПО УРОВНЮ
• Выберите место для стиральной машины и
отрегулируйте положение по уровню при
помощи регулируемых ножек 4.
• Обратите особое внимание на выбор места,
выравнивание стиральной машины по уровню
и на затяжку контргаек 5.
Если выравнивание стиральной машины по уровню
не выполнено, не будет обеспечена стабильная
устойчивость машины, уровень вибраций при
работе будет повышенным, что может привести к
неполадкам.
Если стиральная машина устанавливается на
ковролин, необходимо, чтобы между стиральной
машиной и полом свободно циркулировал воздух.
ВАЖНО! Перед подключением устройства
внимательно прочтите эти инструкции. Ремонт
поломок, возникающих из-за неправильного
монтажа или использования устройства не
покрываются гарантией. Сохраните эту
брошюру для дальнейшего использования.
FÜR DEN INSTALLATEUR
Die Waschmaschine kann in einem beliebigen Raum
eingerichtet sein, in dem die minimale Temperatur 3ºC
beträgt. Bei der Aufstellung des Gerätes lassen Sie
nicht zu, dass die Elektrol ie
an der Rückwand des weder geknickt noch
gequetscht werden.
Vor dem Anschluss der Waschmaschine müssen 4
Schrauben 1 und 4 Sicherungen 2 , die zum
Transportieren eingerichtet sind, entfernt werden. Es
ist empfehlenswert, sie im Falle der möglichen
nachfolgenden Transportierung der Waschmaschine
aufzubewahren.
Schließen Sie die Öffnungen mit speziellen Stopfen 3,
die sich in dem Beutel mit der Dokumentation befinden.
WASCHMASCHINE WAAGERECHT AUFSTELLEN
eitungen und d Schläuche
Gerätes
• Wählen Sie einen Platz für die Waschmaschine
und regulieren Sie ihre Position mit Hilfe der
regulierbaren Füßen 4 und einer Wasserwaage.
• Eine besondere Aufmerksamkeit ist bei der Wahl
des Platzes, Regulierung der waagerechten
Position und dem Festziehen der
Sicherungsmutter 5 geboten.
Wenn eine waagerechte Position der Waschmaschine
nicht erfühlt ist, wird keine stabile Installation der
Maschine gewährleistet, das Vibrationsniveau wird bei
der Arbeit erhöht, und das kann zu Defekten führen.
Wenn die Waschmaschine auf dem Teppich aufgestellt
wird, ist es notwendig, dass zwischen der
Waschmaschine und dem Fußboden die Luft frei
zirkuliert.
Achtung! Wenn die Sicherungen in der
Waschmaschine geblieben sind, sollte das
hintere Paneel entfernt, Sicherungen
herausgenommen und das Paneel zurück
montiert werden.
Внимание! В случае если распорки остались в
машине, следует снять заднюю панель, вынуть
распорки и установить панель на место.
DE RU
7
WICHTIG! Vor dem Anschuß des Gerätes lesen
Sie diese Hinweise sorgfältig. Reparatur der
Fehler von ungeeigneten Verbindungen oder
Verwendung des Gerätes wird nicht von der
Garantie abgedeckt. Bewahren Sie diese
Broschüre sicher für die weitere Verwendung.
8
EN
1
3
2
Caution! Connection of hoses and cords as well
as placing the appliance into operation must be
made by a qualified expert only. Incorrect
installation may result in damage to persons and
property.
CONNECTING TO WATER SUPPLY AND
SEWERAGE NETWORK
Connecting the Aqua-Stop inlet hose
The inlet hose equipped with Aqua-Stop System 1 is
provided with double walls. The Aqua-Stop System
ensures blocking of water supply in case the inlet hose
has broken as well as if the air gap between the hose
itself and its corrugated shell is filled with water.
Connect the appliance to the water mains with new
hose sets only. Never reuse old hose sets.
Water pressure must amount to 0,05 MPa (min.) and 1
MPa (max.). In case the pressure is below the minimum
value, consult the Service Center.
• Pull the inlet hose completely out from storage
compartment located at the back of the
dishwasher.
• Connect the corner end of the inlet hose 2 to the
machine.
• While adjusting to the faucet, tighten the screw 3
of the safety inlet hose (3/4-inch thread).
• Before starting the washing machine, turn on the
faucet against the stop.
Connecting cold water
Connect the cold water inlet hose to the threaded 3/4-
inch connector. Make sure it is fastened tightly.
If the water pipes are new or have not been used for an
extended period of time, let the water run to make sure
that the water is clear and free of impurities.
If this precaution is not taken, there is a risk that the
water inlet can get blocked and damage the appliance.
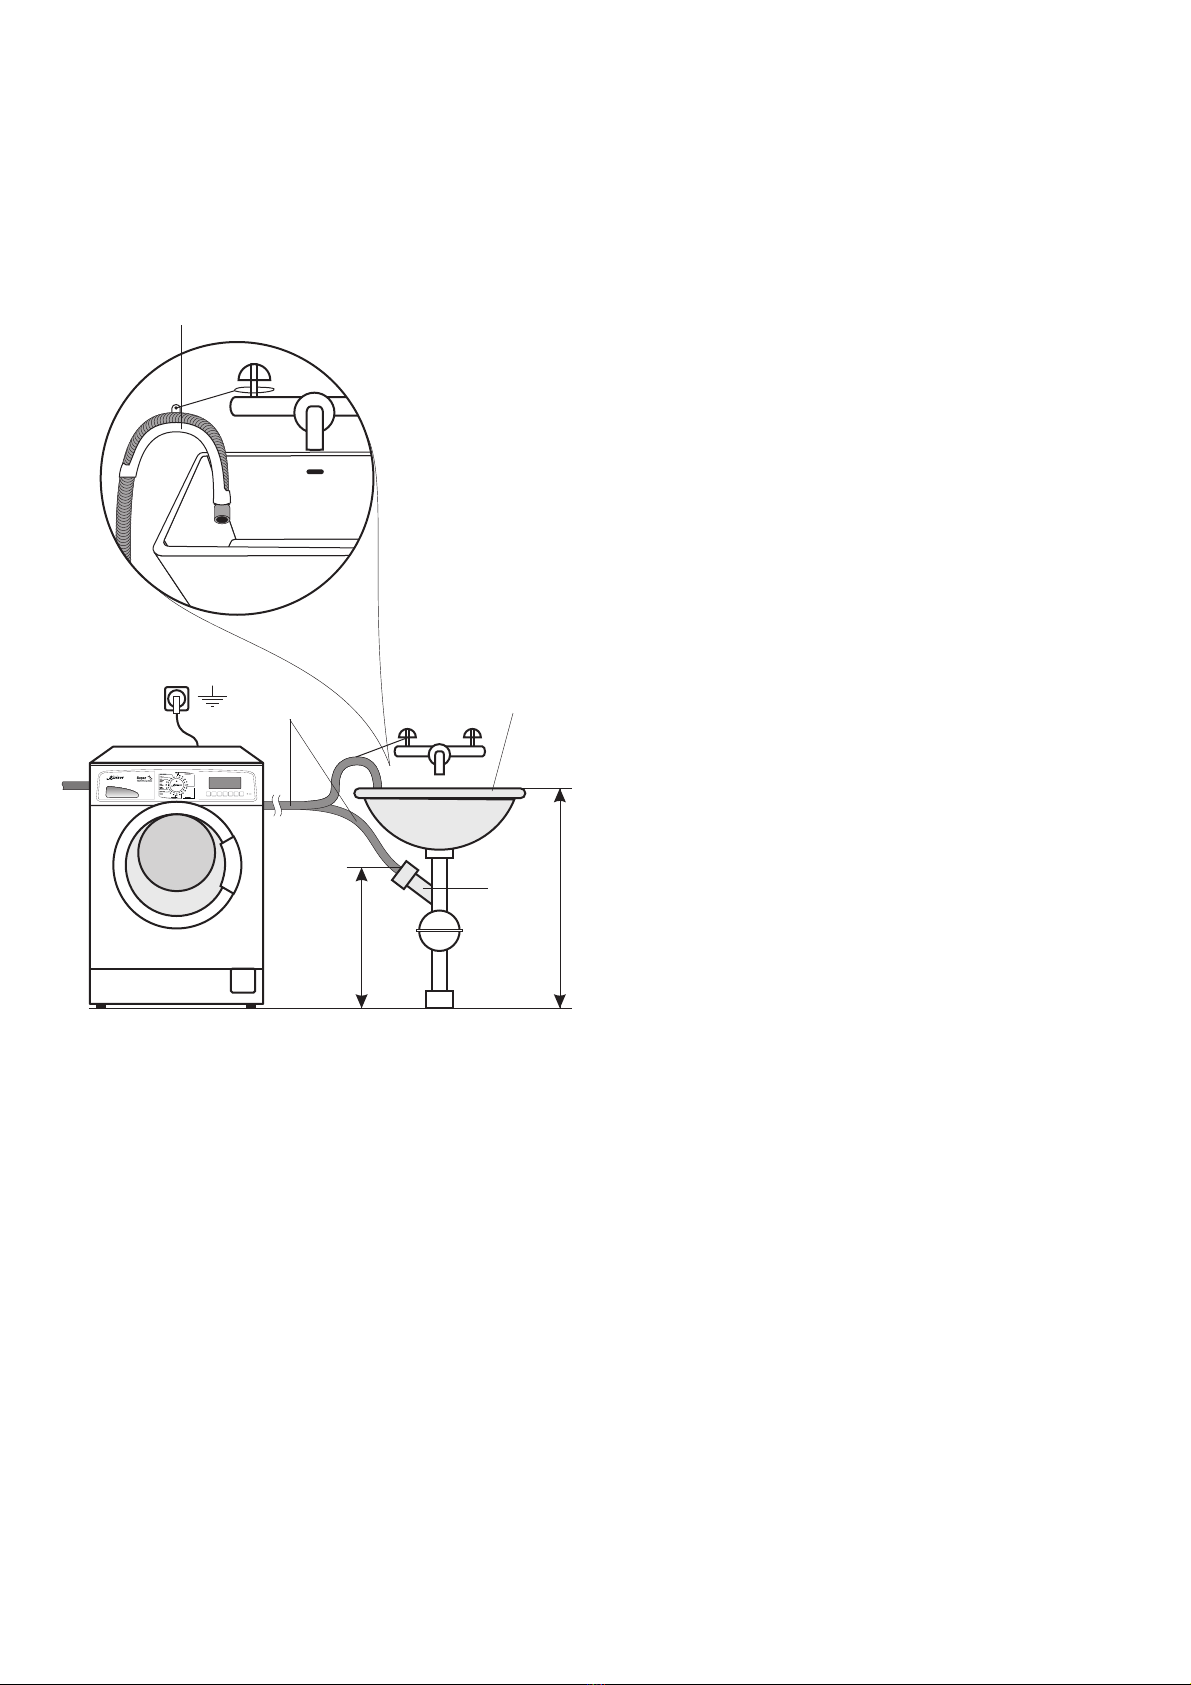
ANSCHLUSS ANS WASSERNETZ
Anschluss des Wasserzulauf-Schlauchs mit Aqua-
Stop-System
Der Wasserzulauf-Schlauch mit Aqua-Stop-System 1
ist doppelwandig. Das Aqua-Stop-System sperrt den
Wasserzufuhr, falls der Wasserzulaufschlauchs
beschädigt bzw. der Luftraum zwischen dem Schlauch
und seiner geriffelten Außenhülle mit Wasser gefüllt ist.
Bei dem Anschluss des Gerätes an die Wasserleitung
verwenden Sie nur einen neuen
Wasserzulaufschlauch. Die gebrauchten Schläuche
dürfen nicht wieder verwendet werden.
Der Wasserdruck soll Minimum 0,05 Mpa (0,5 Bar) und
Maximum 1 MPa (10 Bar) betragen. Wenden Sie sich
an das Servicezentrum, wenn der Wasserdruck
niedriger als Minimum ist.
Kaltwasseranschluss
Schließen Sie den Kaltwasserschlauch an den
Anschluss mit 3/4-Zoll-Gewinde an und vergewissern
Sie sich, dass er fest und dicht sitzt.
Wenn die Wasserröhre neu sind, oder eine längere Zeit
nicht benutzt worden sind, lassen Sie zuerst Wasser
fließen, um sicherzugehen, dass das Wasser klar und
frei von Unreinheiten ist.
Wird diese Vorsichtsmaßnahme nicht eingehalten,
besteht das Risiko, dass der Wasserzufluss blockiert
und das Gerät dadurch beschädigt wird.
• Nehmen Sie den Wasserzulaufschlauch aus der
speziellen Nische auf der Rückwand der
Waschmaschine heraus.
• Schließen Sie das Schlauchende 2, das eine
Eckform hat, an die Waschmaschine an.
• Drehen Sie die Mutter 3 des Wasserzulauf-
Schlauches auf dem Hahn der Wasserleitung mit
dem 3/4- Zoll-Gewinde zu.
• Nach dem Anschließen des Wasserzulauf-
Schlauches drehen Sie den Wasserzulaufhahn
vor dem Start der Waschmaschine vollständig
auf.
DE RU
ПОДКЛЮЧЕНИЕ К СЕТИ ВОДОСНАБЖЕНИЯ
И КАНАЛИЗАЦИИ
Подключение подающего шланга c системой
Aqua-Stop
Подающий шланг c системой Aqua-Stop 1 имеет
двойные стенки. Система Aqua-Stop блокирует
поток воды в случае разрыва подающего шланга, а
также в случае, если воздушное пространство
между самим шлангом и его внешней рифленой
оболочкой заполнено водой.
При подключении стиральной машины к
водопроводу всегда используйте новый подающий
шланг, подающие шланги, бывшие ранее в
употреблении использовать не рекомендуется
Максимальное допустимое давление воды 1 МPа
(10 бар), минимально допустимое давление воды
0,05 МPа (0,5 бар). При давлении ниже минимума
обратитесь в сервисный центр.
• Достаньте подающий шланг из специальной
ниши на задней стенке машины.
• Подсоедините конец шланга 2, выполненный
в виде угла, к машине.
• Закрутите гайку 3 подающего шланга на кране
водопровода с резьбой 3/4 дюйма.
• После подключения подающего шланга к
стиральной машине и водопроводу перед
запуском машины полностью откройте кран
подачи воды.
Подключение к холодной воде
Подключите шланг к месту соединения с резьбой
3/4 дюйма и убедитесь, что он плотно сидит на
месте.
Если водопроводные трубы новые или долгое
время не использовались, дайте воде стечь, чтобы
удостовериться, что вода чистая.
При несоблюдении этой меры предосторожности
остается риск того, что поступление воды может
быть заблокировано и вследствие этого машина
выйдет из строя.
Внимание! Монтаж, подключение шлангов и
сетевого кабеля стиральной машины должны
производиться только квалифицированным
специалистом. Неправильная установка может
нанести ущерб людям и имуществу.
9
Achtung! Die Montage und Anschluss der
Waschmaschine ans Wasser- und Stromnetz
sollen nur von einem qualifizierten Fachmann
durchgeführt werden. Die Installation, die nicht
ordnungsgemäß durchgeführt wurde, kann den
Leuten und dem Eigentum schaden.
EN
Max 900 mm
Min 600 mm
1
2
3
4
Connecting drain hose
• Connect the drain hose 1 to the drain pipe 2
(diameter: 40 mm min.), or let it run directly into
the sink 3.
Use the special plastic hose support 4 which is
delivered with the appliance.
• Make sure that the hose is free from being bent or
flattened.
The free end of the hose must be at a height of 400 to
1000 mm and must not be immersed.
Disconnecting from water supply and sewerage
• To disconnect the Aqua-Stop inlet hose, cut off
water supply by turning off the faucet, screw out
the nut of the safety inlet hose which adjusts it to
the faucet.
• Put the hose into the special storage
compartment at the back of the dishwasher.
In case the free end of the hose is put directly into the
sink, pay attention to the following:
If the sink is mounted at the height of 100 cm from the
floor, the excess water cannot be drained directly into
the sink.
To drain the excess water from the hose in this case,
you need a pail or any other suitable container which
should be put below the sink at the side of it
10