Kaleidescape Cinema One User manual

Kaleidescape Cinema One
Installation Guide
July 2013

2
Kaleidescape, Inc. 440 Potrero Avenue Sunnyvale, CA 94085 USA
This document is for informational purposes only. Kaleidescape makes no representations or
warranties, express or implied, regarding the accuracy or completeness of the information contained
herein and Kaleidescape shall have no obligation to provide updates to this information in the future.
Copyright © 2013 Kaleidescape, Inc. All rights reserved. Kaleidescape and the Kaleidescape logo are
trademarks of Kaleidescape, Inc. and are registered in the United States and certain other jurisdictions.
Other trademarks and trade names are owned by third parties and may be registered in some
jurisdictions.
Kaleidescape Part No. 101-0207-00 Rev 1.
This document revision corresponds to kOS software version 5.2.
Bonjour, FireWire, Mac, iPhone, iPod and iTunes are trademarks of Apple Inc., registered in the U.S. and
other countries.
HDMI and High-Definition Multimedia Interface are trademarks or registered trademarks of HDMI
Licensing LLC in the United States and other countries.
Manufactured under license from Dolby Laboratories. Dolby is a trademark of Dolby Laboratories.
Manufactured under license under U.S. Patent #’s: 5,451,942; 5,956,674; 5,974,380; 5,978,762;
6,487,535 & other U.S. and worldwide patents issued & pending. DTS and the Symbol are registered
trademarks, & DTS-HD, DTS-HD Advanced Digital Out and the DTS logos are trademarks of DTS, Inc.
Product includes software. © DTS, Inc. All Rights Reserved.
Java and all Java based trademarks and logos are trademarks or registered
trademarks of Sun Microsystems, Inc. in the U.S. and other countries.

3
Contents
Overview ...........................................................................................................................................................5
The Kaleidescape Cinema One ......................................................................................................................5
Supported Configurations .............................................................................................................................5
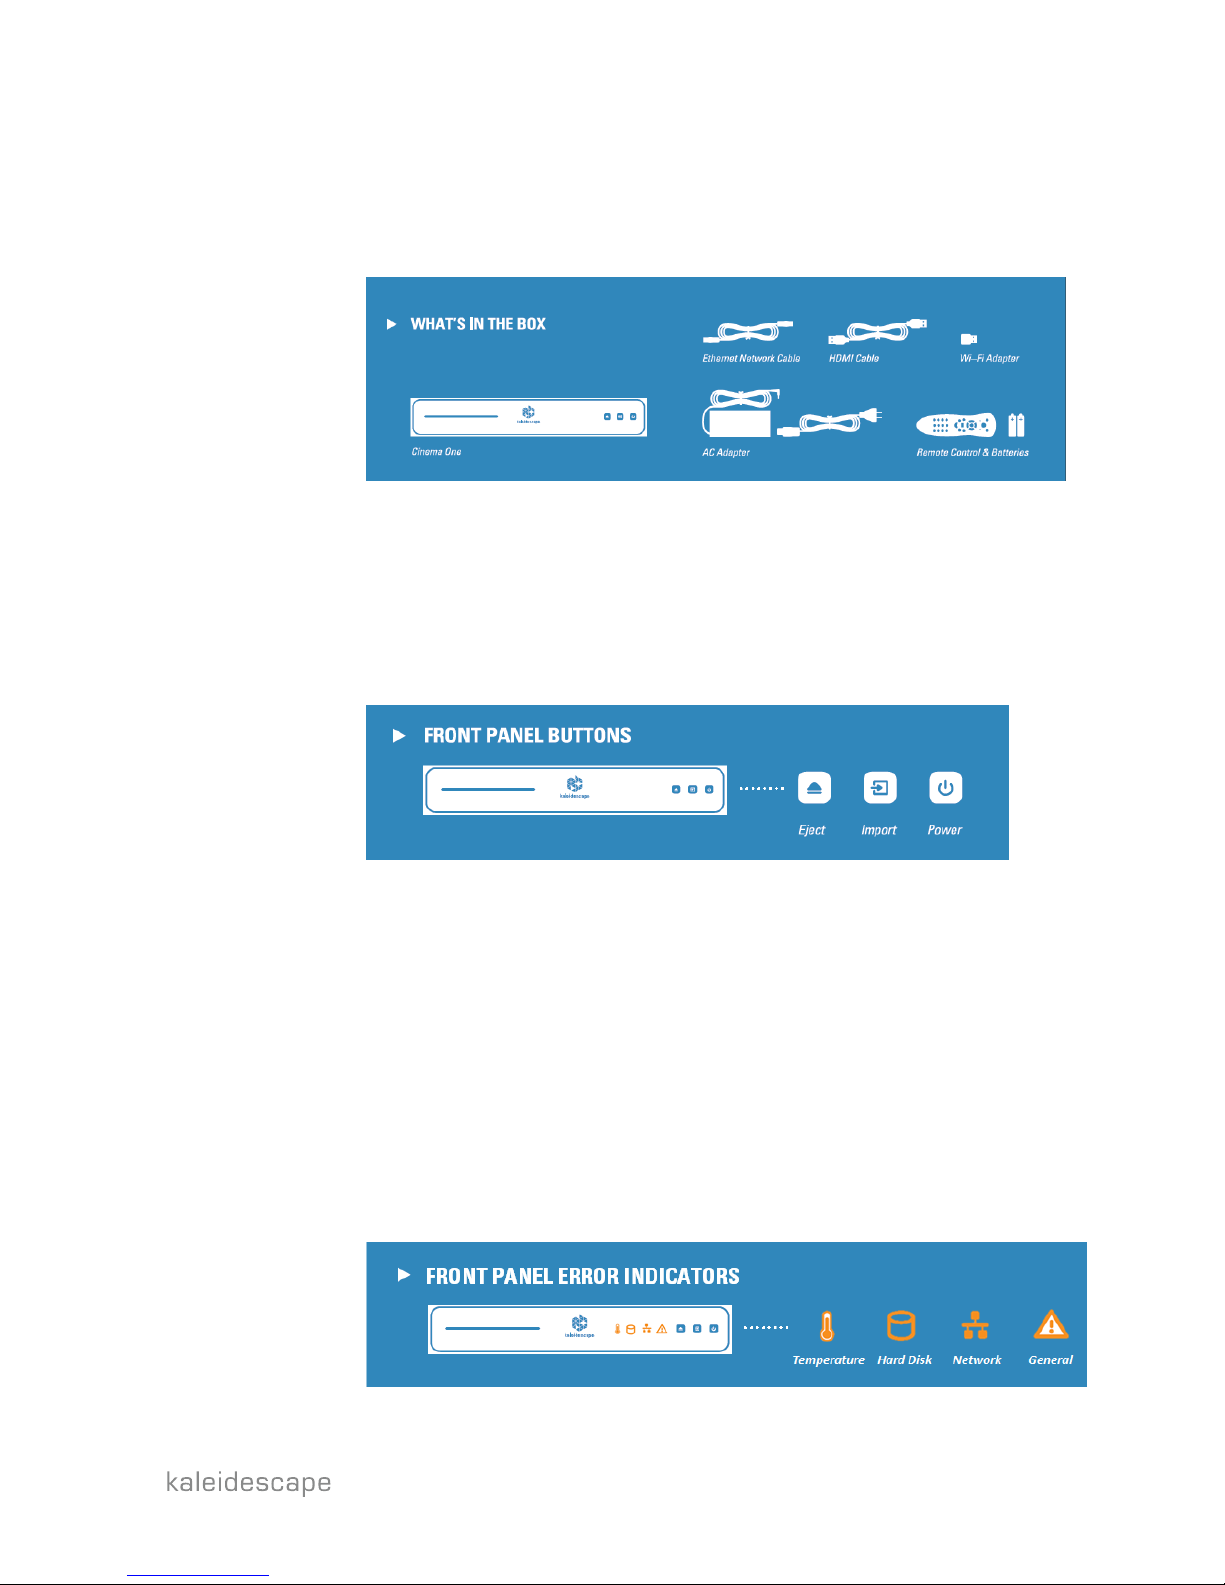
What’s in the Box ..........................................................................................................................................5
Front Panel Buttons.......................................................................................................................................6
Front Panel Error Indicators ..........................................................................................................................6
Physical Installation...........................................................................................................................................7
Planning the Installation ...............................................................................................................................7
Ventilation and Clearance .........................................................................................................................7
Power Requirements.................................................................................................................................7
System Design ...........................................................................................................................................7
Installing Cinema One ...................................................................................................................................8
System Configuration ........................................................................................................................................9
First-Time Setup ............................................................................................................................................9
Connecting to your home network .........................................................................................................10
Activating your Cinema One....................................................................................................................12
Linking a second Cinema One .................................................................................................................14
Configuring Settings ....................................................................................................................................15
General....................................................................................................................................................15
Audio .......................................................................................................................................................16
Video .......................................................................................................................................................19
Network...................................................................................................................................................22
Player Name ............................................................................................................................................22
Link Players..............................................................................................................................................22
Disc Vault.................................................................................................................................................23

4
DVD Region..............................................................................................................................................23
Language & Subtitles...............................................................................................................................24
Passcode..................................................................................................................................................26
Parental Control Level.............................................................................................................................28
Advanced.................................................................................................................................................30
Control Systems...............................................................................................................................................31
Communication...........................................................................................................................................31
Types of Control Devices.............................................................................................................................31
IR Remote Control...................................................................................................................................31
The Kaleidescape App for iPad................................................................................................................32
Keypad Control for Music........................................................................................................................35
Product Specifications.....................................................................................................................................36
Notices.............................................................................................................................................................38
Compliance..................................................................................................................................................38
Third-Party Software and Technology Licensing Information.....................................................................39

5
Section 1
Overview
The Kaleidescape Cinema One Installation Guide describes how to set up and
configure Cinema One, and add new components to an existing installation.
The Kaleidescape Cinema One
Cinema One is an all-in-one movie server and movie player that stores and plays
up to 100 Blu-ray quality or 600 DVD-quality movies. It is easy to set up, comes
with a comprehensive movie guide for special scene selection and lets you
download Blu-ray quality movies online (where available). It provides amazing
convenience without compromising quality.
Cinema One enables you to:
Play Blu-ray discs and DVDs instantly without the delay or distraction of
previews, menus or advertisements
Store up to 100 Blu-ray or 600 DVD-quality movies for instant access
and playback
Use the comprehensive Kaleidescape Movie Guide to easily navigate
your collection and directly access memorable scenes
Download movies from the Kaleidescape Store with precisely the same
audio and video fidelity as Blu-ray discs
Upgrade your DVDs to Blu-ray quality downloads at the great price of
$6.99 per movie
Cinema One supports easy integration into audio, video and whole-house
control systems.
Supported Configurations
Two Cinema One players can be connected together to enjoy a shared
library of content on both players. Both players must have a wired
network connection to be linked.
One DV700 Disc Vault can be added to Cinema One system. The disc
vault must be connected to your home network using a wired network
connection. If connecting a disc vault to one Cinema One player, then the
player can be connected over Wi-Fi.
What’s in the Box
The following accessories are packaged with each Cinema One:

6
1x Ethernet Network Cable
1x HDMI Cable
1x Wi-Fi Adapter
1x AC Adapter
1x Remote Control
2x Batteries
Front Panel Buttons
There are three buttons located on the front panel of Cinema One:
Eject –ejects a disc from the slot
Import –imports a Blu-ray disc, DVD or CD
Power –turns on or off Cinema One
Front Panel Error Indicators
There are four error indicators located on the front panel of Cinema One.
These error indicators light up only in the event of a problem:
Temperature –indicates Cinema One is operating too hot or too
cold
Hard disk –indicates the hard disk drive inside Cinema One has a
disk failure
Network –indicates that Cinema One has lost network connection
or does not have a valid IP address
General –when lit up alone, this indicates there was a failure
importing a disc.

7
Section 2
Physical Installation
Planning the Installation
Ventilation and Clearance
Use the following guidelines when installing system components to ensure
proper clearance and ventilation. These guidelines apply to all installations
including rack mounting.
1. Mount components in a location with adequate ventilation.
2. Check for proper grounding if installing components in a rack.
3. Maintain a 2 in. (5 cm) clearance in back, and a 1 in. (2.5 cm) clearance
in front and on the sides.
4. Verify that there is sufficient space for a disc to be ejected from the disc
slot.
Power Requirements
Kaleidescape component power supplies are universal input and operate on
any nominal line voltage between 100–240 V, and frequency between 50–60
Hz. Verify that power outlets are grounded, preferably shielded from power
surges and brownouts.
Kaleidescape recommends a grounded outlet with a high-quality surge protector
for the power source for players and servers. A UPS is optional for servers.
System Design
Before beginning the installation, determine the type of the display and
audio systems that will connect to Kaleidescape components.
Kaleidescape Systems support combinations of the following outputs:
Video
High-Definition Multimedia Interface (HDMI)
Audio
HDMI (Digital stereo or multi-channel)
Coaxial (Digital stereo or multi-channel)
Optical (Digital stereo or multi-channel)

8
A Gigabit network is suggested, and required if there are two Cinema One
players and Blu-ray movies are played in more than one room at the same time.
Installing Cinema One
Connect network, audio and video cables. Then connect the AC adapter.
A wired network connection is recommended. Use the included Wi-Fi adapter
(not shown above) if a wired connection is not possible.
Make sure your television is set to the correct HDMI input, and you are seeing
the setup menu.

9
Section 3
System Configuration
First-Time Setup
After installing your Cinema One, you will be prompted to set it up using
your onscreen display. Connecting to your home network (via a wired or
wireless network connection) and activating your Cinema One is required.
Two Cinema One players can be linked together to combine their storage
capacity and content into a single library that can be enjoyed on both
players. If a second Cinema One is being added, it can be linked using
the Link Players page in the onscreen menu.

10
Connecting to your home network
Wired network connection
Select Network from the onscreen menu. In most cases, Cinema
One will automatically obtain an IP address from a DHCP server.
If you wish to set a static IP address, select Set static IP
configuration and enter your network information.
Select Accept these settings to save the information entered.
After a valid network connection is set up, the Continue option in
the onscreen menu will be available. Select Continue to proceed
to activating your Cinema One.

11
Wireless network connection
Insert the included Wi-Fi adapter and select Wi-Fi Setup from the
onscreen menu. A list of available wireless networks will be
displayed. Select the one you would like to connect to, and enter
the username (if applicable) and password. If your Wi-Fi network is
not displayed, select Connect to another network to enter its
information.
After a valid network connection is established, a checkmark will
appear next to the name of the connected Wi-Fi network and the
Continue option in the onscreen menu will be available. Select
Continue to proceed to activating your Cinema One.
A wireless network connection should only be used if a wired
connection is not possible.

12
Activating your Cinema One
Cinema One must be activated in order to use all its features. To activate
your Cinema One, select Begin Activation from the Activation page on the
onscreen display.
Enter your email address using the onscreen keyboard, and the select
Done on the keyboard. Check your email for registration instructions.
If the email was not received, select Send email again to resend the
email, or Change email address to send the email to a different email
address.

13
Once the email address has been submitted, the Finish option in the
onscreen menu will be available. Select Finish to exit the initial setup
menu and start using your Cinema One.

14
Linking a second Cinema One
If a second Cinema One is being added, it can be linked using the Link
Players page. This page will only appear if there is more than one Cinema
One detected on the same network. Both players must have a wired
network connection to be linked. Both players must be also be activated
to be linked. Any Cinema One players that are not activated will appear in
the list, but will be unavailable for linking.
To link two Cinema One players, configure the first Cinema One by
connecting it to your home network and activating it. Then, connect and
turn on the second Cinema One. Connect it to your home network using a
wired network connection. A Link Players option will be displayed
onscreen.
A list of other Cinema One players detected on your home network will be
displayed. Select the one you wish you link to. A checkmark will appear
next to the one you are linked to.
If you do not wish to link to any players, select Do not link. The Select
Continue to proceed.

15
Configuring Settings
Additional settings can be configured using the onscreen Settings menu.
To access this menu, press the MENU button on your Kaleidescape
remote, scroll to the System tab, and select Settings.
General
General player settings can be configured from the General page of the
onscreen Settings menu.
Time Zone –select Select other to set your local time zone
Screensaver Timeout –select Select other your preference for
how long the onscreen display can be idle before displaying a
screensaver
Import Preferences

16
oAllow Importing - select whether you want to allow discs to
be imported on this player
oEject disc when import finishes –select whether you want
the disc to be automatically ejected when an import
finishes
When the player is turned off
oStandby –select this option to allow downloads from the
Kaleidescape Store to continue when the player. This
power mode consumes approximately 21 Watts of power.
oPower down –select this option to completely power down
the player. This power mode consumes approximately 2
Watts of power. In power down mode, no power up or down
commands can be received using the iPad app or IP
control.
Audio
Audio settings for your player can be configured from the Audio page of
the onscreen Settings menu. A summary of all the audio settings is
displayed on the Audio page.
Cinema One can be used to watch DVD and Blu-ray movies with nearly any
audio receiver or processor. To hear lossless audio tracks (for example, Dolby
TrueHD or DTS-HD Master Audio) from Blu-ray discs without alteration, the A/V
receiver or audio processor must be able to decode these formats.
Audio Mode
The audio decode mode affects all other audio settings. The decode
mode determines if the player or the receiver decodes the audio. Audio can be

17
sent as multichannel PCM over HDMI by default, with all outputs enabled, or it
can be passed through to HDMI with other outputs disabled.
HDMI AUDIO
Bitstream pass-through
Select bitstream pass-through to send 7.1-channel Blu-ray
soundtracks over HDMI at the highest bandwidth possible (up to
192 kHz or 7.1 channels).
The lossless audio formats available on Blu-ray discs, such as Dolby
TrueHD, DTS-HD Master Audio and 7.1-channel PCM, exceed the
capabilities of analog and coaxial audio outputs. These formats
are only available over HDMI, and only when bitstream pass-through is
enabled. This setting turns off the analog and coaxial
outputs, and picture-in-picture audio cannot be heard.
Player Decode Mode
Select Player Decode to hear Blu-ray secondary audio or when coaxial or
analog audio outputs are used. This setting sends 48 kHz PCM output
over HDMI, up to 5.1 channels depending on content and cabling.
In this mode, the coaxial output passes through the audio bitstream for
DVDs, but re-encodes multichannel audio to DTS Digital Surround for
Blu-ray discs.
Secondary audio with picture-in-picture
Blu-ray discs support a secondary audio track typically used for
interactive audio and commentary. This track is mixed with the
main audio so both tracks can be heard at the same time. M-
Class players play secondary audio with picture-in-picture when
in player decode mode. (To hear unaltered primary audio,
bitstream pass-through must be enabled.)

18
Downmixing
The stereo audio output sends downmixed stereo when playing Blu-ray
discs or DVDs.
Dolby Surround Support
Select this option if the output is connected to a sound bar or receiver
capable of Dolby Surround / Pro Logic / Pro Logic II decoding.
D-BOX mode
Select this option if you have D-BOX equipped seating. Selecting
this option will send D-BOX compatible audio up to 5.1 channels
over HDMI and coax.
PCM stereo
Select this option to downmix all audio to stereo, as when
connecting to two-channel devices like TVs.
Volume
Movie Volume
Select Enable Dynamic Range Compression for movies if you want the
player to allow information from the audio track to compress the
dynamic range, thus reducing the volume of loud sounds or amplifying
quiet sounds.
Music Volume
Select your preference for the volume at which music is played.
Music Crossfading
Select whether you would like crossfading between songs when playing
mix albums and playlists.

19
Advanced
HDMI Capability Override
Audio receivers connected via HDMI automatically provide
information via EDID used to determine the audio formats sent by
the player to the receiver. Selecting Auto detect will automatically
detect the receivers capabilities and should provide the best results.
In rare cases, these capabilities must be overridden because of an
EDID that is inaccurate or has been corrupted by an HDMI extender
or switcher. Select Receiver supports all audio formats if you are
sure your receiver supports all audio formats.
Video
Video settings for your player can be configured from the Video page of
the onscreen Settings menu. A summary of all the video setting is
displayed on the Video page.

20
Video Mode
Video Resolution
Select your preferred video resolution.
Other manuals for Cinema One
1
Table of contents
Other Kaleidescape Blu-ray Player manuals