KBS Gastrotechnik TK 220 User manual

FREEZER
INSTRUCTION MANUAL
GEFRIERSCHRANK
BETRIEBSANLEITUNG
DIEPVRIEZER
GEBRUIKSAANWIJZING
GB
DE
NL

1

2
SAFETY INSTRUCTIONS
CAREFULLY READ THE INSTRUCTION MANUAL! If instructions are not
followed, there is a risk of injury, damage of the appliance and loss of
the right to free warranty service. We recommend to keep the Instruction
manual the whole time you have the appliance. When you sell the appliance
pass the Instruction manual to the new owner of the appliance.
WARNING!
–Do not cover the ventilation holes at the top and on the sides of the
appliance.
–Do not use any mechanical means or electrical devices to hasten the thawing
process when cleaning the freezer compartment.
–Do not use electrical appliances inside the food storage compartments of the
appliance, unless they are of the type recommended by the manufacturer.
–If the supply cord is damaged it must be replaced by the manufacturer,
manufacturer service agent or a similarly qualified person, in order to avoid a
hazard.
–Disposal of the appliance should be according to national rules.
–Do not damage the appliance refrigeration system. It contains the refrigerant
gas R600a. If the refrigeration system is damaged:
•Do not use any open flame.
•Avoid sparks ―do not turn on any electrical devices or lighting
fixtures.
•Immediately ventilate the room.
–Do not allow children to play with the appliance or to plug it in or unplug from
the electricity supply socket. Do not allow children to play with the packaging
material from the appliance.
–This appliance can be used by children aged from 8 years and above and
persons with reduced physical, sensory or mental capabilities or lack of
experience and knowledge if they have been given supervision or instruction
concerning use of the appliance in a safe way and understand the hazards
involved.
–Cleaning and user maintenance shall not be made by children without
supervision.
–The appliance should be used only for freezing and storing foodstuffs.
G
B

3
–This appliance is not designed for the storage of explosive substances such
as aerosol cans with a flammable propellant.
–It is prohibited to store petrol and other flammable liquids near the appliance.
CONNECTION TO THE MAINS
–The appliance must be plugged into an earthed electricity supply socket. The
earthed electrical socket by which the appliance is connected to the mains
should be in an accessible place.
–IF THE APPLIANCE IS PRODUCED WITH THE SPECIAL SUPPLY CORD
IT CAN BE EXCHANGED ONLY BY THE SAME SPECIAL SUPPLY CORD
PROVIDED BY THE MANUFACTURER.
–TO AVOID HAZARDS, DAMAGED POWER SUPPLY CORDS SHOULD BE
REPLACED ONLY BY THE MANUFACTURER, A MAINTENANCE
TECHNICIAN, OR A PERSON WITH AN EQUIVALENT QUALIFICATION.
–DO NOT USE extension cords or connectors (adapters) or couplers.
–The frequency and power of the electricity supply in your house must
conform to the general data parameters of the appliance as it is shown in the
product label.
–When positioning the appliance be careful that the electrical cord isn’t
squeezed in order to avoid its damage. Do not store heavy objects such as
cooling devices, furniture or other domestic devices next the appliance in
such a way that they could squeeze and damage the electrical cord. This can
cause a short circuit and a fire.
–Make sure that the plug of the electrical cord is not squeezed by the back
wall of the appliance or otherwise damaged. A damaged plug can be the
cause of a fire!
•IF THE APPLIANCE IS UNPLUGGED (FOR CLEANING, MOVING TO ANOTHER PLACE, ETC. , IT
MAY BE REPEATEDLY SWITCHED ON AFTER 15 MIN.
•It is forbidden to use a technically damaged appliance.
•Do not place any switched on electrical devices (such as microwave ovens, hair dryers, irons,
electric kettles or other electrical devices on top of the appliance because this may cause ignition
of plastic parts.
•Do not place any dishes with liquids on top of the appliance and do not keep flowers in vases or
other liquid-filled vessels on the appliance.
•Do not climb on or sit on the appliance, do not lean on or hang on the appliance doors and do
not allow children to do this.
IF THE APPLIANCE IS OUT OF ORDER AND IT IS NOT POSSIBLE TO REPAIR IT
BY MEANS OF GIVEN RECOMMENDATIONS, UNPLUG IT, OPEN THE DOORS AND
CALL THE SERVICE EXPERT. ONLY A SERVICE REPRESENTATIVE CAN REMEDY
ALL TECHNICAL OR CONSTRUCTION FAULTS.

4
ENVIRONMENTAL PROTECTION INFORMATION
This symbol indicates that once the appliance is no longer needed, it cannot
be disposed together with other miscellaneous municipal waste. It should be
collected and eliminated separately, i.e. in containers specially marked with
this symbol in large-dimension rubbish collection areas. Full information on
where to submit the old appliance safety can be obtained from local
government authorities, the shop where you bought the appliance or the
manufacturer’s representatives.
•The appliance can’t be disposed of by burning!
If you decided to scrap the appliance, make it impossible to use in order to prevent
possible misadventure. Pull out the electric plug from the electricity supply socket and
then cut off the cord. Tear off the gasket. Break the door lock if any.
WARNING! Do not d smantle the appl ance yourself. Pass t on to recycl ng
compan es.
GENERAL INFORMATION
The appliance is a upright freezer. The freezer is intended for freezing and
long-term storage of foodstuffs.
THE APPLIANCE IS ECOLOGICALLY CLEAN, CONTAINING NO MATERIALS
HARMFUL TO THE OZONE LAYER: the refrigerant used is R600a, the foaming
agent used for the appliance insulation is cyclopentane C
5
H
10
.
THE MANUFACTURER GUARANTEES RELIABLE OPERATION OF THE FREEZER
WHEN THE RELATIVE AIR HUMIDITY NOT GREATER THAN 70 PER CENT AND
THE AMBIENT TEMPERATURE IS:
+16 TO +32 DEGREES CELSIUS (Climate class N;
+16 TO +38 DEGREES CELSIUS (Climate class ST ;
+16 TO +43 DEGREES CELSIUS (Climate class T.
All device-specific data of the energy label have been determined by the manufacturer
under laboratory conditions in accordance with pan-European standardized measuring
methods. These are regulated by ISO EN 15502. The actual energy consumption
depends on the usage and might therefore also be above the values determined by the
manufacturer under standard conditions. An expert knows these relations and will
execute the tests with special measurement instruments in accordance with the
regulations in place.
MANUFACTURER DATA
The manufacturer reserves the right ti make future changes to technical parameters
and specifications. Product s subject to changes and mprovements.

5
DESCRIPTION OF THE APPLIANCE, BASIC PARTS (f g. 1, 2)
1 Thermostat knob - temperature regulator 6 Frozen products section(s
3 Electric supply indicator (green light 7 Condenser
4 Temperature rise indicator (red light 8 Compressor
5 Fast-freeze section
Total gross volume, L 215
Freezer net volume, L 196
Actual consumption will depend on how the appliance is used a
nd where it is located
Energy efficiency class A+ A++
Energy consumption: kWh / 24 h
kWh / year
0,643
235
0,530
193
Climate class N - ST N - T
Noise level, dB(A re 1pw 41
Dimensions (HxWxD , cm 145 x 60 x 62 145 x 60 x 65
Freezing capacity, kg/24 h 12
Freezer temperature rising time from storage
temperature to -9 ºC after power-cut, h 20
Electrical Data see in the product label

6
1 Thermostat knob - temperature regulator 6 Frozen products section(s
3 Electric supply indicator (green light 7 Condenser
4 Temperature rise indicator (red light 8 Compressor
5 Fast-freeze section
Total gross volume, L 248
Freezer net volume, L 227
Actual consumption will depend on how the appliance is used a
nd where it is located
Energy efficiency class A+ A++
Energy consumption: kWh / 24 h
kWh / year
0,717
262
0,565
206
Climate class N - T N - T
Noise level, dB(A re 1pw 41
Dimensions (HxWxD , cm 163 x 60 x 62 163 x 60 x 65
Freezing capacity, kg/24 h 12
Freezer temperature rising time from storage
temperature to -9 ºC after power-cut, h 20
Electrical Data see in the product label

7
REVIEW OF MECHANICAL CONTROL (f g. 1, 2)
CONTROL PANEL — DESCRIPTION OF SYMBOLS AND OPERATIONS
1 −
−−
− THERMOSTAT KNOB. The temperature in the appliance is controlled using the
thermostat knob by turning it to one side or the other. More in “Temperature regulation”.
3−
−−
− ELECTRICITY SUPPLY INDICATOR marked with the symbol
When the appliance is connected to the electricity supply, the green indicator light is
illuminated. Simultaneously also the the temperature r se nd cator l ghts up. It
indicates that the freezer was switched off for a longer time, i.e. the freezer is switched
on for the first time, after defrosting or after losing of voltage. When the temperature in
the compartment again falls below -9 ºC, the temperature r se nd cator light will go
out.
4 −
−−
− THE TEMPERATURE RISE INDICATOR marked with the symbol
When the temperature in the freezer rises above -9 ºC, the red indicator light is
illuminated. It indicates that:
•The freezer was switched off for a longer time, i.e. the freezer is switched on for the
first time, after defrosting or after losing of voltage.
•The door of the freezer is opened or is being opened too frequently.
•It is loaded a large amount of unfrozen foodstuffs.
•The freezing system is failed, i.e. the indicator does not go out longer 6 hours and it is
heard running compressor or the compressor does not switch off. In this case you
should apply to your service agent (at first make sure that three above items were
taken into account .
PREPARING THE APPLIANCE FOR OPERATION
It is recommended to prepare the appliance for operation with a helper.
•Remove package. Lift the appliance away from foamed polystyrene base.
To not r se or push freezer tak ng by handles. Handles may break.
•Tear away the adhesive tapes – they are intended only for the transport of the appliance.
Remove the separate polystyrene part (transport protection between the rear of the
device and condenser – metal grid (if available .
NOTE. When you open the freezer compartment door a little red packing detail will
fall out – IT IS FOR TRANSPORTATION PURPOSES ONLY.
•When positioning the appliance in chosen location, it will move more easily into position if
you lift the front a little and incline it backward,
allowing it to roll on its casters.
•Suitably dispose the packaging material.
•Take two supports 1 from the bag and insert
them into the guides 2 at the top back part of the
appliance.
•If the appliance is brought in from the cold
(temperature is not higher than +12 °C , you should wait for two hours before connecting
it to the mains.
•The appliance should not be connected to the mains until all packing and transport
materials aren’t removed.

8
POSITIONING
•Place the appliance in a dry, well ventilated room.
WARN ING! The appliance should not be operated in an unheated room or porch. Place
the appliance away from heat sources such as kitchen stove/oven, radiators, or direct
sunlight.
WARN ING! The appl anc e must not tou ch any p pe s for heat ng,
gas or water supply o r a ny other e lectr cal dev ces.
•Do not cover the ventilation holes at the top of the appliances–it must be a
good air circulation around the appliance. There should be a gap of at least
10 cm between the top of the appliance body and any furniture that may be
above it. If this requirement is not followed, the appliance consumes more
electrical energy and its compressor may
overheat.
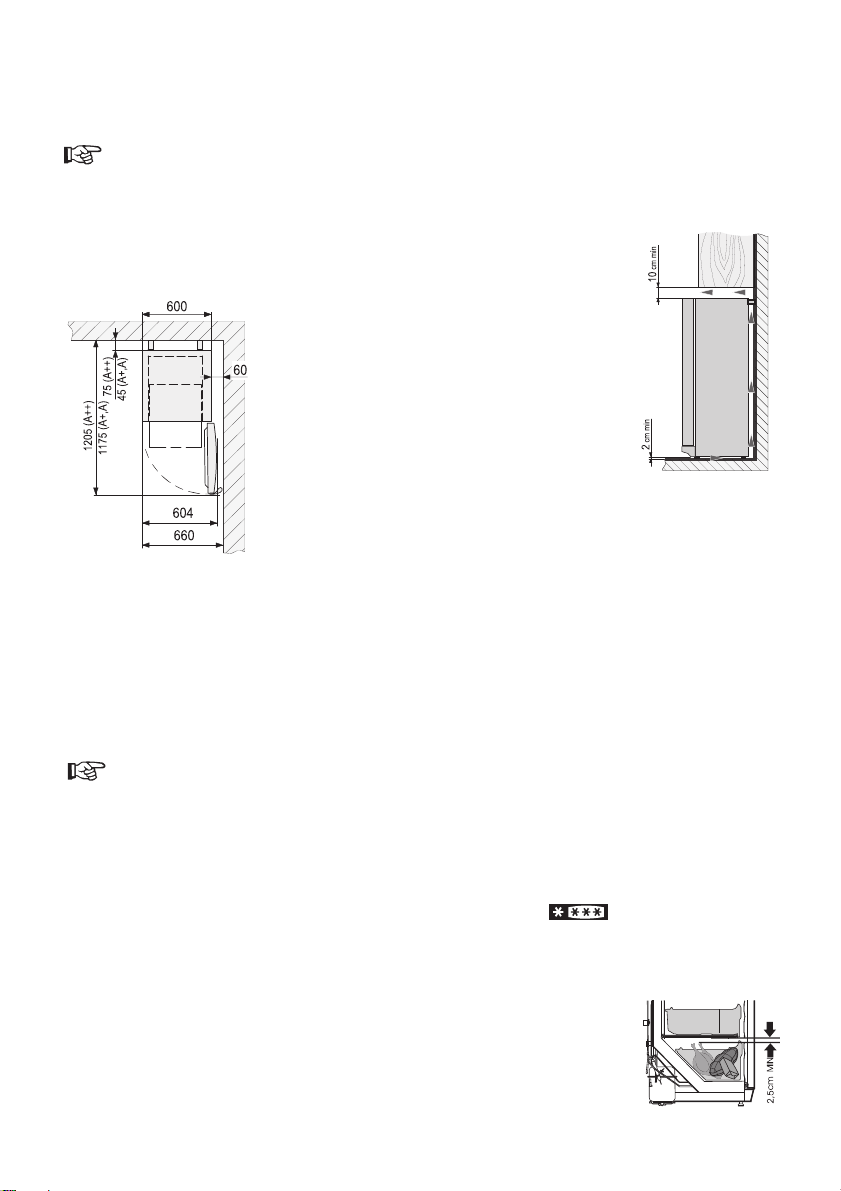
•⊳ If the appliance is placed in a corner, a gap
of at least 6 cm must be left between the
appliance body and the wall so that the freezer
door can be opened enough to pull out the
frozen product drawer (see f g. .
•The appliance must stand on a level surface
and must not touch the wall. If necessary,
regulate the height of the appliance by adjusting the levelling feet:
by turning them clockwise – the front of the appliance rises, by
turning them counter clockwise – it comes down. If the appliance is
tilted slightly backward – the doors will close by themselves.
TEMPERATURE REGULATION
Temperature set in the freezer by the manufacturer is -18
0
C
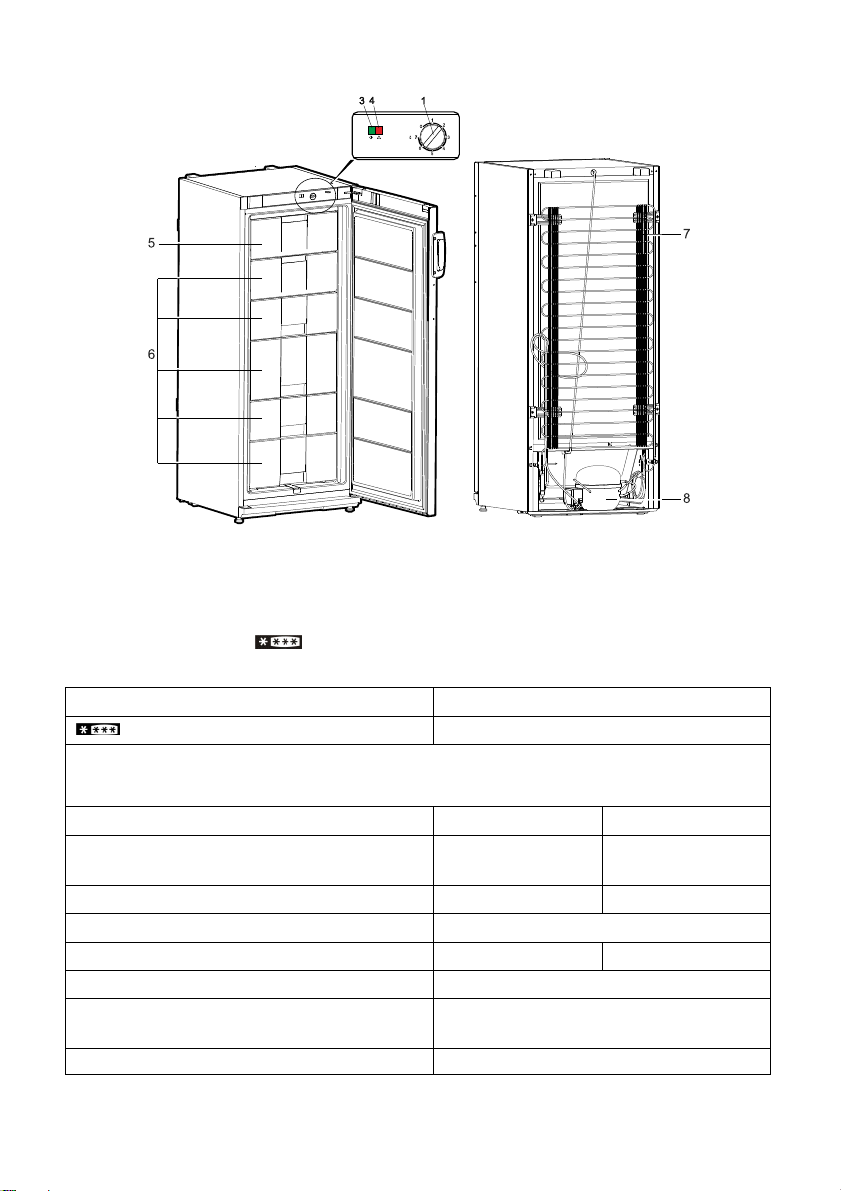
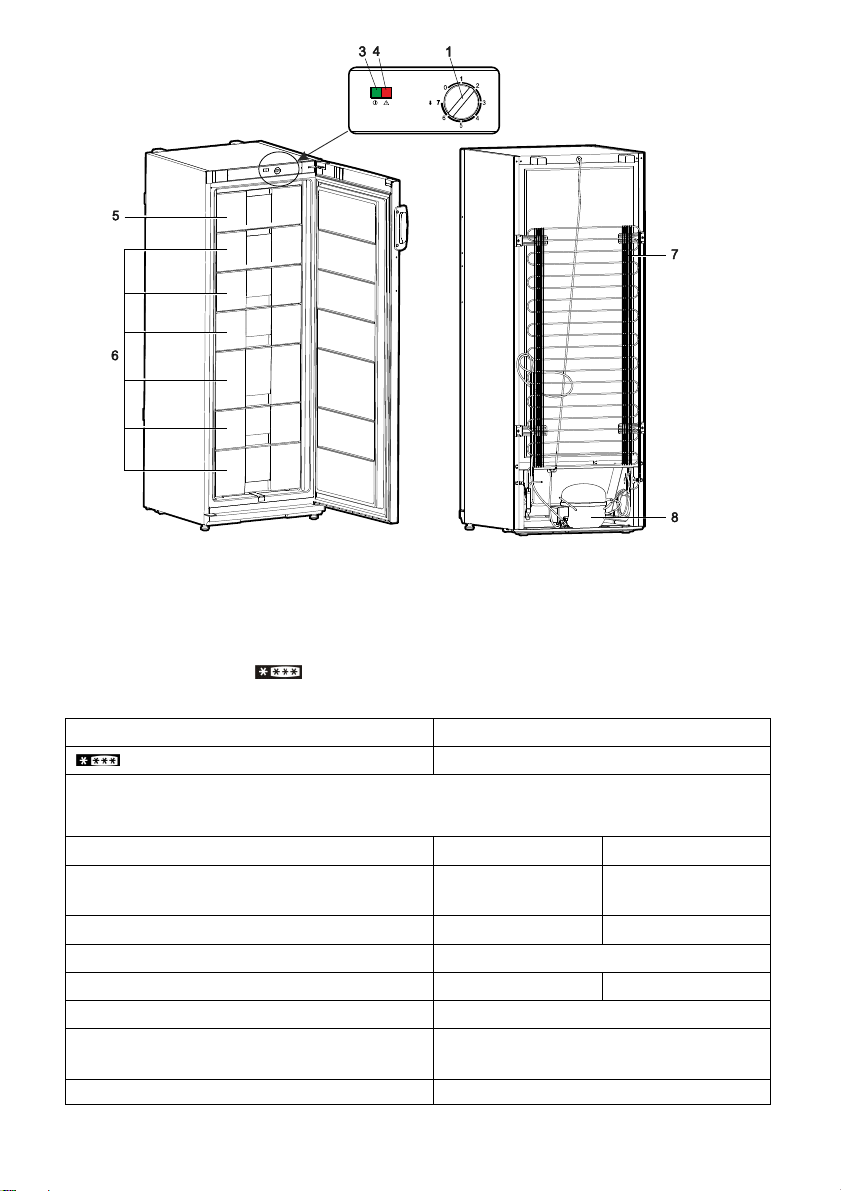
The temperature in the appliance is controlled using the thermostat knob 1 (f g. 1, 2 by turning it
to one side or the other. The temperature indication in digits is shown beside the thermostat knob.
The temperature is regulated on the scale of seven digits.
0 = Compressor is switched off. WARN ING! Electr c current s not sw tched off.
1 = highest temperature (lowest cooling
7 = lowest temperature (highest cooling
Please set the desired temperature in the appliance according to your own requirements.
THE TEMPERATURE IN THE FREEZER MAY VARY DEPENDING ON AMBIENT
TEMPERATURE, THE AMOUNT OF FOODSTUFFS, THE TEMPERATURE OF THE
FOODSTUFFS, AND HOW OFTEN THE APPLIANCE DOOR IS OPENED AND CLOSED.
IF THE ROOM IS COOL, THE APPLIANCE COOLS LESS. THE TEMPERATURE IN THE APPLIANCE
MAY THEREFORE RISE. Use the thermostat wheel to set a lower temperature.
FREEZING OF FOODSTUFFS IN THE FREEZER COMPARTMENT
In the freezer the fast-freeze sect on is marked with the symbol
Place the fresh foodstuffs to be frozen in one or two rows in the fast-freeze section. When the
foodstuffs are frozen should be removed from the fast-freeze section and placed in the storage
section drawer(s .
DO NOT EXCEED THE MAXIMUM QUANTITY OF FROZEN PRODUCTS
INDICATED IN THE GENERAL DATA TABLE (see 5, 6 pages .
•Leave a gap of not less than 2,5 cm between the foodstuffs being frozen
and the upper partition (see fig. .
•Do not place unwrapped foodstuffs in the freezer sections.
•Fresh food for freezing should not touch already frozen foodstuffs.

9
•Do not freeze foodstuffs that are warmer than the room temperature.
•Do not freeze l qu d foodstuffs n glass vessels or bottles. Do not freeze carbonated
beverages.
•Strictly observe the frozen foodstuffs validity dates indicated by the manufacturer on the their
packaging.
•WE RECOMMEND THAT FROZEN FISH AND SAUSAGE SHOULD BE STORED IN THE FREEZER
COMPARTMENT NOT LONGER THAN 6 MONTHS; CHEESE, POULTRY, PORK, LAMB – NOT MORE
THAN 8 MONTHS; BEEF, FRUIT AND VEGETABLES – NOT LONGER THAN 12 MONTHS.
•appliance door must not to be left open,
•the appliance door should not be open longer than it is necessary to take out or put in foodstuffs.
DEFROSTING THE FREEZER COMPARTMENT
The freezer compartment should be thawed not less than twice a year or when a layer of ice
thicker than 5 mm forms in it. Do the actions below in the order they are listed:
WARN ING! Turn the appl ance off and pull the plug out of the electr cal socket.
•Remove foodstuffs from freezer compartment. The frozen foodstuffs will not warm up too much
while you are thawing the freezer compartment if you cover them with a thick cloth and keep
them in a cool place.
•Pull out the melt water channel, turn it by 180° and hang it (F g. 4 . Place a vessel under the
melt water channel.
•Place a dish under the thaw water channel. Leave door of
freezer compartment open.
•When the ice melts, clean and wipe dry the surfaces and
fixtures of the freezer compartment.
•Remove the melt water channel, turn it by 180° again and put
it back in its original place.
•Close the freezer compartment door.
• Plug in and turn on the appliance.
CLEANING AND CARE
REGULARLY CLEAN THE APPLIANCE.
Remember that before defrost ng the freezer compartment and clean ng the
back part of the appl ance body you must d sconnect the appl ance from the
electr cal energy supply socket by pull ng the plug out of the electr c ty outlet.
•Protect the appliance inner surfaces and plastic parts from fats, acids and sauces. In case of
accidental spills – immediately clean with warm soapy water or dishwashing detergent. Wipe dry.
•Clean the appliance inner surfaces with warm soapy water. Dishwashing detergent may also be
used. Wipe dry inner and outer surfaces.
•Regularly clean the hermetic gaskets of the doors. Wipe dry.
•At least once a year clean dust away from the back part of the appliance
body and the compressor. A soft brush, electrostatic cloth or vacuum
cleaner may be used for cleaning (see fig. .
•DO NOT use detergents containing abrasive particles, acid, alcohol or
benzene for cleaning the appliance inner and outer surfaces.
•DO NOT use for cleaning cloths or sponges that have coarse surfaces intended for scrubbing.
PRACTICAL TIPS AND OBSERVATIONS
•Do not consume ice made in the freezer straight away.
•Products will freeze more quickly if they are divided up and packed in small portions.
•IF TH E APPL I ANCE IS TO BE LEFT SWIT C HE D O FF FOR AN E XTE NDED
PER I OD, L E AVE I T S DO ORS OPE N .

10
Remarks on the appl anc e operat ng no se . As the appliance operates and
goes through the freezing cycle, various noises will be emitted. This is normal and is not a
sign of any malfunction.
•As the refrigerant circulates around the refrigeration system, it causes sounds like murmuring,
bubbling or rustling.
•Louder sounds like popping or clicking may be heard for a short time as the freezer compressor
switches on.
CHANGING THE OPENING DIRECTION OF THE DOORS
It is recommended that changing the opening direction of the doors should be done with a helper.
You will need two spanners No. 8 and No. 10 and a Philips head screwdriver.
! When changing the opening direction of the door YOU CAN NOT lay the freezer horizontally.
Do the actions below in the order they are listed:
WARN ING! Turn off the appl ance and pull the plug out of the electr c ty supply
socket.
1. Remove the covers c from the body of the refrigerator and of the inner side of the door. Also
remove the upper bracket 6 together with the nut and washers and the spacer under the
bracket.
2. Remove the door of the freezer compartment.
3. Remove the bottom cover 1.
4. Remove the bottom bracket 2 together with washers on the axle and the plastic spacer.
Unscrew the axle together with washers from the bracket and screw them into the aperture on
the opposite side of the bracket symmetrically to former position.

11
5. Remove the bottom bracket 7 and fix the bottom bracket 2 together with washers on the axle
and the plastic spacer instead of it. Screw the bracket 7 in place of the bracket 2.
6.
Hang the freezer compartment door on the axle of bracket 7.
7. Turn the bracket 6 around by 180° together with the washers on the axle and the plastic
spacer. Unsrew the axle and the washers and screw them on the other side of the bracket.
Once the bracket 6 is attached to the freezer compartment door, fix it in place on the other
side of the freezer in the uppermost apertures.
8. Use the covers c to cover the bracket and the remaining space.
9. Remove the bolt covers a and the stoppers b. Remove the screws that hold the handles in
place. Move the handles to the other side and screw them in place. Place the stoppers into the
remaining apertures in the door, and put the screw caps in place.
10. Remove the cover 10 from the bottom cover 1 and insert it to the guides on the other side of
the bottom cover (symmetrically to former position . Insert left and right legs of the bottom
cover 1 (see pic. and push it until cover fixing.
OPERATION PROBLEMS AND THEIR SOLUTIONS (TROUBLESHOOTING)
What f …
•The appl ance s plugged n to the ma ns but t does not work and the electr c ty
supply voltage nd cator s not llum nated. Check that your house electricity supply
installations are in order. Check that the plug is correctly inserted into the electricity supply
socket.
•The no se has become louder. Check that the appliance is standing stable on a level place. To
make it level, regulate the front feet. Check if the appliance is not touching any furniture and that
no part of the refrigeration system at the back part of the appliance body is touching the wall.
Pull the appliance away from any furniture or walls. Check that the cause of increased noise isn’t
due to bottles, cans or dishes in the appliance that might be touching each other.
•When the appl ance door s opened, the rubber seal ng gasket pulls out. The gasket is
smeared with sticky foodstuffs (fat, syrup . Clean the sealing gasket and the groove for it with
warm water containing soap or dishwashing detergent and wipe dry. Put the rubber sealing
gasket back into the place.
•The temperature r se nd cator l ght s llum nated red. This means the appliance is being
connected to the electricity supply for the first time or it was disconnected for a significant period
(for thawing or during an interruption to the electricity supply , the freezer door is not closed or
is being frequently opened and closed, or a large amount of fresh food has been put in, and
therefore the temperature in the compartment has risen above -9 ºC. When the temperature in
the compartment again falls below -9 ºC, the indicator light will go out.
ATTENTION! If the temperature nd cator l ght does not go out (for reasons other
than those l sted above) for longer than s x hours, the compressor s e ther work ng
constantly or s not funct on ng. You need to consult serv ce people.
•H gh temperature n appl ance, the compressor operat on pauses are short. Ascertain
whether the appliance door are shutting tightly, whether the door wasn’t kept open longer than
necessary when taking out or putting in foodstuffs or whether a large amount of warm food was
placed in the appliance.
•The top of the appl ance has condensat on on t. The ambient relative air humidity is
above 70 %. Ventilate the room where the appliance stands and if possible remove the cause
of the humidity.

12
TRANSPORT
THE MANUFACTURER WILL NOT BE RESPONSIBLE FOR ANY DAMAGE OF THE
APPLIANCE THAT RESULTS FROM NON-COMPLIANCE WITH THE INSTRUCTIONS
FOR TRANSPORTATION.
•The appliance should be transported in the vertical position.
•When being transported, the appliance should be protected from atmospheric
conditions (rain, snow, dampness .
•The appliance should be firmly secured in place while being transported, to avoid
slippage or any shocks in the transport vehicle.
If the appliance was transported not vertically, it may be connected to the mains after 4
hours at least. If this is not done, the appliance compressor may fail.
WARRANTY SERVICE
IF YOUR APPLIANCE IS NOT WORKING PROPERLY, ASCERTAIN WHETHER YOU CAN REMEDY THE
CAUSE OF THE FAULTY FUNCTIONING OF THE APPLIANCE YOURSELF. If you cannot solve the
problem yourself, contact the nearest refrigerator service representative by telephone or in writing.
When making contact necessarily indicate the refrigerator model 1 and number 2. You will find
this data on the product label, which is glued to the wall of the freezer compartment.

13
SICHERHEITSHINWEISE
LESEN SIE BITTE DIE GEBRAUCHSANWEISUNG SORGFÄLTIG DURCH ! Bei
Nichtbeachtung der in der Gebrauchsanweisung genannten Anweisungen besteht die
Gefahr der Beschädigung des Geräts und des damit verbundenen Verlusts des
Rechts auf Garantieleistungen. Wir empfehlen ihnen, die Gebrauchsanweisung bis
zum Ende der Betriebszeit aufzubewahren und sie im Falle eines Verkaufs des Geräts
an den neuen Eigentümer weiterzugeben.
ACHTUNG!
−Halten Sie die Lüftungsöffnungen im Gerategehäuse oder in möglichen
Seitenwändenvon umgebenden Einbauwänden frei von Hindemissen.
−Benutzen Sie keine mechanichen Gegenstände order andere Mittel, um den
Abtauprozess zu beschleunigen, ausser den vom Hersteller empfohlenen.
−Das Kühlsystem des Geräts nicht beschädigen. Verwendetes Kühlmittel
R600a. Falls das Kühlsystem beschädigt ist:
•Kein offenes Feuer verwenden.
•Funkenschlag vermeiden, keine elektrischen sowie
Beleuchtungsgeräte einschalten.
•Den Raum sofort durchlüften.
−Kinder nicht mit dem Kühlschrank spielen oder ihn ans Netz anschließen oder
den Stecker ziehen lassen. Kinder nicht mit der Verpackung spielen lassen.
−Das Gerät kann von Kindern ab 8 Jahren sowie von Personen mit reduzierter
physischen, sensorischen oder mentalen Fähigkeiten oder Mangel an Erfahrung
und/oder Wissen benutzt werden, wenn siebeaufsichtigt oder bezüglich des
sicheren Gebrauchs des Gerätes unterwiesen wurden und die daraus
resultierenden Gefahren verstanden haben.
−Reinigung und Benutzer-Wartung dürfen nicht durch Kinder ohne
Beaufsichtigung durchgeführt werden.
−Das Kühlgerät nur zur Kühlung und Aufbewahrung von Esswaren verwenden.
−In diesem Gerät keine explosionsfähigen Stoffe, wie zum Beispiel
Aerosolbehälter mit brennbarem Treibgas, lagern.
NETZANSCHLUSS
−Das Kühlgerät unbedingt an eine geerdete Steckdose anschließen. Die
geerdete Steckdose für den Netzanschluss des Geräts sollte sich an gut
zugänglicher Stelle befinden.
DE

14
−VOR DEM AUFSTELLEN EIN DEFEKTES KABEL UNBEDINGT DURCH
EIN NEUES VOM SELBEN TYP WIE DAS VOM HERSTELLER DES
KÜHLGERÄTS VERWENDETE ERSETZEN, UM SCHADEN AN
GESUNDHEIT UND EIGENTUM ZU VERMEIDEN.
−UM JEGLICHES RISIKO AUSZUSCHLIESSEN, DARF EIN SCHADHAFTES
NETZKABEL NUR VOM HERSTELLER, DESSEN WARTUNGSMEISTER
ODER EINER ENTSPRECHEND AUSGEBILDETEN PERSON
AUSGEWECHSELT WERDEN.
–Das Verwenden von Verlängerungskabeln, Adaptern oder
Mehrfachsteckdosen ist NICHT ZULÄSSIG.
−Netzspannung und -frequenz müssen mit den in Angaben in der Tabelle über
die allgemeinen Eigenschaften des Kühlschranks übereinstimmen.
−Beachten Sie bitte beim Aufstellen des Kühlgeräts, dass dieser das Netzkabel
nicht beschädigt. Nichts Schweres wie Kühlgeräte, Möbel oder andere
Haushaltgeräte auf das Stromkabel stellen, um dieses nicht zu beschädigen.
Andernfalls könnte dies zu einem Kurzschluss und zu einem Brand führen.
−Achten Sie darauf, dass die Rückwand des Kühlgeräts den Netzstecker nicht
berührt oder letzterer in irgendeiner Weise beschädigt ist. Ein defekter
Netzstecker kann zu einem Brand führen!
•NACH DEM AUSSCHALTEN DES GERÄTS (ZUR REINIGUNG, ZUM
AUFSTELLEN AN EINEM ANDEREN PLATZ USW.) DIESES ERST NACH
MINDESTENS 15 MINUTEN WIEDER ANS NETZ ANSCHLIEßEN.
•Die Benutzung eines technisch nicht einwandfreien Geräts ist zu unterlassen.
•Vor der Reinigung das Gerät ausschalten und den Netzstecker aus der
Steckdose ziehen.
•Schützen Sie die Innenwände und alle Kunststoffteile des Kühlgeräts vor
Kontakt mit Fett, Säuren und Soßen.
•Bitte keine elektrischen Geräte wie Mikrowellengeräte, Haartrockner,
Bügeleisen, Wasserkocher und ähnliche auf den Kühlschrank stellen:
Kunststoffteile könnten sich entzünden.
NUR DER SERVICE-FACHMANN IST IMSTANDE, TECHNISCHE
MÄNGEL ZU BEHEBEN.

15
UMWELTHINWEISE
Dieses Symbol bedeutet, dass der Kühlschrank nach Ablauf der Betriebszeit
nicht über den normalen Haushaltsabfall entsorgt werden darf, sondern
getrennt, in speziellen, mit diesem Zeichen versehenen Containern, über eine
spezielle Sammelstelle entsorgt werden muss. Das Gerät darf nicht verbrannt
werden!
Genauere Informationen, wo alte Kühlschränke zur Entsorgung abgegeben werden
können, erhalten sie von den örtlichen Behörden, dem Geschäft, in dem Sie den
Kühlschrank gekauft haben, oder vom Hersteller.
Vor der Entsorgung des Geräts machen Sie dieses bitte unbrauchbar, damit mögliche
Unfälle verhindert werden können. Ziehen Sie den Netzstecker aus der Steckdose,
zerschneiden sie das Kabel. Reißen Sie dann den Dichtungsgummi vom Kühlgerät. Falls
vorhanden, machen Sie das Türschloss unbrauchbar.
ACHTUNG! Zerlegen S e das Kühlgerät auf ke nen Fall selbst. Br ngen S e es
zu e nem Abfallentsorgungsunternehmen.
ALLGEMEINE DATEN
Bei Ihrem Kühlgerät handelt es sich um einen Gefrierschrank (Standmodell . Das
Gefrierfach dient zum Einfrieren und längeren Aufbewahren von Esswaren und zur
Herstellung von Speiseeis.
DER KÜHLGERÄT IST UMWELTFREUNDLICH, ER BEINHALTET KEINE DIE
OZONSCHICHT SCHÄDIGENDEN MATERIALIEN: als Kühlmittel wird R 600a verwendet,
die Isolierung Ihres Geräts besteht aus Zyklopentan C
5
H
10
.
DER HERSTELLER GARANTIERT EINE ZUVERLÄSSIGE FUNKTION DES KÜHLSCHRANKS
EINER VERHÄLTNISMÄSSIGEN LUFTFEUCHTIGKEIT VON BIS ZU 70 PROZENT UND BEI
EINER UMGEBUNGSTEMPERATUR:
VON +16 BIS +32 GRAD CELSIUS. Der Kühlschrank gehört der Klimaklasse N an.
VON +16 BIS +38 GRAD CELSIUS. Der Kühlschrank gehört der Klimaklasse ST an.
VON +16 BIS +43 GRAD CELSIUS. Der Kühlschrank gehört der Klimaklasse T an.
Alle gerätespezifischen Daten des Energielabels sind durch den Gerätehersteller nach
europaweit genormten Messverfahren unter Laborbedingungen ermittelt worden. Sie
sind in der ISO EN 15502 festgehalten. Der tatsächliche Energieverbrauch der Geräte im
Haushalt hängt natürlich vom Aufstel¬lungsort und vom Nutzerverhalten ab und kann
daher auch höher liegen als die vom Gerätehersteller unter Normbedingungen
ermittelten Werte. Der Fachmann kennt diese Zusammenhänge und führt die Prüfungen
mit speziellen Messgeräten nach den gültigen Normen durch.
HERSTELLERANGABEN
Der Hersteller behält sich das Recht vor, die in der Gebrauchsanweisung genannten
technischen Ei genschaften des Gerätes sowie dessen Ausstattung zu ändern.
Änderungen zur Verbesserung des Produktes vorbehalten.

16
BESCHREIBUNG DES GERÄTS , HAUPTBESTANDTEILE (Abb. 1, 2)
1 Temperaturdrehregler 6 Abteil(e für eingefrorene Produkte
3 Stromanzeige (grün 7 Kondensator
4 Anzeige für steigende Temperatur (rot 8 Kompressor
5 Schnellgefrierabteil
Gesamtbruttovolumen, L 215
Nutzinhalt Kühlteil, L 196
Der tatsächliche Verbrauch hängt von der Nutzung und vom Standort des Gerätes ab
Energieeffiziensklasse A+ A++
Energieverbrauch: kWh/24 h
kWh/Jahr
0,643
235
0,530
193
Klimaklasse N - ST N - T
Geräuschemission dB(A 1 pW 41
Abmessungen, mm 145 x 60 x 62 145 x 60 x 65
Gefriervermögen, kg / 24 h 12
Lagerzeit bei Störung , h 20
Elektrische Daten siehe Typenschild

17
1 Temperaturdrehregler 6 Abteil(e für eingefrorene Produkte
3 Stromanzeige (grün 7 Kondensator
4 Anzeige für steigende Temperatur (rot 8 Kompressor
5 Schnellgefrierabteil
Gesamtbruttovolumen, L 248
Nutzinhalt Kühlteil, L 227
Der tatsächliche Verbrauch hängt von der Nutzung und vom Standort des Gerätes ab
Energieeffiziensklasse A+ A++
Energieverbrauch: kWh/24 h
kWh/Jahr
0,717
262
0,565
206
Klimaklasse N - T N - T
Geräuschemission dB(A 1 pW 41
Abmessungen, mm 163 x 60 x 62 163 x 60 x 65
Gefriervermögen, kg / 24 h 12
Lagerzeit bei Störung , h 20
Elektrische Daten siehe Typenschild

18
ÜBERSICHT ÜBER DIE MECHANISCHE BEDIENUNG (Abb. 1, 2)
Beschre bung der Symbole auf dem Schaltpult
1 - TEMPERATURDREHREGLER.
Die Temperaturregelung ist ausgeschaltet, wenn die Temperaturregelanzeige auf 0 steht.
Durch Drehung des Reglers im Uhrzeigersinn wird die Temperatur niedriger gestellt.
3 - STROMANZEIGE, mit Symbol
Nach dem Netzanschluss des Geräts leuchtet die Anzeige grün.
4 - ANZEIGE FÜR STEIGENDE TEMPERATUR, mit Symbol
Bei Anstieg der Temperatur auf über -9 ºC leuchtet die Anzeige rot. Bei Anschluss des
Gefrierschranks ans Netz leuchtet auch die rote Lampe. Si signalisiert:
•Gefrierschrank blieb eine längere Zeit ausgeschaltet, d.h. es wird zum ersten mal
eingeschaltet; nach dem Auftauen oder nach dem Stromausfall.
•Die Tür des Gefrierschrankes ist nicht geschlossen oder wird oft geöffnet.
•Es ist zu grosse Menge der zum Gefrieren vorbereiteten Produkten eingelegt.
•Das Kühlsystem ist kaputt (länger als 6 Stunden erlösccht die Lampe nicht und die Arbeit
des Kompressors ist zu hören oder er schaltet sich nicht aus, und es gibt keine oben
erwähnte Gründe - sich zum Servicedienst wenden .
VORBEREITUNG DES GERÄTS
Wir empfehlen, für die Vorbereitungsarbeiten eine weitere Person heranzuziehen.
•Die Verpackung entfernen.
•Den Kühlgerät von der Schaumstoffunterlage nehmen.
•Klebebänder entfernen. Entnehmen Sie das separate Styroporteil (Transportschutz zwischen
Geräterückwand und Kondensator -Metallgitter (falls vorhanden .
Ist Ihr Gefr erschrank m t angeschraubten Handgr ffen ausgestattet, so be m
Anheben und Versch eben des Kühlschranks b tte n cht auf Handgr ffe zu
nehmen, um hren Abbruch zu verme den.
•Neigen Sie beim Aufstellen den Vorderteil des Kühlgeräts ein wenig nach hinten, dann können
Sie ihn auf den Rädchen leicht an den gewünschten Platz rollen.
•Entfernen Sie die roten Klebestreifen, diese sind nur während des Transports erforderlich.
ANMERKUNG. Beim Öffnen der Gefrierschranktür fällt ein rotes Kleinteil heraus – DIESES WIRD
NUR FÜR DEN TRANSPORT BENÖTIGT.
•Entsorgen Sie die Verpackungen fachgerecht.
Nehmen Sie die zwei Streben 1 und setzen Sie sie in die
Führungen 2 im oberen Teil der Rückwand ein.
•Falls der Kühlschrank sich in kühler Umgebung befunden hat
(Außentemperatur weniger als +12 oC , diesen erst nach
Ablauf von zwei Stunden ans Netz anschließen.
•Das Gerät nicht ans Netz anschließen ohne vorher alle Verpackungs- und Transportelemente
entfernt zu haben.
AUFSTELLUNG
Stellen Sie den Kühlgerät in einem trockenen, gut gelüfteten Raum auf.
ACHTUNG! Der Kühlgerät darf nicht in ungeheizten Räumen oder auf
dem Balkon betrieben werden. Das Gerät nicht in unmittelbarer Nähe
einer Heizquelle (Kochherd, Heizkörper, direkte Sonneneinstrahlung
aufstellen.
Table of contents
Languages:
Other KBS Gastrotechnik Freezer manuals