Kentucky Junior User manual

EXTENSION
Agriculture and Natural Resources • Family and Consumer Sciences • 4-H Youth Development • Community and Economic Development
COOPERATIVE EXTENSION SERVICE • UNIVERSITY OF KENTUCKY COLLEGE OF AGRICULTURE, LEXINGTON, KY, 40546
4JD-01PB
4-H Apparel and Textiles
SEWING
4-H Member Project Guide and Practice Projects
Junior Level
18 U. S. C. 707
State Contact: Marjorie M. Baker, M.S., Extension Associate for Textiles and Clothing

Purpose
The primary goal of the Kentucky 4-H Sewing program is to teach youngsters about the
art and skills of using needle and thread to create useful items. This includes not only the use
of a hand needle and thread but the sewing machine and the serger. Youngsters can learn to
create clothing and wardrobe essentials as well as useful items for daily living.
4-H Apparel and Textiles—Sewing
18 U. S. C. 707
Contents
Junior Unit I—Project Guide: Let’s Learn to Sew (Age: 9 to 13) .................................................................................3
Travel Kit ........................................................................................................................................................................ 5
Tissue Holder................................................................................................................................................................. 8
Laundry Bag .................................................................................................................................................................10
Drawstring Shoulder Bag........................................................................................................................................... 12
Go Green Tote Bag ...................................................................................................................................................... 15
Junior Unit II—Project Guide: Let’s Get to the Boom (Age: 9 to 13).................................................. 21
Fabric Book Cover ....................................................................................................................................................... 20
Zippered Travel Bag.................................................................................................................................................... 22
Duel Bag..................................................................................................................................................................... 24
Zippered Quilted Tote Bag (Quilted Purse) ............................................................................................................ 27
Garment Bag ................................................................................................................................................................ 30
Junior Unit III—Project Guid: Top It O (Age: 9 to 13) ......................................................................... 39
Hanger Cover—Serger................................................................................................................................................ 35
Pillowcase with Buon Closure................................................................................................................................ 37
Backpack....................................................................................................................................................................... 39
Gi Bag ......................................................................................................................................................................... 44
Junior Unit IV—Project Guide: Stretch Your Knit Skills (Age: 9 to 13) ............................................... 53
Bath Mi....................................................................................................................................................................... 47
Junior Unit V—Project Guide: Put It All Together (Age: 9 to 13) ......................................................... 49
Wild Things Tote Bag .................................................................................................................................................... 51
Shoe Bag .......................................................................................................................................................................... 54
4-H Sewing Record ............................................................................................................................. 55

3
4-H Apparel and Textiles—Sewing
18 U. S. C. 707
4JD-01PB
University of Kentucky - Cooperative Extension Service - College of Agriculture
DO
Learn the tools of the trade and how to
use them.
You will learn to:
• Identify sewing machine parts
• Use the sewing machine
• Use an iron and ironing board
• Follow simple pattern directions
• Use measuring tools
• Identify and prepare a woven fabric for
sewing
• Sew on a woven fabric
• Sew straight seams, nish seams, and
a casing
• Sew a turned-and-stitched machine hem
APPLY
Using the skills listed above, practice what
you have learned, complete a project, and
keep a record of what you have sewn.
What you will do:
Practice the skills
We learn to sew by sewing! You will
begin learning to sew by constructing
an item made from woven fabric. The
more you sew and practice the skills
you have learned, the beer you will
become.
Make one or more Practice/Service
Projects. See your leader/teacher or
county agent for copies of the paerns.
Consider giving some of these projects
as gis to friends or family. Practice/
Service Projects cannot be exhibited in
4-H Sewing at the Kentucky State Fair.
Sew and exhibit an item from
one of the options listed
• Clothing Option—Shorts, pants,
or skirt with a casing waistline
• Non-Clothing Option—Tote bag,
laundry bag, or drawstring shoul-
der bag
Project Guide—Junior Unit I
Let’s Learn to Sew
Ages 9 to 13
Sewing can be a fun and exciting activity. It begins
with learning some of the basics.

4
4-H Apparel and Textiles—Sewing
18 U. S. C. 707
4JD-01PB
University of Kentucky - Cooperative Extension Service - College of Agriculture
Keep a record of what you
have sewn
Ask your parent or leader to help you
ll out the “4-H Sewing Record” for
this project. Store it in a notebook to
review before you begin next year’s
sewing unit.
Check off the skills you have
learned
Make note of the skills you have
learned this year and check them o
on the “Suggested Skills and Tech-
niques to Learn” sheet.
What you will need:
Equipment
• Sewing machine
• Serger (optional)
• Tape measure
• Sewing gauge
• Marking pen
• Large safety pin
• Seam ripper
• Dressmaker’s shears
• Thread snips
• Dressmaker’s pins
• Pin cushion (magnet preferred)
• Iron and ironing board
Notions and Materials
• Paern*
• Woven fabric (see paern for exact
amount; your leader/teacher has
some fabric suggestions)
• Thread to match fabric
• Non-roll elastic or drawstring (see
paern for exact amount)
*Paerns for the Non-Clothing option are
included in the 4-H Member Project Guide.
Practice projects may not be entered as 4-H
sewing exhibits at the Kentucky State Fair. A
commercial paern, meeting the project guide-
lines, may be used for the Clothing and Non-
Clothing options. A list of suggested paerns
will be available from your county Extension
oce each project year.
SHARE
Show others what you have learned.
What you can do:
• Participate in your county
Fashion Revue
• Participate in your county
Demonstration Contest
• Exhibit at your county Fair or Rally Day
(Project Card required)
• Participate in your club or county
Knowing Sewing Skillathon
• Exhibit at State Fair

5
4-H Apparel and Textiles—Sewing
18 U. S. C. 707
4JD-01PB
University of Kentucky - Cooperative Extension Service - College of Agriculture
Travel Kit
Materials Required:
• One terrycloth finger or hand towel
• One striped washcloth
• One shoestring, 27 inches long
• Matching thread
• Seam sealant
• Washable basting tape (optional)
Equipment Required:
• Dressmaker’s shears
• Pins
• Hand sewing needle
• Sewing machine
Sewing Instructions:
Before you get started, think about what your
travel kit will look like.
1. Fold the washcloth in half with the stripes
running up and down. Then pin the open
edges together with three or four pins
(Figure A).
Going somewhere? Then make a travel kit to
take along. With this project, you will learn
pinning, color coordination, measuring,
straight stitching, and hand basting.
Fold and cut ed
g
e
Figure A
2. Use shears to cut the washcloth in half
at the fold. Your leader will show you
how to handle the shears so that you
can take long, even strokes.
3. Remove the pins and separate the
pieces. Fold one of the washcloth halves
again to find the center. Mark the center
with a pin at the raw edge and the top
edge (Figure B).
Fold
Cut edge
Pin to mark center
Figure B
Practice Project—Junior Unit I
Let’s Learn to Sew

6
4-H Apparel and Textiles—Sewing
18 U. S. C. 707
4JD-01PB
University of Kentucky - Cooperative Extension Service - College of Agriculture
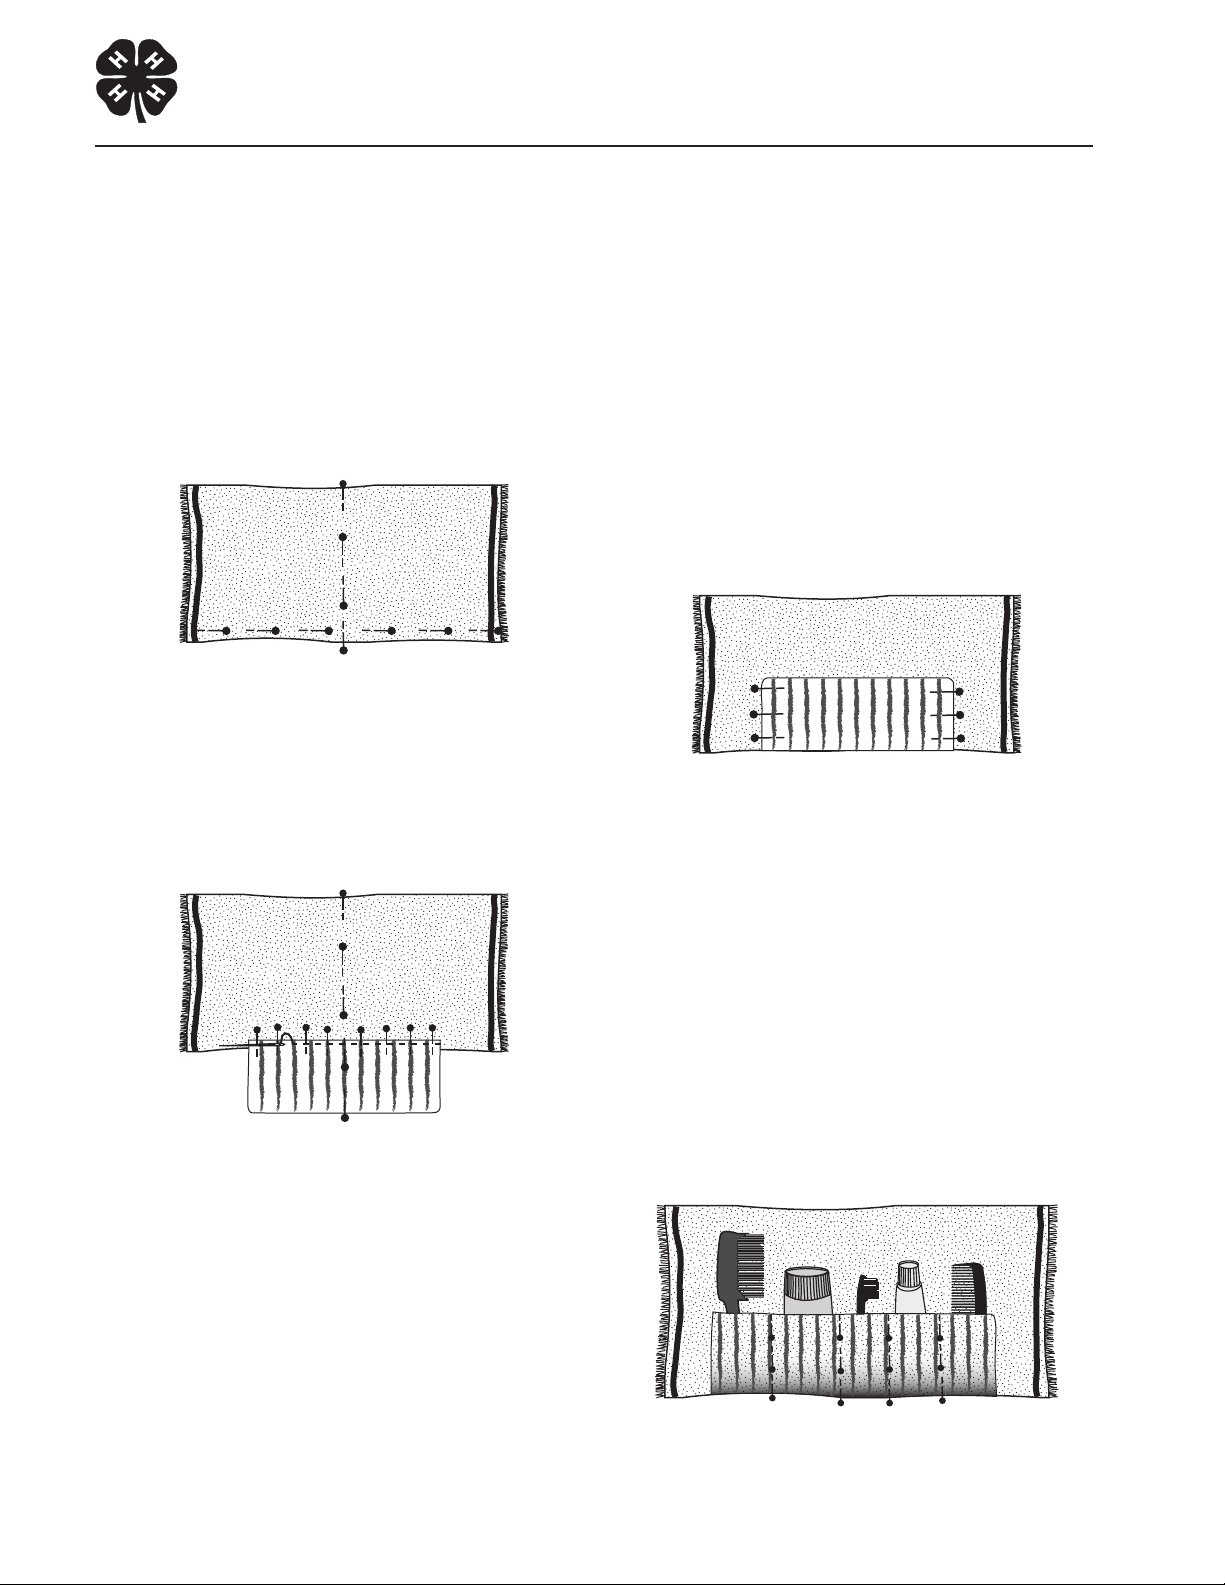
4. Find the center of the towel by folding
it in half crosswise with right side out.
Mark the center of the towel with pins,
using at least three pins on the fold line.
Also, insert a row of pins on the right
side of the towel, inch from the lower
hem (Figure C).
Center
Figure C
5. Place the washcloth on the towel match-
ing the center of the washcloth with the
center of the towel (Figure D). Cut edge
of wash cloth should overlap edge of
towel inch.
Center
Figure D
6. Use pins to hold the washcloth in place
as pictured in Figure D. Hand baste to
hold the washcloth in place for machine
stitching. Because many of you have
never sewn by hand, you may need to
practice making stitches on scrap materi-
al. Try to keep the basting stitches about
¼ inch long.
Option: Use washable basting tape in
place of pins and hand basting.
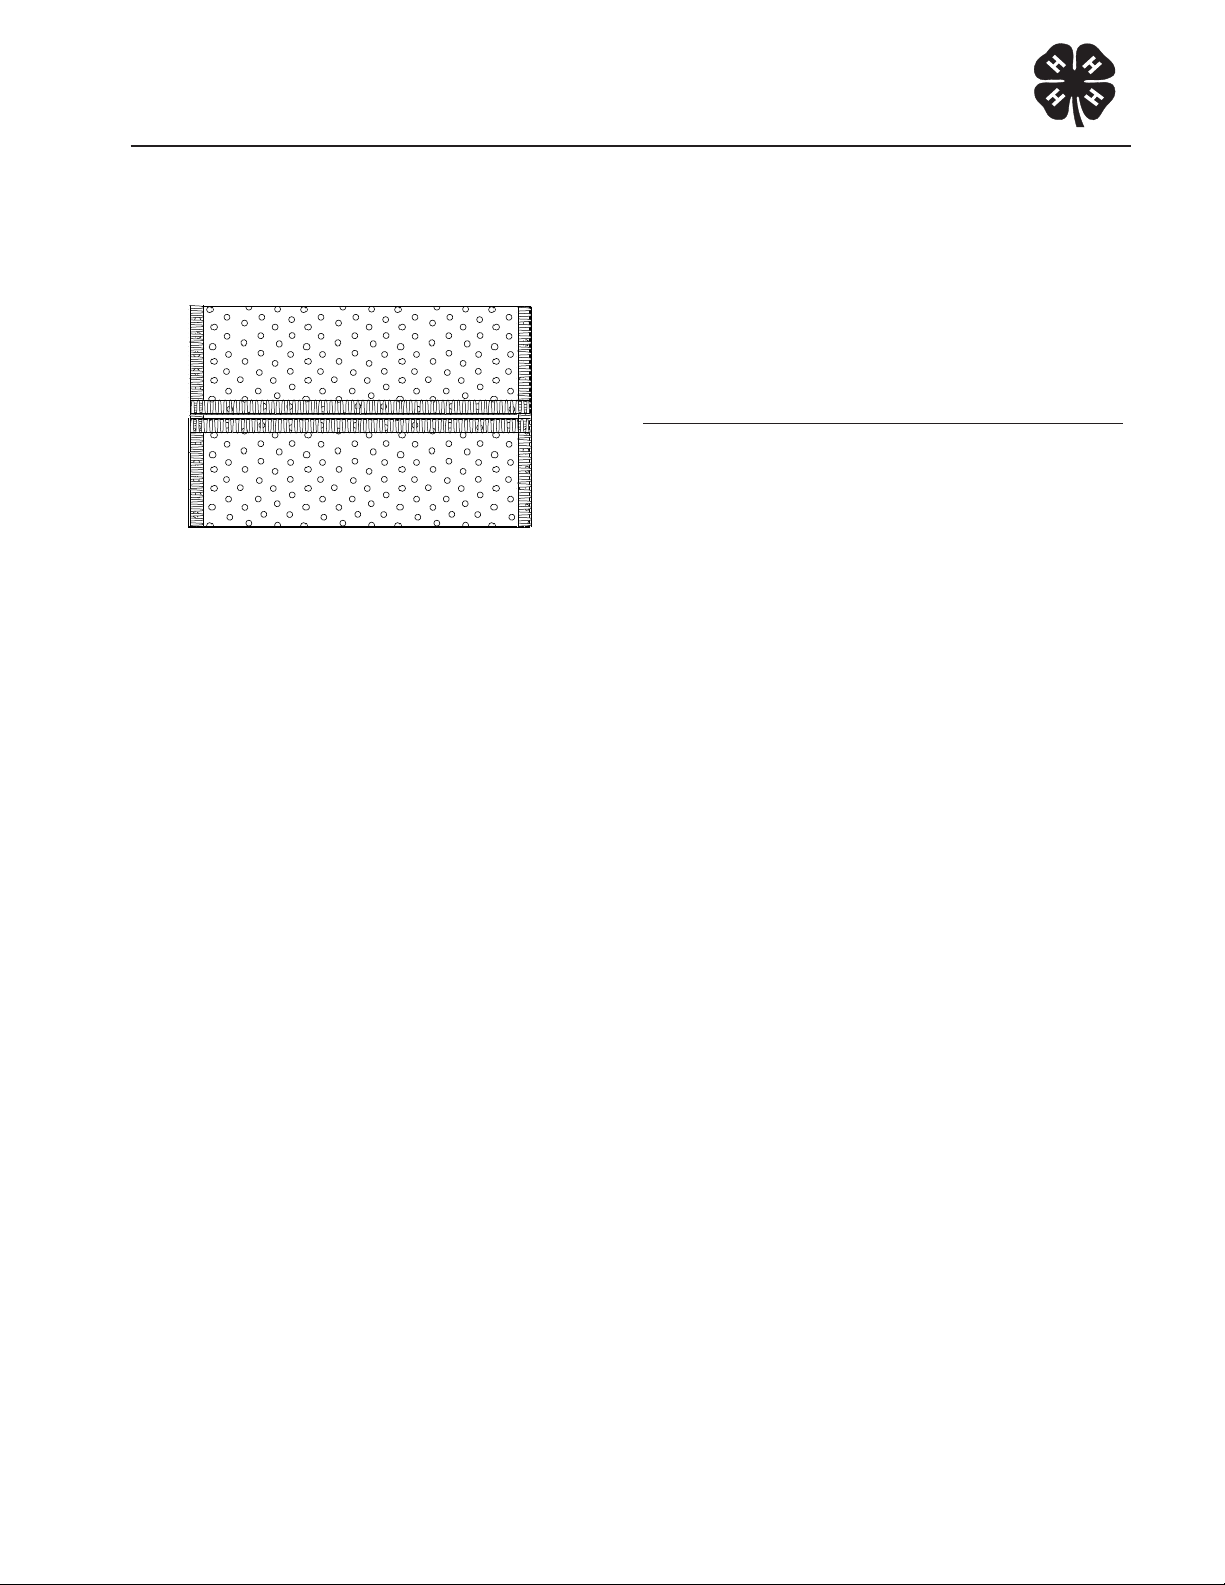
7. Take out the pins if used and stitch
the washcloth to the towel. You will be
stitching ¼ inch from the hem of the
towel. Be sure to secure your seam by
either stitching backward or tying the
thread ends together with knots.
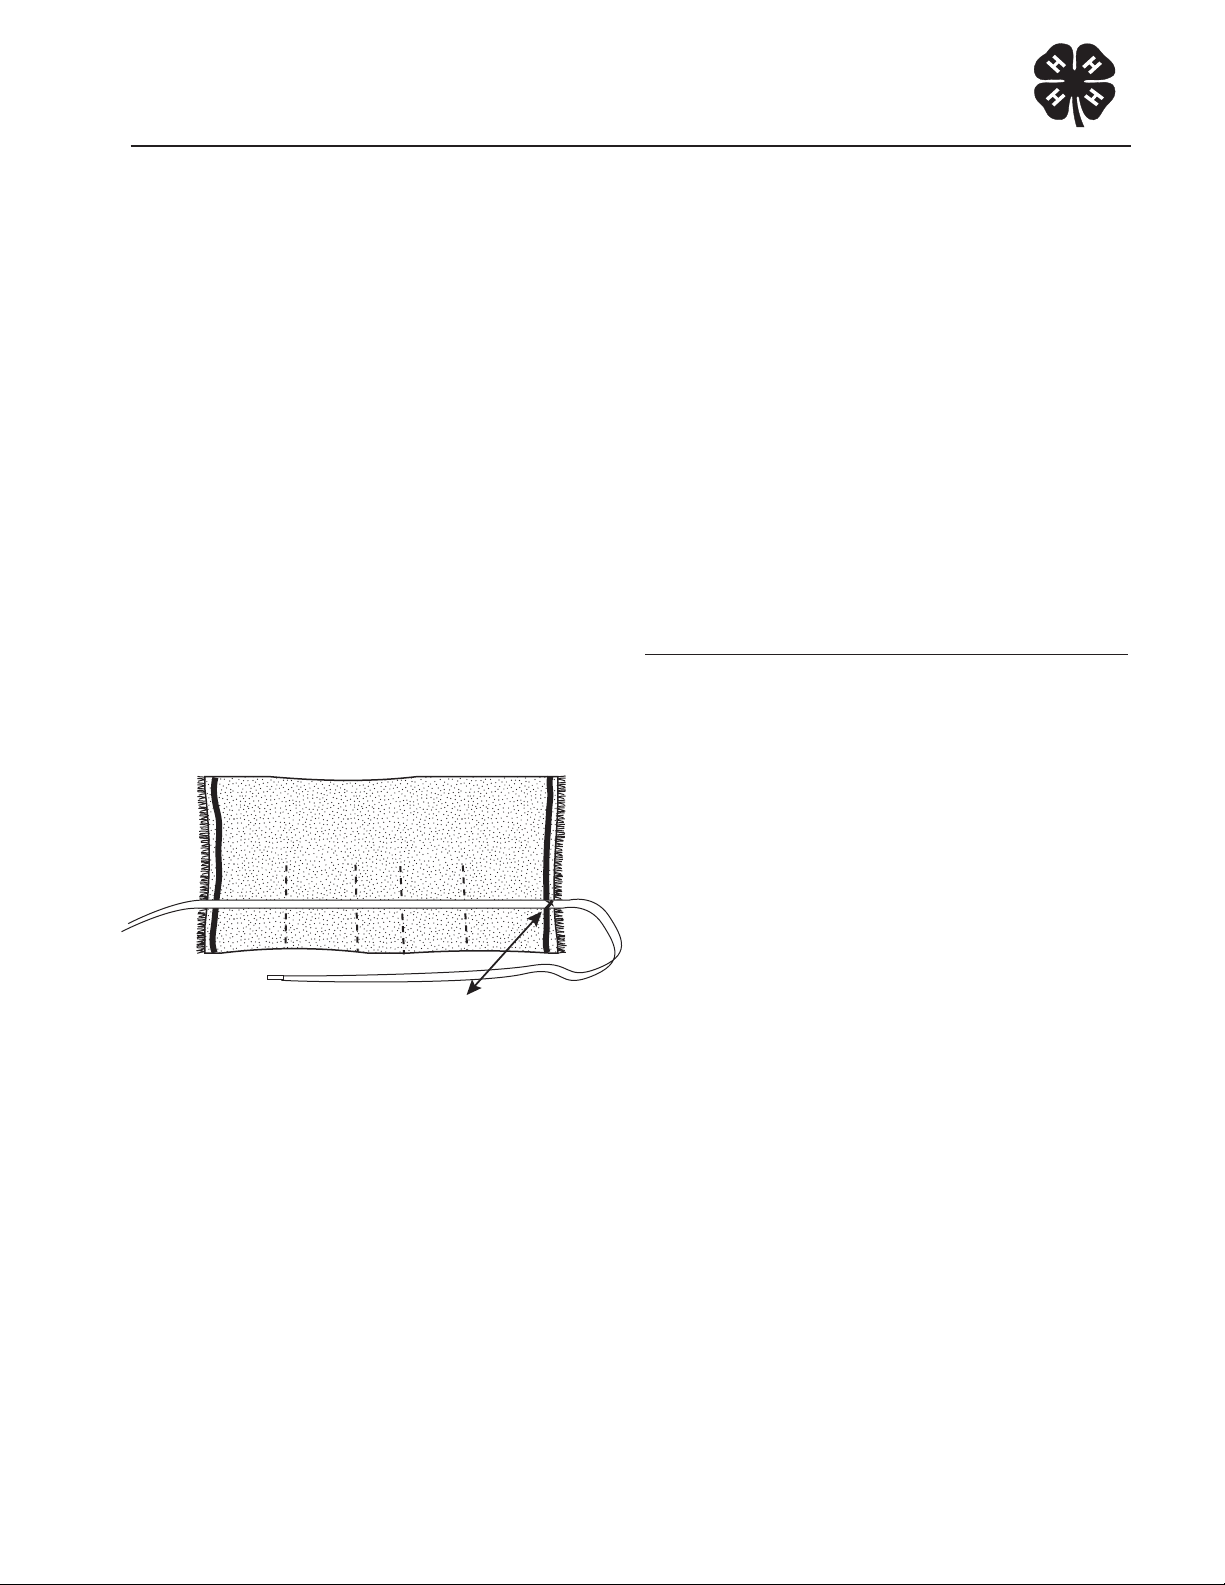
8. Fold the washcloth up onto the towel,
hiding the raw edge that you just
stitched and keeping edges of the towel
and washcloth even. Pin the washcloth
in place on the sides (Figure E).
Figure E
9. Machine stitch sides of pockets removing
pins as you come to them. Guide the edge
of the presser foot along the edge of the
washcloth.
10. To make pockets for the travel kit: De-
cide which articles you would like to
take and place them on the washcloth.
Choose the stripes nearest to the size of
the pocket needed for each article. Pin
the washcloth to the towel along these
stripes to make the pockets (Figure F).
Figure F

7
4-H Apparel and Textiles—Sewing
18 U. S. C. 707
4JD-01PB
University of Kentucky - Cooperative Extension Service - College of Agriculture
11. Slip the items into the pockets to be
sure you have left enough room for
them. If everything slips into position
easily, you are ready to sew. If not, the
pockets can be made bigger by mov-
ing the pins to another stripe.
12. When you have decided which stripe
you will use for each pocket, begin by
backstitching at the lower seam, and
stitch up to the top of the washcloth.
Backstitch again. One, two, three, four
rows of stitching—your pockets are
finished!
13. Fold the shoestring in half. Pin the
mid-point of the string to the towel at
the point marked in the drawing
(Figure G).
Back side of towel
Midpoint of shoestring
14. Fasten the string with very small ma-
chine stitches. Do this by sewing back
and forth across the width. Clip the
threads close to the stitching line. Use a
dot of seam sealant to secure.
Now that you have nished your travel
kit, put your toilet articles and brushes in the
pockets. Fold the upper edge down to cover
them. Roll the towel up from the right to the
le. Wrap the shoestring around the towel
and tie it into a bow. You are all set to tuck it
in your suitcase or under your arm and take
o!
Revised 4-2009 from Stitching Fun for Girls
and Boys (4-H 1307) University of Kentucky
Figure G

8
4-H Apparel and Textiles—Sewing
18 U. S. C. 707
4JD-01PB
University of Kentucky - Cooperative Extension Service - College of Agriculture
Materials Required:
• yard fabric
– may use quilted fabric, upholstery, or
synthetic suede
• Thread to coordinate or match (decora-
tive thread may be used in upper looper
of serger)
• Seam sealant (optional)
Equipment Required:
• Dressmaker’s shears
• Pins and pin cushion
• Ruler or sewing gauge for measuring
• Marking pencil
• Serger
Pattern Layout/Cutting
1. On single fabric thickness using a ruler
and marking pen, measure and mark a
5-inch by 7-inch rectangle.
2. Cut along marked edges using dress-
maker’s shears and long cutting strokes.
This is a simple project to learn sewing with a
serger. It includes a serged edge nish and serged
seams.
Sewing Instructions:
1. Serge the two 5-inch sides of the fabric,
allowing the cutting blade to trim off “a
hair’s width” of the fabric (Figure A).
Figure A
2. With ruler/sewing gauge and a marking
pencil, measure and mark the midpoint
of the fabric along each of the 7-inch
sides.
3. With wrong sides together, fold the
serged edges toward the mark in the
center of the fabric. Make sure the
serged edges meet at the marked points
on either end.
Tissue Holder
Practice Project—Junior Unit I
Let’s Learn to Sew

9
4-H Apparel and Textiles—Sewing
18 U. S. C. 707
4JD-01PB
University of Kentucky - Cooperative Extension Service - College of Agriculture
4. Serge the two ends (Figure B).
Figure B
5. Secure the serger thread chains by
threading them back into the serged
seam or cutting the thread chains off
and applying seam sealant.
6. Insert package of tissues.
Adapted from Tissue Holder, Nadine Hackler,
Retired Professor Clothing and Textiles,
University of Florida, Florida Cooperative
Extension Service.

10
4-H Apparel and Textiles—Sewing
18 U. S. C. 707
4JD-01PB
University of Kentucky - Cooperative Extension Service - College of Agriculture
Laundry Bag
Ages 9 to 13
Non-Clothing Option—Junior Unit I
Let’s Learn to Sew
Materials Required:
• 1 yard of 44/45 inches wide medium-
weight denim or sports cloth
• 1 yards of -inch cording
Equipment Required:
• Dressmaker’s shears
• Pins and pin cushion
• Sewing gauge
• Large safety pin
• Sewing machine
• Serger (optional for finishing seam
edges)
Bag Construction:
1. Finish sides and bottom of bag pieces by
zigzag stitching, machine overcast, or
serging the edges.
2. With right sides together, fold fabric in
half lengthwise.
This simple drawstring bag includes straight machine
stitching, seam nish, and a casing with cording
drawstring. It requires machine sewing, fabric prepa-
ration, and measuring skills.
3. Stitch across finished end and up the
side (making a -inch seam), stopping
2 inches from the top (Figure A).
Fold
Wrong
side
2“
Figure A
4. Secure thread ends at the beginning
and end of each line of stitching (back-
stitch on sewing machine).
5. Press seams open. Press the 2-inch
openings above the seam back inch.

11
4-H Apparel and Textiles—Sewing
18 U. S. C. 707
4JD-01PB
University of Kentucky - Cooperative Extension Service - College of Agriculture
6. Reinforce and secure drawstring open-
ing. Beginning on the left seam allow-
ance, stitch approximately inch from
opening edge down 2 inches, across,
and back up the other seam allowance
(Figure B).
Figure B
7. Turn top edge under ¼ inch and press.
8. Fold top edge down 1 inch to form
casing.
9. Stitch close to the lower folded edge,
leaving ends open to insert the draw-
string (Figure C).
Figure C
Wrong
side
10. Turn laundry bag right side out and
press.
11. Using a large safety pin attached to
drawstring, pull cording through the
casing.
12. Tie cording ends together with an over-
hand knot.
Adapted from Laundry Bag, Nadine Hackler,
Retired Professor, Clothing and Textiles,
University of Florida, Florida Cooperative
Extension Service.

12
4-H Apparel and Textiles—Sewing
18 U. S. C. 707
4JD-01PB
University of Kentucky - Cooperative Extension Service - College of Agriculture
This simple drawstring bag includes straight machine stitching, topstitching, self-fabric
straps, and a casing. It requires beginning machine sewing and measuring skills.
Materials Required:
• 1 yard medium- to heavyweight
fabric (denim, sports cloth, etc.)
• Thread to match
Equipment Required:
• Dressmaker’s shears
• Pins and pin cushion
• Sewing gauge
• Measuring tape
• Large safety pin
• Sewing machine
• Serger (optional)
Drawstring
Shoulder Bag
Ages 9 to 13
Non-Clothing Option—Junior Unit I
Let’s Learn to Sew
Cutting instructions: (Figure A)
Draw pattern pieces on paper.
Cut out using paper scissors.
Pin pattern to fabric according to layout. Keep
the grain lines () parallel to the fabric selvages.
Cut fabric with dressmaker’s shears.
Straps: Cut (2) 33” x 2¾”
Bag: Cut (2*) 15” x 16” with 1⁄” square notch
cut from each corner of the bottom of bag only.
*If using lighter weight fabric, cut four bag pieces. Use
two pieces for the bag and two pieces for the bag lining.
Pattern Layout:
Fold
Selvage
Strap
Bag Bottom of bag
Figure A

13
4-H Apparel and Textiles—Sewing
18 U. S. C. 707
4JD-01PB
University of Kentucky - Cooperative Extension Service - College of Agriculture
Bag Construction:
1. Finish seam allowances on sides and
bottom of bag pieces.
2. Press top edge of each bag piece under
inch. Fold pressed edge down 1 inch
to the inside of the bag and press again.
(Pressing these lines first makes the bag
construction easier.)
3. Unfold all pressed edges. With right
sides together, pin bag pieces together
along the bottom edge. Sew a -inch
seam. Press seam open.
4. With right sides of the bag together, pin
side edges together. Sew side seams,
-inch seam allowance, leaving a
1-inch opening for the drawstring
(Figure B). Press side seams open.
Note: The corners of the bag should not be
sewn yet.
Corner
1
/
2
”
fold line
1“ fold line
Leave open
Corner
Top
Bottom
5. Casing: Fold top edge of bag along the
1-inch established crease lines to form
the casing. Pin in place. Using regula-
tion machine stitching (12 to 14 stitches
per inch), stitch close to lower edge of
casing. Overlap stitching to secure.
6. Straps: Measure and press the long
edges of each strap under (toward the
wrong side of the fabric) inch. Fold
each strap in half, long ways, matching
the pressed edges. Pin together. Press.
Each strap should measure inch wide.
7. Topstitch around each strap close to
the edge.
8. Attach straps to the bottom corners:
To form corners, fold bag bottom so
that side seams and bottom seam
match. Insert one end of the strap
between the layers of the bottom of
the bag (Figure C).
Bottom
Side seam
Strap
Top
Strap
inserted
inside bag
Figure B

14
4-H Apparel and Textiles—Sewing
18 U. S. C. 707
4JD-01PB
University of Kentucky - Cooperative Extension Service - College of Agriculture
Paern: Jennifer Klee, Woodford FCS Agent,
revised by Marjorie M. Baker, M.S., Extension
Associate for Clothing and Textiles
9. Turn bag right side out. Using a large
safety pin attached to the strap end, in-
sert the other end of the strap through
the casing, threading it through to the
opposite side seam. Repeat with second
strap on other side of bag.
10. Remove safety pin and pin strap end
under casing. Sew through casing and
strap to secure. Be careful to leave re-
maining casing open so that other strap
may be inserted.
11. Insert other strap and sew in place.

15
4-H Apparel and Textiles—Sewing
18 U. S. C. 707
4JD-01PB
University of Kentucky - Cooperative Extension Service - College of Agriculture
Materials Required:
• 1 yard of firmly woven medium
weight fabric
• All purpose sewing thread
Equipment Required:
• Dressmaker’ shears
• Tape measure or sewing gauge
• Pins and pin cushion
• Pencil
• Ruler/yard stick
• Newsprint or similar paper
for pattern
• Paper scissors
• Iron and ironing surface
• Sewing machine
Non-clothing Option – Junior Unit I
Let’s Learn to Sew
Go Green Tote Bag
Ages 9 to 13
This simple tote bag includes straight machine stitching, top
stitching, seam nish, self fabric straps, pocket, and turned and
stitched hem. Use it for shopping, books, or toting your favorite
project. Finished size 18” x 14”.
Cutting instructions: (Figure A)
Draw pattern pieces on paper.
Cut out using paper scissors.
Pin pattern to fabric according to layout.
Keep the grain lines () parallel to the
fabric selvages.
Cut fabric with dressmaker’s shears.
Straps: Cut (2) 22 ½” x 4”
Bag: Cut (1) 32” x 19”
Pocket: Cut (1) 9” x 20”
BAG
POCKET
STRAP
STRAP
Figure A

16
4-H Apparel and Textiles—Sewing
18 U. S. C. 707
4JD-01PB
University of Kentucky - Cooperative Extension Service - College of Agriculture
2. With right sides together, fold pocket in
half matching short ends together. Sew
” seam around the three sides, leaving
a 4” opening in one side to turn (Fig-
ure C). When turning the corners, stop
and put the needle in the fabric, lift the
presser foot, turn the fabric, and lower
the presser foot before continuing to
sew. Turn right side out and press seams
flat. Center pocket on bag right side and
4” down from one top edge. Stitch close
to pocket edge around three sides, back-
stitching at each end to reinforce.
Sewing instructions:
All seam allowances are ”
1. With wrong side of strap fabric facing
up, press ” over along each long edge.
Fold in half lengthwise matching folded
edges. Stitch close to both long edges of
each strap (Figure B).
STRAP
3. Fold bag in half wrong sides together
and matching short ends to each other.
Measure up 2” from bottom fold and
pin the edges together at each side seam
(Figure D).
Fold
POCKET
2”
4”
Bring short ends down over each pin
forming a pleat at the bottom of the bag
(Figure E).
Figure B
Figure D
Figure E
Figure C

17
4-H Apparel and Textiles—Sewing
18 U. S. C. 707
4JD-01PB
University of Kentucky - Cooperative Extension Service - College of Agriculture
4. Pin side seams together, maintaining
the pleat. Sew side seams. Zigzag or
overcast the seam allowances together.
Press seams flat to one side (Figure F).
5. Turn bag right side out and pin straps to
top edge 3 inches each side of the center.
Stitch ” and 1” away from top edge of
bag. Press top edge to inside along the
one-inch stitching line and again one
more inch creating a double folded hem.
Stitch close to lower hem edge (Figure
G). Bring straps to outside of bag, pin to
top edge of bag and stitch close to the
top edge all the way around (Figure H).
Marjorie M. Baker, M.S., Extension Associate
for Clothing and Textiles
Figure F
Figure G
Figure H

18
4-H Apparel and Textiles—Sewing
18 U. S. C. 707
4JD-01PB
University of Kentucky - Cooperative Extension Service - College of Agriculture
Project Guide—Junior Unit II
Let’s Get to the
Bottom
Ages 9 to 13
You will continue to use and build on the sewing skills learned in Unit I.
DO
Learn new skills.
You can learn to:
• Use interfacing
• Use the serger to finish your seams
• Finish a waistline with a waistband
or facing
• Make darts
• Ease a seamline
• Handle bulk in an enclosed seam
• Put in a zipper (may include centered,
lapped, or fly)
• Put on a hook and eye or snap
• Hem using a hand sewing needle and
thimble
APPLY
Using some of the new skills listed above,
along with ones you learned in Unit 1, com-
plete a project and keep a record of what you
have sewn.
What you will do:
Practice the skills
We learn to sew by sewing! You will
continue learning to sew by construct-
ing an item made from woven fabric.
The more you sew and practice the
skills you have learned, the beer you
will become.
Make one or more Practice/Service
Projects. See your leader/teacher or
county agent for copies of the paerns.
Consider giving some of these as gis
to friends or family. Practice/Service
Projects cannot be exhibited in 4-H
Sewing at the Kentucky State Fair.
Sew and exhibit an item from
one of the options listed
• Clothing Option—Shorts, pants,
or skirt with a zipper and a waist-
line facing or waistband
• Non-Clothing Option—Tote bag,
garment bag, purse, or gym bag
with zipper and self-fabric straps
or handles

19
4-H Apparel and Textiles—Sewing
18 U. S. C. 707
4JD-01PB
University of Kentucky - Cooperative Extension Service - College of Agriculture
Keep a record of what you have
sewn
Ask your parent or leader to help you
ll out the “4-H Sewing Record” for
this project. Store it in a notebook to
review before you begin next year’s
sewing unit.
Check off skills you have
learned
Make note of the skills you have
learned this year and check them o
on the “Suggested Skills and Tech-
niques to Learn” sheet.
What you will need:
Equipment
• Sewing machine
• Serger (if available)
• Basic sewing kit to include: thread
snips, tape measure, sewing gauge,
thimble, seam ripper, dressmaker’s
shears, dressmaker’s pins, pin
cushion/magnet
• Iron and ironing board
• Zipper foot aachment for sewing
machine
• Hand sewing needles (sharps)
Notions and Materials
• Paern*
• Woven fabric (see paern for exact
amount; your leader/teacher will
have some fabric suggestions)
• Thread to match fabric
Interfacing (see paern for exact
amount)
• Zipper (match/coordinate color to
fabric)
• Hook and eye
• Snap
*Paerns for the Non-Clothing option are
included in the 4-H Member Project Guide.
Practice projects may not be entered as 4-H
sewing exhibits at the Kentucky State Fair. A
commercial paern, meeting the project guide-
lines, may be used for the Clothing and Non-
Clothing options. A list of suggested paerns
will be available from your county Extension
oce each project year.
SHARE
Show others what you have learned.
What you can do:
• Participate in your county Fashion
Revue
• Participate in your county Demonstra-
tion Contest
• Exhibit at your county Fair or Rally Day
(Project Card required)
• Participate in your club or county
Knowing Sewing Skillathon
• Exhibit at State Fair

20
4-H Apparel and Textiles—Sewing
18 U. S. C. 707
4JD-01PB
University of Kentucky - Cooperative Extension Service - College of Agriculture
Fabric Book Cover
Ages 9 to 13
Materials Required:
• Your favorite paperback book
• yard (approx.) firmly woven,
medium-weight fabric—amount
depends on size of book
• yard fusible interfacing
• Thread to match fabric
Equipment Required:
• Sewing machine
• Measuring tape
• Dressmaker’s shears
• Dressmaker’s pins and pin cushion
• Pencil and paper to make pattern
• Iron and pressing surface
Cutting Instructions:
1. Measure your book to determine size.
Top to boom ___ + 1¼ inches = ___ [A]
Side to side ___ x 2 + spine ___ = ___ [B]
[B] ___ + 6 inches = ___ [C]
This is a simple project to practice pinning, measuring, cut-
ting, pressing, sewing straight, applying interfacing, and
following pattern direction.
2. Cut one piece of fabric for the book
jacket (inside width [A] by length [B]).
3. Cut one piece of fabric for jacket outside
(the width [A] by the length [C]).
4. Cut one piece of interfacing the same
size as the jacket outside.
Sewing Instructions:
1. Fuse interfacing to the wrong side of the
jacket outside piece.
2. On short sides of jacket outside, turn
under inch to the wrong side of the
fabric. Press. Sew ¼ inch from the folded
edge (Figure A).
Figure A
Practice Project—Junior Unit II
Let’s Get to the Bottom
Table of contents