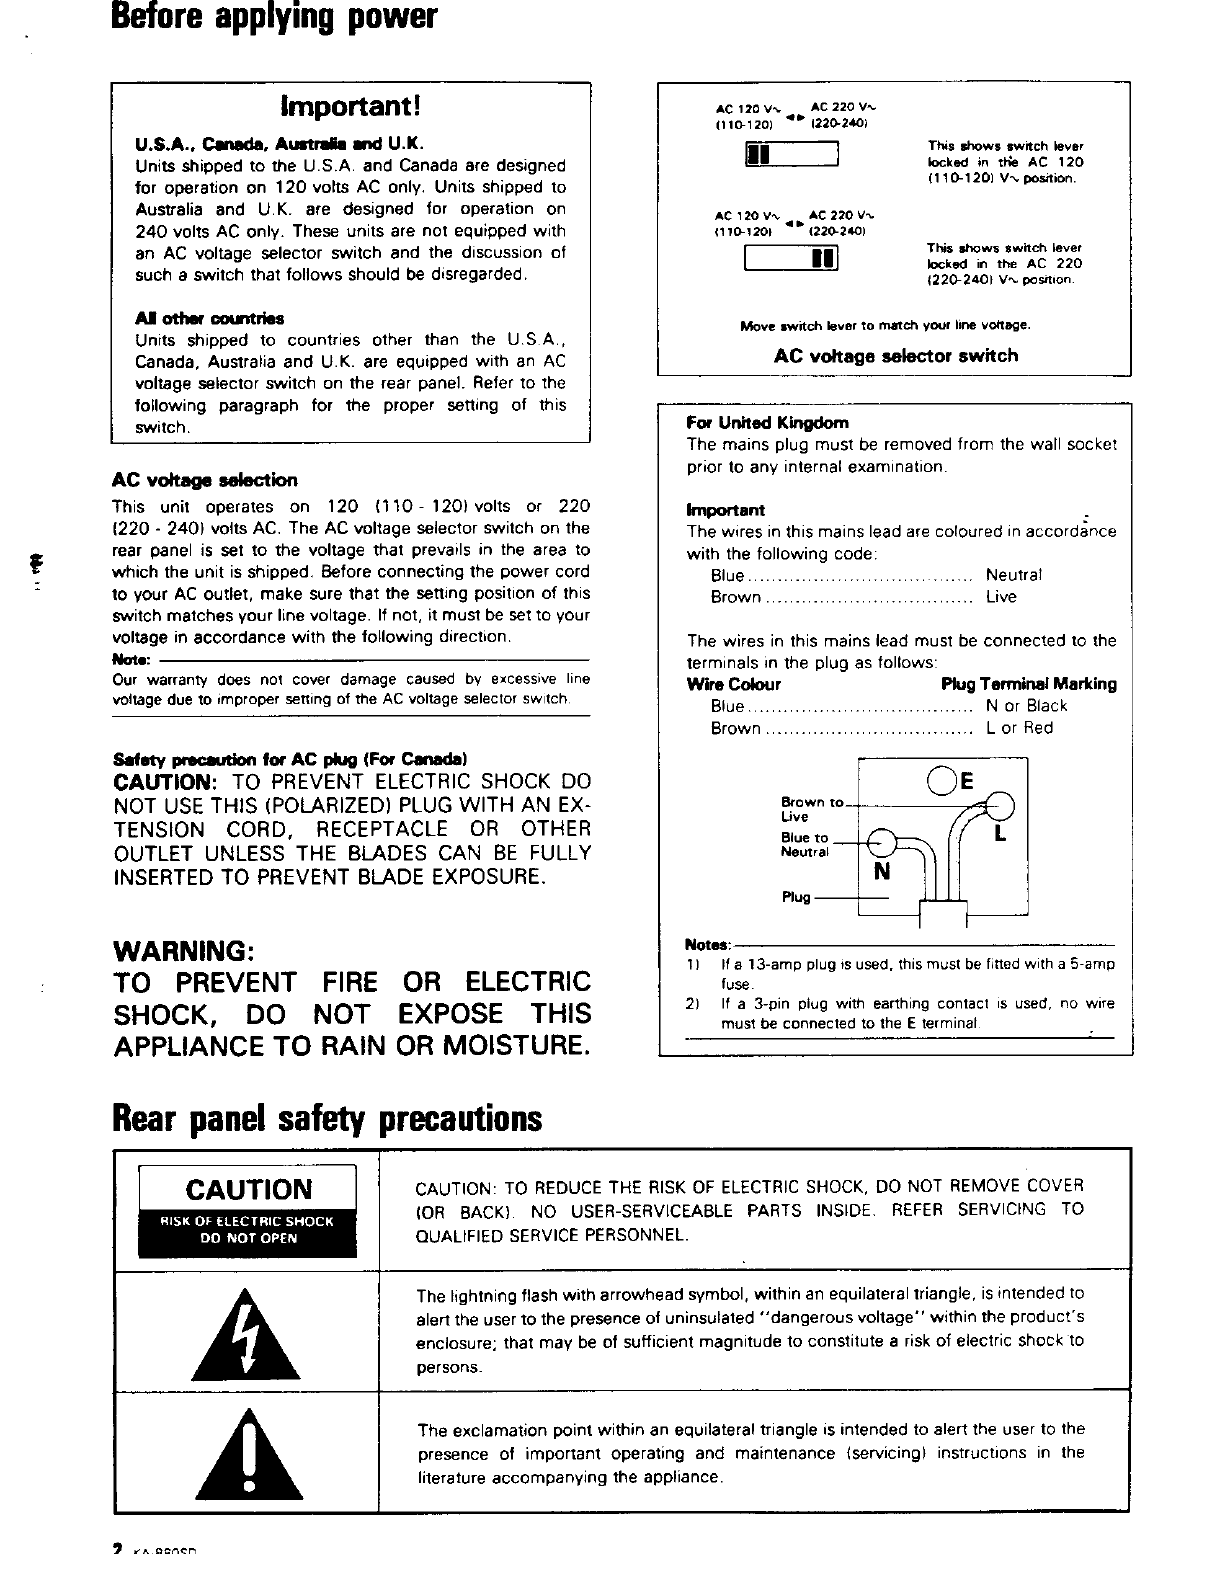
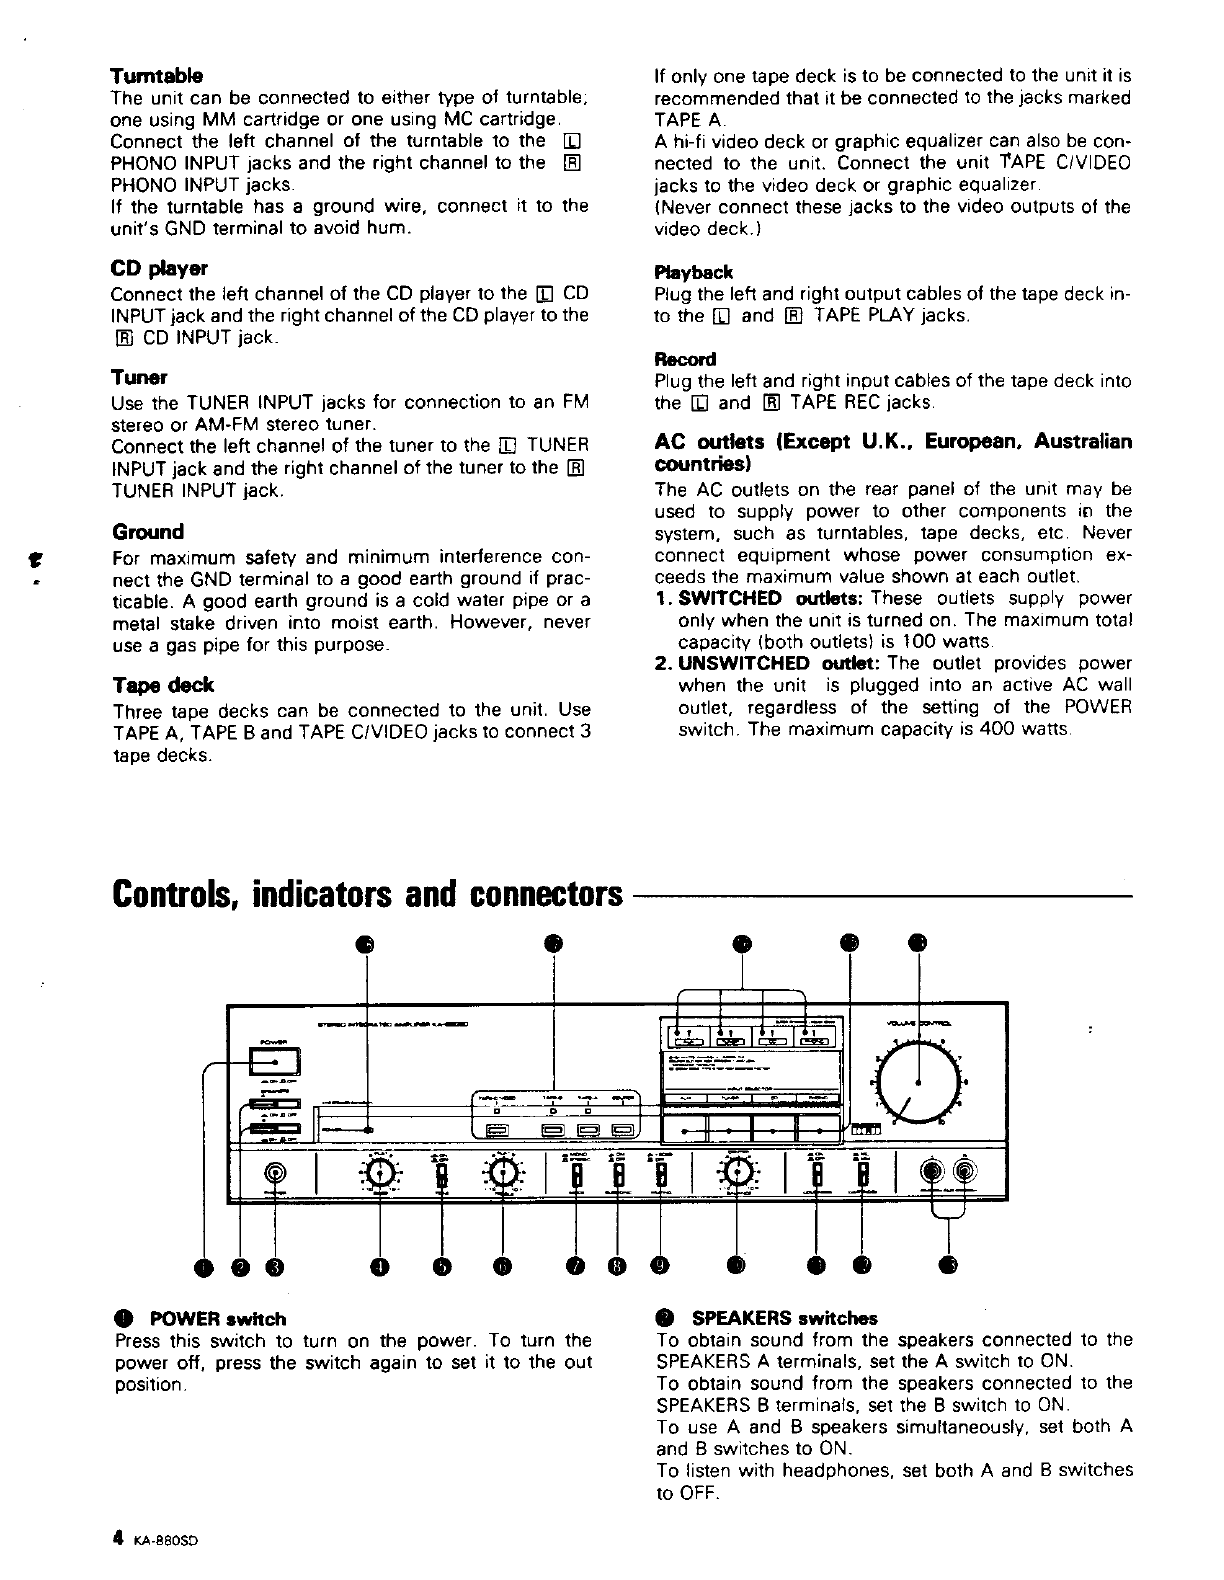
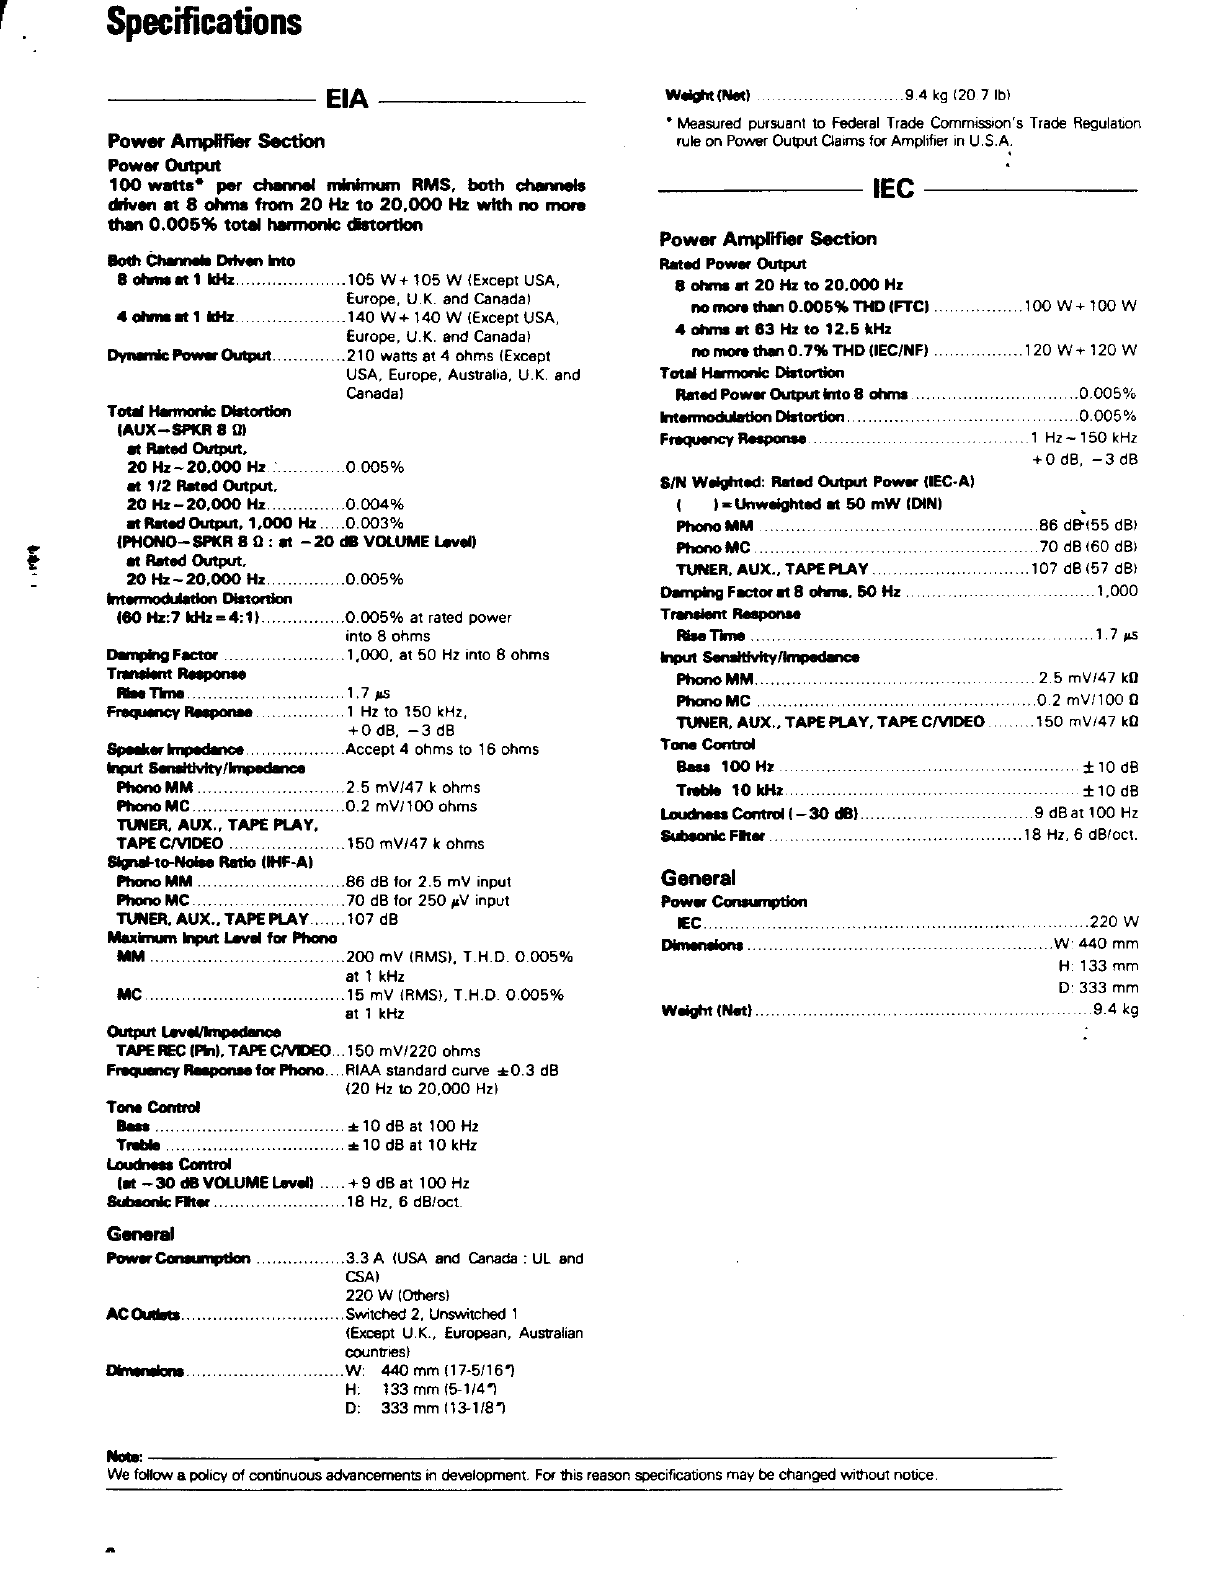
Kenwood KA-880SD User manual

STEREO
INTEGRATED
AMPLIFIER
KA-880SD
INSTRUCTION
MANUAL
KENWOOD
Introduction
Your
choice
of
this
product
indicates
that
you
are
a
devotee
to
excellence
in
sound
reproduction.
We
appreciate
your
patronage
and
take
pride
in
the
long
tradition
of
quality
components,
that
our
company
represents.
So
that
you
can
get
the
most
out
of
your
unit,
we
suggest
that
you
take
the
time
to
read
through
this
manual
before
you
hook
up
and
operate
your
system.
This
will
acquaint
you
with
operating
features,
and
system-connection
considerations,
so
that
your
listen-
ing
pleasure
will
be
enhanced
right
from
the
start.
You
will
notice
that
in
all
aspects
of
planning,
engineering,
styling,
operating
convenience
and
adaptability,
we
have
sought
to
anticipate
your
needs
and
desires.
Keep
this
manual
handy
for
future
reference.
For
your
records
Record
the
serial
number,
found
on
the
back
of
the
unit,
in
the
spaces
designated
on
the
warranty
card,
and
in
the
space
provided
below.
Refer
to
the
model
and
serial
numbers
whenever
you
call
upon
your
dealer
for
information
or
service
on
this
product.
Model
_____
Serial
Number.
Unpacking
Unpack
the
unit
carefully
and
make
sure
that
al!
ac-
cessories
are
put
aside
so
they
will
not
be
lost.
Examine
the
unit
for
any
possibility
of
shipping
damage.
If
your
unit
is
damaged
or
fails
to
operate,
notify
your
dealer
immediately.
If
your
unit
was
shipped
to
you
directly,
notify
the
shipping
company
without
delay.
Only
the
consignee
(the
person
of
company
receiving
the
unit)
can
file
a
claim
against
the
carrier
for
shipping
damage.
We
recommend
that
you
retain
the
original
carton
and
packing
materials
for
use
should
you
transport
or
ship
the
unit
in
the
future.
Before
operation
Safety
precautions
Never
remove
the
case.
If
the
internal
parts
are
touched
accidentally,
a
serious
electric
shock
might
occur.
.
$
Never
touch
internal
parts.
If
a
metal
object,
such
as
a
hair
pin
or
a
needle,
comes
into
contact
with
the
power
socket
on
the
rear
panel,
a
dangerous
electric
shock
may
result.
For
families
with
children,
never
permit
children
to
put
anything,
especially
metal,
inside
this
unit.
Do
not
connect
other
audio
equipment
with
a
power
consumption
larger
than
that
specified
to
the
AC
outlet
on
the
rear
panel.
Never
connect
other
electrical
ap-
pliances,
such
as
an
iron
or
toaster.
Touching
the
power
plug
when
your
hands
are
wet
may
result
in
a
serious
electric
shock.
“
“”
Q
ws
Never
touch
with
wet
.
r
hands.
joa
Never
pull,
bend
or
extend
the
power
cord.
This
could
damage
the
power
cord,
resulting
in
a
broken
cord
or
short-circuit.
Never
pull
or
stretch
i
In
case
of
abnormal
smell
If
an
abnorrnal
smell
or
smoke
is
detected,
immediately
turn
the
power
OFF
and
pull
out
the
power
cord.
Con-
tact
your
dealer
or
nearest
service
station.
Cyr
(3
Cleaning
Do
not
use
volatile
solvents
such
as
alcohol,
paint
thin-
ner,
gasoline,
benzine,
etc.
to
clean
the
cabinet.
Use
a
silicone
cloth
or
a
clean
dry
“
Sl
Siticone
cloth
Thinner
Benzine
Installation
precautions
a)
Avoid
locations
subject
to
direct
sunlight.
b)
Avoid
high
or
low
temperature
extremes.
c)
Keep
the
unit
away
from
heat
radiating
sources.
d)
Choose
a
location
that
is
relatively
free
of
vibration
or
excessive
dust.
e)
Make
sure
power
is
off
before
making
any
system
connections.
PRINTED
IN
JAPAN
B50-5495-00
(K,P,U,M,UE,X,E)
(T)
23456789101112/85
123456789101
112/86

te
Before
applying
power
important!
U.S.A.,
Canada,
Australia
and
U.K.
Units
shipped
to
the
U.S.A.
and
Canada
are
designed
for
operation
on
120
volts
AC
only.
Units
shipped
to
Australia
and
U.K.
are
designed
for
operation
on
240
volts
AC
only.
These
units
are
not
equipped
with
an
AC
voltage
selector
switch
and
the
discussion
of
such
a
switch
that
follows
should
be
disregarded.
All
other
countries
Units
shipped
to
countries
other
than
the
U.S.A.,
Canada,
Australia
and
U.K.
are
equipped
with
an
AC
voltage
selector
switch
on
the
rear
panel.
Refer
to
the
following
paragraph
for
the
proper
setting
of
this
switch.
AC
120
Vx.
AC
220
Vx
(110-120)
*®
(220-240)
iT
This
shows
switch
lever
locked
in
the
AC
120
(110-120)
V~
position.
AC
120
Vw
«a.
AC
220
V~
4170-120}
(220-240)
ee
|
||
This
shows
switch
lever
locked
in
the
AC
220
{220-240}
V~
position.
Move
switch
lever
to
match
your
line
voltage.
AC
voltage
selector
switch
AC
voltage
selection
This
unit
operates
on
120
(110-120)
volts
or
220
(220
-
240)
volts
AC.
The
AC
voltage
selector
switch
on
the
rear
panel
is
set
to
the
voltage
that
prevails
in
the
area
to
which
the
unit
is
shipped.
Before
connecting
the
power
cord
to
your
AC
outlet,
make
sure
that
the
setting
position
of
this
switch
matches
your
line
voltage.
If
not,
it
must
be
set
to
your
voltage
in
accordance
with
the
following
direction.
Note:
Our
warranty
does
not
cover
damage
caused
by
excessive
line
voltage
due
to
improper
setting
of
the
AC
voltage
selector
switch
Satety
precaution
for
AC
plug
(For
Canada)
CAUTION:
TO
PREVENT
ELECTRIC
SHOCK
DO
NOT
USE
THIS
(POLARIZED)
PLUG
WITH
AN
Ex-
TENSION
CORD,
RECEPTACLE
OR
OTHER
OUTLET UNLESS
THE
BLADES
CAN
BE
FULLY
INSERTED
TO
PREVENT
BLADE
EXPOSURE.
WARNING:
TO
PREVENT
FIRE
OR
ELECTRIC
SHOCK,
DO
NOT
EXPOSE
THIS
APPLIANCE
TO
RAIN
OR
MOISTURE.
Rear
panel
safety
precautions
For
United
Kingdom
The
mains
plug
must
be
removed
from
the
wall
socket
Prior
to
any
internal
examination.
important
.
The
wires
in
this
mains
lead
are
coloured
in
accordance
with
the
following
code:
Blue...
eee
Neutral
BlOWN
0...
e
cece
eee
ee
teens
Live
The
wires
in
this
mains
lead
must
be
connected
to
the
terminals
in
the
plug
as
follows:
Wire
Colour
Plug
Terminal
Marking
....
Nor
Black
.
Lor
Red
OE
Brown
to_{
Live
Blue
to
__|
L
Neutral
N
Plug
}___
|
F
Notes:
1)
ia
13-amp
plug
is
used,
this
must
be
fitted
with
a
5-amp
fuse
2)
If
a
3-pin
piug
with
earthing
contact
is
used,
no
wire
must
be
connected
to
the
E
terminal
CAUTION
CAUTION:
TO
REDUCE
THE
RISK
OF
ELECTRIC
SHOCK,
DO
NOT
REMOVE
COVER
RISK
OF
ELECTRIC
SHOCK
(OR
BACK).
NO
USER-SERVICEABLE
PARTS
INSIDE.
REFER
SERVICING
TO
DO
NOT
OPEN
QUALIFIED
SERVICE
PERSONNEL.
persons.
The
lightning
flash
with
arrowhead
symbol,
within
an
equilateral
triangle,
is
intended
to
alert
the
user
to
the
presence
of
uninsulated
‘‘dangerous
voltage’’
within
the
product's
enciosure;
that
may
be
of
sufficient
magnitude
to
constitute
a
risk
of
electric
shock
to
The
exclamation
point
within
an
equilateral
triangle
is
intended
to
alert
the
user
to
the
presence
of
important
operating
and
maintenance
(servicing)
instructions
in
the
literature
accompanying
the
appliance.
2
va.cenen

System
connections
O
=
[Except
U.K.,
European,
Australian
countries
egwirenes
ee
(fe)
eorrcat,
LIBR
LIER
LINE
IN
LINE
OUT
Evol
=
c=
Jobleae
29
Speakers
This
amplifier
has
two
pairs
of
speaker
terminals,
SPEAKERS
A
and
SPEAKERS
B.
Connecting
one
speaker
system
Connect
speakers
rated
at
4
ohms
or
more
to
the
SPEAKERS
A
terminals.
Connecting
two
speaker
systems
To
connect
an
additional
pair
of
speakers,
use
the
B
ter-
minals.
In
this
case,
each
speaker
must
be
rated
at
8
ohms
or
more.
Ne
1.
During
speaker
systems
connection,
set
the
POWER
switch
to
OFF.
2.
Check
that
the
connected
lead
wires
of
the
speaker
systems
do
not
contact
other
jacks
or
terminats
3.
When
connecting
one
pair
of
speakers
to
the
SPEAKERS
A
or
B
terminals,
be
sure
that
the
impedance
of
each
speaker
is
between
4
and
16
ohms.
When
connecting
speakers
to
both
SPEAKERS
A
and
B
terminals,
be
sure
that
the
impedance
of
each
speaker
is
between
8
and
16
ohms.
WARNING!
Particular
attention
must
be
given
to
making
good
electrical
contact
at
the
amplifier-output
and
speeker
terminals.
Poor
or
loose
connections
can
cause
sparking
or
buming
at
the
terminals
because
of
the
very
high
power
that
the
amplifier
can
deliver.
Follow
these
steps
carefully.
Remove
insulation
et
og)
from
lead
tip.
oo
Insert
the
lead
tip
Turn
the
knob
To
ensure
firm
as
far
as
it
will
go.
clockwise
to
tock
contact.
pull
the
the
wire.
wire
slightly.
Connecting
speaker
cords
oe
Twist
wire
tightly,
and
solder.

Turntable
The
unit
can
be
connected
to
either
type
of
turntable;
one
using
MM
cartridge
or
one
using
MC
cartridge.
Connect
the
left
channel
of
the
turntable
to
the
[)
PHONO
INPUT
jacks
and
the
right
channel
to
the
[R]
PHONO
INPUT
jacks.
lf
the
turntable
has
a
ground
wire,
connect
it
to
the
unit’s
GND
terminal
to
avoid
hum.
CD
player
Connect
the
ieft
channel
of
the
CD
piayer
to
the
cD
INPUT
jack
and
the
right
channel
of
the
CD
player
to
the
{}
CD
INPUT
jack.
Tuner
Use
the
TUNER
INPUT
jacks
for
connection
to
an
FM
stereo
or
AM-FM
stereo
tuner.
Connect
the
left
channel!
of
the
tuner
to
the
TUNER
INPUT
jack
and
the
right
channel
of
the
tuner
to
the
TUNER
INPUT
jack.
Ground
For
maximum
safety
and
minimum
interference
con-
nect
the
GND
terminal
to
a
good
earth
ground
if
prac-
ticable.
A
good
earth
ground
is
a
cold
water
pipe
or
a
metal
stake
driven
into
moist
earth.
However,
never
use
a
gas
pipe
for
this
purpose.
Tape
deck
Three
tape
decks
can
be
connected
to
the
unit.
Use
TAPE
A,
TAPE
B
and
TAPE
C/VIDEO
jacks
to
connect
3
tape
decks.
Controls,
indicators
and
connectors
If
only
one
tape
deck
is
to
be
connected
to
the
unit
it
is
recommended
that
it
be
connected
to
the
jacks
marked
TAPE
A.
A
hi-fi
video
deck
or
graphic
equalizer
can
also
be
con-
nected
to
the
unit.
Connect
the
unit
TAPE
C/VIDEO
jacks
to
the
video
deck
or
graphic
equalizer.
{Never
connect
these
jacks
to
the
video
outputs
of
the
video
deck.)
Playback
Plug
the
left
and
right
output
cables
of
the
tape
deck
in-
to
the
{[}
and
[R}
TAPE PLAY
jacks.
Record
Plug
the
left
and
right
input
cables
of
the
tape
deck
into
the
[[]
and
[R]
TAPE
REC
jacks.
AC
outlets
(Except
U.K.,
European,
Australian
countries)
The
AC
outlets
on
the
rear
panel
of
the
unit
may
be
used
to
supply
power
to
other
components
in
the
system,
such
as
turntables,
tape
decks,
etc.
Never
connect
equipment
whose
power
consumption
ex-
ceeds
the
maximum
value
shown
at
each
outlet.
1.
SWITCHED
outlets:
These
outlets
supply
power
only
when
the
unit
is
turned
on.
The
maximum
total
capacity
(both
outlets}
is
100
watts.
2.
UNSWITCHED
outlet:
The
outlet
provides
power
when
the
unit
is
plugged
into
an
active
AC
wall
outlet,
regardless
of
the
setting
of
the
POWER
switch.
The
maximum
capacity
is
400
watts.
@
POWER
switch
Press
this
switch
to
turn
on
the
power.
To
turn
the
power
off,
press
the
switch
again
to
set
it
to
the
out
position.
@
Kassosp
@
SPEAKERS
switches
To
obtain
sound
from
the
speakers
connected
to
the
SPEAKERS
A
terminals,
set
the
A
switch
to
ON.
To
obtain
sound
from
the
speakers
connected
to
the
SPEAKERS
B
terminals,
set
the
B
switch
to
ON.
To
use
A
and
B
speakers
simultaneously,
set
both
A
and
B
switches
to
ON.
To
listen
with
headphones,
set
both
A
and
B
switches
to
OFF.

ote
@
PHONES
jack
Plug
stereo
headphones
into
this
jack
for
private
listen-
ing.
The
speakers
are
silenced
when
the
SPEAKERS
switches
are
set
to
OFF.
©
BASS
control
Turn
clockwise
to
increase
bass
response,
counter-
clockwise
to
reduce
bass
response.
The
‘‘FLAT”’
setting
provides
a
flat
bass
response.
©
TONE
switch
This
switch
provides
flat
frequency
response
by
deac-
tivating
the
tone
control
circuit.
BASS
and
TREBLE
con-
trols
do
not
operate
when
this
switch
is
set
to
OFF.
Set
this
switch
to
ON
when
the
BASS
and
TREBLE
con-
trols
are
used.
@
TREBLE
control
Turn
clockwise
to
increase
treble
response,
counter-
clockwise
to
reduce
treble
response.
The
‘FLAT’
setting
provides
a
flat
treble
response.
@
MODE
switch
STEREO
—
This
provides
stereophonic
reproduction
of
any
stereo
program
source.
The
left
channel
is
heard
from
the
left
speaker,
and
the
right
channel
is
heard
from
the
right
speaker.
MONO
—
Monaural
reproduction.
The
left
and
right
channels
are
mixed
together
and
heard
from
both
speakers.
@
SUBSONIC
switch
ON
—
With
the
switch
in
this
setting,
signals
below
18
Hz
are
attenuated
at
the
rate
of
6
dB
per
oc-
tave.
Although
such
signals
are
inaudible,
they
can
cause
intermodulation
distortion
components
in
the
audible
range.
It
is
recommended
that
this
switch
be
depressed
at
all
times,
even
if
no
turn-
table
rumble
is
apparent.
OFF
—
With
this
setting,
the
frequency
characteristics
are
flat,
which
is
suitable
for
extreme
bass
sound
reproduction.
@
MUTING
switch
Used
to
temporarily
reduce
the
volume
level.
When
the
switch
is
pressed,
the
volume
level
is
attenuated
by
30
dB.
To
release
muting,
press
this
switch
again.
@
BALANCE
control
This
control
permits
balancing
of
the
left
and
right
channels
when
an
imbalance
exists
from
the
sound
source,
or
to
correct
acoustic
imbalance
due
to
room
conditions.
Turn
it
to
the
left
from
the
CENTER
position
to
raise
the
left
channel;
turn
it
to
the
right
of
CENTER
to
raise
the
level
of
the
right
channel.
@
LOUDNESS
switch
ON
—
Bass
notes
are
boosted
at
fow
listening
levels.
This
precisely
offsets
a
characteristics
of
human
hearing
whereby
we
are
less
sensitive
to
bass
notes
at
very
low
listening
levels.
OFF
—
The
low-level
bass
boost
is
removed.
Use
this
setting
for
sound
reproduction
at
high
volume
level.
@
CARTRIDGE
selector
switch
This
switch
is
used
to
select
the
type
of
cartridge
of
the
turntable
connected.
MM
—
When
using
an
MM
(moving
magnet)
and
an
high
output
MC
(moving
coil)
cartridge,
set
the
switch
to
this
position.
MC
—
When
using
an
MC
cartridge
set
the
switch
to
this
position.
@
AUX
jacks
Temporarily
used
high-level
signal
sources
such
as,
tuner,
CD
player,
extra
tape
decks,
TV,
VTR
sound
out-
puts,
mic
preamps,
etc.
are
connected
to
these
jacks.
@
VOLUME
CONTROL
This
control
adjusts
left-
and
right-channel
volume
simultaneously.
Set
it
for
the
desired
listening
level.
@
INPUT
SELECTORs
Used
to
select
the
program
source
connected
to
the
IN-
PUT
jacks.
To
activate
the
INPUT
SELECTOR,
press
the
SOURCE
button
of
tape/video
selector
switches.
With
the
SOURCE
button
set
to
OFF,
the
INPUT
SELECTOR
cannot
be
activated.
AUX
—
To
listen
to
the
sound
source
connected
to
AUX
jacks.
TUNER
—
To
listen
to
the
tuner
sound
connected
to
the
TUNER
jacks.
CD
—
To
listen
to
the
CD
sound
connected
to
the
CD
jacks.
PHONO
—
To
listen
to
the
record
sound
connected
to
the
PHONO
jacks.
@
input
selector
indicators
*
One
of
these
indicators
lights
according
to
the
INPUT
SELECTOR
pressed
to
indicate
that
one
of
AUX,
TUNER,
CD
or
PHONO
is
selected.
@
Tape/video
selector
switches,
indicators
The
TAPE-C/VIDEO
button
is
independent
of
other
but-
tons
of
the
tape/video
selector
switches,
which
enables
you
to
press
the
TAPE-C/VIDEO
button
with
one
of
the
other
tape/video
selector
switches
pressed;
the
TAPE-
CIVIDEO
button
setting
has
priority
over
other
tape/
selector
switches.
;
When
one
of
the
TAPE
buttons
is
pressed,
the
cor-
responding
indicator
lights.
TAPE-C/VIDEO
—
Press
this
button
to
play
back
the
sound
of
the
tape/video
deck
connected
to
the
TAPE
C/VIDEO
jacks.
With
this
setting,
rec-
monitoring
is
also
possible.
TAPE-B
—
Press
this
button
to
play
back
the
sound
of
the
tape
deck
connected
to
the
TAPE
B
jacks.
TAPE-A
—
Press
this
button
to
play
back
the
sound
of
the
tape
deck
connected
to
the
TAPE
A
jacks.
SOURCE
—
Press
this
switch
to
activate
the
INPUT
SELECTORs.
With
this
setting,
program
source
selection
with
the
INPUT
SELECTORs
is
possible.
@
POWER
indicator
Lights
when
the
POWER
switch
is
set
to
ON.
xa-seosp
§

wr
;)
Operating
instructions
Prior
to
operation
tt
is
recommended
that
rarely
used
controls
and
swit-
ches
be
preset
in
accordance
with
your
preference
in
order
to
simplify
operation.
Once
these
controls
and
switches
have
been
preset,
normal
operation
is
simply
turning
on
the
POWER
switch
and
selecting
the
desired
program
source
by
depressing
one
of
the
INPUT
SELECTOR
switches.
CI
=
pe
e
oe
te
oi]
Set
according
to
the
FLAT
OFF
FLAT
STEREO
ON
CENTER
OFF
Select
according
to
the
Oo
.
speakers
setting.
cartndge
type.
.
Prior
to
operation
Tuner
Tape
decks
1.
Press
the
SOURCE
button
of
the
tape/video
selector
switches.
2.
Press
the
TUNER
INPUT
SELECTOR
switch.
The
cor-
responding
indicator
lights.
3.
Tune
to
the
desired
station.
4.
Adjust
the
volume
and
tone.
Turntable
1.
Press
the
SOURCE
button
of
the
tape/video
selector
switches.
2.
Turn
the
VOLUME
CONTROL
counterclockwise
to
temporarily
mute
the
volume
level.
3.
Press
the
PHONO
INPUT
SELECTOR
switch.
The
corresponding
indicator
lights.
4.
According
to
the
type
of
phono-cartridge
used,
set
the
CARTRIDGE
selector
switch
to
appropriate
posi-
tion.
5.
Operate
the
turntable
connected
to
the
PHONO
jacks.
6.
Adjust
the
votume
and
tone.
To
listen
to
CD
1.
Press
the
SOURCE
button
of
the
tape/video
selector
switches.
2.
Press
the
CD
INPUT
SELECTOR.
The
corresponding
indicator
tights.
3.
Operate
the
CD
player
connected
to
the
CD
jacks.
4.
Adjust
the
volume
and
tone.
AUX
1.
Press
the
SOURCE
button
of
the
tape/video
selector
switches.
2.
Press
the
AUX
INPUT
SELECTOR
switch.
The
cor-
responding
indicator
lights.
3.
Operate
the
component
connected
to
the
AUX
jacks.
4.
Adjust
the
volume
and
tone.
B
xa-nansn
Tape
playback
1.
Press
the
appropriate
tape/video
selector
switch.
(For
example,
to
play
back
tape
deck
A,
press
the
TAPE
A
button.)
.
Operate
the
tape
deck
to
playback
your
recorded
tape.
.
Adjust
the
volume
and
tone.
Using
the
TAPE
C/VIDEO
jacks,
the
audio
output
of
a
hi-fi
video
deck
can
also
be
enjoyed.
For
details,
refer
to
the
Instruction
Manual
of
the
video deck.
Recording
(with
one
tape
deck)
1.
2.
Connect
the
tape
deck
to
the
TAPE
A,
TAPE
B
or
TAPE
C/VIDEO
jacks.
Press
the
SOURCE
button
of
the
tape/video
selector
switches
and
select
the
program
source
to
be
recorded
with
the
INPUT
SELECTORs.
.
Set
up
the
program
source
component
for
operation
and
set
up
your
tape
deck
for
recording.
.
Set
recording
levels
with
the
controls
on
your
tape
deck.
The
controls
on
the
unit
do
not
affect
the
signal
output
to
the
tape
deck.
Recording
(with
two
and/or
three
tape
decks}
1.
2.
Connect
the
tape
decks
to
the
TAPE
A,
TAPE
B
and/or
TAPE
C/VIDEO
jacks.
Press
the
SOURCE
button
of
the
tape/video
selector
switches
and
select
the
program
source
to
be
recorded
with
the
INPUT
SELECTORs.
.
Set
up
your
two
and/or
three
tape
decks
for
record-
ing.
.
Recording
levels
should
be
set
using
controls
on
the
individual
tape
decks.
Using
the
TAPE
C/VIDEO
jacks,
the
program
source
selected
by
the
INPUT
SELECTOR
can
be
recorded
on
a
hi-fi
video deck.
For
details,
refer
to
the
Instruc-
tion
Manual
of
the
video
deck.

x
;)
Tape-to-tape
dubbing
When
two
tape
decks
are
connected
to
the
TAPE
A,
B
and
TAPE
C/VIDEO
jacks,
tape
recordings
may
be
duplicated
easily
using
one
tape
deck
to
play
the
prerecorded
tape
and
the
other
tape
deck
to
record
the
copy.
Dubbing
from
tape
deck
A
to
tape
deck
B/C
1.
Press
the
TAPE-A
button
of
the
tape/video
selector
switches.
2.
Set
tape
deck
A
to
playback
mode
and
tape
deck
B/C
to
recording
mode.
3.
The
recording
level
should
be
set
with
the
controls
on
the
tape
deck
B/C.
Dubbing
from
tape
deck
B
to
tape
deck
A/C
1.
Press
the
TAPE-B
button
of
the
tape/video
selector
switches.
2.
Set
tape
deck
B
to
playback
mode
and
tape
deck
A/C
to
recording
mode.
3.
The
recording
level
should
be
set
with
the
controls
on
the
tape
deck
A/C.
Monitoring
lf
your
tape
deck
is
equipped
with
three
heads,
you
can
compare
the
sound
quality
of
the
recording
in
progress
with
that
of
the
program
source.
Connect
the
tape
deck
to
the
TAPE
C/VIDEO
jacks.
(Connécting
to
other
than
the
TAPE
C/VIDEO
jacks
makes
monitoring
impossible.)
Press
the
TAPE-
C/VIDEO
button
of
the
tape/video
selector
switches.
In
case
of
difficulty
Recording
another
program
source
on
tape
deck
A/B
while
playing
back
tape
deck
C
1.
Press
the
SOURCE
and
TAPE-C/VIDEO
buttons
of
the
tape/video
selector
switches.
,
2.
Select
the
program
source
to
be
recorded
with
the
INPUT
SELECTOR.
3.
Set
up
the
program
source
component
for
operation
and
set
up
tape
deck
A/B
for
recording.
4.
Set
the
recording
level
with
the
rec
level
control
on
tape
deck
A/B.
5.
Set
tape
deck
C
to
playback
mode.
Thermal
protector
This
unit
employs
the
thermal
protector
circuits
which
automatically
shuts
off
the
power
or
operates
muting
if
the
temperature
inside
the
amplifier
becomes
unusually
high.
The
protector
automatically
restores
the
power
when
the
temperature
drops
to
the
normal
level
and
the
cause
of
the
unusual!
temperature
rise
must
be
removed
before
the
power
is
restored.
Unusually
high
temperatures
may
be
caused
in
poor
ventila-
tion
condition
or
by
a
shorted
output
circuit.
Speaker
protection
circuit
Should
the
POWER
switch
be
set
to
ON
with
the
speaker
cords
short
circuited,
the
speaker
protec-
tion
circuit
functions
and
the
power
indicator
flickers.
At
that
time,
the
muting
circuit
still
functions
even
if
the
short
circuit
is
eliminated.
Turn
the
power
off
once,
then
supply
power
again.
Normal
operation
is
resumed.
If
your
unit
should
not
perform
as
expected,
consult
the
table
below
to
see
if
the
problem
can
be
corrected
before
seek-
ing
help
from
your
dealer
or
service
representative.
Symptom
Cause
Remedy
No
sound
from
both
speakers.
.
Speakers
switched
off.
.
Speaker
cords
disconnected.
.
VOLUME
CONTROL
set
fully
counterclockwise.
4.The
MUTING
switch
is
ac-
tivated.
Wh
Wn
.
Check
SPEAKER
switches.
.
Check
speaker
connections.
.
Set
the
control
to
your
preference.
.
Set
the
switch
to
OFF.
Sound
from
left
or
right,
but
not
both.
1.
Poor
speaker
connections.
2.
BALANCE
control
set
to
one
ex-
treme
or
the
other.
.
Check
connections
at
both
ends
of
speaker
cord.
.
Check
BALANCE
control
setting.
No
sound
of
the
program
source
selected
by
the
INPUT
SELEC-
TOR
(PHONO,
CD,
TUNER,
AUX)
SOURCE
button
set
to
OFF.
Press
the
SOURCE
button.
xa-sgosp
7

tee
Specifications
EIA
Power
Amplifier
Section
Power
Output
100
watts*
per
channel
minimum
RMS,
both
channels
driven
at
8
ohms from
20
Hz
to
20,000
Hz
with
no
more
than
0.005%
total
harmonic
distortion
S
ohmsat
i
kHz...
105
W+
105
W
(Except
USA,
Europe,
U.K.
and
Canada)
4
ohmeat
1
kHz...
140
W+
140
W
(Except
USA,
Europe,
U.K.
and
Canada)
Dynamic
Power
Output..............
210
watts
at
4
ohms
(Except
USA,
Europe,
Australia,
U.K.
and
Canada)
Total
Harmonic
Distortion
(AUX—SPKR
8
0)
at
Rated
Output,
20
Hz~
20,000
Hz...............
0.005%
at
1/2
Rated
Output,
20
Hz
-
20,000
Hz
at
Rated
Output,
1,000
Hz
-
{PHONO-—
SPKR
8 0
:
at
—
20
dB
VOLUME
Level)
st
Rated
Output,
20
Hz~
20,000
Hz...............
0.005%
intermodulation
Distortion
(60
Hz:7
bkHz=
4:9)...
0.005%
at
rated
power
into
8
ohms
.-1,000,
at
50
Hz
into
8
ohms
17
ps
..1
Hz
to
150
kHz,
+0
dB,
-3
dB
Accept
4
ohms
to
16
ohms
2.5
mV/47
k
ohms
..0.2
mV/100
ohms
TAPE
C/VIDEO
.....80.
20.
150
mV/47
k
ohms
Signal-to-Noise
Ratio
(IHF-A)
Phono
MM
86
dB
for
2.5
mV
input
Phono
MC
.
70 dB
for
250
xV
input
TUNER,
AUX.,
TAPE
PLAY.......107
dB
Maximum
Level
for
Phono
MM.
:
.200
mV
(RMS),
T.H.D.
0.005%
at
1
kHz
bn
15
mV
(RMS),
T.H.D.
0.005%
at
7
kHz
Output
Level/knpedance
TAPE
REC
(Pin),
TAPE
C/VIDEO...150
mV/220
ohms
Frequency
Response
for
Phono....RIAA
standard
curve
+0.3
dB
{20
Hz
to
20,000
Hz)
Weight
(NOt)
oe
9.4
kg
(20.7
Ib}
*
Measured
pursuant
to
Federal
Trade
Commission's
Trade
Regulation
rule
on
Power
Output
Claims
for
Amplifier
in
U.S.A.
lEC
Power
Amplifier
Section
Rated
Power
Output
8
ohms
at
20
Hz
to
20,000
Hz
no
more
than
0.005%
THD
(FTC)
.
.100
W+
100
W
4
ohms
st
63
Hz
to
12.5
kHz
no
more
than
0.7%
THD
(IEC/NF)
.................
120
W+
120
W
Total
Harmonic
Distortion
Rated
Power
Output
into
8
ohms...
0.005%
Intermodulation
Distortion
severe
O.005
%
...1
H2~
150
kHz
+0d8,
-3dB
SIN
Weighted:
Rated
Output
Power
{IEC-A)
(|
}=Unweighted
at
50
mW
(DIN)
.
Phono
MM
...
.B6
dB155
dB)
..70
dB
(60 dB)
107
dB
(5? dB)
TUNER,
AUX.,
TAPE
PLAY...
Damping
Factor
at
8
ohms,
50
Hz
.
beteetee
tees
1,000
Transient
Response
Rise
TH
oo...
teeter
etree
enn
1.7
ps
input
Sensitivity
‘impedance
Phono
MM...
ees
.
2.5
mVi47
kO
Prono
MC
tte
0.2
mv/100
Q
TUNER,
AUX.,
TAPE
PLAY,
TAPE
C/VIDEO
..
Tone
Control
-150
mvV/47
kQ
Bass
100
Hr.
-
£10
dB
Treble
10
kHz
£10
dB
Loudness
Control
(—
30
dB
.--9
dB
at
100
Hz
Subsonic
Fitter
...
.-18
Hz,
6
dB/oct.
General
Power
Consumption
LS
Oe
eOSEOSSS
220
W
Dbervemstores
ere
rere
renee
e
ene
W:
440
mm
H:
133
mm
D:
333
mm
Weight
(Neth
cert
ctr
entities
9.4
kg
Tone
Control
Bass.
..
#10
dB
at
100
Hz
Treble
..10
dB
at
10
kHz
Loudness
Control
(at
—30
dB
VOLUME
Level)
.....
+9
dB
at
100
Hz
Subsonic
Filter
...........000000055
18
Hz,
6
dB/oct.
General
Power
Consumption
.................
3.3.
A
(USA
and
Canada:
UL
and
CSA)
220
W
(Others)
AC
Outiats
0
ee
Switched
2,
Unswitched
1
(Except
U.K.,
European,
Australian
countries)
Dimensions...
W:
440
mm
(17-5/169
H:
433
mm
(5-1/4)
DB:
333
mm
(13-1/87
Note:
We
follow
a.
policy
of
continuous
advancements
in
development.
For
this
reason
specifications
may
be
changed
without
notice.
Table of contents
Other Kenwood Amplifier manuals

Kenwood
Kenwood KAC-646 User manual

Kenwood
Kenwood KA-1100D User manual

Kenwood
Kenwood KAC-X401M User manual

Kenwood
Kenwood KAC-5020 User manual

Kenwood
Kenwood A-85 User manual

Kenwood
Kenwood KAC-322 User manual

Kenwood
Kenwood R-A100 User manual

Kenwood
Kenwood KAC-719 User manual

Kenwood
Kenwood KAC-525 User manual

Kenwood
Kenwood KAC-6203 User manual

Kenwood
Kenwood KA-770D User manual

Kenwood
Kenwood KA-V7500 User manual

Kenwood
Kenwood MA-5100 User manual

Kenwood
Kenwood KAC-943 User manual

Kenwood
Kenwood L-07C User manual

Kenwood
Kenwood KAC-8406 User manual

Kenwood
Kenwood KAC-M645 User manual

Kenwood
Kenwood KAC-714 User manual

Kenwood
Kenwood KAC-719 User manual

Kenwood
Kenwood TAJFUN 1000 User manual