manuals.online logo
Brands
  1. Home
  2. •
  3. Brands
  4. •
  5. King Canada
  6. •
  7. Impact Driver
  8. •
  9. King Canada 8044 User manual

King Canada 8044 User manual

COPYRIGHT © 2006 ALL RIGHTS RESERVED BY KING CANADA TOOLS INC.
14.4V CORDLESS
IMPACT DRIVER
plusplus
performanceperformance
INSTRUCTION MANUAL
MODEL: 8044
WARRANTY INFORMATION
2-YEAR
LIMITED WARRANTY
FOR THIS 14.4V IMPACT DRIVER
KING CANADA TOOLS
OFFERS A 2-YEAR LIMITED
WARRANTY FOR NON-COMMERCIAL USE.
PROOF OF PURCHASE
Please keep your dated proof of purchase for warranty and servicing purposes.
LIMITED TOOL WARRANTY
KING CANADA makes every effort to ensure that this product meets high quality
and durability standards. KING CANADA warrants to the original retail consumer a
2-year limited warranty as of the date the product was purchased at retail and that
each product is free from defects in materials. Warranty does not apply to defects
due directly or indirectly to misuse, abuse, negligence or accidents, repairs or
alterations and lack of maintenance. KING CANADA shall in no event be liable for
death, injuries to persons or property or for incidental, special or consequential
damages arising from the use of our products. To take advantage of this warranty,
the product or part must be returned for examination by the retailer. Shipping and
handling charges may apply. If a defect is found, KING CANADA will either repair
or replace the product.
1. KNOW YOUR TOOL.
Read and understand the owners manual and labels affixed to the tool. Learn its
application and limitations as well as its specific potential hazards.
2. Don’t use power tools in damp or wet locations or expose them to rain. Keep work area
well lit and provide adequate surrounding work space.
3. USE RIGHT TOOL.
Don’t force the tool or the attachment to do a job for which it was not designed.
4. MAINTAIN TOOL WITH CARE.
Keep tool clean for best and safest performance. Follow instructions for operation and
changing accessories.
5. USE RECOMMENDED ACCESSORIES.
Only use recommended accessories. Follow the instructions that accompany the
accessories. The use of improper accessories may cause hazards.
6. CHECK FOR DAMAGED PARTS.
Before further use of the tool, parts that are damaged should be carefully checked to ensure
they will operate properly and perform their intended function. Check for alignment of
moving parts, breakage of parts, mounting, and any other conditions that may affect its
operation. Parts which are damaged should be properly repaired or replaced.
7. USE PROPER SPEED.
A tool will do a better and safer job when operated at the proper speed.
8. WEAR PROPER APPAREL.
Do not wear loose clothing, gloves, neckties or jewelry (rings, watch) because they could
get caught in moving parts. Non-slip footwear is recommended. Wear protective hair
covering to contain long hair.Roll up long sleeves above the elbows.
9. ALWAYS WEAR SAFETY GLASSES.
Always wear safety glasses (ANSI Z87.1). Everyday eyeglasses only have impact
resistant lenses, they are NOT safety glasses. Also use a face or dust mask if operation is
dusty.
10. Do not use tool if trigger does not turn it on or off. A tool which can not be controlled with
the trigger is a potentially dangerous tool and must be repaired.
GENERAL & SPECIFIC
SAFETY INSTRUCTIONS
Safety instructions for Performance Plus 14.4V batteries and charger
1. Never attempt to open the charger for any reason or attempt to charge a battery which is
not designed for use with this charger.
2. Do not store in locations where the temperature may exceed 40˚C.
3. Charge only at ambient temperatures between 4˚C and 40˚C.
4. Charge only using the charger provided with the tool.
5. Under extreme conditions, battery leakage may occur.When you notice liquid on the
battery, proceed as follows:
•Carefully wipe the liquid off using a cloth. Avoid skin contact.
In case of skin or eye contact, follow the instructions below:
In case of skin contact, immediately rinse with water. Neutralise with a mild acid such as
lemon juice or vinegar. In case of eye contact, rinse abundantly with clean water for at least
10 minutes. Consult a physician.
6. Disconnect the battery pack from the tool or place the forward/reverse switch in the center
lock position before making any adjustments, changing accessories, or storing the tool.
7. Be careful not to drop, shake or strike the battery.
Fire hazard! Do not short the battery. Do not touch the terminals with any conductive
material. Do not store battery in a container with other metal objects such as nails, screws,
coins. The charger must be used in a well ventilated area.
Important: This charger is intended for indoor use only.
1. Only use the supplied charger to charge the batteries.
2. Never attempt to charge non-rechargeable batteries.
3. Have defective charger power cord replaced immediately.
4. Do not expose charger to rain or snow.
5. Do not open the charger.
6. Do not allow anything to cover or clog the charger vents.
Protecting the Environment- Be responsible
Should you find one day that your tool needs replacement, or if it is of no further use to you,
think of the protection of the
environment. If you want to dispose of
the tool yourself, the batteries must be
removed and disposed of in
accordance with local regulations.
Take the batteries to your service
agent or a local recycling station.
Collected batteries will be recycled or
disposed of properly.
GENERAL & SPECIFIC
SAFETY INSTRUCTIONS
GETTING TO KNOW YOUR
CORDLESS IMPACT DRIVER
1) 1/4” Hex. driver bit locking collet
2) LED light
3) Variable speed trigger
4) Carbon brush cover (1 of 2)
5) Forward/reverse switch w/lock position
6) 2 Position belt clip
7) Rechargeable 14.4V, 1.7Ah batteries (2)
8) 2 Double-ended driver bits
9) 14.4V Battery charger
10) Charger Red light, battery is charging
11) Charger green light, battery is fully charged
Specifications
Model ..................................................................................................................8044
Voltage ..............................................................................................................14.4V
Collet size ....................................................................................................1/4” Hex.
No load speed ........................................................................................0-2400 RPM
Impacts per minute ..................................................................................0-3000 IPM
Torque ........................................................................................................900 in/lbs.
Battery type ............................................................................................1.7Ah Ni-Cd
Charger Input ............................................................................................120V/60Hz
Charge time ......................................................................................................1 hour
CHARGING AND INSTALLING
BATTERY
IMPORTANT STEPS BEFORE USE
If you are using the cordless impact driver for the first time, the batteries must first be charged.
A new battery, or one which has not been used for an extended period of time, achieves full
performance only after 5 charges and discharges of the battery. A substantial drop in operating
period per charge indicates that the battery is worn out and must be replaced.
BATTERY CHARGER
•Always inspect the battery charger, cord and plug before each use.
•The supplied charger is suitable for charging KING CANADA batteries only.
•Protect battery charger from humidity and only operate in dry areas.
•Do not disassemble charger or operate the charger if it has received a sharp blow, has been
dropped or damaged in any way. Replace damaged charger immediately. Do not use damaged
battery or charger.
CHARGING BATTERY
Start the charging procedure by plugging the charger to a power source and inserting the battery
into the charger slot. The battery and the charger become warm during the charging process.
This is normal and expected. To prevent incorrect battery insertion in the charger, insert the
battery according to the position of the key in the charger.
The red light on the charger indicates that the battery is charging and the green light indicates
that the battery is fully charged. After charging is complete, disconnect the charger from its power
source and then remove the battery.
INSTALLING/REMOVING BATTERY
Toinstall a battery into the base of the impact driver,
simply slide the battery into the base of the impact driver
and push it all the way until the battery clips snap the
battery into place.
To remove the battery from the base of the impact driver,
simultaneously press the battery clips (A) Fig.1 on both
sides of the battery and pull the battery out.
Figure 1
IMPACT DRIVER OPERATION
VARIABLE SPEED TRIGGER
Your cordless impact driver is equipped with a variable
speed trigger switch (A) Fig.2. The speed can be
controled from the minimum to the maximum RPM just by
the pressure applied to the trigger switch. Apply more
pressure to increase speed and apply less pressure to
decrease speed.
FORWARD / REVERSE AND TRIGGER LOCK
Your cordless impact driver is equipped with a Forward /
Reverse lever and a trigger lock (B) Fig.2. It is located
above the trigger. This lever is designed to change the
rotation direction of the collet and locking the trigger to
help prevent accidental starts and battery discharge. For
aforward rotation (with the chuck pointing away from you)
move the lever to the left. For reverse rotation move the
lever to the right. To lock the trigger, place the lever in the
center position.
WARNING! Do not change the rotation direction until
the impact driver has come to a complete stop.
Changing the rotation during operation can cause damage to the tool.
LED LIGHT
Your cordless impact driver features a LED light system (C) Fig.2 which gets activated by
pressing the trigger. This feature is ideal when working in partially lit work environments.
ELECTRIC BRAKE
This impact driver is equipped with an electric brake. If the tool consistantly fails to stop quickly
after the trigger is released, have the tool serviced.
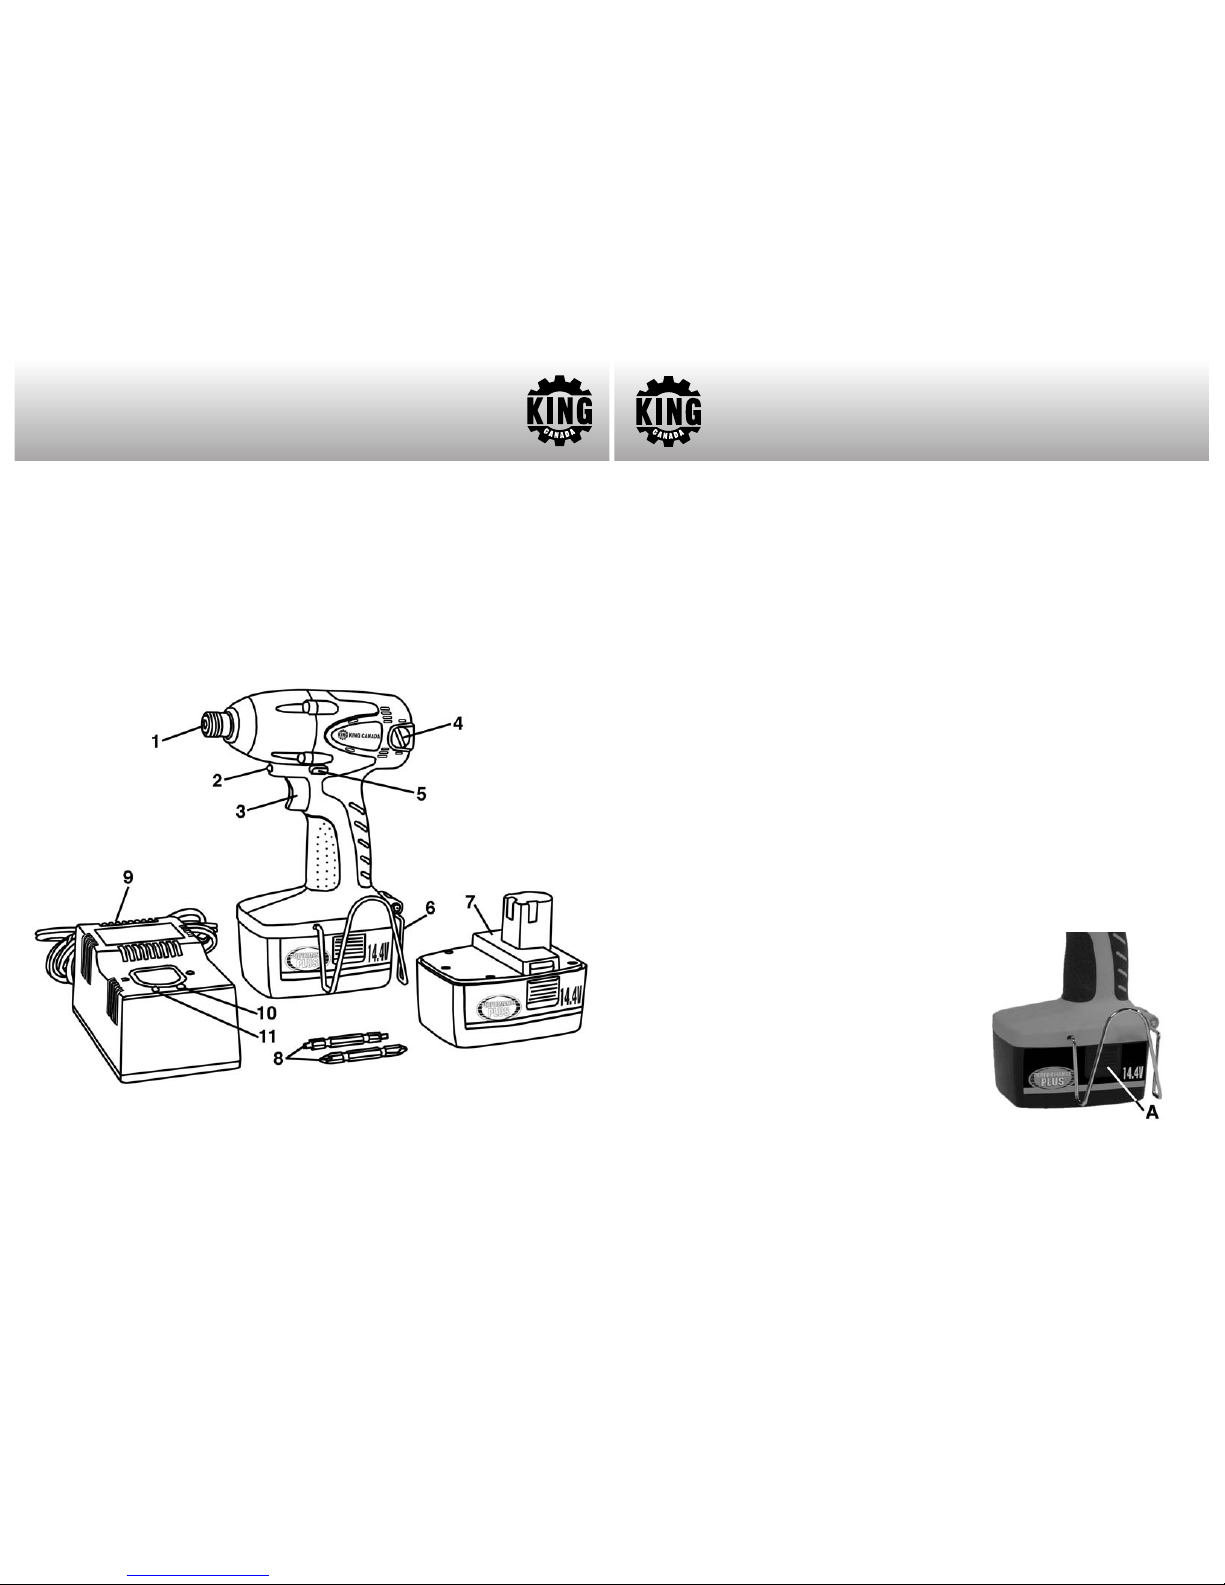
INSERTING/REMOVING DRIVER BIT INTO 1/4” LOCKING COLLET
Warning! Only use 1/4” driver bits with identical dimensions as shown in Fig.3. Do not use any
other driver bits or socket bits.
Toinstall a driver bit into the 1/4” hex. collet, pull the collet (D) Fig.2
away from the impact driver (arrow direction) and insert the bit into
the collet as far as it will go. Release the collet to lock the driver bit
into place.
Warning! If the driver bit is not fully inserted into the collet, the
collet will not return to the original position when released and the
driver bit will not lock into place.
Toremove the driver bit, pull the collet away from the impact driver and pull the driver bit out.
IMPACT ACTION
When this impact driver reaches a certain torque, the impact function is engaged and a clicking
sound will be heard, this is normal.
Figure 2
Figure 3
OPERATION AND MAINTENANCE
2POSITION BELT CLIP
This impact driver comes with a 2 position belt clip which
allows you clip the impact driver upside down on your
belt. The belt clip can be installed on either the right or
left side of the impact driver base. To install the belt clip;
1) Remove the battery from the impact driver base.
2) Remove the clip retainer plate (D) Fig.4 by undoing
the 2 flat head screws (E).
3) Insert the belt clip (A) all the way into hole (B).
4) Pivot the belt clip and position the tip (C) as shown,
place the clip retainer plate over the tip and secure plate
into place with the same 2 flat head screws removed
previously.
MAINTENANCE
WARNING: THERE ARE NO USER SERVICEABLE
PARTS INSIDE
Preventative maintenance performed by unauthorized
personnel may result in the misplacement of internal
wires and components which could cause serious
hazards. Werecommend that all servicing be performed
by a qualified KING CANADA service center technician.
REPLACING CARBON BRUSHES
Remove and check the carbon brushes regularly. They
can be accessed by removing the brush caps (A) Fig.5
using a screwdriver. Both carbon brushes must be
replaced once one wears down to the limit line on the carbon block. Only use identical replace-
ment carbon brushes.
BATTERIES
If you notice a decrease in battery performance or a significant difference in running power
between charges, then it is time to replace the battery. Failure to do so may damage the
charger and cause improper operation. LONG TERM BATTERY STORAGE SHOULD BE IN THE
DISCHARGE STATE. Batteries last longer and recharge better when they are stored discharged.
Fully recharge the battery before using after prolonged storage.
CLEANING
Toavoid accidents, always remove the battery before cleaning. The tool is most effectively
cleaned with the use of an air compressor.Always wear safety glasses when using an air
compressor. Ventilation openings and switch levers must be kept clean and free of foreign
objects. Do not insert pointed objects through these openings in the attempt to clean them.
CAUTION: Some cleaning products and solvents can damage the plastic parts of your tool, such
as gasoline, chlorinated cleaning agents, ammonia and household detergents that contain
ammonia.
PARTS DIAGRAM & PARTS LISTS
Refer to the Parts section of the King Canada web site for the most updated parts diagram and
parts list.
Figure 4
Figure 5

This manual suits for next models

1

Other King Canada Impact Driver manuals

King Canada 8055L User manual

King Canada

King Canada 8055L User manual

King Canada 8311 User manual

King Canada

King Canada 8311 User manual

King Canada 8044 User manual

King Canada

King Canada 8044 User manual

Popular Impact Driver manuals by other brands

Panasonic EY-6506 operating instructions

Panasonic

Panasonic EY-6506 operating instructions

Makita 6904VH instruction manual

Makita

Makita 6904VH instruction manual

Triton T20ID Operating and safety instructions

Triton

Triton T20ID Operating and safety instructions

Makita DTD148 Technical product information

Makita

Makita DTD148 Technical product information

Makita DTL060 instruction manual

Makita

Makita DTL060 instruction manual

Makita DTD129 instruction manual

Makita

Makita DTD129 instruction manual

GreenWorks IW24L00 Operator's manual

GreenWorks

GreenWorks IW24L00 Operator's manual

Makita BTD200 instruction manual

Makita

Makita BTD200 instruction manual

Chicago Pneumatic CP797 Series Operator's manual

Chicago Pneumatic

Chicago Pneumatic CP797 Series Operator's manual

Makita BTD146 technical information

Makita

Makita BTD146 technical information

BGS technic 6684 instruction manual

BGS technic

BGS technic 6684 instruction manual

Sparky Group GUR 12S instruction manual

Sparky Group

Sparky Group GUR 12S instruction manual

Makita DTD171 instruction manual

Makita

Makita DTD171 instruction manual

Facom NK.3000F Original instructions

Facom

Facom NK.3000F Original instructions

Milwaukee 2662-20 Operator's manual

Milwaukee

Milwaukee 2662-20 Operator's manual

Cornwell Tools CCT18IW operating instructions

Cornwell Tools

Cornwell Tools CCT18IW operating instructions

GreenWorks ISG402 Operator's manual

GreenWorks

GreenWorks ISG402 Operator's manual

DeWalt XR Li-Ion DCD776 Original instructions

DeWalt

DeWalt XR Li-Ion DCD776 Original instructions

manuals.online logo
manuals.online logoBrands
  • About & Mission
  • Contact us
  • Privacy Policy
  • Terms and Conditions

Copyright 2025 Manuals.Online. All Rights Reserved.