• We recommend that you keep batteries installed in the unit even though you’ll be powering it with the AC adapter. That way, you’ll be able to continue
a performance even if the cord of the AC adaptor gets accidentally disconnected from the unit.
•To prevent malfunction and speaker damage, make sure to switch off the power before you insert or replace batteries, and before connecting it to other
devices.
• Take care that no metal object touches the contacts of the battery case. This can short-circuit the batteries, causing the case to overheat or burn.
• Insert the batteries as directed, taking care to observe the correct polarity (+/–- orientation).
• Do not mixed new and used batteries of different types.
• Carefully read and observe the cautions and handling instructions that accompany the batteries.when using nickel-metal hydride batteries, you must
use the charger that is specified by the battery manufacturer.
• Remove the batteries if you wont be using the unit for several months.
• If any electrolyte leaks from the battery, use a dry cloth to carefully wipe off any electrolyte that might be on the battery case, and then install new
batteries, Battery electrolyte that contacts your skin may cause a rash. Battery electrolyte is hazardous to your eyes; if any electrolyte gets into your
eyes, flush them immediately with water.
• Do not carry or store batteries together with metallic objects such as pens, necklaces, or hairpins.
Know these safety symbols
The ‘bolt of lightning’ indicates uninsulated material within your unit may cause an
electrical shock. For the safety of everyone in your household, please do not remove
product covering.
The ‘exclamation point’ calls attention to features for which you should read the
enclosed literature closely to prevent operating and maintenance problems.
WARNING:
To reduce the risk of fire or electric shock, this apparatus should not be exposed to rain
or moisture and objects filled with liquids, such as vases, should not be placed on this
apparatus.
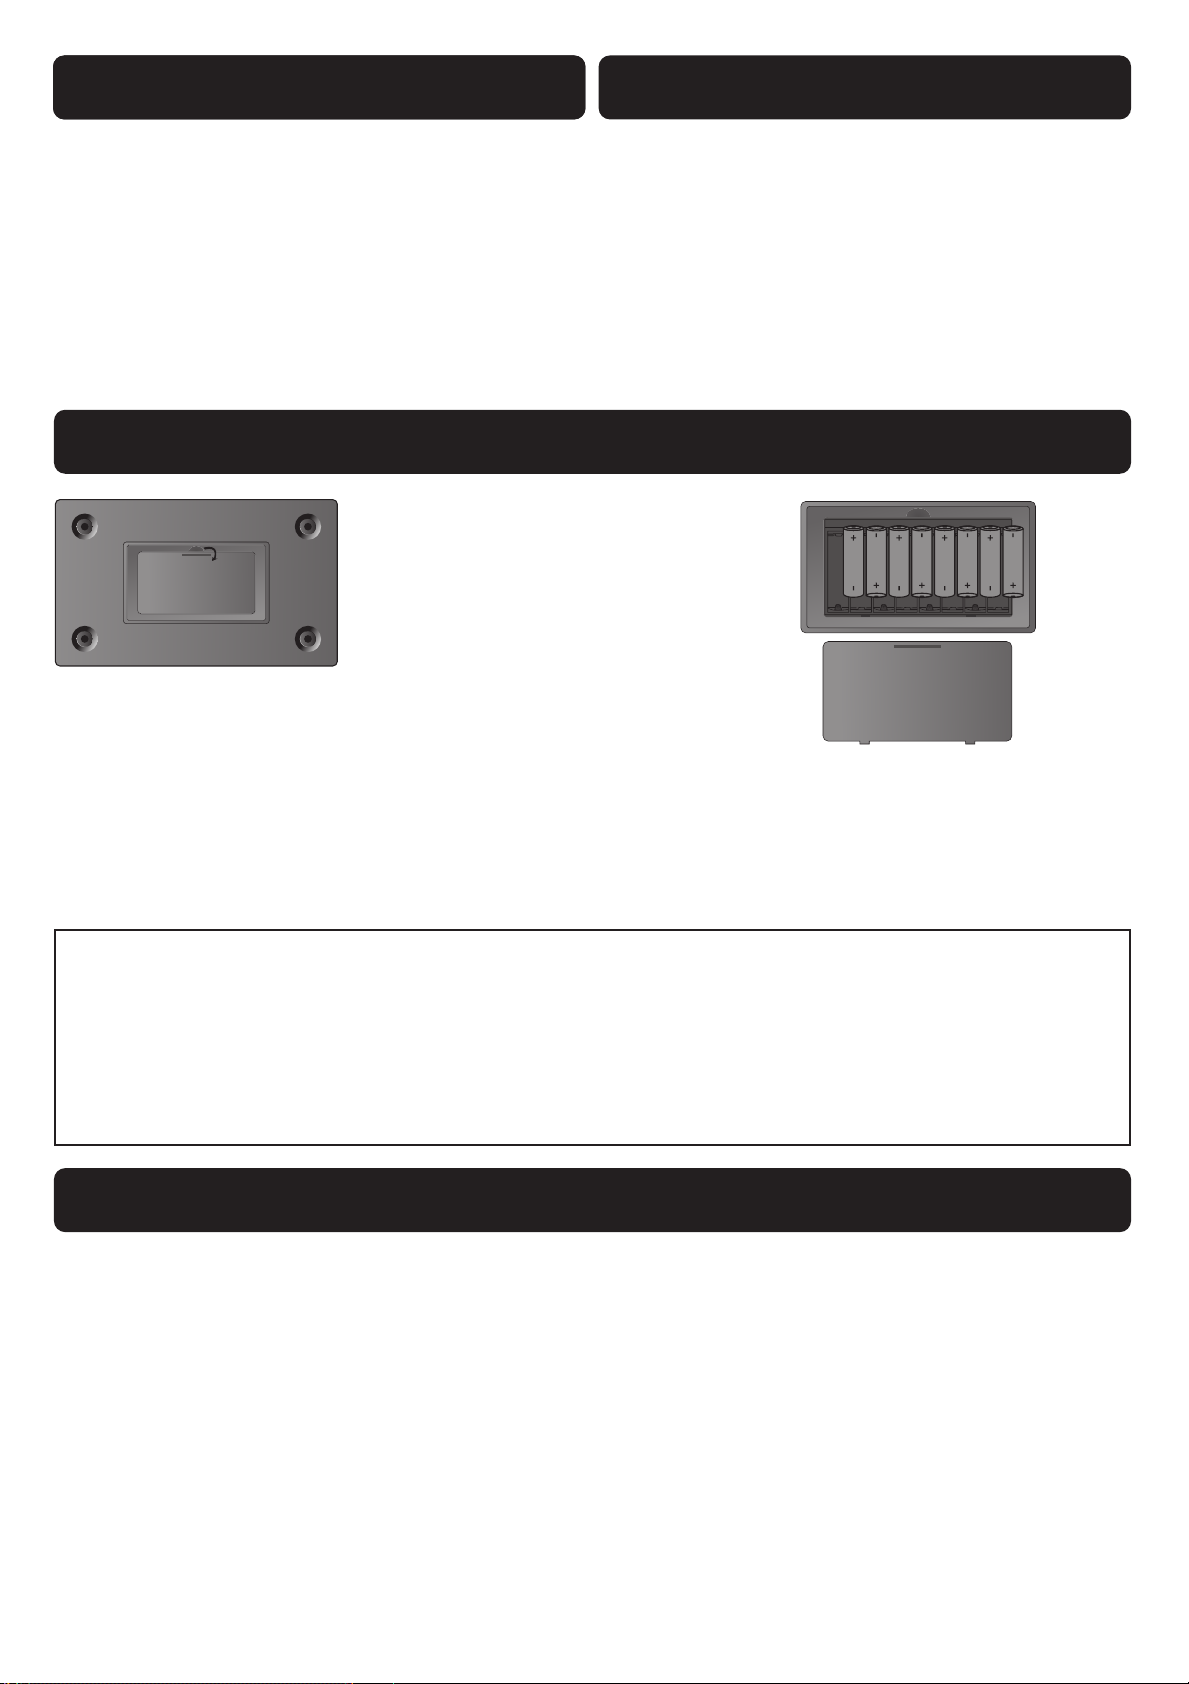
1. Remove the battery compartment cover
2. Insert batteries, taking care to
observe the correct polarity
Important Safety Instructions
• Read these instructions.
• Heed all warnings.
• Follow all instructions.
• Do not block any ventilation openings.
• Do not install near any heat sources such as radiators, fan heaters, stoves, or other units that produce heat.
Protect the power lead from being walked on or pinched, particularly at plugs, and the point where they exit from the amplifier.
• Unplug this amplifier during lightning storms or when unused for long periods of time.
• Refer all servicing to qualified service personnel. Servicing is required when the amplifier has been damaged in any way, such as
power supply lead or plug is damaged, liquid has been spilled or objects have fallen into the unit, or the unit has been exposed to rain
or moisture, does not operate normally, or has been dropped.
• Never remove the casing of this apparatus.
• Never lubricate any part of this apparatus.
• Never place this apparatus on other electrical equipment.
• Keep this apparatus away from direct sunlight, naked flames or heat.
Only connect the power supply lead to an earth grounded AC receptacle in accordance with the voltage and frequency ratings listed
under INPUT POWER on the rear panel of this product.
WARNING: To prevent damage, fire or shock hazard, do not expose this unit to rain or moisture.
Unplug the power supply lead before cleaning the unit exterior (use a dry or slightly damp cloth only). Wait until the unit is completely
dry before reconnecting it to a power source.
Maintain at least 6 inches (15.24 cm) of unobstructed air space behind the unit to allow for proper ventilation and cooling of the unit.
This product should be located away from heat sources such as radiators, fan heaters, or other products that produce heat.
WARNING: THIS APPARATUS MUST BE EARTHED!
Always use the supplied AC power adapter, if a replacement is required please contact your authorised dealer.
This product is supplied with an earthed plug. This is a safety feature. If you are unable to insert the plug into the outlet, contact an
electrician to replace your obsolete outlet. Do not defeat the safety purpose of this plug.
CAUTION: DO NOT attempt to remove the amplifier chassis, there are no user serviceable parts inside, refer servicing to qualified
personnel only.
Hazardous voltages may be present within the cabinet even when the power switch is off and the power lead is disconnected.
NEVER attempt to bypass the fuses or fit ones of the incorrect value.
Kinsman amplifiers and loudspeaker systems are capable of producing very high sound pressure levels which may cause temporary or
permanent hearing damage. Use care when setting and adjusting volume levels during use.
Important notes for users in the U.K.
Mains fuse – This information applies only to products with a UK mains plug.
This product is fitted with an approved molded plug. If you replace the fuse, use one with:
• the ratings shown on the plug,
• a BS 1362 approval, and
• the ASTA approval mark.
Contact your dealer if you are not sure about what type of fuse to use.
SAFETY INSTRUCTIONS
Caution: To conform with the EMC directive (2004/108/EC), do not detach the plug from the power lead. This product complies with
the radio interference requirements of the European Community. This product complies with the requirements of the following
directives and guidelines: 2004/108/EC + 2006/95/EC
Your product is designed and manufactured with high quality materials and components, which can be recycled and reused.
When a crossed-out wheeled bin symbol is printed on a product it means that the product is covered by the European Directive
2002/96/ EC.
Please inform yourself about the local separate collection system for electrical and electronic products.
Please act according to your local rules and do not dispose of your old products with your normal household waste.
Correct disposal of your old product helps to prevent potential negative consequences for the environment and human health.
Environmental information
All unnecessary packaging has been omitted. We have tried to make the packaging easy to separate into three materials: cardboard
(box), polystyrene foam (buffer) and polyethylene (bags, protective foam sheet.) Your amplifier consists of materials which can be
recycled and reused if disassembled by a specialised company. Please observe the local regulations regarding the disposal of
packaging materials, exhausted batteries and old equipment.
SAFETY INSTRUCTIONS
INSTALLING BATTERIES
KAA25 SPECIFICATION
KAA25 SPECIFICATION
1. OUTPUT: 25W (RMS)
2. SPEAKER: 6.5 (inch) 4 (ohm) full-frequency speaker
3. DIMENSIONS: 290 (W) x 240 (H) x 180 (D) mm
4. POWER: DC 12V: AC Adaptor or Dry Battery ‘AA’ x 8
5. BATTERIES: (Not included) Alkaline Batteries
(approx 4 Hours) Expected battery life under
continuous use: (These figures will vary depending on
the actual conditions of use).
Nickel-metal hydride batteries approx 9 hours.
5. POWER CONSUMPTION: 25W Please note: Use of
non-alkaline batteries will reduce power supply time less
than 4 hours.
1. OUTPUT: 45W (RMS) using the AC adaptor
28W rated output power) using the alkaline batteries
2. SPEAKER: Woofer 6.5 (inch) 4 (ohm) Tweeter 3 (inch)
3. DIMENSIONS: 330 (W) x 260 (H) x 200 (D) mm
4. POWER: DC 15V: AC Adaptor or Dry Battery ‘AA’ x 8
5. BATTERIES: (Not included) Alkaline Batteries (approx 3
Hours) Expected battery life under continuous use: (These
figures will vary depending on the actual conditions of
use).Nickel-metal hydride batteries approx 4 hours.
5. POWER CONSUMPTION: 45W Please note: Use of
non-alkaline batteries will reduce power supply time less
than 4 hours.
KAA45 SPECIFICATION