KINZO BL-168DLR User manual

[UK] Instruction Manual
Air Cooler
MODEL NO.: BL-168DLR
With Remote Control

WARNING
Do not position the air inlet too close to a wall, curtain etc., as this will block the air flow
and affect the functioning of the air cooler.
When using the appliance for the first time, please check that your mains voltage
complies with the information on the nameplate of the air cooler.
Before use, please check that the power cable and plug are not damaged.
Do not let the power cable become twisted. If the power cable is damaged, it must be
replaced by the manufacturer, its service agent or similarly qualified persons in order to
avoid a hazardous situation.
Do not cover the outlet. Be sure to keep the fan away from the mains socket.
The mains socket must have at least 10A current. Do not use the same socket for other
appliances
When the air cooler is working, it is absolutely forbidden to place hands or other foreign
bodies through the grill. Pay special attention to the actions of children.
This appliance can be used by children aged from 8 years and above and persons with
reduced physical, sensory or mental capabilities or lack of experience and knowledge if
they have been given supervision or instruction concerning use of the appliance in a
safe way and understand the hazards involved.
Children shall not play with the appliance.
Cleaning and user maintenance shall not be made by children without supervision.
Unplug appliance during filling and cleaning
Please turn off the power before pulling out the plug. To avoid causing a short-circuit,
fire or electric shock, do not pull on the power cable, only on the plug.
To avoid electric shock, do not touch the plug with wet hands.
Please remove the plug from the mains socket when the appliance is not in use.
Do not place the working air cooler on an incline or on an uneven surface.
Please do not use the air cooler outdoors or in the vicinity of a bath, shower or pool.
The water level displayed on the water tank must be below ‘Max’at all times. While the
air cooler is cooling (humidifying), the level must be above ‘Min’.
After water has been added to the water tank, do not lean on, bump or move the air
cooler.
Never place anything on the air cooler.
Never cover the outlet or inlet of the air cooler.
Dear customer
Thank you for purchasing your air cooler. We kindly request that you read this instruction
manual carefully and save it for future reference.
Function Control Panel

1. On/Off/Speed button
After the plug is inserted into the socket, a buzzer will sound.
Press the button. The ‘low’indicator on the control panel will light up, showing that air
cooler is working at low speed.
Press the button for a second time. The ‘Med’ indicator on the control panel will light up,
showing that air cooler is working at medium speed.
Press the button for a third time. The ‘High’ indicator on the control panel will light up,
showing that air cooler is working at high speed.
Press the button for a fourth time. The air cooler will stop working.
2. Cooler (Humidifying) button
Press the button when the air cooler is working. The ‘Cooler’ indicator (red) will light up
on the control panel.
Press the button for a second time when the air cooler is working. The ‘Humidifying’
indicator (blue) will light up on the control panel.
Press the button for a third time when the air cooler is working. No indicator will be lit,
showing that the Cooler (Humidifying) functions are not working.
3. Swing button
Press the button while the air cooler is working. The ‘Swing’ indicator will light up and
the air filter will start moving from side to side.
Press the button a second time while air cooler is working. The ‘Swing’ indicator will go
out and the air filter will stop moving from side to side.
4. Timer button
Press the button while the air cooler is working. The ‘0.5H’ indicator will come on and
the air cooler will stop working after half an hour.
Press the button for a second time while the air cooler is working. The ‘0.5H’ indicator
will go out and the ‘1H’ indicator will come on. The air cooler will stop working after an
hour.
Press the button for a third time while the air cooler is working. The ‘0.5H’ indicator will
come on again and the ‘1H’ indicator will stay on. The air cooler will stop working after
an hour and a half.
Press the button for a fourth time while the air cooler is working. The ‘0.5H’ indicator
and the ‘1H’ indicator will both go out. The ‘2H’ indicator will come on. The air cooler
will stop working after two hours.
Press the button for a fifth time while the air cooler is working. The ‘0.5H’ indicator will
come on again. The ‘1H’ indicator will stay off and the ‘2H’ indicator will stay on. The air
cooler will stop working after two and a half hours.
Press the button for a sixth time while the air cooler is working. The ‘0.5H’ indicator will
go out. The ‘1H’ indicator will come on again and the ‘2H’ indicator stay on. The air
cooler will stop working after three hours.
The sequence is followed until you press the button for a fifteen time, when the ‘0.5H’

and ‘1H’ and ‘2H’ and ‘4H’ indicators will all be lit. The air cooler will stop working after
seven and a half hours.
Press the button for a sixteen time. The indicators will go out and the air cooler will no
longer be using the timer function.
How to add water to the water tank
Pull out the water tank from the bottom of the air cooler’s rear and drain off 1/3 of the
water tank while adding fresh water.
Watch the water level while adding water.
While water is being added, the water level for the tank must stay below ‘Max’.
While the air cooler is cooling and humidifying, the water level for the tank must be
above ‘Min’.
Ice packs or ice can be placed into the water tank for cooler air.
Warning:
The water level of the water tank should still be below ‘MAX’ even after ice packs or
ice have been placed in the tank.
How to use ice packs
Cold ice packs can slowly absorb the heat from water, making it cooler than the
surroundings. An air cooler containing frozen ice packs will produce cooler air.
Place the ice packs in a fridge. Once the ice packs are frozen, take them out.
Pull out the water tank and place the frozen ice packs inside it.
Two ice packs are required for each air cooler so that you can be freezing one at all
times.

Cleaning
Cleaning the air filter:
Remove the plug from the mains socket, then pull on the holder of the air filter. When
you have successfully removed the air filter, clean it with neutral cleaning fluid and a
soft brush before rinsing it with clean water. You can then place the filter back in the air
cooler.

Cleaning the wet curtain paper:
Remove the plug from the mains socket and pull out the air filter, then take the wet
curtain paper out of the air cooler too. Clean it with cleaning fluid and a soft brush
before rinsing it with clean water. You can then put it back in the air cooler.
Important:
In order to avoid leakage, the wet curtain paper must be installed so that it remains
flat.
Cleaning the water tank:
Remove the plug from the mains socket and take out the water tank. Wipe as much
scale as possible from the water tank with a cloth and a little cleaning fluid, then rinse
the tank with clean water. You can then place the tank back in the air cooler.
Cleaning the housing:
Wipe off the housing using neutral cleaner and a soft cloth.
Important:
Before cleaning the air cooler, you must remove the plug from the mains socket to cut
off the power supply. During cleaning, you must ensure that no water comes into
contact with the control panel.
The symbol above and on the product means that the product is classed as Electrical
or Electronic equipment and should not be disposed with other household or
commercial waste at the end of its useful life.
The Waste of Electrical and Electronic Equipment (WEEE) Directive (2011/65/EU)
has been put in place to recycle products using best available recovery and recycling
techniques to minimise the impact on the environment, treat any hazardous substances
and avoid the increasing landfill. Contact local authorities for information on the
correct disposal of Electrical or Electronic equipment.

[NL] Gebruikershandleiding
Luchtkoeler
MODEL NR.: BL-168DLR
Met afstandsbediening

WAARSCHUWING
Plaats de luchtinlaat niet te dicht bij een muur, gordijn, enz. Dit blokkeert de
luchtstroming wat de werking van de luchtkoeler nadelig kan beïnvloeden.
Controleer voordat u het apparaat voor de eerste keer gebruikt of de netspanning
overeenstemt met de informatie op het typeplaatje van de luchtkoeler.
Controleer vóór gebruik of het netsnoer en de stekker niet beschadigd zijn.
Voorkom knopen in het netsnoer. Als het netsnoer beschadigd is, moet deze worden
vervangen door de fabrikant, de service-agent of andere gekwalificeerde personen om
gevaren te voorkomen.
Sluit de luchtuitlaat niet af. Zorg ervoor dat u de ventilator nooit op het stopcontact
richt.
Het stopcontact dient minstens 10A te zijn. Gebruik dit stopcontact niet voor andere
apparaten.
Als de luchtkoeler in werking is gesteld, is het absoluut verboden om handen of andere
vreemde objecten door de gril heen te steken. Let vooral op de handelingen van
kinderen.
Dit apparaat kan gebruikt worden door kinderen van 8 jaar en ouder en door personen
met verminderde lichamelijke, zintuiglijke of geestelijke vermogens of een gebrek aan
ervaring of kennis indien zij toezicht of instructies hebben gekregen over het veilige
gebruik van het apparaat en de gevaren ervan begrijpen.
Kinderen mogen niet met het apparaat spelen.
Kinderen mogen zonder toezicht het apparaat niet reinigen en onderhouden.
Haal de stekker tijdens vullen en reinigen uit het stopcontact
Schakel het apparaat altijd eerst uit voordat u de stekker uit het stopcontact trekt. Om
kortsluiting, brand of een elektrische schok te voorkomen, dient u niet aan het netsnoer
te trekken, maar alleen aan de stekker.
Raak de stekker nooit met natte handen aan om een elektrische schok te voorkomen.
Trek de stekker alleen uit het stopcontact als het apparaat niet in gebruik is.
Plaats de werkende luchtkoeler nooit op een helling of op een oneven ondergrond.
Gebruik deze luchtkoeler niet buiten of in de nabijheid van een bad, douche of
zwembad.
Het water in de watertank mag de 'Max'-aanduiding nooit overschrijden. Als de
luchtkoeler aan het koelen (bevochtigen) is, moet het niveau altijd hoger zijn dan 'Min'.
Als u water heeft toegevoegd aan de watertank, dient u niet op de luchtkoeler te leunen,
er tegenaan te stoten of deze te verplaatsen.
Zet nooit iets bovenop de luchtkoeler.
Dek de luchtinlaat en -uitlaat van de luchtkoeler nooit af.
Geachte klant
Wij danken u voor de aankoop van deze luchtkoeler. Wij verzoeken u vriendelijke deze
gebruikershandleiding goed door te lezen en te bewaren voor toekomstig gebruik.
Bedieningspaneel diverse functies

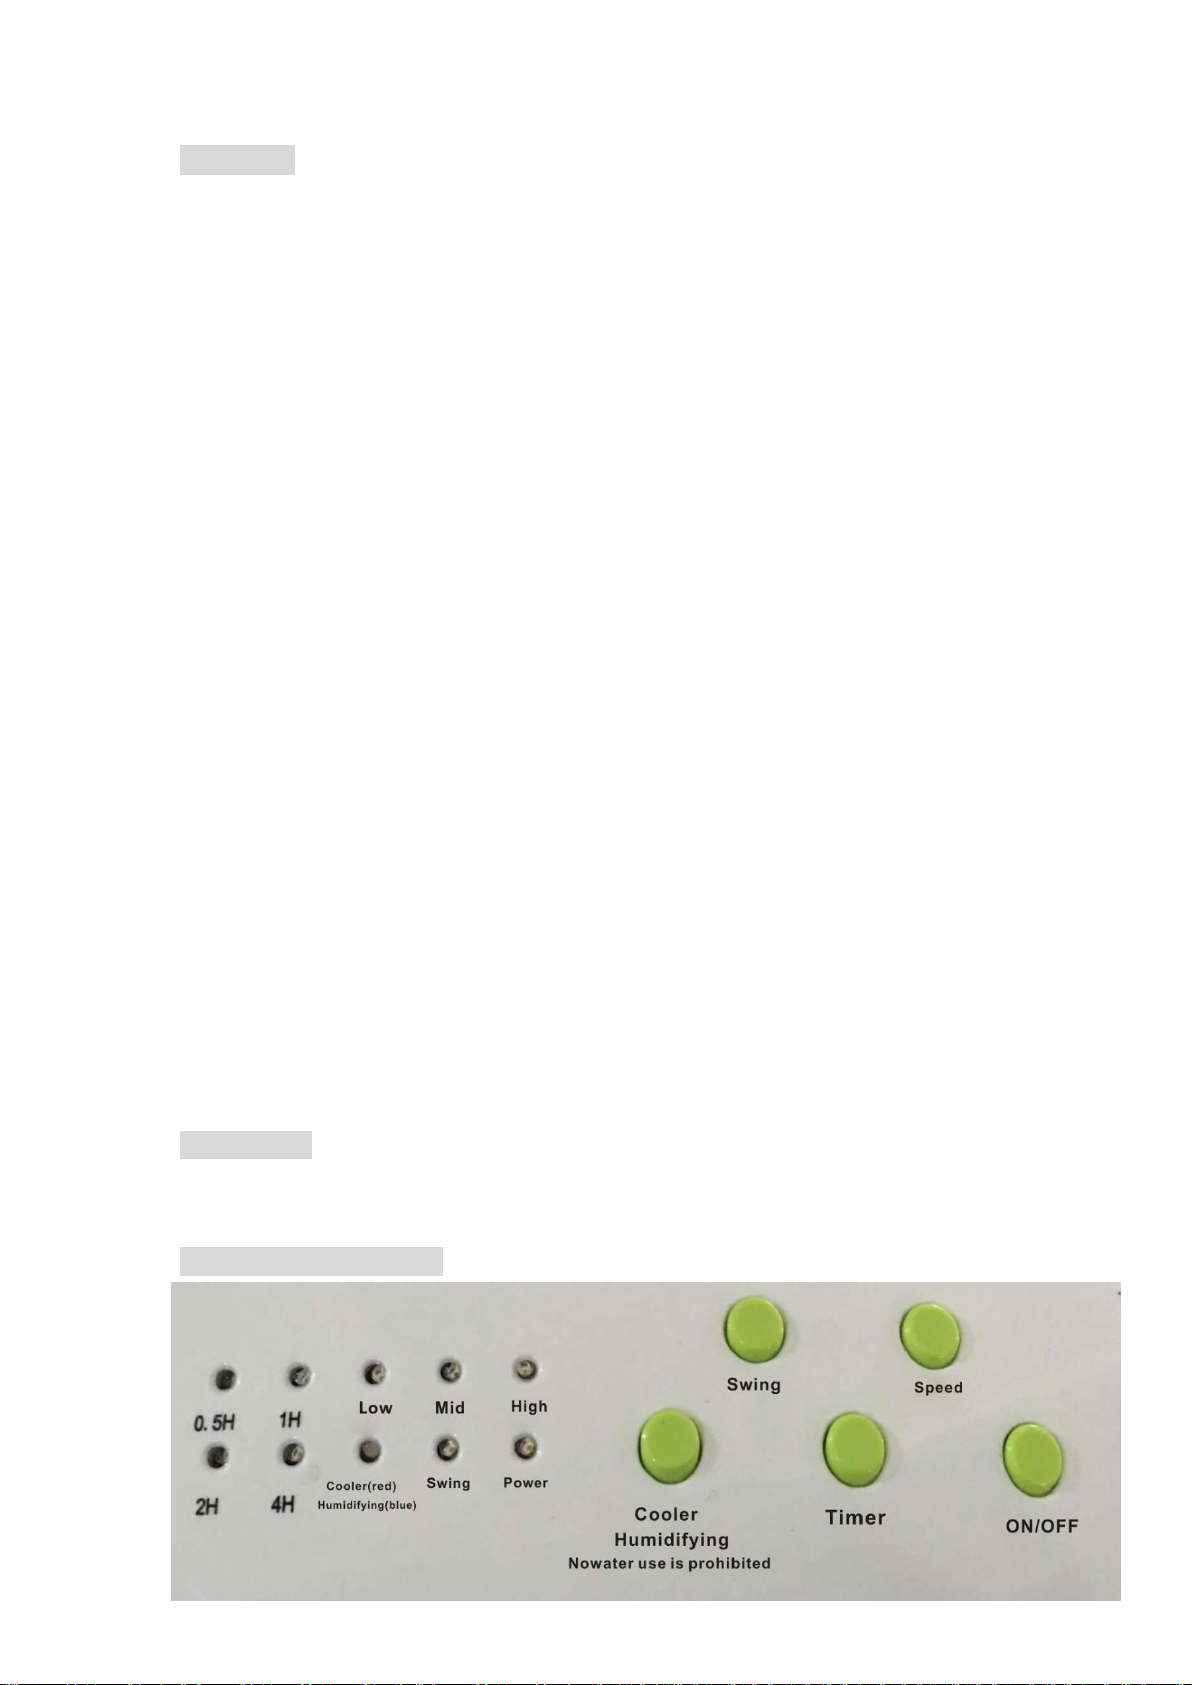
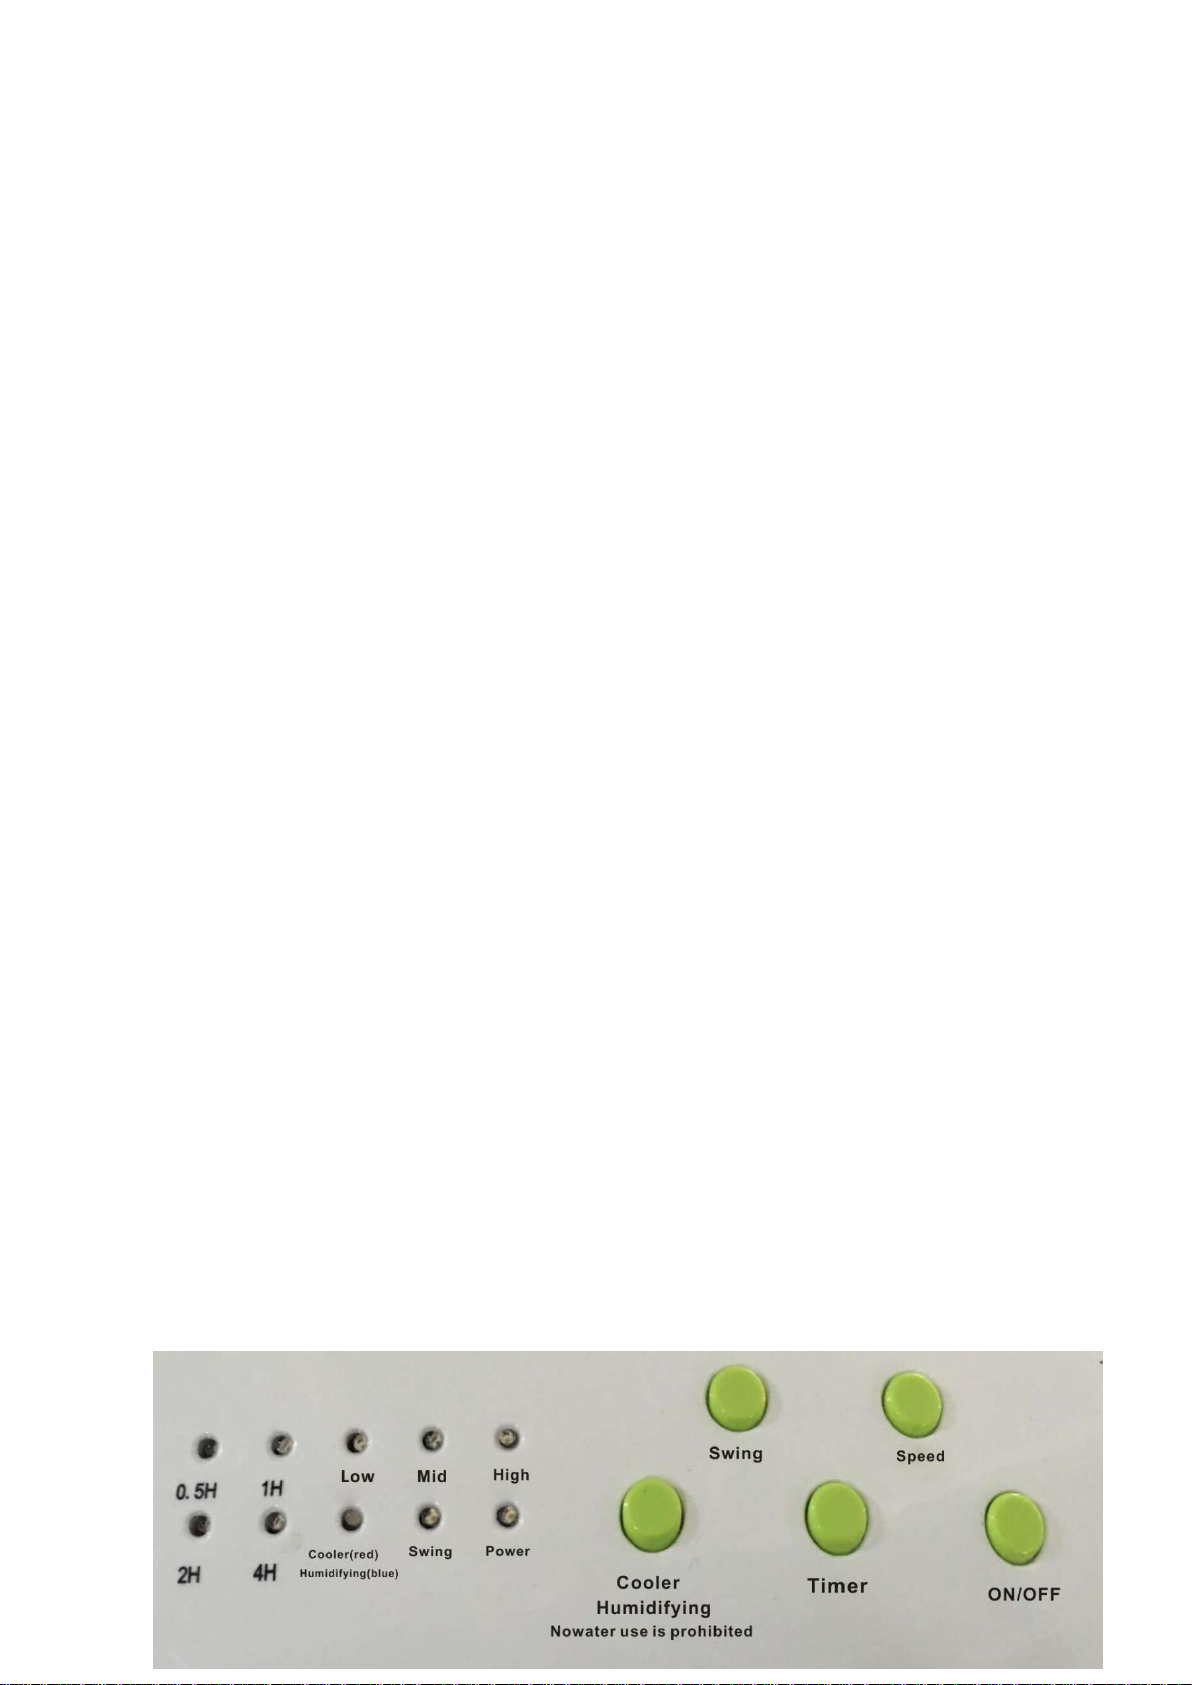
1. On(aan)/Off(uit)/Speed(snelheid)-knop
Zodra u de stekker in het stopcontact steekt, hoort u een zoemgeluid.
Druk op de knop. De 'Low'-indicator op het bedieningspaneel gaat branden, wat
aangeeft dat de luchtkoeler op lage snelheid werkt.
Druk nogmaals op de knop. De 'Med'-indicator op het bedieningspaneel gaat branden,
wat aangeeft dat de luchtkoeler op gemiddelde snelheid werkt.
Druk voor de derde keer op de knop. De 'High'-indicator op het bedieningspaneel gaat
branden, wat aangeeft dat de luchtkoeler op hoge snelheid werkt.
Druk voor de vierde keer op de knop. De luchtkoeler wordt uitgeschakeld.
3. Cooler (koeling) Humidifying (bevochtiging)-knop
Druk op de knop terwijl de luchtkoeler aan staat. Het 'Cooler'-indicatorlampje (rood) op
het bedieningspaneel gaat branden.
Druk nogmaals op de knop terwijl de luchtkoeler aan staat. Het
'Humidifying'-indicatorlampje (blauw) op het bedieningspaneel gaat branden.
Druk voor de derde keer op de knop terwijl de luchtkoeler aan staat. Beide lampjes gaan
uit, wat aangeeft dat de Koeling- en Bevochtigingsfuncties niet gebruikt worden.
3. Swing-knop (zwenken)
Druk op de knop terwijl de luchtkoeler aan staat. Het 'Swing'-indicatorlampje gaat
branden en het luchtfilter gaat zich van links naar rechts bewegen en weer terug.
Druk nogmaals op de knop terwijl de luchtkoeler aan staat. Het 'Swing'-indicatorlampje
gaat uit en het luchtfilter stopt met bewegen.
4. Timer-knop
Druk op de knop terwijl de luchtkoeler aan staat. Het ‘0.5H’-indicatorlampje gaat
branden en de luchtkoeler schakelt automatisch uit na 30 minuten.
Druk nogmaals op de knop terwijl de luchtkoeler aan staat. Het ‘0.5H’-indicatorlampje
gaat uit en het ‘1H’-indicatorlampje gaat branden. De luchtkoeler schakelt automatisch
uit na 1 uur.
Druk voor de derde keer op de knop terwijl de luchtkoeler aan staat. Het
‘0.5H’-indicatorlampje gaat weer branden en het ‘1H’-indicatorlampje blijft aan. De
luchtkoeler schakelt automatisch uit na 1,5 uur.
Druk voor de vierde keer op de knop terwijl de luchtkoeler aan staat. Het
‘0.5H’-indicatorlampje en het ‘1H’-indicatorlampje gaan allebei uit. Het
'2H'-indicatorlampje gaat branden. De luchtkoeler schakelt automatisch uit na 2 uur.
Druk voor de vijfde keer op de knop terwijl de luchtkoeler aan staat. Het
'0.5H'-indicatorlampje gaat weer branden. Het ‘1H’-indicatorlampje blijft uit en het
‘2H’-indicatorlampje blijft aan. De luchtkoeler schakelt automatisch uit na 2,5 uur.
Druk voor de zesde keer op de knop terwijl de luchtkoeler aan staat. Het
'0.5H'-indicatorlampje gaat uit. Het ‘1H’-indicatorlampje gaat weer branden en het
‘2H’-indicatorlampje blijft aan. De luchtkoeler schakelt automatisch uit na 3 uur.
Deze volgorde kunt u aanhouden tot u voor de vijftiende keer op de knop drukt, waarbij

zowel het ‘0.5H’-indicatorlampje als de ‘1H’ en ‘2H’ en ‘4H’-indicatorlampjes allemaal
branden. De luchtkoeler schakelt automatisch uit na 7,5 uur.
Druk voor de zestiende keer op de knop. Alle indicatorlampjes gaan uit en de
luchtkoeler maakt niet langer gebruik van de timer-functie.
Hoe water toe te voegen aan de watertank
Trek de watertank, die zich onderaan de achterzijde van de luchtkoeler bevindt, eruit en
voer 1/3 van de inhoud af terwijl u vers water toevoegt.
Let tijdens het vullen op het waterniveau.
Terwijl u water toevoegt, zorgt u ervoor dat de 'Max'-aanduiding niet wordt
overschreden.
Als de luchtkoeler aan het koelen en bevochtigen is, moet het waterniveau in de tank
altijd hoger zijn dan 'Min'.
U kunt altijd ijszakken of ijs in de watertank stoppen als u koelere lucht wilt.
Waarschuwing:
Nadat u de ijszakken of ijs in de tank heeft gestopt, dient het waterniveau nog steeds
beneden 'MAX' te zijn.
Hoe de ijszakken te gebruiken
Koude ijszakken kunnen langzaam de hitte van water absorberen, waardoor het koeler
wordt dan de directe omgeving ervan. Een luchtkoeler met bevroren ijszakken
produceert koelere lucht.
Bevries de ijszakken in de koelkast. Haal ze eruit zodra ze bevroren zijn.
Trek de watertank uit de luchtkoeler en doe de bevroren ijszakken erin.
Voor iedere koeler heeft u twee ijszakken nodig, zodat u atijd een derde ijszak in de
vriezer hebt liggen.

Reiniging
Het luchtfilter schoonmaken:
Trek de stekker uit het stopcontact en trek dan de houder met het luchtfilter eruit. Als u
het luchtfilter succesvol heeft kunnen verwijderen, reinigt u het filter met een neutraal
schoonmaakmiddel en een zachte borstel alvorens u het afspoelt met schoon water.
Daarna kunt u het filter weer terugplaatsen in de luchtkoeler.

Het natte gordijnpapier reinigen:
Trek de stekker uit het stopcontact en verwijder het luchtfilter. Haal daarna het natte
gordijnpapier uit de luchtkoeler. Reinig het met een vloeibaar schoonmaakmiddel en
een zachte borstel voordat u het afspoelt met schoon water. Daarna kunt u het papier
weer terugplaatsen in de luchtkoeler.
Belangrijk:
Om lekkages te vermijden dient u het natte gordijnpapier zodanig te plaatsen dat het
helemaal vlak ligt.
De watertank reinigen:
Trek de stekker uit het stopcontract en haal de watertank uit de luchtkoeler. Wrijf zoveel
mogelijk kalkaanslag van de watertank met een doek en een beetje vloeibaar
schoonmaakmiddel en spoel de tank daarna af met schoon water. Daarna kunt u de
watertank weer terugplaatsen in de luchtkoeler.
De buitenkant reinigen:
Reinig de buitenkant met een zachte doek en een neutraal schoonmaakmiddel.
Belangrijk:
Voordat u de luchtkoeler reinigt, dient u de stekker uit het stopcontact te trekken om
de stroomtoevoer te stoppen. Tijdens het reinigen dient u ervoor te zorgen dat het
bedieningspaneel niet in aanraking komt met water.

Het symbool hierboven en op het product betekent dat het product als
Elektrisch of Elektronisch apparaat is ingedeeld en mag niet worden
weggegooid met ander huishoudelijk of commercieel afval aan het einde van
zijn levensduur.
De Waste of Electrical and Electronic Equipment (WEEE) Richtlijn is
vastgesteld om producten te recyclen met behulp van de beste beschikbare
technieken voor terugwinning en recycling om de impact op het milieu te
minimaliseren, het behandelen van gevaarlijke stoffen en het voorkomen van
toenemende stortplaatsen. Neem contact op met de lokale autoriteiten voor
informatie over het juist afvoeren van Elektrische of Elektronische apparatuur.

[FR] Manuel d’utilisation
Refroidisseur d’air
MODÈLE N° BL-168DLR
avec télécommande

AVERTISSEMENT
Ne placez pas l’entrée d’air trop près du mur, des rideaux, etc. Cela risquerait d’obstruer
l’écoulement de l’air et de nuire au bon fonctionnement du refroidisseur.
Lors de la première utilisation, vérifiez que le niveau de tension de votre système
électrique est conforme aux données indiquées sur la plaque signalétique du
refroidisseur d’air.
Avant d’utiliser l’appareil, vérifiez que la fiche et le câble d’alimentation sont en bon
état.
N’entortillez pas le câble d’alimentation. Si le câble d’alimentation est endommagé, il
doit être remplacé par le fabricant, son représentant ou une personne de qualification
équivalente, pour des raisons de sécurité.
Ne couvrez pas la prise. Maintenez le ventilateur éloigné de la prise secteur.
La prise secteur doit fournir un niveau d’intensité minimum de 10 A. Ne branchez pas
d’autres appareils sur cette prise.
Il est strictement interdit d’insérer les mains ou tout autre corps étranger dans la grille
du refroidisseur d’air lorsque celui-ci est en marche. Les enfants doivent rester sous
surveillance à proximité de l’appareil.
Cet appareil peut être utilisé par les enfants âgés d'au moins 8 ans et par les personnes
à capacités physiques, sensorielles ou mentales réduites ou manquant d'expérience et
de connaissances, à condition qu'ils soient surveillés ou aient reçu des consignes
concernant l'utilisation sécurisée dudit appareil et qu'ils comprennent les risques
impliqués.
Les enfants ne doivent en aucun cas jouer avec l'appareil.
Le nettoyage et l'entretien utilisateur ne doivent pas être réalisés par des enfants sans
surveillance.
Débranchez l'appareil pendant le remplissage et le nettoyage.
Mettez l’appareil hors tension avant de débrancher la prise. Pour éviter tout risque de
court-circuit, d’incendie ou de décharge électrique, ne tirez pas sur le câble
d’alimentation. Empoignez uniquement la fiche.
Pour éviter tout risque de décharge électrique, ne touchez pas la fiche avec les mains
mouillées.
Retirez la fiche de la prise secteur lorsque vous n’utilisez pas l’appareil.
Ne placez pas le refroidisseur d’air sur une surface inclinée ou inégale lorsqu’il est en
marche.
N’utilisez pas le refroidisseur d’air à l’extérieur ou à proximité d’une baignoire, d’une
douche ou d’une piscine.
Le niveau d’eau doit toujours se trouver en dessous de la limite « Max » indiquée sur le
réservoir. Lorsque l’appareil est en cours de refroidissement (humidification), le niveau
doit être supérieur à la limite « Min ».
Après avoir ajouté de l’eau dans le réservoir, ne vous appuyez pas sur l’appareil, ne le
soumettez pas à des chocs et ne le déplacez pas.
Ne posez aucun objet sur le refroidisseur d’air.
Ne couvrez jamais l’entrée ou la sortie du refroidisseur d’air.

Cher(e) client(e)
Merci d’avoir choisi ce refroidisseur d’air. Veuillez lire attentivement ce manuel d’utilisation
et le conserver pour pouvoir vous y référer ultérieurement.
Fonctions du tableau de commande
1. Bouton On/Off/Speed (Marche / Arrêt / Vitesse)
Après avoir branché la fiche dans la prise, un signal sonore retentit.
Appuyez sur le bouton. Le témoin « Low » (faible), sur le tableau de commande,
s’allume. Cela signifie que le refroidisseur d’air fonctionne à faible vitesse.
Appuyez une deuxième fois sur ce bouton. Le témoin « Med » (moyenne), sur le tableau
de commande, s’allume. Cela signifie que le refroidisseur d’air fonctionne à vitesse
moyenne.
Appuyez une troisième fois sur ce bouton. Le témoin « High » (élevée), sur le tableau de
commande, s’allume. Cela signifie que le refroidisseur d’air fonctionne à vitesse élevée.
Appuyez une quatrième fois sur ce bouton. Le refroidisseur d’air arrête de fonctionner.
4. Bouton « Cooler (Humidifying) » (Refroidisseur [humidification])
Appuyez sur ce bouton lorsque le refroidisseur est en marche. Le témoin « Cooler
(red) » (Refroidisseur [rouge]) s’allume sur le tableau de commande.
Appuyez une deuxième fois sur ce bouton lorsque le refroidisseur d’air est en marche.
Le témoin « Humidifying (blue) » (Humidification [bleu]) s’allume sur le tableau de
commande.
Appuyez une troisième fois sur ce bouton lorsque le refroidisseur d’air est en marche. Le
témoin s’éteint. Cela signifie qu’aucune des fonctions « Cooler (Humidifying) »
(Refroidisseur [humidification]) n’est active.
3. Bouton « Swing » (Oscillation)
Appuyez sur ce bouton lorsque le refroidisseur est en marche. Le témoin « Swing »
(Oscillation) s’allume et le filtre à air oscille de gauche à droite (et vice-versa).
Appuyez une deuxième fois sur ce bouton lorsque le refroidisseur d’air est en marche.
Le témoin « Swing » (Oscillation) s’éteint et le filtre s’arrête de tourner.
4. Bouton « Timer » (Minuteur)
Appuyez sur ce bouton lorsque le refroidisseur est en marche. Le témoin « 0,5H »
s’allume. Cela signifie que le refroidisseur d’air s’éteindra après un délai d’une
demi-heure.

Appuyez une deuxième fois sur ce bouton lorsque le refroidisseur d’air est en marche.
Le témoin « 0,5H » s’éteint et le témoin « 1H » s’allume. Le refroidisseur d’air s’éteindra
après un délai d’une heure.
Appuyez une troisième fois sur ce bouton lorsque le refroidisseur d’air est en marche. Le
témoin « 0,5H » s’allume à nouveau et le témoin « 1H » reste allumé. Le refroidisseur
d’air s’éteindra après un délai d’une heure et demie.
Appuyez une quatrième fois sur ce bouton lorsque le refroidisseur d’air est en marche.
Le témoin « 0,5H » et le témoin « 1H » s’éteignent. Le témoin « 2H » s’allume. Le
refroidisseur d’air s’éteindra après un délai de deux heures.
Appuyez une cinquième fois sur ce bouton lorsque le refroidisseur d’air est en marche.
Le témoin « 0,5H » s’allume à nouveau. Le témoin « 1H » reste éteint et le témoin « 2H »
reste allumé. Le refroidisseur d’air s’éteindra après un délai de deux heures et demie.
Appuyez une sixième fois sur ce bouton lorsque le refroidisseur d’air est en marche. Le
témoin « 0,5H » s’éteint. Le témoin « 1H » s’allume à nouveau et le témoin « 2H » reste
allumé. Le refroidisseur d’air s’éteindra après un délai de trois heures.
La séquence se poursuit ainsi jusqu’à ce que vous appuyiez une quinzième fois sur le
bouton. Là, les témoins « 0,5H », « 1H », « 2H » et « 4H » sont tous allumés. Le
refroidisseur d’air s’éteindra alors après un délai de sept heures et demie.
Appuyez une seizième fois sur le bouton. Tous les témoins s’éteignent et la fonction de
minuteur n’est plus active.
Comment remplir le réservoir d’eau ?
Retirez le réservoir d’eau, en bas à l’arrière du refroidisseur. Videz 1/3 du réservoir et
ajoutez de l’eau fraîche.
Prêtez attention au niveau d’eau.
Lorsque vous remplissez le réservoir, veillez à ne jamais dépasser la limite « Max ».
Lorsque l’appareil est en mode de refroidissement et d’humidification, le niveau d’eau
du réservoir doit être supérieur à la limite « Min ».
Vous pouvez placer un accumulateur de froid ou de la glace dans le réservoir pour
obtenir de l’air plus frais.
Avertissement :
Le niveau d’eau du réservoir doit rester en dessous de la limite « MAX », même après
y avoir ajouté des accumulateurs de froid ou de la glace.
Comment utiliser les accumulateurs de froid ?

Les accumulateurs de froid absorbent lentement la chaleur contenue dans l’eau pour
rendre l’eau plus froide que l’environnement. Un refroidisseur d’air qui contient des
accumulateurs de froid produit de l’air plus froid.
Placez les accumulateurs de froid au congélateur. Lorsqu’ils sont congelés, sortez-les.
Retirez le réservoir d’eau du refroidisseur et placez les accumulateurs de froid congelés
dans le réservoir.
Chaque refroidisseur nécessite deux accumulateurs de froid. Ainsi, vous disposez
toujours d’au moins un accumulateur au congélateur.
Nettoyage
Nettoyage du filtre à air :

Débranchez la fiche de la prise secteur, puis tirez sur le filtre à air en l’empoignant à
l’endroit prévu à cet effet. Après avoir retiré le filtre à air, nettoyez-le avec un produit de
nettoyage liquide neutre et une brosse souple. Puis, rincez-le à l’eau claire. Replacez le
filtre dans le refroidisseur d’air.
Nettoyage du tampon d’humidification :
Débranchez la fiche de la prise secteur et retirez le filtre à air. Puis, retirez le tampon
d’humidification. Nettoyez-le avec un produit de nettoyage liquide et une brosse souple
et rincez-le à l’eau claire. Replacez le tampon d’humidification dans le refroidisseur d’air.
Important :
Pour éviter tout risque de fuite, le tampon d’humidification doit être installé à plat.
Nettoyage du réservoir d’eau :
Débranchez la fiche de la prise secteur et retirez le réservoir d’eau. Essuyez-le avec un
chiffon et un petit peu de produit liquide nettoyant pour éliminer le plus de calcaire
possible. Puis rincez le réservoir à l’eau claire. Replacez le réservoir dans le refroidisseur
d’air.
Nettoyage du boîtier :
Essuyez le boîtier avec un nettoyant neutre et un chiffon doux.
Important :
Avant de nettoyer le refroidisseur d’air, débranchez la fiche de la prise secteur pour
couper l’alimentation. Pendant la procédure de nettoyage, veillez à éviter tout contact
entre l’eau et le tableau de commande.

Le symbole ci-dessus signifie que le produit est classé comme équipement
électrique ou électronique et ne doit pas être jeté avec les déchets ménagers
ou commerciaux à la fin de sa durée de vie utile.
La directive Déchets d'équipements électriques et électroniques (DEEE) a été
mise en place pour le recyclage des produits en utilisant les meilleures techniques
de collecte et de recyclage disponibles afin de l'impact sur l'environnement, traiter
toutes les substances dangereuses et éviter au maximum la mise en décharge.
Contactez les autorités locales pour plus d'informations sur la mise au rebut des
équipements électriques ou électroniques.
Table of contents
Languages:
Popular Air Conditioner manuals by other brands

REMKO
REMKO RKV 13 T operating instructions

International comfort products
International comfort products R2A3 GKR Series installation instructions

dirna Bergstrom
dirna Bergstrom bycool green Series Mounting instructions

mundoclima
mundoclima MUCHR-H6A Series installation manual

Kenmore
Kenmore 580.76105 owner's manual

Ferroli
Ferroli LIFE user manual

flakt woods
flakt woods RoomMaster ABR-2 Commissioning

conexa
conexa Corona Plus MSC-09HRDN1-QD0E Service manual

Airwell
Airwell XLM36IRCB Operation manual & installation instructions

Axair
Axair Ulisse 10-13 A Operating instruction

EdgeStar
EdgeStar AP10002BL Service manual

Panasonic
Panasonic CU-J24DBE5 Service manual