Kiwip KW3 User manual

KW3
MODE D’EMPLOI | USERS GUIDE | BEDIENUNGSANLEITUNG | MODO DE EMPLEO

Because the safety of your children is our priority, our servers and the transmis-
sion of our data are fully secured.
Our French technical
team work hard to ensure high
levels of quality
All user data is
hosted on our secure
servers in France
A CNIL
approved
communication
system
Designed and de-
veloped in France,
the KiwipWatch
has been granted
the French Tech
label
SAFETY CHARTER
2

The Kiwip Technologies nano SIM card is designed to be used exclusively with
your KiwipWatch. It has been activated to make it quick and easy to use - to get
started, simply insert it into the watch.
You have opted for an operator and a SIM card other than Kiwip* - please
deactivate the PIN code for the SIM card prior to inserting it into the KiwipWatch.
Insert the SIM card into a nano SIM compatible smartphone, go to the smart-
phone’s security settings and deactivate the PIN code. Once you have done this,
you can re-insert the nano SIM card into your watch. You can ask your mobile
provider to deactivate the PIN code for you in store if you are not able to do it
yourself.
Please select an appropriate network provider for your town or city. Kiwip will
not be held responsible for any weak network distribution on the part of mobile
service providers.
Please ensure that you have enough on your tariff in terms of calls and data in
order to use the watch. We would recommend that you have at least 50Mb on
your data tariff.
*Please note - pre-paid cards will not work with the KiwipWatch.
1. ACTIVATING THE KIWIP NANO SIM CARD
2. FREE OPERATOR
PLEASE READ BEFORE USE
3

CONTENTS OF THE BOX
KW3 connected
telephone watch USB cable DC sector adapter
Screwdriver User manual
4

Functions button
- Press to access the menu
- Hold for 3 seconds for SOS mode
Bottom button
- Hold for 3 seconds to switch off the watch
- Press to: Go back to the menu
End / Reject a call
Colour touchscreen
Battery charge socket
SIM card slot
KIWIPWATCH KW3 DESCRIPTION
5

INSERTING YOUR SIM CARD
The Kiwip Technologies Nano SIM card is exclusively designed for use with your
KiwipWatch, in accordance with the terms and conditions of sale and use.
Please ensure that the device has been properly switched off before opening
the SIM card cover.
Insert the SIM card into the slot provided.
Please ensure that the SIM card cover has been properly locked after inserting
the card.
FREE OPERATOR: You should deactivate the PIN code prior to inserting the SIM
card into your KiwipWatch.
6

The battery has an average operating life of one day.
Use the magnetic Kiwip USB cable provided in order to
recharge your watch. The bar will progress to tell you
that the battery is charging.
Once the bar is full, the battery is fully charged.
You should recharge the device once the following noti-
cation appears: “Low battery”.
OUR GUIDELINES
Charge your device using the charger provided or another Kiwip Technologies
charger (available from www.kiwip.fr).
Using any other charger runs the risk of damaging your device.
Exposing the device to high temperatures will reduce the lifespan of the battery.
We recommend that you charge the watch every evening so that this becomes
routine for the child and so that they are able to get the most out of the battery’s
operating life.
RECHARGING THE BATTERY
7

Download the KiwipWatch application from the Google Play Store or the Apple
Store using your smartphone.
THE KIWIPWATCH APPLICATION
SWITCHING THE WATCH ON AND OFF
To switch the watch on or off, simply hold the button at the bottom right down
for 3 seconds (see page 4).
Please note, if the option “You may not switch off the watch” has been activated,
the watch will restart automatically if the child tries to switch it off.
To activate the “You may not switch off the watch” option, press on the child’s
avatar/photo in the application in order to access the watch settings.
8

ACTIVATING THE DEVICE FOR THE 1ST TIME
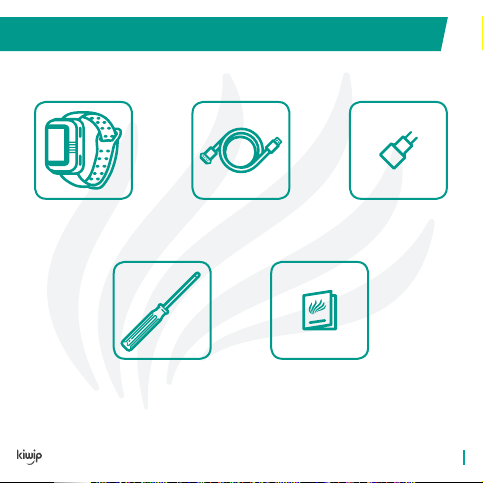
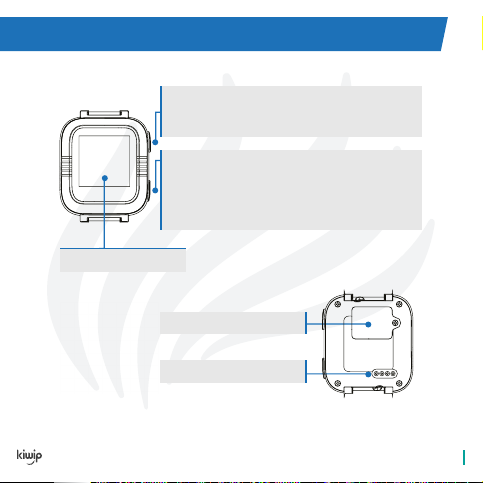
You have the option of entering your KiwipWatch’s IMEI number using the small
pencil icon at the top right. You will nd the IMEI number on the underside of the
box, on the back of this user manual or by using the watch:
On the QR Code screen, press quickly 10 times on the button at the top and then
once on the button at the bottom of the watch and the number will be dis-
played at the bottom of the screen.
Open the KiwipWatch application and authorise all of the requested settings
Go to “Create a new user account”
Enter your mobile phone number and press next
Enter the verication code sent to you in a text message
Switch on your watch and then verify the quality of the network
signal, the time and the weather.
Follow the synchronisation instructions on your KiwipWatch appli-
cation and scan the QR code on your watch (available by swip-
ing up on the home page).
Enter the activation code located beneath the QR code on the watch.
Congratulations! Your KiwipWatch and your smartphone are
now connected.
If you are not able to scan the QR Code:
STEP 1: CREATING AN ADMINISTRATOR ACCOUNT
STEP 2: SYNCHRONISING YOUR WATCH WITH YOUR SMARTPHONE
9

ADMINISTRATOR
Only one administrator account is authorised when it comes to managing
your KiwipWatch. Once the user has launched the rst synchronisation be-
tween the watch and the smartphone, they will become the default admin-
istrator.
You may, however, designate another administrator:
In order to do this, the designated person will need to download the applica-
tion, scan the QR Code on the watch and be accepted by the current administra-
tor from the application’s “New” section.
Now go to “Contacts” and select the previously accepted contact. Then click on
the blue “Change administrator” icon. If necessary, the person designated will be
able to return administrator authorisation to you using the same process.
For all contacts who have created a user account and who have synchronised
with the watch, the administrator will have the option of authorising geotrack-
ing for the watch, as well as authorising whether or not to receive notications.
In order to do this, activate the “Authorise geotracking” option in the correspond-
ing “Contacts” form.
You must repeat step 2 for each watch, selecting the function “Add/Change
watch” from the main menu of your mobile application.
If you have more than one watch:
10

INFORMATION
The rst time you synchronise your watch and the application, you will be able
to nd out your watch’s telephone number by clicking:
A- On the photo of the watch that you have selected at the top left of the appli-
cation to activate the functions menu.
B- Now click again on the photo at the top left to access the child’s information.
C- You will be able to read the watch’s number on the 3rd line.
Please note: If the watch’s number is not contained within the child’s informa-
tion, please check with your provider to ensure that the SIM card has been ac-
tivated, as well as the DATA option for the tariff subscribed to for the watch.
You can choose the language of the watch by sliding down twice from the main
screen of your KiwipWatch.
Once on the “Language” screen, tap once and then choose the desired lan-
guage.
TO FIND YOUR WATCH’S NUMBER:
TO CHOOSE THE LANGUAGE OF THE WATCH:
11

UPDATES
In the interests of quality, Kiwip offer regular updates to the software used on
your KiwipWatch as well as updates to the mobile application.
PROCEDURE FOR UPDATING THE SOFTWARE ON YOUR WATCH
1. Please ensure that your watch is switched on with at least 2 bars of both
charge and network
2. Keep the watch next to your smartphone without touching it
3. Open the KiwipWatch application and go to the “Watch settings” section (in
the application menu)
4. Select “Watch software version”
5. Launch the update for the version on the watch
6. Please wait while the watch downloads the update. It will then switch to
a white background with a red progress bar. Do not touch it during this time.
7. Once the watch has nished with the updates, it will automatically restart.
Congratulations! Your watch has been successfully updated.
PROCEDURE FOR UPDATING THE APPLICATION
1. If you are not offered an update for your KiwipWatch parental application
automatically, please visit the store where you downloaded the application
(Google Play or Apple Store). You will be notied once an update becomes
available.
2. Launch the update via the store and allow it to progress until it has nished.
Congratulations! Your application has been successfully updated.
12

When this signal appears, check the status of the network and check to ensure
that the SIM card has been properly inserted into the watch before restarting it.
TROUBLESHOOTING
The date and the time on your KiwipWatch will be adjusted automatically.
If the time given is incorrect, you can try switching the watch off and switching
it back on again. Should this fail to resolve the issue, we would recommend
that you check to ensure that your KiwipWatch is up to date and to install any
updates if this is not the case.
KIWIPWATCH TUTORIALS
WARRANTY
To help you use your product, we have created “KiwipWatch tutorials” on
our YouTube channel:
Our watches are all covered by a 2-year warranty. Water oxidation, broken
screens, loss and theft are not covered by this warranty.
To activate your warranty:
Create your customer account and activate your 2-year warranty via our web-
site by going to the “My account” section:
http://bit.ly/2zNcUs0
www.kiwip.fr
13

Generally speaking, the watch must always be switched on and connected to a
network in order to receive any orders sent from the application.
You can restart the watch remotely using the “Reboot” function contained within
your watch settings.
You can also restore factory settings if necessary. This function will permanently
delete the settings saved on the watch.
The watch is water resistant with a protection index of 65 (splashes,
sand, dust, etc.). This means that it may not be submerged in water
(baths, swimming pools, etc.).
TECHNICAL INFORMATION
You have the option of setting notications using the application by going to the
“Child alarms” menu.
ALARMS
14

STRUCTURE OF THE KIWIPWATCH MENU
Settings
Best Friend
Home page Contacts MessagesQR Code
Activity tracking
TOUCHSCREEN
Advice: Protect the screen on your KiwipWatch with a soft smartphone protec-
tion lm that can be adjusted to t the size of your watch or with a suitable
tempered glass screen protector.
Pressing on the back button will take you back to the home page.
Access the sub-menus by swiping down and from left to right.
To select an element once it has been displayed, simply press on the touch-
screen.
15

You can adjust the brightness and the volume of your watch by swiping down
on the screen.
Reducing the volume to minimum levels will activate vibration mode.
Please note: in vibration mode, the watch will not emit any “Low battery” sound
notications.
SETTINGS
HOME PAGE
Hold down on the home page for 2 seconds in order to view the different time
displays. This allows you to choose the preference for your child.
16

CONTACTS
The watch can contain up to 50 contacts. Only external contacts authorised by
the administrator will be able to communicate with the watch.
The child’s “Best Friend” contacts will also be authorised contacts. Nevertheless,
the administrator will be able to select or delete them where appropriate.
Contact details viewed in the application
The KiwipWatch (in green) + Best Friend contacts
Administrator (just one if possible)
“Tribe” contact: can make or receive calls, can send text or voice mes-
sages (using the application, account and QR Code scan required), can
geotrack the child (for administrator authorisation), can become an ad-
ministrator, can be an SOS contact.
Basic contact: can be sent manually via the application by the adminis-
trator, can make or receive calls, can be an SOS contact.
If one of the authorised contacts wants to send voice or text
messages to the child’s watch, they will need to download
the KiwipWatch parental application and create an account.
You will then need to scan the QR Code on your watch (or
enter your watch’s IMEI number using the small icon located
at the top right). Once the administrator has accepted, the
contact will be able to send messages.
17

TELEPHONE
To make a call, press for 2 seconds on the avatar of the person that the child
wants to call. To hang up, press for 2 seconds on the red icon or on the button
at the bottom.
To answer a call, simply swipe your nger from left to right, without lifting your
nger from the screen.
18

USING YOUR KIWIPWATCH PARENTAL APPLICATION
Select “Contacts” in the application, click on the child’s contact and then select
“Message” at the bottom right of the screen.
You may send either a voice or a text message by selecting the “keyboard” icon
at the bottom left of the screen.
USING THE KIWIPWATCH
Select your contact and then record your message by holding down on the
“Hold down to speak” button. Release to send your message.
Should your message fail to send, check the status of the net-
work to which the watch is connected. Should this problem per-
sist, go to page 13 > Troubleshooting.
Please note: The watch can only exchange messages with con-
tacts who have the mobile application or “Best Friend” contacts.
CHAT
19

Your child can synchronise with their friends who also have a KiwipWatch.
In order to do this, the two children must go to the “Best Friend” menu at the
same time and they must each follow the instructions on the watch. Please note
that the watches must be kept no more than 20 cm apart in order to ensure
synchronisation.
They will then be able to call, chat and track their respective physical activity
via the rankings.
The watch’s administrator will receive a notication on their application, notify-
ing them that a new friend has been added, whom they will then be able to
delete as required.
BEST FRIEND
20
Table of contents