Kolibri Domino User manual

Domino
Kolibri Domino One-Pocket Currency Discriminator
USER MANUAL

H
CHOKING HAZARD.
SMALL PARTS.
Not for children under
3 years old.
DO NOT DISPOSE
IN TRASH. Follow
appropriate local electronics
scrap procedures.
WARNING: RISK OF
ELECTRICAL SHOCK. This
equipment is to be serviced by
trained personnel only.
WARNING: HAZARDOUS
MOVING PARTS. Do not
place fingers, hair, clothes,
lanyard... near moving parts.
PROP 65 WARNING. This product may contain chemicals known to the State
of California to cause cancer, or birth defects or other reproductive harm.
https://oehha.ca.gov/
This manual contains important information on safety measures
and operational features of the Kolibri Domino 1-pocket currency
discriminator. Please read it carefully before operating your machine
and keep it for future reference.
While every effort has been made to include all features into this user
manual, specications stated may not reect all the features of the later
software versions.
If you have questions about your Kolibri Domino and its operation,
please contact technical support at www.kolibriusa.com/support.
Table of contents:
1. INTRODUCTION
1.1 About the Kolibri Domino ____________________________________________________ 1
1.2 Box contents________________________________________________________________ 1
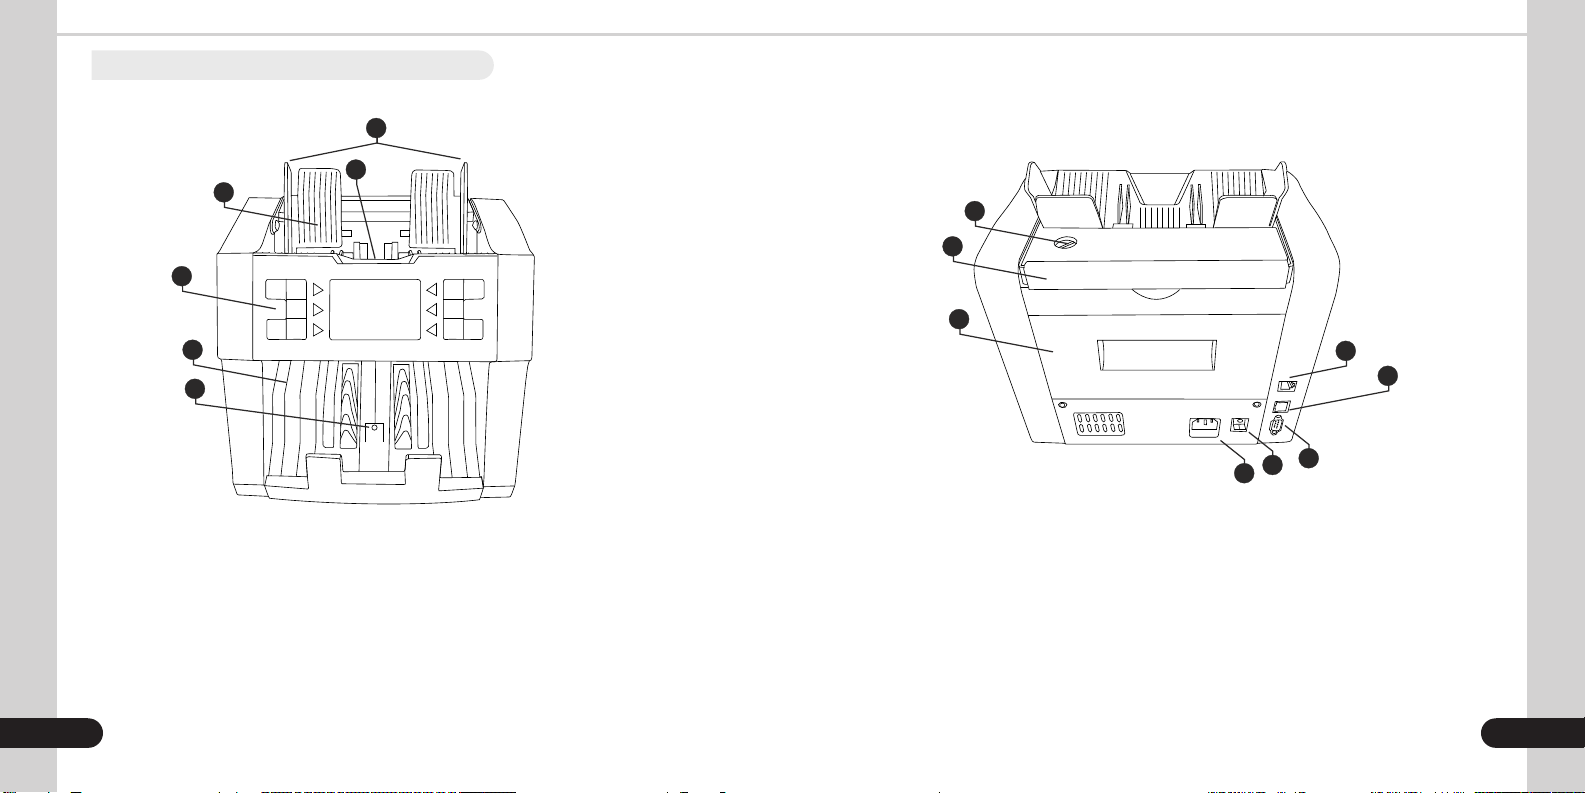
1.3 Views of the Kolibri Domino _________________________________________________ 2
1.4 Control panel _______________________________________________________________ 4
1.5 Display _____________________________________________________________________ 5
2. OPERATION
2.1 Getting started ______________________________________________________________ 6
2.2 Bill Loading Procedure ______________________________________________________ 6
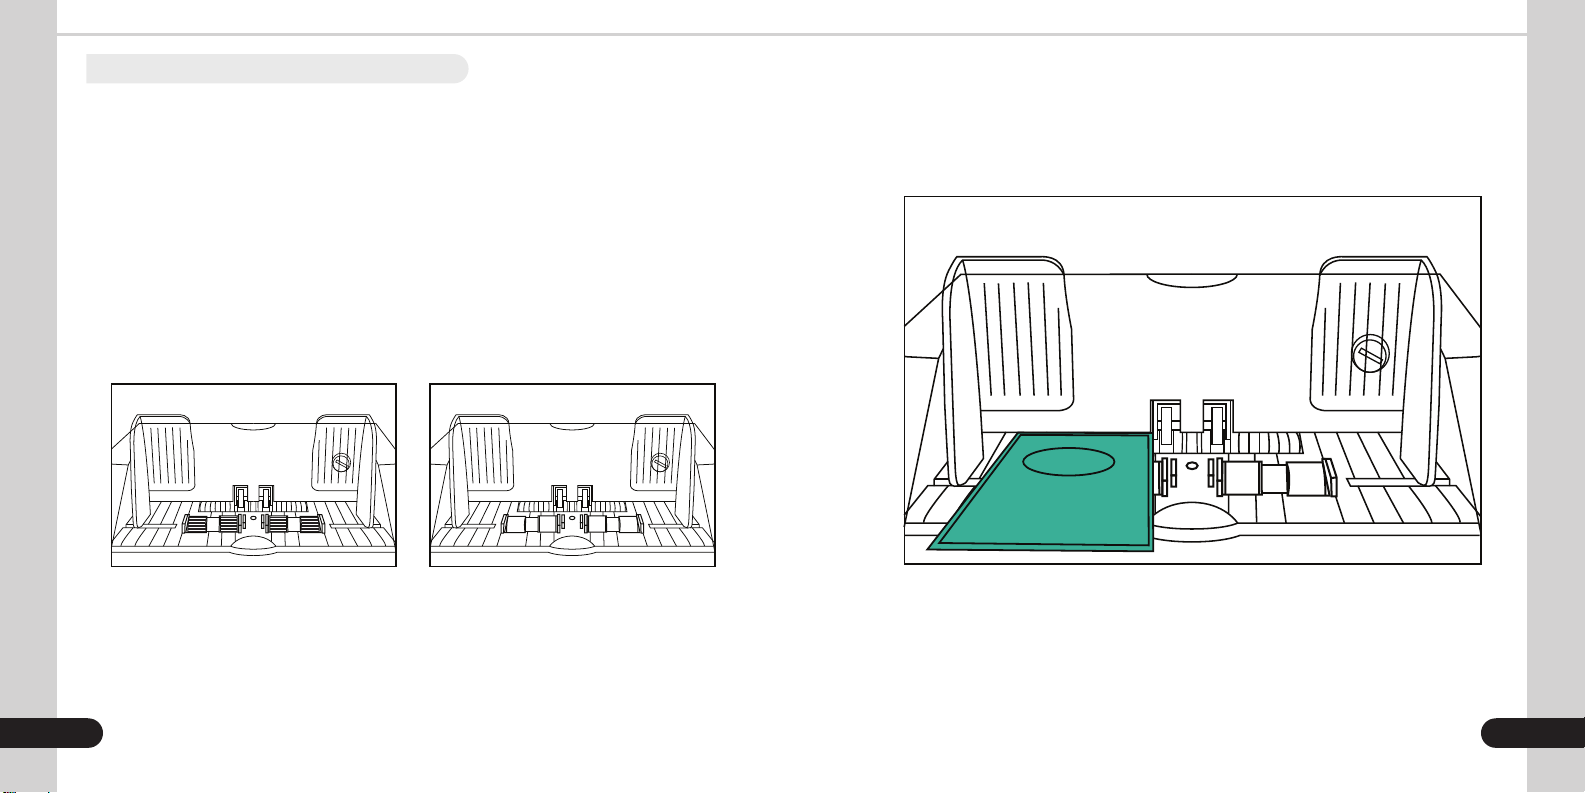
2.3 Feed Gap Adjustment Procedure_____________________________________________ 8
2.3.1 Counting Modes ___________________________________________________________ 11
2.3.2 MIX mode _________________________________________________________________ 11
2.3.3 SORT mode ________________________________________________________________ 11
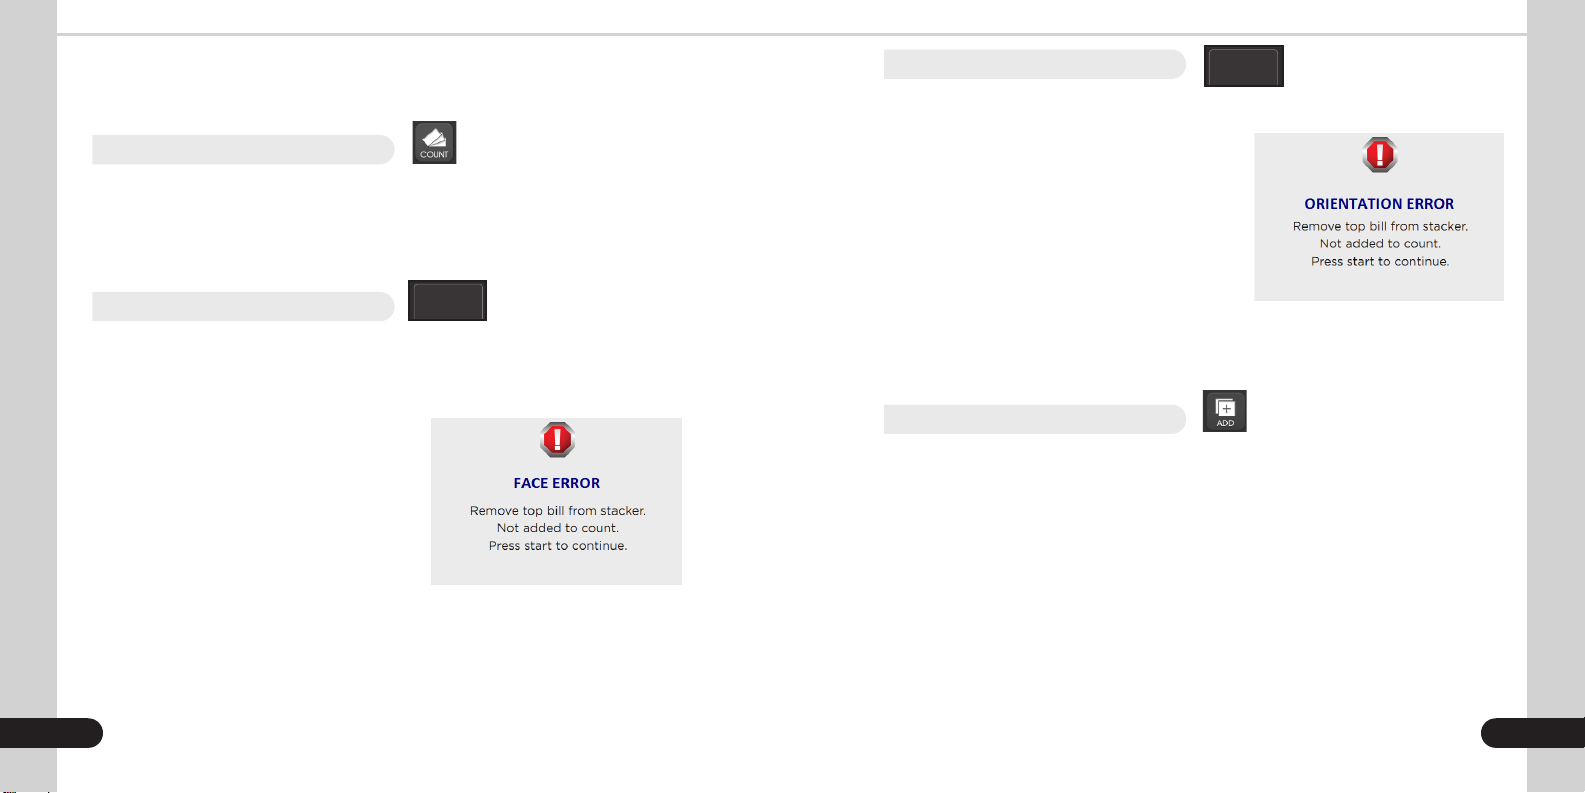
2.3.4 COUNT mode ______________________________________________________________ 12
2.3.5 FACE mode ________________________________________________________________ 12
2.3.6 ORIENTATION Mode________________________________________________________ 13
2.3.7 ADD Mode _________________________________________________________________ 13
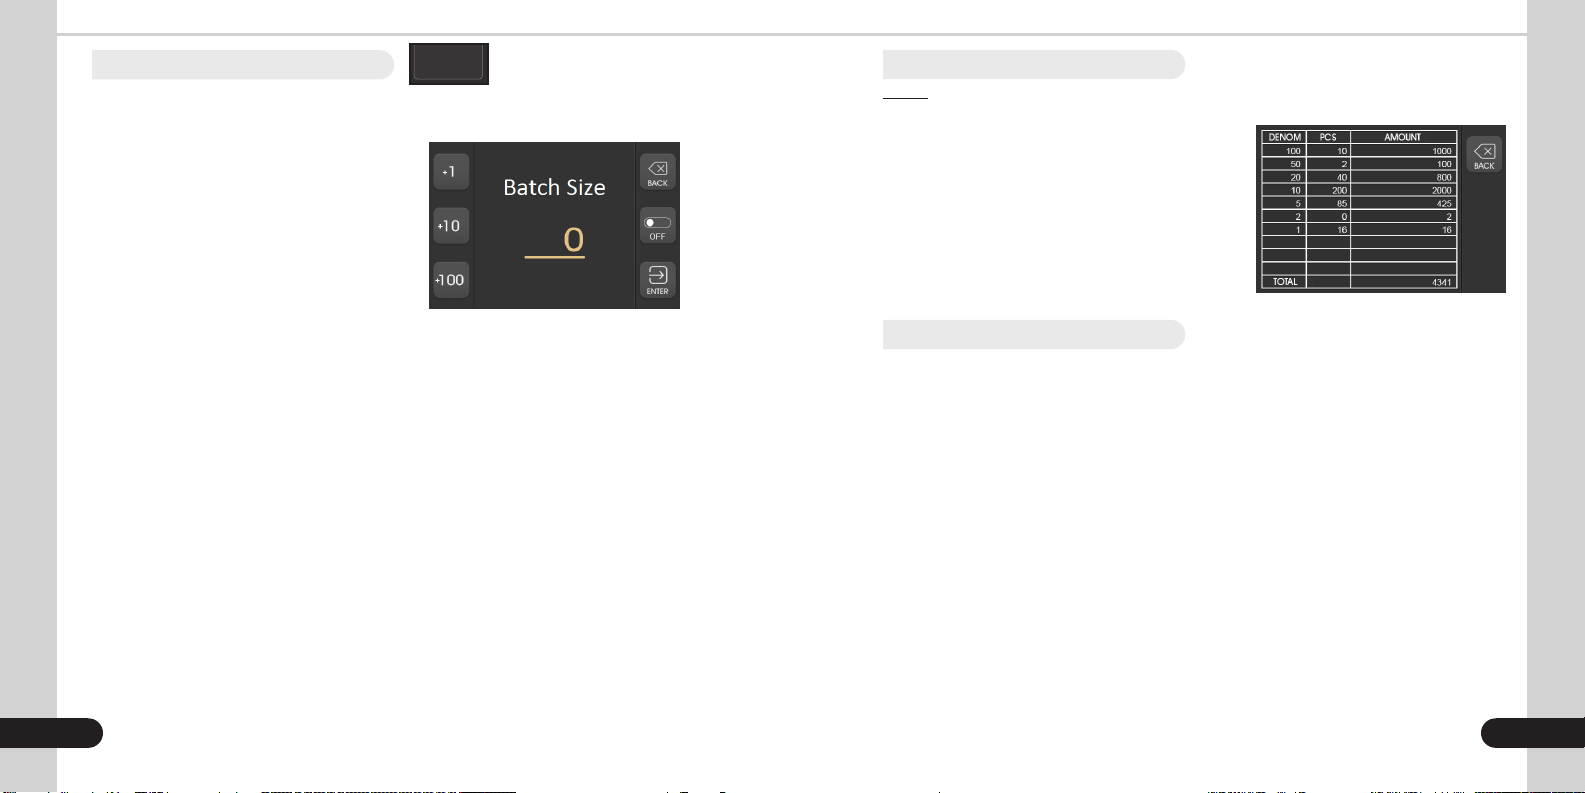
2.3.8 BATCH Mode ______________________________________________________________ 14
2.4 After-Count Functions ______________________________________________________ 15
2.4.1 Print _______________________________________________________________________ 15
2.5 Menus _____________________________________________________________________ 16
2.6 Important Safety Notes_____________________________________________________ 17
3. ERROR MESSAGES
4. MAINTENANCE, WARRANTY, CONTACT, SPECIFICATIONS
4.1 Maintenance_______________________________________________________________ 19
4.2 Cleaning Procedure ________________________________________________________ 19
4.3 Calibration Procedure ______________________________________________________ 20
4.4 Trouble Shooting___________________________________________________________ 21
4.5 Warranty___________________________________________________________________ 22
4.6 Shipping ___________________________________________________________________ 22
4.7 Specications______________________________________________________________ 23
4.8 Contact Information________________________________________________________ 23

1.1 About the Kolibri Domino
Thank you for choosing the Kolibri Domino 1-pocket currency discriminator.
The Kolibri Domino is a professional, powerful, value counter and sorter, with strong
counterfeit detection and high level of performance. The Kolibri Domino has a convenient
user friendly interface, intuitive touch panel, and a variety of counting modes.
1.2 Box contents
1. Kolibri Domino 1-pocket sorting machine
2. Cleaning Brush
3. Bill Guides
4. Power cord
5. User manual
INTRODUCTION
1.
1

1.3 Views of the Kolibri Domino
3
2
1
1
3
4
5
876
2
5
6
4
1.
Bill guides
2.
Hopper Sensor
3.
Hopper
4.
Control Panel / Touch Display
5.
Stacker
6.
Stacker Sensor
7. + 8.
USB and Memory Ports (under control panel - not used)
3
2
1
1
3
4
5
876
2
5
6
4
1.
Feed Gap Adjuster
2.
Carrying Handle
3.
Access Door
4.
RJ11 Port (not used)
5.
RJ45 Port (not used)
6. RS232 9 pin Printer Port
7.
Power Switch
8.
AC Power
2 3

1
2
3
5
4
2
6
START
CLEARPRINT
BATCH
X
1.4 Control panel
Control panel
Key Function
1.
Batch Opens the batch screen
2.
Multi-function These buttons change according to mode or menu setting
3.
Print Prints the Total Report if a printer is connected
4.
Touch Screen Shows total count and settings
5.
Start Starts the count (when not in auto-start mode)
6.
Clear Clears the count and / or error
AUTO BATCH
FAC E ORIENT
SORT MENU
1.5 Display
1.
Mix Button / Icon
2.
Sort Button / Icon
3.
Count Button / Icon
4.
Auto / Manual Toggle
5.
Batch Button / Icon
6.
Total Amount Indicator
7.
Total Piece Count Indicator
8.
Face Button / Icon
9.
Orient Button / Icon
10.
Add Button / Icon
11.
Menu Button / Icon
12.
Total Button / Icon
1
2
3
4 5
6
7
10
11
12
8 9
4 5

OPERATION
2.
2.1 Getting started
Connect the power cable to the port. Before switching on the unit, make sure the hopper
is empty. Using the power switch behind the counter, turn the machine on. The device will
self-test and is ready for operation when the display shows the home screen. Before using
the device, it is recommended to leave the machine turned on for 10-15 minutes (to warm
up the counterfeit detection sensors)
2.2 Bill Loading Procedure
Before loading bills and working on the Kolibri Domino, the user should check the
counting mode.
It is very important to place the bills into the hopper correctly, because recognition
performance of the bills is highly affected by the arrangement of the bills. Bills should be
placed in a neat stack prior to being placed into the hopper. Avoid counting bills that are
wet, excessively dirty, spoiled, folded, curled or with foreign material like clips, bands, etc.
Bills such as these can cause the machine to malfunction.
Tips: To reduce rejects
• Place the bills evenly arranged as shown below.
• Adjust bill guides to t to the size of the bills.
• Correct the bills if they are severely wrinkled or damaged.
WARNING: Hazardous moving parts!
Do not place ngers, hair, clothes, etc. near the moving parts.
TIPS: To Reduce Rejects
1. MAKE A STACK
3. FEED THE BILLS
2. LOAD THE STACK
Correct or remove bills that are severely wrinkled,
damaged or folded. Square the bill stack.
67

2.3 Feed Gap Adjustment Procedure
Sometimes, during the transportation or shipment of the unit, the adjustment of the feed
mechanism may loosen. This can also happen during normal wear or tear and can lead
to DB and DD errors. The feed gap is the actual height of the bill feed path, and should be
tuned to just about the thickness of a single bill. If the feed gap is too wide, the user may
experience a high amount of DB and DD errors which are caused by more than one bill
entering the scanning path at one time. If the feed gap is too tight, the unit may not be able
to pass bills into the scanning path, or catch on bills and tear them.
The following steps are the procedure for adjusting the feed gap:
1. Ensure the machine is turned off.
2. Position the rollers so that none of the dark-colored rubber teeth are visible. This can be
done by turning the kick rollers. Only the black smooth sections of the rollers should
be showing.
Incorrect Position:
Turn rollers until teeth are no longer visible.
Correct Position:
3. Place one bill that is crisp and rigid enough to prevent bending during the adjustment
procedure. Place it lengthwise either to the right or left side of the hopper. See image
below for example.
8 9

10
4. Guide the bill between the inner rollers during this step; you should feel moderate
resistance as you move the bill back and forth through these rollers. In other words,
the gap between these rollers is wide enough to pass just one bill per count, but narrow
enough to feel a slight tension or friction when pulling the bill out.
To adjust the bill feed gap, use the instructions below to turn the adjustment screw at the
top of the unit:
a) Make a 1/16 of an inch adjustment, then retest.
b) If the bill feels too loose, tighten the feed gap by turning the adjustment
screw counterclockwise.
c) If the resistence against the bill feels too strong, loosen the gap by turning the
screw clockwise.
Important Note:
The Kolibri Domino’s feed gap adjustment can be sensitive during adjustments. Do not
overturn each adjustment or you may overshoot the optimum gap. We recommend testing
with a stack of bills after each adjustment turn.
If you are experiencing a
high amount of Double
Error, Chain Error or
multiple bills jamming
inside the machine,
turn the adjustment
screw 1/16 of an inch
counterclockwise.
Then retest.
If the unit has a hard
time feeding the bills
or tears the bill, make
a 1/16 of an inch turn
clockwise, then retest.
2.3.1 Counting Modes
There are 7 counting modes on the Kolibri Domino
MIX mode
SORT mode
COUNT mode
FACE mode
ORIENT (Orientation) mode
ADD mode
BATCH mode
2.3.2 MIX mode
This mode is available from the home screen by touching the button that corresponds to the
MIX icon, or by touching the MIX icon directly on the touch display.
MIX mode is used to count a stack of mixed denominations. Total number of bills and total
value will be displayed on screen. When operation is complete, you can view a detailed report
by pressing the TOTAL icon on the touch screen, or by pressing the corresponding button.
2.3.3 SORT mode
This mode is available from the home screen by touching the button that corresponds to
the SORT icon, or by touching the SORT icon directly on the touch display.
SORT mode allows the user to count and sort
bills by one denomination which is automatically
determined by the rst bill scanned in a stack. This
can be useful when you have a large strap of one
denomination, but you want to be sure that there
are no bills of other denominations in the strap.
After the rst bill is identied, the machine will stop
every time a bill of a different denomination passes
through the machine. When this occurs, a message
will pop up on screen with directions for the user to
remove the top bill from the stack and
continue counting.
Sort Message
11

The result of this process is a uniform stack of bills of a single denomination. When
operation is complete, you can view a detailed report by pressing the TOTAL icon on
the touch screen, or by pressing the corresponding button.
2.3.4 COUNT mode
This mode is available from the home screen by touching the button that corresponds
to the COUNT icon, or by touching the COUNT icon directly on the touch display.
COUNT mode allows the user to simply count the total number of bills. It does not
recognize or record the denomination of any bills. During COUNT mode, there is no
counterfeit detection active.
2.3.5 FACE mode
AUTO BATCH
FAC E
ORIENT
SORT MENU
This mode is available from the home screen by touching the FACE on the display, or
by selecting FACE/Orientation from the menu.
FACE mode allows the user to sort bills
based on whether they are loaded into the
Domino face up or face down. The rst bill
in the hopper determines the sorting and
counting orientation. If the rst bill through
the machine is face up, all bills in the stack
that are face up will end up in the stacker.
Any time a bill passes through the Domino
that is not face up, the machine will stop
and prompt the user to remove that bill
from the stack. Total number and total
value of the counted bills will be displayed
on the home screen. Face Message
2.3.6 ORIENTATION Mode
This mode is available from the home screen by touching the ORIENT icon on the display, or
by selecting Face/Orientation from the menu.
ORIENTATION mode allows the user to count and
sort bills by one of 4 orientations. The rst bill in
the hopper determines the counting orientation. Any
time a bill passes through the machine and does not
conform to the orientation determined by the rst
bill, the machine will stop and prompt the user to
remove the nonconforming bill from the stack. Total
number and total value of the counted bills will be
displayed on the home screen.
ORIENTATION mode is most effective when used after a stack of bills has already been faced
uniformly by using the FACE mode.
2.3.7 ADD Mode
This mode is available from the home screen by touching the button that corresponds to the
ADD icon on the home screen, or by touch the ADD icon directly.
The addition function provides a cumulative count of bills even across multiple stacks of
bills. For example, the user wants to process 500 bills but the machine can only process
250, which is the limit of the stacker. The user can process the rst 250, then remove the
bills from the stacker and the machine will process the remaining 250 bills and add them to
the running total.
AUTO BATCH
FAC E
ORIENT
SORT MENU
Orientation Message
12 13

2.3.8 BATCH Mode
This mode is available from the home screen by touching the BATCH icon or by
selecting BATCH from the menu.
The BATCH function is used to select a batch
quantity for a specic counting process. With
the BATCH mode active, the machine counts
a preset number of bills and then stops
counting when the batch number has been
reached even if bills remain in the hopper. By
default, opening the batch menu will set the
batch size to 0. From this menu the batch size
can be adjusted by pressing the +1, +10, or
+100 icons, and saved by pressing the enter
icon.
A “BATCH FULL” message will ash on the display when the counting reaches the
preset number. The user can then remove the batch of bills from the stacker and the
machine will automatically count out the next batch.
If there are not enough bills in the hopper to complete a batch, a “BATCH
INCOMPLETE” message will ash on the display. More bills can then be added to the
hopper and the batching can be resumed.
AUTO
BATCH
FAC E ORIENT
SORT MENU
Batch Screen
2.4 After-Count Functions
TOTAL
This function is available from the home screen by
touching the button that corresponds to the TOTAL
icon, or by touching the TOTAL icon directly on the
touch screen.
The TOTAL function adds all of the current
counting results and provides an on-screen report
of the total amount of each denomination counted,
the value of the counted bills of that denomination,
and a grand total value of all bills counted.
2.4.1 Print
This function is available by opening up the counting report by pressing TOTAL and then
pressing the PRINT key. If a printer* is connected, a detailed printout of the counting report
will be produced.
* Printer sold seperately.
Total Screen
14 15

2.5 Menus
The menu can be accessed by pressing the button
that corresponds to the MENU icon or by touching the
MENU icon directly on the touch screen.
1. Batch Opens the Batch screen
2. Face/Orientation Opens the Face/Orientation screen
3. Speed Opens the Speed screen, allowing the user to adjust the count
speed
4. Auto Start Opens the Auto Start screen, allowing the user to toggle between
manual start mode and auto start mode. This screen is also
accessible by touching the Manual/Auto icon on the home
screen.
5. Settings Opens the settings menu allowing access to the following
options:
1. Beeper
Allows the user to toggle the beeping that occurs with every
action
2. Time
Allows the user to adjust the time which appears on the
report printouts
3. Version
Allows the user to see the software version
4. Currency
Allows the user to change currency. Note: USD, CAD, & EUR
are the only currencies available on the Domino at this time
6. Service Menu This menu contains access to delicate sensor settings and
parameters that should only be adjusted by a Kolibri technician.
The menu is password protected to prevent the user from
accidentally adjusting these settings and interfering with the
Domino’s ability to operate.
2.6 Important Safety Notes
When using this unit, basic safety precautions should always be observed, including
the following:
• Do not use this unit in areas where it may be exposed to water or any other liquids
• Make certain the unit is installed on a at surface
• Do not operate the machine in areas with high temperature, humidity or smoke, as
these conditions may prevent proper operation
• This unit is designed for indoor use in a ventilated environment. Keep the machine
away from direct sunlight or strong directional interior lighting and strong magnetic
elds. These could interfere with the counterfeit detection sensors.
• During operation, do not touch the moving parts of the unit
• Avoid allowing foreign objects into the machine attached to your bills such as
staples or paper clips
• Avoid dropping the unit
• When nished operating, ensure there are no bills in the hopper or transport system
• Use a surge protector or power conditioner when possible
• When not using the unit for an extended period of time, disconnect the power cord
from the wall outlet
• Unplug the unit from the wall outlet before cleaning. Use a damp cloth or
specically designed maintenance accessories such as an air duster, soft bristle
brush, or cleaning cards*
• To avoid the risk of electrical shock, do not disassemble this unit. Disassembly will
expose you to dangerous voltages and other safety risks. Incorrect reassembly can
cause electrical shock when the appliance is subsequently used
*
Air duster, soft bristle brush, and cleaning cards sold seperately.
16 17

ERROR MESSAGES
3.
Error message Solution
DENOMINATION
ERROR
While in SORT mode, this error will occur when a bill is passed
that does not conform to the denomination of the rst bill passed
in the stack
ORIENTATION ERROR While in ORIENTATION mode, this error will occur when a bill is
passed that does not conform to the orientation of the rst bill
passed in the stack
FACE ERROR While in FACE mode, this error will occur when a bill is passed
that does not conform to the facing of the rst bill passed in the
stack
CHAIN ERROR This error will occur when bills are pulled through the machine
incorrectly and may cause a miscount
DOUBLE ERROR This error will occur if two bills pass through the machine while
stuck together and may cause a miscount
IMAGE ERROR This error will occur if the machine does not recognize the bill
that was passed through the machine
IR SUSPECT ERROR This error will occur if the machine suspects a bill to be
counterfeit based on Infrared scanning
MG SUSPECT ERROR This error will occur if the machine suspects a bill to be
counterfeit based on magnetic scanning
UV SUSPECT ERROR This error will occur if the machine suspects a bill to be
counterfeit based on ultraviolet scanning
MAINTENANCE, WARRANTY, AND SHIPPING INFO
4.
4.1 Maintenance
WARNING:
This unit has many sophisticated sensors. To keep the machine running
correctly, it requires proper maintenance. If you notice performance has
deteriorated, please clean all sensors prior to calling a technician. Unplug
the machine completely from all electrical sources before attempting any
cleaning process.
All parts of the Kolibri Domino need daily care and cleaning. Pay close attention to the
sensors, which are delicate components. If any dust or other foreign matter adheres to the
sensors, it may cause various problems during operation of the machine.
• To avoid malfunction caused by foreign objects, please clean your machine
every day
• Clean sensors with a dry cloth frequently
• Rubber rollers may be cleaned with a slightly damp cloth. You may use a small
amount of liquid soap on the cloth but the soap residue should be properly removed.
WARNING:
DO NOT use solvents such as thinner, alcohol, etc. to clean the machine.
4.2 Cleaning Procedure
Dirty sensors can cause false errors such as Double and Half errors, and may decrease the
performance of your Kolibri Domino Currency Counter/Discriminator. It is suggested that the
user performs daily maintenance on the unit to maintain top performance.
First, wipe away dust with a soft microber cloth. Then, if needed, clean the sensors using a
can of compressed air (“air duster”, found at any electronics store). If this does not resolve the
issue, continue cleaning with a cotton swab lightly moistened with isopropyl alcohol
18 19


20
4. Close the back door with the calibration paper inside. Turn the machine face
side to yourself to start the calibration process.
5. Go to the MENU => 6. SERVICE MENU (Passcode 0518) => 5. CIS
CALIBRATION.
Press ENTER. The process will take a few seconds.
A message of successful adjustment will show up.
6. Reset the machine by turning it off, then on. The calibration paper will be sent
into the stacker pocket automatically.
7. The CIS calibration is done.
If, after calibrating the unit, this does not resolve the issue, please see the
support section on the Kolibri USA website at www.kolibriusa.com, or contact
Kolibri Support at
21
4.3 Calibration Procedure
The contact image sensor (CIS) of the unit is calibrated properly from the factory.
With regular, basic use, the sensor’s sensitivity decreases which can lead to
IMAGE errors. To resolve this issue, the unit can be re-calibrated.
Please follow the steps below to calibrate the sensor:
1. Ensure the machine is turned ON.
2. Turn the machine backside front.
3. Open the back door. Put provided laminated calibration card inside the back door opening.
To make sure the calibration card is
properly loaded look at the machine
from the front side. The calibration card
edge should not reach the stacker
pocket area (white plastic guide).

22
4.4 Trouble Shooting
Error message display:
Issue Procedure Reference
UV SUSPECT
Error (Excessive)
1. Clean ultra violet (UV) sensors
2. Lower or deactivate UV sensitivity
Cleaning Procedure (See page 19)
Calibration Procedure (See page 20)
MG SUSPECT
Error (Excessive)
1. Clean magnetic (MG) sensors
2. Lower or deactivate MG sensitivity
IR SUSPECT Error
(Excessive)
1. Clean contact image sensor (CIS) lines
2. Lower or deactivate IR sensitivity
DOUBLE Error
(Excessive)
1. Clean contact image sensor (CIS) lines
2. Lower or deactivate CIS sensitivity
IMAGE Error
(Excessive)
1. Clean counting sensors
2. Lower or deactivate CIS sensitivity
1. Clean contact image sensor (CIS) lines
2. Lower or deactivate ID sensitivity
Hopper Clean Hopper sensor
Stacker 1. Clean Stacker sensor
2. Stacker panel replacement
Motor 1. Turn off unit and remove any jammed bills
or foreign objects
2. Check if drive belt damaged (+ send part)
Chain Error
(excessive)
1. Adjust Feed Gap
2. Load Bills Properly Bill Loading Procedure (See page 6)
Feed Gap Adjustment Procedure
(See page 8)
CHECK PS1 Check if the upper door is open or a bill
exists in the bill path
CHECK PS2 Check if lower door is open or a
bill exists in the bill path
Issue Procedure Reference
Unit Does Not Turn On 1. Ensure power cord is plugged in
2. Check fuse and replace if
damaged (under power outlet)
UNIT DOES NOT
DETECT COUNTERFEIT
1. Clean ALL sensors
2. Recalibrate unit
Bill Loading Procedure (See page 6)
Feed Gap Adjustment Procedure
(See page 8)
Cleaning Procedure (See page 19)
Calibration Procedure (See page 20)
BILLS DON’T FEED
SMOOTHLY OR
JAMS
1. Clean sensors
2. Adjust feed gap
3. Load bills properly
4. NOTE: If CAD, send in to upgrade
with the latest software
1. Turn off unit and clean foreign
objects present in bill path
2. Adjust feed gap
3. Check if the pocket guide loosen
4. Align bills
5. Load bills properly
MOTOR/ROLLERS
KEEP TURNING
1. Turn off/on unit
2. Clean sensors
MOTOR/ROLLERS
DO NOT ROTATE
1. Turn off unit and remove any
jammed bills or foreign object.
2. Check if drive belt damaged
(plus send part)
Please contact Kolibri support at
1-877-898-8750
MOTOR/ROLLERS
KEEP TURNING
1. Ensure lid is properly closed
2. Turn unit off/on
UPGRADE UNIT 1. All units come with the latest
software
2. No software update at the
moment
23

24
4.5 Warranty
Warranty is effective for a period of one year from the date of purchase. In most cases,
malfunctions can be resolved by cleaning the unit.
• Customer should allow the manufacturer the time and opportunity to test and diagnose
the machine to determine warranty and non-warranty claims
• After receiving and unpacking the unit, customer shall keep the package and its user
manual. Warranties are canceled in the event the device is transported in a non-original
packaging or operation/maintenance conditions are not met
• Company is not responsible for unit malfunction due to improper maintenance, storage,
or transportation including, but not limited to mechanical damage
• Manufacturer is entitled to introduce updated software, not described in the current user
manual
Non-Warranty Service:
The manufacturer can perform maintenance and cleaning for an extra fee. For a non-warranty
repair or maintenance quotation, contact our Technical Support team.
Warranty service is not available in the following cases:
• Cleaning of the unit from dust and mud
• Operation or maintenance rules requirements set in the user manual are not met
• There is mechanical damage to the unit or the sealed portions of the unit have been
opened or tampered with
• There are foreign objects or liquid inside the unit
4.6 Shipping
The warranty does not cover shipping cost to or from our Technical Service Center.
Technical Support contact information:
www.kolibriusa.com/support
When contacting Technical Support, please have the following available:
• Product Model – Located on the back side of your currency discriminator
• Serial Number – Located on the back side of your currency counter
• Nature of the problem – What happened, and when did it happen? Did the machine
display an error message?
• Steps already taken to resolve the problem, and the results
4.7 Specications
Feeding system: Roller friction
Counting speed: 800/1000/1200 bills/min
Hopper capacity: 600 bills (uncirculated)
Stacker capacity: 250 bills (uncirculated)
Banknote size range: 120x60. 180x90 mm
Display: 3.2” LCD Touch Screen
Interface: RJ-11, RJ-45, RS-232, USB
Detection: MG, UV, IR, CIS
Power Supply: 110-240V, 50/60Hz
Size (WxDxH): 10.5” x 9.5” x 11”
Weight: 14 lbs (6.4kg)
Ambient Temperature: 50 F – 95 F (10 C – 35 C) Relative humidity below
the dew point not permissible: 20%-90% r.h. (Non
– condensing)
4.8 Contact Information
For technical support, call 1-877-898-8750
or visit www.kolibriusa.com/faq-domino/
When contacting Technical Support, please have the following available:
• Product Model – Located on the back side of the machine.
• Serial Number – Located on the bottom of the machine.
• Nature of the problem – What happened, and when did it happen? Did the
machine display an error message?
• Steps already taken to resolve the problem, and the results.
25

Kolibri
©2019 Printed in China.
Specications subject to change without notice.
www.KolibriUSA.com
FNDOMINO062019
Other manuals for Domino
1
Table of contents
Other Kolibri Bank Note Validator manuals