Laelaps BT 10.0 User manual

User Manual
Please read it because there is some information that we
thought was helpful and there are some of the usual legal
notices that we were told we needed to tell you.
Please check back frequently for updates to features and instructions.
Revision 08072017

2
Index
Laelaps® System and Requirements……………………………………………………….…………...3
Charging Your Laelaps® Gateway/Communicator and Collar(s)……………………………4
Laelaps® Hardware Operations……………………………………………………………….……………5
Laelaps® App Operations……………………………………….……………………………….……………9
Connecting to a Gateway to the Laelaps® App…………..…………………………………..….11
Adding Collar(s) to the Gateway ………………………………………………………………………..11
Enabling GPS Position Transmission…………………………………………………………………...12
Changing a Collar Name………………………………………………………………………………….….12
Deleting a Collar from a Gateway………………………………………..………………………….….13
Changing a Gateway Name…………………………………….…………………………………………..14
Collar Menu Features.………………………………………………………………………………………..15
Using the Laelaps® Map ……………………………………………………………………………......….16
Data / Stats Menu …………………………………………………………………………………………….17
Path Replays ……………………………………………………………………………………………….17
Settings Menu…………………………………………….……………………………………………………..17
Capturing Offline Maps………………………..……………………………………………………...17
Manage Map Data…………………..…………..……………………………………………………...18
Delete Data………………….…….………………..……………………………………………………...18
Reset Devices…………….…….…………………..……………………………………………………...18
Controlling the LED Beacon on and off………………………………………………………………..19
Waypoints .…………………………………………..……………………………………………………………20
Manual Firmware Updates………………………………………………………………………………….21
How Laelaps® works……………………………………………………………….………………………….22
How to get the best range and GPS signal……………………………………….………………….22
Legal Restrictions…………………………………………………………………………….………………….22
FCC Notice ………………………………………………………………………………………………………….23
Warranty and additional information ……………..………………………………………………….24

3
Laelaps ® System and Requirements
WARNING - The Laelaps® system is really easy to use! The Laelaps® App was
designed to be easy to use and intuitive on your smartphone or tablet.
Please spend a few minutes getting familiar with the Laelaps® components,
downloading the App from either Apple’s iTunes Store (iOS) or Google’s Play
Store (Android) and reading this User Guide and you will be tracking your dog
anywhere quickly.
No complicated handheld devices or searching through menu after menu for basic
functions. Swipe. Tap. Easy… Laelaps® - it’s All About the Dog!
PERSONAL SMART PHONE / DEVICE SYSTEM REQUIREMENTS:
•Bluetooth 4.0 or higher
•Android 4.4 or higher
•iOS 10.2 or higher
WARNING!
Your Laelaps® System includes:
Laelaps® BT 10.0 Gateway/Communicator
Review the Safety and Product Information found in the Laelaps® box for important product
warnings and other safety information.
Clip Strap
LED Indicators
Charger Contacts
Power / Connect
Button
Antenna Screw Port
Antenna

4
Laelaps® DTC 10.0 Tracking Collar
Charger + Charger Adapter 1.0mmm Antenna + Wrench
Collar Strap
LED Indicators
Charger Contacts
Power / Connect
Button
Antenna Screw Port
Antenna
LED Beacon
Micro-USB Charger
Charger Adapter

5
Charging Your Laelaps ® Gateway/Communicator and Collar(s)
Prior to using your LAELAPS ® Tracking System, WE RECOMMEND A FULL Charge (approx. 4-hours) FOR
EACH GATEWAY AND COLLAR.
FIDO (Function, Input & Device Output) Panel:
Located on the side of the Gateway/Communicator and Collar housings, the FIDO Panel charges
and powers the device On/Off. LED lights indicate important communication interactions and
charging status. The FIDO Panel functions the same for the Gateway/Communicator and Collar.
1. Insert the micro-USB plug on the end of the Charger cord into the back of the Charger
Adapter.
2. Place the narrow end of the Charger Adapter onto the FIDO panel toward the LED
indicators aligning the two gold-plated Charging Adapter magnets with the two gold-
plated Device Charger Contacts - allowing the magnets to align themselves and connect
properly. The Charging system is designed to disconnect if either the cord or device is
pulled away in order to reduce possible connector damage.
3. Plug the Charger into a wall outlet supplying 110-240V AC power.
4. The LED may or may not illuminate depending on Power State when connected.
5. The LED will be SOLID (green) showing Charger Connection.
6. The LED will be:
SOLID (red) during Fast Charging - to fully charged (100%)
FLASHING (red) during Trickle Charging –system may trickle charge for up to 2 hours
after fully charged (100%)
OFF when Trickle Charging is complete
For optimal performance, we suggest you clean and dry the Charging Contacts on the device (and the
Charger Adapter) with a microfiber cloth or cotton swab before charging or if the charging indicator
does not turn on when connected. Visually inspect them for foreign debris or damage which may
impact contact resistance.
Charger
LED Indicators
Charger Contacts
Power / Connect
Button
FIDO Panel
Device

6
WE UNDERSTAND HOW IMPORTANT BATTERY LIFE IS AND HAVE DESIGNED IT TO BE THE
BEST SOLUTION AVAILABLE. LAELAPS® PREMIUM BATTERIES ARE DESIGNED TO LAST UP
TO 36 HOURS ON A FULL CHARGE. TRICKLE CHARGING PROVIDES A LITTLE ADDITIONAL
CHARGE BEYOND WHAT WE CONSIDER A FULL CHARGE –WE LIKE TO THINK OF IT AS A
BONUS.
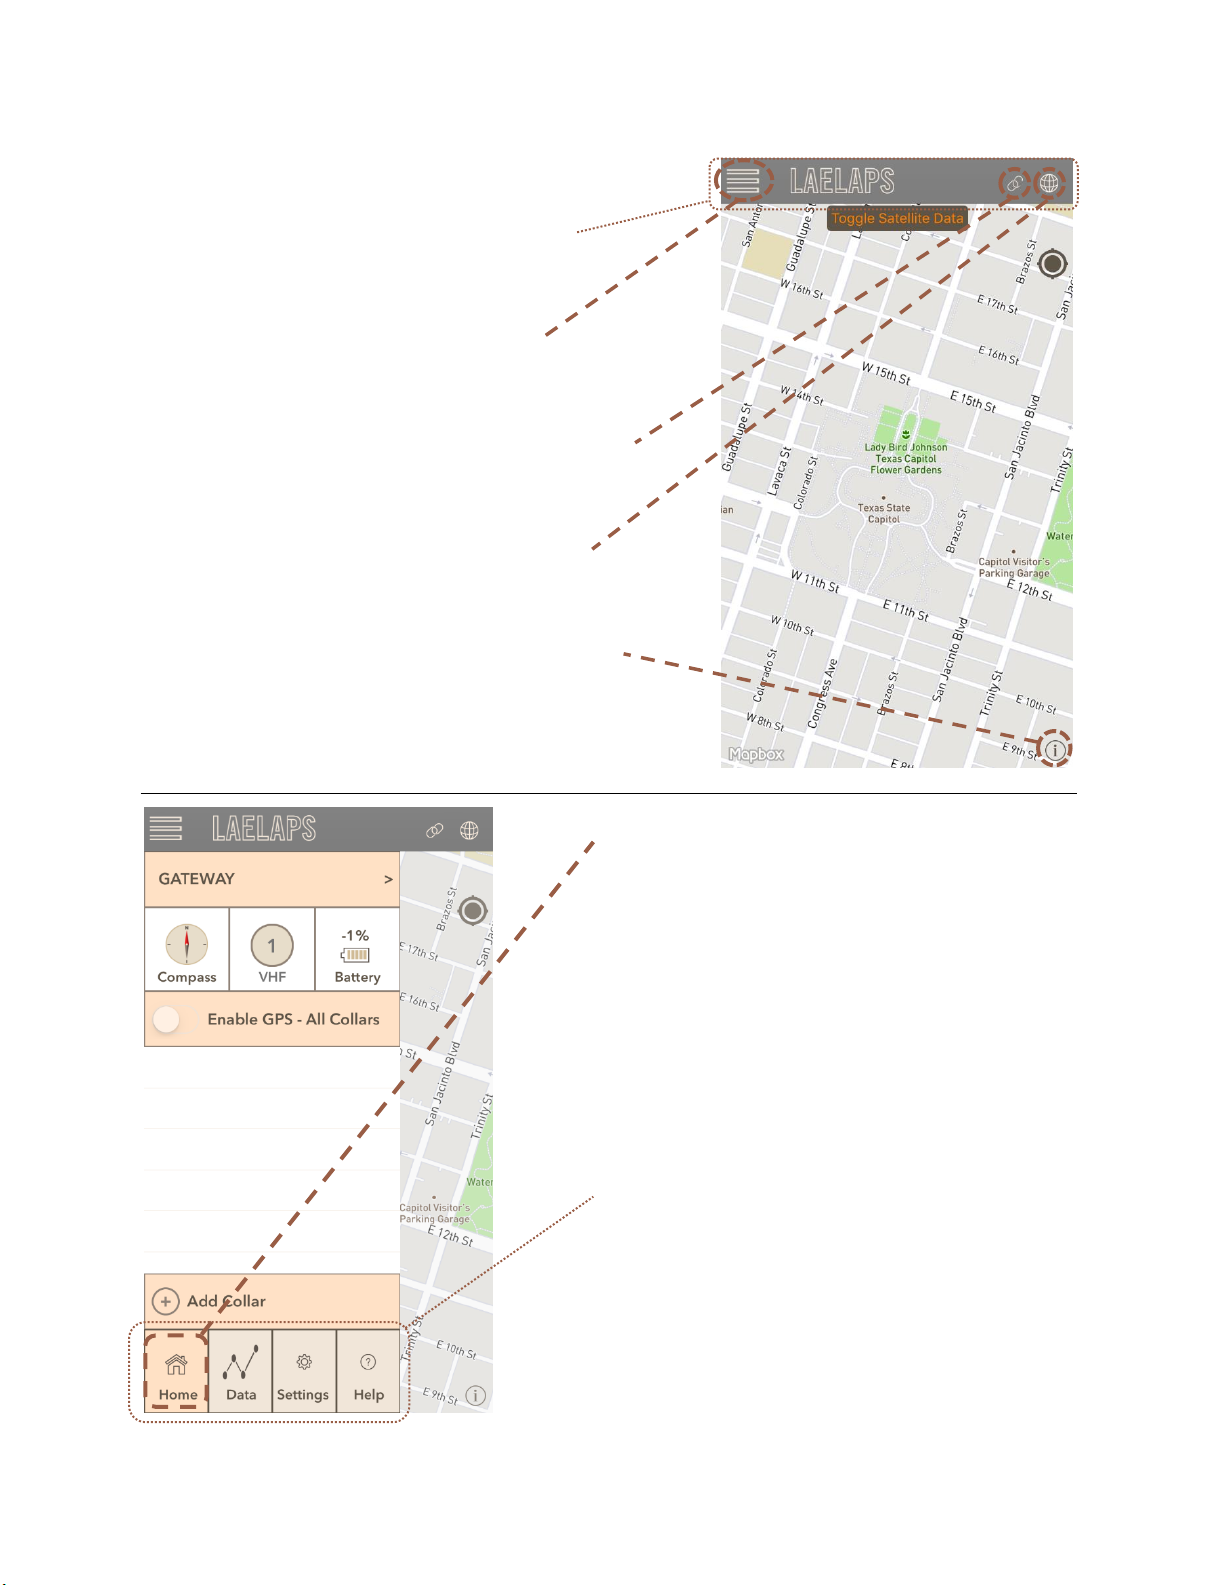
•A FULL CHARGE IS ADVISED BEFORE EACH OUTING. IT IS EASY TO CHECK BATTERY
STATUS IN THE APP WHEN THE DEVICE IS CONNECTED.
•KEEP YOUR DEVICE BATTERIES FULLY CHARGED TO EXTEND SYSTEM LIFE AND REDUCE
THE POSSIBILITY OF A LOST DOG.
•KEEP YOUR PHONE OR TABLET RUNNING AS FULLY CHARGED AS PRACTICAL.
•SOME USERS PREFER TO MAXIMIZE THEIR PHONE/TABLET BATTERY LIFE BY:
oTURNING OFF OTHER APPS
oMINIMIZING SCREEN BRIGHTNESS
oTURNING OFF CELLULAR AND WiFi WHEN OUTSIDE OF SERVICE AREA(S)
IT’S ALL ABOUT THE DOG...
WARNING –Laelaps® Gateways/Communicators and Collars contain lithium-ion
batteries. Store these devices away from direct sunlight or extreme heat to avoid the
possibility of personal injury or damage to the devices. Do Not Attempt to access or
service the Batteries!
•Do not submerge the device or batteries in water or other liquids.
•Do not leave the device exposed to a heat source or in a high-temperature location,
such as in the sun in an unattended vehicle.
•Contact your local waste disposal department to dispose of the device/batteries in
accordance with applicable local laws and regulations.
•Do not disassemble, modify, remanufacture, puncture or damage the device or
batteries.
•Do not expose the device or batteries to fire, explosion, or other hazard.
•Do not use a sharp object to remove the removable batteries.
KEEP BATTERIES AWAY FROM CHILDREN,
NEVER PUT BATTERIES IN MOUTH. Swallowing can lead to chemical burns,
perforation of soft tissue, and death. Severe burns can occur within hours of
ingestion. Seek medical attention immediately.
•When using an external battery charger, only use the Laelaps® accessory or other UL
Listed charger rated for a minimum of 1A Output.
•If your device requires battery replacement, contact your Laelaps® dealer or the
Laelaps® website. Do not attempt to replace the battery yourself.
•Do not leave the device where a dog may attempt to chew on it. If the battery cell is
punctured, electrolyte can be released that can be harmful to the dog and risk fire or
explosion.

7
Laelaps® Hardware Operations:
WARNING
Tracking Collar (DTC 10.0)
IMPORTANT –Laelaps® GPS Tracking Collars (Collar) have extremely fast GPS Acquisition locking
times, but we still recommend to turn on the Collar(s) first as the time to acquire adequate signal
depends on the current environment and position - preferably outside with a clear view of the sky.
GPS acquisition will take longer and use more power if attempted inside a structure or under a roof.
Power ON and Advertising Mode:
1. Press the Power Button on the Collar FIDO Panel once to turn Power ON - see figure on pg.3
a. LED will flash (red) once, then turns off
b. LED will FAST flash (green) 3 times, then turns off
c. LED will turn (red) for 3 seconds, then turns off
d. LED will FAST flash (green) for 30 seconds (ADVERTISING mode active) and then
SLOW flash but does not power off
The FAST flashing (green) LED indicates the Collar is ADVERTISING and ready to
connect to a Gateway.
2. Repeat steps 1-3 for each Collar that will be tracked during your activity (Laelaps® tracks up to
20 Collars).
The Collar ADVERTISING mode can be re-activated simply by pressing the Power / Connect
Button quickly. The LED will FAST flash (green) per Step 1.d. above. Repeat as needed for
additional collars.
Power Off:
1. Hold down the Power Button on the FIDO Panel for 5 seconds until the Collar LED flashes
(red) - release quickly. This turns the Collar off (all LEDs will be off).
Laelaps® Gateways/Communicators and Collars utilize extremely thin, strong, and flexible NiTi
antennas for durability and optimal performance. Use outdoors only –do not use indoors.
Antennas are shipped in a loop –NEVER remove any loops NEVER use a broken or frayed antenna.
NEVER use antenna if the protective tip is damaged or missing. IMMEDIATELY replace any
damaged or missing antennas ONLY with a Laelaps approved replacement.
Exercise caution when operating these devices to prevent possible personal injury to the yourself,
others in the vicinity, or to your canine companion(s). Do not leave the dog device (collar) where a
dog may chew on it. Remove collars from dogs placed in crates.
Keep Laelaps® devices (collars and gateways/communicators) away from children.

8
Gateway/Communicator (BT 10.0)
Power On and Advertising Mode:
1. Press the Power Button on the Gateway FIDO Panel once to Power ON - see figure on pg.4
a. LED will flash (red) once, then turns off
b. LED will FAST flash (green) 2 times,then SLOW flash (green) 1 time, then turns off
c. LED will turn (red) for 3 seconds, then turns off
d. LED will FAST flash (green) for 3 minutes (ADVERTISING mode active) and then
SLOW flash but does not power off
The FAST flashing (green) LED indicates the Collar is ADVERTISING and ready to
connect to the App on your device.
Gateway/Communicator ADVERTISING mode can be re-activated simply by pressing
the Power / Connect Button quickly. The LED will FAST flash (green) per Step 1.d.
above.
Power Off:
1. Hold down the Power Button on the FIDO Panel for 5 seconds until the Gateway/Communicator
LED flashes (red) - release quickly. This turns the Gateway/Communicator off (all LEDs will
be off).

9
Laelaps® App Operation
Your system requires the Laelaps® App to be downloaded to a user
Android or iOS device (phone or tablet). This can be obtained searching for
“Laelaps” in the Play Store for Android or App Store for iOS.
The App has been designed to be powerful but simple and intuitive to use. It
can also run in the background and allow normal use of your phone or tablet
while still tracking your dog. You can use live maps (locations where your
device has service) or download maps ahead of time for use off-line (locations
where your device does NOT have service).

10
Main Screen
After you have
downloaded the App
from the store, launch
the App by tapping on
the App Icon.
Familiarize yourself
with the basic Main
Screen features on
this page.
Home Menu
Most interaction with the devices will take
place in the Home Menu. This is easily accessed
at any time by tapping the 3 lines and Laelaps
name in the Home Menu bar (above).
Pressing the Menu Button (above) or tapping
on the map will close this menu.
Data, Settings, and Help Menus
These menus are selected by pressing the
appropriate button at the bottom of the
screen.
Pressing the Menu Button (above) or tapping
on the map will close this menu.
Home Menu Bar
Menu Button
Gateway Link Button
About (versions)
Mapbox info button

11
Connecting a Gateway to the Laelaps® App:
1. Ensure that your Gateway/Communicator is in ADVERTISING mode indicated by the LED FAST
flashing (green) –see “Gateway - Power on and Advertising” p.7-8
2. Tap the open chain icon in the top right corner of
Home Menu Bar.
3. This opens the Gateway connection window.
4. Tap Gateway name when it appears in pop up box.
NOTE: Your Gateway ships named GATEWAY and
can be changed after connecting (see “Changing
Gateway Name”page X).
5. Successful connection is indicated with a closed chain
icon in the menu bar. Success!
Adding Collar(s) to the Gateway:
1. Make sure Collar is advertising ( rapid green
LED flashes –see “Collar – Power on and
Advertising”, p.7)
2. Press the Add Collar Button in the Home Menu
to open the Add Collar Menu.
3. The Collar Bar will
indicate “scanning”.
If you do not see
the collar scroll
down in the list.
4. Tap the collar you
wish to add from
the list.
NOTE: Collar names can be changed after
connecting (see “Changing Collar Name” page X)
Collar will appear in the Collar Menu.
5. Repeat for additional Collars (20 total)

12
Enabling GPS Position Transmission
1. After connecting Collar(s) to the Gateway (see “Adding and connecting to a Collar” (p.7), open
Home Menu (p.10)
2. In Home Menu either:
•Tap the bubble to the left of Enable GPS –All
Collars to activate GPS on ALL connected Collars
or
•Tap the bubble to the left of Collar name to
activate GPS on select Collars
3. Bubbles will turn green when GPS is Active
•LED flashes (red) on Gateway FIDO Panel
indicating successful transmission.
•A Collar GPS icon will appear on map when
position is acquired.
•Collar Battery Level will update when GPS position
is acquired.
4. Tap the Menu Button or tap on the map to close
this menu.
Changing a Collar Name:
1. Access the Home Menu (p.11)
2. Tap the area to the right of the GPS bubble for the Collar you are
renaming.
3. Tap Edit Button in upper right corner of Collar menu bar

13
4. Type in your choice of name using the keyboard at the
bottom and tap Done Button or the Return Key when
you are finished to save the new name. Long names
are permitted and may be truncated in the previous
screen.
The name will be stored in the Collar, the Gateway, and
the App. You will not have to update if you switch any
of these in the future. Simple.
HINT: Overachievers can change Collar Color and other
attributes at this time unless you want to wait till we
provide directions later.
5. Tap <Back to return to the Home Menu.
Deleting a Collar from a Gateway:
1. Access the Home Menu (p.11)
2. Tap the area to the right of the GPS bubble for the Collar you are
deleting.
3. Scroll to the bottom of the Collar menu by either:
•Placing your finger on the bottom of the screen and
moving it upward without lifting (your finger) until it
stops
or
•Tap on the Down button
4. Tap the Delete Collar button at the bottom of the
screen.
5. The Delete Collar confirmation menu will pop-up. Select the Delete button
to permanently delete the Collar from the Gateway (and App) or the Cancel
button to return to close the pop-up and return to the Collar menu.
6. Tap the < Back Button in the Home Menu Bar at the top to return to the Home menu.

14
Changing a Gateway Name:
1. With the Gateway connected to the App (see
Connecting a Gateway to the Laelaps® App on p.12),
access the Home Menu (p.11)
2. Tap the Gateway button in the Home Menu.
3. Tap the Edit Button in upper right corner of Gateway
menu bar
4. Type in your choice of name using the keyboard at the
bottom and tap Done Button or the Return Key when
you are finished to save the new name. Long names are
permitted and may be truncated in the previous screen.
The name will be stored in the Gateway and the App.
You will not have to update if you switch any of these
in the future.
5. Tap <Back to return to the Home Menu.

15
Collar Features:
The Laelaps® Collar has numerous advanced features which are
all selectable in the Collar Menu.
Collar name can be changed (p.13-14).
Connection via VHF will indicate (green) when active and
(empty) when disconnected.
Battery indicates the percent charge remaining.
Location Last Updated indicates the last day and time a GPS
location was received from the collar.
Distance Away indicates the distance from the collar’s last
known location to your device’s GPS position.
Collar Color is selectable by tapping on the button.
GPS module is turned On / Off by tapping. Turning Off
stops the transmission of collar location and saves battery.
VHF Transmission Interval is adjusted by tapping the button
and selecting between 1 -60 seconds. Selecting a lower value
will provide more frequent locations and uses more power.
Different collars may be set to different intervals unless there is
not enough bandwidth on the frequency and the Gateway will
adjust to make sure that each collar is transmitting as often as it
can without losing transmissions from other collars.
VHF Channel may be adjusted if you believe you have
interference in the area. Individual Collars may be adjusted in
the Collar menu if they were not changed in the Gateway menu.
It is best to only use this option if you have already changed
channels in the Gateway menu and experienced a lost collar due
to interference of poor signal quality.
LED Beacon can be set to Off/Low/Medium/High. Turning it off
will turn the Beacon completely off even if it was turned on in
LED Strobe.
LED Strobe will flash the LED Beacon on High. Turning it off will
turn the Beacon completely off.
Point Sensitivity can be set to Off/Low/Medium/High. The Collar icon on the map will change from
when the collar is in motion to when the dog is on point. The direction of the arrow indicates the
direction the dog is/was traveling.
Tree Sensitivity can be set to Off/Low/Medium/High. The Collar icon on the map will change from
(arrow direction indicates the direction the dog is traveling) when the collar is in motion to when the
dog is treed its quarry.
Alert Volume sets the volume of the notification of a Point/Tree/Lost event on your device. Set it loud
enough to hear taking into account your environment.
Vibrate generates a vibration in the collar to communicate a command to the dog.
Breadcrumb show past collar positions on the current map. Breadcrumbs are color coded to the collar
and are selectable on an individual collar basis.
Delete Collar is used to remove a previously connected (paired) collar.

16
Using the Laelaps® Maps:
WARNING
NOTE: Maps are sourced through Mapbox and are the current versions when cached.
Please check when online for updated versions. In order to download maps, you will
need to be connected to the internet either by Wifi or through your cellular carrier.
Changing Map View:
1. Place two (2) finger on the device screen and manipulate as follows:
•Move around to relocate the center of the map by panning
•Spread 2 fingers outward to zoom in
•Pinch 2 fingers inward to zoom out
•Tap the screen 2 times to zoom 2x
•Twist your fingers to rotate
2. To re-center the map on the location of the device running the App, tap the button on the map
3. To reset to North Up, tap the button in the top right corner of the map
Toggle Satellite View:
1. Tap the button at the top right corner of the map to toggle between Map and Satellite
image.
Laelaps® maps and mapping functions are intended for recreational use only. The information
provided is for tracking of dogs, horses, other animals or assets and is NOT intended for vehicle
navigation nor does it replace the information presented by your own personal observations.
Laelaps® maps utilizes a combination of governmental and private data sources. Virtually all
data sources contain some inaccurate or incomplete data. The User bears full responsibility for
awareness of their actual location and familiarity with the area should be aware of current
location and notify local authorities.

17
Data Menu (Initially an iOS data log)
Stats Menu
The Laelaps® Gateway has a large buffer to store all of the information about your excursion and transfer
it to your device App storage.
Path Replay
Laelaps® allows the User to replay the path each collar has traveled for a specific period of time.
1. Access the Laelaps Menu. (page XX)
2. Tap <Data> icon at the bottom of the Main Menu.
3. Tap <Review Stats> to specify times on a calendar or Stat Log to pull up most recent activity.
4. <Review Stats>: choose a Start and End time on the <Calendar>; <Stat Log> choose the event you
want to replay.
5. Choose how fast the replay goes (X2, X10, X100) at the bottom of the screen.
6. Tap Play to start
7. Individual Collar paths can be viewed or hidden by tapping their individual bubble at the top of
the playback window. NEED MULTIPLE COLLAR PIC
Settings Menu
The Laelaps® App utilizes your device storage store all of the information about your excursion in addition
to any maps you have captured (cached) for offline use. To avoid data usage, it is suggested that maps be
captured when connected to the internet via WiFi.
Capturing Maps for Offline Use: (Initially limited to Android version only –iOS update in progress)
Maps must be downloaded ahead of time to be used offline. We recommend a stable high speed internet
connection for quickest download
1. Locate the area you want to have available for offline mapping on Home map screen.
2. Open the Home Menu (p.11)
3. In Home Menu tap the icon at the bottom of the screen
4. Choose either <Capture Topography Map> or <Capture Satellite Map>.
5. Once you have chosen the map type and the area tap “Capture Topo” or “Capture Satellite” in the
top right corner of the screen in the Laelaps app menu bar pictured below
6. This brings up the Map Set name dialog box pictured below; Tap <Type New Map Set name> to
assign a name to the downloaded map area.
7. This brings up a status bar that show download progress picture below
8. When map is downloaded you will get a Home notification in you device’s Notification drawer
and an Offline Cache Download Complete notification if you swipe down
9. The downloaded map will also appear on the screen

18
NOTE: Downloaded maps are accessible from your personal device when it is viewing the actual area
captured and the correct map type is selected (see “Changing Map View above)
Manage Map Data permits the user to rename and delete maps in this menu.
Delete Data will delete all of the application data including connected
Gateways, Collars, and their historical data. If you select this button, a
confirmation window will pop-up.Tap on Delete Data to PERMANENTLY
DELETE ALL of your data from the App. Tap Cancel to return to the previous
menu without deleting any data.
Reset Device will reset the selected Gateway/Communicator or Collar to the
factory default. This will also DELETE DATA associated with that particular
device. If you delete a Gateway, you will DELETE ALL DATA of any associated
collars stored on the smart device. Tap on Reset Device to reset the device
to the factory default. Tap Cancel to return to the previous menu without
resetting the device.

19
Controlling the Beacon LED:
The Laelaps® Beacon White LED is located on the GPS housing on the Collar to assist in finding your dog
(or collar) in poor light conditions.
•LED Beacon can be set to Off/Low/Medium/High. Turning it off will turn the Beacon off including
Strobe feature.
•LED Strobe will flash the LED Beacon on High when turned on. Turning it off will turn the Beacon
completely off.
LED Beacon Control
1. Access the Home Menu (p.11)
2. Tap the area to the right of the GPS bubble for the Collar you are
turning on the Beacon on.
3. Tap the LED Beacon Button to open the selection
pop-up menu. The current setting is shown to the left
of the button.
4. In the pop-up menu, scroll up or down to your preferred setting, then press
the Save Button. The LED light on Collar’s GPS housing will respond
accordingly.
5. You can turn the LED off using the same steps.
LED Strobe Control
1. Access the Home Menu (p.11)
2. Tap the area to the right of the GPS bubble for the Collar you are
turning on the Beacon on.
3. Tap the Strobe bubble to the right of Strobe to
activate the LED Strobe. The Strobe will be green
when active.
4. Tap Strobe bubble to deactivate the LED Strobe.

20
Waypoints: (Initially limited to Android version only –iOS update in progress)
Keep track of the events and places you encounter with your dog with Laelaps® easy-to-use waypoint
(pin drop) system.
Adding a Waypoint:
1. Tap the map where you would like to set a waypoint.
2. This menu will appear:
3. Tap <Pick Collar> if you want to associate the waypoint
with a specific Collar (not required).
4. Tap one of the pre-programmed waypoint options
<Covey>, <Truck>, <Camp> or <Pin> to drop these
waypoints on the map
5. You can also track Shots Fired or Birds Flushed or input
personal notes in <Additional Notes> by tapping these
areas and inputting numbers or notes
6. Tap <Save> at the top right of the screen and your
waypoint will appear on the map.
Tapping a waypoint on the map brings up the information
recorded for that particular mark.
Deleting a Waypoint:
1. Tap an existing waypoint on the map
2. Tap <Delete> in the top right corner of the waypoint
data screen.
Table of contents
Other Laelaps Pet Care Product manuals
Popular Pet Care Product manuals by other brands

Prevue Pet Products
Prevue Pet Products Catville quick start guide

Bimar
Bimar PSK1A Instruction booklet

Famree
Famree Smart Cat Litter Box user manual

Dogtra
Dogtra 180NCP Series owner's manual

Safety Step Products
Safety Step Products Picket Play Fencing Assembly instructions

Silicon Graphics
Silicon Graphics PETBLE SmartTag instruction manual