L&L Kiln Mfg, Inc. VENT-SURE DOWNDRAFT User manual

L&L VENT-SURE DOWNDRAFT KILN VENT INSTRUCTIONS
ventsure-instruct.pdf REV: 8/1/2017 Page 1
© 2017 L&L Kiln Mfg, Inc. 505 Sharptown Rd, Swedesboro NJ 08085 856.294.0077 F:856.294.0070 [email protected] hotkilns.com
TABLE OF CONTENTS READ THE INSTRUCTIONS
You are now the proud owner of an L&L “VENT-SURE”
kiln ventilation system, engineered to give you the utmost
in performance and results. This is an expensive and
potentially hazardous appliance (if not used with proper
caution). PLEASE TAKE THE TIME TO READ THESE
INSTRUCTIONS. There is important information that you
need to understand in order to operate your L&L kiln
ventilation system safely and effectively.
USEFUL WEB LINKS
See this video on how to install a vent:
hotkilns.com/install-vent-sure
See this video on how to drill holes for a vent:
hotkilns.com/drilling-holes-vent-sure-vent-system
TABLE OF CONTENTS ................................................................. 1
READ THE INSTRUCTIONS ......................................................... 1
USEFUL WEB LINKS..................................................................... 1
CHECKING SHIPMENT................................................................. 2
WHAT IS INCLUDED WITH VENT................................................ 2
IMPORTANT CAUTIONS............................................................... 2
INSTALLATION TIP BEFORE STARTING .................................... 2
INTRODUCTION............................................................................ 3
KILN VENTILATION CAUTIONS ................................................... 3
INSTALLATION.............................................................................. 3
ROOM AIR REPLACEMENT ......................................................... 4
DRILL CHART................................................................................ 5
OPERATION .................................................................................. 5
ADJUSTING THE BYPASS SYSTEM .......................................... 5
VENTING CODES.......................................................................... 6
REGULAR MAINTENANCE........................................................... 6
INSTALLATION OF MULTIPLE VENTS ........................................ 6
OPTIONAL VENT CONTROL........................................................ 7
FREQUENTLY ASKED QUESTIONS............................................ 7
FEATURES AND SPECIFICATIONS............................................. 9
MOTOR SPECIFICATIONS ......................................................... 10
PARTS.......................................................................................... 10

L&L VENT-SURE DOWNDRAFT KILN VENT INSTRUCTIONS
ventsure-instruct.pdf REV: 8/1/2017 Page 2
© 2017 L&L Kiln Mfg, Inc. 505 Sharptown Rd, Swedesboro NJ 08085 856.294.0077 F:856.294.0070 [email protected] hotkilns.com
Bypass/Collection Box
Slide
Adjustment
Flex Duct
Wall
Plate
12” Exhaust Pipe
Motor
Inlet
Duct Vent System Blower Motor
IMPORTANT CAUTIONS
Check duct occasionally to see if there is wax or other
residual build up. Wax could condense in the duct,
which is a potential fire hazard. This is especially
important if you are using a wax resist.
Be sure that the exhaust of the vent is not being brought
back into your building. Keep exit of vent at least four feet
away from any open windows or doors.
We recommend the use of a carbon monoxide monitor in
your kiln room. These are available from good hardware
stores for about $50 (This is another good way to be sure
you are getting proper venting).
Disconnect power cord from power source when doing any
maintenance on the fan motor. Do not put your fingers inside
the blower without disconnecting power. Blower may start
unexpectedly because of automatic thermal shut off switch
built into the motor.
DO NOT place anything in the blower/motor while powered.
Serious injury and/or damage to the motor could result.
INSTALLATION TIP BEFORE STARTING
NOTE: Attach the Bypass Box to the stand and the
aluminum duct to the Bypass Box before installing the
kiln on the stand because it can be hard to do this when
the kiln is on top of the stand.
CHECKING SHIPMENT
Your ventilation system was carefully packed and inspected
prior to shipment to make sure that all parts were in perfect
condition.
When carrier makes delivery, you should immediately unpack
your ventilation system and accessories to determine
whether or not any damage has occurred in transit.
If damage has occurred, retain all of the packaging material
and notify L&L at once. Retain all papers to ensure that a
proper claim can be filed.
WHAT IS INCLUDED WITH VENT
One (1) wall-mounted blower mounted on a bracket with vent
pipe to go through outside wall and a Motor Inlet Duct. An 8
foot power cord with an attached On/Off switch plugs into a
120 volt standard receptacle. (Note: 220-240 volt models will
have a different cord).
One (1) Bypass Collection Box to be mounted to the kiln
stand, with mounting hardware.
One (1) length of flexible aluminum ducting (expands to 15
feet) with two (2) hose clamps.
One (1) 4” diameter 90 degree elbow (for outside the
building).

L&L VENT-SURE DOWNDRAFT KILN VENT INSTRUCTIONS
ventsure-instruct.pdf REV: 8/1/2017 Page 3
© 2017 L&L Kiln Mfg, Inc. 505 Sharptown Rd, Swedesboro NJ 08085 856.294.0077 F:856.294.0070 [email protected] hotkilns.com
INTRODUCTION
WHAT DOES THE VENT DO?
The Vent-Sure Kiln Ventilation System is designed to pull
air contaminated with carbon monoxide and other fumes
including those of volatile metals, decals, sulfur oxide, and
others in a down draft fashion out of the kiln and then vent it
outside or to a central vent system.
KILN VENTILATION CAUTIONS
VENTILATION IS ESSENTIAL
1. Kilns generate harmful fumes when firing ceramics
including: carbon monoxide, sulfur oxides, hydrogen
fluoride and metal vapors (all of which can be toxic).
2. Install kiln in a well-ventilated area and never operate
in an enclosed space unless you have good airflow.
3. Severe corrosion can be caused by kiln fumes, salt air
,or other environmental conditions.
AMBIENT HEAT AND VENTILATION
1. The kiln should operate in an environment that is
between -18°C (0°F ) and 38°C (100°F).
2. Kiln vents do not take care of ambient ventilation of the
kiln room to remove the heat of the kiln.
3. See the following web page for guidance on how to
calculate ventilation requirements for a kiln room:
hotkilns.com/calculate-kiln-room-ventilation
INSTALLATION
IMPORTANT CAUTION
MAKE CERTAIN KILN POWER IS OFF BEFORE
PROCEEDING WITH INSTALLATION.
Step 1. Turn Off Kiln Power
This is critical for safety reasons.
Step 2. Drill Holes (if needed)
Before mounting the Bypass Box, you should drill the vent
holes. (Note: if you bought the vent system with a new kiln,
it should be pre-drilled) The easiest way to drill the vent
holes is to place the stand upside-down on the kiln bottom,
center it, and then drill your holes within the large aperture.
Otherwise you can measure out the center of your kiln slab
and draw a circle in the middle with a radius of 1.5” Then
drill your vent holes within that circle.
Step 3. Install Bypass Collection Box
With the vent holes taken care of, you can install the Bypass
Collection Box. Just simply use the studs on the bottom of
the stand and secure with the provided hardware.
IMPORTANT: Remember to have the outlet pointed towards
your fume exhaust location.
The Bypass Collection Box is mounted to the bottom of the
stand with provided hardware.
Step 4. Install Blower System
Install blower system by penetrating outside wall or setting
into a window with appropriate support. Attach the provided
90 degree elbow to point down on the outside of the building
(this is to prevent rain water from getting into the duct).
(Note: this procedure will change if you use the Multi-Mount
bracket). Mount securely because motor may vibrate over
time especially if it builds up any dust in the blower.
The motor assembly comes pre-mounted onto the Wall mount
bracket:
3” Diameter Inlet
4” Diameter
Outlet

L&L VENT-SURE DOWNDRAFT KILN VENT INSTRUCTIONS
ventsure-instruct.pdf REV: 8/1/2017 Page 4
© 2017 L&L Kiln Mfg, Inc. 505 Sharptown Rd, Swedesboro NJ 08085 856.294.0077 F:856.294.0070 [email protected] hotkilns.com
CAUTION: Make sure that the vent outlet is at least
four feet from any open windows or doors. This is to
make sure fumes do not get back into your building.
Also the fumes can be hazardous to plants within a
few feet.
A CAUTION ABOUT MOUNTING VERTICALLY
If the discharge duct of the vent is mounted pointing up (as
shown on the photograph to the left), water that condenses
in the duct may drop down and rust the motor. We
recommend having a water trap in the bottom of a vertical
duct run to drain off the water before it runs into the motor.
This is not a problem when the vent has been mounted
horizontally. The Multi-Mount bracket will allow you to mount
the motor horizontally as well. You can then use 90 degree
bends or flexible duct to go vertically. Just remember that
there is water in the exhaust that will condense somewhere
as it cools after it discharges from the vent motor.
A special Multi-Mount bracket is available from L&L which will
allow you to mount the vent on the floor or wall with the outlet
of the vent pointing up. This is useful when you want to use an
existing penetration in a wall that won’t support the vent (like a
window) or when you want to have the vent go out of a roof or
into a central vent system.
Step 6. Connect Flexible Duct
Attach blower system to bypass/collection box by stretching
the flexible aluminum duct carefully (it can extend up to
15 feet) and securing to both the blower housing and the
bypass/collection box with the provided hose clamps.
NOTE: You may want to firmly attach this to the Bypass
Collection Box before installing the kiln on the stand
because it can be hard to maneuver under the kiln.
Step 7. Plug In Vent
Plug in the switched cord to a standard 120 volt receptacle.
If need be you can safely use a grounded extension
cord because of the small amperage required. Be sure
to secure cord away from heat of kiln. Note: On 220-240 volt
models this may vary.
ROOM AIR REPLACEMENT
ROOM AIR REPLACEMENT:
The Vent-Sure system moves up to 146 cubic feet of air per
minute. We suggest opening a window slightly, or bringing
another fresh air source into the room, to replace this room
air.
Vent-Sure Installation Diagram
Metal Plate for Window (optional)
(Not supplied)
Wall Mounted Fan Assembly
Hose
Clamp
Flexible
Aluminum
Duct
Kiln
Kiln Stand
Attach
to
Wall
Non-Flammible Floor
Note: Exit temperature is less than 150 Deg F.
Bypass
Collection
Box

L&L VENT-SURE DOWNDRAFT KILN VENT INSTRUCTIONS
ventsure-instruct.pdf REV: 8/1/2017 Page 5
© 2017 L&L Kiln Mfg, Inc. 505 Sharptown Rd, Swedesboro NJ 08085 856.294.0077 F:856.294.0070 [email protected] hotkilns.com
DRILL CHART
MODEL CUBIC FT NO OF
HOLE HOLES DIA
FUEGO 1.5 1 1/4”
e23S 4.7 2 1/4”
e23T, SM23T, EQ23T 7.0 2 1/4”
e28S 6.9 2 1/4”
e28T, SM28T, EQ2827 10.3 3 1/4”
JD18, E18S, LB18 2.6 1 1/4”
JD18X, E18T 3.9 1 1/4”
JF23 4.7 2 1/4”
J230 7.0 2 1/4”
J236, EQ2836 9.4 3 1/4”
J245 11.75 3 1/4”
J2918 6.9 2 1/4”
J2927 10.3 3 1/4”
J2936 13.8 4 1/4”
J2945 17.2 5 1/4”
X1818 3.4 1 1/4”
X1827 5.1 2 1/4”
XB2318 5.0 2 1/4”
X2327 8.1 2 1/4”
X2336 10.8 3 1/4”
X2345 13.5 4 1/4”
XB2818 7.8 2 1/4”
X2827 11.7 3 1/4”
X2836 15.6 4 1/4”
X2845 19.5 3 5/16”
XB3218 10.0 3 1/4”
X3227 15.0 4 1/4”
X3236 20.0 3 5/16”
X3245 25.0 4 5/16”
TB2318 9.7 3 1/4”
T2327 14.6 4 1/4”
T2336 19.4 3 5/16”
T2345 24.3 4 5/16”
TB3418 13.8 4 1/4”
T3427 20.7 3 5/16”
T3436 27.6 5 5/16”
T3445 34.5 6 5/16”
EL2424 8.0 2 1/4”
EL2427 9.0 3 1/4”
EL2436 12.0 3 1/4”
EL2448 16.0 4 1/4”
EL2848 20.0 4 5/16”
EL3048 25.0 5 5/16”
OPERATION
1. Plug blower cord into 120 Volt receptacle. (Note: 220-
240 volt models may be different).
2. Close all kiln apertures such as peepholes unless you
very specifically want more air vented.
3. Turn on Vent with the in-line switch on the power cord.
4. Close the lid and fire. For heavy loads with lots of
fumes you may want to avoid firing faster than 150°F
per hour to prevent the generation of more fumes than
the system can eliminate.
5. Use the flow control on the Bypass Box to modify the
flow of exhaust - a larger flow control opening reduces
the flow of exhaust fumes from the kiln, and a smaller
flow control opening increases the exhaust.
ADJUSTING THE BYPASS SYSTEM
The sliding adjuster allows you to fine adjust the amount of
venting that is done to your kiln. It is easy to adjust but hard
to know just how to adjust it. The problem is that there are
many factors that contribute to the amount of “pull” required.
For instance, the amount of fumes that are being given off
by your specific work is one factor. Some clays have a lot
of carbon in them; others do not. Depending on the size of
the load, and the ingredients in the clay/glaze, there will be
more or less fumes generated. Another factor is the “static
pressure” in your vent ducts. If you have a lot of curves,
90 degree bends, or long runs of duct this will increase the
static pressure (back pressure) and hence increase the
need for more venting force. One suggestion is to start with
the valve in the half open position and see what happens.
The Smoke Method:
1) With power disconnected from the kiln and with the kiln
empty, turn the vent on.
2) Start with the bypass valve in the fully closed position.
This will give it the maximum suction in the kiln.
3) Light a piece of paper on fire or something that will create
smoke. Blow it out, and hold it near the cracks around the
closed lid.
4) If the smoke is being pulled into the kiln around these
door cracks, open the Bypass (decreasing flow from the
kiln) until the smoke stops being pulled in, then back up the
valve slightly, so the draw increases just slightly again. Try
this when kiln is at about 100°F.
5) You can do the same test directly at the bottom hole with
the kiln open also to test the differential between the pull

L&L VENT-SURE DOWNDRAFT KILN VENT INSTRUCTIONS
ventsure-instruct.pdf REV: 8/1/2017 Page 6
© 2017 L&L Kiln Mfg, Inc. 505 Sharptown Rd, Swedesboro NJ 08085 856.294.0077 F:856.294.0070 [email protected] hotkilns.com
at the actual suction hole from the kiln and the pull around
the lid.
For Gross Adjustment:
Remember that the sliding adjuster is for fine adjustment.
Drilling or plugging the holes in the floor (and possibly
adding or plugging holes in the top) is how you would
dramatically change the amount of air vented.
VENTING CODES
OSHA has set standards for carbon monoxide exposure
of 35 ppm (parts per million) for long-term exposure and
200 PPM for short-term exposure. Independent testing
has shown that fumes near the kiln can exceed 200 PPM
near the kiln during the firing of greenware. This can
cause headaches, fatigue, sore throats and nausea. When
properly installed and operated, a downdraft vent removes
all harmful fumes and provides a safer working environment.
Most states and localities have set venting requirements
for firing kilns in public places. Your local and state health
board should have this information.
The Uniform Mechanical Code says that you must vent
ceramic kilns. It says that you can use a canopy-type
hood (and gives specific requirements for such use) or
that “listed exhaust blowers may be used when marked as
being suitable for the kiln and installed in accordance with
manufacturer’s instructions.”
Our Vent-Sure vent is listed to UL499 standards by MET
for L&L Kilns and is appropriate to meet this ventilation
requirement. L&L takes no responsibility for improperly
installed vents or kilns nor do we take responsibility for the
use of other vents with our kilns.
REGULAR MAINTENANCE
Occasionally check for leaks in the aluminum duct. Replace
if necessary. Check for corrosion especially if you are using
clay with a high content of sulfur, phosphorus or fluorine.
Check for wax or carbon build up if you are using a wax
resist process or a high carbon content clay.
We recommend unmounting the fan and blowing out the
squirrel cage with compressed air every two years or so
especially if you are in a very dusty or if you have it mounted
on the floor where it is more likely to pick up dust.
If the discharge duct of the vent is mounted pointing up you
may get water that condenses in the duct drop down and
rust out the motor. Taking it apart and spraying with WD-40
can restore the motor in some cases. We recommend
having a water trap in the bottom of a long vertical duct run
to drain off the water before it runs into the motor. This is not
a problem when the vent has been mounted horizontally.
INSTALLATION OF MULTIPLE VENTS
For more information see:
hotkilns.com/vent-doubler-system
VENT DOUBLER SYSTEM
This shows a photograph of the Vent Doubler System:
The Vent Doubler system includes a bracket for mounting the
vent motor on the floor or wall (as shown), an extra Bypass
Collection Box, an extra Flexible Aluminum Duct and a “T”
Connector with dampers. You can vent two 10 cubic kilns with
one Vent-Sure plus this Vent Doubler System.
CENTRAL VENT SYSTEMS
Multiple Vent-Sure systems may be installed individually,
or each system may be connected to a central duct. The
following information is provided to help the installer make
decisions concerning the size and length of the central duct.
CENTRAL DUCT SIZING
QTY OF SYSTEMS SIZE OF CENTRAL DUCT
1 4”
2 6”
3 8”
4 8”
5 10”
6 10”
EXTENDING DUCT LENGTH
The duct may be 60 feet in length, and include up to four
90° bends, without a significant drop in static air flow or
a reduction in kiln air pull. You may use any galvanized,
stainless or aluminum duct. The outlet duct size (after the
motor) is 4” diameter. The inlet duct (before the motor) is
3” diameter.

L&L VENT-SURE DOWNDRAFT KILN VENT INSTRUCTIONS
ventsure-instruct.pdf REV: 8/1/2017 Page 7
© 2017 L&L Kiln Mfg, Inc. 505 Sharptown Rd, Swedesboro NJ 08085 856.294.0077 F:856.294.0070 [email protected] hotkilns.com
OPTIONAL VENT CONTROL
For more information see:
hotkilns.com/vent-control
The Vent Control allows you to automatically control the
operation of the Vent-Sure kiln vent with one of the outputs
from the DynaTrol (or Genesis).
Construction
The Vent Control consists of a relay that is controlled from
output #4 on the DynaTrol (or Genesis).
There is a female 120 volt receptacle to plug the vent into
and a cord to plug into a 120 volt wall outlet.
There is a 6 foot wire that connects the control box to the
kiln control panel. A grommet is included for non-factory
installation.
Where It Can Be Used
It is only available for kilns with DynaTrols and Genesis
controls.
It may not be used with kilns with powered bottoms
(because the same output on the control is used)
Operation
NOTE: These options are set in the “Hidden Menu” of the
DynaTrol.
OPTION A (OP A)
Used to control a vent. Output 4 can be programmed to
be on or off during each segment of a Vary-Fire program.
During an Easy-Fire program, output 4 comes on at the
beginning of the firing and turns off after the kiln has cooled
to 150F.
OPTION B (OP B)
Used to control a vent. Output 4 can be programmed to
be on or off during each segment of a Vary-Fire program.
Output 4 comes on at the beginning of an Easy-Fire
program, off at 1450°F, back on after the firing is complete
and the kiln has cooled to 1000°F and finally off again when
the temperature is below 150°F.
OPTION C (OP C)
Used to control a vent, an alarm, or other atmospheric
control. Output 4 can be programmed to be on or off during
each segment of a Vary-Fire program. Output 4 is off during
Easy-Fire programs.
FREQUENTLY ASKED QUESTIONS
How do I know if the system is working?
See our comments under “Adjusting the Bypass Valve”
How hot does the duct get during the firing?
Not very, for two reasons. One is that the Vent-Sure does not
draw out much heat from the kiln. The hotter the kiln gets, the
less hot air that is extracted by the vent motor. The other is that
the bypass box combines fresh cool air with the hot air from the
kiln before passing through the ductwork.
How long can the duct be and how many
bends can it have?
Up to 60 feet of ducting containing four 90 degree bends
may be safely used with no drop in static air flow at the duct
exhaust point or a reduction in draw at the kiln. The ducting
can be run either horizontally or vertically. (The Vent-Sure
should handle more static pressure than the Orton vent
because of the stronger motor. This translates into longer
lengths of pipe and more 90 degree bends. If you have a
choice run two 45 deg bends rather than one 90 degree
bend or use flexible duct which has a gentler bend).
Can I vent through a ceiling and/or roof?
Yes. You will need the multi-mounting bracket (M-V-
MULT/00), so that you can position the motor output
vertically. Additionally, you need to make sure that you install
a water trap. At the bottom of the longest vertical run, install a
u-shaped bend to catch any condensation that forms before
it enters the motor. Of course if you are going through a roof,
you will also need a rain cap and screen.
You do not normally need double wall ducting when going
through the roof since the pipe or duct does not reach high
temperature. It is always advisable to check your local
building codes for their requirements.

L&L VENT-SURE DOWNDRAFT KILN VENT INSTRUCTIONS
ventsure-instruct.pdf REV: 8/1/2017 Page 8
© 2017 L&L Kiln Mfg, Inc. 505 Sharptown Rd, Swedesboro NJ 08085 856.294.0077 F:856.294.0070 [email protected] hotkilns.com
How do I determine the size, number, and
location of holes in the top and bottom of
the kiln?
As a general rule, you should have one 1/4 inch hole for
every 4 cubic feet of kiln volume. The holes are normally
placed within a 4 inch circle in the center of the kiln floor.
Please see our hole chart on page 7. L&L does not normally
recommend drilling holes in the top except for certain
instances where airflow needs to be increased such as for
glazes which need an oxygen rich environment.
Will the fumes coming through the vent
damage my plants, the neighborhood pets
or disturb the local environment?
For the most part, the fumes have been diluted enough
already when they are exhausted, however that depends
on how you have your bypass box setup. We do not
recommend placing the outlet of the vent below an open
window and we have heard of plants near the vent outlet
being affected by the vent fumes so keep this in mind
when locating vent outlet. Once the fumes are exhausted,
they will quickly be diluted by the outside air, so it is only
the immediate area around the vent that you need be
concerned about.
Will using the vent cause my firing to take
longer?
Generally only a little bit longer. The vent system removes
only a small amount of heat from the kiln due to the physics
of how thin air gets at very high temperatures. (L&L NOTE:
We have seen vents overpower smaller kilns - so it is
important to adjust the amount of venting in some cases.
On the other hand an example of an e23T 7 cubic foot kiln
firing an 85 pound load on Fast Glaze program to cone 8
took 7 hours and 4 minutes with a vent on and 6 hours and
24 minutes without a vent. The vent was on the whole time).
What does it cost to operate the vent system?
The vent system should likely cost less than 1 cent/hour to
operate (electricity costs). Downdraft vents are still vastly
more efficient than hoods which remove tons of air from
the kiln room while the Vent-Sure only removes a small
amount of air from the kiln. (It does cost more to run the
vent because it does take heat out of the kiln. For example
an e23T 7 cubic foot kiln firing an 85 pound load on Fast
Glaze program to cone 8 took 70 KW hours with a vent on
and 62 KW hours without a vent. At 8 cents per KW hour
that would be a cost of $0.64 more for the firing. The vent
was on the whole time).
Will the cold air entering the kiln damage the
product?
No. The amount of air coming in is too small unless you drill
holes in the lid, which is not normally recommended. The
air coming in is also distributed throughout the kiln evenly.
Will faster cooling crack the ware if I leave
the vent on during the cooling Cycle?
No. Most kilns will cool faster with the vent system, but it
is achieved at such an even rate and distribution that there
would not be any damage to ware. (L&L NOTE: The vent
will remove more molecules of air and hence heat as the
kiln cools. This is because the density of the air increases
the lower in temperature you go. This is one reason why
kiln vents are so efficient - they don’t remove too much heat
when you don’t want them too at the higher temperatures).
What should I do if I still smell fumes?
Check all ductwork for leaks and see our comments on
“Adjusting the Bypass System”.
If using a hood type vent (like the Vent-a-Kiln) do
you need a kiln vent (like the Vent-Sure) also?
You need to vent fumes from the kiln and the room and heat
from the room. You must have ambient ventilation in a small
room for heat and to remove fumes that may not be fully
removed by the kiln vent. If you have a very large room that
can dissipate heat and trace fumes than you may not need
ambient ventilation.
The Vent-Sure is designed to remove fumes that are
generated in the kiln from the kiln and therefore from the
room. The Vent-Sure downdraft kiln vent does not remove
enough heat from a small room to be used for ambient
ventilation.
If you have a good overhead vent hood you may discharge
the output of the Vent-Sure into that hood.
At what temperature should you turn off the
Vent-Sure kiln vent?
A customer writes: When firing glazes what is a good temp
to turn off the vent so kiln can hit target temp in my case
2190 Deg F. Do glazes off-gas after say 2000 degrees? Is
there a general temperature to turn off vent?
Answer: Generally speaking it is best for your kiln to leave
the Vent-Sure on for the entire time the kiln is heating up.
Mostly this is to get all of the corrosive fumes before they
get to your elements, wiring, and other metal parts of the
kiln.
You can leave it on for the cooling as well if you need it to
cool off more quickly.

L&L VENT-SURE DOWNDRAFT KILN VENT INSTRUCTIONS
ventsure-instruct.pdf REV: 8/1/2017 Page 9
© 2017 L&L Kiln Mfg, Inc. 505 Sharptown Rd, Swedesboro NJ 08085 856.294.0077 F:856.294.0070 [email protected] hotkilns.com
Usually a slower cool-down is preferred though, so often the
fan is turned off for the cool-down.
High-fire clays and glazes out-gas until the kiln begins to
cool. Once the glaze has set, and the clay has vitrified no
more gasses escape.
The heat in a red-hot kiln is almost all radiant heat. The
hotter the kiln gets, the fewer and fewer air molecules are
even present inside. Because of this- it is only helping the
heating rate a tiny little bit to turn off the vent before the end
of the firing.
How long does a Vent-Sure downdraft vent last?
The Vent-Sure downdraft kiln vent is pulling not only air
but moisture and the products of hot moisture and the
chemicals that are present in the clay. Some of these
products are highly acidic (like sulfuric acid, hydrofluoric
acid and others). The exact amount and composition of
the effluents of your kiln, and hence in the vent, will vary
with how dry your work is and what is in the clay to begin
with. The Vent life seems to be totally dependent on these
conditions. The more moisture and acids created by the
materials in the clay and water then the shorter the vent
life. If you have good conditions the vent can last for many
years - if not - then you will be replacing various parts over
the years.
That said - L&L’s experience has been very positive. We
have sold thousands of Vent-Sures for over 15 years. We
sell very few replacement motors and other parts. The most
vulnerable part seems to be the thin aluminum flexible duct
that goes from the kiln to the vent motor. This is cheap and
you can find replacements locally.
The motors hold up very well in terms of lubrication and
vibration. The Vent-Sure is warranted for three years.
FEATURES AND SPECIFICATIONS
ADJUSTABLE AMOUNT OF VENTING
A sliding adjuster on the vent Bypass Collection Box adjusts
the amount of venting from the system (see photo on page 3).
Vent only what you need to vent - don’t waste heat and energy
by venting more than you need.
EXTERNAL VENTING
External venting is safer and surer than venting to the inside
of your kiln room with a filter.
REMOTE MOUNTING OF MOTOR
The vent blower motor is mounted to a wall plate with a 12”
length of exhaust pipe that mounts on the wall (see photo).
This keeps the heat of the kiln away from the motor (for
longer motor life) and keeps the motor vibration away from
the kiln. (With the special “Multi-Mounting Bracket” the vent
motor may be mounted on the floor or a wall with the outlet
pointing up and then connected to an existing vent system
or 4” wall outlet. If you decide to mount it this way see the
caution on page 5).
MOUNTS ON ANY L&L KILN
The Vent-Sure vent system can be installed on almost any
kiln. It requires only that you drill several small vent holes
through the kiln floor (note that if mounting the bypass/
collection box to the stand, that four studs are factory
installed on the bottom of the stand). Mounting hardware
is included.
Note: L&L Vent-Sure vent are not c-MET-us listed for use
on any kiln except those made by L&L Kiln Mfg., Inc.
POWERFUL VENT MOTOR
The blower vents up to 146 CFM (cubic feet per minute at 0
static pressure and 110 CFM at 0.500-In. static Pressure).
Remember - not all of this air comes from the kiln - some
comes from the Bypass Collection Box.
OUTLET TEMPERATURE UNDER 150ºF
The outlet temperature of the air is less than 150ºF as long
as you do not exceed the recommended holes in the kiln.
FLEXIBLE DUCT INCLUDED
15 feet of flexible expandable aluminum 3” diameter duct is
included along with necessary hose clamps. Longer lengths
or lengths of 3” stove pipe can be used as well.
LOW ELECTRICITY USAGE
The Vent-Sure vent System uses only 0.75 amps at 120
volts.
VENTS UP TO 20 CUBIC FEET OR MORE
The Vent-Sure vent System was designed to be used with
all L&L model kilns. We recommend one vent system for
kilns up to approximately 20 cubic feet. On larger kilns,
depending on how much venting you need, you may need
more than one vent system. (This really depends on how
much venting you need for your situation). Even our largest
35 cubic feet DaVincis have usually been adequately
vented with one Vent-Sure. Note that you can always add
another vent if you find you need more venting.

L&L VENT-SURE DOWNDRAFT KILN VENT INSTRUCTIONS
ventsure-instruct.pdf REV: 8/1/2017 Page 10
© 2017 L&L Kiln Mfg, Inc. 505 Sharptown Rd, Swedesboro NJ 08085 856.294.0077 F:856.294.0070 [email protected] hotkilns.com
MOTOR SPECIFICATIONS
120 VOLT MOTOR
PSC Blower, Type:Forward Curve, Direct Drive
Wheel Dia. (In.):3-15/16,Wheel Width (In.):2-1/2
CFM @ 0.000-In. SP:146, CFM @ 0.100-In. SP:140, CFM
@ 0.200-In. SP:126, CFM @ 0.300-In. SP:124. CFM @
0.400-In. SP:120, CFM @ 0.500-In. SP:110,
Voltage:115, Hz:50/60, Phase:1, Full Load Amps:0.75,
RPM:3100
Bearing Type:Ball, Motor Type:Permanent Split Capacitor,
Motor Enclosure:Open, Motor Insulation:Class B, Thermal
Protection:Auto
Lead Length (In.):13, Conduit Box:Yes,
Ambient Temp. (Deg. F):104, Max. Inlet Temp. (Deg. F):104
Inlet Dia. (In.):3-1/8, Outlet Height (In.):2-3/16, Outlet
Width (In.):3-1/4, Overall Height (In.):5-3/4, Overall Width
(In.):6-5/16, Overall Depth (In.):5-3/8, Mounting:All Position,
Housing Finish:Gray Enamel, Housing Material:Rolled Steel
Agency Compliance:UL Recognized US and Canada
(E47479)
220-240 VOLT MOTOR
Item-PSC Blower,Type-Forward Curve, Direct Drive
Wheel Dia. (In.):3-3/4, Wheel Width (In.):1-7/8
CFM @ 0.000-In. SP:133,CFM @ 0.100-In. SP:128, CFM
@ 0.200-In. SP:126, CFM @ 0.300-In. SP:119, CFM @
0.400-In. SP:112, CFM @ 0.500-In. SP:105,
Voltage:230, Hz:50/60, Phase:1
Full Load Amps:0.33, RPM:2880
Bearing Type:Ball, Motor Type:Permanent Split Capacitor,
Motor Enclosure:Open, Motor Insulation:Class B, Thermal
Protection:Auto, Lead Length (In.):13, Conduit Box:Yes,
Ambient Temp. (Deg. F):104, Max. Inlet Temp. (Deg. F):104
Inlet Dia. (In.):3-1/4, Outlet Height (In.):2-1/2, Outlet Width
(In.)2-9/16, Overall Height (In.)6-9/16, Overall Width (In.):5-
5/8, Overall Depth (In.):6-9/16
Mounting:All Position, Housing Finish:Gray Enamel,
Housing Material:Rolled Steel
The Vent-Sure vent is c-MET-us listed in both the US and
Canada for use with L&L listed kilns. UL 499, CSA C22.2,
No. 122, CSA C22. Listing No E112742.
PARTS
Prices of all parts are listed at:
hotkilns.com/parts
Complete Vent-Sure Kiln Vent System
M-V-VENT/00 ................................................................. (see web)
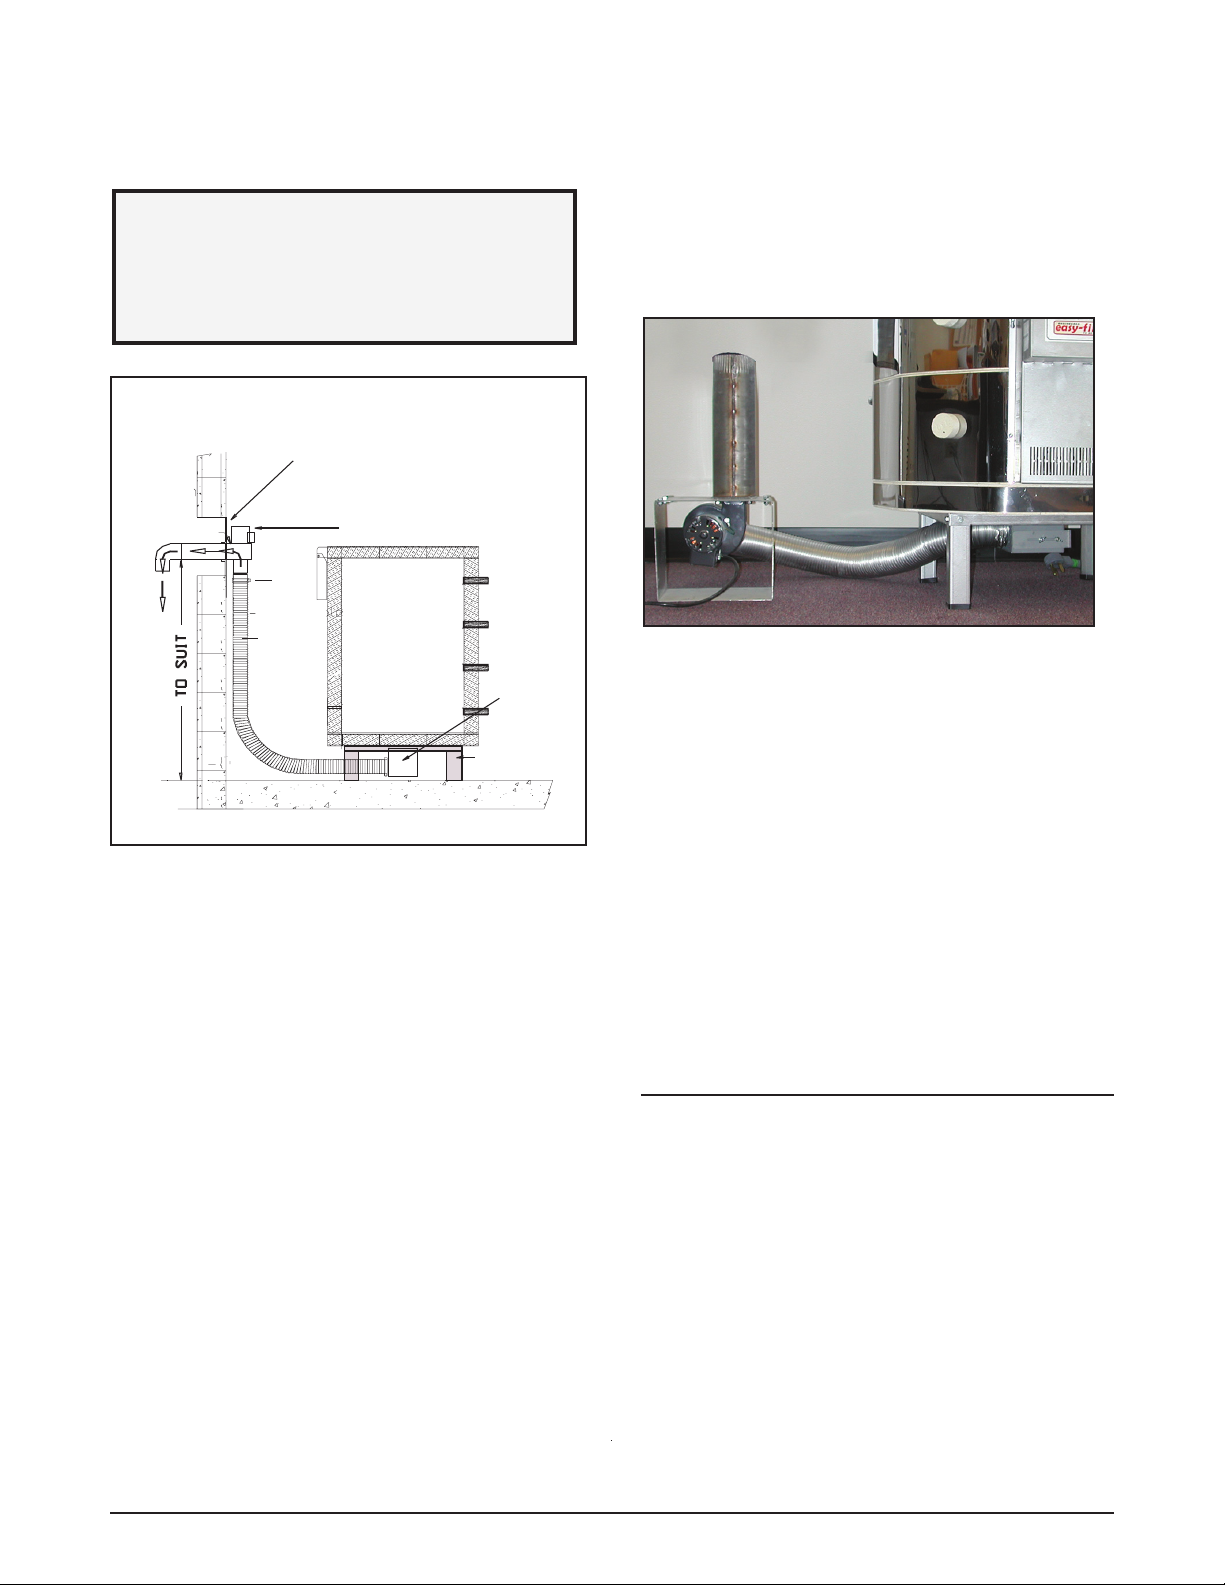
VENT-SURE Vent. 120 Volt. Complete System as described
above and on our separate Vent-Sure brochure. This includes the
motor, an 8 foot cord with a rocker type On/Off switch mounted
in line in the cord, the inlet duct attached to the motor, the wall
mounting bracket, a 90 deg elbow for mounting on the end of the
outlet pipe (to keep rain water out), the Bypass Collection Box
for attaching to the kiln stand or kiln side along with mounting
hardware for mounting to an L&L kiln stand and one section of 15
foot flexible aluminum duct with hose clamps.
M-V-VENT/41 ................................................................. (see web)
VENT-SURE Vent. 220-240 Volt. Typically used in non-US instal-
lations.
You can also purchase individual parts to suit your
own configuration or as replacements:
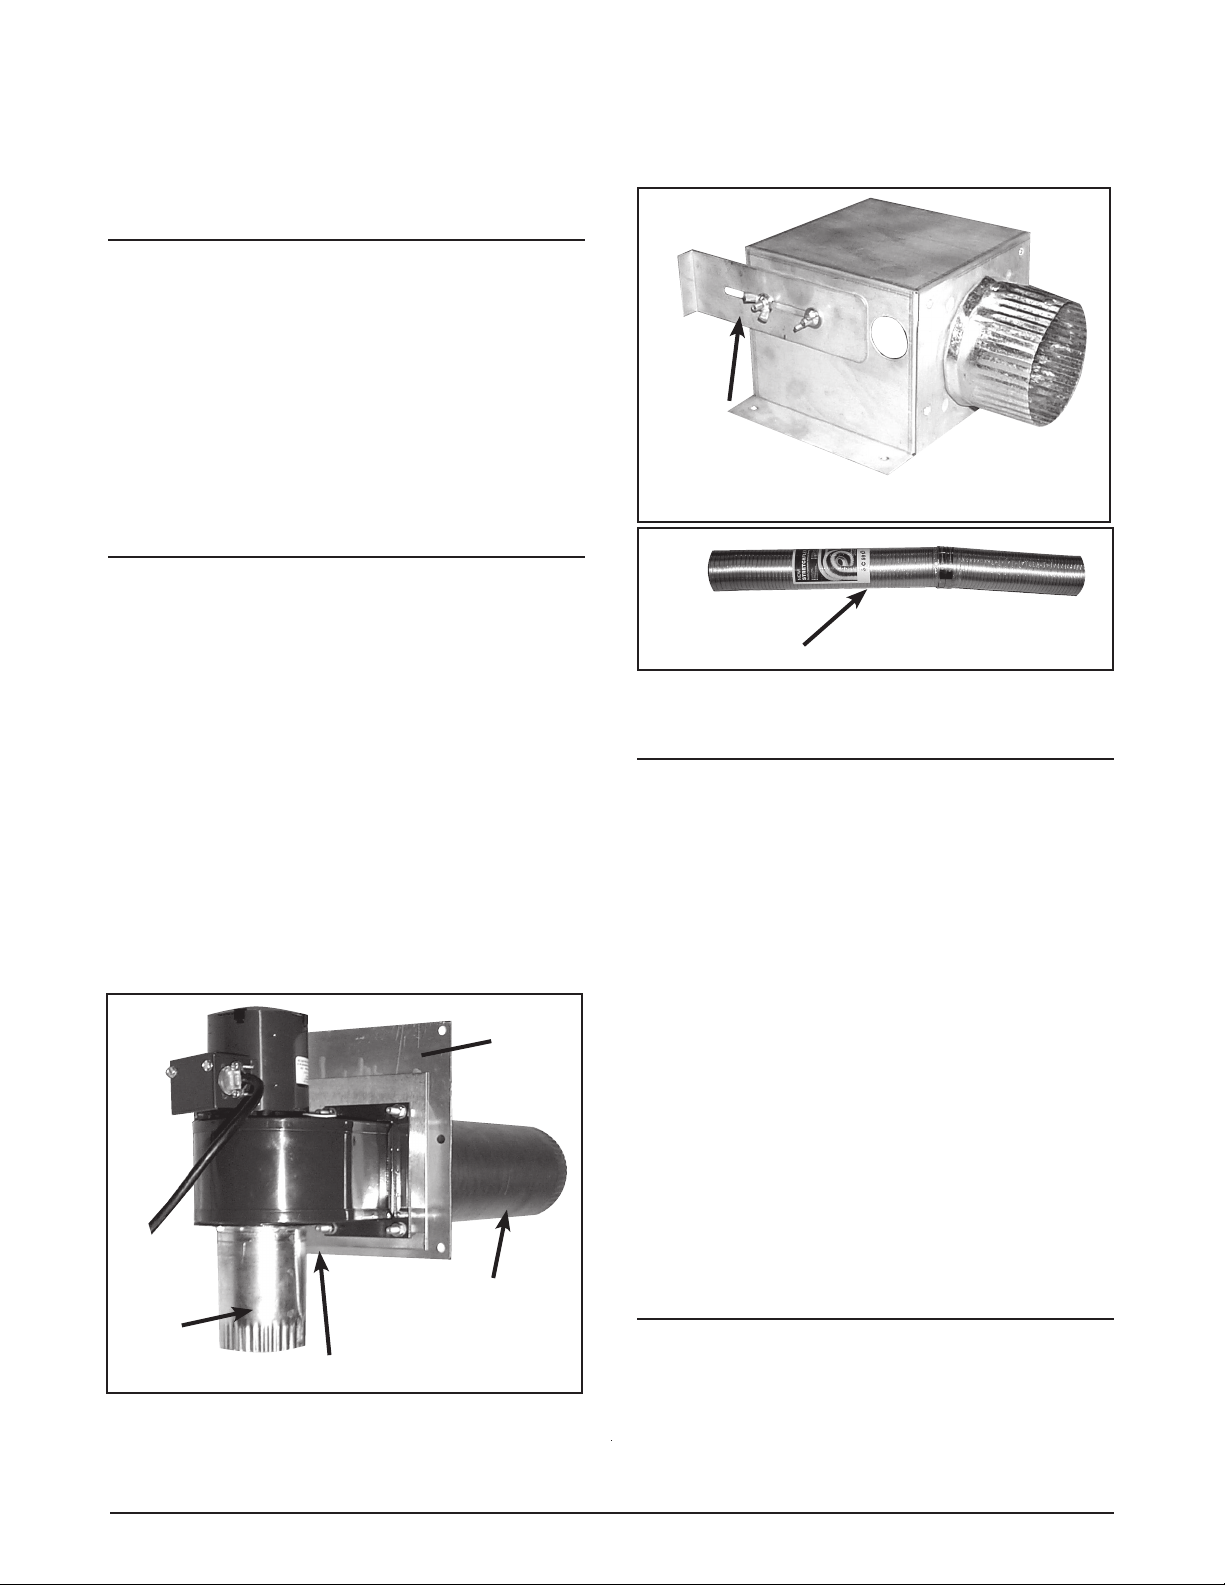
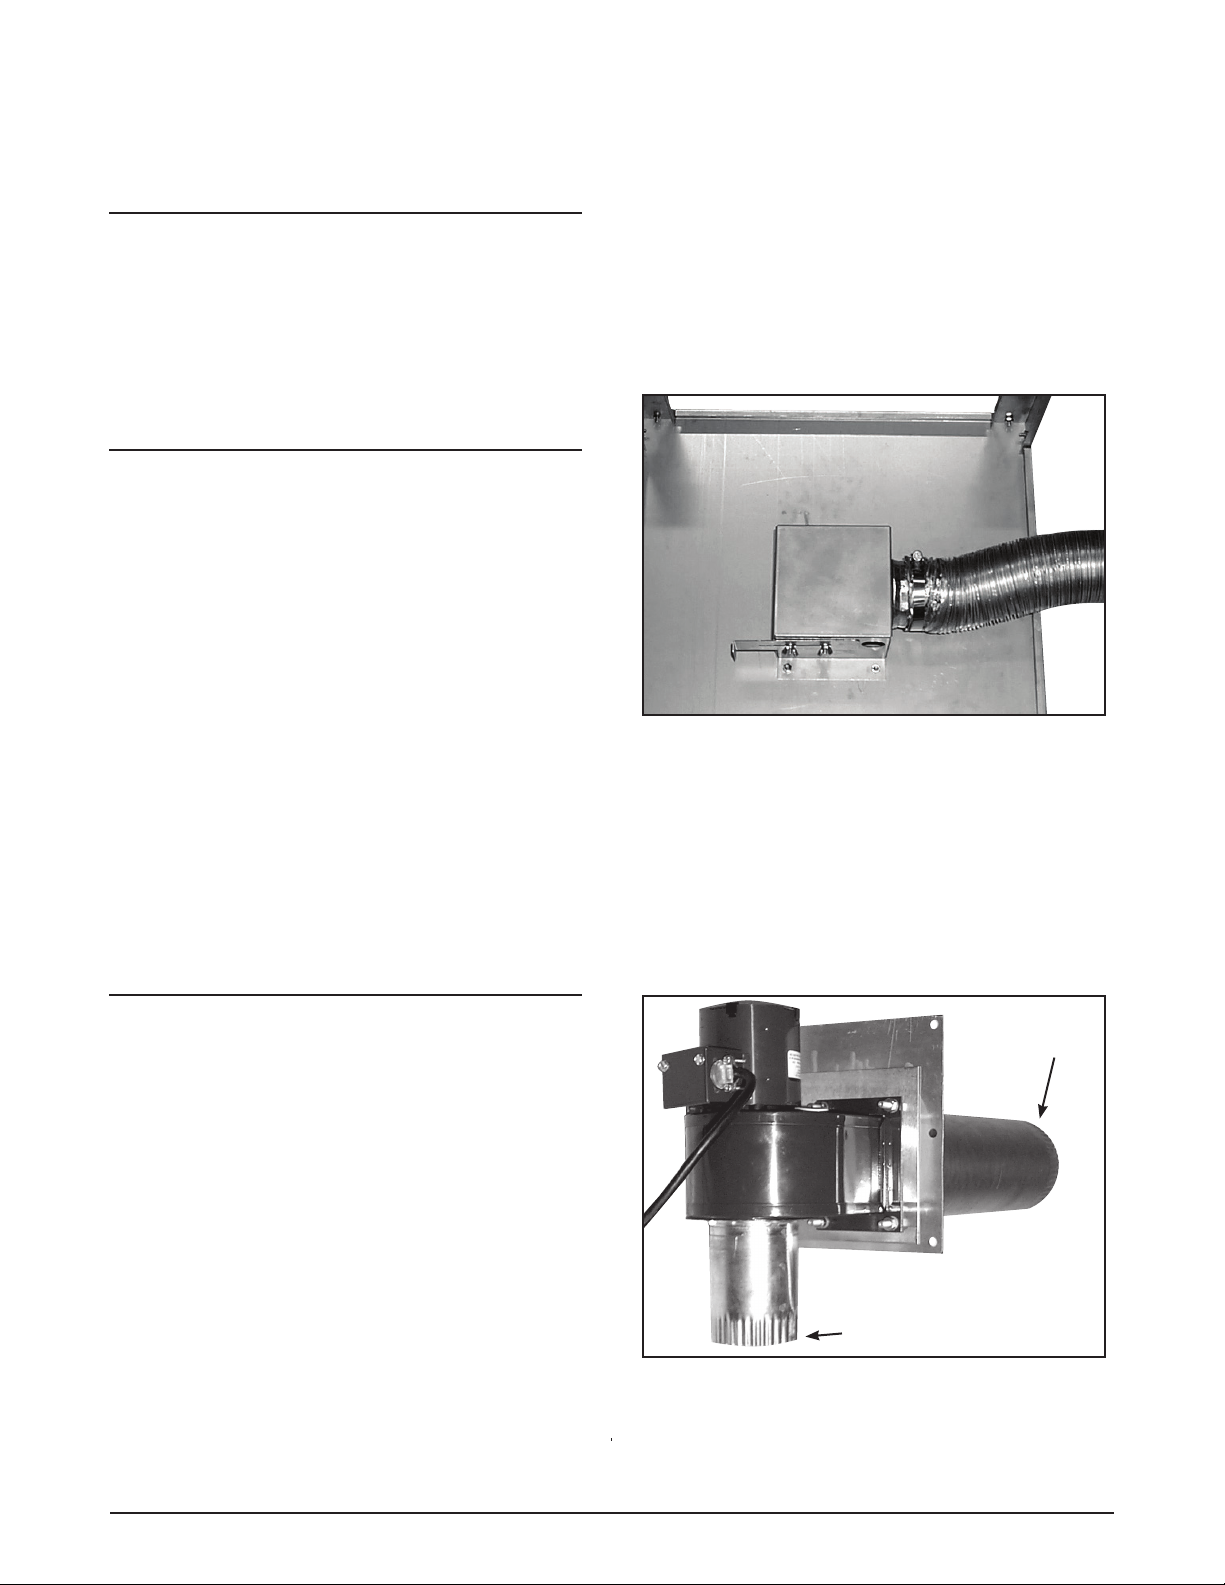
Below shows the vent system blower assembly with the motor,
cord and switch set, 3” inlet duct to hold the flexible duct, 12”
duct to go through a wall and 90 Degree elbow.
M-V-FANK/00..................................................................(see web)
Complete blower assembly. Pictured above ^
M-V-FAN0/00 ................................................................. (see web)
Fan/Blower Motor for Vent-Sure. 120 Volts. This is just the motor
with no attached brackets or inlets. Cord is not included.
M-V-FAN0/41 ................................................................. (see web)
Fan/Blower Motor for Vent-Sure. 220-240 Volts. This is just the
motor with no attached brackets or inlets. Cord is not included.
M-V-BRKT/00................................................................. (see web)
Steel plate onto which the motor mounts. Includes 4” x 12” outlet
pipe and output mounting plate.
M-V-INLT/00....................................................................(see web)
Motor Inlet Duct. This is the piece of duct that attaches to the inlet
of the motor. The expandable aluminum duct fits onto this.

L&L VENT-SURE DOWNDRAFT KILN VENT INSTRUCTIONS
ventsure-instruct.pdf REV: 8/1/2017 Page 11
© 2017 L&L Kiln Mfg, Inc. 505 Sharptown Rd, Swedesboro NJ 08085 856.294.0077 F:856.294.0070 [email protected] hotkilns.com
M-V-OUTT/00..................................................................(see web)
Motor Outlet Duct. This is the piece of duct that attaches to the
outlet of the motor.
M-V-90EL/00 ...................................................................(see web)
90 Deg 4” elbow. Used for attaching to motor mount duct to the
outside to prevent water from getting into duct.
M-V-CORD/00 ................................................................ (see web)
Power Cord for Vent-Sure. Includes a cord mounted on/off switch.
(Call factory for non-USA cords)
Power Cord with On/Off switch:
M-V-DUCT/00................................................................. (see web)
Flexible Vent Duct 2-1/2 to 15 Feet Expandable, Flexible
Aluminum 3” duct with two hose clamps.
Flexible Aluminum Duct shown with hose clamps:
M-V-BBOX/00 ................................................................ (see web)
Bypass Collection Box. Includes hardware for mounting and slide
control. Note: This has the proper mounting hole configuration to
be mounted to any L&L kiln stand. It can also be mounted to the
side of other kilns (typically on the bottom section).
Bypass Collection Box:
M-V-MULT/00................................................................. (see web)
Mult-Mounting Bracket. Comes with six (6) sets of 1/4-20 bolts,
nuts and lock washers for mounting this to the “Wall mount
bracket” (M-V-VENT/BK).
This special “Multi-Mounting Bracket” will allow you to
mount the vent on the floor or wall with the outlet of the vent
pointing up. There are mounting holes on the bottom (for floor
mounting) and on the side as well (for wall mounting):
M-V-VENT/DB................................................................ (see web)
Vent Doubler System for Vent-Sure. Includes a “T” duct with
dampers, an extra Bypass Collection Box, Extra Flexible Duct.
(Consider buying the Multi-Mounting Bracket which is not included
but sometimes useful for this installation as shown in the photo-
graph).
Vent Doubler System:
M-V-TDUC/00................................................................. (see web)
“T” DUCT to attach two aluminum flexible ducts to. Includes
dampers on the two inlets. The outlet fits onto the Motor Inlet
Duct of the Vent-Sure and the Flexible Vent Duct(s) fit onto the
inlets of this “T” Duct.
Special “T” duct for doubler system:
This manual suits for next models
2
Table of contents
Popular Fan manuals by other brands

Johnson
Johnson Rondo Instructions for use

OERTLI
OERTLI SPIRADO S-350 Instructions for use

Elba
Elba ETWF-A3540RC owner's manual

Hitecsa
Hitecsa WPVBZ HE Installation, operation & maintenance manual

Helios
Helios ultra Silence ELS-GU Installation and operating instructions

Parrot Uncle
Parrot Uncle 530173SQ-SMART Use and care guide

Hunter
Hunter 82040 owner's manual

Fanimation
Fanimation FP8012 series owner's manual

One World Technologies
One World Technologies Arctic Cove MBF0181 Operator's manual

DuraVent
DuraVent duraplus htc installation instructions

Impecca
Impecca FAN FAIR FBF-700 user guide

Holmes
Holmes 32510091 instruction manual