manuals.online logo
Brands
  1. Home
  2. •
  3. Brands
  4. •
  5. Larson Electronics
  6. •
  7. Fan
  8. •
  9. Larson Electronics EPF-SM-30-100-EPP Manual

Larson Electronics EPF-SM-30-100-EPP Manual

EPF-SM-30-100-EPP
Larson Electronics, LLC Phone: (800) 369-6671 Fax: (903) 498-3364 www.larsonelectronics.com
1of 3
30" Electric Explosion Proof Fan on 4' Stand
8723 CFM - 30" - Pedestal Mount - 100' Cord - C1D1
Instruction Guide
Thank you for your purchase of the Larson Electronics EPF-SM-30-100-EPP explosion proof fan on stand.
This fan is completely assembled, tested and ready for installation when shipped from the factory. Please
follow the steps below in order to operate and maintain this product.
IMPORTANT
READ CAREFULLY BEFORE OPERATING THIS FIXTURE. SAVE THESE INSTRUCTIONS FOR FUTURE
REFERENCE. THE EPF-SM-30 MUST BE OPERATED IN ACCORDANCE WITH NATIONAL ELECTRICAL CODE AND
ALL APPLICABLE LOCAL CODES.
FOR PERSONAL SAFETY, ALWAYS CONFIRM THE RATING OF ANY KNOWN HAZARDOUS OR POTENTIALLY
HAZARDOUS LOCATION WHERE THE FAN IS TO BE USED.
WARNING: TO PREVENT IGNITION OF A HAZARDOUS ATMOSPHERE, THE SUPPLY CIRCUIT SHOULD BE
DISCONNECTED WHEN INSTALLING OR PERFORMING ANY MAINTENANCE ON THIS UNIT.
WARNING: WHEN INSTALLING FAN IN HAZARDOUS LOCATIONS, CHECK THE OPERATING TEMPERATURE
LIMITS PRIOR TO INSTALLATION TO BE SURE IT CONFIRMS TO THE ENVIRONMENTAL TEMPERATURE
RESTRICTIONS AND NEC CLASSIFICATIONS. CHECK THE NAMEPLATE FOR TEMPERATURE (T) RATINGS.
WARNING: TO REDUCE THE RISK OF FIRE OR ELECTRIC SHOCK DO NOT US ANY SOLID-STATE SPEED
CONTROL DEVICE WITH THESE FANS.
WARNING: OPERATE FAN ONLY AT THE VOLTAGE OF YOUR SPECIFIC SUPPLY CIRCUIT.
WARNING: SUBSTITUTE COMPONENTS MAY IMPAIR EXPLOSION PROOF SAFETY.
WARNING: BEFORE SERVICING OR CLEANING THE UNIT, SWITCH THE POWER OFF AT THE SERVICE PANEL
AND LOCK SERVICE PANEL TO PREVENT POWER FROM BEING SWITCHED ON ACCIDENTALLY.
•USING THIS PRODUCT FOR ANY OTHER PURPOSE THAN IT WAS INTENDED, OR NOT WITHIN THE
OPERATING SPECIFICATIONS IN THIS MANUAL WILL VOID THE WARRANTY AND MAY CAUSE DAMAGE TO
THE FAN OR SERIOUS INJURY TO PERSONNEL.
•DO NOT EXPOSE FAN TO WATER OR RAIN.
OPERATION
Place fan in a location as close to level as possible. Ensure the fan has no chance
of tipping over easily and will not come into contact with water.
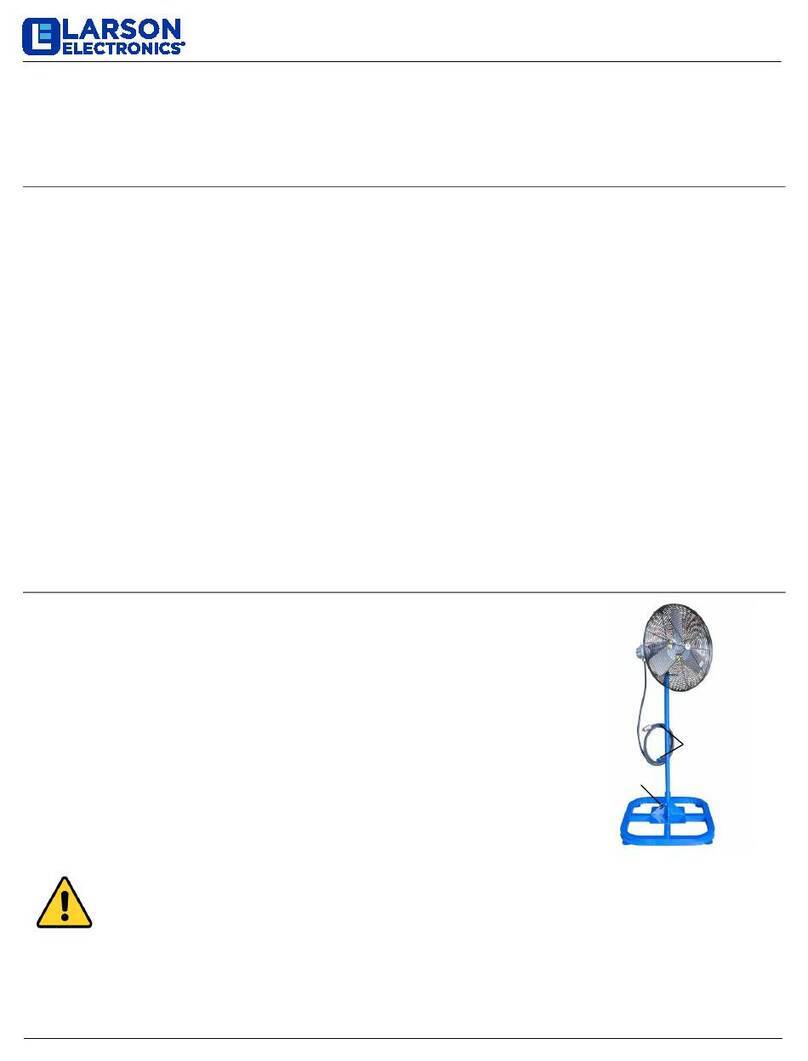
There is a single hand screw toward the base which allows the fan to be rotated
360°. Simply loosen the hand screw, rotate, and tighten hand screw once desired
angle is achieved. This also frees the top pole from its base and will allow fan and
pole to come out of base. Ensure this remains tight before transporting.
CAUTION: Ensure hand screw is tight before transporting fan!
Use the cord wrap on stand for neatly storing cord when not in use.
WIRING
CAUTION:
ALL ELECTRICAL WORK SHOULD BE PERFORMED BY A QUALIFIED ELECTRICIAN AND
MEET ALL NATIONAL, STATE, AND LOCAL CODES.
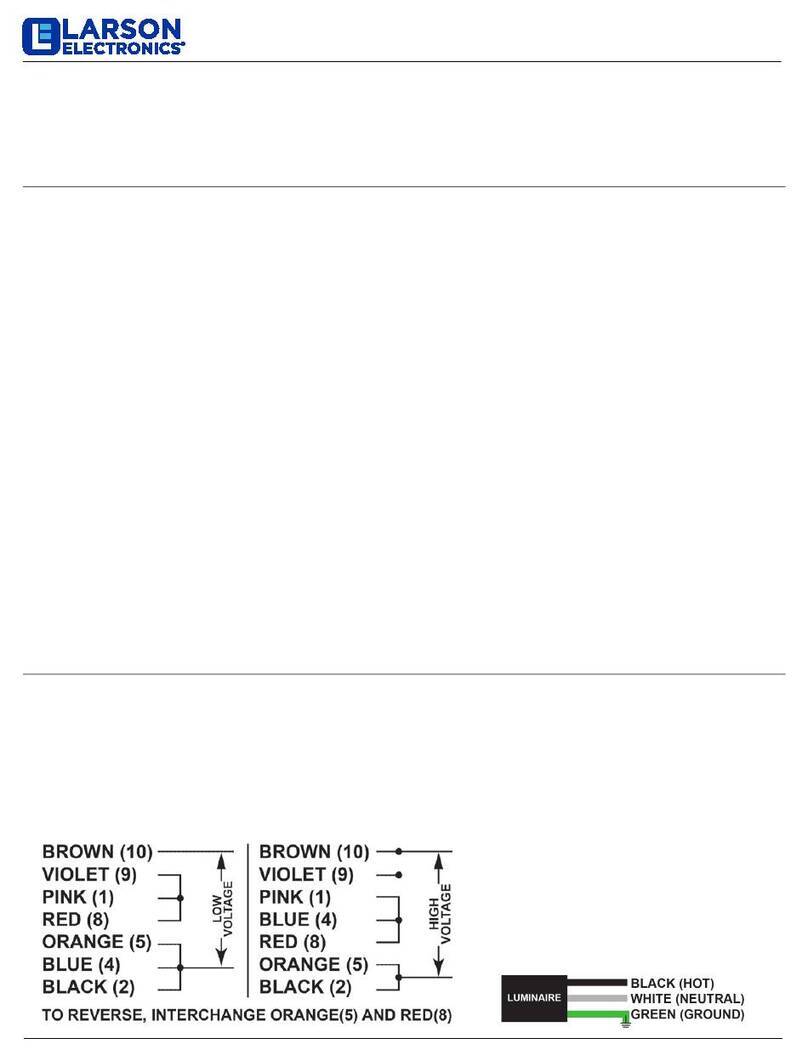
Be sure the voltage and cycles shown on the motor nameplate correspond to the power supply. Check product
nameplate for Ratings and Approvals. This fan is rated for single phase 115V or 208-230V AC.
PEDESTAL STAND
CORD WRAP
HAND SCREW
EPF-SM-30-100-EPP
Larson Electronics, LLC Phone: (800) 369-6671 Fax: (903) 498-3364 www.larsonelectronics.com
2of 3
Fans pre-wired with 120V 3-prong power cord:
•The power source must conform to the electrical requirements of the fan.
•The power cord has a 3-prong grounded plug that must be plugged into a compatible circuit.
•Do not alter the plug to remove the grounding prong and never use a two prong adapter.
•Replace damaged or worn power cords immediately.
•Where possible, avoid using extension cords. If one must be used, the cord must be UL listed, be the
proper size (Amp rating), and have 3-prong grounded connections.
Before activating fan, inspect to be sure that there are no obstructions or debris that would interfere with the
propeller. Check all fasteners for tightness.
RECEPTACLE OPERATION
The receptacles are dead-front construction. Electrical connection between it and plug is accomplished after
plug fully inserts into receptacle and rotated clockwise.
1. Lift receptacle door and locate polarization on mating plug pin and receptacle face. Insert plug straight all
the way into receptacle until it cannot go further.
2. Rotate plug clockwise limit (37º), this closes internal contacts and completes circuit. This also mechanically
locks plug into receptacle so it cannot be pulled out.
3. To remove plug, push plug inward and turn to counterclockwise, pull plug straight out.
TILT ADJUSTMENT
The fan can tilt up or down by loosening the fasteners on the motor yoke
bracket. Loosen the center bolt and adjustment bolt to adjust the fan to
the desired angle and securely tighten all mounting hardware.
CAUTION: Fasteners may loosen over time. It is
important to check and tighten fasteners frequently.
LUBRICATION
This motor is equipped with pre-lubricated ball bearings. The original supply of lubricant is kept free of dirt, grit
or outside contamination by the bearing closures and does not require replenishment for the life of the bearing
under normal operating conditions.
MAINTENANCE
WARNING:
DISCONNECT POWER BEFORE CLEANING OR MAINTAINING YOUR FAN IN ORDER TO
PREVENT SERIOUS INJURY OR DEATH.
It is recommended that you implement a standard monthly or more frequent preventive maintenance schedule.
Safety requires a thorough visual examination of the unit for physical damage that might cause a spark or
result in the ignition of hazardous atmospheres.
Maintenance includes a careful examination to ensure at least:
1/4"
3/8"
EPF-SM-30-100-EPP
Larson Electronics, LLC Phone: (800) 369-6671 Fax: (903) 498-3364 www.larsonelectronics.com
3of 3
A. The Cable is not frayed and is gripping tightly in all points of cable contact.
B. The Cable Jacket is completely intact and that no internal conductors or conductor insulation
is exposed.
C. The Connection Box is not cracked, broken or breeched.
D. The Cord Plug is not cracked or damaged and the Ground Post is intact.
Keeping blades clean and free of material splatter, overspray, and debris during usage will ensure the
maximum life of the fan. An accumulation of dirt may cause blade vibration and motor overload. Occasionally
check tightness of blade set screws.
NOTE: Handle the propeller carefully as it is factory balanced and aligned to ensure smooth operation.
•Some maintenance procedures may require removal of fan guarding.
•After servicing, guards and other safety devices must be reinstalled per their original condition.
•Excessive dust and debris may cause overheating and reduced fan performance.
•Keep guards, motor and blades clean by vacuuming or wiping with a damp cloth.
•Do not use harsh chemicals or cleaners to clean any part of the fan.
•Pressure washing the unit will void the warranty.
•Sealed motor bearings are pre-lubricated and do not require servicing.
TROUBLESHOOTING
SYMPTOM
POSSIBLE CAUSES
CORRECTIVE ACTION
Fan does not operate
1.
Fan not plugged in
2.
Blown fuse or tripped circuit breaker
3.
Defective on/off switch
4.
Defective motor
5.
Fan blade contacting housing
1.
Check power cord connection
2.
Replace fuse or reset circuit breaker
3.
Repair or replace switch
4.
Repair or replace motor
5.
Realign fan blade in fan housing
Insufficient airflow
1.
Guards excessively dirty
2.
Blade and motor excessively dirty
1.
Clean inlet and outlet guards
2.
Clean blade and motor
Excessivenoise
1.
Fan blade contacting housing
2.
Defective motor bearings
3.
Loose guards
1.
Realign fan blade in fan housing
2.
Repair or replace motor
3.
Tighten guard fasteners
Excessive vibration
1.
Damaged fan blade
2.
Motor shaft bent
3.
Motor loose
1.
Replace fan blade
2.
Repair or replace motor
3.
Realign if necessary and tighten
fasteners
If you need replacement parts, please contact your dealer. Take special care when ordering replacement
blades and motors to ensure you get the proper configuration for your fan. If you do not have that information,
please contact Larson Electronics by phone 1-800-369-6671 or email [email protected] for further
assistance.
Please visit LarsonElectronics.com for Warranty and Return information.

Other Larson Electronics Fan manuals

Larson Electronics EPF-10P.3 Series User manual

Larson Electronics

Larson Electronics EPF-10P.3 Series User manual

Larson Electronics EPF-RME Series User manual

Larson Electronics

Larson Electronics EPF-RME Series User manual

Larson Electronics 970 CFM User manual

Larson Electronics

Larson Electronics 970 CFM User manual

Larson Electronics EPF-RME Series User manual

Larson Electronics

Larson Electronics EPF-RME Series User manual

Larson Electronics EPL-DL-24-12W-WF.24 User manual

Larson Electronics

Larson Electronics EPL-DL-24-12W-WF.24 User manual

Larson Electronics C1D1 - 850 CFM User manual

Larson Electronics

Larson Electronics C1D1 - 850 CFM User manual

Larson Electronics EPF-SM-24 Manual

Larson Electronics

Larson Electronics EPF-SM-24 Manual

Larson Electronics EPF-30 Series Manual

Larson Electronics

Larson Electronics EPF-30 Series Manual

Larson Electronics IND-HVAC-DTW-UVC-R1-SS Series Manual

Larson Electronics

Larson Electronics IND-HVAC-DTW-UVC-R1-SS Series Manual

Larson Electronics EPF-24 Series Manual

Larson Electronics

Larson Electronics EPF-24 Series Manual

Larson Electronics EPF-VFP-10-120V-NFK-15C-16.3-EPP User manual

Larson Electronics

Larson Electronics EPF-VFP-10-120V-NFK-15C-16.3-EPP User manual

Larson Electronics EPF-30-PM-EYM-25-EPP User manual

Larson Electronics

Larson Electronics EPF-30-PM-EYM-25-EPP User manual

Popular Fan manuals by other brands

FRIMEC FCR200-1400E manual

FRIMEC

FRIMEC FCR200-1400E manual

Home Decorators Collection TAGER N383C-MBK Use and care guide

Home Decorators Collection

Home Decorators Collection TAGER N383C-MBK Use and care guide

Helios VD Series Installation and operating instructions

Helios

Helios VD Series Installation and operating instructions

Awenta Vega WGB100H instruction manual

Awenta

Awenta Vega WGB100H instruction manual

New H3C Technologies LSWM1HFANSC Assemblies Installtion

New H3C Technologies

New H3C Technologies LSWM1HFANSC Assemblies Installtion

Mistral MDB-30F09 instruction manual

Mistral

Mistral MDB-30F09 instruction manual

aldes TAHA Series Assembly instruction

aldes

aldes TAHA Series Assembly instruction

Hinkley 930008 instruction manual

Hinkley

Hinkley 930008 instruction manual

CFM DVK-0910 brochure

CFM

CFM DVK-0910 brochure

INNOLIVING INN-514 user manual

INNOLIVING

INNOLIVING INN-514 user manual

Daikin Modular T installation manual

Daikin

Daikin Modular T installation manual

ITT Lowara TLC Series operating manual

ITT

ITT Lowara TLC Series operating manual

Ferroli TOP FAN Plus rem installation manual

Ferroli

Ferroli TOP FAN Plus rem installation manual

Parrot Uncle F6115-SMART Use and care guide

Parrot Uncle

Parrot Uncle F6115-SMART Use and care guide

Kuvent IB 125-12 Assembly instruction

Kuvent

Kuvent IB 125-12 Assembly instruction

Boneco F100 manual

Boneco

Boneco F100 manual

Giacomini CLEAN-AIR KHRA2HS460 Use, Installation and Maintenance Manual

Giacomini

Giacomini CLEAN-AIR KHRA2HS460 Use, Installation and Maintenance Manual

Fortress Technologies FTF2013 user manual

Fortress Technologies

Fortress Technologies FTF2013 user manual

manuals.online logo
manuals.online logoBrands
  • About & Mission
  • Contact us
  • Privacy Policy
  • Terms and Conditions

Copyright 2025 Manuals.Online. All Rights Reserved.