LeapFrog Paw Patrol: To the Rescue! User manual

Instruction Manual
This guide contains important information. Please save it for future reference.
©2022 & TM Spin Master Ltd. All rights reserved. IM-616003-001 UK

2
INTRODUCTION
Thank you for purchasing the PAW Patrol: To the Rescue! Learning Video
Game! Go on missions with the PAW Patrol to save Adventure Bay and
learn problem-solving skills along the way!
INCLUDED IN THE PACKAGE
• 1 wireless controller
• 1 HDMI game stick
• 1 micro USB power cable
• Quick Start Guide
WARNING
All packing materials such as tape, plastic sheets, packaging locks,
removable tags, cable ties, cords and packaging screws are not part of
this toy and should be discarded for your child’s safety.
NOTE
Please save this Instruction Manual as it contains important information.
D-Pad
B Button
A Button
Home Button Help Button
HDMI Game Stick
Wireless Controller Power Switch
Micro USB
Power Cable

3
GETTING STARTED
Initial Setup
1. Plug the USB B Connector end of the Micro USB
Power Cable into the USB B port on the HDMI
Game Stick.
2. Plug the HDMI Game Stick into an HDMI port on
your television.
3. Plug the USB A Connector end of the Micro USB
Power cable into a USB port on your television.
4. Make sure your television is set to display the
same HDMI port that the HDMI Game Stick is
plugged into.
5. Find the battery cover located on the back of the
Wireless Controller, use a screwdriver to loosen
the screw and then open the battery cover.*
6. Remove old batteries by pulling up on one end
of each battery.
7. Install 2 new AA (AM-3/LR6) batteries
following the diagram inside the battery box.
(For best performance, alkaline batteries or
fully charged Ni-MH rechargeable batteries are
recommended.)
8. Replace the battery cover and tighten the screw
to secure.
9. Turn the power switch on the device to On.
* To ensure proper connectivity, install batteries in the device after
the HDMI Game Stick has been plugged into the television.
NOTE
The HDMI Game Stick is only compatible with television sets and is
not compatible with computers or computer monitors.
WARNING:
Adult assembly required for battery installation.
Keep batteries out of reach of children.

4
IMPORTANT: BATTERY INFORMATION
• Insert batteries with the correct polarity (+ and -).
• Do not mix old and new batteries.
• Do not mix alkaline, standard (carbon-zinc) or rechargeable batteries.
• Only batteries of the same or equivalent type as recommended are
to be used.
• Do not short-circuit the supply terminals.
• To save battery power, turn off the controller when it is not in use.
• Remove batteries during long periods of non-use.
• Remove exhausted batteries from the toy.
• Dispose of batteries safely. Do not dispose of batteries in fire.
• Disposal of a battery into fire or a hot oven, or mechanically crushing
or cutting of a battery, that can result in an explosion;
• Leaving batteries in extremely high temperatures may result in an
explosion or can cause leakage of flammable liquids or gas.
• A battery subjected to extremely low air pressure may result in an
explosion or the leakage of flammable liquid or gas.
RECHARGEABLE BATTERIES
• Remove rechargeable batteries (if removable) from the toy before
charging.
• Rechargeable batteries are only to be charged under adult supervision.
• Do not charge non-rechargeable batteries.
NOTE
If the Wireless Controller powers down or if the light fades out during
play, please install a new set of batteries.

5
Disposal of batteries and product
The crossed-out wheelie bin symbols on products and
batteries, or on their respective packaging, indicates they
must not be disposed of in domestic waste as they contain
substances that can be damaging to the environment and
human health.
The chemical symbols Hg, Cd or Pb, where marked, indicate
that the battery contains more than the specified value of
mercury (Hg), cadmium (Cd) or lead (Pb) set out in the
Batteries and Accumulators Regulation.
The solid bar indicates that the product was placed on the
market after 13th August, 2005.
Help protect the environment by disposing of your product
or batteries responsibly.
LeapFrog®cares for the planet.
Care for the environment and give your toy a second life by disposing
of it at a small electricals collection point so all its materials can be
recycled.
In the UK:
Visit www.recyclenow.com to see a list of collection points near you.
In Australia & New Zealand:
Check with your local council for kerbside collections.

6
Safety information when using power supply for toys
LeapFrog recommend a power supply (AC/DC adaptor) of the below
specification:
Power rating: 5V/500mA or 5V/1A DC output
• Use Leapfrog or any standard adaptor that complies with EN61558
• This toy shall only be used with a power supply for toys.
• The power supply is not a toy.
• This toy is not intended for use by children under 3 years old.
• Do not connect the toy to more than the recommended number of
power supplies.
• Never clean a plugged in toy with liquid.
• Please examine the power supply periodically for conditions that
may result in the risk of fire, electric shock, or injury to persons (such
as damage to the supply cord, output cord, plug, blades, housing,
or other parts) and that, in the event of such conditions, the power
supply should be scrapped.
• Power supplies for toys are not intended to be used as toys, and the
use of these products by children shall be under the full supervision
of parents.
This toy is only to be connected to equipment bearing either of the
following symbols: or
Warning! Not suitable for children under 36 months. Transformer toy.
Electric shock hazard.
PRODUCT FEATURES
1. D-Pad
• Press the D-Pad on the Wireless Controller to select an item on
the Menu screen.
• See Games section below for D-Pad usage in individual games.
2. Home Button
• Press the Home Button on the Wireless Controller to quit a level,
quit the game, or return to the previous Menu screen.

7
3. Help Button
• Press the Help Button on the Wireless Controller to hear hints and
tips on how to play the game or navigate the Menu screen.
4. A Button
• Press the A Button on the Wireless Controller to select the
highlighted objects on the Menu screen.
• See Games section below for A Button usage in individual games.
5. B Button
• Press the B Button on the Wireless Controller to return to the
previous Menu screen.
• See Games section below for B Button usage in individual games.
6. Menu Screens
• The following Menu screens appear in the game.
Profile Selection Screen
• Create or delete a saved profile on
the Save Selection screen.
• If a saved file has been accidentally
deleted, highlight a New save slot
and press the following buttons on
the Wireless Controller: Home +
Home + Help + Help + B + B + Help
+ Home + B. This will recover the
deleted file. This will also unlock all
the missions in the game.
Game Mode Screen
• Play missions sequentially by
selecting Missions, or individual
curricular games in Quick Challenge
mode.
• Select the Grownups option to
read about the learning curriculum
featured in the product.

8
Mission Menu Screen
• Access the different missions from
the Mission menu screen.
• The player will need to get one star
in each game in a mission before the
next mission is unlocked.
Game Menu Screen
• Select a pup’s game within a specific
mission.
• Stars earned during gameplay will
display below each game’s icon.
Quick Challenge Menu
• Access the games featuring learning
curriculum by selecting one of the
three icons on screen associated with
each curricular game.
7. Games
Chase
• Press the D-Pad left and right to move the character.
• Press the A Button to make the character jump.
• Press the A Button a second time while the character is in the air
to make the character double-jump.
• Use the double-jump to reach higher platforms.
• Find all the mission items in a level to complete the game. Mission
items are pictured at the top of the screen.
Skye
• Press the D-Pad left, right, up, and down to move the character.
• Press the A Button to collect a mission item when hovering above it.
• Press the B Button to drop supplies on a target when in range.
• Follow the arrows on screen to find the next mission item.
Marshall
• Press the D-Pad left, right, up, and down to move the character.
• Press the A Button when inside an action zone to complete a
mission action.
• Press the B Button multiple times when next to a broken fire hydrant
to fill the meter and fix it.

9
• Fixing hydrants adds time to the timer.
• Complete all the mission actions in a level before the timer runs
out to complete the game. Mission actions are pictured at the top
of the screen.
• Follow the arrows on screen to the next mission item.
Rubble
• Press the D-Pad left and right to highlight different Rubble dance
poses.
• Press the D-Pad up and down to change Rubble’s costume.
• Press the A Button to select a highlighted image of Rubble as your
answer.
• To get a high score, match images of Rubble with as many
silhouettes as you can before the time runs out.
Rocky/Tracker
• Press the D-Pad left and right to rotate the vehicle on screen until
a broken part of the vehicle is highlighted. Press the A Button to
confirm the part that you’d like to fix.
• Then, press the D-Pad left and right to choose a shape that matches
the broken part pictured on the vehicle. Press the A Button to
confirm your choice.
• Press the B Button multiple times to fill the progress meter and
complete the repair.
Zuma/Everest
• Press the D-Pad left, right, up, and down to move the character
one space at a time.
• The crabs or penguins will move across the screen in between each
turn the player takes.
• Press the A Button to jump up and down on the square the player
is currently in. Time the jumps correctly to avoid crabs or penguins
if necessary!
• Collect all the bags of Pup Treats on the screen to complete the
game.

10
8. In-Game Items
The following in-game items appear throughout the game.
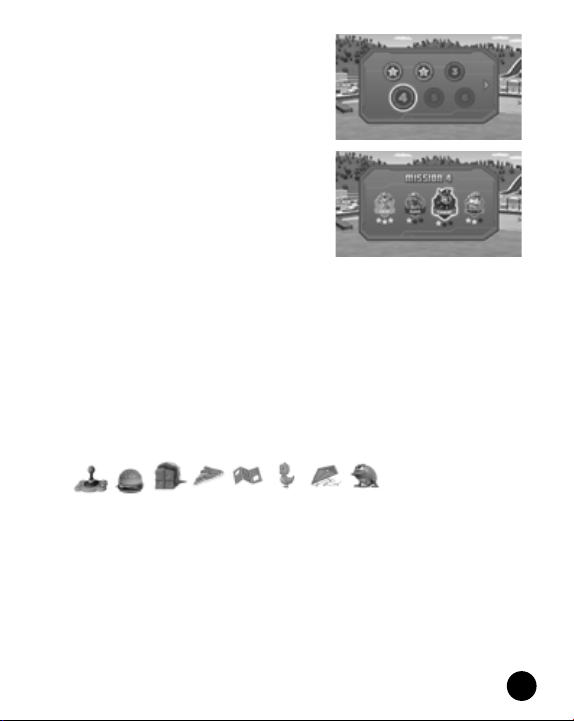
Pup Treats
• Players can collect Pup Treats in every mission.
• When a game in a mission is completed, stars are rewarded based
on the total number of Pup Treats that they have collected.
• A game can be completed multiple times using a saved profile.
Each completion will present the player with a new star score, but
only the highest score will be saved.
Health
• In Chase and Skye’s games, players can collect Health collectibles
in every level.
• Health gives the playable character one heart of health.
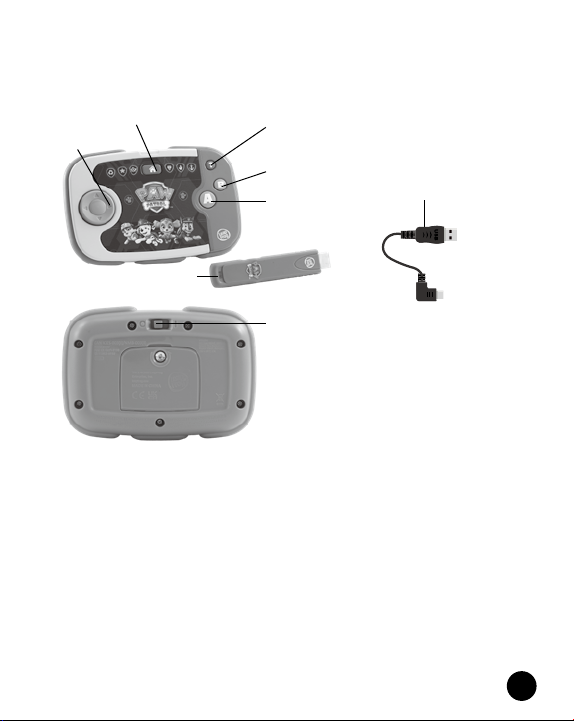
9. Automatic Shut-Off
• To preserve battery life, the Wireless Controller will automatically
go into sleep mode after approximately 1 minute without input. The
unit can be turned on again by pressing the D-Pad,Home Button,
A Button, or B Button.
10. Screen Saver Mode
• PAW Patrol: To the Rescue! Learning Video Game will automatically
save and quit the current game, then go into Screen Saver mode
after approximately 20 minutes without input. To exit Screen Saver
mode, press the D-Pad, Home Button, A Button, or B Button on
the Wireless Controller.
Recommended AC Adapter Electrical Ratings:
Input: ~ 120VAC, 60Hz (for US); ~ 230VAC, 50Hz (for UK or EU);
~ 240VAC, 50Hz (for AS/NZL)
Output: DC5V, 1.5A, 7.5VA or DC5V, 1A, 5VA or
DC5V, 0.5A, 2.5VA
CARE & MAINTENANCE
1. Keep the unit clean by wiping it with a slightly damp cloth.
2. Keep the unit out of direct sunlight and away from any direct
heat sources.

11
3. Remove the batteries if the unit will not be in use for an extended
period of time.
4. Do not drop the unit on hard surfaces and do not expose the unit to
moisture or water.
5. Always keep the Wireless Controller and HDMI Game Stick away
from water.
6. Examine the Micro USB Power Cable regularly, checking for damage
to the cables, plugs and other parts. Do not use a third party adapter.
Do not use the Micro USB Power Cable if there is any damage.
TROUBLESHOOTING
If you are unable to insert the HDMI Game Stick directly into the HDMI
port on your television due to clearance issues, a third-party HDMI
extension cable may be a good solution. A short HDMI extension cable
can be purchased from major electronics retailers.
If for some reason the unit stops working or malfunctions, please follow
these steps:
HDMI Game Stick
1. Interrupt the power supply by unplugging the USB A Connector end
of the Micro USB Power Cable from the USB port on your television.
2. Unplug the HDMI Game Stick from the HDMI port on your television.
3. Wait for 10 Seconds, then plug the HDMI Game Stick into the HDMI
port on your television.
4. Plug the USB A Connector end of the Micro USB Power Cable into
the USB port on your television. The unit will now be ready to play
again.
Wireless Controller
1. Turn off the Wireless Controller using the Power Switch on the back
of the controller.
2. Interrupt the power supply by removing the batteries.
3. Let the unit stand for 10 seconds, then replace the batteries.
4. The unit will now be ready to play with again.
5. If the unit still does not work, replace with an entire set of
new batteries.

12
OTHER NOTES
Static electricity may cause the HDMI Game Stick to malfunction. In cases
where the HDMI Game Stick is malfunctioning due to static electricity,
disconnect the Micro USB Power Cable, wait for 10 seconds, then
reconnect the Micro USB Power Cable to reboot the HDMI Game Stick.
DECLARATION OF CONFORMITY
Hereby, Leapfrog, a division of VTech Electronics Europe Plc, declares
that the radio equipment type 6160 is in compliance with The Radio
Equipment Regulations 2017 (2017 No.1206). The full text of the Declaration
of conformity is available at the following internet address:
www.leapfrog.com/en-gb/legal/eudoc
Frequency Band: 2408 MHz – 2472 MHz
Maximum RF power: <0.01 W
Hereby, Leapfrog, a division of VTech Electronics Europe BV, declares that
the radio equipment type 6160 is in compliance with Directive 2014/53/EU.
The full text of the EU declaration of conformity is available at the following
internet address : www.leapfrog.com/en-gb/legal/eudoc
Frequency Band: 2408 MHz – 2472 MHz
Maximum RF power: <0.01 W
®
The terms HDMI, HDMI High-Definition Multimedia Interface, and the
HDMI Logo are trademarks or registered trademarks of HDMI Licensing
Administrator, Inc.
HDMI game stick connects TV USB A or 3rd party AC adapter
with DC 5V 1A output through Micro USB Power cable

13
CONSUMER SERVICES
Creating and developing LeapFrog® products is
accompanied by a responsibility that we at LeapFrog® take
very seriously. We make every effort to ensure the accuracy
of the information, which forms the value of our products.
However, errors sometimes can occur. It is important for you
to know that we stand behind our products and encourage
you to call our Consumer Services Department with any
problems and/or suggestions that you might have. A service
representative will be happy to help you.
UK Customers:
Phone: 01702 200244 (from UK) or +44 1702 200244 (outside UK)
Website: www. leapfrog.co.uk/support
Australian Customers:
Phone: 1800 862 155
Website: support.leapfrog.com.au
NZ Customers:
Phone: 0800 400 785
Website: support.leapfrog.com.au
PRODUCT WARRANTY/
CONSUMER GUARANTEES
UK Customers:
Read our complete warranty policy online at leapfrog.com/warranty.
Australian Customers:
VTECH ELECTRONICS (AUSTRALIA) PTY LIMITED –
CONSUMER GUARANTEES
Under the Australian Consumer Law, a number of consumer
guarantees apply to goods and services supplied by VTech
Electronics (Australia) Pty Limited. Please refer to
leapfrog.com/en-au/legal/warranty for further information.

Visit our website for more
information about our products,
downloads, resources and more.
leapfrog.com
LeapFrog Enterprises, Inc.,
a subsidiary of VTech Holdings Limited.
TM & © 2022 LeapFrog Enterprises, Inc.
All rights reserved.
Printed in China.
IM-616000-001
Version:0
Read our complete warranty and privacy
policies online at:
leapfrog.co.uk/warranty
www.leapfrog.com/en-gb/legal/privacy
Other manuals for Paw Patrol: To the Rescue!
1
Table of contents
Other LeapFrog Game Console manuals
Popular Game Console manuals by other brands

Intellivision Productions
Intellivision Productions 10Video user manual

Nintendo
Nintendo RVLSWC Operation manual

Nintendo
Nintendo N64 Rumble Pak Instruction booklet

ESCALADE
ESCALADE Quarterback Pass Attack M01901 instruction manual

Sega
Sega ROYAL RUMBLE 999-1117 Installation & service manual

Excalibur
Excalibur 460 operating manual