LG F1422TD0 User manual

P/No.: MFL59755509
Washing Machine
OWNER'S MANUAL
F1422TD(0~9)
F1222TD(0~9)
F1022TD(0~9)
Thank you for buying a
LG Fully Automati Washing ma hine.
Please read your owner's manual arefully, it provides
instru tions on safe installation, use and maintenan e.
Retain it for future referen e.
Re ord the model and serial numbers of your washing
ma hine.

2
roduct Features
P
ontents
C
Warnings....................................................................................3
Spe ifi ations.............................................................................4
Installation..................................................................................5
Care before washing................................................................11
Adding detergent .....................................................................12
Fun tion ...................................................................................14
How to use washer ..................................................................15
Maintenan e ............................................................................22
Troubleshooting guide .............................................................26
Terms of Warranty ...................................................................29
추가선택, 예약,
Protection against creases
With the alternate rotation of the drum, reasing in the laundry is
minimized.
Built-in Heater
Internal heater automati ally heats the water to the best
temperature on sele ted y les.
More economical by Intelligent Wash System
Intelligent Wash System dete ts the amount of load and water
temperature, and then determines the optimum water level and
washing time to minimize energy and water onsumption.
Child Lock
The Child lo k prevents hildren from pressing any button to
hange the settings during operation.
Low noise speed control system
By sensing the amount of load and balan e, it evenly distributes
load to minimize the spinning noise level.
Direct Drive System
The advan ed Brushless DC motor dire tly drives the drum without
belt and pulley.

3
arnings
W
F r y ur safety, the inf rmati n in this manual must be f ll wed t minimize
the risk f fire r expl si n, electric sh ck, r t prevent pr perty damage,
pers nal injury, r l ss f life.
!
READ ALL INSTRUCTIONS AND EXPLANATION OF THE INSTALLATION BEFORE USE
WARNING!
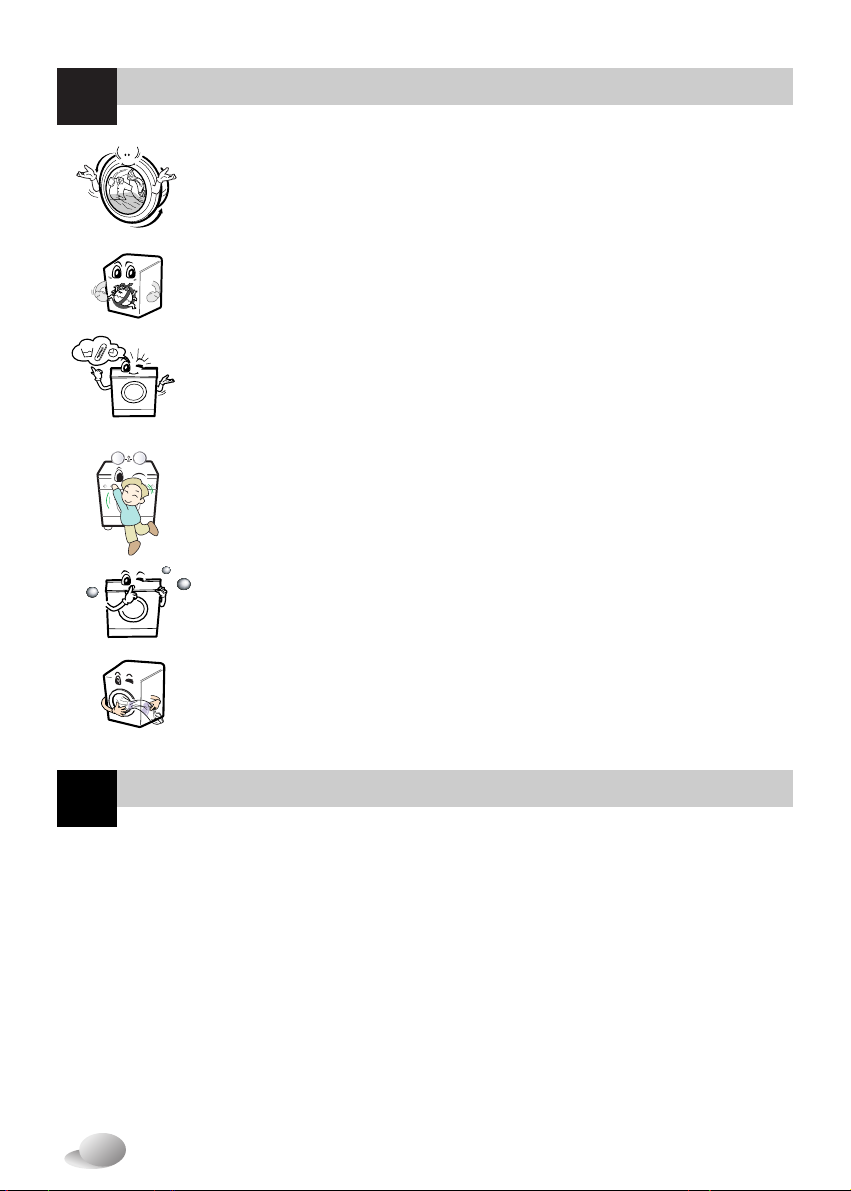
❊ D n t push d wn the d r excessively, when washer d r pen.
This c uld t pple ver the washer.
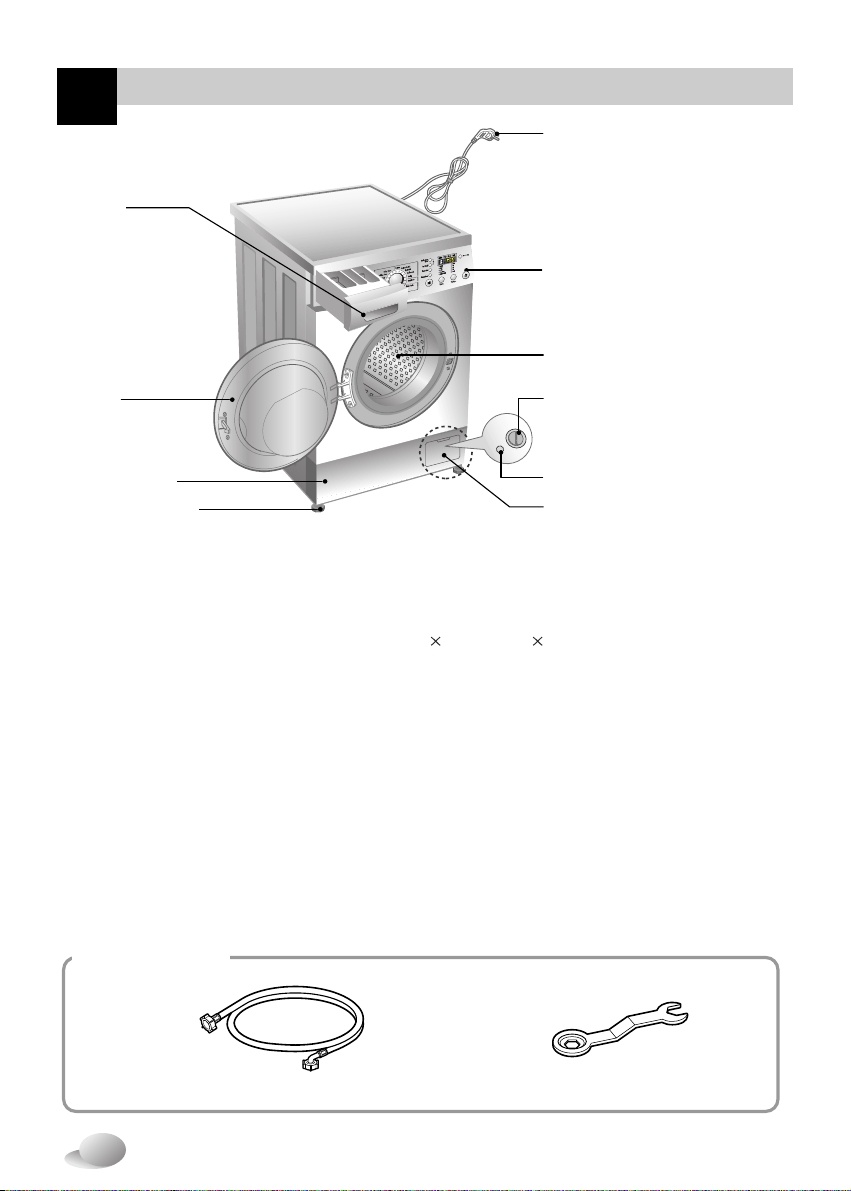
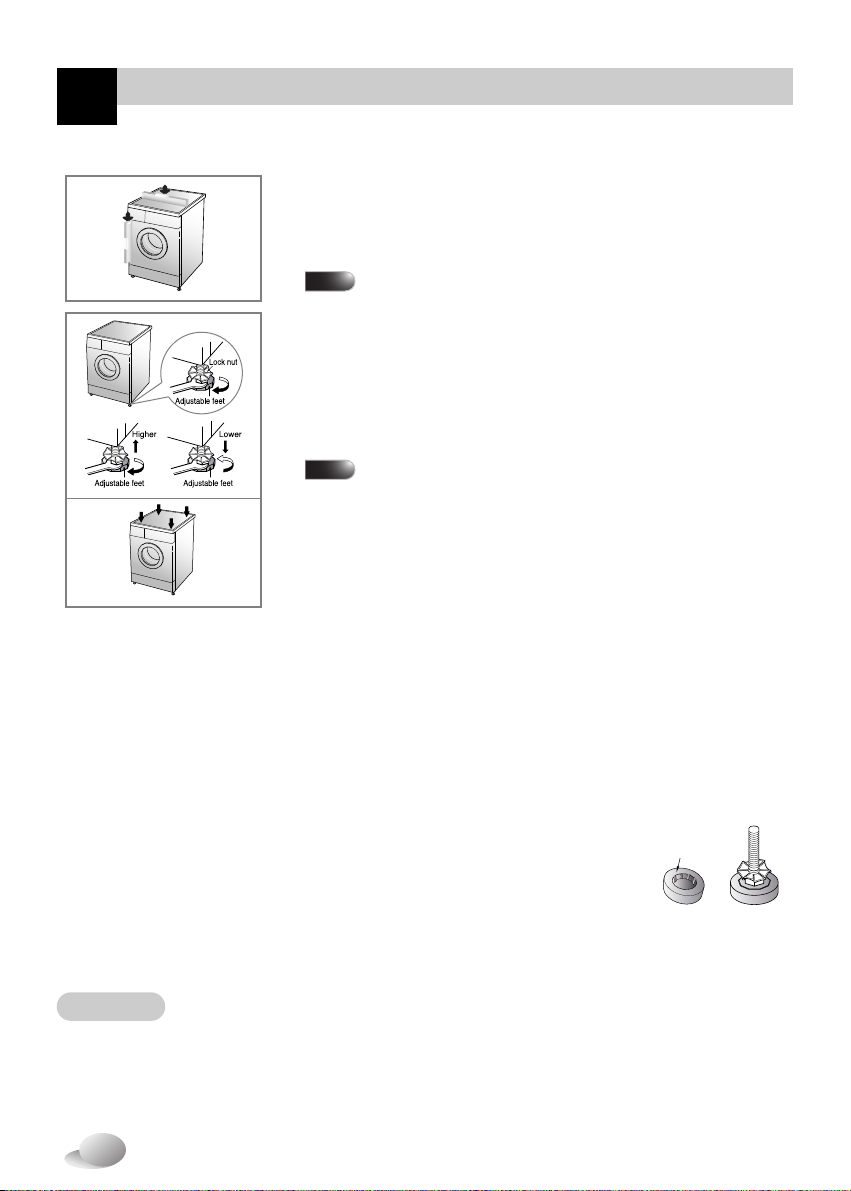
• Before installation, he k exterior damages. If it has,
do not install.
• Do not install or store the washer where it will
be exposed to the weather.
• Do not tamper with ontrols.
• Do not repair or repla e any part of the washer
or attempt any servi ing unless spe ifi ally
re ommended in the user-maintenan e instru tions
or published user-repair instru tions that you
understand and have the skills to arry out.
• Keep the area underneath and around your
applian es free of ombustible materials su h as
lint, paper, rags, hemi als, et .
• Close supervision is ne essary if this applian e is
used by or near hildren. Do not allow hildren to
play on, with, or inside this or any other applian e.
• Keep small animals away from the applian e.
• Do not leave the washer door open.
An open door ould enti e hildren to hang on the
door or rawl inside the washer.
• Never rea h into washer while it is moving. Wait
until the drum has ompletely stopped.
• The laundry pro ess an redu e the flame retardant
of fabri s.
• To avoid su h a result, arefully follow the garment
manufa turer’s wash and are instru tions.
• Do not wash or dry arti les that have been leaned
in, washed in, soaked in, or spotted with
ombustible or explosive substan es (su h as wax,
oil, paint, gasoline, degreasers, dry- leaning
solvents, kerosene, et .) whi h may ignite or
explode. Oil may remain in the tub after a whole
y le resulting in fire during drying. So, do not load
oiled lothes.
• Do not slam the washer door losed or try to for e
the door open when lo ked. This ould result in
damage to the washer.
• When the ma hine runs high temperature, the front
door may be very hot. Don’t tou h it.
• To minimize the possibility of ele tri sho k, unplug
this applian e from the power supply or dis onne t
the washer at the household distribution panel by
removing the fuse or swit hing off the ir uit breaker
before attempting any maintenan e or leaning.
• When unplugging power ord, do not pull out by
grasping the ord. Otherwise, the power ord may
be damaged.
• Never attempt to operate this applian e if it is
damaged, malfun tioning, partially disassembled, or
has missing or broken parts, in luding a damaged
ord or plug.
• Before dis arding an old ma hine unplug it. Render
the plug useless. Cut off the able dire tly behind
the applian e to prevent misuse.
• When a produ t was under water, Please all
servi e enter. The risk of ele tri sho k and fire.
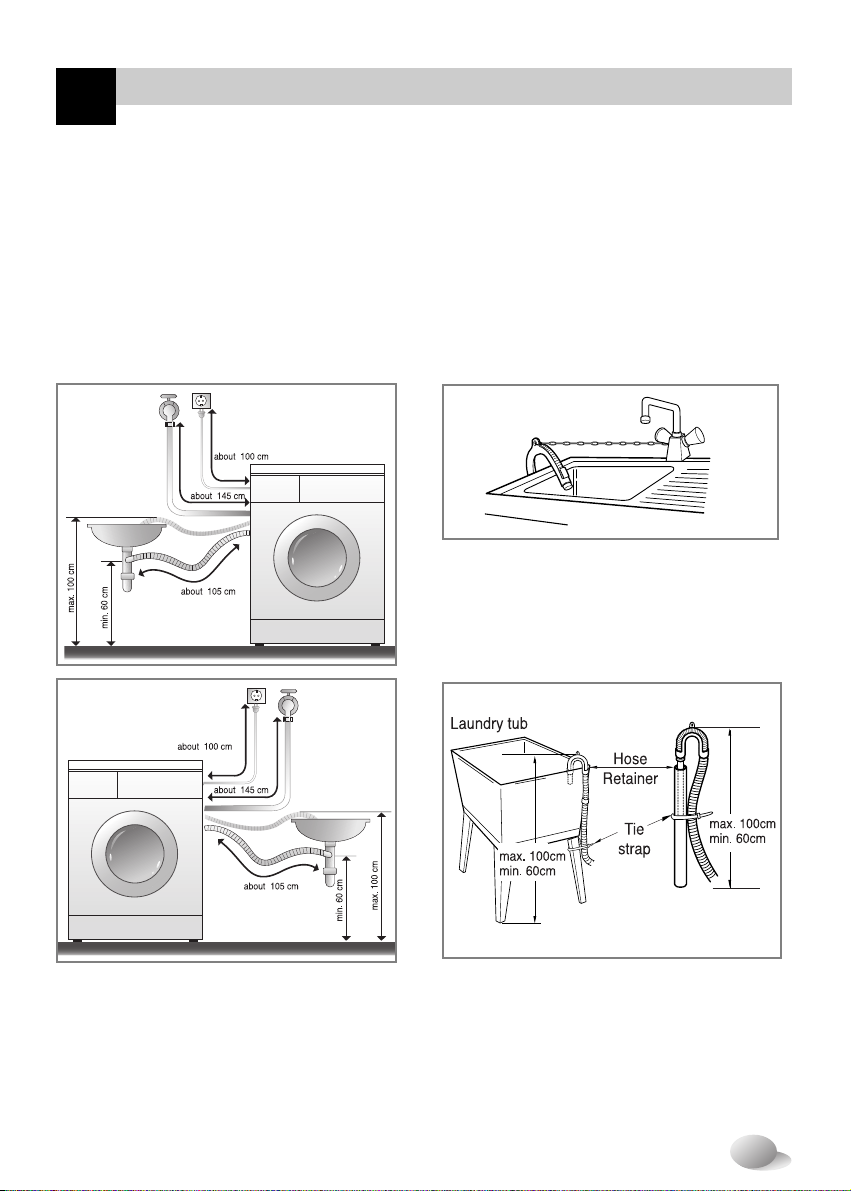
GROUNDING INSTRUCTIONS
This applian e must be grounded. In the event of malfun tion or breakdown, grounding will redu e the risk of ele tri sho k by providing a path
of least resistan e for ele tri urrent. This applian e is equipped with a ord having an equipment-grounding ondu tor and grounding plug.
The plug must be plugged into an appropriate outlet that is properly installed and grounded in a ordan e with all lo al odes and ordinan e.
• Do not use an adapter or otherwise defeat the grounding plug.
• If you don’t have the proper outlet, onsult an ele tri ian.
IMPORTANT SAFETY INSTRUCTIONS
WARNING :To redu e the risk of fire, ele tri sho k, or injury to persons when using
the washer, follow basi pre autions, in luding the following:
SAVE THESE INSTRUCTIONS
WARNING :
Improper onne tion of the equipment-grounding ondu tor an result in risk of ele tri sho k. Che k with
a qualified ele tri ian or servi eman if you are in doubt as to whether the applian e is properly grounded. Do not modify
the plug provided with the applian e - if it does not fit the outlet, have a proper outlet installed by a qualified ele tri ian.

4
pecifications
S
■
Accessories
■Name : Front loading washing ma hine
■Power supply : 220-240V~,50Hz
■Size : 600mm(W) 550mm(D) 850mm(H)
■Weight/Max.Watt : 58kg / 2100W
■Wash apa ity : 8kg
■Water onsumption : 56ℓ(7ℓ/ kg)
■Spin speed :
No Spin/400/800/1400
[F1422TD(0~9)]
No Spin/400/800/1200
[F1222TD(0~9)]
No Spin/400/800/1000
[F1022TD(0~9)]
■Permissible water pressure : 0.3-10kgf/㎠(30-1000kPa)
The appearan e and spe ifi ations may be varied without noti e to raise the units quality.
Drum
Drain Pump Filter
Drain Plug
L wer C ver Cap
D r
Drawer
(For detergent and
fabri softener)
C ntr l Panel
Adjustable Feet
L wer C ver
P wer Plug
• If the supply ord is damaged,
it must be repla ed by the
manufa turer or its servi e agents
or a similarly qualified person in
order to avoid a hazard.
Inlet hose (1EA) Spanner

5
nstallation
I
1. To prevent internal damage during
transport, the spe ial 4 bolts are
lo ked. Before operating the washer,
remove
the bolts along with the rubber bungs.
• If they are not removed, it may ause
heavy vibration, noise and malfun tion.
3. Take out the 4 bolts along with the
rubber bungs by slightly twisting the
bung. Keep the 4 bolts and the
spanner for future use.
• Whenever the applian e is transported,
the transit bolts must be refitted.
The applian e is fitted with transit bolts to prevent internal damage during transport.
• Packing and all transit bolts must
be removed before using the
washer.
When unpacking the base, be
sure to remove the additional
packing support in the middle
of the base packing.
2. Uns rew the 4 bolts with
the spanner supplied.
4. Close the holes with the aps supplied.
Transit bolts
Install or store where it will not be ex osed to tem eratures below freezing or ex osed to the weather.
Pro erly ground washer to conform with all governing codes and ordinances.
The base o ening must not be obstructed by car eting when the washing machine is installed on a
car eted floor.
In countries where there are areas which may be subject to infestation by cockroaches or other vermin,
ay articular attention to kee ing the a liance and its surroundings in clean condition at all times.
Any damage which may be cause by cockroaches or other vermin will not be covered by the a liance
guarantee.
Removing transit bolts
Packing Support
(Packing support may not
be used depending on
models.)
Washer
ase Packing

6
nstallation
I
Installation place requirement
Positioning
Install the washer on a flat hard floor.
Make sure that air ir ulation around the washer is not impeded by arpets,rug et .
• Never try to orre t any unevenness in the floor with pie es of wood, ardboard or similar
materials under the washer.
• If it is impossible to avoid positioning the washer next to a gas ooker or oal burning
stove,an insulating(85x60 m) overed with aluminum foil on the side fa ing the ooker or
stove,must be inserted between the two applian e.
• The washer must not be installed in rooms where the temperature an drop below 0°C.
• Please ensure that when the washer is installed, it is easily a essible for the engineer in
the event of a breakdown.
• With the washer installed adjust all four feet using the transit bolt spanner provided
ensuring the applian e is stable, and a learan e of approximately 20mm is left between
the top of the washer and the underside of the work-top.
Level fl r :
Allowable slope under entire washer is 1˚
P wer utlet :
Must be within 1.5 meters of either side of lo ation of
washer. Do not overload the outlet with more than one
applian e.
Additi nal Clearance :
For wall, door and floor modeling is required.
(10 m : rear /2 m:right & left side)
Do not pla e or store laundry produ ts on top of washer at
any times.
They an damage the finish or ontrols.
Drain Hose
Washer
Laundry
Tub
approx.
2 m

7
nstallation
I
▶Water supply pressure must be between 30kPa and 1000kPa
(0.3~10kgf/cm2)
▶D n’t strip r cr ssthread when c nnecting Inlet h se t the valve.
▶If the water supply pressure is m re than 1000kPa, a dec mpressi n device
sh uld be installed.
• Two rubber seals are supplied with the water inlet hoses. They are
used for preventing water leaks.
• Make sure the onne tion to taps is tight enough.
• Periodi ally he k the ondition of the hose and repla e the hose if
ne essary.
• Make sure that there is no kink on the hose and that it is not rushed.
■
Washing Machine is to be connected to the water mains using new hose-sets and old hose-sets should
not be used.
■
Connecting water supply hose
1. Do not use an extension ord or double adapter.
2. If the supply ord is damaged, it must be repla ed by the manufa turer or its servi e agents or similarly
qualified person in order to avoid a hazard.
3. Always unplug the ma hine and turn off the water supply after use.
4. Conne t the ma hine to an earthed so ket in a ordan e with urrent wiring regulations.
5. The applian e must be positioned so that the plug is easily a essible.
• Repairs to the washing ma hine must only be arried out by qualified personnel. Repairs arried out by
inexperien ed persons may ause injury or serious malfun tioning. Conta t your lo al servi e enter
• Do not install your washing ma hine in rooms where temperature below freezing may o ur. Frozen hoses may burst
under pressure. The reliability of the ele troni ontrol unit may be impaired at temperatures below freezing point.
• If the applian e is delivered in the winter months and temperatures are below freezing : Pla e the washing
ma hine at room temperature for a few hours before putting it into operation.
■
Electrical connection
CAUTION c ncerning the P wer C rd
Most applian es re ommend they be pla ed upon a dedi ated ir uit; that is, a single outlet ir uit
whi h powers only that applian e and has no additional outlets or bran h ir uits. Che k the
spe ifi ation page of this owner's manual to be ertain.
Do not overload wall outlets. Overloaded wall outlets, loose or damaged wall outlets, extension ords,
frayed power ords, or damaged or ra ked wire insulation are dangerous. Any of these onditions
ould result in ele tri sho k or fire. Periodi ally examine the ord of your applian e, and if its
appearan e indi ates damage or deterioration, unplug it, dis ontinue use of the applian e, and have
the ord repla ed with an exa t repla ement part by an authorized servi er.
Prote t the power ord from physi al or me hani al abuse, su h as being twisted, kinked, pin hed,
losed in a door, or walked upon. Pay parti ular attention to plugs, wall outlets, and the point where
the ord exits the applian e.
CAUTION
NOTE
After completing connection, if water leaks from the hose, repeat the same steps. Use the most conventional type
of faucet for water supply. In case the faucet is square or too big, remove the spacing ring before inserting the
faucet into the adaptor.
Cold
Cold
water
tap
Hose onne tor
Sealing
washer

8
nstallation
I
Normal Tap without thread & screw type inlet hose
Normal Tap without thread & one touch type inlet hose (Single inlet models)
1.Uns rew the fixing s rew to
atta h the tap.
2.Push the onne tor up till the
rubber pa king is in tight onta t
with the tap. Then tighten the 4
s rews.
3.Push the water supply hose
verti ally upwards so that the
rubber pa king within in the
hose an adhere ompletely to
the tap and then tighten it by
s rewing it to the right.
1.Untighten the upper onne tor
s rew.
2.Push the upper onne tor up till
the rubber pa king is in tight
onta t with the tap. Then
tighten the 4 s rews.
3. Conne t the water supply hose
to the middle onne tor,
pushing the plate down.
• Make sure that there are no
kinks in the hose and that it is
not rushed.
• Make sure that the rubber seal
is inside the hose onne tor.
Upper
Conne tor Rubber
pa king
Middle
onne tor
Fixing s rew
Guide plate
Conne tor
Rubber seal
Hose onne tor
Used the h riz ntal tap
Horizontal tap
Extension tap
Square tap
Rubber pa king
Upper
Conne tor
Middle
onne tor
Plate
Upper
Conne tor
Water supply
hose
• In ase the diameter of the tap is
large remove the guide plate.
• Turn the middle onne tor not
to have water leaked.
• To separate the water supply
hose from the middle onne tor
shut off the tap. Then pull the
inlet hose down, pushing the
plate down.

9
nstallation
I
Installation of drain hose
• The drain hose should not be pla ed
higher than 100 m above the floor.
• Proper se uring of the drain hose will
prote t the floor from damage due to
water leakage.
• When the drain hose is too long, do
not for e ba k into the washer. This
will ause abnormal noise.
• When installing the drain hose sink,
se ure it tightly with a string.
• Proper se uring of the drain hose will
prote t the floor from damage due to
water leakage.
This equipment is not designed for maritime use or for use mobile installations su h as
aravans, air raft et .
Turn off the stop o k if the ma hine is to be left for any length of time (e.g. holiday),
espe ially if there is no floor drain(gully) in the immediate vi inity.
When disposing of the applian e, ut off the mains able, and destroy the plug Disable the
door lo k to prevent young hildren being trapped inside.
Pa kaging material (e.g. Films, Styrofoam) an be dangerous for hildren. There is a risk
of suffo ation !
Keep all pa kaging well away from hildren

10
nstallation
I
Level adjustment
Concrete floors
Wooden floors (Suspended floors)
1. Adjusting the washing ma hine level properly prevents ex essive
noise and vibration.
Install the applian e on a solid and level floor surfa e, preferably in a
orner of the room.
2. If the floor is uneven, adjust the adjustable feet as required. (do not
insert pie es of wood et . under the feet)
Make sure that all four feet are stable and resting on the floor and
then he k that the applian e is perfe tly level. (use a spirit level)
※※
After the washer is level, tighten the lock nuts up towards of the base of
the washer. All lock nuts must be tightened.
❊ Diagonal Check
When pushing down the edges of the washing machine top plate diagonally, the machine
should not move up and down at all. (Please, check both of two directions
If machine rocks when pushing the machine top plate diagonally, adjust the feet again.
• The installation surface must be clean, dry and level.
• Install washer on a flat hard floor.
Tile floors (Slippery floors)
• Position each foot on the Tread Mate and level the machine to suit. (Cut Tread Mate into 70x70 mm
sections and stick the pieces on to the dry tile where machine is to be placed.)
※※
Tread Mate is a self adhesive material used on ladders & steps that prevents slipping.
• Wooden floors are particularly susceptible to vibration.
• To prevent vibration we recommend you place rubber cups under each foot,
at least 15mm thick under the washer, secured to at least 2 floor beams with screws.
• If possible install the washer in one of the corners of the room, where the floor is more stable.
※※
Insert the rubber cups to reduce vibration.
※※
You can obtain the rubber cups (p/no.4620ER4002B from the LG spares dept.
Important!
• Proper placement and levelling of the washer ensure long,regular and reliable operation.
• The washer must be absolutely horizontal and stand firmly in position.
• It must not “Seesaw” across corners under load.
• The installation surface must be clean, free from floor wax and other lubricant coatings.
• Do not let the feet of the washer get wet. If feet of the washer get wet, slipping may occur.
Rubber Cup
NOTE
Timber or suspended type flooring may contribute to
excessive vibration and unblance errors.
NOTE
In the case that the washing machine is installed on a raised
platform, it must be securely fastened in order
to eliminate the risk that it might fall off.

11
are before washing
C
1. Care Labels
Look for a are label on your lothes. This will tell you about the fabri ontent of your garment and
how it should be washed.
2. Sorting
To get the best results, Sort lothes into loads that an be washed with the same wash y le.
Water temperature and spin speed and different fabri s need to be washed in different ways.
Always sort dark olors from pale olors and whites. Wash separately as dye and lint transfer an
o ur ausing dis oloration of white et . If possible, do not wash heavily soiled items with lightly
soiled one.
Soil (Heavy, Normal, Light) Separate lothes a ording to amount of soil.
Color (White, Lights, Darks) Separate white fabri s from olored fabri s.
Lint (Lint produ ers, Colle tors) Wash lint produ ers and lint olle tors
separately.
3. Caring before loading
Caring before washing
Before the first washing
Combine large and small items in a load. Load large items first. Large items should not be more than half
the total wash load.
Do not wash single items. This may cause an out-of-balance load. Add one or two similar items.
• Che k all po kets to make sure that they
are empty. Items su h as nails, hair lip,
mat hes, pens, oins and keys an damage
both your washer and your lothes.
• Close zippers, hooks and strings to
make sure that these items don’t
snag on other lothes.
• Pre treat dirt and stains by brushing a little
detergent dissolved in water onto stains like
ollars and uffs to help shift dirt.
Sele t a y le (COTTON 60°C, add a half load of detergent) allow the unit to wash
without lothing. This will remove residues and water from the drum that may have been left
during manufa turing.
• Che k the folds of the flexible gasket (gray) and
remove any small arti les,if any.
• Che k inside of the drum and remove any left
items in it for next wash y le.
• Remove any lothing or items on the flexible
gasket to prevent lothing and the gasket
damages.

12
dding detergent
A
• Main wash only
➔
• Pre Wash + Main Wash
➔
• Do not ex eed the maximum fill line.
Close the dispenser drawer slowly.
Overfilling an ause early dispensing
of the fabri softener whi h ould stain
lothes.
• Do not leave the fabri softener in the
detergent drawer for more than 2 days.
(Fabri softener ould harden)
• Softener will automati ally be added
during the last rinse y le.
• Do not open the drawer when water is
supplied.
• Solvents(benzene, et ) are not
allowable.
1. The Dispenser Drawer
2. Adding Fabric Softener
Adding detergent and fabric softener
Do not pour fabric softener
directly on the cloths
NOTE
MAX
max

13
dding detergent
A
• The detergent sh uld be used acc rding t the
instructi n f the detergent manufacture.
• If t much detergent is used, t many suds
can ccur and this will decrease the washing
result r cause heavy l ad t the m t r.
• Use p wder detergent nly f r the fr nt
l ading washer.
❇
If suds ccur t much, pleas reduce the
detergent am unt.
• Detergent usage may need to be adjusted
for water temperature, water hardness,
size and soil level of the load. For best
results, avoid oversudsing.
4. Water softener
• A water softener, su h as Anti limes ale
(Calgon) an be used to ut down on the
use of detergent in extremely hard water
areas. Dispense a ording to the amount
spe ified on the pa kaging.
First add detergent and then the water
softener.
• Use the quantity of detergent as for soft
water.
❋
Tips
Full l ad : acc rding t
manufacturer’s rec mmendati n.
Part l ad : 3/4 f the n rmal
am unt.
Minimum l ad : 1/2 f full l ad.
• Detergent is flushed from the dispenser
at the beginning of the y le.
1) Open the door and Tablets into the
drum.
3. Detergent dosage
5. Using the Tablets
MAX
max
2) Load the laundry into the drum.
3) Close the door.

14
unction
F
Recommended courses according to the laundry type
❋Water Temperature : Sele t the water temperature to the wash y les.
Always follow garment manufa ture’s are label or instru tions when laundering.
❋Medic Rinse : For high effe tiveness or more purity in rinse operation you an hoose Medi Rinse option.
❋Pre Wash : If the laundry is heavily soiled, “Pre Wash” Course is re ommended.
❋Intensive : When washing heavily soiled laundry you an in rease effe tiveness by hoosing “Intensive” option.
❋Program setting with “Cotton
60˚C+
Intensive” option for test in a ordan e or in onformity with EN60456 and
IEC60456.
❋Crease Care : If you want to prevent rease, sele t Crease Care button.
Cotton Quick
Synthetic
Quick 30
Bio Care
Duvet
Hand Wash /
Wool
Boiling Care
Bulky
Baby Care
Cotton whi h is lightly soiled
Polyamide, A ryi , Polyester
Colored Laundry whi h is lightly
soiled fast.
For elimination of remnant
detergent after boiling wash
For elimination of protein stains
Hand wash marked deli ate and
ma hine wash wool laundry
Cotton bedding with filling duvet,
pillow, blanket, sofa over with
light filling
Delicate Deli ate laundry easily damaged
(silk, urtains...)
Thi k laundry absorbing mu h
water(Jumper)
Laundry for infant
60˚C
(95˚C)
30˚C
(
Cold
)
60˚C
(40˚C, 95°C)
40˚C
(
Cold
, 30˚C,
60˚C)
30˚C
(
Cold
, 40˚C)
95˚C
40˚C
(
Cold,
30˚C)
-
Medi Rinse
-
Intensive
-
Pre Wash
-
Crease Care
-
Intensive
-
Crease Care
Less than
8.0 kg
Less than
8.0 kg
1 king size
(9 dog)
Less than
6.0 kg
Less than
8.0 kg
Less than
2.0 kg
Less than
4.0 kg
Less than
8.0 kg
Less than
2.0 kg
Less than
2.0 kg
Program Fabric Type Proper Temp. Option Maximum Load
Cotton
Color fast garments
(shirts, night dresses,
pajamas...)and lightly soiled white
otton(underwear)
60˚C
(
Cold
, 30˚C,
40˚C, 95°C)
-
Medi Rinse
-
Intensive
-
Pre Wash
-
Crease Care
Less than
8.0 kg
❋ N tes : Neutral detergent is re ommended.
The wool y le features gentle tumbling and low-speed spin for garment are.
The wool wash y le of this ma hine has been approved by Woolmark for the washing of ma hine
washable Woolmark produ ts provided that the produ ts are washed a ording to the instru tions
on the garment label and those issued by the manufa turer of this washing ma hine M0806.

15
ow to use washer
H
• Press the P wer button to start.
• Press the Start/Pause button.
• Initial onditions
- Wash : main wash
- Rinse : 3 times
- Spin :
• 1400 rpm
[F1422TD(0~9)]
• 1200 rpm
[F1222TD(0~9)]
• 1000 rpm
[F1022TD(0~9)]
- Water temperature : 60˚C
- Program : C tt n
1. Cotton automatically
selected upon power on.
• Press the P wer button to start.
• Sele t the onditions whi h you want to use,
by turning the program dial and pressing
ea h button.
For selecting the each conditions, please refer to
the page16~page21
• Press the Start/Pause button.
2. Manual Selecting
3. Beep on/off
• The Beep on/off fun tion an be set by
pressing Time Delay button.
(About three se onds.)
• The Beep on/off fun tion an be set at any
time and it is automati ally an eled when
power failure.
Also the Beep on/off fun tion works when
power is off.

16
ow to use washer
H
(1) Dial : Program
(2) Button : Start / Pause
(3) Button : Spin
(4) Button : Temperature
(5) Button : Power
(6) Button : Medi Rinse
(7) Button : Pre Wash
(8) Button : Intensive
(9) Button : Crease Care
(10) Child Lo k
(11) Tub Clean
(12) Button : Time Delay
Power
• Press the Power button to turn power on and off.
• To an el the Time Delay fun tion, the power
button should be pressed.
• When the Power button is pressed, the
washer is ready for Cotton program. And
the other initial onditions as follows.
• So, if you want to advan e into the ashing
y le without hanging the program, just
press the Start/Pause button and then the
washer will pro eed.
■
Initial program
• [F1422TD(0~9)]
- C tt n Pr gram / Main wash /
N rmal Rinse / 1400 rpm / 60˚C
• [F1222TD(0~9)]
- C tt n Pr gram / Main wash /
N rmal Rinse / 1200 rpm / 60˚C
• [F1022TD(0~9)]
- C tt n Pr gram / Main wash /
N rmal Rinse / 1000 rpm / 60˚C
Program
• 13 programs are available a ording to the
laundry type.
• Lamp will light up to indi ate sele ted
program.
• When Start/Pause button is pressed, the
Cotton program is automati ally sele ted.
- By turning the Program dial, the program is
sele ted in order of
“ Cotton – Cotton Qui k – Syntheti – Duvet
– Bulky – Qui k 30 – Rinse+Spin – Spin –
Deli ate – Hand Wash/Wool – Bio Care –
Boiling Care – Baby Care”.
Regarding to the laundry type for each program
Please refer to the page14.
1. Power
2. Initial Program

17
ow to use washer
H
Start/Pause
Detecting
• This Start/Pause button is used to start
wash cycle or pause the wash cycle.
• If temporary stop of wash cycle is needed,
press the Start/Pause button.
• When in Pause, the power is turned off
automatically after 4 minutes.
• NB. The door will not open before 1 to 2
minutes when Pause is selected,
or at the end of the wash cycle.
• While the " etecting" is shown in the display
the machine rotates slowly and detects how
many laundries are loaded in the drum. It
will take a few seconds.
• Available in Cotton, Cotton Quick and
Synthetic.
Door Lock
• Lights whenever the door of the washer is
locked.
• The door can be unlocked by pressing the
Start/Pause button to stop the washer.
• The door can be opened after a short delay.
Option
• By pressing the
Option button, all
Option functions may
be selected.
• If the laundry is heavily soiled, “Pre Wash”
course is effective.
• Pre Wash is available in Cotton, Cotton
Quick, Synthetic, Bio Care, Baby Care and
Boiling Care.
• For high effectiveness or more purity in
rinse operation you can choose Medic Rinse
option.
• It can be chosen in all course with the
exception of Quick 30, Hand Wash/Wool,
uvet, elicate and Bulky.
• If you want to prevent crease, select this
button with spin speed.
The required lamp will light up for
identification.
• If the laundry is heavily soiled “Intensive”
option is effective.
• By selecting the Intensive option, the wash
time may be extended, depending on the
program selected.
1. Start
1. Medic Rinse
2. Pre Wash
3. Intensive
4. Crease Care
2. Pause

18
ow to use washer
H
Child Lock
If you hoose to lo k the buttons on the
ontrol assembly to prevent tampering this
fun tion may be sele ted.
• Child Lo k an be set by pressing the
Medic Rinse button and Pre Wash button
simultaneously. (About three se onds)
• To dea tivate Child Lo k system, press
Medic Rinse and Pre Wash buttons
simultaneously again. (About three
se onds)
• To hange to the desired program, whilst in
hild lo k mode.
1. Press both Medic Rinse and Pre Wash
together on e again. (About three
se onds)
2. Press the Start/Pause button.
3. Sele t the desired program and press the
Start/Pause button again.
• The hild lo k an be set at any time and it
an be dea tivated only by using hild lo k
an el pro ess. Turning the power off and
operational errors will not affe t hild lo k.
Tub Clean
Tub Clean ourse an be set by pressing
and holding Intensive and Crease Care
button simultaneously.
When Tub Clean ourse is set, display
“ ”, and all buttons are inoperable.
TUB CLEAN is spe ial y le to lean the
inside of the washer. This y le uses higher
water level with higher spin speed. Perform
this y le regularly.
H w t use the Tub Clean cycle:
1. Remove any lothing or items from the
washer and lose the door.
2. Open the dispenser drawer and add Anti
limes ale (Calgon) to the Main wash
ompartment.
NOTE: Do not add any detergent to the
detergent ompartments. Ex essive
suds may generate and leak from the
washer.
3. Close the dispenser drawer slowly.
4. Power On and then press and hold
Intensive and Crease Care button for 3
se onds. then “ ” is displayed in LED
5. Press the Start/Pause button to start.
6. After the y le is omplete, leave the door
open to dry around the washer door
opening, flexible gasket and door glass.
Change
the desired
program
CAUTION: If there is a small hild, be
areful not to leave the door
open for too long.
!

19
ow to use washer
H
Spin
[F1422TD(0~9)] [F1222TD(0~9)] [F1022TD(0~9)]
• Rinse Hold is sele ted by pressing the spin
button repeatedly this fun tion leaves
lothes in the ma hine; suspended in the
water after a rinse without entering into spin.
• To pro eed through to a drain or spin, on e
the rinse hold fun tion is ompleted using to
Program dial and Spin button to the
required program.(Spin)
The required lamp will light up for
identification.
• If No spin is sele ted, the washer stops after
draining water.
F1422TD(0~9)
- C tt n, C tt n Quick, Rinse+Spin, Quick 30,
Bi Care, Bulky
Rinse Hold - No Spin - 400 - 800 - 1400
- Delicate, Duvet, Baby Care, B iling Care,
Synthetic, Hand Wash/W l
Rinse Hold - No Spin - 400 - 800
- Spin
No Spin - 400 - 800 - 1400
• Spin Speed is available a ording to
the program as follows.
F1222TD(0~9)
- C tt n, C tt n Quick, Rinse+Spin, Quick 30,
Bi Care, Bulky
Rinse Hold - No Spin - 400 - 800 - 1200
- Delicate, Duvet, Baby Care, B iling Care,
Synthetic, Hand Wash/W l
Rinse Hold - No Spin - 400 - 800
- Spin
No Spin - 400 - 800 - 1200
F1022TD(0~9)
- C tt n, C tt n Quick, Rinse+Spin, Quick 30,
Bi Care, Bulky
Rinse Hold - No Spin - 400 - 800 - 1000
- Delicate, Duvet, Baby Care, B iling Care,
Synthetic, Hand Wash/W l
Rinse Hold - No Spin - 400 - 800
- Spin
No Spin - 400 - 800 - 1000
• After sele ting the spin ourse, the spin
speed an be hosen by pressing the spin
button.
1. Spin selection 2. No spin
3. Rinse Hold

20
ow to use washer
H
Water Temp.
• By pressing the Temp.
button, the water
temperature an be
sele ted.
- Cold
- 30˚C / 40˚C / 60˚C / 95˚C
• Water temperature an be sele ted
a ording to the program.
The required temperature lamp will light up for
identification.
For the more detailed information, please refer
to the page14.
Time Delay
Preparing washing before starting
“Time Delay”
- Turn on the water tap.
- Load laundry and lose the door.
- Pla e the detergent and fabri softener in
the drawer.
• How to set “Time Delay”
- Press P wer button.
- Turn the Pr gram dial to sele t
the program you require.
- Press Time Delay button and set the
desired time.
- Press the Start/Pause button.
(“:” blinks.)
• If Time Delay button is pressed, “3:00” is
displayed. The maximum delayed time is 19
hours and the minimum time is 3 hours.
• Ea h pressing of the button advan es on
time delay by one hour.
• To an el the time delay, press the P wer
button.
• Time Delay is ‘expe ted time’ from the
present to the ompletion of washing y le
or sele ted pro ess (Wash, Rinse, Spin).
• According to the condition of water supply and
temperature, the delayed time and the actual
washing time may vary.
This manual suits for next models
29
Table of contents
Languages:
Other LG Washer manuals