LG F2R3HYL Series User manual

8
F2R3HYL**

10
16
17
21
23
27
30
31
33
33
13
19
29
29
30


F2R3HYL**
7 kg
50 kPa and 800 kPa.
•The recommended maximum capacity for each washing programme
may differ. To get good wash results, please refer to Programme
Table in OPERATION chapter for further details.


INSTALLATION
Front View
Control Panel
Detergent dispenser drawer
Drum
Door
Cover cap
Drain pump filter
Drain plug
Adjustable feet
Rear View
Power plug
Transit bolts
Drain hose
Parts and Specifications
NOTE
•Appearance and specifications may change without notice to improve the quality of the appliance.
Accessories
* This feature may vary depending on the model purchased.

9
EN
Cold water inlet hose*
Spanner
Anti-Slip Sheet (2EA)*
Elbow bracket for securing drain hose*
Specifications
Model
F2R3HYL**
Power Supply 220 - 240 V~, 50 Hz
Product Weight 63 kg
•No further backflow protection required for connection to the water inlet.
Dimension (mm)
W 600 mm D 450 mm D’’ 970 mm
H 850 mm D’ 490 mm

10
Installation Place
Requirements
Before installing the appliance, check the following
information to make sure that the appliance should
be installed in a correct place.
Installation Location
•Install the appliance on a flat hard floor.
(Allowable slope under the appliance: 1°)
•Never try to correct any unevenness in the
floor with pieces of wood, cardboard or similar
materials under the appliance.
•If it is impossible to avoid positioning the
appliance next to a gas cooker or coal burning
stove, an insulation (850 X 600 mm) covered
with aluminum foil on the side facing the cooker
or stove must be inserted between the two
appliances.
•Ensure that when the appliance is installed, it is
easily accessible for an engineer in the event of
a breakdown.
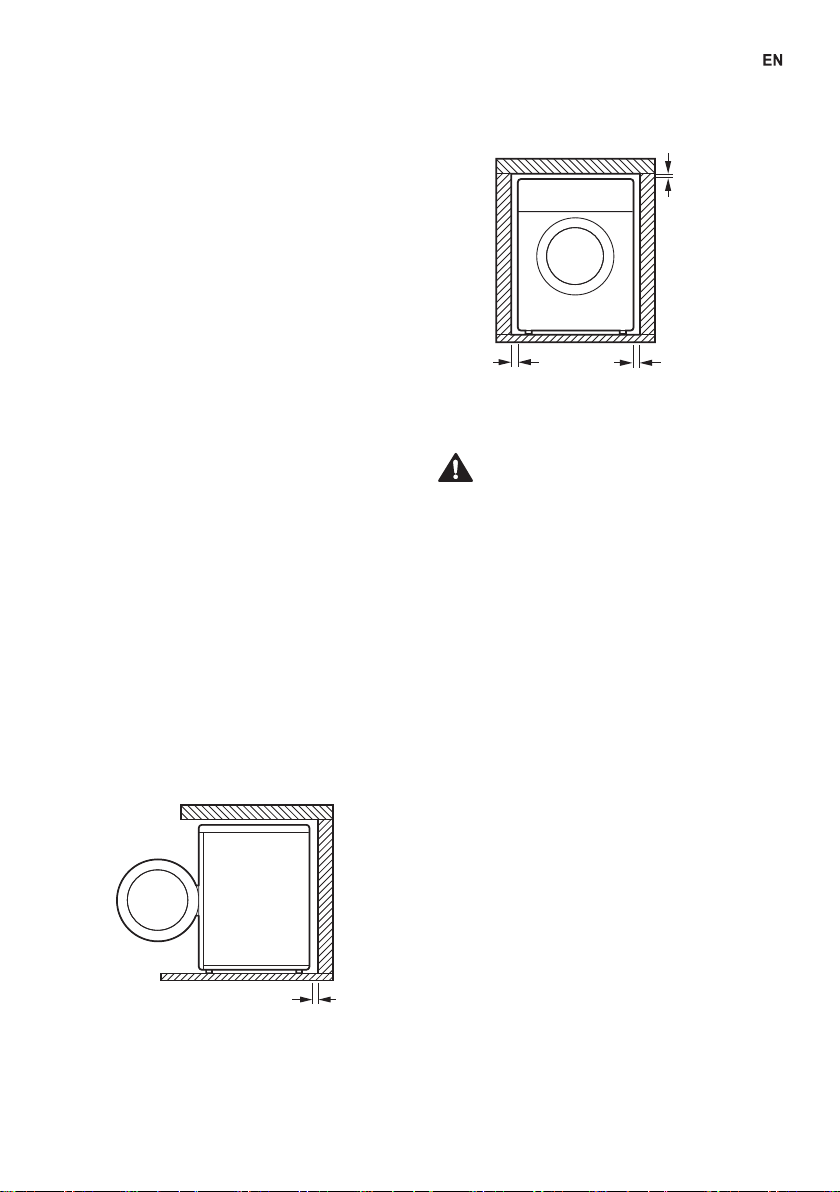
•With the appliance installed, adjust all four feet
using the transit bolt spanner provided to ensure
the appliance is stable, and a clearance of
approximately 5 mm is left between the top of
the appliance and the underside of any worktop.
•To ensure sufficient clearance for water inlet
hoses, drain hose and airflow, allow minimum
clearances of at least 20 mm at the sides and
100 mm behind the appliance. Be sure to
allow for wall, door, or floor moldings that may
increase the required clearances.
100 mm
20 mm
5 mm
20 mm
WARNING
•This appliance must only be used for domestic
household purposes and should not be used in
mobile applications.
NOTE
•If the appliance is installed on a raised platform,
it must be securely fastened in order to eliminate
the risk of falling off.
Wooden Floors (Suspended
Floors)
When installing the appliance on wooden floors,
use rubber cups to prevent the appliance from
excessive vibration and unbalance.
•To prevent vibration, we recommend you to
place rubber cups aat least 15 mm thick of the
each foot of the appliance, secured to at least
two floor beams with screws.

11
•If possible, install the appliance in one of the
corners of the room, where the floor is more
stable.
•Fit the rubber cups to reduce vibration.
NOTE
•You can purchase rubber cups (Part
No.4620ER4002B) from the LG Electronics
service centre.
Ventilation
•Make sure that air circulation around the
appliance should not be impeded by carpets,
rugs, etc.
Ambient Temperature
•Do not install the appliance in rooms where
freezing temperatures may occur. Frozen hoses
may burst under pressure. The reliability of
the electronic control unit may be impaired at
temperatures below freezing point.
•If the appliance is delivered in winter and
temperatures are below freezing, place the
appliance at room temperature for a few hours
before putting it into operation.
Electrical Connection
•Do not use an extension cord or double adapter.
•Always unplug the appliance and turn off the
water inlet after use.
•Connect the appliance to an earthed socket in
accordance with current wiring regulations.
•The appliance must be positioned so that the
plug is easily accessible.
•Repairs to the appliance must only be carried
out by the qualified personnel. Repairs carried
out by inexperienced persons may cause injury
or serious malfunctioning. Contact your LG
Electronics service centre.
•Power outlet must be at least 1 meter of either
side of the location of the appliance.
WARNING
•The power plug must be plugged into an
appropriate socket outlet that is installed and
grounded in accordance with all local codes and
ordinances.
Unpacking the Appliance
Lifting the Appliance Off the Foam
Base
* This feature may vary depending on the model
purchased.
1 After removing the carton and shipping
material, lift the appliance off the foam base.
Make sure the tub support a* comes off with
the base and is not stuck to the bottom of the
appliance.
2 If you must lay the appliance down to remove
the carton base b, always protect the side of
the appliance and lay it carefully on its side. Do
not lay the appliance on its front or back.
*

Cut the strap and open the upper flaps
of packing box & take out the Anti Rat
Cover
Anti Rat Cover is
Placed below the upper
flaps of packing box.
12
Removing the Bolt Assemblies
1 Starting with the bottom two transit bolts a, use
the spanner (included) to fully loosen all transit
bolts by turning them counterclockwise.
2 Remove the bolt assemblies by wiggling them
slightly while pulling them out.
3 Install the hole caps.
•Locate the hole caps bincluded in the
accessory pack or attached on the back.
Levelling the Appliance
Checking the Levelling
When pushing down the edges of the top plate
diagonally, the appliance should not move up and
down at all (check both directions). If the appliance
rocks when pushing the top plate of the appliance
diagonally, adjust the feet again.
Adjusting and Levelling the Feet
When installing the appliance, the appliance should
be aligned and perfectly level. If the appliance is not
aligned and level properly, the appliance may be
damaged or may not operate properly.
1 Turn the adjustable feet as required if the floor
is uneven.
•Do not insert pieces of wood etc. under the
feet.
•Make sure that all four feet should be stable
and resting on the floor.
2 Check if the appliance is perfectly level using a
spirit level a.

13
3 Secure the adjusting feet with the lock nuts b
by turning counterclockwise against the bottom
of the appliance.
4 Check if all lock nuts at the bottom of the
appliance are secured properly.
NOTE
•Proper placement and levelling of the appliance
will ensure long, regular, and reliable operation.
•The appliance must be 100% horizontal and
stand firmly in position.
•It must not ‘Seesaw’ across corners under the
load.
•Do not let the feet of the appliance get wet.
Failure to do so may cause vibration or noise.
Using Anti-Slip Sheets
This feature may vary depending on the models
purchased.
If you install the appliance on a slippery surface, it
may move because of excessive vibration. Incorrect
levelling may cause malfunction through noise and
vibration. If this occurs, install the anti-slip sheets
under the levelling feet and adjust the level.
1 Clean the floor to attach the anti-slip sheets.
•Use a dry rag to remove and clean foreign
objects and moisture. If moisture remains,
the anti-slip sheets may slip.
2 Adjust the level after placing the appliance in
the installation area.
3 Place the adhesive side aof the anti-slip
sheets on the floor.
•The most effective way is to install the anti-
slip sheets under the front feet. If it is difficult
to place the sheets under the front feet of the
appliance, attach them under the rear feet.
4 Put the appliance on the anti-slip sheets.
•Do not attach the adhesive side aof anti-slip
sheets to the feet of the appliance.
NOTE
•Additional anti-slip sheets are available at LG
Electronics service centre.
Connecting the Water Inlet
Hose
Note for Connection
•Water pressure must be between 50 kPa and
800 kPa (0.5‒8.0 kgf/cm²). If the water pressure
is more than 800 kPa, a decompression device
should be installed.
•Do not overtighten the water inlet hose to all
valves.
•Periodically check the condition of the hose and
replace the hose if necessary.

EN
14
Checking the Rubber Seal on the
Water Inlet Hose
Two rubber seals aare supplied with the water
inlet hoses. They are used to prevent water leaks.
Make sure that the connection to taps should be
sufficiently tight.
Connecting Hose to Water Tap
Screw - Type Hose to Tap with Thread
Screw the hose connection to the water supply,
which has ¾” threaded union.
NOTE
•Before connecting the inlet hose to the water
tap, turn on the water tap to flush out foreign
substances (dirt, sand, sawdust, and etc.) in the
water lines. Let the water drain into a bucket,
and check the water temperature.
Connecting Screw-Type Hose to Tap
Without Thread
1 Loose the four fixing screws.
Fixing screw
Upper
connector
Rubber
seal
2 Remove the guide plate if the tap is too large to
fit the adapter.
Guide plate
3 Push the adapter onto the end of the tap so that
the rubber seal forms a watertight connection.
Tighten the four fixing screws.

EN
15
4 Push the supply hose vertically upwards so
that the rubber seal within the hose can adhere
completely to the tap and then tighten it by
screwing it to the right.
Plate
Supply
hose
Connecting One Touch Type Hose
to Tap Without Thread
1 Unscrew the adapter ring plate and loose the
four fixing screws.
Ring plate
2 Remove the guide plate if the tap is too large to
fit the adapter.
Guide plate
3 Push the adapter onto the end of the tap so that
the rubber seal forms a watertight connection.
Tighten the four fixing screws and the adapter
ring plate.
4 Pull the connector latch plate down, push the
supply hose onto the adapter, and release the
connector latch plate. Make sure the adapter
locks into place.
Latch plate
NOTE
•After connecting the supply hose to the water
tap, turn on the water tap to flush out foreign
substances (dirt, sand, sawdust, and etc.) in the
water lines. Let the water drain into a bucket,
and check the water temperature.
Connecting Hose to the Appliance
Screw the water line to the water supply on the
back of the appliance.
NOTE
•After completing connection, if water leaks from
the hose, repeat the same steps. Use the most
conventional type of tap for the water supply. If
the tap is square or too big, remove the guide
plate before inserting the tap into the adaptor.
•Make sure that the hose should not be kinked
or trapped.

16

17
Operation Overview
Using the Appliance
Before the first wash, select the Cotton wash
programme and add a half amount of the detergent.
Start the appliance without laundry. This will remove
possible residues and water from the drum that may
have been left during manufacturing.
1 Sort laundry and load items.
•Sort laundry by fabric type, soil level, colour
and load size as needed. Open the door and
load items into the appliance.
2 Add detergent or softener.
•Add the proper amount of detergent to the
detergent dispenser drawer. If desired, add
bleach or fabric softener to the appropriate
areas of the dispenser.
3 Turn on the appliance.
•Press the Power button to turn on the
appliance.
4 Choose the desired cycle.
•Press the cycle button repeatedly or turn the
cycle selector knob until the desired cycle is
selected.
•Now select a wash temperature and spin
speed. Pay attention to the care labeling of
your clothes.
5 Begin cycle.
•Press the Start/Pause button to begin the
cycle. The appliance will agitate briefly
without water to measure the weight of the
load. If the Start/Pause button is not pressed
within 15 minutes, the appliance will shut off
and all settings will be lost.
6 End of cycle.
•When the cycle is finished, a melody will
sound. Immediately remove your clothing
from the appliance to reduce wrinkling.
Check around the door seal when removing
the load for small items that may be caught
in the seal.
Preparing the Wash Load
Sort laundry for best washing results, and then
prepare laundry according to the symbols on the
care labels.
Sorting the Wash Load
•For best washing results, sort your clothes
according to the symbol on the care labels
according to the type of fabric and washing
temperature and wash them with adapted spin
speed.
•Always sort dark colours from pale colours and
whites. Wash separately as dye and lint transfer
can occur causing discolouration of white and
pale garments. If possible, do not wash heavily
soiled items with lightly soiled ones.
NOTE
•Soil (Heavy, Normal, Light): Separate clothes
according to amount of soil. The Intensive
option is effective when washing normally and
heavily soiled laundry.
•Colour (White, Lights, Darks): Separate white
fabrics from coloured fabrics. Wash new dark
and colored garments separately at first.
•Lint (Lint producers, Collectors): Wash lint
producers and lint collectors separately.

18
Checking the Clothes Care Label
Symbols on the care labels
The symbols tell you about the fabric content of
your garment and how it should be washed.
Symbol Wash / Fabric type
•Normal Wash
•Cotton, Mixed Fabrics
•Easy Care
•Synthetic, Mixed Fabrics
•Special Delicate Wash
•Delicates
•Hand Wash Only
•Wool, Silk
•Do not wash
NOTE
•The dashes under the symbol give you
information about the type of fabric and the
maximum allowance of mechanical stress.
Checking the Clothes before
Loading
•Combine large and small items in a load. Load
large items first.
•Large items should not be more than half of the
total wash load. Do not wash single items. This
may cause an unbalanced load. Add one or two
similar items.
•Check all pockets to make sure that they are
empty. Items such as nails, hair clips, matches,
pens, coins and keys can damage both your
appliance and clothes.
•Wash delicates (stockings, underwired bras) in
a wash net.
•Close zippers, hooks and strings to make sure
that these items do not snag on other clothes.
•Pre-treat dirt and stains by brushing a small
amount of detergent dissolved water onto stains
to help lift dirt.
•Check the folds of the flexible gasket (gray) and
remove any small articles.
CAUTION
•Check if the laundry gets stuck between the
door and the seal, otherwise the laundry may
get damaged while washing.
•Remove items from the flexible gasket to prevent
clothing and door seal damage.

19
Adding Detergents and
Softeners
Detergent Dosage
•Detergent should be used according to the
instruction of the detergent manufacturer and
selected according to type, colour, soiling of the
fabric and the washing temperature.
•If too many suds occur, reduce the detergent
amount.
•If too much detergent is used, too many suds
can occur and this will result in poor washing
results or cause heavy load to the motor.
•If you wish to use liquid detergent, follow
the guidelines provided by the detergent
manufacturer.
•You can pour liquid detergent directly into the
main detergent drawer if you are starting the
wash cycle immediately.
•Do not use liquid detergent if you are using
Delay End function, or if you have selected
Pre Wash option, as the liquid may harden.
•Detergent usage may need to be adjusted for
water temperature, water hardness, size and
soil level of the load. For best results, avoid
oversudsing.
•Refer to the label of the clothes, before choosing
the detergent and water temperature.
•Use only suitable detergents for the respective
type of clothing:
−Liquid detergent is often designed for special
applications, e.g. for coloured fabric, wool,
delicate or dark laundry.
−Powdered detergent is suitable for all types
of fabric.
−For better washing results of white and pale
garments, use powdered detergent with
bleach.
−Detergent is flushed from the dispenser at the
beginning of the wash cycle.
NOTE
•Do not let the detergent harden. Doing so may
lead to blockages, poor rinse performance or
odour.
•Full load: According to manufacturer’s
recommendation.
•Part load: ¾ of the normal amount
•Minimum load: ½ of full load
Adding Detergent
NOTE
•Use the appropriate amount of detergent. Too
much detergent, bleach or softener may cause
an overflow.
•When selecting Pre Wash, divide the dosage
into ⅓ for pre wash and ⅔ for main wash.

20
EN
Adding Detergent Tablet
Detergent tablet is also available when washing
laundry.
1 Open the door and put detergent tablets into
the drum.
2 Load the laundry into the drum and close the
door.
NOTE
•Do not put tablets into the drawer.
Adding Fabric Softener
•Do not exceed the maximum fill line. Overfilling
can cause early dispensing of the fabric
softener, which may stain clothes. Close the
dispenser drawer slowly.
•Do not leave the fabric softener in the detergent
drawer for more than 2 days (Fabric softener
may harden).
•Softener will automatically be added during the
last rinse cycle.
•Do not open the drawer when water is being
supplied.
•Solvents (e.g. benzene, etc.) must not be used.
NOTE
•Do not pour fabric softener directly onto the
garments, as this may cause stains on your
clothing.
Adding Water Softener
A water softener, such as anti-limescale can be
used to cut down on the use of detergent in areas
with high water hardness level.
•First add detergent, and then the water softener.
Dispense according to the amount specified on
the packaging.
Table of contents
Other LG Washer manuals
Popular Washer manuals by other brands

Beko
Beko D 6081 B user manual

Hotpoint Ariston
Hotpoint Ariston AQUALTIS AQ9D 292 I Instructions for installation and use

Whirlpool
Whirlpool AWT 8123 D - SERVICE Programme chart

Samsung
Samsung WD8122CVC user manual

Bosch
Bosch WAN24263BY User manual and installation instructions

Whirlpool
Whirlpool RAP5244A Use and care guide

Homemaker
Homemaker HCLT user manual

Haier
Haier HW80-B14979 user manual

Fisher & Paykel
Fisher & Paykel excellence GW512 Installation instructions and user guide

Tricity Bendix
Tricity Bendix AW870 OPERATING AND INSTALLATION Manual

Tricity Bendix
Tricity Bendix CAW 1210 Operating and installation instructions

Indesit
Indesit IWB 6123 Instructions for use