Limora Limora Classic User manual

- 1 -
Bedienungsanleitung /
Operation manual
UKW Radio mit USB/SD/MP3 Player und Bluetooth-Konnektivität
FM Radio with USB/SD/MP3 Player and Bluetooth connectivity

- 2 -
Bedienfeldfunktionen
• Die Bedienung des Radios ist intuitiv und folgt erprobten
Branchenstandards. Druck auf den rechten Knopf schaltet
das Gerät ein, Drehen des Knopfes steigert oder reduziert die
Lautstärke.
• Gefundene Radiosender speichern Sie durch längeres Drü-
cken auf eine der Speichertasten. Das Speichern wird mit
einem kurzen Ton quittiert.
• Der AUX Eingang nimmt MP3 Player, CD-Spieler oder andere
Geräte mit einer 3,5mm Kopörerklinke auf.
• Der SD Kartenslot nimmt SD und kompatible Formate an. Die
Audiodateien im Rootverzeichnis werden zuerst gespielt. Eine
Verzeichnisstruktur legen Sie am besten bereits beim Kopieren
der Audiodateien an.
• Der USB Slot kann zum Laden Ihres Mobiltelefons verwendet
werden. Auf einem USB Stick bendliche Audiodateien (MP3/
WMA) werden abgespielt.
Ein/Aus Schalter und Modus
Frequenzbandumstellung BAND/
Telefon Annahme Auswahl der Sendestationen und APS
Zeituhr Einstellung DIS/Telefon Auflegen
Empfänger Fernbedienung
Lautstärkeregler und Funktionswechsel VOL5/
Mehrfach Funktionswahl SEL
Speicherauswahl "1,2,3,4,5,6"
AUX Eingang
SD Kartenslot
USB Anschluss

- 3 -

- 4 -
Fernbedienungsfunktionen
Das Radio kann ohne die Fernbedienung in Betrieb genommen
werden. Die Fernbedienung bietet zusätzliche Funktionen, die
auf dem Bedienfeld des Radios keinen Platz gefunden haben.
Ein/Aus
Modus Wechsel
Lautstärke lauter
Lautstärke leiser
Mehrfach Funktionswahl
Bedienelemente zur Dateiauswahl
Stummschaltung
Suche für Sendestationen AMS/ Telefon Auflegen
Sound Einstellungen DISP
Auswahl der Scanfunktionen
Frequenzbandumstellung BAND/ Telefon Annahme
Gleichmäßige Lautstärke

- 5 -

- 6 -
Willkommen
Wir wünschen Ihnen viel Spaß mit Ihrem Limora Classic Car
Radio. Das sehr kompakte Gerät kombiniert guten Radio-
empfang mit MP3 Abspielfunktionen von vielen Medien.
Besonderes Highlight ist die Freisprechfunktion in Kombination
mit Ihrem Bluetooth - fähigen Mobiltelefon.
Bitte lesen Sie die gesamte Bedienungsanleitung, um die
korrekte Funktionsweise dieses Radios zu verstehen und um
weitere Informationen zu erhalten.
Wichtige Hinweise!
Bitte beachten Sie den Betriebstemperaturbereich von -20°C
bis +60°.
Wenn das Gerät nicht mit Strom versorgt wird, überprüfen Sie
bitte den Anschluß des Gerätes. Wenn alles normal ist,
überprüfen Sie die Sicherung.
Um einen Kurzschluss zu vermeiden, dürfen keine Metall-
gegenstände (Schrauben, Münzen, Werkzeuge) und andere
Komponenten in das Gerät fallen.
Um die Verkehrssicherheit zu gewährleisten, konzentrieren
Sie sich bitte auf die Straße und nicht auf die Bedienung des
Gerätes während der Fahrt.
Vor der Installation ist der Schaltplan zu beachten (siehe Seite 21).
Beachten Sie, dass der Anschluss korrekt ist um einen Kurzschluss
zu vermeiden.
Das Gerät akzeptiert das Musikformat MP3 und WMA, laden
Sie keine Bilder und Videodateien herunter, um sie auf diesem
Gerät abzuspielen. Sie können Videoformate nicht abspielen,
sie verlangsamen das Gerät. Wenn das aktuelle Format das
MP3-Format ist, zeigt das Display MP3 an, wenn es WMA-Format
ist wird WMA angezeigt.

- 7 -
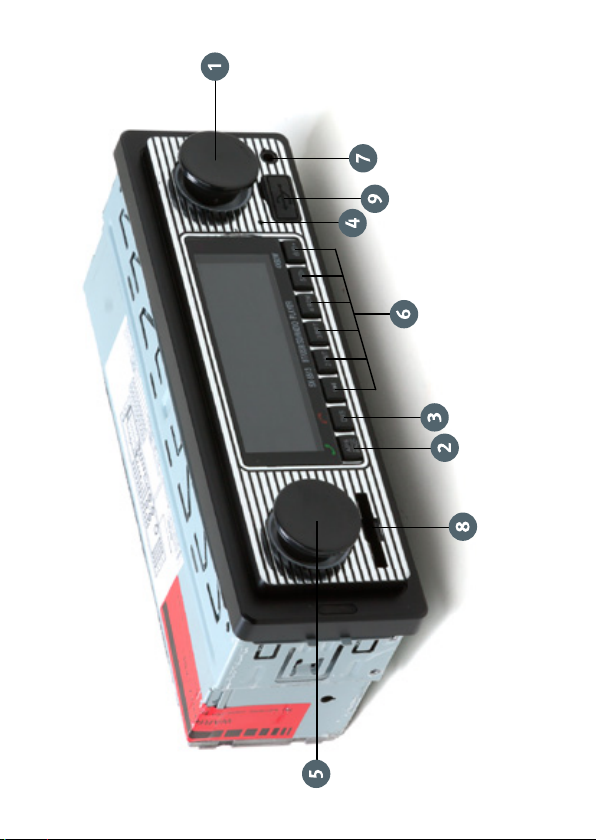
Achten Sie beim Einführen des USB-Sticks oder der SD-Karte
bitte darauf, dass keine Wollfussel, Haare oder Fremdkörper in
den USB- oder SD-Schacht gelangen, um Kontaktschwierigkei-
ten zu vermeiden.
Verbindung mit dem Bluetooth fähigen Mobiltelefon: Radio
einschalten. Am Telefon Bluetooth einschalten, nach Geräten
suchen. Das Limora Radio wird als neues Gerät erkannt, pairen.
Code ist 0000 oder 1234. Eingehende Anrufe werden mit dem
grünen Hörer abgenommen und rot beendet, solange das Telefon
und das Radio verbunden sind.
Installationshinweise
1. Einbau des Geräts
Bitte beachten Sie bei der Installation den Schaltplan Seite 21!
Das Radio benötigt einen Din/ISO einfach Einbauschacht. Wenn
Ihr Fahrzeug den benötigten Schacht nicht zur Verfügung stellt,
haben wir mit der Bestellnummer 510899 eine unterbaufähige
Einbaukonsole, die das Radio aufnehmen kann.
Zur Montage des Metallrahmens/Montagerahmens wird dieser in
das Armaturenbrett (oder die Einbaukonsole) eingesetzt und die
Befestigungslaschen mit einem Schraubendreher an geeigneten
festen Stellen umgelegt (siehe auch Einbauzeichnungen).
Das Radio wird von vorne in den Metallrahmen geschoben. Aus
dem Metallrahmen entnehmen lässt es sich nur mit Hilfe der
beiden mitgelieferten Entriegelungsschlüssel.
2. Elektrischer Anschluss
Das Gerät wird über einen mitgelieferten Iso Anschlussblock
angeschlossen. Die Stecker sind kodiert und passen nur in
einer Position.
ISO Stecker Spannungsversorgung:
• Gelb (Speicherleitung): 12V positiv Konstantspannung
(Klemme 30) zur konstanten Spannungsversorgung des
Datenspeichers.

- 8 -
• Rot (Stromleitung): 12V positive geschaltete Spannung
(Klemme 15) zur geschalteten (Zündschalter) Spannungs-
versorgung des Gerätes.
• Blau: Schaltleitung für elektrische Antenne (kann unbelegt
bleiben)
• Schwarz: Masse (-)
Bitte stellen Sie die Verbindungen zur Fahrzeugelektrik sach-
und fachgerecht her. An Klemme 30 und Klemme 15 keine
Stromdiebe verwenden, sondern 1,5 mm² Leitung vom Siche-
rungskasten ziehen.
ISO Stecker Lautsprecheranschluss
• Sie können vier Lautsprecher anschließen, siehe Anschluss-
diagramm.
• Wenn Sie nur zwei Lautsprecher anschließen, benutzen Sie
bitte die Anschlüsse für vorne. Der Fader muss dann auch
nach vorne gestellt werden.
• Sie können Lautsprecher mit 4-8 Ohm Impedanz verwenden.
Unterbrechen Sie die Stromversorgung, bevor Sie die Laut-
sprecher anschließen, um Kurzschlüsse zu vermeiden.
• Achten Sie darauf, dass keines der Lautsprecherkabel gegen
Masse liegt.
• Die Cinchanschlüsse auf der Gehäuserückseite sind für exter-
ne Verstärker. Wenn kein externer Verstärker montiert wird,
kann der Anschluss unbeachtet bleiben.
Installieren Sie die Antenne: Die Zuleitung der Antenne muss in
den vorgesehene Antenneneingang gesteckt werden. Damit die
Antenne einen guten Empfang hat, muss sie mit der Fahrzeug-
masse verbunden sein.

- 9 -
Einbauzeichnung
Fehlerbehebung
Bitte setzen Sie sich mit dem Radio und seinen Funktionen im
Vorfeld auseinander. Viele vermeintliche Fehler sind unent-
deckte Features.
Die häugsten elektrischen Fehler sind Fehler in der Verdrah-
tung, Massefehler oder durchgebrannte Sicherungen.
1. Keine Stromversorgung?
Prüfen Sie die Spannung. Liegen Dauerplus und Zündungsplus
an? Wenn nicht, die Sicherungen der Bordelektrik prüfen.
Wenn Fahrzeugseitig die Stromversorgung sichergestellt ist,
prüfen Sie die Sicherung im Radio und ersetzen sie ggf. durch
eine Sicherung gleichen Typs und gleicher Stärke.
2. Ausschalten durch Drücken der Aus-Taste funktioniert nicht:
Das Gerät hat sich aufgehängt. Am Bedienfeld ist hinter einem
kleinen Loch oberhalb des USB Anschlusses eine Reset-Taste.
Bitte setzen Sie das Gerät zurück, im Allgemeinen funktioniert
es dann wieder.

- 10 -
Wenn es immer noch nicht richtig funktioniert, ziehen Sie den
Stecker des Versorgungskabels für eine kurze Zeit und stecken
Sie dann den Stecker wieder ein.
3. Lautlos oder zu leise:
• Lautstärkeregler oder Balance-Einstellungen werden auf der
Seite eingestellt, die Fader- und Balance-Einstellungen an der
zentralen Position. Wenn Sie die Lautsprecher vorne ange-
schlossen haben, sollte der Fader auch neutral oder vorne
stehen.
• Ein-/Ausgangskabel oder Kabelbaum sind ordnungsgemäß
angeschlossen? Bitte beachten Sie hierzu den Schaltplan.
Verpolung bei den Lautsprechern?
• Ist die Lautstärke zu hoch oder eine zu hohe Impedanzlast,
schützt sich das Gerät automatisch vor Überlastung und
schaltet ab: Ändern Sie Einstellungen, das Gerät schaltet
nach Abkühlung wieder auf normal.
4. Klangqualität (Verzerrung):
• Prüfen Sie, ob Lautsprecherkabel z.B. durch eine Schraube
eingeklemmt werden und ob die Lautsprecherkabel richtig
verdrahtet sind. Prüfen Sie die Lautsprecherausgangsan-
schlüsse bzw. die Lautsprecheranschlüsse.
• Überprüfen Sie, ob die Teleskopantenne korrekt montiert ist
und ob der Antenneneingang guten Kontakt hat.

- 11 -
Technische Daten
UKW-Radio
Frequenzbereich ............................................. 87.5 - 108.0 Mhz
Empndlichkeit .............................................................< 20dB
Stereo-Trennung ............................................................. >25dB
SNR ...............................................................................>60dB
Wiedergabemöglichkeiten
Unterstützung für Musikformate ............................. MP3 / WMA
Display .................................................................. ID3 display
Verzerrung ..................................................................... <0.3%
SNR ...............................................................................>60dB
Bedienfeldgröße
188 mm Breite X 150 mm Tiefe X 58 mm Höhe
Einbauabmessungen
178 mm Breite X 150 mm Tiefe X 50 mm Höhe
Spannungsversorgung
12 V Gerät ................................................................... 11 ~ 16 V
Hinweis: Dieses Gerät ist ein 12 Volt Gerät und nicht für 24 Volt
Spannungsversorgung geignet.
Audiobereich
Arbeitstemperatur ............................................... -20° ~ +60° C
Ruhestrom Lautsprecherimpedanz ................................. 4 Ohm
Frequenzbereich .............................................. 200 ~20000 Hz
Sicherung
Rot ......................................................................................1 A
Gelb ..................................................................................15 A

- 12 -
Control panel functions
• The operation of the radio is intuitive and follows proven in-
dustry standards. Pressing the right button turns the unit on,
turning the button increases or decreases the volume.
• If you nd a radio station, press and hold one of the memory
buttons to save it. A short tone acknowledges the saving.
• The AUX input accepts MP3 players, CD players or other de-
vices with a 3.5mm headphone jack.
• The SD card slot accepts SD and compatible formats. The
audio les in the root directory are played rst. It is best to
create a directory structure when copying the audio les.
• The USB slot can be used to charge your mobile phone. Audio
les on a USB stick (MP3/WMA) are played back.
The Power and Mode
Band controis BAND/Phone pick up
Search for stations a APS
Clock adjustmen DIS/Phone hand up
IR remote control window
Button to adjust volume or functional changes
in VOL5/Multi functional selection key SE
Storage key "1,2,3,4,5,6"
AUX IN
SD card slot
USB connector

- 13 -

- 14 -
Remote control features
The radio can be used without the remote control. The remote
control itself oers additional features that did not have enough
room to be put on the front face of the radio.
The power switch
Mode conversion
Volume increase
Volume reduction
Multi fnuctional selection Key
digital key
Mute function
Search for stations a AMS/Phone Hand up
Sound settings DISP
Scan feature selections
Band conversion BAND/Phone Pick up
Equal loudness

- 15 -

- 16 -
Welcome
We wish you every possible fun with your Limora Classic Car
Radio. The very compact device combines good radio receiv-
ing with MP3 playback functions from many media. A special
highlight is the hands-free function in combination with your
Bluetooth mobile phone.
Please read the entire operating manual to understand the cor-
rect function of this radio and to receive further information.
Important notices!
Please note the operating temperature range from -20°C to +60°.
If the device is not supplied with power, please check the con-
nection of the device. If everything is normal, check the fuse.
To avoid a short circuit, no metal objects (screws, coins, tools)
or other components may fall into the device.
In order to ensure road safety, please concentrate on the road
and not on operating the unit while driving.
The wiring diagram must be read before installation (see page 21).
Make sure that the connection is correct to avoid a short circuit.
The device accepts MP3 and WMA music formats, do not
download images and video les to play them on this device.
You cannot play video formats, they slow down the unit. If the
current format is MP3, the display will show MP3, if it is WMA,
the display will show WMA.
When inserting the USB flash drive or SD card, make sure that
no wool lint, hair or foreign objects get into the USB or SD slot
to avoid contact problems.
To connect to the Bluetooth enabled mobile phone: Switch
on the radio. Switch on Bluetooth on the phone, search for
devices. The Limora radio is recognized as a new device, pair.
The code is 0000 or 1234. Incoming calls are answered with the

- 17 -
green handset and ended with the red one as long as the phone
is connected to the radio.
Installation instructions
1. Installing the device
Please check the wiring diagram when installing (page 21)!
The radio needs a Din/ISO standard mounting slot. If your vehi-
cle does not provide the required slot, Limora oers a suitable
console with the order number 510899 that can accommodate
the radio.
To mount the metal frame/mounting frame, insert it into the
dashboard (or the mounting bracket) and fold down the xing
straps with a screwdriver at suitable xed points (see also
installation drawings).
The radio is pushed into the metal frame from the front. It can
only be removed from its metal frame using the two unlocking
keys supplied.
2. Electrical connection
The device is connected via a supplied Iso connector block. The
plugs are coded and can only t in one position.
ISO Plug power supply:
• Yellow (storage line): 12V positive constant power supply (ter-
minal 30) for constant power supply of the data memory.
• Red (power line): 12V positive switched power (terminal 15) to
the switched (ignition switch) power supply of the device.
• Blue: Switching cable for electrical antenna (can remain
unconnected).
• Black: Ground (-)
Please install the electric connections to the vehicle properly and
professionally. Do not use irregular connectors to terminal 30
and terminal 15, but install a new 1.5 mm² lead from the fuse box.

- 18 -
ISO Plug speaker-connector
• You can connect four speakers, see connection diagram.
• If you are connecting only two speakers, use the front termi-
nals. The fader must then also be set to front.
• You can use speakers with 4-8 Ohm impedance. Disconnect
the power supply before connecting the speakers to avoid
short circuits.
• Make sure that none of the speaker cables is grounded.
• The RCA connectors on the rear panel are for external ampli-
ers. If no external amplier is mounted, ignore the connectors.
Install the antenna: The aerial feed line must be plugged into
the antenna input provided on the radio. For good radio recep-
tion the antenna needs to be connected to vehicle ground.
Bug Fixing
Please take a closer look at the radio and its functions in ad-
vance. Many supposed errors are undiscovered features.
Installation drawing

- 19 -
The most common electrical faults are wiring faults, ground
faults or blown fuses.
1. no power supply?
Check the voltage. Are continuous plus and ignition plus given?
If not, check the fuses of the on-board electrical system.
If the power supply from the vehicle is ensured, check the fuse
on the radio and replace it with a fuse of the same type and
rating if necessary.
2. Switching o by pressing the O button does not work:
The device has hung up. There is a reset button on the control
panel behind a small hole above the USB port. Please reset the
device, usually it will work again.
If it still doesn‘t work properly, unplug the power cord for a
short time and then plug it in again.
3. Silent or too quiet:
• Volume controls or balance settings are set on the side, fader
and balance settings on the central position. If you have
connected the speakers to the front, the fader should also be
neutral or at the front.
• Are the input/output cables or wiring harness properly con-
nected? Please refer to the wiring diagram. Is the polarity of
the speakers reversed?
• If the volume is too high or the impedance load is too high,
the device automatically protects itself against overload and
switches o: Change settings, the device switches back to
normal aer cooling down.
4. sound quality (distortion):
• Check whether speaker cables are clamped by a screw, for
example, and whether the speaker cables are properly wired.
Check the speaker output terminals or speaker terminals.
• Check that the telescopic antenna is correctly mounted and
that the antenna input is in good contact.

- 20 -
Specications
FM radio
Tuning Range .................................................. 87.5 - 108.0 Mhz
Sensitivity ...................................................................... < 20dB
Stereo Separation .......................................................... >25dB
SNR ............................................................................... >60dB
Some playback
Music format support ............................................. MP3 / WMA
Display Format ....................................................... ID3 display
Distortion ....................................................................... <0.3%
SNR ...............................................................................>60dB
Panel Size
188wide X 150deep X 58high-mm
Installation dimensions
178wide X 150deep X50high-mm
Power supply
12VMachine ................................................................ 11 ~ 16 V
Note: This machine is 12V machine, not according to the 24V
power supply
Audio
Operating temperature ........................................ -20° ~ +60° C
Quiescent current speaker impedance ............................ 4 Ohm
Frequency Response ........................................ 200 ~20000 Hz
Fuse
Red ......................................................................................1 A
Yellow ................................................................................15 A
Table of contents
Languages: