9GB/CY
- Pencil/marking tool
- Voltage tester
- Screwdriver
- Power drill
- Drill bit
- Side cutters
- Ladder
Prior to installation
Familiarise yourself with all the instructions and
diagrams in this manual, as well as with the ceil-
ing fan with LED light itself, before you install it.
Before installation, ensure that the circuit to which
the ceiling fan with LED light will be connected is
not energised. To do so, remove the fuse or sw
itch
off the circuit breaker in the fuse box (0 setting).
Before installation, make sure that the installation
site is suitable to bear the weight of the ceiling
fan with LED light.
Use a voltage tester to verify cables are not live.
Installation
Note: You will need a power drill for the installation
work.
Note: Please also follow the instructions for your
power drill.
Important: Before starting to drill, make sure that
there are no electrical cables in the place where you
wish to drill.
Installing the ceiling fan
with LED light
Note: Remove all packaging materials from the
product.
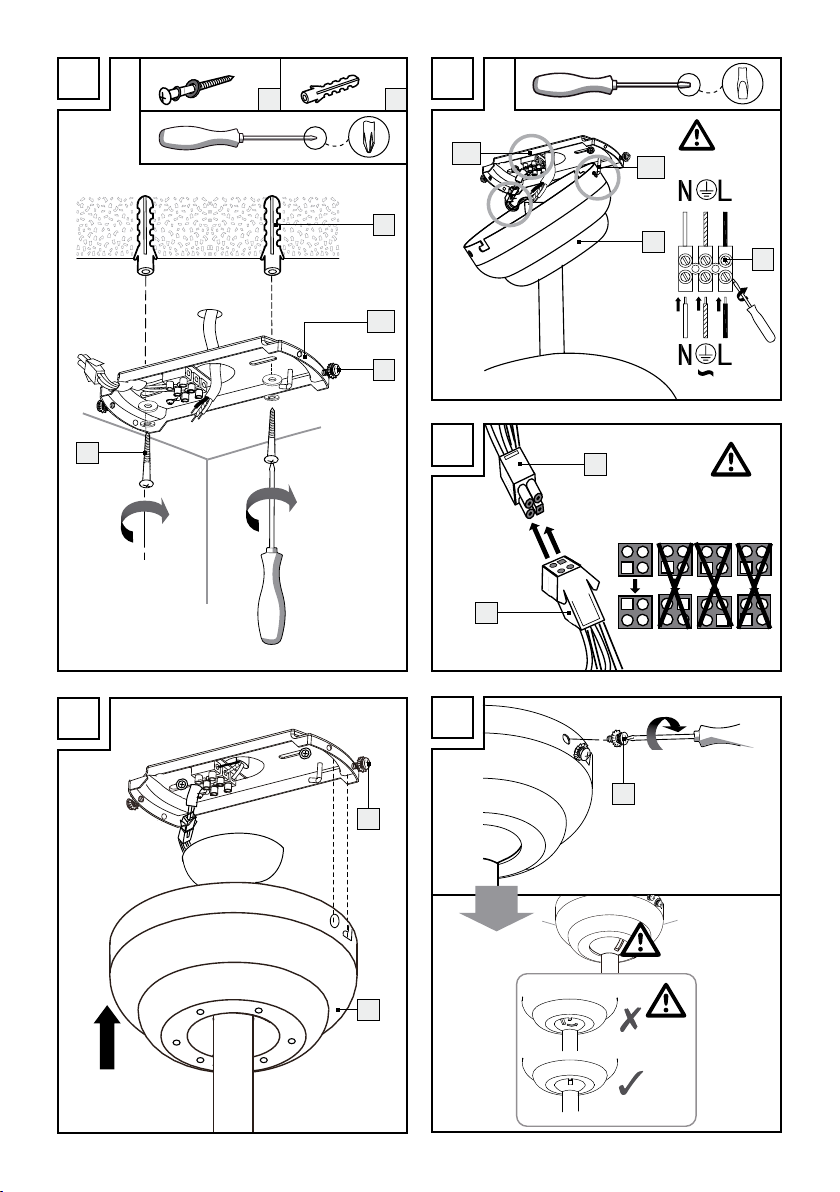
Remove the fuse or switch off the circuit breaker
(0 setting) in the fuse box prior to installation.
Unscrew the right-hand fixing screw 15 , which is
located at the side of the mounting bracket 12a .
Remove the left-hand fixing screw 15 including
the washer and the tooth spring lock washer.
Mark the drill holes using the holes provided
for screws 8in the mounting bracket 12a .
Now drill the fixing holes. Be sure not to damage
the supply line, water pipes or electric cables.
Important! The chosen installation location
must be able to hold the total weight of the
ceiling fan.
Pass the connection cable (external) through
the hole provided for this in the centre of the
mounting bracket 12a . Fasten the mounting
bracket 12a using the included washers, spring
lock washers and screws 8(see fig. A).
Using the holes provided for this, hang the
cover 1on the hooks 12b on the mounting
bracket 12a (see fig. B).
Connect the connection cable (external) with the
lustre terminal 16 in the mounting bracket 12a .
Please also be sure the colours of the connected
lines match (black or brown live wire = L symbol,
blue neutral wire = N symbol, protected ground
wire = green-yellow (see fig. B)).
Insert the mounting bracket 12a connection
cable 17 into the connection cable port 18 of
the ceiling light (see fig. C).
Now place the cover
1
on the mounting br
acket
12a by guiding the screws 15 into the grooves
on the cover and then turning the cover 1anti-
clockwise (see fig. D).
Now screw the ceiling fan with LED light and
the mounting bracket 12a together, using the
four fixing screws 15 .
Ensure that it is positioned correctly (see fig. E).
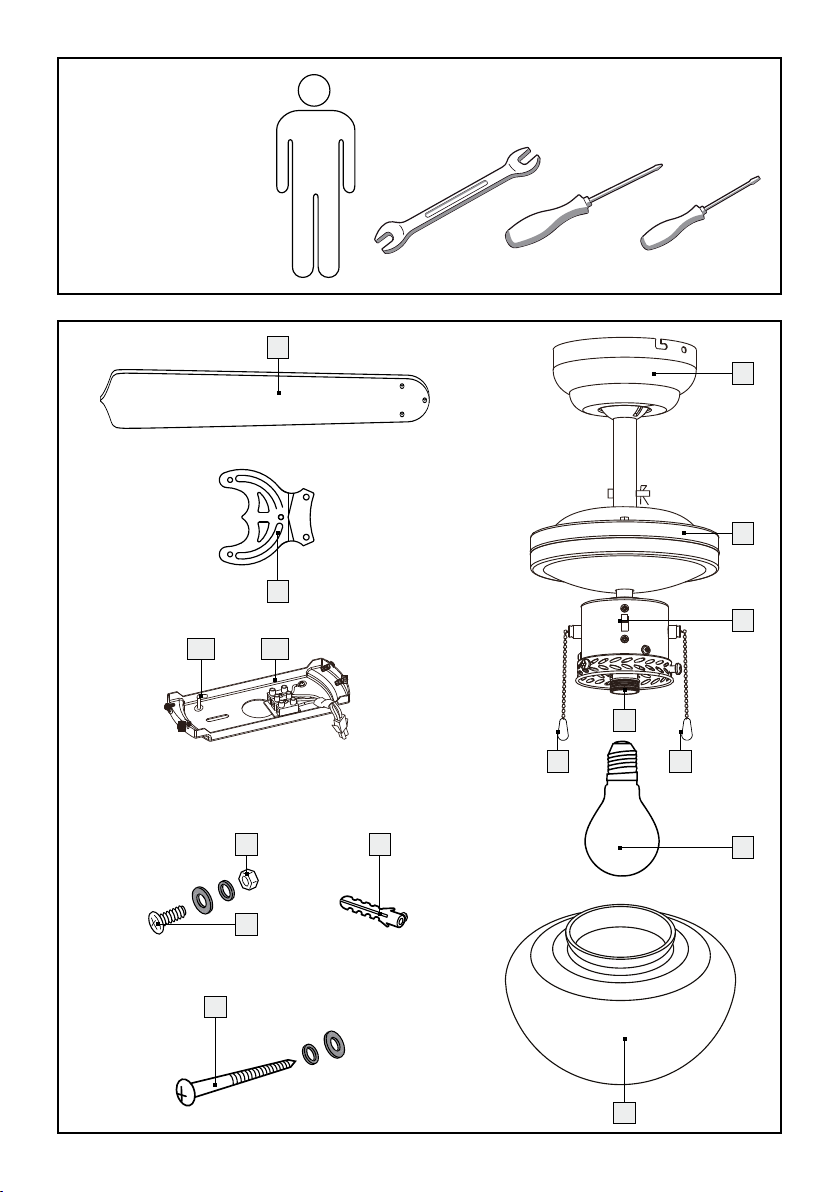
Fasten the fan blades 14 to the fan blade hold-
ers 13 using the nuts 11 , spring lock washers,
washers and screws 10 (see fig. F).
Fasten the fan blade holders 13 to the rotor
housing 2. To do this, use washers and the
screws 2a pre-installed on the rotor housing 2.
Ensure that printed side of the fan blades 14 is
facing down (see fig. G).
Insert the light bulb 19 as shown in figure H.
Attach the lampshade 7. Use the pre-installed
thumb screws 20 for this (see fig. I).
CAUTION! Do not use pliers to fasten the
thumb screws 20 . This could cause the glass
of the lampshade 7to crack. This could lead
to injuries caused by splinters of glass.