manuals.online logo
Brands
  1. Home
  2. •
  3. Brands
  4. •
  5. Loewe
  6. •
  7. TV
  8. •
  9. Loewe bild 7 User manual

Loewe bild 7 User manual

TV
Loewe bild 7
bild 7.55
bild 7.65
Operating Manual
Loewe bild 7
Operating Manual
english
2

Table of contents
Welcome!.......................................................................................3
Scope of delivery .......................................................................................... 3
Imprint............................................................................................................ 3
About this operating manual ...................................................................... 3
For your safety..............................................................................4
Technical information .................................................................................. 5
Remote control button mapping................................................6
Operating controls on the TV set............................................... 7
Connections rear side of the device ..........................................8
Loewe bild 7.55 / bild 7.65 ........................................................................... 8
Installation of the device ............................................................9
Preparing the TV set ..................................................................10
Connecting the TV set............................................................................... 10
Switching the TV set ON/OFF ................................................................... 11
General information on the operation..................................... 12
On-screen displays..................................................................... 14
Explanation of keys......................................................................................14
Explanation of symbols ..............................................................................14
Automatic menu info ..................................................................................14
Permanent clock display............................................................................14
Initial installation....................................................................... 15
Home view................................................................................... 16
Home view - Favourites ..............................................................................16
Home view - Sources..................................................................................16
TV..................................................................................................17
Setting the volume ......................................................................................17
Select station ...............................................................................................17
Status display...............................................................................................19
Function list (TV mode).............................................................................20
Sources........................................................................................................20
Electronic Programme Guide – EPG.........................................................21
Picture in Picture (PIP)...............................................................................22
Teletext.........................................................................................................23
HbbTV / MediaText.................................................................................... 24
Recordings ..................................................................................25
Digital Recorder ..........................................................................................25
TV viewing with time shift.......................................................................25
Archive recording.....................................................................................25
Multi recording .........................................................................................26
DR+ archive .............................................................................................. 27
DR+Streaming ........................................................................................28
Follow-Me function ..................................................................................28
Mobile Recording.....................................................................................29
Video ............................................................................................................30
Video playback.............................................................................................31
Additional functions for DR+ archive playback ......................................32
Audio/Radio ...............................................................................33
Audio playback ...........................................................................................34
Radio mode (DVB radio) ...........................................................................35
Radio mode (Internet radio) .....................................................................36
Photo ...........................................................................................37
Photo display...............................................................................................38
Web ............................................................................................. 39
Apps .............................................................................................................39
App Gallery..................................................................................................39
Browser........................................................................................................40
System settings ......................................................................... 41
Functions.................................................................................... 42
Bluetooth .....................................................................................................42
Multiroom ....................................................................................................43
Rotating the TV set.....................................................................................43
Timer............................................................................................................44
Software update .........................................................................................45
Miscellaneous............................................................................ 46
Conditional Access module (CA module)...............................................46
Asterisk key function..................................................................................46
Integrated features ..................................................................................... 47
Documentation........................................................................................... 47
Conformity / Manufacturer’s declaration............................................... 47
Important hints on the special features of OLED technology..............48
Notes on Kinematics..................................................................................48
Technical data ........................................................................... 49
Environment .............................................................................. 50
Legal Information...................................................................... 50
Index ............................................................................................ 51
Service.........................................................................................52
Loewe bild 7
Operating manual
english
3

Welcome!
Thank you,
for choosing a Loewe product and having placed your trust in us.
With Loewe you have not simply decided on a modern and technically
innovative TV set, but for timeless design, sharp picture quality, brilliant
sound for movies and music as well as intuitive operation with the
Loewe remote control unit, smart phone or tablet. In short, Loewe is
perfect for home entertainment – Made in Germany.
This operating manual gives you a short overview of all functions
and features of your new Loewe TV set. A detailed user manual file
can be downloaded via the support portal of the Loewe homepage:
www.loewe.tv/int/my-loewe.
We look forward to welcome you as our customer and hope that you
enjoy your Premium Home Entertainment made by Loewe.
Many features, one result:
perfect Home Entertainment.
Just more entertainment.
The Loewe Assist Media user interface is intuitive and
graphically optimised. This is how you quickly find your
desired content – from TV set to online.
In the user guide refer to Home view.
Perfectly networked.
Thanks to its numerous connections, your Loewe TV
becomes your entertainment centre. Connect it to the
Internet, DVD/Blu-ray player, external speakers, etc.
Hard disk for your TV archive.
Record the TV programme or pause it and continue watching
it at a later date. With DR+ (Digital Recording), all this is no
problem for your Loewe TV set.
In the operating manual refer to Recordings
Your contact person.
We are happy to help you with any questions regarding your
TV set and other Loewe products.
In the operating manual refer to Service.
Customer
Care
Center
Scope of delivery
LCD TV set
Loewe Wall Mount 7
Mains cable
Antenna cable
Remote control Assist with two batteries
Operating manual Imprint
Loewe Technologies GmbH
Industriestraße 11
D-96317 Kronach
www.loewe.tv
Printed in Germany
Editorial date 07/16-1.0 SB/PS
© LoeweTechnologiesGmbH,Kronach
ID: 4.0.15.0
All rights including translation, technical modifications and errors
reserved.
About this operating manual
For best results regarding safety and the longevity of the set, we
recommend you read the chapter For your safety before switching
it on for the first time.
Paragraphs which begin with the symbol indicate important
instructions, tips or conditions for the following settings. Terms which
you will find in the menus or printed on the remote control or TV set
are written in bold type.
The necessary control elements are shown in the descriptions to the
left of the text containing the instructions for action.
Depending on the connected accessory equipment the menus in the
TV set can differ from those described here.
All the station names, programme contents, the illustrated photos,
titles, albums and album covers in this quick guide are examples.
In addition to the remote control, a PC keyboard can be connected to
one of the USB ports on your TV and then used to control your TV set.
In the user guide, this symbol indicates places in which
the use of a keyboard is particularly advantageous.
The user guide and the user manual for your TV set are updated at
irregular intervals. We recommend an occasional examination on the
Support Portal of the Loewe homepage (see chapter Miscellaneous,
section Documentation).
General information on the operation of the
TV set
For further information on the user interface and the general operation
of your TV set see chapter General information on the operation.
Interactive data services
In some countries the stations also broadcast interactive data services
with their programmes, leading to the functions of individual keys not
being available or only so to a limited extent. You can find out more
about this in chapter TV, section HbbTV / MediaText.
Important information
Loewe does not accept any liability for the nature and content of
receivable Internet services. This also applies to the Loewe MediaNet
portal. With its devices, Loewe provides the technical platform that
fundamentally enables such material to be received. Loewe cannot
make any guarantees regarding changes in scope and content,
particularly with regard to the future and after going to press. The
receivable online services are not included in the delivery and can vary
depending on the product and country.
Loewe bild 7
Operating Manual
english
4
For your safety, and to avoid unnecessary damage to your unit,
please read and follow the safety instructions below:
Intended use and ambient conditions
This TV set is intended exclusively for receiving and playing visual and
audio signals. The TV set is designed for dry rooms (living rooms and
offices). It must not be operated in rooms with high humidity (for
example bathroom, sauna).
Please note that our TV sets are sensitive to dust and sooty particles
in the ambient air.
Excessive environmental pollutions of this kind can lead to damage of
the device up to a malfunction.
Pay attention to a clean ambient air, so that your device is not damaged.
The cleaning or replacement of the panel is excluded from the warranty
claims in such cases, because it is not a defect of the device, but an
external influence.
If the unit is used outdoors, make sure that it is protected from moisture
(rain, dripping water and splashing water or dew). High humidity and
dust concentrations lead to leakage currents in the device. This can
result in a shock hazard when touching it or even fire.
If you have moved the unit out of the cold into a warm environment,
leave it switched off for about an hour to avoid the formation of
condensation.
Do not place objects containing liquids on top of the unit. Protect
the appliance against dripping and splashing water.
Candles or naked flames must be kept away from the TV set at all times
to prevent it from catching fire.
Never place the TV set in a location where it is exposed to vibrations. This
may lead to damage.
Transporting
Move the device in vertical position only. Get
hold of the device on the upper and lower
edges of the housing.
Do not stand it up on the bottom edge, so as to
reduce the risk of damage and soiling. If the set
has to be put down during packing/unpacking, place the TV set with
its entire front surface lying flat on soft material. Use a blanket or the
fleece from the packing material as an underlay.
The OLED screen is made of glass or plastic and can break if not
handled properly.
Power supply
Incorrect voltages can damage the unit. This device may only be
connected to a power supply with the voltage and frequency indicated
on the type plate using the supplied mains cable. The mains plug of the
TV set must be easily accessible so that the device can be disconnected
from the mains at any time. When unplugging the unit from the mains,
pull at the connector body and not at the cable. The cables in the mains
plug could otherwise be damaged and could cause a short-circuit when
plugged in again.
Lay the mains cable so that it cannot be damaged. Do not step
on the mains cable. The mains cable may not be kinked or laid over
sharp edges nor be exposed to chemicals; the latter also applies to
the unit as a whole. A mains cable with damaged insulation can cause
electric shocks and poses a fire risk.
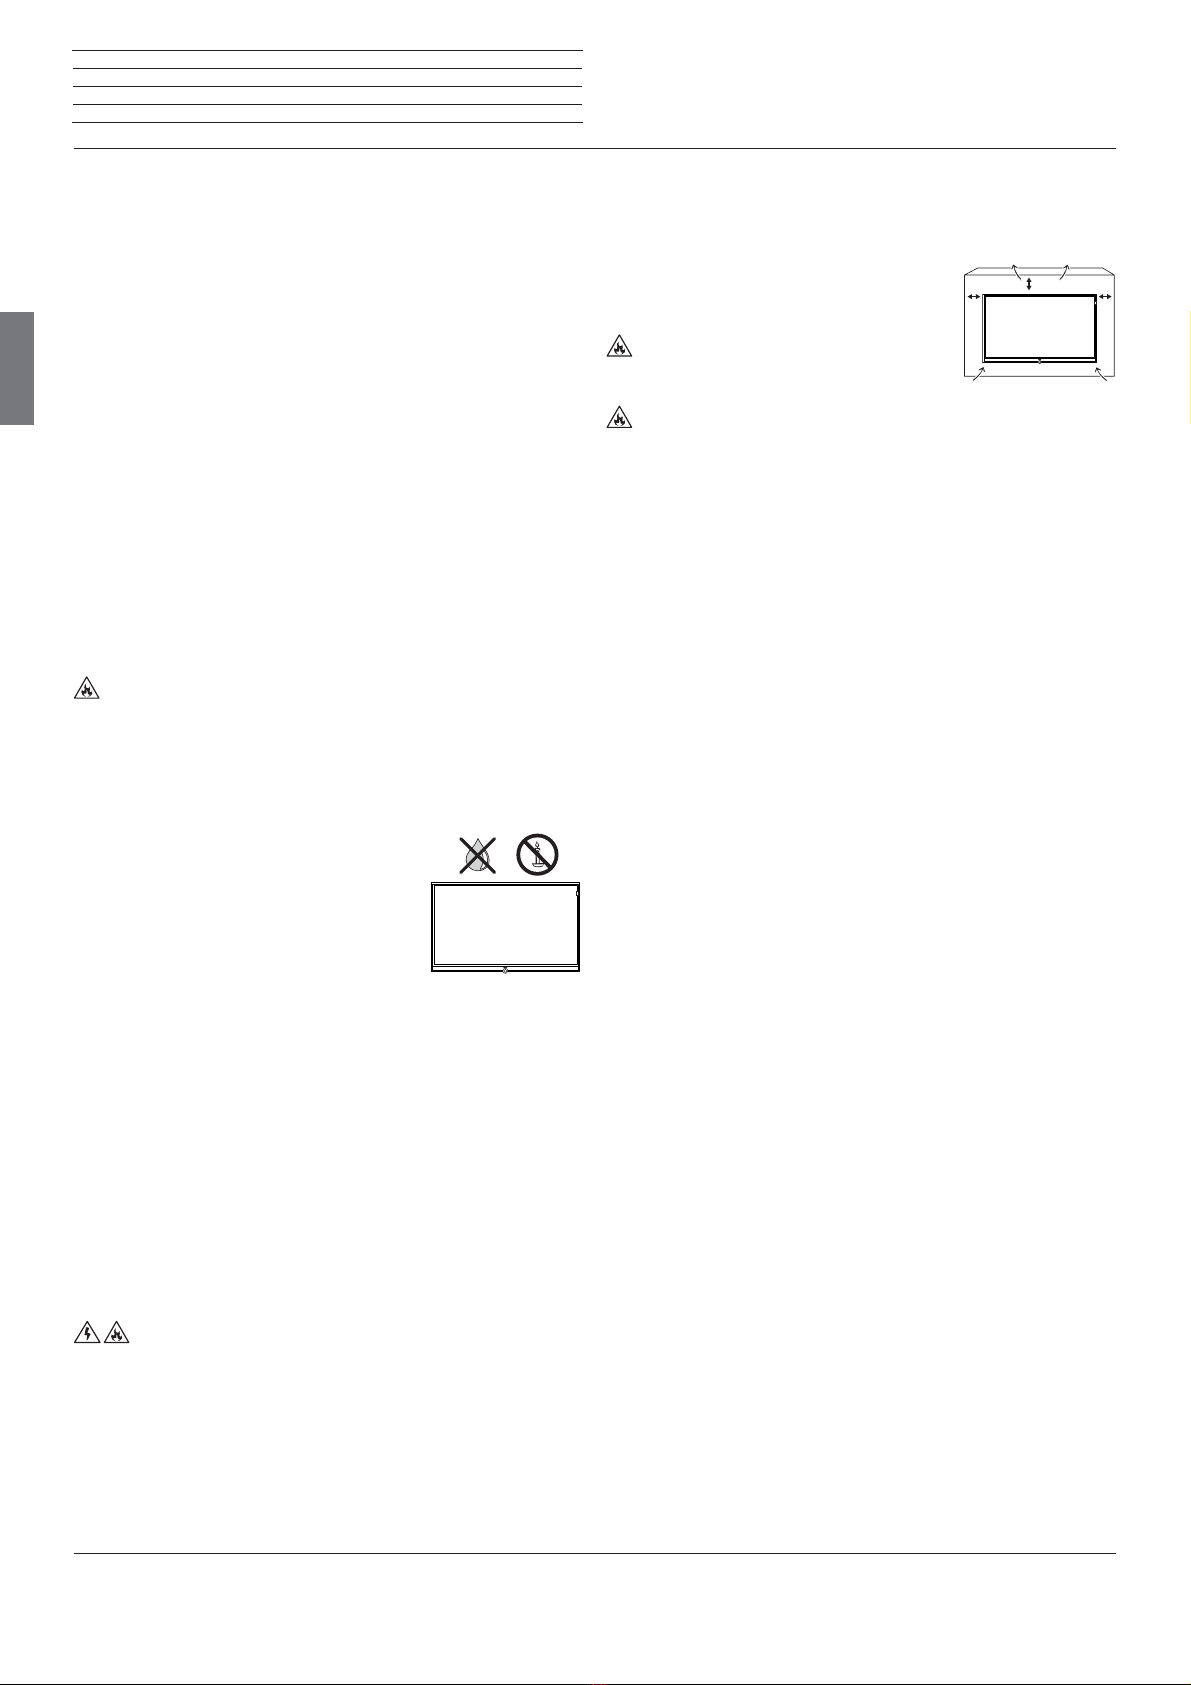
Air circulation and high temperatures
The vent slots on the rear panel of the set must always be kept
unobstructed. Please do not place newspapers or cloths on/over the
TV set.
Make sure that there is at least 10 cm free space
on the sides and above the set for air circulation,
if the set is placed in a cabinet or on a shelf.
Like any electronic device, your TV set re-
quires air for cooling. Obstruction of the air cir-
culation can cause fires.
Prevent metal items, needles, paper clips, liquids, wax, or similar
items, from getting into the interior of the device through the vent slots
in the rear panel. Such objects can cause short circuits in the set,
which could possibly cause a fire.
If something should get into the interior of the set then immediately
unplug the mains plug of the device and contact the field service for
more information.
About the OLED screen
The TV set with OLED screen you have purchased satisfies the most
rigorous quality requirements and has been inspected with respect
to pixel errors. Despite of thorough care when manufacturing the
display, it cannot be 100% guaranteed that no subpixel defects will
occur due to technical reasons. Please understand that these types
of effects, as long as they are within the limits specified in the standard,
cannot be considered as a device defect in terms of the guarantee.
Avoid displaying still images for long periods of time. It is possible that
a copy of the image may remain visible.
TV sets with 3D function
Read the following safety instructions before using the 3D function
of your TV set.
Please use the Loewe 3D TV sets only with the Loewe 3D glasses which
can be purchased as an accessory from your Loewe dealer.
People with a visual disorder may not be able to perceive 3D effects
or may only be able to perceive them to a limited extent. People who
are sensitive to flickering images (e.g. those with epilepsy) should only
use the 3D function after having consulted their doctor.
It might take some time for you to get used to the 3D glasses and
before you can perceive the 3D effects properly.
Stop using the 3D function immediately if you experience any feelings
of nausea, dizziness or malaise when viewing 3D content.
Supervise children whilst they are viewing 3D content, as they can be
particularly sensitive to it.
Allow more time for a break after having watched 3D movies, so that
you are able to relax. Failure to do so could result in headaches, fatigue,
dizziness or malaise.
Position yourself comfortably in front of the 3D TV set and ensure that
you are seated firmly. By doing this, you will avoid any injuries that may
occur due to reacting to extreme 3D content.
10 cm 10 cm 10 cm

For your safety
Loewe bild 7
Operating manual
english
5

For your safety
Set-up
Loewe flatscreen TV sets are specified for Loewe accessories. The TV
set is suitable for mounting in many different ways. Note the assembly
instructions regarding the different possible mounting options.
When using accessories from other manufacturers take care that the
TV set can be easily inclined or rotated on the respective mounting
option.
For mounting options from other manufacturers with motor drive,
make sure that the TV set cannot be rotated manually. The use of
mounting options from other manufacturers with locks in certain
positions is generally discouraged.
When rotating the TV set it is essential to
ensure that the pressure exerted on the device
frame is not too large. Especially in case of
large-format displays there is a risk to damage
the screen.
Before setting up the device, please check that the final location is
suitable to bear the load of the device in terms of surface (sensitivity
to pressure) and stability (statics).
This is particularly the case for the high-gloss painted surfaces and
surfaces that are made from real wood / real wood veneer or plastic
surfaces.
Place the TV set with the table or floor stand only on a level, sturdy,
horizontal base. Particularly ensure that the set does not protrude to
the front when placed in or on pieces of furniture.
Place the TV set in a normal position for use. TV set may only be used
in an upright horizontal position. It may not be tilted by more than 10
degrees. The TV set must never be operated in portrait position, lying
flat or hanging overhead from the ceiling.
Set up the device where it is not exposed to direct insolation and where
it is not exposed to additional heating by radiators
.
When using the VESA mounting points (1, please refer to the informa-
tion in chapter Miscellaneous, section VESA standard.
Supervision
Do not let children operate the TV set unsupervised and do not
let them loiter and play close to the set. The set could tip over, be
pushed off or pulled down from the stand surface and injure someone.
Do not allow the switched-on TV set to run unattended.
Volume
Loud music can lead to ear damage. Avoid extreme volume
especially over long periods and when using headphones.
Thunder storms
Pull out the mains plug and all connected antenna cables from the TV
set in a thunderstorm. Overvoltage caused by lightning strokes can
damage the set via the antenna system, as well as via the mains. The
mains plug and all connected antenna cables should also be pulled
out during long periods of absence.
±10°
D
Automatic shutdown
If the TV is not operated for 4 hours (adjustment of volume, programme
change, etc.) the TV will automatically switch to stand-by mode to save
energy. A prompt to terminate this shutdown process appears one
minute before expiry of the 4 hours.
The automatic shutdown is active in the energy efficiency mode
Home Mode.
Automatic shutdown does not occur when using the radio without
screen display (screen off).
Cleaning and care
Switch off the TV set with the main switch prior to cleaning.
Clean the TV set, the front screen and the remote control unit with a
soft, moist, clean and colour-neutral cloth only, without any aggressive
or scouring cleaning agents.
In the case of dirt on the inside, the front screen can be removed (see
chapter Miscellaneous, section Screen cleaning).
The speaker panel of your TV set is covered with textile. Vacuum the
surface regularly using a soft brush set.
In case of dirt or stains:
Moisten a soft, colour-neutral cloth with detergent or normal stain
remover and gently rub away the stain. You can also treat the mark/
stain directly with normal dry stain remover spray (vacuum up
powder).
Do not moisten the covering fabric directly with detergent or stain
remover (risk of encrustation). Do not use any solvents to clean the
fabric.
Follow the manufacturer’s instructions when using stain removers.
There is an increased risk of encrustation when cleaning speaker
panels with nicotine deposits.
Repairs and accessories
Never remove the back of the TV set yourself. Have your TV
set repaired or serviced by authorised television technicians only.
Only use original accessories such as Loewe stands, if possible.
Technical information
Switching off the TV set with the mains switch during operation or
an inadvertent disruption to the power supply (e.g., power failure)
can cause damage to the hard disk file system and hence loss of the
recorded broadcasts.
Never ever disconnect the USB storage device from the TV set during
a copy process. Before switching off the set with the mains switch, we
recommend you to switch it to standby mode.
However, if unexpected problems occur when operating the hard
disk, formatting the hard disk may rectify this. You can find the
corresponding menu items under System settings טControl ט
more...טHard disks.
Loewe are not liable for the loss of data on the integrated hard disk
of your TV set. To avoid data loss, we recommend copying important
recordings to an external storage medium.
Loewe bild 7
Operating Manual
english
6

Remote control
(1
The assignment of these keys can be changed. The description refers to the standard setting. The factory setting of the keys can vary depending on the firmware version
of the remote control.
(2
Depending on the settings HbbTV mode on/off, start behaviour of HbbTV station (System Settings
ט
Control
ט
more ...
ט
HbbTV).
Remote control button mapping
Depending on the selected operating mode (TV/Video/Audio/Photo/Apps) and function (e.g. DR+, EPG, PIP, Teletext, HbbTV, etc.), the key assignment
may differ from the assignment described here (see the corresponding chapter in this user manual).
1
Sound mute/on.
2
LED display for currently operated device.
3
Call the TV mode.
4
Reassign remote control to SetTop-Box(1 (presetting: Apple TV).
5
Pressing briefly
: Open the DR+ archive.
P
ressing longer
: Call timer list.
6
Add current object to Home favourites.
7
EPG (Electronic Programme Guide) on/off.
8
Teletext/MediaText(2
on/off.
9
Pressing briefly
: Call function list for the active operating mode.
P
ressing longer
: Call System settings.
10
V+/V- increase/reduce volume.
11
Pressing briefly
:
Call station list.
Pressing longer
: Call
expanded station list.
In the menu: confirm/call up.
12
Green coloured key: screen on/off in Audio/Radio mode.
13
Red coloured key: call preferred value-added network service, if available (
2
.
14
Pressing briefly: skip backwards.
Pressing longer: winding backwards.
15
Pressing briefly: direct recording (with determination of recording duration).
Pressing longer: One Touch Recording.
16
Pause / Start/pause the timeshift television.
17
Stop / End timeshift (return to live image).
18
Pressing briefly: skip forwards.
Pressing longer: winding forwards.
19
Play / Start/continue timeshift television.
20
Blue coloured key: call station function list
(selection of language/sound, subtitles or channel/video track).
21
Pressing briefly: Yellow coloured key: call history.
Pressing longer: Yellow coloured key: call last station.
22
Navigation on the user interface, select objects.
In the menu / lists: select/set.
23
P+/P– next/previous station.
24
Pressing briefly: step / level back.
Pressing long: close all displays.
25
Press briefly during an on-screen display: info display. Info text appropriate to the content
that can assist you further, should you have any questions about your TV set.
Press briefly, without on-screen display: access status display. With status display open
and repeatedly pressing the key call the detailed information on the broadcast.
Press longer: show Explanation of keys.
26
PIP (picture in picture) on/off.
27
Call up the Home view.
28
. Select stations with numeric buttons directly.
In the menu: enter numbers or letters
29
Call Sources
(standard assignment)
(1.
30
Reassign remote control to video device(1 (presetting: BluTech Vision 3D).
31
Call radio mode (standard assignment) (1
.
32
Switches the TV set on (mains switch must be turned on) or switches to standby mode.
Press briefly while TV set is switched on: TV set and all CEC-enabled devices connected to
the HDMI ports will be switched off to standby (System Standby).
1
2
3
4
5
6
7
8
9
10
11
12
13
14
15
16
31
18
19
20
21
22
23
24
25
26
27
28
29
30
32
17
Loewe bild 7
Operating manual
english
7
Preparing the remote control unit
Removing the battery protection
The remote control is supplied with batteries. To make them ready for
use, remove the plastic flag out as shown below.
Inserting or replacing batteries
Press on the embossed arrow whilst pushing the battery cover down.
Only use leak-proof micro-cells of the LR 03 (AAA) Alkali-Manganese
type. Do not use different types of batteries and old and new batteries
together.
The batteries used must not be exposed to excessive heat such as
sunlight, fire or similar!
The position of the batteries is indicated in the battery compartment
(in opposite directions). Pay attention to the correct polarity of +
and – when inserting the batteries.
If the batteries are too weak after longer use, the TV set prompts you to
change the batteries. Dispose of used batteries in an environmentally
friendly way (see chapter Environment / Legal information).
Push the cover back on from below after having inserted the batteries.
Adjusting the remote control unit for operating the TV set
Press the TV key.

Operating controls on the TV set
Preparing the remote control unit
Functions of the operating controls
1Mains switch:
The mains switch is located on the bottom of the set.
Always return the TV set to Standby mode before switching it off
with the main switch.
2 Display:
white: TV set in standby.
Depending on the ambient brightness, the
white LED display is dimmed (1 and lights
up with a different degree of brightness.
If the TV set is in quick start mode, the
white LED display is not dimmable and
starts with full brightness.
white, intermittent:
TV set starts.
green: TV set switched on.
red: timer recording active.
blue:
TV set in standby and background operation active (EPG
data updating, software update or DR+ streaming server
function).
3 IR receiver:
Infrared receiver for receiving the remote control commands.
3
2
1
(1 Automatic dimming depending on the room brightness (OPC) must be activated (System settings
טPicture טmore ... טAuto dimming).
Loewe bild 7
Operating Manual
english
8
K
3 4
11
12
6 7
15
5
10
19
18
16
17
1
13
14
20
2 8 9
21
22

Connections rear side of the device
Loewe bild 7.55 / bild 7.65
Position and function of the connections (Loewe bild 7.55 / bild 7.65)
AC IN - Mains connection
Mains socket – 220-240 V ~ 50 / 60 Hz
Slot for Kensington lock
LAN - Network connection
RJ-45 – Ethernet / Fast Ethernet
HDMI 1 ARC - HDMI input 1 (with Audio Return Channel)
HDMI – Digital Video IN (4K@60Hz)/Audio IN/OUT
5
HDMI 2 - HDMI input 2
HDMI – Digital Video IN (4K@60Hz)/Audio IN
6
ANT TV - Antenna/cable analogue /
DVB-T/T2 / DVB-C
IEC socket – 75 Ohm / 5 V / 80mA
7
ANT SAT 1 - Satellite antenna (Sat tuner 1) DVB-S/S2
F socket – 75 Ohm / 13/18 V / 500mA
8
ANT SAT 2 - Satellite antenna (Sat tuner 2) DVB-S/S2
F socket – 75 Ohm / 13/18 V / 500mA
9
SPDIF OUT - Audio output (digital)
Cinch socket (orange)
10
USB 3.0 - USB connection
USB type A – USB 3.0 (max. 900mA)
11
MOTOR UNIT - rotating stand control
12
DIGITAL AUDIO LINK - Surround audio outputs (digital) – (RJ45)
1
2
3
4
13
HEADPHONE - Headphone connection
Jack 3,5 mm – Headphones 32–200 Ohm
14
HDMI 3 - HDMI input 3
HDMI – Digital Video IN (4K@60Hz)/Audio IN
15
AUDIO OUT - Audio output (analogue) L/R – (
Jack 3,5 mm)
16
RS-232C - Serial interface (1 – (RJ12)
17
AV - Micro AV socket (1
Audio/Video IN with Scart adapter:
Y/C (S-VHS/Hi 8)
CVBS (VHS/8 mm)
RGB
L/R
Audio/Video IN with VGA adapter:
PC/STB video signal
Component (YPbPr)
L/R
18
COMMON INTERFACE - CI slot 1 (standard V1.3)
19
COMMON INTERFACE - CI slot 2 (standard V1.3)
20
HDMI 4 UHD - HDMI input 4 (2
HDMI – Digital Video IN (4K@60Hz)/Audio IN
21
USB - USB connection
USB type A – USB 2.0 (max. 500mA)
22
USB - USB connection
USB type A – USB 2.0 (max. 500mA)
(1 The adaptor is available as an accessory from your dealer.
(2 HDMI sources that provide UHD content should be connected to this port.
Loewe bild 7
Operating manual
english
9

Installation of the device
1
2
3
4
Installing the TV set
Mounting options / Installation notes
Your Loewe dealer can also assist you in finding other mounting
options. Look for the corresponding directions in the installation
instruction.
The four round self-adhesive covers that are supplied with the TV set,
are used as a cover of the four rear panel openings when installing the
TV with Floor Stand Reference 75 / 85 MU.
Choose a place for installing your TV set where no bright light or
sunlight shines directly onto the screen. This could cause reflections
which impair the picture.
3 times the screen diagonal can be taken as a guide value for the
viewing distance (e.g., for a 55-inch set approx. 4.2 m for SD signal).
The viewing distance can be reduced with an HD/UHD signal.
Preparing the Loewe Wall Mount 7
With the enclosed Loewe Wall Mount 7 installation option, you can
easily attach your TV set to the wall.
First attach the support plate on the rear panel of the TV set. Pay
attention to the correct alignment of the openings (arrows on picture
1 and 2) and use the enclosed screws.
Loewe Wall Mount 7 for wall mounting
Now attach the bracket to the wall. Use appropriate dowels and screws
and the enclosed drilling template. Ensure a horizontal orientation.
Finally, hang your bild7 with the two retaining bolts in the openings of
the bracket (cf.. detailed figure).
Loewe bild 7
Operating Manual
english
10
Connecting the TV set
Connecting to the mains supply
Remove the cover for the connections.
Connect the TV set to a 220-240V mains socket:
First plug the smaller plug (small connector) of the power cord into
the AC inlet (AC IN) on the TV set, and then the larger connector (Euro
plug) into a mains socket.
Connecting antennas
Cable (analogue) / DVB-C / DVB-T antenna:
Plug the cable of antenna, cable TV system or room antenna into the
ANT TV socket.
If you want to use analogue cables / DVB-C connection and a DVB-T
antenna together, use an external antenna switch (available from
your dealer).
Satellite antenna DVB-S:
Depending on the used satellite system, connect a connecting cable
from the multi-switch or directly from the LNC to the ANT-SAT and
ANT-SAT2 sockets of the TV set respectively.
When connecting the TV set to a single cable community antenna,
connect the ANT-SAT and ANT-SAT2 sockets directly to the
appropriate SAT antenna socket.
When connecting the TV set to a DiSEqC single cable community
antenna (in accordance with EN 50494), connect the ANT-SAT
socket directly to the appropriate SAT antenna socket.
In case of a DiSEqC one cable communal system you require only
one antenna cable. Further distribution of the signal to the two
reception routes is accomplished by the TV set’s satellite tuner.
It is possible, however, to continue using an existing SAT cabling
with two antenna cables in a DiSEqC one cable communal system.
If two transmission channels of the DiSEqC single cable community
exist, one system channel is used per satellite antenna cable.
Ask your dealer in this regard.
Connecting the TV set to the Home network
You may link your TV set to the home network by a wired connection
(Ethernet, Powerline adapters separately available) or by a wireless
radio connection (WLAN). For wireless connections, the TV set has
an internal WLAN antenna.
In order to play back data from your home network your Loewe TV
supports the UPnP AV standard.
You call the network wizard to configure the network adaptor (System
settingsטMultimedia/NetworkטNetwork settingsטNet-
working).
Under no circumstances may the TV set be wired and at the same
time connected by a wireless connection to the same network, e.g.
router. This may cause severe operational faults!
Example for a wired connection
Connect the LAN socket of your TV set to the LAN switch/router of
your home network with a network cable (available from your dealer).
R TV
Cable
analogue /
DVB-C
DVB-T DVB-S
DSL
LAN switch/router
TV set PC

Preparing the TV set
Loewe bild 7
Operating manual
english
11
Example for a wireless connection
You can connect the TV set to your home network by a wireless radio
connection via the WLAN antenna inside the set.
Shadow effects of various materials, such as reinforced concrete,
metal surfaces, etc., attenuate the WIFI signal sometimes
significantly or completely.
Help for configuration problems
Loewe cannot provide any support for PC hardware and software or
network components owing to the diverse configuration options with
home networks.
Please contact the administrator of your home network and/or specialist
dealer for support when setting up and for maintenance of network
connections, storage media, media server software and network devices
such as routers.
DSL
WLAN router
TV set PC

Preparing the TV set / Switching TV set on/off
Switching the TV set ON/OFF
Switching TV set to the standby mode
Switch the mains switch on the bottom side of the device to position I.
The indicator in the control panel on the front side lights up white. The
set is now in standby mode.
Switching the TV set on by means of the Remote control
Press the on/off key.
Or:
Press the TV key.
The previously watched station will be called.
Or:
Press numerical keys 1-9.
The corresponding station will be called.
After switching on the TV set, it takes a few seconds for further
operating commands to be processed (Exception: Quick Start Mode,
see below). Your TV set is ready to operate as soon as the status
indicator in the control panel lights up in green.
Switching the set off with the remote control (Standby)
Press the on/off key.
Before switching off the set with the mains switch,
we recommend you to switch it to standby mode.
Switching TV set and connected additional devices off
(System Standby)
Press the On/Off key longer:
TV set and all CEC-enabled devices connected to the
HDMI ports will be switched off to standby (System
Standby).
Quick start mode
If you enable the Quick Start Mode and you switch on the TV set from
standby, the TV picture can be immediately seen without delay. You
can specify the times at which your device will be in the Quick Start
Mode. Please note that in this case you will have a higher energy
consumption.
You can find the Quick Start Mode under System settings טControl
טQuick start mode.
Default setting for the Quick Start Mode: off
.
Loewe bild 7
Operating Manual
english
12
General information on the operation
The most important keys for navigation will be explained in general.
The numbers in the text refer to the figure showing the remote control
in chapter Remote control.
The arrow keys
22 help you to navigate in the menus and lists of the
TV set and for selecting menu items. They are arranged in the middle
of the remote control in a circle around the OK key
11 . Later in this
user guide they will be represented as follows:
 Select the desired item.
The OK key
11 is used to confirm a selection, for calling the highlighted
menu item and for opening the station list. In this user guide, an
instruction for this key looks like the following:
OKconfirm.
Using the numerical keys of your remote control
29 you enter
programme channels and teletext pages directly. With key 0you open
the AV list. In this user guide, entering numbers with numerical keys
is shown as follows:
Entering programme channel directly.
The numerical keys are also used to enter text (see chapter General
information on the operation, section Entry of characters by
remote control).
The Home view is the central overview page for all of your TV set‘s
operating modes. You reach Home view with the HOME key
27 .
HOME: Calling the Home view.
Pressing the BACK key
24 briefly brings you one level up in the wizard.
Pressing the BACK key longer closes all opened displaying. An example
for the BACK key in this user guide:
BACK: Stop text entry and exit entry box.
Pressing longer on the NFO key
25 displays an explanation of the
most important key functions of the current operating mode (e.g. TV
mode, teletext, PIP, etc.).
If the function for a key is not available, this will be indicated by an
inserted symbol on the right above.
Structure of the Menu screen
Basically, the structure of the different menu screens is similar,
regardless of whether it is e.g. a wizard, rendering media content or
a setup menu. The structure is explained by means of three different
figures.
Screen structure: Wizard
(A) Title bar with name of the wizard and the current operating step.
(B) Selected items, whose number can be different according to the
operating step.
(C) Bottom line showing the available operating controls. If required,
instructions and information are inserted.
Screen structure: Rendering of media content (example: Audio
player)
(A) Title bar with selected album / subdirectory.
(B) Menu item Back to exit the menu or to go back to the previous
menu item.
(C) Selection of album or title.
(D) Time bar.
(E) Bottom line with the different symbols for controlling the playback
function.
A
B
C
A B
C
D
E

General information on the operation
continued on the next page ט
Loewe bild 7
Operating manual
english
13

General information on the operation
Entering characters with on-screen keyboard
For certain functions, entering letters or characters is required, e.g., for
Web addresses (URLs) in the browser or for renaming archive entries.
An on-screen keyboard appears for entering text.
 Highlight character / on-screen button,
OK accept character.
In the event of letters with a triangular, additional letters
are displayed when pressing the OK button longer (2
sec). For the selection of special characters use the
.-/ field.
To conclude the entry:
 Select Adopt,
OK confirm.
Entry of characters by remote control
Alternatively to the on-screen keyboard you can also enter the desired
characters by means of the remote control (as with the keypad of a
mobile phone).
 Select text entry field.
Under the first letter of the name you will see a line
indicating the current input position.
Input position one character to the right (also for
blanks).
Input position one character to the left.
Enter the letters one after another. When using the remote
control, press the numerical keys just as on a mobile
phone keypad (0-9) until the desired symbol is displayed.
Key Characters (uppercase - lowercase)
1[space] 1
2A B C 2 Ä Æ Ã Å Ā À Á Ć Ç Č - a b c 2 ä æ ã å ā â à á ć ç č
3D E F 3 Ė Ë Ē Ę Ê È É - d e f 3 ė ë ē ę ê è é
4G H I 4 Ï Ī Į Î Ì Í - g h i 4 ï ī į î î ì í
5J K L 5 - j k l 5
6M N O 6 Ö O E Õ Ō Ô Ò Ó Ø - m n o 6 ń ñ ö o e õ ō ô ò ó ø
7P Q R S 7 ß - p q r s 7 ß
8T U V 8 Ü Ū Û Ù Ú - t u v 8 ü ū û ù ú
9W X Y Z 9 - w x y z 9
0. 0 - / _ : + , ; ? ! = & # % ~ @ $ * ’ ( ) ” § \ { } [ ] < > ´ ` ^ |
To conclude the entry:
 Select Accept,
OK confirm.
Screen structure: Setup (example: picture)
(A) Selected function in the Home overview (here: system settings).
(B) Home Menu System settings, with selected menu item Picture.
(C) Help text for the selected menu item Picture > Contrast.
Navigation: Selection of elements (example: On-screen displays)
Highlighting and thus selecting the symbols/elements or menu items
on the screen can be effected by the arrow keys on the remote control.
So you can see all the time where you are. As soon as there is a bar
above a symbol or text, this is a selected element.
(A) Selectable elements / menu items.
(B) The text in the line where the marker is currently located is white.
(C) Move the selection marking by means of the arrow keys 
to the menu item to be set.
The position of the marking is to see by a grey rectangle.
In most cases, the marked menu item will be automatically
adopted. The font colour of the previously active item will change
to grey, that of the newly selected item to white.
In a few menus, to confirm a selected menu item is required by
pressing OK.
A BC
BC A
Loewe bild 7
Operating Manual
english
14

On-screen displays
Explanation of keys
An explanation of the main operating keys that can be used at the
moment, can be displayed.
The availability of the key explanation is dependent on the currently
active operating situation.
INFO press longer: show Explanation of keys.
INFO or BACK: hide Explanation of keys.
Explanation of symbols
On screen pages with operating symbols in the bottom line, an explanation
of the function appears as soon as the symbol is selected.
Automatic menu info
The automatic menu info provides an info text for the selected menu
item appropriate to the on-screen display that can assist you further
with the operation of your TV set.
An on-screen display is displayed.
The factory setting is that the info display is shown
automatically for each menu item. In this case you can
temporarily hide the info texts with the INFO key.
Permanent clock display
The clock display can be permanently shown. It is always visible as
long as no other display is made.
You can switch the permanent clock display on or off in Home view
under System SettingsטControlטmore ...ט On-screen displays.
Loewe bild 7
Operating manual
english
15
Initial installation wizard
Initial installation after switching on for the first time
The Initial installation wizard starts automatically with an initial instal-
lation. It may be called repeatedly again.
If a parental lock is activated, the access code must be entered
before repeating initial installation.
First installation wizard routine
The selected settings affect the routine of the Initial installation wizard.
 Select desired Menu language.
Selecting the language of the user guidance is the
wizard’s first step. Then you simply follow the instruc-
tions on your TV screen.
Proceed to next step.
A licence agreement will be displayed.
 Scroll through the licence agreement.
OK Confirm the licence agreement and proceed to
the next step.
Select Energy efficiency.
Determine how energy efficient your TV set shall
be. The value for the contrast (and thus the
brightness of the background lighting) is adapted
and the automatic dimmer activated or
deactivated depending on the presetting.
Menu
language
Energy
efficiency
Home mode:
The emphasis for home use is on low energy
consumption. The automatic dimmer is activated.
Premium mode:
This mode optimises the settings to a brighter
environment at a higher energy consumption. The
automatic dimmer is activated.
The use of this energy efficiency setting must be
confirmed afterwards once again.
Shop mode:
The picture settings are aligned to operation in
the presentation room. The automatic dimmer is
deactivated. If the ambient brightness diminishes, the
energy consumption is not reduced.
The use of this energy efficiency setting must be
confirmed afterwards once again.
The presetting can be changed later in System
settings under Control טEnergy efficiency.
Proceed to next step.
 Select Location of TV set.
For certain locations (e.g., Australia), there
is finally a selection screen where you can
indicate in which state/territory the device
is being operated.
Proceed to next step.
Follow the instructions on the screen for the following
steps.
With the selection of the TV set location the country-
specific presettings are adopted.
In most cases, the predetermined parameters can
be adopted.
Energy
efficiency
(continued)
Location of
TV set

Initial installation
Loewe bild 7
Operating Manual
english
16
Home view
The Home view is the central overview page for all of your TV set‘s
operating modes.
The left selection bar allows you to access the operating modes TV,
recordings, sources, and apps. By means of System settings you
have access to more functions and you can configure your TV set.
The right part of the screen displays the favourites depending on the
selected operating mode (see also right column) and the available
sources.
The number of selectable items varies depending on the TV
equipment, network connection, available media/media servers
and connected gadgets.
Call Home view
HOME: Calling the Home view.
 Select menu item / Favourite / Source,
OK call.
Description of the individual sections/functions:
Home: Under the item Home all favourites of the different sections
are summarized.
TV: You can access the TV favourites and a variety of sources such
as Station lists, EPG, Timer) via the item TV.
See chapter TV for further information.
Recordings
:The item Recordings gives you access to videos from
local sources. (USB, DR+)
See chapter Recordings for further information.
Sources: Here you have access to the ports on your TV (HDMI, AV,
video, USB, etc.)
See chapter Sources for further information.
Apps: Via the menu item Apps you can find multimedia content
on the Internet (App Gallery), Internet and DVB radio and a full-
featured browser.
See chapter Apps for further information.
System settings: In menu item System settings you find the
configuration menu of the TV set e.g., with settings for picture,
sound, connections or sound components.
See chapter System settings for further information.
Home view - Favourites
You will find your favourites on the right of the individual operating
modes.
By selecting the operating mode, the favourites are filtered accordingly.
When selecting Home, the favourites of all operating modes are
displayed together.
After an initial installation, some favourites will already be
automatically created depending on the installation site of the TV
set and of existing Internet links (e.g. TV stations, online links).
Creating favourites
In the operating modes of the TV set you can define the current object
(e.g. station, music title, teletext page, website, photo, etc.) as favourite.
In the selected operating mode, the active object will be added as
favourite and placed at the end.
Create favourite.
If there are more favourites than can be shown on one
page, this will be indicated by rectangular symbols in
the upper line of Home view. Example:
Three pages with favourites exist. The first page of
them is indicated. Equivalent is the display with the
symbols for the source selection.
P+/P– Scrolling through the individual pages.
Editing favourites
You can edit the existing favourites in Home view. Change the
sequence of your favourites as you wish or delete favourites you do
not need any more.
HOME: Calling the Home view.
 Select the favourite to be changed.
MENU: Change favourite.
Move favourite or delete it (see below).
Moving favourites
 Move favourite to new position.
BACK: Finish procedure.
Deleting favourites
TEXT: Delete selected favourite.
BACK: Finish procedure.

Home view
Loewe bild 7
Operating manual
english
17
continued on the next page ט
TV
In TV mode that can be selected via the Home overview, you can use
the basic TV functions of your TV set. In TV mode you will have numer-
ous functionalities at your disposal as, for instance, PIP, EPG and, if
offered by the station, HbbTV (hybrid broadcast broadband television).
By means of the function list you may call additional options and set-
tings all around TV operation.
Setting the volume
Switching sound off/on
Sound off.
Sound on: Press key again or increase the volume
using V+.
Setting the volume
V+/V– Volume up/down.
The volume control bar will be displayed in the upper
right corner.
The volume control bar can be deactivated in the
menu System settings טControl ט more ... ט
On-screen displays.
Select station
Select station with P+ / P–
When using Instant Channel Zapping, you can very quickly switch to other
stations. The instant channel zapping technology uses the second tuner
in the background in order to pre-select the next stations. Due to this
pre-selection, you can now switch to this channel within a very short time.
While using the digital recorder DR+ (timeshift operation, archive
recording, multi recording) or in PIP mode, Instant Channel Zapping
is not available. Switching is done at „normal“ speed.
For encrypted stations Instant Channel Zapping is only possible to
a limited extent.
P+/P– Station up/down.
The number and the name of the station along with the
title of the programme and that of the next programme
will be briefly shown.
Also, the status display with time/
date and programme-dependent symbols appears.
The symbols of the status display are described in
chapter TV, section Status display.
Select station using the numerical keys
If you select an unoccupied station position, the next available
station is selected.
1-digit stations
Press the numerical key a little bit longer: The chan-
nel will change immediately or press the numerical
key briefly, the station changes after 2 seconds
(changes immediately if up to 9 stations are stored).
2-digit and 3-digit stations
Press first (and second) numerical key briefly. Keep the
last numerical key depressed a little bit longer: The
channel will change immediately or: press all the numer-
ical keys briefly, the channel changes two seconds after
the last number has been entered (with up to 99 or 999
saved channels it will change immediately).
4-digit stations
Press all four numerical keys briefly, the station
changes immediately.
long
short short long
all short
Selecting a station out of the station list
In normal TV mode, without other displays:
OK Call station list.
 Mark stations.
OK The marked station will be called.
Changing the station list
In normal TV mode, without other displays:
OK Call station list,
call overview of station lists.
MENU: Call Overview of station lists.
 Mark the desired list.
The station list will be changed according to the
selection. The list will be adopted automatically.
Move to the newly selected list.
Explanations of the station lists:
The number and the names of the possible station lists depend on
the available signal sources (antennas, TV reception networks, etc.).
ASTRA LCN
Analogue
DVB-C
DVB-T
Only stations from the selected source / reception
network are indicated in the station list.
Personal list
Only stations of the selected personal list are indicated
in the station list. The name of the list may be changed.
AV list
Exclusively AV inputs are shown in the station list.
Manage list
Call up the station list editing menu (System
settings טStations טStation lists TV).

TV
Volume / stations
Loewe bild 7
Operating Manual
english
18

TV
Stations
Selecting stations by means of the expanded station list
In normal TV mode, without other displays:
OK Call station list,
call function list.
 Mark expanded station list,
call expanded station list.
P+/P– Scrolling in the station list page by page.
 Mark stations.
OK The marked station will be called.
Or:
For numerical sorting: Enter the channel number. The
marker will jump to the selected station.
OK The marked station will be called.
For alphabetical sorting: Enter the first letter. The first
station for the specified letters is marked.
 Mark the station.
OK The marked station will be called.
Filter and sort options of the expanded station list
Using the on-screen buttons on the bottom line of the expanded station
list you can filter and sort the station list by various options.
MENU: Switching between list and bottom line.
0..9
Numerical sorting of the station list.
A..Z
Alphabetical sorting of the station list.
Searching
This allows you to do targeted searches for stations.
The station name is to be entered via the on-screen
keyboard. The entry is described in chapter General
information on the operation.
Signal
source
Select the signal source, the stations of which are
to be displayed in the extended station list (e.g.,
Analogue, DVB-C, DVB-T, ASTRA LCN, Personal
station list, AV list).
All stations Here you can filter the content of the station list
according to various criteria. Shall All Stations,
only HD stations, stations that are Locked or
Scrambled or Unscrambled, CI+ Protected
stations be indicated.
Selecting stations by personal lists
You can save your preferred stations in personal lists (e.g., for several
users). Each personal list can contain up to 99 stations.
Personal list available (creating a new personal list
via Manage list טNew personal list).
In normal TV mode, without other displays.
OK Call station list.
MENU: Select station list.
 Mark the desired personal list,
The station list will be changed according to the
selection. The list will be adopted automatically.
Move to the newly selected list.
 Mark the station.
OK The marked station will be called. Or:
Select station directly with numerical keys.
Explanation of the icons following the station names:
Locked station.
HDTV station.
DVB-T station (digital terrestrial via antenna).
DVB-C station (digital via cable).
DVB-S station (digital via satellite).
Scrambled station.
History
Recently selected stations are saved in History.
In normal TV mode, without other displays:
Yellow button: call History.
Select entry,
OK call.
The last station can also be accessed directly:
Yellow button press longer: Call last station.
Loewe bild 7
Operating manual
english
19

TV
Status display
Status display
In normal TV mode, without other displays.
INFO: Show status display.
Below you see the number and the name of the stati-
on and (if available) the title of the current programme.
The bar (if available) indicates the progress of the
current programme. If information about the current
programme is available, this can be called by pressing
the INFO key again.
The field in the upper left corner contains, depending
on the DVB station and according to availability, various
additional information, which is represented by
symbols (see column on the right).
A window with button descriptions is displayed in the
bottom right corner. The automatic display of the
Explanation of keys with status display can be switched
off via System settings ט Control ט more ... ט
On-screen displays טKey explanation.
By pressing the INFO key longer the Explanation of
keys can be displayed regardless of the status display
(see also chapter On-screen displays, section
Explanation of keys).
The status display is shown automatically every time
you change channels.
The status display is hidden automatically at the end
of the display time.
If you want to hide the status display manually before
the display time ends, you can do this with the BACK
key.
Explanations of the symbols in the status display:
General symbols:
Language/sound selection available.
Subtitles available.
Channel selection for multi-channel providers.
3D programme.
HDTV programme.
HbbTV mode available from this station.
Explanations of the symbols in the status display (continued):
Transmitted audio signal:
Mono Mono audio transmission analogue.
Dual
channel
Dual channel sound transmission (Sound1/Sound2)
analogue.
1+1 Dual channel sound transmission (Sound1/Sound2)
digital.
ܐStereo sound transmission digital (PCM).
Dolby digital sound transmission (DD).
MPEG MPEG sound transmission.
Transmitted audio channels:
DD 1.0
DD 2.0
 DD 3.0
 DD 4.0
 DD 5.0
DD 2.1
 DD 3.1
 DD 4.1
 DD 5.1
 DD 7.1
Selected listening mode:
܃
Playback of centre sound or mono (left/right).
܃ Playback of front sound (L/R stereo).
܃ Playback of front and centre sound.
܃ Playback of front and surround sound.
܃ Playback of front, surround and centre sound.
܃6RXQG
projector Playback of sound via sound projector.
܃([WHUQDO
speakers
Playback of sound via speakers connected to an
external amplifier.
If the number of speakers appears in brackets, the sound of missing
speakers is transmitted by the existing speakers (virtually). The Dolby
Virtual speaker (VS mode) developed by Dolby is activated for the
virtual sound reproduction in sound mode (4) and (5). Here you
can choose between Dolby Virtual and Cinema Surround. In sound
mode (3), proprietory settings of Loewe are used for the virtual
reproduction.
Loewe bild 7
Operating Manual
english
20

TV
Function list / Sources
Function list (TV mode)
The function list contains settings and additional options. Die individual
List items will be briefly explained as follows:
The function list can be opened for the current station or the selected
station list. Depending on this, some list items may possibly not
be available.
Function list for the current station:
MENU: Call function list.
Function list for the selected station list:
OK Call station list,
call function list.
 Select function,
OK call.
Explanations of the symbols in the function list:
Expanded station list. Exchanging the station lists.
Recordings. Here you can call up a recording dialogue.
Detailed info. Calling additional information on the current pro-
gramme.
Favourite. Storing the current station as a favourite.
Multiroom playback. Accessing other multiroom devices in the
home network and making settings.
Language / sound. Selecting other languages and audio formats
(if available).
Subtitles. Display programme subtitles (if available).
Picture settings. Make frequently used picture settings.
Sound settings. Adjusting all available audio settings.
Headphone volume. Adjustable irrespective of the volume of the
device speakers..
Store station. Here you can save the current station to a list that
is selected in the following step.
Expanded station list. Here, you can open the entire station list
in full screen mode. You can filter it according to various criteria.
Sources
Selecting the AV source via the AV list
In normal TV mode, without other displays.
Open station list AV list.
 Select desired connection,
OK switch over.
If the selected AV source provides a signal (picture), it
should be visible now.
When selecting VIDEO, you switch to the signal source
Cable analogue, channel E36. The TV set can display
the signal from an external source via the antenna input
TV ANT.

This manual suits for next models

2

Other Loewe TV manuals

Loewe bild 1 User manual

Loewe

Loewe bild 1 User manual

Loewe Connect ID 32 User manual

Loewe

Loewe Connect ID 32 User manual

Loewe Articos 55 HD User manual

Loewe

Loewe Articos 55 HD User manual

Loewe bild 5.65 oled User manual

Loewe

Loewe bild 5.65 oled User manual

Loewe bild series Instruction Manual

Loewe

Loewe bild series Instruction Manual

Loewe Profil Plus 3272Z User manual

Loewe

Loewe Profil Plus 3272Z User manual

Loewe Xelos A 42 HD+ 100 User manual

Loewe

Loewe Xelos A 42 HD+ 100 User manual

Loewe Articos 55 HD User manual

Loewe

Loewe Articos 55 HD User manual

Loewe bild 1.65 Instruction manual

Loewe

Loewe bild 1.65 Instruction manual

Loewe Individual 40 Selection User manual

Loewe

Loewe Individual 40 Selection User manual

Loewe Aconda 9581 ZW User manual

Loewe

Loewe Aconda 9581 ZW User manual

Loewe Xelos M155 TM User manual

Loewe

Loewe Xelos M155 TM User manual

Loewe Art 40 LED 200 User manual

Loewe

Loewe Art 40 LED 200 User manual

Loewe Contur 2063 User manual

Loewe

Loewe Contur 2063 User manual

Loewe Aconda 9272 ZP User manual

Loewe

Loewe Aconda 9272 ZP User manual

Loewe Calida 5784 ZP User manual

Loewe

Loewe Calida 5784 ZP User manual

Loewe 56435 User manual

Loewe

Loewe 56435 User manual

Loewe Spheros R 26 User manual

Loewe

Loewe Spheros R 26 User manual

Loewe bild 7.77 User manual

Loewe

Loewe bild 7.77 User manual

Loewe bild 5.55 User manual

Loewe

Loewe bild 5.55 User manual

Loewe Xelos M55 VT User manual

Loewe

Loewe Xelos M55 VT User manual

Loewe CAL 2323 MB User manual

Loewe

Loewe CAL 2323 MB User manual

Loewe Individual 40 Selection User manual

Loewe

Loewe Individual 40 Selection User manual

Loewe ART 37 SL FULL-HD+ 100 User manual

Loewe

Loewe ART 37 SL FULL-HD+ 100 User manual

Popular TV manuals by other brands

Sanyo CP25ST3T instruction manual

Sanyo

Sanyo CP25ST3T instruction manual

Panasonic TX-55CRW434 operating instructions

Panasonic

Panasonic TX-55CRW434 operating instructions

Sky media TV user guide

Sky media

Sky media TV user guide

Sharp 27L-S100 Service manual

Sharp

Sharp 27L-S100 Service manual

Beko B55 Q 990 A user manual

Beko

Beko B55 Q 990 A user manual

RCA M50WH92S Specifications

RCA

RCA M50WH92S Specifications

Philips Matchline 46PP910A user manual

Philips

Philips Matchline 46PP910A user manual

Samsung UN40C6500VFXZA troubleshooting manual

Samsung

Samsung UN40C6500VFXZA troubleshooting manual

Philips 24PT6341/37 user manual

Philips

Philips 24PT6341/37 user manual

Sanyo CP21SA1 Service manual

Sanyo

Sanyo CP21SA1 Service manual

Panasonic TX-28EX3C operating instructions

Panasonic

Panasonic TX-28EX3C operating instructions

Sony Bravia KLV-S19A10E Service manual

Sony

Sony Bravia KLV-S19A10E Service manual

Samsung UN60ES8000 E-manual

Samsung

Samsung UN60ES8000 E-manual

Sony Trinitron operating instructions

Sony

Sony Trinitron operating instructions

Sanyo C25EG27 Original manual

Sanyo

Sanyo C25EG27 Original manual

Panasonic TX-32PB50 Service manual

Panasonic

Panasonic TX-32PB50 Service manual

Grundig 65 GHQ 8990 user manual

Grundig

Grundig 65 GHQ 8990 user manual

Magnavox TS2573 owner's manual

Magnavox

Magnavox TS2573 owner's manual

manuals.online logo
manuals.online logoBrands
  • About & Mission
  • Contact us
  • Privacy Policy
  • Terms and Conditions

Copyright 2025 Manuals.Online. All Rights Reserved.