M-LIVE Merish5 User manual

USER MANUAL

4 GET STARTED
_TRANSFERRING THE REPERTOIRE, HARD DISK AND STORAGE
_USE OF USB PEN DRIVES OR EXTERNAL HARD DISKS
_BROWSING THE CONTENT OF A USB PEN DRIVE.
_MANAGING THE ARCHIVE OF BACKING TRACKS INSIDE MERISH5,
“COPY PASTE” FUNCTION
_SEARCH A SONG, PLAY IT AND MOVE TO THE NEXT SONG
_MERISH5 AND THE DATABASE INFORMATION, META-EVENTS
_INTERNET WI-FI CONNECTION - WWW.SONGSERVICE.IT
_DOWNLOAD FILES WITH SONGNET CREDIT
_DOWNLOAD FILES WITH THE ALL SONGS SUBSCRIPTION
_IMPORT FROM MERISH4-3 OR OKYWEB4
8 RECURRING ICONS
_MESSAGES
_MERISH5 MANAGER
10 FRONT PANEL
_MIXER
_RECORDING – REC BUTTON
_MIC – AUDIO
_HARMONIZER
_AUDIO EQUALIZER
_ROUTING
_WEB
_DOWNLOAD
_ACCOUNT
16 CONNECTIONS
17 THE DIGITAL MIXER
18 EXPANDER AND SOUNDS
_“SPECIAL SOUND” FUNCTION
_GENERAL MIDI DATABASE
_M.KEYB
_PATCH
_AM.KEYBOARD - COMPUTER
_M.KEYBOARD - ACCORDION
_WEB
_DOWNLOAD
_ACCOUNT
21 MAIN SCREEN
_THE 5 VIRTUAL BUTTONS
_OTHER AREAS OF THE HOME SCREEN
_SCROLL BAR
INDEX
_NEXT SONG & GO TO
_TEMPO AND KEY
_MARKER
_DJ AREA
_EFX BUTTON
25 SONGS BUTTON
_THE VIRTUAL BUTTONS
_SONG INFORMATION
_MOVING MUSIC FILES AND/OR FOLDERS IN THE ARCHIVE
_GENRE AND ARTISTS BUTTON
_LOOKING FOR A MUSIC FILE WITH MANUAL BROWSING
_LOOKING FOR A MUSIC FILE WITH THE “SEARCH” FUNCTION
_LOOKING FOR A MUSIC FILE IN A FOLDER: “LOOK IN” FEATURE
_LOOKING FOR A MUSIC FILE ON THE INTERNET
_CREATING AND PLAYING THE PLAYLISTS
30 “DISPLAY” BUTTON (DISPLAY)
_“KARAOKE” BUTTON (KARAOKE)
_“KARAOKE TV” BUTTON (KARAOKE TV)
_“TV BACKGROUND” BUTTON (BACKGROUND IMAGE)
_“MESSAGE” BUTTON (TV MESSAGE)
_“THEMES” BUTTON (THEMES)
33 “CHORDS” BUTTON (CHORDS)
34 “EDIT” BUTTON “EDIT”
_EDIT SONGS
_EDIT TEXT
_EDIT CHORDS
_EDIT MARKER
38 “OPTIONS” AREA (OPTIONS)
_“PREFERENCES”
_“NETWORK”
_UTILITIES
_MIDI (MIDI)
_CUEING (CUEING)
_(SIAE) LOG
_SYSTEM
41 USE OF THE KEYBOARD AND TABLES
42 LIST OF SOUNDS
46 LIST OF DRUM KITS
47 PATCH LIST

3
– THE NEW M-LIVE MUSICAL
OPERATING SYSTEM
Merish5 contains Xynthia, an Operating System devel-
oped by M-Live in over three years of research. Xynthia
supports easy and extremely quick management of
large-sized music archives, direct browsing of music
websites, downloading music files from the internet.
Thanks to Xynthia, Merish5 is a powerful external gen-
erator also controllable by a USB Master Keyboard, with
optimised Midi sound, comprehensive multitasking of
the various work sessions, expansion of the part con-
cerning the Digital Mixer with control over any Mixing
and Eq parameter, and many more features that you will
discover by using your Merish5.
THE NEW SOUND OF MERISH 5
Merish5 includes all the sounds that were featured in
the previous versions, but a great many of them were
reprocessed, resampled and optimised so that the stor-
age space has increased almost tenfold. The sound da-
tabase of Merish5 is up to the demands of professional
live artists.
Merish5 can be played even by using a USB Master Key-
board which, after connecting, is powered and ready to
play the internal database of Merish5. A master key-
board and Merish5 are the ideal combo for people who
demand excellent sounds and uncompromising perfor-
mance in terms of control and management of music
archives.
the Live Machine
MERISH5 IS THE EVOLUTION OF THE PREVIOUS
VERSIONS AND IS THE BEST IN STAND ALONE DE-
VICES FOR READING, ARCHIVING AND PLAYING BACK
DIGITAL BACKING TRACKS. MERISH5 INCLUDES
ALL THE FEATURES OF ITS ANTECEDENTS, BUT IT
HAS BEEN OPTIMISED AND WHOLLY REDESIGNED.
ON THE INTERNET IN FEW AND
SIMPLE MOVES
If you love having archives of high level Backing Tracks
of any genre at your fingertips, Merish5 is the ideal in-
strument. As a matter of fact, Xynthia OS is able to con-
nect to the Internet via Wi-Fi to browse the archives of
www.songservice.it. The Backing Tracks will download
very quickly, and thanks to the AllSongs subscriptions,
you will be granted access to a repertoire of thousands
of Midi or Mp3 Backing Tracks, constantly updated by
M-Live. Even without going through your Computer, the
available repertoire will be huge and very high quality.
In addition to these important innovations, all parts
of Merish5 have been optimised: the digital mixer has
been enhanced, and many, extremely useful features
have been added for virtually flawless performance. The
display is very precise and sensitive, and all hardware
parts have been accurately and functionally redesigned.
Have fun with Merish5!
M-Live staff

4
Moving the repertoire is not subject to any particular
restrictions with regards to folder and file manage-
ment. We recommend using the Merish5 Manager soft-
ware to transfer large-sized archives. If the files to be
transferred exceed 3 GigaByte of space, it is recom-
mended to use the Ethernet cable connection, in order
to avoid long download times. The database automat-
ically updates the indexes. Tens of thousands of Files
can be uploaded and managed easily, it is recommend-
ed not to use very long titles in order not to slow down
the Database.
USE OF USB PEN DRIVES OR EXTERNAL HARD DISKS
When a USB Pen Drive or Hard Disk is inserted in the
appropriate slot, Merish5 is able to read the content
and to play the stored files. What is more, the content
of the USB Pen Drive can be copied in the Hard Disk
of Merish5. The USB Pen Drive can be browsed with
the normal features of the “Song” button. It is advis-
able to transfer the content of a USB Pen Drive into
the Merish5 memory so its content can be indexed
and the archive can be browsed with more flexibility.
WARNING: the “search” function is not active in USB
pen Drives.
BROWSING THE CONTENT OF A USB PEN DRIVE.
1. Insert the USB Pen Drive in the appropriate slot, on
the right side of Merish5
2. Touch the “Song” button, the relevant window
opens
3. Touch the USB button
4. Select the folders or files contained in the USB Pen
Drive by using the Alpha Dial or the Enter button.
To quickly transfer the content of a USB Pen Drive into
Merish5, proceed as follows:
1. Select the desired directory
2. Press “IMPORT”
3. The files will be copied in a specific folder called “Im-
ported Files”
GET STARTED
TRANSFERRING THE REPERTOIRE,
HARD DISK AND STORAGE
Mass storage and PC connection.
Merish5 has a 128 Gb solid state mass storage, and
reads USB pen drives. What is more, an external Hard
Disk may be connected through the USB ports and other
peripherals that store data.
The USB pen drive and the external Hard Disk must be
inserted in the slot on the right, called: USB 1 - 4.
Merish5 contains a solid state storage able to con-
tain tens of thousands of Midi Files, and several
thousands of Mp3 and Mp4 Video files. In order to
load this repertoire into Merish5, several methods
are possible:
1.Connect it to a PC through the ETHERNET port and
move the files and folders with the Merish5 Manager
software (PC or MAC) supplied.
2.Connect Merish5 to a home WiFi network, also via the
Ethernet cable. Move the files and folders with the Mer-
ish5 Manager software (PC or MAC) supplied.
3.Connect Merish5 to a WiFi network using a Wi-Fi
stick or by opening a Hotspot connection with an An-
droid mobile phone. Move the files and folders with the
Merish5 Manager software (PC or MAC) supplied.
4. Copy the repertoire from a USB pen drive (or from an
external Hard Disk) into Merish5.
GET STARTED

5
2. Type the title of the song you are looking for
3. When you have found the song, press Play
The search engine of Merish5 looks for a title, author
or genre without distinctions, if it is in the Database
information of the archived files. If for example you type
“Dance”, Merish5 might find all Dance tracks (grouped
under the specific genre) or songs that contain the
word “Dance” in the title. The list of files found can be
browsed using the Alpha Dial or the “Up” and “Down”
buttons.
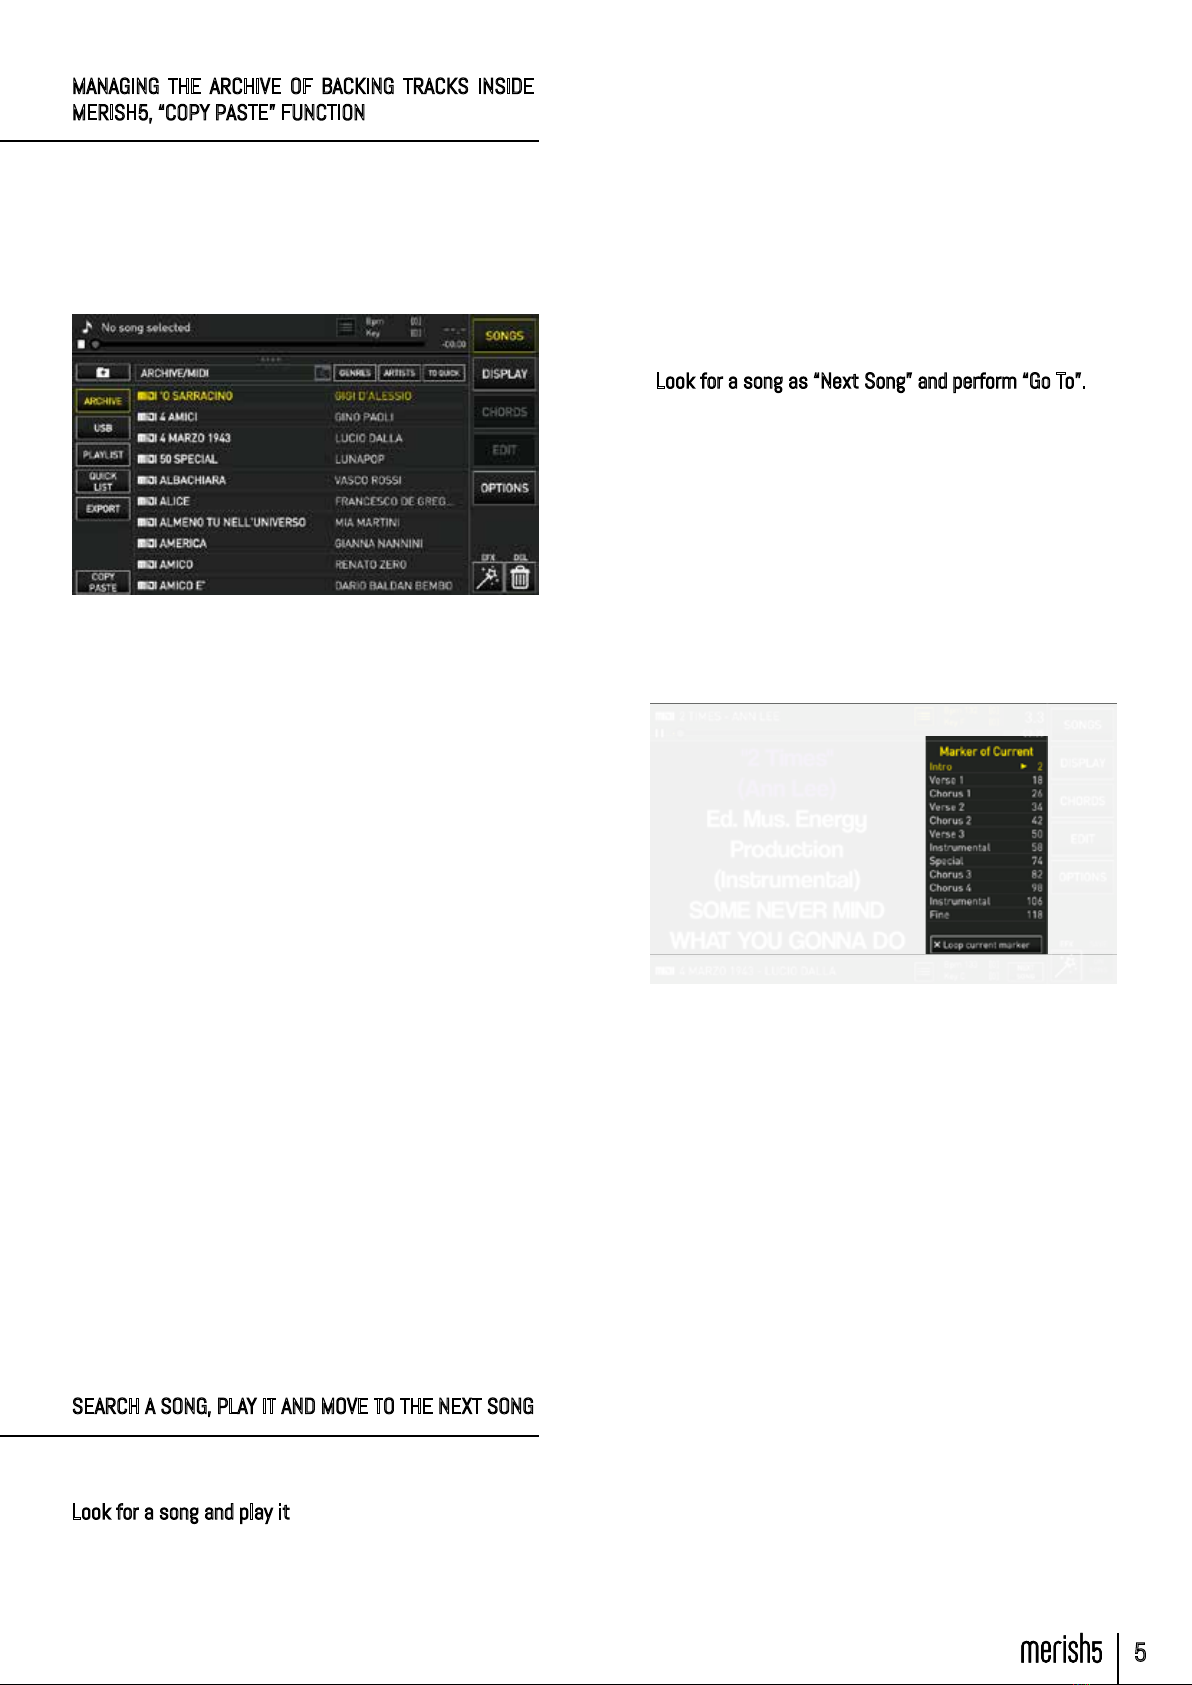
Look for a song as “Next Song” and perform “Go To”.
To find the song you are looking for, repeat the procedure
of the previous paragraph, even while the current song
is Playing. Now place a new song as the “Next Song”.
Once you have found the desired title press ENTER. The
song is placed as the Next Song and the title is shown
in the bottom bar of the display.
You can switch to the next song in several ways:
1. Wait for the song being currently played to end, then
press Play
2. Press “GO TO” and Merish5 immediately mixes the
current song with the Next Song.
3. Select a Marker of the next song then press GO TO.
To select a marker, touch this icon in the home screen:
The Markers indicate the various parts of a track, which
typically may be Intro, Verse, Chorus and others. With
Merish5, you can insert the Markers, which are displayed
while playing the Midi File and used to move quickly in-
side the Song we are playing.
If we enable the Wizard functions in the DJ page, the
current song and the next song will be mixed at best by
Merish, automatically.
MANAGING THE ARCHIVE OF BACKING TRACKS INSIDE
MERISH5, “COPY PASTE” FUNCTION
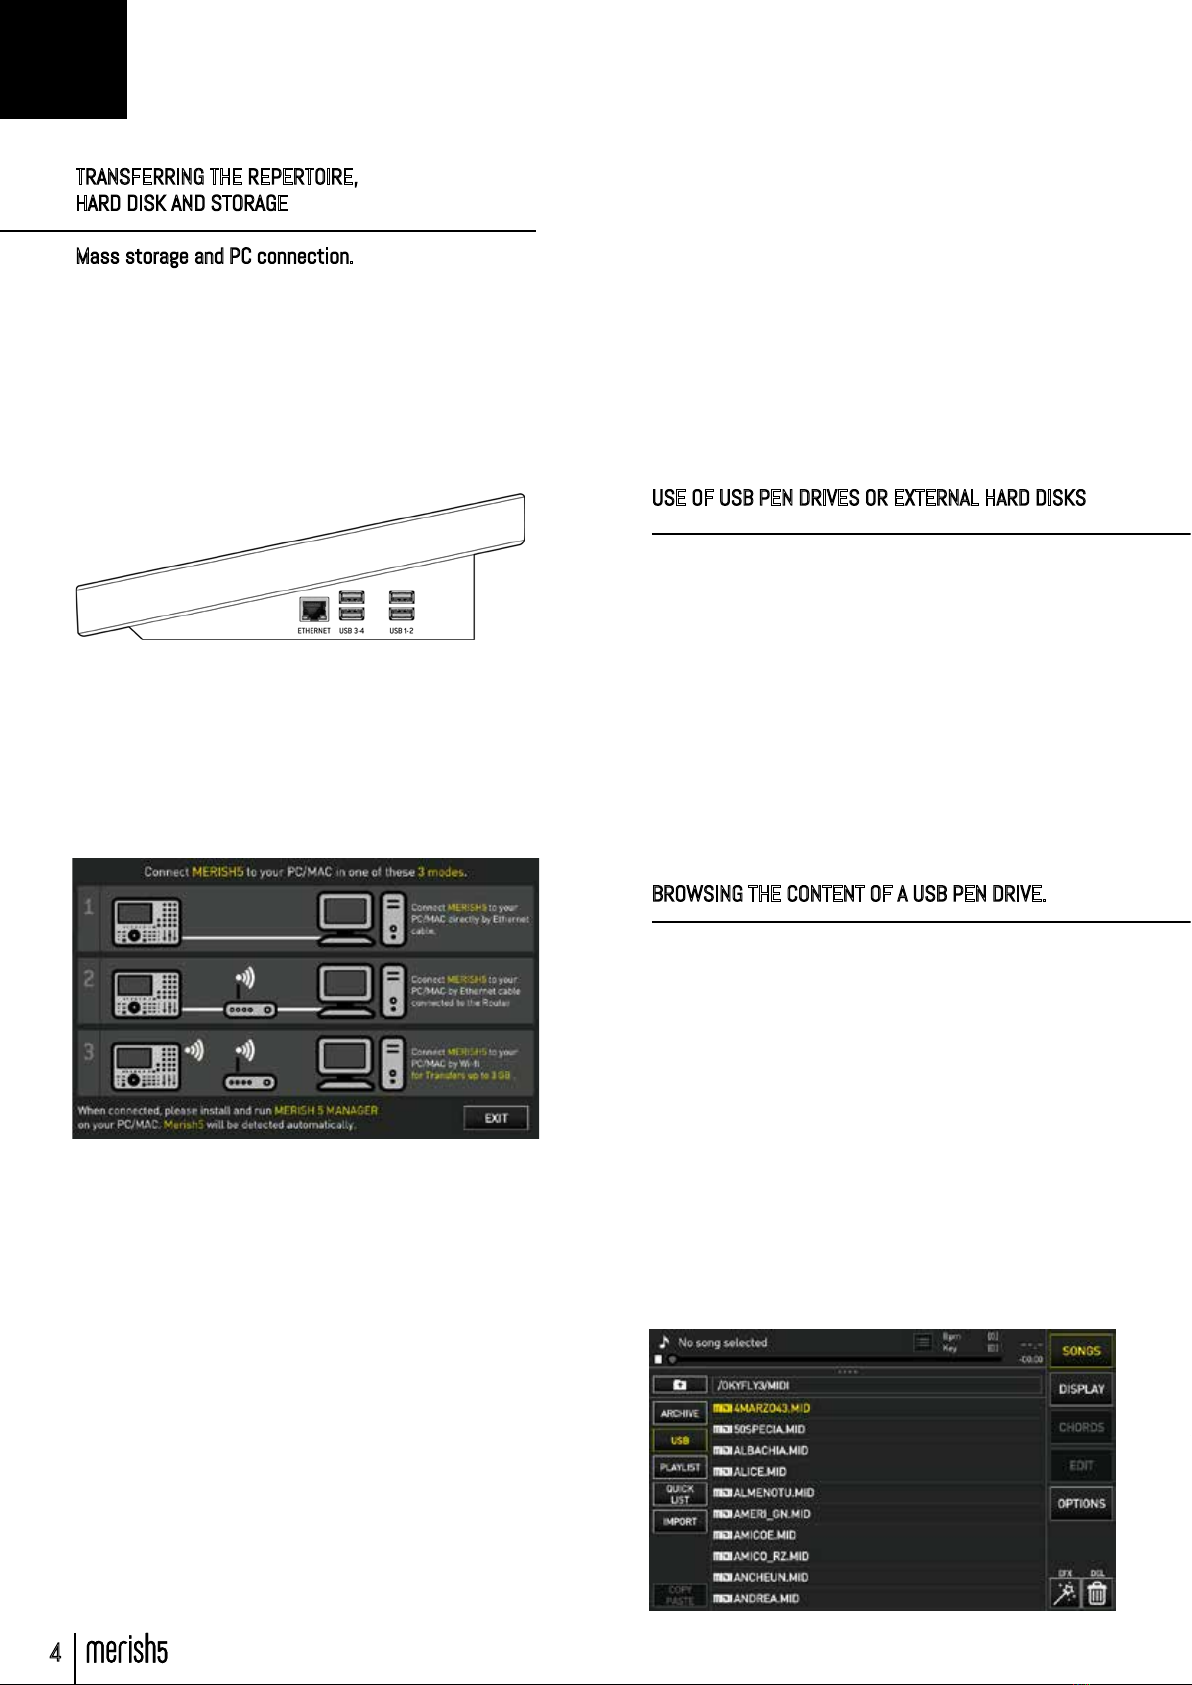
Merish5 is able to manage files like a normal PC, i.e.
you can move any file (by copying or dragging) to a
specific destination. For instance, you may copy files
from one Folder to another, and to do so proceed as
follows:
1. Touch the “Song” button to open the relevant window
2. View the window full-screen
3. Touch the “Copy Paste” button.
Page 1.Select is displayed.
4. Select the elements to be copied or moved inside
the Merish5 Hard Disk. If you wish to select the whole
content, touch the “Select All” button. To select a file,
you need to point it with the Alpha Dial then press “En-
ter”.
5. Press “Copy” to copy the selected items (or “Cut” if
you wish to move them from the current position to a
new destination).
6. The next page, 2.Paste, lets you select the destina-
tion of the files, or you may create a specific destination
folder with the “new Folder” button.
7. You then choose the file destination by using the Al-
pha Dial or touching on the screen the desired peripher-
als or directories. If you wish to select the internal Hard
Disk, touch the HD icon.
8. Touch the “Paste” button to confirm the transfer of
the files you have selected.
At the end, you will have copied the content of one
folder from one part to another of the internal stor-
age of Merish5. For more information read chapter:
(SONGS) button
SEARCH A SONG, PLAY IT AND MOVE TO THE NEXT SONG
As soon as you have added some songs in Merish5, you
can try playing them, and browse the archive.
Look for a song and play it
1.Press SEARCH on the panel
GET STARTED

6
registered to Song Service, and have an account. After
that you can select two purchasing methods:
1. Songnet Prepaid Credit. Various sizes of credit paid
into the website which makes it possible to download
music files until you have used up all the credit.
2. AllSongs subscription. This is a Flat rate subscrip-
tion that makes it possible to download any backing
track in Midi and MP3 format from www.songservice.
it. It is a time-limited subscription, available in various
formats.
For any commercial and additional information, please
go to www.songservice.it
DOWNLOAD FILES WITH SONGNET CREDIT:
If you have a Songnet credit activated in the Song Service
website you can buy single Backing Tracks even from Mer-
ish5. By enabling the
SEARCH button you can include the
Song Service website by pressing the relevant
button
The Backing Tracks results will therefore show the backing
tracks in the archive as well as those in the Song Service
website marked with the logo “€”. The logo means that the
Backing Track is in the website www.songservice.it and is
available for Download provided you have a minimum active
credit. The cost of the track is displayed by tapping the title
or Enter. The following picture is displayed
Touch the box indicating the cost and the Cloud to con-
firm the purchase. Once it has been downloaded from
the Internet, the track will be permanently available on
Merish5
MERISH5 AND THE DATABASE INFORMATION, ME-
TA-EVENTS
Merish5 uses Meta Events massively, such as Marker,
Extended title, Artist, Genre. Merish5 also perfectly
manages Songs that do not contain any Meta Event,
and is able to quickly find the desired files, by using the
Search function, with only the filename or Song title as
reference. Merish5 is able to write any Meta Event in
the Files. From the Song Info window: to access, touch
the MIDI or MP3 icon on the left side column of the
“Songs” window.
All the Meta Events it contains can be written in this
window:
Most Backing tracks produced by M-Live and available
on www.songservice.it contain the following informa-
tion:
Extended title – Artist – Authors – Marker – Genre –
Chords – Synchronised lyrics.
INTERNET CONNECTION – WI FI – www.songservice.it
Merish5 connects to the Internet. To connect:
1. Via the Ethernet connection cable, from the output
to a Router
2. Via the Wi-Fi stick to an access point or mobile phone
in Hot Spot mode.
3. Via an Android mobile phone connected via USB in
Tethering mode. Connect the Mobile to a USB port. To
set the Mobile up in Tethering mode, refer to the Smart-
phone’s manual.
To configure and access the Wi-Fi networks, press Op-
tions > Network. Then select the Wi-Fi network and en-
ter the access Password if required.
At the time of publishing this Manual, the available net-
work functions are browsing and downloading Music
Files from www.songservice.it
To be able to download and play the files you need to be
GET STARTED

7
DOWNLOAD FILES WITH THE ALL SONGS SUBSCRIPTION
The All Songs subscription is the quickest and easiest
way to use SongService Backing Tracks. The subscriptions
have a time limit, and may be renewed upon expiry. The
subscription is purchased by creating an Account in www.
songservice.it, where you will find information on costs and
payment methods.
Once the All Songs subscription is activated, the user
may access the whole M-Live repertoire available on
www.songservice.it in Midi and Mp3 formats. Therefore,
when running a search after including WEB in the search
function, the contents of www.songservice.it will also
be shown in the search results, marked with the CLOUD
download logo:
These files can be used on Merish5 as if they were in the
archive, therefore you can:
1. Press Enter and set the file as next Song
2. Press Play and play the selected song
3.Press GO TO and immediately cue in the song chosen on
the WEB
A very short wait time is required because the file is
physically on the Internet, and a few seconds may be
required if the network is slow and the file is in Audio
format.
Upon expiry of the subscription, the downloaded files will
no longer be in Merish5 but if the All Songs subscription is
reactivated, all the files will automatically be back in the
archive.
GET STARTED
IMPORT FROM MERISH4-3 OR OKYWEB4
If you have a Merish 3 or 4 or an Okyweb 4 you will be able
to import automatically on MERISH5 the whole repertoire
including the Playlists.
• Switch off Merish 4
• Switch on Merish5 and go to the home screen
• Connect Merish 4 with USB cable from PC IN of Merish 4
to USB 1 – 4 of Merish5
• Switch on Merish 4 and wait for it to start with the words
PC CONNECTION
• At that stage Merish5 displays the following screen:
• Select YES
• At this stage the files start being imported from Merish
4 to Merish5
• Wait for the importing to end

8
RECURRING ICONS
• VIRTUAL SLIDER:
With the virtual slider it is possible to edit
a value by dragging your ginger across the
touchscreen. Some virtual sliders are verti-
cal, others are horizontal. As an alternative to
dragging, you may use the Alpha Dial to move
the virtual potentiometer. To do so you need
to touch the potentiometer, when it turns yel-
low the alpha dial can be turned to edit the
value.
• VIRTUAL POTENTIOMETER:
With the virtual potentiometer it is possi-
ble to edit a setting by dragging your finger
around the touchscreen. As an alternative to
dragging, you may use the Alpha Dial to move
the virtual potentiometer. To do so you need
to touch the potentiometer, when it turns yel-
low the Alpha Dial can be turned to edit the
value.
• FULL SCREEN ICON:
When this icon is displayed, it is possible to
lift and enlarge or lower and reduce a screen
by touching the touchscreen upwards or
downwards.
• SAVE:
This icon becomes active each time a change
is made. Click this icon to save the changes
made on the song you have just uploaded.
• ALPHA DIAL:
When this icon is displayed next to or inside a
box, it means that the value or setting of that
box is changed by rotating the Alpha Dial. The
Alpha Dial is generally effective on any set-
ting that may be edited.
• MIDI/MP3/MTV:
These icons identify the file format.
• DROP-DOWN MENU:
Click on the drop-down menu to display a set
of settings or values. To switch between the
open options in the drop-down menu, you can
slide your finger on the touchscreen, use the
Alpha Dial or the physical “UP” and “DOWN”
buttons. You can use the “ENTER” button to
confirm the setting or desired value.
When a list is displayed (for example the list of files
or songs contained in a folder) it is possible to scroll
through the list simply by sliding your finger on the
touchscreen up and down. The speed at which the lists
scroll is a result of the speed of the motion.
MESSAGES
Underneath the 5 function buttons on the right of the
display is a normally empty space intended for certain
messages:
CONNECTED:
indicates that Merish is connected to the INTERNET
FAN:
indicates the fan status
PLAYLIST:
indicates that a playlist is playing
RECORDING:
indicates that recording is on.
RECURRING ICONS

9
CREATE backup:
creates a safety copy of the Merish5 archives on PC
MERISH System Update:
starts the Merish5 Firmware update
RESTORE factory reset:
resets Merish5 with the default settings.
RESTORE Backup:
moves into Merish5 all the files that have been written
in the Backup
MERISH5 MANAGER
The Merish5 MANAGER software is used to optimally
organise File transfers from PC/MAC to Merish5. This
Software is downloaded from the specific webpage for
Merish5 in www.m-live.com, and once it is installed on
PC/MAC it can be launched, taking care to connect the
Merish5 directly to the PC via the network cable sup-
plied, or through a direct Wi-Fi connection or Router. To
transfer large-sized archives or exceeding 3 GB, it is ad-
visable to use the Merish5 Manager connected to the
Merish5 via the standard supplied Ethernet cable. If the
PC has no Ethernet connection, an Ethernet to USB con-
verter may be used.
Once the Software is uploaded, the home screen is dis-
played
The window is split into two parts: on the left you can
read the PC/MAC Directories. On the right you can read
the Merish5 Directories.
Click the box to the left of a Directory or file to select it
for a specific action, such as copying or transferring. For
instance, if you wish to transfer an entire directory from
the PC to Merish5, select it and click on the right arrow
at the top. File copying into the Merish5 begins.
In this way, you may transfer archives of varying size
from PC / MAC to Merish5. The archives are indexed au-
tomatically, with no further actions required.
In the Merish5 window it is possible to act directly in the
internal storage of the Merish5 connected to the PC, and
files and folders can be optimally arranged.
The six buttons at the top are used to:
Copy, cut, paste, delete the selected items.
With the three buttons on the right you may delete con-
tents, create an empty folder, edit the names.
Click on the icon at the top right to access the FUNC-
TIONS menu, which includes:
RECURRING ICONS

10
• 1. SEARCH:
To perform a search based on Title, Genre and Artist ei-
ther on the Merish 5 Hard Disk or on the Backing Track
Marketplace you are connected to.
• 2 MELODY (mute melody):
it has 3 options:
• 1 click (Mute):
no melody (button light steady)
• 2 clicks (Semi-mute):
melody at minimum volume (button light blinking)
• 3 clicks (Normal):
play melody (button light off)
• 3.SMOOTH:
lowers the track volume in real time while keeping the
microphone volume unchanged.
• 4. MUTE instrument buttons:
they work on the MIDI tracks. One click mutes the
tracks, double click sets the tracks to SOLO.
FRONT PANEL
The front panel of Merish5 offers three areas to interact with the Operating System:
The capacitive Touchscreen Display
The panel with the control buttons
The potentiometers and sliders controlling the Digital Mixer
All the screens displayed will be examined in detail when dealing the Merish5 Software, for
the time being let’s look at the panel buttons:
• 5. BACK:
go back one step in the software, in the various con-
ditions. For example, if you have entered a group of
sub-folders the BACK button goes back by one folder at
the time.
• 6. ESC:
exits the function you have entered.
• 7. DIAL: According to the contexts:
• Moves the selection cursor
• Changes the value of the selected setting
• ENTER: Lets you select the tracks and/or confirm a
control or setting (e.g. selection of the Song, access to
the page/function/setting etc.).
• 8. PLAY:
Starts playing the selected song or resumes playing the
song in pause.
FRONT PANEL

11
sounds by clicking on the relevant light buttons (single
click MUTE, double click SOLO)
MIX ON – OFF
to enable and disable the Mixer.
When the MIXER page is full screen, it is possible to see
how many and what instruments are playing for each
MIDI sound family.
Use the MUTE light buttons to MUTE (single click) or set
to SOLO (double click) the relevant tracks.
RECORDING – REC BUTTON
Merish5 is also a digital recorder.
There are various possible uses:
1.record a live performance and create an Mp3 to be
handed to the artist
2.record a performance to learn a song
3.create an Mp3 file from a track in Midi File Format
(From Midi to Mp3)
4.record instrumental or vocal parts on a Midi or Mp3
track
Use of the recorder is extremely simple, and it is sum-
marised as follows:
1. Load the Midi or Mp3 track on which you wish to sing
or play to record
2. Press REC
3. Select or uncheck the peripherals to be recorded in
the box
4. Set optional functions
5. Press the touch or physical “REC” button to start re-
cording. The physical REC button starts blinking.
9. STOP:
Stops the song: press once = PAUSE; pressed twice:
STOP and empties the memory.
10. UP – DOWN:
goes up or down a list of scale of values by one item.
11. SPEED:
It lets you increase or decrease the BPM of a track.
12. KEY:
It lets you increase or decrease the key of a track.
13. MIXER:
opens the midi MIXER screen from which it is possible
to edit the volume of the instruments of a MIDI FILE
backing track. See following description.
14. DJ:
area to select the type of mixing you wish to use to
switch between tracks or between points in the track.
See chapter 1.
15. M.KEYB:
Merish5 expander interface screen with external instru-
ments.
16. REC:
controls recording.
17. WEB:
accesses the Internet part.
18. HARMONIZER:
Activates the Harmonizer function.
MIXER
The mixer button opens a screen that has two positions:
half screen or full screen.
The 6 potentiometers manage the 6 “families” of midi
sounds in real time. These adjustments are only possi-
ble on Midi File tracks.
It is possible to raise and lower the volume of a group
of instruments, or set to solo or mute the “families” of
FRONT PANEL

12
particularly interesting and functional, but one needs
to know very well what to edit and how the machine
reacts to fine-tuning. We shall not provide a technical
description of the settings here, but we shall explain
the logic of use of this truly powerful and versatile Dig-
ital Mixer.
Let us analyse the home screen of the MIC AUDIO ses-
sion
The function keys are on the right:
MIC PRESET: enters the session intended for Micro-
phones.
HARMONIZER: manages the 4 Voice vocal harmoniser
AUDIO EQUALIZER: manages the equaliser intended for
all non-microphone tracks
ROUTING: manages Main and Aux audio outputs, the vol-
ume of the Metronome Click
MIC PRESET:
On the left:
EFFECTS: goes to the Effect setting and Editing page of
the two Microphone lines. These are a Reverb and Delay.
Each microphone setting may be assigned to Presets,
which can be accessed or opened from a specific page.
Merish5 is standard supplied with 4 basic presets, which
can be restored with a System reset (OPTION>UTILI-
TIES>RESET).
REVERB: reverb has 10 modes, and for each one of these
it is possible to edit all operating settings by acting on
the relevant virtual potentiometers.
DELAY: the Delay has four operating modes, for which
two values may be set: Tone Gain and Feedback. Fur-
thermore, the BPM of the delay can be set, either in Auto
Sync mode or with the tempo TAP, or by changing the
BPM directly on the potentiometer.
6. At the end of the performance press “STOP REC” (or
the physical “Rec” button), a window is displayed asking
for confirmation to save the recording. After that, the
virtual keypad appears to write the title of the file to be
saved in the Recorded files folder.
The files created by the recording are archived in a spe-
cial Folder. Press “Open Folder” to access the recorded
files, which are Mp3 files.
With Merish5 you can record one or more available audio
sources: the Backing Track jointly with the Mic 1 and Mic
2 and the two auxiliary Audio inputs. You can convert a
Midi File in Mp3 format with the specific “Midi to Mp3”
function.
You can insert a NoiseGate with optional levels. The bit
rate of the Mp3 file may be from 128 to 320 kb/s.
“Start song on Rec” button: it automatically starts the
backing track loaded in the memory when the REC but-
ton is pressed (either physical or on Display).
Warning: when the physical STOP button is pressed,
the Backing Track is stopped but recording continues
until the REC button is pressed (either physical or on
Display).
MIC – AUDIO
This button gives access to a specific Software for
setting up the Digital Mixer. The settings concerning
the Microphones (settings, effects, equalisation and
compression) may be saved in available Presets or
within each backing track. All the other settings
concerning Harmonizer, Equalisation of the Audio
part and Routing may be saved in the Backing Tracks
or as general setup. This Software is very powerful
and comprehensive and offers any option in terms of
editing Effects, Equalisation, setting Audio connec-
tions and much more. Merish5 has the option of sep-
arately equalising all input channels (microphones,
audio and Backing track) and the general MAIN OUT
output.
In order to make the best use of the Mic Audio settings,
it is advisable to study the use of Effects, Equalisers,
Compressors and any other available feature on a Dig-
ital Mixer with the aid of courses or technical manu-
als. Editing these settings makes the use of Merish5
FRONT PANEL

13
NAME: the preset name may be freely edited by clicking
on the Pencil logo.
Once a preset is selected, its values may be edited, with
regards to the two pages we have analysed. The edits
may be saved on the preset, or on the Song we have just
uploaded to the memory.
To save the settings on the SONG select “SAVE ON
SONG”. The backing track will therefore contain all the
settings you have made.
To save the Microphone settings in the presets, press
ESC and confirm saving in the next dialogue box.
The same saving mode (on the song or preset) is valid in
the other sections of the Mic Audio Software.
UNDO: removes the last changes made and goes back to
the setting previously loaded and saved.
HARMONIZER
Merish5 includes a 4-voice Harmonizer that may be used
in various manners and with various types of Harmonisa-
tion Effects. The voice going through the Mic 1 input is
processed by the harmoniser.
The following operating modes are possible:
Harmonizer:
harmonises the voice following a MIDI track that must
be written in the Midi File being played. The choral back-
ing is played when needed if programmed. Most M-Live
tracks distributed on www.songservice.it include the
harmonised choral backing when musically needed. The
Midi harmonisation track is selected with the Track Po-
tentiometer. Track 5 is normally used.
EQ & COMPR: on this screen you can select the Equali-
zation modes of the microphone channels, the Phantom
mode and Compressor and Noise Gate control.
Equalization: the Equaliser of Merish5 is very sophisti-
cated, and supports professional settings at any level,
i.e. the microphones, audio inputs, Midi or Mp3 backing
tracks and the Main outputs.
Equalisation on the input (microphones, line inputs and
MIDI and MP3 backing tracks) is independent for each
channel: it is 3-band, parametric type (High, Mid and
Bass) and the modifiable parameters are Gain, Operating
frequency and Mid curve Q.
The Gain of the two microphones is controlled with the
specific potentiometers on the back panel. All the other
parameters may be set on the pages of the MIC-AUDIO
section under EQ & COMPR.
X Phantom: to enable or disable Phantom Microphone
supply.
Compr X Off: to enable or disable the compressor. Three
Compressor settings are possible: Threshold, Release
and Attack.
Noise Gate X Off: to enable or disable the noise Gate: it
is possible to set the Threshold and Release level of the
Noise Gate.
Pan: to set the Pan Pot of the microphone channel.
PRESET: from this screen you select the Preset and cre-
ate new presets, where to store the Microphone channel
settings.
FRONT PANEL

14
Track:
select the Midi track that contains the Harmonizer track
in the Midi Files loaded in the memory.
AUDIO EQUALIZER
In the Audio Equalizer section you may act with pow-
erful equalisers that have an effect on the backing
track, on audio 1 and 2 inputs, and finally with a 10
band Equaliser that acts on the whole of the Merish5
audio output.
Also in this case it is possible to save the various set-
tings as general setup, as well as setup for the individu-
al Backing Tracks.
The UNDO button restores the last saved settings
INPUTS: access the equalizer for the Tracks and for in-
puts
OUTPUT: access the 10 band equaliser for the general
outputs
ROUTING
On the Routing page you can manage all parameters of
Merish5 Audio outputs.
There are three portions:
Main: to decide what audio parts must go through the
Main Outputs. The various parts may be disabled or en-
abled.
AUX / Phones: to decide what parts must go through Aux
and Headphones, monitor or auxiliary outputs. The vari-
ous parts may be disabled or enabled, or the volume may
be changed.
Click: you can set the volume of the Click. If the Click
volume is assigned to the USER potentiometer, this con-
trol is temporarily disabled.
Keyboard Harmonizer:
harmonises following a track played in real time from
the Midi keyboard connected to Merish5. Backing
tracks with no Harmonizer track can thus be harmo-
nized.
Unisono 2 up:
this MODE creates automatic harmonization from your
voice, which will be the chord tone. Merish creates a
HIGHER octave unison 2-voice harmonization on your
voice. It can be switched on/off with the “HARMONIZ-
ER” button on the front panel or by holding the pedal
down.
Unisono 2 dn:
This MODE creates automatic harmonization from your
voice, which will be the chord tone. Merish creates a
LOWER octave unison 2-voice harmonization on your
voice. It can be switched on/off with the “HARMONIZ-
ER” button on the front panel or by holding the pedal
down.
Unis 1 up + 1 dn:
This MODE creates automatic harmonization from your
voice, which will be the chord tone. Merish creates a
2-voice harmonization on your voice, one HIGHER octave
and one LOWER octave. It can be switched on/off with
the “HARMONIZER” button on the front panel or by hold-
ing the pedal down.
Detuned 2:
This MODE creates automatic harmonization from your
voice, which is the chord tone. There are 2 voices, one
slightly lower and one slightly higher with respect to
your voice. This type of harmonization can be defined as
a desired detune or glissando.
Detuned 4:
This MODE creates automatic harmonization from your
voice, which is the chord tone. There are 4 voices, 2
slightly lower and 2 slightly higher with respect to your
voice. This type of harmonization can be defined as a
desired detune or glissando.
Jazz:
This MODE creates automatic harmonization from your
voice, which will be the chord tone.
Merish creates a 3-voice harmonization on your voice
with a third/fifth/seventh interlude. It can be switched
on/off with the “HARMONIZER” button on the front panel
or by holding the pedal down.
Melody Tracker:
adds a synthetic voice that tracks the melody.
Dry Wet:
move towards Dry for the natural voice to prevail, move
towards Wet for the synthetic voice of the harmonizer
to prevail.
Effect:
it adjusts the output of the harmonizer voices towards
the reverb.
Octave:
translates the optional octave harmonised voices.
FRONT PANEL

15
WEB
The WEB button accesses control and management of
the Internet connection, and lets you launch the Apps
that M-Live is developing and will release for Merish5.
The first App to be released in early 2019 is called Grinta
Live and lets you interact with the Audience of a musical
evening. With this App the audience can read the lyrics
of the songs you play, make requests, read the musi-
cian’s repertoire and much more.
To access the WEB you need to connect to a Wi-Fi net-
work, to do so refer to ch. “Options area”. When the
connection is established, press WEB and the following
screen is displayed:
The Song Service screen shows the latest music news
in the Song Service Market Place. From this screen you
can make searches in the Song Service website, and
you can download the backing tracks if you have an
active Songnet credit or if you have a subscription to
the Allsongs service. For more information go to www.
songservice.it or refer to the manual under ch. “Get
Started”
At the top is the Account information, the SEARCH but-
ton, the MIDI or Mp3 format selection, the DOWNLOAD
ALL button lets you download all the files contained in
the page. If for example you have searched for songs by
artist you can download all the Songs by that artists in
one go. On the right is the Account information and cho-
sen Purchase format.
The list of the most recent titles uploaded in www.song-
service.it is displayed below. Or you may search in the
Website which contains tens of thousands of Midi and
Mp3 Music Files.
DOWNLOAD
Shows the files that have been downloaded from the
website www.songservice.it
ACCOUNT
Shows the Account information of the Song Service user.
Specifically, the lower part of the screen shows the ser-
vices that the user has activated and can be selected.
Namely, the Songnet prepaid credit and the ALLSONGS
Subscription. If the user has enabled both purchase
methods, they may select them alternatively by touch-
ing the flag on the right. See ch. “Get Started”
MERISH APP
To manage the used and active Apps.
EXIT
Quits the WEB function
WEB SEARCH
Includes or excludes the Song Service archive from the
searches run by pressing the Search button.
FRONT PANEL

16
ON OFF Switching on and off
Power 12 V DC Power socket (use the standard M-Live
power adapter provided only).
HDMI Video output to display on a TV screen lyrics,
Chords and Images in .JPG or .BMP format. Lyrics and
chords must be contained in the music file. All the back-
ing tracks produced by M-Live and distributed on www.
songservice.it contain this information.
FOOT SWITCH Normally open pedal jack socket. The
pedal functions can be assigned in the OPTIONS Menu
> Footswitch
CLICK OUT Click output, especially used by drummers to
have a precise rhythmic reference with respect to the
Midi File being played. It works with Midi Files, and may
be set from OPTIONS > MIDI&CLICK or from EDIT MIDI.
If the Count In is active (DJ Page) the output also pro-
vides a pre-count.
MIDI IN
Midi input of the General Midi generator. Operation
changes according to the settings on OPTIONS > MIDI
> MIDI IN
Disabled: midi input disabled
Expander: standard General Midi operation, with 16 ac-
tive channels.
Master Keyboard: the events received are managed in-
ternally, regardless of the midi channel received, and
drive the Performances listed on Pg 18.
MIDI OUT: Midi Output
USB MIDI: same function as the MIDI IN, the two ports
cannot be used together.
ETHERNET:
connects Merish5 to a PC via network cable supplied.
Ideal to transfer large-sized music archives. If the PC
does not have a Network input an Ethernet-USB con-
verter may be used.
USB 1 - 4 USB type inputs for USB type pen drives, exter-
nal Hard Disk, PC keyboards, and to connect peripherals
such as Wi-Fi sticks. With these peripherals, Merish5
can be connected to the WEB. You can connect an An-
droid Smart Phone to connect to the Internet directly. It
does not work with iPhone-iPad.
CONNECTIONS
AUX MON Audio output towards a Monitor speaker in ste-
reo, or two speakers in mono. A TV set may be connected
as third option. This output can be regulated by the AUX
MON potentiometer, located on the front panel of Mer-
ish5. You may choose what to send into the AUX MON by
pressing MIC AUDIO > ROUTING
PHONE Headphone output with Stereo Jack
AUDIO OUT Balanced audio jack output
LINE 2 and LINE 1 Stereo inputs to connect music in-
struments, or audio peripherals. The volume of these two
inputs can be controlled via the designated potentiome-
ters, on the front panel of Merish5.
MIC 2 and MIC 1 Inputs for microphone, balanced jack
also Phantom. Each input is fitted with gain control, and
settings are made from the MIC AUDIO menu. Adjust-
ments are possible on the front panel of Merish5.
THE CONNECTIONS

17
THE DIGITAL MIXER
Merish5 includes a real multi-effect Digital Mixer that
actually simplifies the performance and offers the op-
tion of achieving the utmost Audio quality with the min-
imum effort in terms of using external peripherals. Most
settings may be saved on the Backing Tracks so as to
have the utmost perfection in terms of settings, effects
and equalization.
The Merish5 digital mixer is configured as follows:
1.6-channel Digital Mixer, with 4 inputs (two voice and
two Line ones)
2. Control of the two tracks relating to the Midi or Audio
/ Video Backing Track
3. Control of the Aux/Headphones output
4. Multi-effect for the two Mic inputs.
5 .Compressor and Noise gate
6 .Parametric Equaliser for each Audio channel.
7. 10 band equaliser for the general outputs.
8. 4-voice Harmonizer with various operating modes
9. Digital Recorder
The Digital Mixer is managed via the back connections,
where it is possible to connect the Microphones and au-
dio peripherals such as keyboards or other instruments.
The right part of the front panel is dedicated to the
potentiometers and sliders controlling the Mixer parts
available to the user.
The MIC AUDIO button goes to the page for all Digi-
tal Mixer settings, for the details refer to Ch. “Front
panel”.
EQ: the potentiometers regulate the equaliser in the
three main Bands “High” – “Mid” – “Low”. You need to
enter MIC AUDIO for the settings of parametric equali-
sation.
FX: the potentiometers regulate the output of the two
effects acting on the Microphones: delay and rev. For the
choice of the type of effect and other settings, you need
to go into MIC AUDIO / MIC / EFFECTS. You can choose
the various types of effect and perform many settings
that may also be saved in the individua Backing Track.
AUDIO IN 1: Audio 1 input level. Equalisation of this input
is set up from MIC AUDIO / MIC PRESET / EQ. & COM-
PRESSOR
AUDIO IN 2: Audio 2 input level. Equalisation of this input
is set up from MIC AUDIO / MIC PRESET / EQ. & COM-
PRESSOR
AUX MON: Auxiliary and Headphones output level. Go into
MIC AUDIO / ROUTING to choose what to listen to from
this output.
AUDIO: sets up the level of the AUDIO backing track (Mp3
or Video). This channel is equalised from MIC AUDIO /
AUDIO EQUALIZER
The sliders regulate: the volume of the two microphones,
the general output volume.
The 4-voice Harmonizer may be used automatically (if
the Midi Files contain the Harmonizer track) or by us-
ing chords with a Midi instrument, for example a Master
Keyboard. To set the various modes see the MIC AUDIO /
HARMONIZER section.
To enable the harmonizer press the relevant light button.
The potentiometer connected to the button regulates
the volume of the harmonised tracks. Other Harmonizer
controls may be associated to the Pedal or User Button,
see the OPTION section.
THE DIGITAL MIXER

18
Merish5 is also a powerful Expander with high quality
Midi sounds. When playing the backing tracks you can
choose the best sounds and edit any setting via the
EDIT button
“SPECIAL SOUND” FUNCTION
The OPTIONS>MIDI menu includes the SPECIAL SOUND
option: this options automatically optimises the Midi
File Backing Tracks. It may be enabled or disabled, and
the option is free depending on how the Backing Tracks
are played. Should unsuitable sounds for the backing
track be played, the Special Sound function can be dis-
abled, then check whether the Midi File is programmed
correctly. At the time of publishing this Manual, the Spe-
cial SOUND function is not enabled. It will be implement-
ed in the first Firmware Updates.
GENERAL MIDI DATABASE
The Midi Sounds database includes:
• Over 500 Sounds
• Over 50 Drumkit Setups with hundreds of percussion
sounds
• 62 Live Patches to be used in combination with a Mas-
ter Keyboard
• 66 free Patches to be configured at will
Merish5 works perfectly in plug and play mode with
USB powered Master keyboards. All you need to do is
connect the USB keyboard and you will have a truly
wide and comprehensive range of setup sounds at your
fingertips.
The Master Keyboard connected to Merish5 acts on a
sound toolbox unconnected to the Midi File being played,
hence you have the utmost musical freedom, and you
can choose sounds in the freest way.
Merish5 includes a series of Patches designed for Live
performances, and fun to play. Use the Program Chang-
es sent from the Master Keyboard to apply the Patches
listed in a table at the end of the manual
By assigning the USER potentiometer to the Master
Keyboard Volume (See OPTION/PREFERENCES) you
have immediate control over the volume of the track in-
tended for the Master Keyboard and played live.
In Expander mode, Merish5 can be used in combination
with a PC to play the backing tracks from external se-
quencers.
Every Master keyboard setting can be saved, edited and
stored in a Song in Midi or Audio File.
EXPANDER AND SOUNDS
M.KEYB
Merish5 can also be used as expander with a USB type
Master Keyboard. The MIDI IN – MIDI OUT – USB connec-
tions are on the left side of Merish 5. To play Merish5
from an external instrument, you need to connect the
Midi Out output of the Master Keyboard (or other Midi pe-
ripheral) to the Midi in input of Merish5.
If you use a USB type Master Keyboard, you can connect
it to one of the 4 USB ports and it is powered by Mer-
ish5. What is more, Merish plays and is controlled by the
Keyboard with no need for further settings, therefore by
launching a program change or other Midi controls from
the Keyboard you have complete control over the Expand-
er contained in Merish5. By Default, the Program Chang-
es launched by the Master Keyboard select one of the
Patches.
There are 128 PATCHES, 62 of which are factory Pro-
grammed, with the most significant sounds for Live per-
formance. There are 66 free positions for the user.
To play the General Midi board, you need to set the GM
mode
To control the expander directly from Merish5, you need
to access the M.KEYB area by pressing the relevant key,
and opening the designated section. In the first screen
the PATCHES can be edited and saved at will. There are
62 preset patches with optimised sounds by default.
This section is particularly indicated for keyboard play-
ers who wish to make full use of the sounds of Merish5
and the live patches we have prepared. Other patches
may be prepared as well. A patch may contain up to 4
EXPANDER AND SOUNDS

19
2.Rotate the Alpha Dial to move the pointer indicat-
ing the right margin and click “ENTER” when you have
reached the note identified as margin.
3.Repeat the operation for the left margin as well if re-
quired.
To add another sound to your keyboard click + LAY-
ER and proceed as you did for the first. To edit the
sounds click + to access the sound “editing” page.
This page mirrors the track midi sound editing one
found in Ch. “EDIT”. A “velocity” range may be applied
to each sound within which to play it, velocity has a
range between 0 and 127. To set the dynamic range
click the “vel” BOX and rotate the Alpha Dial until you
reach the desired margin. Proceed in the same way
to set the upper Velocity margin. The PATCH location
may be modified with the MOVE button. The patches
you have created may be saved on a backing track
from the EDIT page of the same track. Masterkey-
board Setup. When that track is played, the Patch
settings previously saved are applied. To associate
a PATCH for the M.KEYB to the backing track, choose
the backing track and go into the EDIT area where
the MASTERKEYBOARD SETUP box is displayed. A
drop-down menu there lets you choose the desired
PATCH.
M.KEYBOARD - COMPUTER
Thanks to this configuration it is possible to play the MIDI
tracks with a PC or MAC making full use of the Midi sounds
of Merish 5.
Merish 5 turns into an expander with display to monitor the
Midi tracks. It is possible to connect Merish 5 to a PC or
layers (levels) or sounds. To use General Midi sounds
customised Patches can be constructed, or one may
select the General Midi mode and choose the favour-
ite sounds from Merish5 or with Program Changes from
Master Keyboard.
The Patch is a customised keyboard setting that can
be saved in any MIDI file. Merish5 automatically applies
the setting made with the patch, avoiding complex and
time-consuming preparations before playing a song.
It is also possible to adjust the volume balance between
Master Keyboard and backing track being played, by
touching the horizontal slider.
PATCH
This screen is designed for users who need to assign a
group (Patch) of sounds to the keyboard, up to a maxi-
mum of 4 (layers or levels)
The following variables can be assigned to each of the 4
Layers of a Patch:
1. Sound.
2. Extension.
3. Dynamic Range.
To create a new Patch,i.e. a group of sounds or layers (up
to 4), proceed as follows:
1.Click “M.KEYB” to open the screen.
2.Click +PATCH.
3.Name the Patch you have created.
4.Go over the Patch you wish to edit.
5.Click the touch button “EDIT”.
6.Choose the sound by browsing the families of sounds
and instruments, use the alpha dial and the enter button.
Each sound chosen for the Patch may have a range of
keys within which it will be played. i.e. the extension:
1.Click one of the margins. E.g. Right margin
EXPANDER AND SOUNDS

20
MAC choosing between two types of different MIDI in-
terfacing:
1. USB Midi
2. MIDI IN
After connecting the PC to Merish 5 click on “COMPUT-
ER”. At this stage you can play the tracks with your
PC and you can monitor the settings of the Midi track
you are playing on the screen of Merish 5. If you tap the
touch button CLEAR, the list of information collected
until then is cleared.
M.KEYBOARD - ACCORDION
You can use Merish5 as an expander sound Midi
Accordion. Firs of all, you need to connect the Ac-
cordion Midi Out to the Midi In of Merish5. Merish5
makes it possible to apply 4 different sounds to the
3 different Accordion sections (Keyboard, Bass and
Chords), and to an additional section overlapping
the keyboard. To set the sounds on the Accordion
sections click on “ACCORDION” to open the relevant
screen.
This screen shows 3 rows for the 3 accordion sections.
The first row lets you act on the “Chord” section of the
Accordion. The second row lets you act on the “Bass”
section of the Accordion. The third row lets you act on
the “Keyboard” section of the Accordion. Proceed as fol-
lows to set these channels:
1 Click on each of the rows concerning the sections,
press “+” to open the window that lets you select the
instrument you wish to set up. Repeat this operation for
all 3 channels.
2 Click on the channel dropdown Menu. The accordion
sends the 3 sections to 3 different MIDI channels,
therefore the MIDI channels must be indicated based
on the type of accordion used. To edit the sounds “+”
to access the sound “editing” page. This page mir-
rors the track midi sound editing one in Ch. “Edit”. In
addition to the aforementioned 3 channels, it is also
possible to set up another channel overlapping the
keyboard. To do so click + LAYER and a new job row
is added.
Proceed as for the other 3 sections to set it up. After
doing your own set-ups, the settings can be saved by
clicking on “SAVE”.
EXPANDER AND SOUNDS
Table of contents
Other M-LIVE Music Mixer manuals