M-LIVE Merish 3 User manual

TOUCH THE MUSIC
QUICK
GUIDE

© & Print by M-Live srl 2014 - Ed. 11 - 2014
Although the information in this document has been carefully prepared and
checked, M-LIVE s.r.l. declines all liability for possible errors. The information
in this document and the specifications of the product to which it refers
may be altered without notice. M-LIVE s.r.l. declines all liability in relation to
the use or application of the products described in this document. Unless
otherwise specified, all references to names, products, data, song titles,
composers, publishers and companies is random and has the sole purpose
of illustrating the use of M-LIVE s.r.l. products. Any names, logos and
trademarks mentioned are the property of their respective legitimate owners.
All rights reserved. No part of this document may be reproduced in any form
or in any manner or for any purpose without the express written permission
of M-LIVE s.r.l.

#1
CONTENTS
MERISH 3 INTRO #03
QUICK GUIDE FOR THE USE OF MERISH 3 #04
INTRODUCTION. ONLINE HELP #04
ICONS, PULLDOWN MENUS AND SLIDERS #04
CONNECTIONS AND REAR PANEL #05
TRANSFERRING A REPERTORY, HARD DISK AND MEMORIES #06
MASS STORAGE MEDIA AND PC INTERFACE #06
USING USB PEN DRIVES #06
BROWSING USB PEN DRIVE CONTENTS #06
COPYING DATA FROM A USB PEN DRIVE, COPY-PASTE FUNCTION #07
FILE MANAGEMENT #08
FINDING AND PLAYING A SONG #08
FINDING A SONG AS “NEXT SONG” AND USING THE “GO TO” FUNCTION #08
DJ FUNCTION #09
CREATING A PLAYLIST #09
WRITING LYRICS AND MARKERS #10
MERISH 3 AND DATABASE RECORDS, META EVENTS #10
WRITING AND SYNCHRONISING SONG LYRICS #10
WRITING MARKERS #11
RECORDING #11
QUICK LIST #12
EFFECTS #12
SAMPLES #12
BRIDGES #12
VOICES #13
SAVE #13
VIDEOS, CHORDS AND IMAGES #13
CHORDS #14
BACKGROUND IMAGES #14
HANDY TIPS #15
DISPLAYING LYRICS FULL SCREEN #15
MOVING WITHIN A SONG #15
USING LEFT AND RIGHT POINTS IN THE EDIT ENVIRONMENT #15
EDIT MIDI FILE #15
SPECIAL SOUNDS #16
OPERATING SYSTEM AND SOUNDS #16
KEYBOARD MAP #17
SOUNDS LIST #18
DRUMKIT #20
PERFORMANCES #21
EFFECTS #22
TECHNICAL SPECIFICATIONS #23

#2
Before connecting the power supply/external adapter to the mains make sure the mains voltage corresponds to the specified
equipment voltage (max tolerance of ±10%). Use exclusively the power supply/adapter supplied with the unit or an identically
specified replacement: risk of equipment malfunctions or damage.
MAINS POWER CONNECTION
All connections must be made with the unit powered off.
Power the unit on and off only when the audio amplification system is powered off.
CONNECTIONS, POWERING ON/OFF
When connected to a PC via USB to the “USB MIDI” port, MERISH 3 is automatically recognised as a dual audio/MIDI device
without having to install any software. It is usually identified as USB Speaker 1 and USB speaker 2, corresponding to the two
internal MIDI 1 and MIDI 2 generators, but the name may change in accordance with the operating systems or applications in
use.
CONNECTION TO PC AS AN EXPANDER
Avoid prolonged exposure of the unit to direct sunlight, intense heat sources, strong vibration, very damp or dusty surroundings,
and rain, since these conditions can lead to malfunctions and deterioration of the unit and give rise to the risk of electric shock.
Remove dust using a soft dry cloth or a brush. Do not attempt to clean the unit with alcohol, acetone or solvents. No further
maintenance tasks are necessary.
PROTECTION AND MAINTENANCE
Updates and other supports are available from www.m-live.com
DOCUMENTATION
All adjustments for use of the unit are external and easily accessible. Accessing internal parts can cause electric shock and
is permitted only for qualified and authorised personnel. In the cause of faults, contact the M-LIVE Service Centre - e-mail:
IN CASE OF FAULTS
WARNINGS

#3
Merish 3 plays and mixes Midi and Mp3 files, also in the most widely used Karaoke formats. It includes “Wizard” and “Go To”
functions to switch between tracks from and to any point. It reads USB pen drives and external hard disks; it reads the PC
keyboard and functions as a high quality Midi generator. It records performances and edits Midi files. It imports lyrics files and
syncs them with the music, whether Midi or Mp3. It reads and displays JPG, BMP and PNG backgrounds.
PLAYS, MIXES, RECORDS
M-Live has been producing backing tracks and devices for live music since 1987. 1998 saw the presentation of the first Merish,
an innovative device that was to become a benchmark among midi players. In 2009 M-Live released a new version of Merish,
to widespread acclaim. 2013 was the year of Merish 2, which repeated the success of the previous version. In 2014 M-Live
launched Merish 3, the natural evolution of a product that is widely recognised by musicians. M-Live draws from its almost three
decades of experience in the field of Midi, Audio, DSP Technology and the production of digital music in various formats.
ON STAGE
Merish 3 is an easy to use player without limitations in terms of compatibility and musical formats although simultaneously offering
a series of powerful functions and featuring rational ergonomic solutions. We have attempted to provide what artists have long
been clamouring for: a unit that is extremely powerful, but at the same time straightforward and reliable.
SIMPLE AND POWERFUL
A great deal of care has gone into creating the sounds and configuring the audio section. We were assisted in this work by our
experience as a Midi file producer and a library of more than 10,000 titles to which we own the copyright. Sound generation in
Merish 3 is provided by two powerful DSPs capable of playing two Midi files simultaneously with 32 channels and 108 voices.
The samples are stored in a 128Mb memory - double the size of the Merish 2 memory.
NEW SOUND
Two microphone inputs, also with phantom power. Two audio inputs, main audio outputs + monitor; Click Out and Headphones.
The Mixer includes an equalizer for the voice and backing tracks, two microphone effects, and a 3 voice harmonizer on the first
mic channel.
DIGITAL MIXER WITH EFFECTS
Record your performances with Merish 3 and personalise your Midi files to convert them into Mp3 audio files. Save the file also
in Mp3 format for the maximum compatibility.
RECORD IN MP3 FORMAT
Merish 3 reads and plays the majority of digital music formats on the market: Mp3, Mp3 karaoke, MP3-Karaoke5, MP3+G, MIDI,
General MIDI, MF3, MF4, MF5, and Kar. To get the best out of the Midi player we recommend using original M-Live backing
tracks because of the following features:
s 0RESENCEOFMARKERSINTHEBACKINGTRACK
s !CCURATEANDTESTEDWRITINGOF-IDIEVENTS
s 0RESENCEOFDATABASERECORDSTITLEARTISTANDMUSICALGENRE
s 4ESTEDANDGUARANTEEDlLES
s &ILESALLPERFECTLYINLINEWITHCOPYRIGHTLAWBOTHFORTHEMUSICANDTHE+ARAOKELYRICS
SONG OPTIMISATION
Merish 3 plays and mixes music files in Midi or MP3 format. With Midi files the mix can be from and to any point of the songs,
with various connection modes: immediate or mixed with various cross-fade curves. Merish 3 identifies the musical phrases of
the Midi songs and connects them in the manner of a DJ-Arranger. The playlists are created in real time: just choose Next Song
and Merish 3 will mix the song currently playing with the next song in the list.
PLAYLIST WIZARD

#4
This document is a guide containing general information on
Merish 3.
Merish 3 has an OnLine help facility with explanations of
the various functions accessible in real time by pressing the
Enter key for more than 1 seconds.
From that time on, any key you press will be cause a window
to open with an explanation of the associated function.
To quit Help mode press ESC.
OnLine Help is also available for the physical keys and the
potentiometers. Enter the Help environment and try pressing
one of Merish 3’s physical keys: the Help Box will appear
with an explanation of the key.
Use the Help function for information on how to use the front
panel keys and potentiometers.
Merish 3 is a simple and intuitive player. This document
contains instructions for various functions that may not be
completely intuitive and require further explanation.
QUICK GUIDE FOR THE USE OF MERISH 3
When this icon appears alongside or inside
a box turning the Alpha Dial will change the
value or setting in the box. In general, the
Alpha Dial affects all editable parameters or
parameters chosen in a list.
This box is a pulldown menu and it contains
a series of settings or values that can be
selected by turning the Alpha Dial or by
pressing the “Up” / “Down” keys. Simply
touch the pulldown menu to open it.
When this icon appears in a key it means the
associated page can be enlarged.
When this icon appears in a key it means the
associated page can be resized.
This icon identifies an Artist.
This icon identifies a Musical Genre.
These icons define the file type: Midi or MP3.
To activate a slider touch it and change the
value by turning the Alpha Dial. You can move
a slider rapidly by touching the required point
of arrival.
ICONS, PULLDOWN MENUS AND SLIDERS
Alpha Dial
Pulldown menu
Zoom In | Zoom Out
Icons
Sliders
INTRODUCTION. ONLINE HELP

#5
CONNECTIONS AND REAR PANEL
VIDEO OUT
Composite Video Out to display lyrics, chords and
images in .JPG or .BMP format on a TV screen. The
lyrics and chords must be present in the music file.
All backing tracks produced by M-Live and distributed
on www.songservice.it contain this information
AUX MON
Audio output to a monitor speaker (foldback)
in stereo or two speakers in mono. The third
solution is to connect a TV. This output can be
adjusted by the AUX MON potentiometer on the
Merish 3 front panel
ON | OFF
Power-on
Power-off
CLICK OUT
Output for the metronome signal, mainly used
by drummers on headphones to keep perfect
tempo with respect to the Midi file currently
playing. The click out works only with Midi files
and the volume can be set in SETUP > AUDIO
> Click Volume. If Count In is active (SETUP >
MIDI) the output transmits a pre-count
12 V DC POWER
Power input (use exclusively
the M-Live power adapter
supplied with the player)
FOOTSWITCH
Jack socket for a normally-open
footswitch. The footswitch functions
can be assigned in SETUP > PEDAL
LINE 2 | LINE 1
Stereo inputs to connect musical instruments
or audio peripherals. The volume of these
two inputs can be controlled by dedicated
potentiometers on the Merish 3 front panel
PHONES
Headphones output
with stereo minijack
AUDIO OUT
Balanced audio
output jack socket
MIC 2 | MIC 1
Microphone inputs, balanced jacks
with Phantom power option. Each input
features a gain control and can be set
from SETUP > AUDIO PHANTOM MIC.
Adjustments are available on the Merish 3
front panel

#6
TRANSFERRING A REPERTORY, HARD DISK AND MEMORIES
Merish 3 has 64GB of solid state mass memory and is able
to read external USB pen drives. You can also connect an
external Hard Disk.
The USB pen drive and external hard Disk must be
connected to the USB port on the right-hand side of the unit
labelled: PEN - HD.
Merish 3 contains a solid state internal memory that can hold
several thousand Midi files and many thousands of Mp3 files
(approximately 13,000). There are two ways of uploading
this repertory to Merish 3:
1. Connect the unit to a PC on the PC IN input and transfer
the required files and folders by copying them to the Merish
3 peripheral device.
2. Copy the repertory to Merish 3 from a USB pen drive
(or external Hard Disk).
When Merish 3 is connected to the PC (PC - In input) it
will be displayed as an external drive. The files and folders
containing the backing tracks can be moved or copied
directly to the Merish 3 internal memory using normal PC
copy and move functions.
CAUTION: connect the PC to Merish 3 only when it is
powered off to avoid problems of recognition by the PC
and possible malfunctions. Power on Merish 3 and transfer
the files and folders you need. After transferring the backing
tracks from PC to Merish 3 it is good practice to run the
“REBUILD DATABASE” function as follows:
1. Power on Merish 3 and select “Setup”.
2. Touch “DATABASE” and then “HARD DISK” to start
rebuilding the internal memory database.
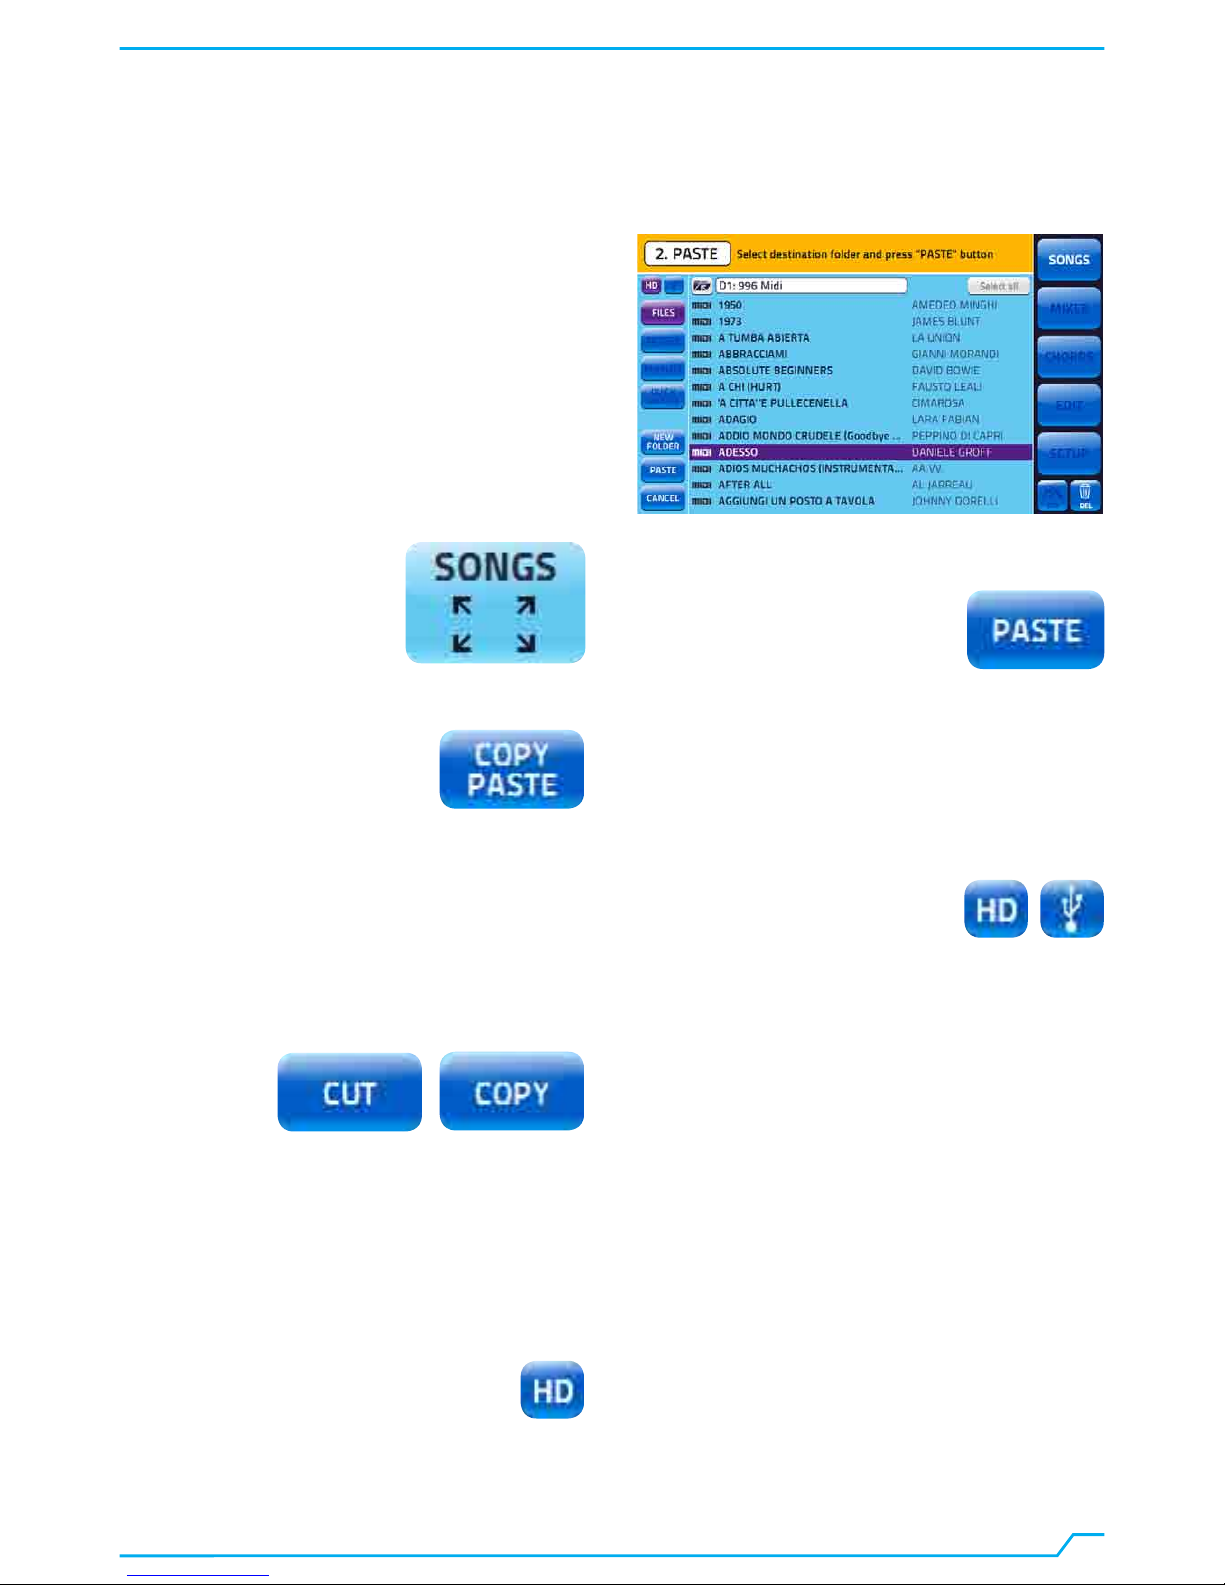
When you plug a USB pen drive into the USB port Merish
3 can read the drive directory and play the files it contains.
You can also copy the contents of a USB pen drive to the
Merish 3 Hard Disk.
The USB drive can be consulted using the normal navigation
functions, i.e. “Search” or the “Songs” key.
You can also index the USB drive database using Setup >
Database > USB Memory. Indexing is active if the stored
songs are complete with Title, Artist and Musical Genre
information. The Midi files distributed by M-Live on
www.songservice.it all contain this type of information.
1. Insert the USB pen in the USB port on the right-hand side
of the Merish 3 unit.
2. Touch the “Songs” key to open the associated window.
3. Touch the USB icon.
4. Select the folders or files on the USB pen drive using the
Alpha Dial and the Enter key.
Alternatively, once you have inserted the USB pen drive you
can press the “Search” key and type in a search keyword:
Title, Artist or preferred Musical Genre. Merish 3 will search
for the files you are seeking both in the internal memory and
on a USB pen drive, if connected.
MASS STORAGE MEDIA AND PC INTERFACE
USING USB PEN DRIVES
BROWSING USB PEN DRIVE CONTENTS
KEYBOARD PEN HD PC IN USB MIDI

#7
Merish 3 can manage files like a normal PC so you can
transfer (move or copy) any file to any destination. For
example, you can copy files from a USB pen drive to the
Merish 3 internal memory, or vice versa. To do this, proceed
as follows:
1. Insert the USB pen in the USB port on the right-hand side
of the Merish 3 unit.
2. Touch the “Songs” key to open the associated window.
3. Touch the zoom icon on the “Songs” key, shown by four
arrows, and then select the folder containing the files you
want to copy or move.
4. Touch the “Copy Paste” key. Page 1.Select will be
displayed.
5. Select the files and folders to copy or move on the Hard
Disk. If you want to select all the contents, touch the “Select
All” key. To select a file highlight it with the Alpha Dial and
then press “Enter”.
6. Press “Copy” to copy the selected files or folders (or
“Cut” if you want to move them from their current location to
a new destination).
7. The next page, 2.Paste, allows you to select the files
target folder or to create a specific target folder with the “new
Folder” key.
8. You can now choose the destination of the files by
navigating with the Alpha Dial or touching the required
peripheral devices or directories on the screen. To select the
hard disk simply touch the HD icon.
9. Touch the “Paste” key to confirm transfer of the previously
selected files.
When the operation is concluded you will have copied the
contents of a drive or folder from one point to another in the
mass storage media available and connected to Merish 3.
The “Hard Disk” and “USB” icons can be selected alternately.
When Merish 3 is connected to an external hard disk
selecting the USB icon will display the disk contents.
COPYING DATA FROM A USB PEN DRIVE, COPY-PASTE FUNCTION

#8
FILE MANAGEMENT
As soon as you have uploaded a few songs to Merish 3 you can start playing them and browsing the archive.
1. Press SEARCH
2. Type the title of the song you want.
3. When the song has been found, press Play to play it.
The Merish 3 search engine searches indiscriminately for a
title, artist or musical genre, if this information is included in
the Database records of the saved files.
For example, if you type “Dance” Merish 3 will find all songs in
the Dance genre (grouped under the specific sub-genre) or
all songs with the word “Dance” in the title. You can browse
through the search results using the Alpha Dial or the “Up”
and “Down” keys.
To find the song you are looking for repeat the procedures
outlined in the previous heading. You can do this even if the
song is currently playing. Now let’s set up a new song as
“Next Song”.
Once you find the required title press ENTER. The song will
be inserted as Next Song and the title will be shown on the
bottom bar of the display.
There are several ways of going to the next song:
1. Wait for the end of the current song, then press Play.
2. Press “GO TO” and Merish 3 will immediately mix the
current song with the Next Song.
3. Select a marker in the next song and then press “GO TO”.
To select a marker touch the key.
The markers identify the various parts of a piece of music,
typically Intro, Verse, Chorus, etc. With Merish 3 you can
enter Markers, which are displayed while the Midi file is
playing and can be used to move rapidly in the track currently
playing.
If you activate the Wizard functions in the DJ page, Merish
3 will automatically control mixing between the current song
and the next song in an optimal manner.
FINDING AND PLAYING A SONG
FINDING A SONG AS “NEXT SONG” AND USING THE “GO TO” FUNCTION

#9
Playlists are lists of songs to be played automatically in
sequence by Merish 3. Playlists can function with Autoplay
mode ON / OFF. With Autoplay ON, the songs will be played
in automatic sequence without pause; with Autoplay OFF, at
the end of each song Merish 3 pauses and will only proceed
with the next song in the Playlist when you press PLAY.
Autoplay mode is selected in the PLAYLIST environment by
touching the associated box, or from SETUP > PLAYLIST &
CUE > AUTO PLAYLIST.
Touch “Playlist” to enter the Playlist environment.
Here you can choose a previously created playlist and play
it by pressing PLAY, or you can create a new playlist by
pressing “NEW PLAYLIST”.
1. Touch “New Playlist”.
2. Type the title of the new playlist and touch “OK”.
3. The Playlist edit page will appear on the screen.
4. You can now browse the archive of songs stored on
Merish 3 using the Search functions and various controls
such as the Alpha Dial. When you find a song to include
in the new playlist press “Enter” and the title will appear in
the upper window. Continue in this manner until you have
completed the playlist.
5. You can now edit the playlist by touching the top of the
page. You can delete a song or move it using the “Move”
key.
Select the song in question, touch “Move” and turn the
Alpha Dial. When you have positioned the song correctly,
press “Enter”.
6. Once you have finished creating the Playlist press ESC or
Exit Edit.
The new playlist has now been created and is ready to play.
If you delete or move one of the songs in the playlist in the
Merish 3 internal memory, it will no longer be played and will
be highlighted red in the playlist.
Playlists are stored in the Merish 3 internal memory. Songs
should be copied from the USB pen drive if you want to
include them in playlists.
The playlists of earlier versions of Merish (Plus, Basi and
Merish 2) are compatible with Merish 3.
Merish 3 can mix Midi files and Mp3s continuously, with
perfect musical synchronism. This is possible thanks to a
sophisticated algorithm that analyses the backing tracks and
chooses the best points at which to mix them, together with
the Cross Fade curves and the BPM tempo. This function is
active in “Wizard” mode on the DJ page.
1. Press the physical DJ key.
2. Touch Wizard to activate the wizard.
3. Select “Short” if you want to execute only part of the song
in automatic play mode.
During execution of a playlist you may not want to play the
songs in full.
With “Short” active Merish 3 will automatically shorten the
songs in accordance with the Short Time settings, which
can be edited in SETUP > PLAYLIST & CUE.
DJ FUNCTION
CREATING A PLAYLIST

#10
With Merish 3 you can write or edit the Karaoke lyrics of a
song. The lyrics can be synced with the music line by line.
IMPORTANT: in this case the highlighting is not syllable by
syllable but rather line by line.
The lyrics must be written on a PC in .TXT format and the
lines must be a maximum of 40 characters in length. Ideally,
write each line of the verse on a separate line, following the
metric division of the song. Once you have finished writing
the lyrics save the file in .TXT format on a USB drive so that
you can transfer it to Merish 3. Now let’s look at how to
upload the musical section.
1. Select the song on which you want to insert the lyrics
and upload it to the Merish 3 internal memory.
2. Press Edit > Edit Lyrics to open the lyrics write page.
3. Now press the “import TXT” key.
4. The lyrics will be uploaded to Merish 3 and can now be
synchronised.
5. Press PLAY and then press the REC key whenever you
want to synchronise a line of the lyrics.
If you want to correct the lyrics simply touch the line in
question and the Keyboard will appear on the screen for
editing purposes.
To move the sync point simply touch the Position Box
associated with the line of lyrics you want to move and then
turn the Alpha Dial.
WRITING LYRICS AND MARKERS
Merish 3 makes widespread use of Meta Events such as
Markers, Full Title, Artist, and Musical genre.
Merish 3 also assures perfect management of songs that
do not contain meta events and is capable of finding the
required files rapidly using the Search function, using either
just the filename or Song title as search keys.
Merish 3 can write any Meta Event into the files. From
the Song Info window: access meta data by touching the
or icon in the left-hand column of the
“Songs” window. In this window, all the Meta events in the
window can be written to a song:
MERISH 3 AND DATABASE RECORDS, META EVENTS
WRITING AND SYNCHRONISING SONG LYRICS

#11
As with lyrics, you can insert markers in Midi files that
currently have none.
Markers are always present in the Midi files produced by
M-Live and available from www.songservice.it.
You can insert markers by selecting Edit > Edit Marker.
The lines on the left contain the marker name and the box on
the right of the page shows the position of the marker in the
song. Activate the edit function by touching the field to be
edited: you can now write a new marker or move an existing
marker to a different point in the song.
If the song contains no markers simply start it by pressing
Play and then press the physical REC key whenever you
want to enter a new Marker. At this point the backing track
will pause and a window will open showing the available
Markers. Choose the marker you require and press Enter,
or save a completely new marker by selecting “New” at the
bottom of the list of available markers. Now type the name
of the new marker.
As in the Edit Lyrics function, here too you can edit the marker
and change its position by touching the areas associated
with this information.
Merish 3 is also a digital recording device with various
possible uses:
1. Record a live performance and create an Mp3 to give to
the musician or singer.
2. Record a performance to learn a song.
3. Create an Mp3 file from a Midi file format backing track.
4. Record instrumental or vocal tracks on a Midi or Mp3
backing track.
The record function is extremely intuitive and can be
illustrated schematically as follows:
1. Upload the Midi or Mp3 backing tracks over which you
want to sing or play to record the song.
WRITING MARKERS
RECORDING
2. Press the “REC” key.
3. Select the sources to be recorded in the Select Source
box.
4. Set up the optional functions in the Recording Setup box.
5. Press the “REC” touch-key or physical key to start
recording.
6. When the performance ends press “STOP REC” (or the
physical “Rec” key). A window will appear prompting you
to confirm that you wish to save the recording. The virtual
keyboard is then displayed so you can write the title of the
file, which will be saved in the Recorded Files folder.
You can then listen to the file created by pressing “Play last
Rec” or “Recorded Files” to open the folder and select the
title from the list.
With Merish 3 you can record one or more of the audio
sources available: the backing track, the Mic 1 and Mic 2
inputs, and the two Auxiliary Audio inputs. You can convert
a Midi File to Mp3 format with the specific “Midi to Mp3”
function.
You can enter a noise gate with the desired levels. The bit
rate of the Mp3 file can be from 128 to 320 kb/s.

#12
QUICK LIST
The “Quick List” is a list of songs that remains in the memory
to be retrieved freely in various different contexts. In practice,
the Quick List is an index in which we can temporarily store
a repertory of special importance.
E.g.: you can enter a backing track from a USB pen drive
supplied by a third party during a gig:
1. Plug in the USB pen drive.
2. Find the song and select it.
3. Press ADD TO QUICK.
4. The chosen song will be copied to the Merish 3 internal
memory and placed in the Quick List so that it can be
retrieved at any time.
5. You can now remove the USB pen drive.
The Quick List is not a regular Playlist because the songs are
only saved in the list and are not played in sequence but only
when we want to retrieve them with Play or Enter.
Merish 3 has a series of sound effects that can be activated
instantly from the EFX page. Effects can be integrated by
copying new effects into the Effects folder.
To display the effects page touch the EFX icon:
On the left of the page there are 6 touch pads associated
with 6 different sampled effects (Samples). The Merish 3
memory contains 60 Samples.
To assign a Sample to a Pad, proceed as follows:
1. Press the Sample Pad you want to use.
2. Press EDIT.
3. The Audio EFX window will open with the list of samples
available.
4. Select the required sample. You can listen to the sample
by pressing “Play”.
5. Press Enter to confirm your selection.
The new effect (Sample) is now assigned to the touch pad.
A Bridge is a musical interval that can be used to break up a
performance into segments.
These musical breaks are Samples that Merish 3 plays in a
loop. There are 8 bridges in the Merish 3 internal memory.
This archive can be updated by the user by copying Mp3
files into the Bridges folder.
You can choose a Bridge and assign it to one of the two
available Pads as follows:
1. Press the Bridge Pad you want to use.
2. Press EDIT.
3. The Audio Bridge window will open with the list of Samples
Bridges available.
4. Select the required sample. You can listen to the sample
by pressing “Play”.
5. Press Enter to confirm your selection.
The new Bridge is now assigned to the touch pad.
SAMPLES
BRIDGES
EFFECTS
EFX

#13
Select one of the 4 options to insert special effects on the
Mic 1 input. Merish 3 has 4 vocal effects: Monster, Child,
Woman and Megaphone. These effects transform the
reproduction of the Mic 1 singer’s voice.
The SAVE function is active whenever the Midi file currently
playing is edited.
Whenever you edit the file you can save it to Merish 3 so that
the next time the song in question is loaded the changes will
be active. The EDIT function includes the “Restore” touchkey,
which returns the Midi file to its original version, i.e. the first
version uploaded to Merish 3.
The EDIT page also includes an UNDO key (select EDIT > +
alongside the chosen track), which is used to return to the
latest saved version of the Midi file and hence discard only
the latest changes.
You can save all track changes, such as sound, volume,
effects, key, etc. in a song. You can also save the selected
font for the lyrics and the font size and colour, plus any
background image that has been selected. You can save
the song also with the microphone presets and a large
number of other settings that can be accessed from the
SETUP menu.
The TV video interface on Merish 3 offers the following
possibilities:
1. Display chords using the chord name, tablature, or
keyboard.
2. Choose the font or preset, the font size and the colour.
3. Insert a background image in .JPG or .BMP format.
These settings can be saved in the song you are currently
playing.
VOICES
SAVE
VIDEOS, CHORDS AND IMAGES
SAVE

#14
To display the chords touch the “CHORDS” icon and then
press the “TV” key to display the chords on the TV screen
connected to Merish 3.
On the right hand side select the preferred
“MODE”: touch the “Guitar” icon and the chords
will be shown in guitar tablature.
Alternatively, touch the “Keyboard” icon to show
the chords on a keyboard. The keyboard will be
shown both on the Merish 3 display and on the TV.
If you touch the LCD key the chords will be
shown also on the Merish 3 display.
You can use background images for Karaoke on a TV
screen. Select the .JPG / .BMP format images you want to
upload as backgrounds for the lyrics. You can import images
from a USB pen drive.
To set up Karaoke go to SETUP > VIDEO KARAOKE and
choose the required settings. The page is split into two: the
parameters for reproduction on the Merish 3 Display are
shown on the left, while the parameters for the TV output are
shown on the right.
You can retrieve the company presets, display a preview of
the graphic settings, or set up background images in .JPG
or .BMP format.
Each video setup can be saved and linked to a specific
backing track.
To set up the background images:
1. Touch and scroll the pulldown menu to select the image
to use as a background.
2. Press Preview to view the image on the display
immediately.
3. If you want to import new images touch “NEW” and
connect a USB pen drive containing the .JPGs you want to
import to Merish 3.
Choose the peripheral device containing the images you
want to upload and use as backgrounds. You can select the
Merish 3 hard disk or a USB pen by touching the icons on
the left. If the image you want is on a USB pen drive, press
the associated touchkey and find the image you require.
Each backing track can use specific images.
If you want to delete one or more images select the image in
question and touch the “Del” key.
CHORDS
BACKGROUND IMAGES

#15
Touch the lyrics text to display them in full screen mode.
The song position bar shows the position in the Song that
is currently playing. You can move along the position bar by
touching the circular icon and moving it with the Alpha Dial.
Touch the Song Position pointer and turn the Alpha Dial to
move it through the song.
Press Enter to confirm and go immediately to the selected
point.
In the Edit page you can display the contents of a track on
the status bar in the top portion of the Merish 3 display.
In the Yellow portions the selected track contains notes and
will therefore play.
Select the track you want to edit by touching the Name and
then position the Left and Right points to delimit a portion
of the song in order to play it in an automatic loop. The left
and right limit points must be positioned in an interval that
contains notes, i.e. indicated with the yellow status bar.
To position the Left and Right points:
1. Touch “Left Point”.
2. The Enter key illuminates and you can turn the Alpha Dial
to position the left point.
3. Repeat the operation after having touched “Right point”.
4. Press “Enter” to confirm.
Merish 3 will now repeat the selected portion of the song in
a continuous loop.
Touch the text again to exit full screen mode.
DISPLAYING LYRICS FULL SCREEN
MOVING WITHIN A SONG
USING LEFT AND RIGHT POINTS IN THE EDIT ENVIRONMENT
HANDY TIPS

#16
Merish 3 contains several special sounds offering high quality
effects, such as distorted guitars. These special sounds are
obtained using the Insert Effect function and they appear in
the table of sounds with the symbol (i). They are normally
uploaded with the General Midi backing tracks, but they can
be used and saved freely as needed.
Merish 3 is fully open to future updates.
The operating system can be updated and new releases
will be available for download from www.m-live.com in the
Merish 3 product page. Also the sounds can be updated
and M-Live will announce any new updates released on
http://merish3.m-live.com/
The Midi file edit page is split into two parts: the first part
allows you to check all the tracks and the general effects
setups, which are shown at the top of the screen.
There is a list of track names on the left-hand side of the
page, complete with the sounds used, while the down arrow
symbol will appear at the bottom left to allow you to scroll to
the next page.
There is a symbol with the + icon to the right of the name
to allow you to enter the Edit 2 page, where all the track
parameters can be checked.
SPECIAL SOUNDS
OPERATING SYSTEM AND SOUNDS
EDIT MIDI FILE

Merish 3 can be used with a standard PC keyboard with a
USB connection. The keyboard must be connected to the
Keyboard port on the right-hand side of the unit.
Once the keyboard has been connected it can control a
large number of Merish 3’s functions, in accordance with the
controls map shown here.
When the keyboard is connected Merish 3 enters Search
mode as soon as it reads the typed text string; for example,
if you write “Love” the text string will appear at the bottom
of the page. Now press “Enter” and Merish 3 will perform a
search based on the string. This means there’s no need to
press “Search” or “Songs” to browse the songs.
USING AN EXTERNAL USB KEYBOARD
KEYBOARD MAP
CANC > Delete
INS > Song Info
ESC > Esc
ENTER > Enter
SPACE > Play
arrows | pag up | pag down >
move lists cursor
Letters and numbers >
quick search
F1 > Go To
F2 > DJ
F3 > Smooth
F4 > Go To
F5 > Harmonizer
F6 > Melody Mute F7 > Search
F8 > Mixer F9 > Chords
F10 > Marker
F11 > Rec
F12 > Playlist
ZERO (num pad) > Stop
+ > Key +
- > Key -
#17

#18
SOUNDS LIST
001 0 Stereo Grand Piano
2 Mono Grand
98 Pianovox 2
99 Piano & Strings
002 0 Stage Ac. Piano
98 Pianovox 1
99 Pianopad
003 0 El. Grand Piano
98 Chip 80 Atmos
99 Bass & Piano
004 0 Honky-Tonk
99 Latin Piano
005 0 Stage El. Piano
1 El. Piano
8 Detuned El.Piano 1
9 Soft El.Piano
16 Fm+Sa El.Piano
24 Wurli
32 Hard Rodex
40 Rodex
48 60’s El.Piano
49 Rhodes heavy phaser (i)
59 Rhodes light phaser (i)
69 Rhodes Tremolo (i)
99 Electric Mood
006 0 El. Fm Piano
8 Detuned El.Piano 3
9 Detuned El.Piano 2
16 Fm Soft El.Piano
24 Hard Fm Ep
32 El. Piano 3
99 Fm & Pad
007 0 Harpsichord
8 Coupled Harpsi
99 Harpsistrings
008 0 Clavinet 1
1 Clavinet 2
49 Claviphaser 1 (i)
59 Claviphaser 2 (i)
009 0 Celesta
010 0 Glockenspiel
011 0 Music Box
012 0 Vibes
1 Vibraphone
49 Vibro Vibes (i)
013 0 Marimba
8 Balafon
49 Marimba Synth (i)
59 Panned Marimba (i)
014 0 Xylophone
015 0 Tubular Bells
8 Church Bell
9 Carillon
016 0 Santur
017 0 Drawbar Organ
8 Detuned Organ 1
9 Ham 109 Organ
16 60’s Organ
24 Pedal Bass Organ
32 Even Bar
49 TremolOrgan (i)
018 0 Percussive Organ
1 Organ 2
8 Detuned Organ 2
9 Jazz Organ
16 Detuned Organ 3
24 Jazz Vib Organ
019 0 Rock Organ
1 Organ 3
8 Rotary Organ Switch
16 Rotary Organ Perc.
24 Rotary Organ Fast
99 Organizer
020 0 Church Organ Tutti
1 Church Organ 1
8 Church Organ 2
021 0 Reed Organ
022 0 Fisa Musette
1 French Accordion
8 Master Fisa
16 Italian Accordion
99 Folk Lead
023 0 Harmonica 1
1 Harmonica 2
8 Electric Harmonica
024 0 Bandoneon 1
1 Bandoneon 2
8 Bandoneon 3
025 0 Classic Guitar
1 Nylon Live Guitar
2 Nylon Guitar
8 Ukulele
9 Veloharmnix
16 Nylon Gt.O
026 0 Steel Live Guitar
1 Steel Guitar 1
2 Steel Strummed Guitar
3 Steel Live Guitar Rel.
5 Steelstrings Guitar
8 12-Strings Guitar 1
9 12-Strings Guitar 2
16 Mandolin
24 Steel Guitar 2
32 Steel Guitar 3
40 Nylon + Steel
027 0 Jazz Guitar 1
1 Jazz Guitar 2
8 Hawaiian Guitar
49 Guitar Vibrojazz (i)
028 0 Clean Live Guitar
1 Clean Guitar 1
8 Chorus Live Guitar
16 Chorus Guitar
24 Clean Guitar 2
49 Clean Chorus Gtr (i)
99 Clean Pad
029 0 Muted Guitar 1
1 Muted Guitar 2
8 Funk Guitar
16 Chorus Funk
24 Funky Okytar
0 Overdrive LP Guitar
030 2 Overdrive Guitar 1
8 Overdrive Guitar 2
49 OVD Solo Gtr (i)
59 Light Crunch Gtr (i)
031 0 Distorted Live Guitar
1 Distorted Guitar 1
2 Distorted Guitar 2
3 Heavy Distorted Guitar
8 Feedback Guitar 1
16 Power Chords
49 Dist Crunch Gtr (i)
032 0 Distorted Harmonix
1 Feedback Guitar
8 Feedback Guitar 2
16 Ac. Guitar Harmonix
033 0 Acoustic Live Bass
1 Acoustic Bass
2 Acoustic Bass Release
034 0 Electric Bass
1 Fingered Bass 1
2 Fingered Okybass
8 Fingered Bass 2
16 Dynamic Bass 1
24 Dynamic Bass 2
32 Lisciobass
PC CC00 SOUND NAME PC CC00 SOUND NAME PC CC00 SOUND NAME
Table of contents
Other M-LIVE Music Mixer manuals