M-Power SV-0129 User manual

1 /
11
WARNING
Must be assembled by an adult.
Kids Ride On Tractor / 12V
Model No. : SV-0129
Weight Capacity : 30kgs
OWNERS MANUAL
With Assembly Instructions
INSTALLATION VIDEO
Read and understand this entire
manual before using!
Please keep this manual for
future reference as it contains
important information.
Before first time use, charge the
battery for at least 8-12 hours.

2 /
11
Model No.:
SV-0129
Battery & Motor
12V7AH*1 Battery & 4x motor
Available ages
3~7 Years
Weight capacity
30KGS
Size
182*65*69 cm
Speed
3-7KM/H
Charge time
8-12 hours
Remote control batteries
2 x AAA batteries(not included)
Charger
Input:110-240V 50-60Hz
Output:DC12V
Specifications
Battery Information
◆Non-rechargeable batteries are not to be recharged.
◆Rechargeable batteries doesn’t need to be removed before charging.
◆Rechargeable batteries are only to be charged under adult supervision.
◆Different types of batteries or new and used batteries are not to be mixed.
◆Batteries are to be inserted with the correct polarity.
◆Exhausted batteries are to be removed from the toy.
◆The supply terminals are not to be short-circuited.
Charging the drive battery
IMPORTANT !
◆Before fist time use, the batteries need to be charged
8-12 hours, no more than 20 hours to avoid overheating
the charger.
◆Re-charge the batteries for 8-12 hours when in low
power, no more than 20 hours to avoid overheating the
charger.
◆The Power Switch must be turned in OFF position when
charging.
◆When the vehicle begins to run slowly, recharge the
battery.
3 /
11
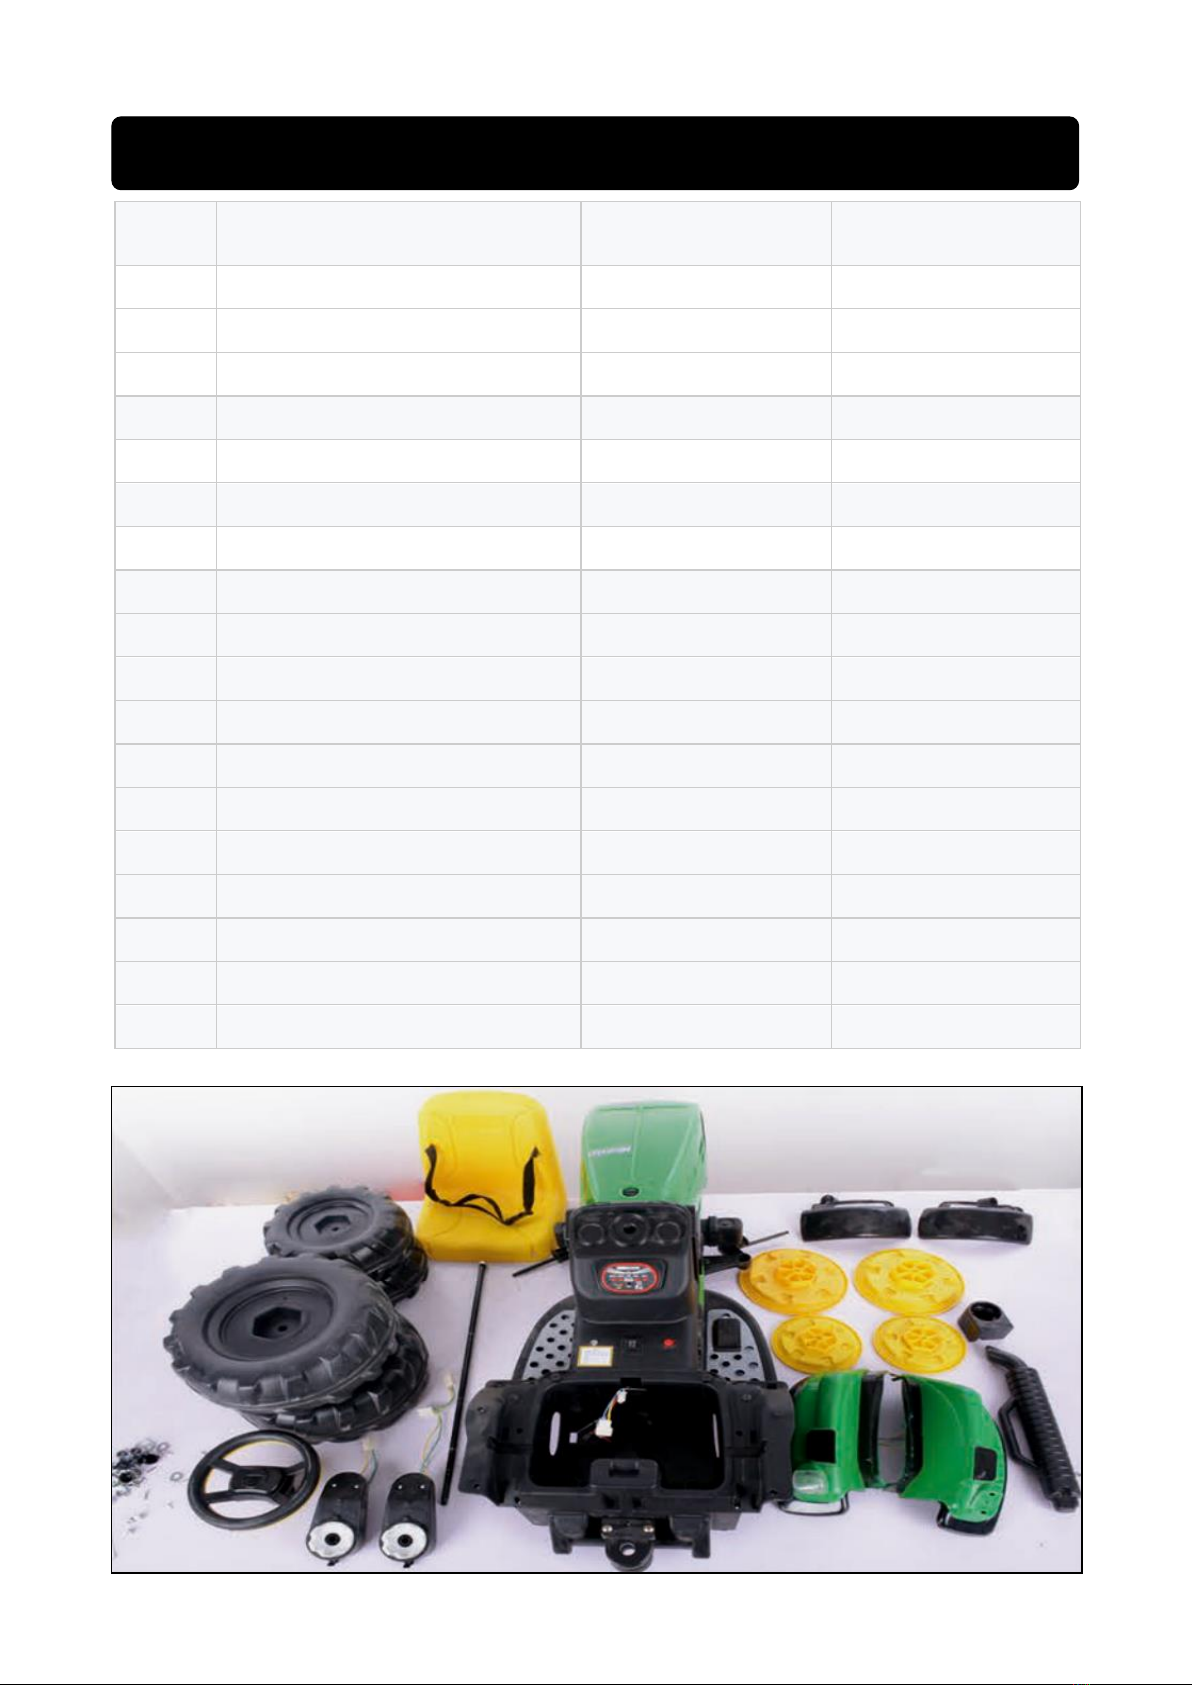
NO.
Part Name
Q’ty (pcs)
Remark
1
Car body
1
2
Front Wheel
3 Pairs
3
Wheel Covers
6
4
Small Covers
6
5
Saddle
1
6
Steering wheel
1
7
Screws & Nuts
1 bag
8
Charger
1
9
Remote
1
10
Chimney&Base
1
11
Axle
2
12
Wheel motor
2
13
Front fender
1 pair
14
Rear febder
1 pair
15
Manual
1
16
Trailer Tow
1
17
Trailer
1
18
Trailer Base
1
Parts List
4 /
11
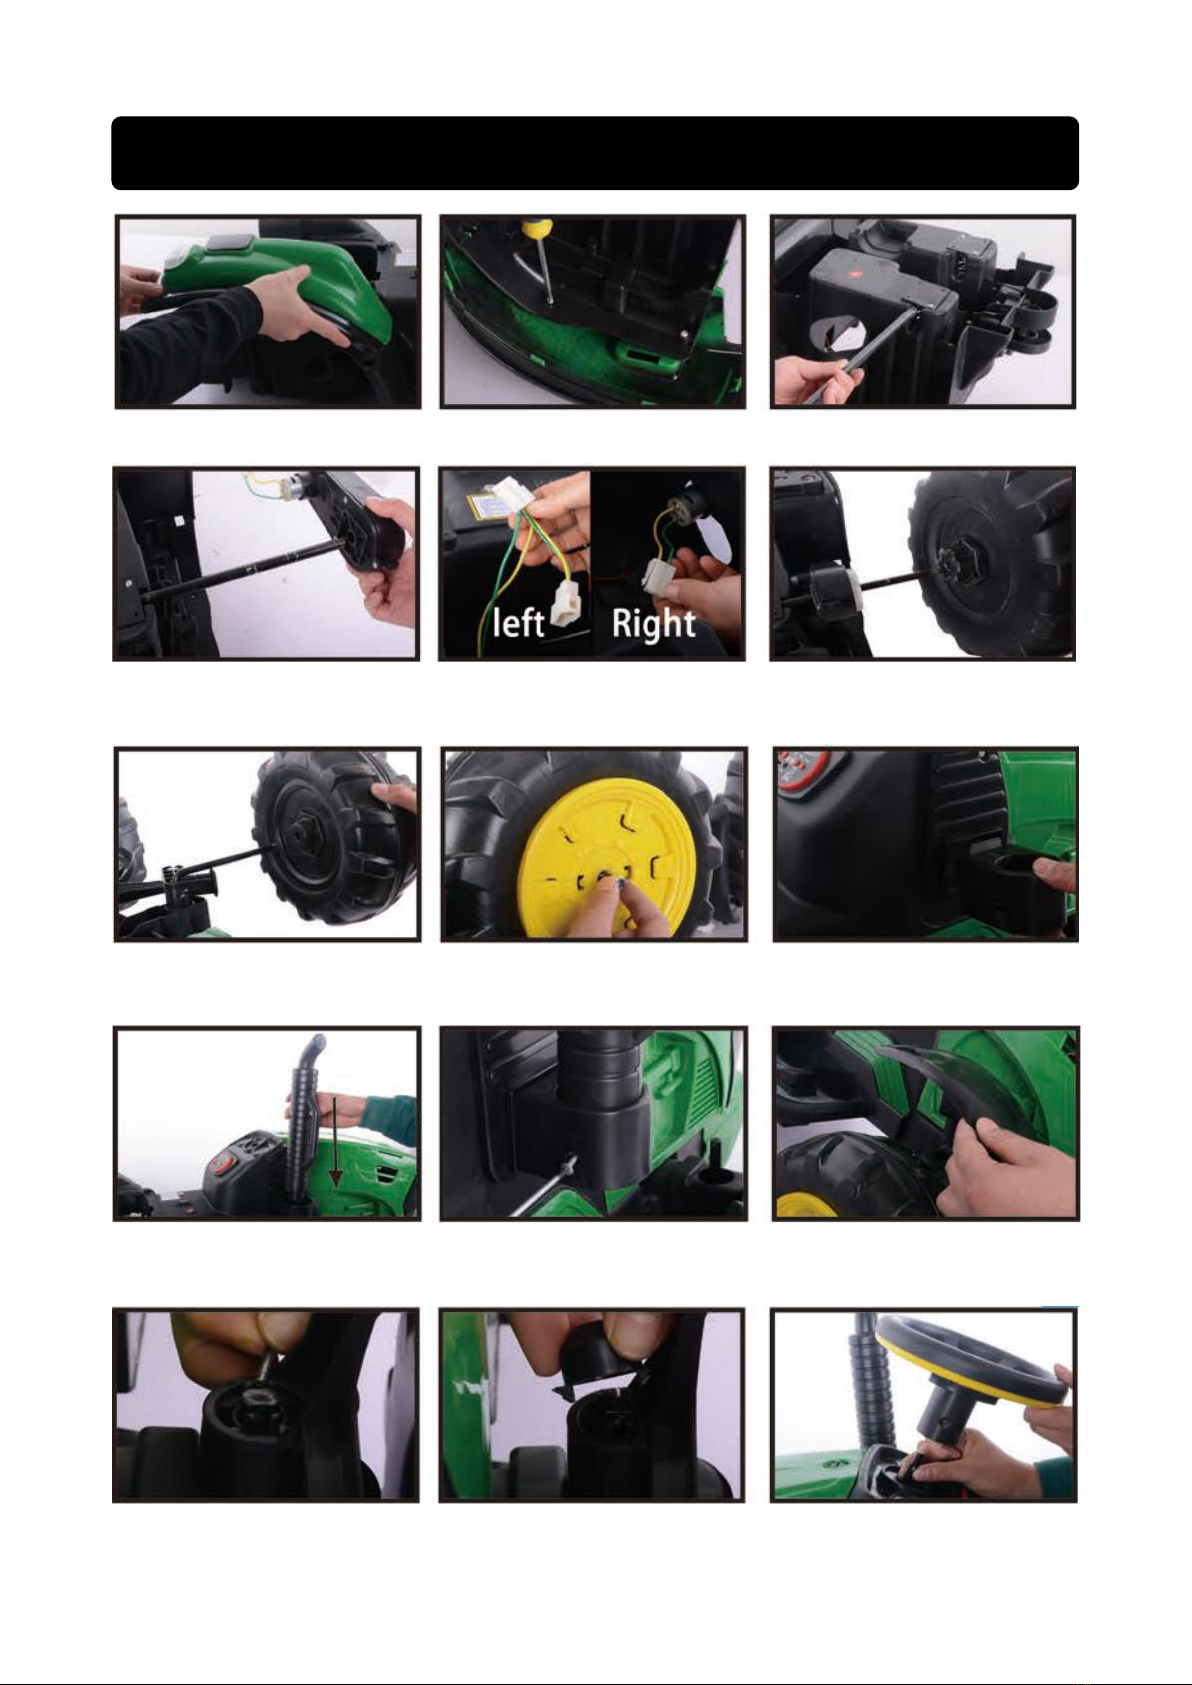
Installation Procedure
Tighten screws with tools
Install the shaft rod
Install the rear fender
Two lines on the left,
one on the right
Put on two rear wheels
Plug in
the left and right motors
Tighten screws with tools
Installing the chimney 1
Install both front wheels
Tighten screws with tools
Installing the front fender
Install the chimney 2
Close the lid
Installing steering wheel
Put on the clip
5 /
11
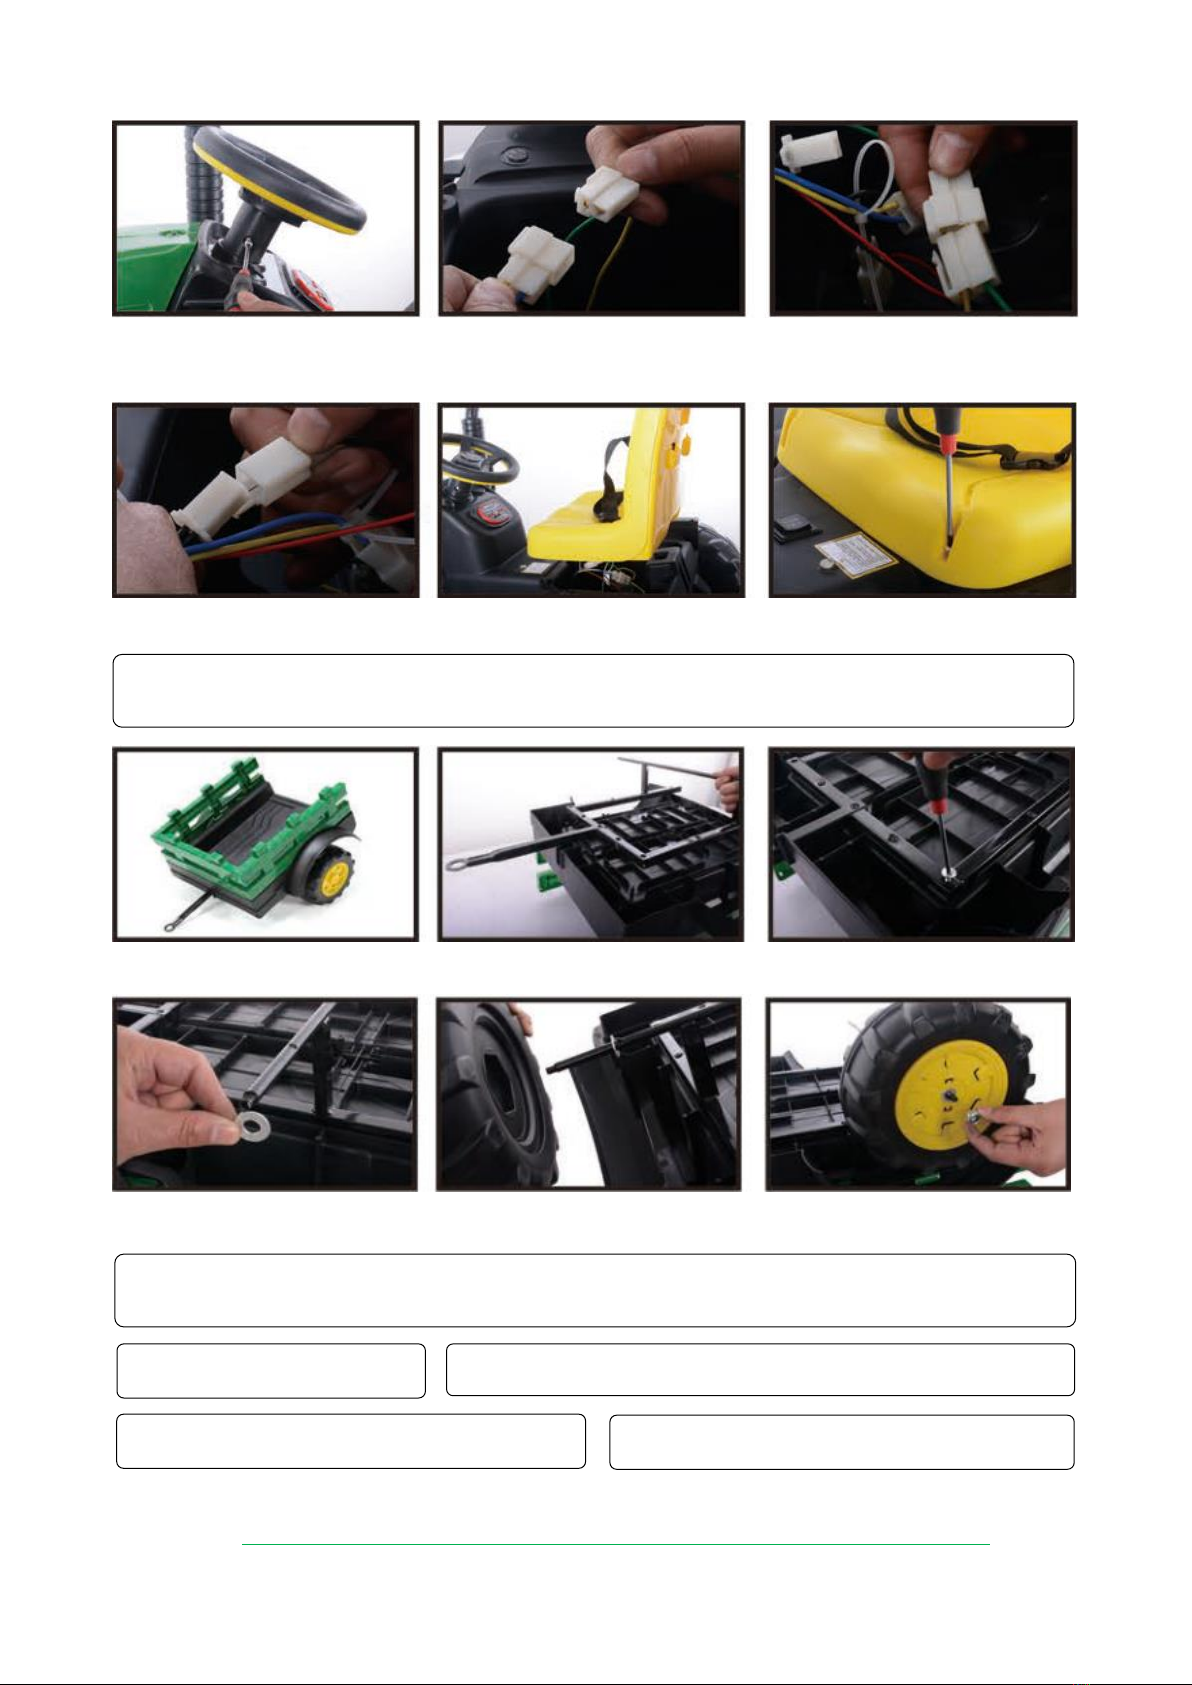
Link line plug
Put on screws
and tighten screws
Link line plug
Installing the seat
Tighten screws with tools
⋆Simulation tractor installation completed ⋆
Installing the body
Body finished
Connect the bottom of the body to the metal frame
and tighten the screws
Put on the gasket and then install the wheel
Tighten screws with tools
Installing the trailer
1. Finished the trailer
2. Connect bottom of the trailer to the metal base
and tighten screws
3. Tighten screws with the tools
4. Install spacer, then install the wheel

6 /
11
Use your new ride on
Indicator Light
Backward
M-pairing
Forward
S-Speed
P-Stop
Turn Right
Turn Left

7 /
11
NOTE
◆Leave the remote controller idling for about 10 seconds, it will shut down
automatically.
◆Rebuild connection when you replace the batteries of the remote controller.
Attach the batteries of controller
Lift the battery compartment door on the back of the controller and insert two
AAA(LR03) batteries.
HINT : Batteries not included. Refer to the Battery Information on the Page 1.
Remote Control Pairing
1. Build connection
Press the connection button for 2 seconds, the status indicator flashes, then turn
on the power switch located on the vehicle dash, when the status indicator turns
off about 2 seconds and turns into long bright, means the connection successful.
If the status indicator makes no response, means the connection failed. Replace
the batteries and try again.
2. Stop button
Press the button to stop the vehicle, press it again to release the brake.
3. Speed select button
The switch poerates the vehicle to move in low, mormal or high speed.
HINT : This switch won’t work while your vehicle moves reverse.
WARNING !
◆CHILDREN must not recharge the battery.
◆This product contains Charging Protection meaning all functions of the car will
not work when charging.
◆Always charge in an open area with adequate ventilation.
◆Plug the charger port into the input socket(below the seat).
◆Plug the charger plug into a wall outlet. The battery will begin charging.
◆The indicator is red when charging, and turn to green when full charged.

8 /
11
MAINTAINING
◆It is parents’responsibility to check main parts of the toy before using, must
regularly examine for potential hazard, such as the battery, charge, cable or
cord, plug, screws are fastening enclosure of other parts and that in the event of
such damage, the toy must not be used until that damage had been properly
removed.
◆Make sure the plastic parts of the vehicle are not cracked or broken.
◆Occasionally use a lightweight oil to lubricate moving parts such as wheels.
◆Park the vehicle indoors or cover it with a tarp to protect it from wet weather.
◆Keep the vehicle away from sources of heat, such as stoves and heaters.
Plastic parts may melt.
◆Recharge the battery after each use. Only an adult can handle the battery.
Recharge the battery at least once a month when the vehicle is not being used.
◆Do not wash the vehicle with a hose. Do not wash the vehicle with soap and
water. Do not drive the vehicle in rainy or snowy weather. Water will damage the
motor, electric system and battery.
◆Clean the vehicle with a soft, dry cloth. To restore shine to plastic parts, use a
non-wax furniture polish. Do not use car wax. Do not use abrasive cleaners.
◆Do not drive the vehicle in loose dirt, sand or fine gravel which could damage
the moving parts, motors or the electric system.
◆When not using, all the electrical source should be turn off. Turn off the
power switch and disconnect the battery connection.
9 /
11
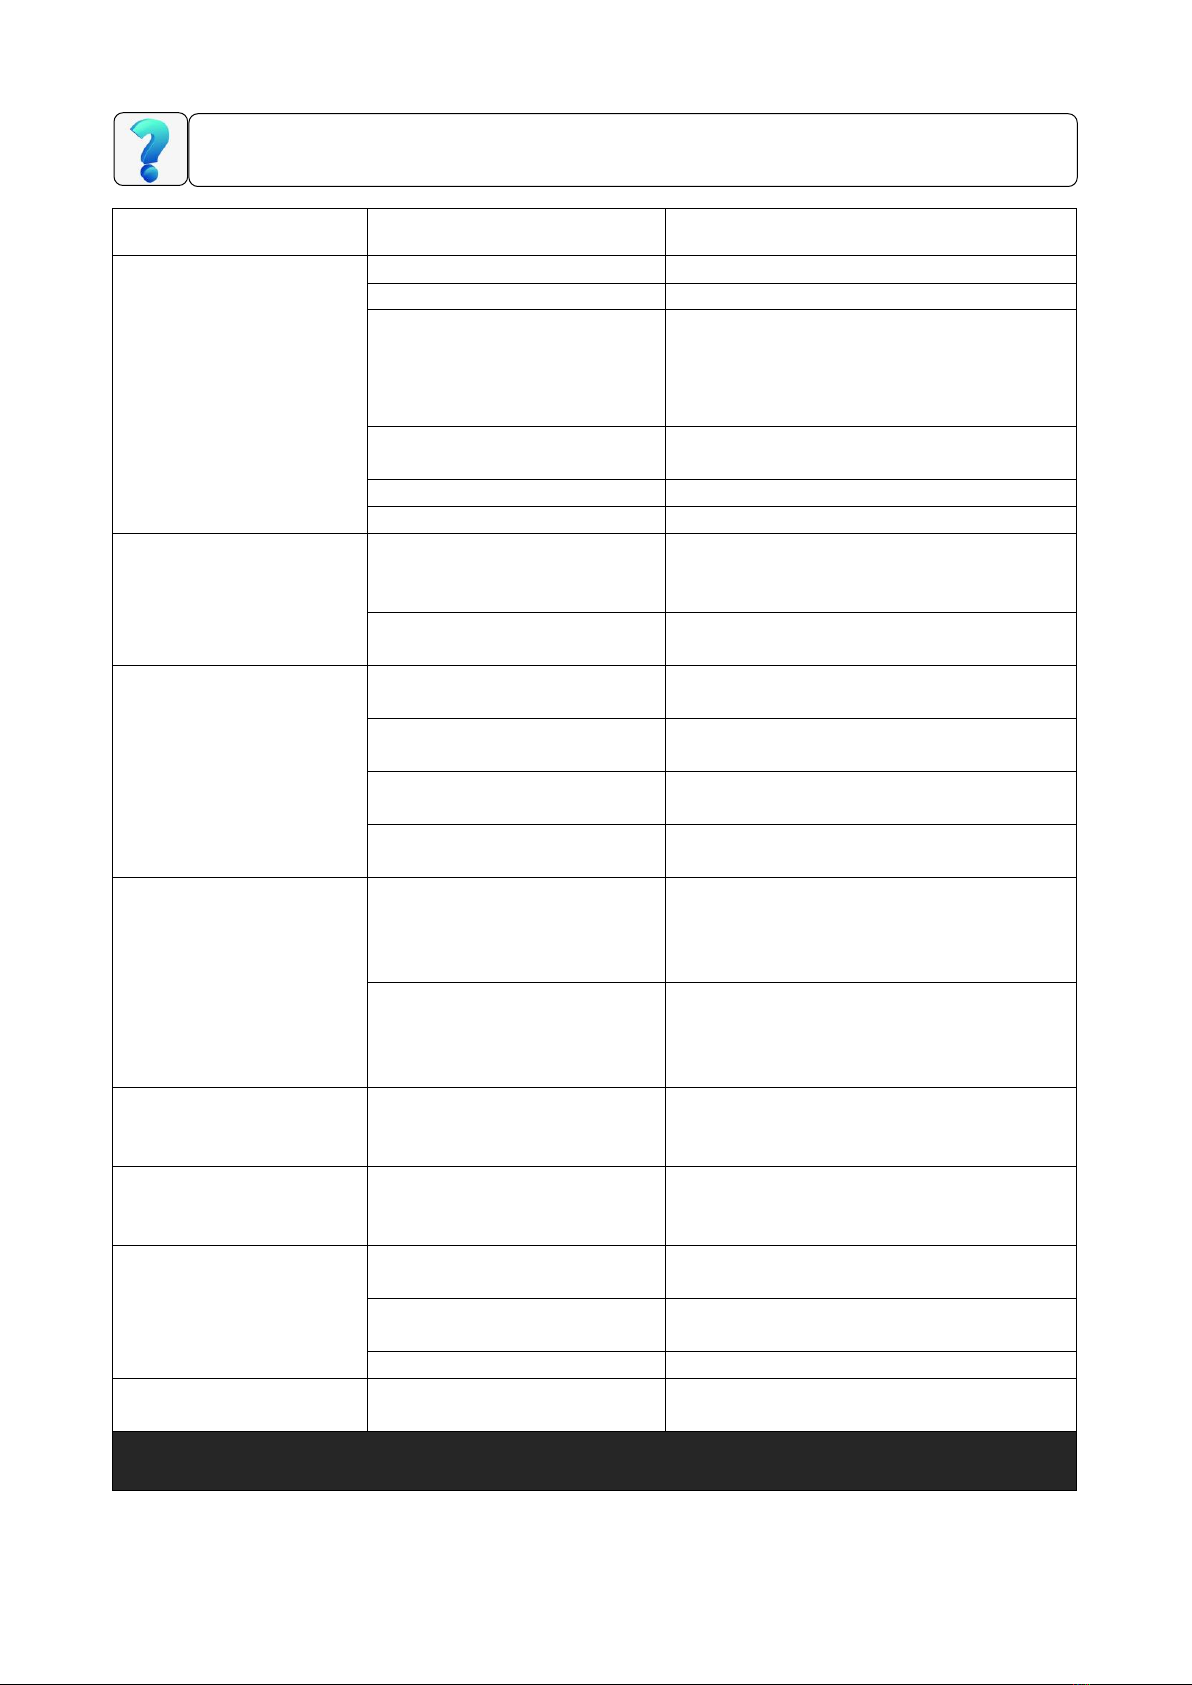
Problem
Possible Cause
Solution
Vehicle does not run
Battery low on power
Recharge battery
Thermal fuse has tripped
Reset fuse, see<Fuse>
Battery connector or wires
are loose
Check that the battery connectors are
firmly plugged into each other, if wires
are loose around the motor
Contact your distributor please
Battery is dead
Replace battery, contact your
distributor, please
Electrical system is damaged
Contact your distributor, please
Motor is damaged
contact your distributor, please
Vehicle doesn’t run very
long
Battery is under changed
Check that the battery connectors are
firmly plugged into each other when
recharging
Battery is old
Replace battery, contact your distributor
please
Vehicle runs sluggishly
Battery low on power
Recharge battery, contact your
distributor, please.
Battery is old
Replace battery, contact your distributor
please
Vehicle is overload
Reduce weight on vehicle, Maximum
user weight is 30kgs.
Vehicle is being used in
harsh conditions
Avoid using vehicle harsh conditions,
see<Safety>.
Vehicle needs a push to
go forward
Poor connect of wires or
connectors
Check that the battery connectors are
firmly plugged into each other. If wires
are loose around the motor, contact
your distributor, please.
“Dead Spot” on motor
A dead spot means the electric power is
not being delivered to the terminal
connection and the vehicle needs
repairs. Contact your distributor, please
Difficult shifting from
forward to reverse or
vice-versa
Attempting to shift while the
vehicle is motion
Completely stop the vehicle and shift,
see<Use your new vehicle>
Loud grinding or
clicking noises coming
from motor or gear box
Motor or gears are damaged
Contact your distributor, please
Battery will not recharge
Battery connector or adapter
connector is loose
Check that the battery connectors are
firmly plugged into each other.
Charger not plugged in
Check that the battery is plugged into a
working wall outlet
Charger is not working
Contact your distributor, please
Charger feels warm
when recharging
This is normal and not a
cause for concern
Completely read through this manual and the trouble shooting guide table before calling.
If you still need help resolving the problem,
Contact your distributor please
.
TROUBLE SHOOTING GUIDE
10 /
11
INSTRUCTIONS
Warning-when replacing a replaceable battery, first open the lid and take out the old battery. Put
in the new battery, pay attention to the positive and negative poles, cover the lid.
WARNING !
For safety reasons,
◆Please use this vehicle under adult guidance and supervision.
◆Do not use this product on main roads, slopes, highways or other dangerous places.
◆Children must wear shoes and protective gears when operating the vehicle.
◆Children should be seated with the seat belt fasten when driving.
◆Only load a maximum of 30kg on the vehicle.
◆Only children aged over 3 years should be allowed on this vehicle.
◆Use this toy strictly according to safety manual.
◆Please check the tires, breaks, steering wheels, seats and seat belts before operating vehicle.
◆This toy vehicle should be used with caution and requires skill to avoid fall or collision with third
parties.
◆Non-rechargeable batteries are not to be recharged;
◆The supply terminals are not to be short-circuited.
◆Rechargeable batteries don’t need to be removed from the car before charging.
◆The toy should be regularly examined for damage to the cord, plug, anclosure and other parts,
and in the event of such damage, they must not be used until the damage has been repaired.
- only use the battery specified by the manufacturer.
- only use the charger specified b y the manufacturer.
Pictures are for reference only, please adhere to the original products as standard.
FUSE
The battery features a thermal fuse with a rest fuse that will automatically trip and cut all power to
the vehicle if the motor, electric system or battery is overloaded. The fuse will reset and power will
be restored after the unit is turned OFF for 20 seconds and then turned ON again. If the thermal
fuse trips repeatedly during normal use, the vehicle may need repair. Contact your distributor
please.
To avoid losing power, follow these guidelines:
◆Do not overload the vehicle.
◆Do not tow anything behind the vehicle.
◆Do not drive up steep slopes.
◆Do not drive into fixed objects, which may cause the wheels to spin, causing the motor to
overheat.
◆Do not drive in very hot weather, components may overheat.
◆Do not allow water or other liquids to come in contact with the battery or other electric
components.
◆Do not tamper with the electric system. Doing so may create a short, causing the fuse to trip.
Disposal of Battery
Your sealed lead-acid battery must be recycled or disposed of in an environmentally sound
manner.
Do not dispose of your lead-acid battery in a fire. The battery may explode or leak.
Do not dispose of a lead-acid battery in your regular, household trash. The incineration, land filling
or mixing of sealed lead-acid batteries with household trash is prohibited by law.
Our products are suitable for EN71 and EN62115 standard.

11 /
11
SAFETY PRECAUTIONS
01. While driving, adult supervision is required all the time.
02. Always wear a helmet when driving.
03. Please don’t drive near road or on the footpath.
04. It is not recommended to drive the vehicle on the surface or on slope greater
that 15-degree.
05. It is recommended to drive this vehicle on smooth surface only.
06. Please don’t drive this vehicle outdoors when it is raining.
07. Make sure that the vehicle stop completely before changing direction from
forward to reverse.
08. Please don’t allow children to operate the charger or play with the battery.
09. Clean the vehicle with a dry cloth only.
10. Please follow the correct and age limits allowed to drive this vehicle.
11. It is prohibited to change the circuit or add other electric parts.
12. Adults must teach their children about safe driving procedures.
13. Please turn the power off when not in use.
14. Check the seat to ensure it has been fitted and secured with bold before
driving.
15. Inspect all wires and connection of the vehicle periodically.
16. Charging the battery should only be done by adults.
17. Charging plug is located underneath the seat.
18. In order to avoid accidents, please ensure the vehicle is safe before driving.
19. Please don’t let children touch the wheels or be near them when the car is
moving.
20. Please mind fingers when opening and closing doors.
Table of contents
Popular Toy manuals by other brands


PAU
PAU 36 Edge540 instruction manual

Eduard
Eduard P-40N landing flaps quick start guide

LEGO
LEGO Star Wars Imperial AT-ST 7127 Building instructions

Kyosho
Kyosho arf kit instruction manual

MTHTrains
MTHTrains PREMIER AUXILIARY TENDER operating instructions

Eduard
Eduard Stirling Mk.I bomb bay quick start guide