Brookstone Rover 2.0 User manual

792593_INS1211_Rover 2.0_Size:5”Wx4.75”H_Output:100%_Prints:1/1,Blk
For ages 14+
Rover 2.0
THE APP-CONTROLLED WIRELESS SPY TANK

1
TABLE OF CONTENTS
Quick Start Guide...........................................................................2
Warnings and Cautions......................................................................3
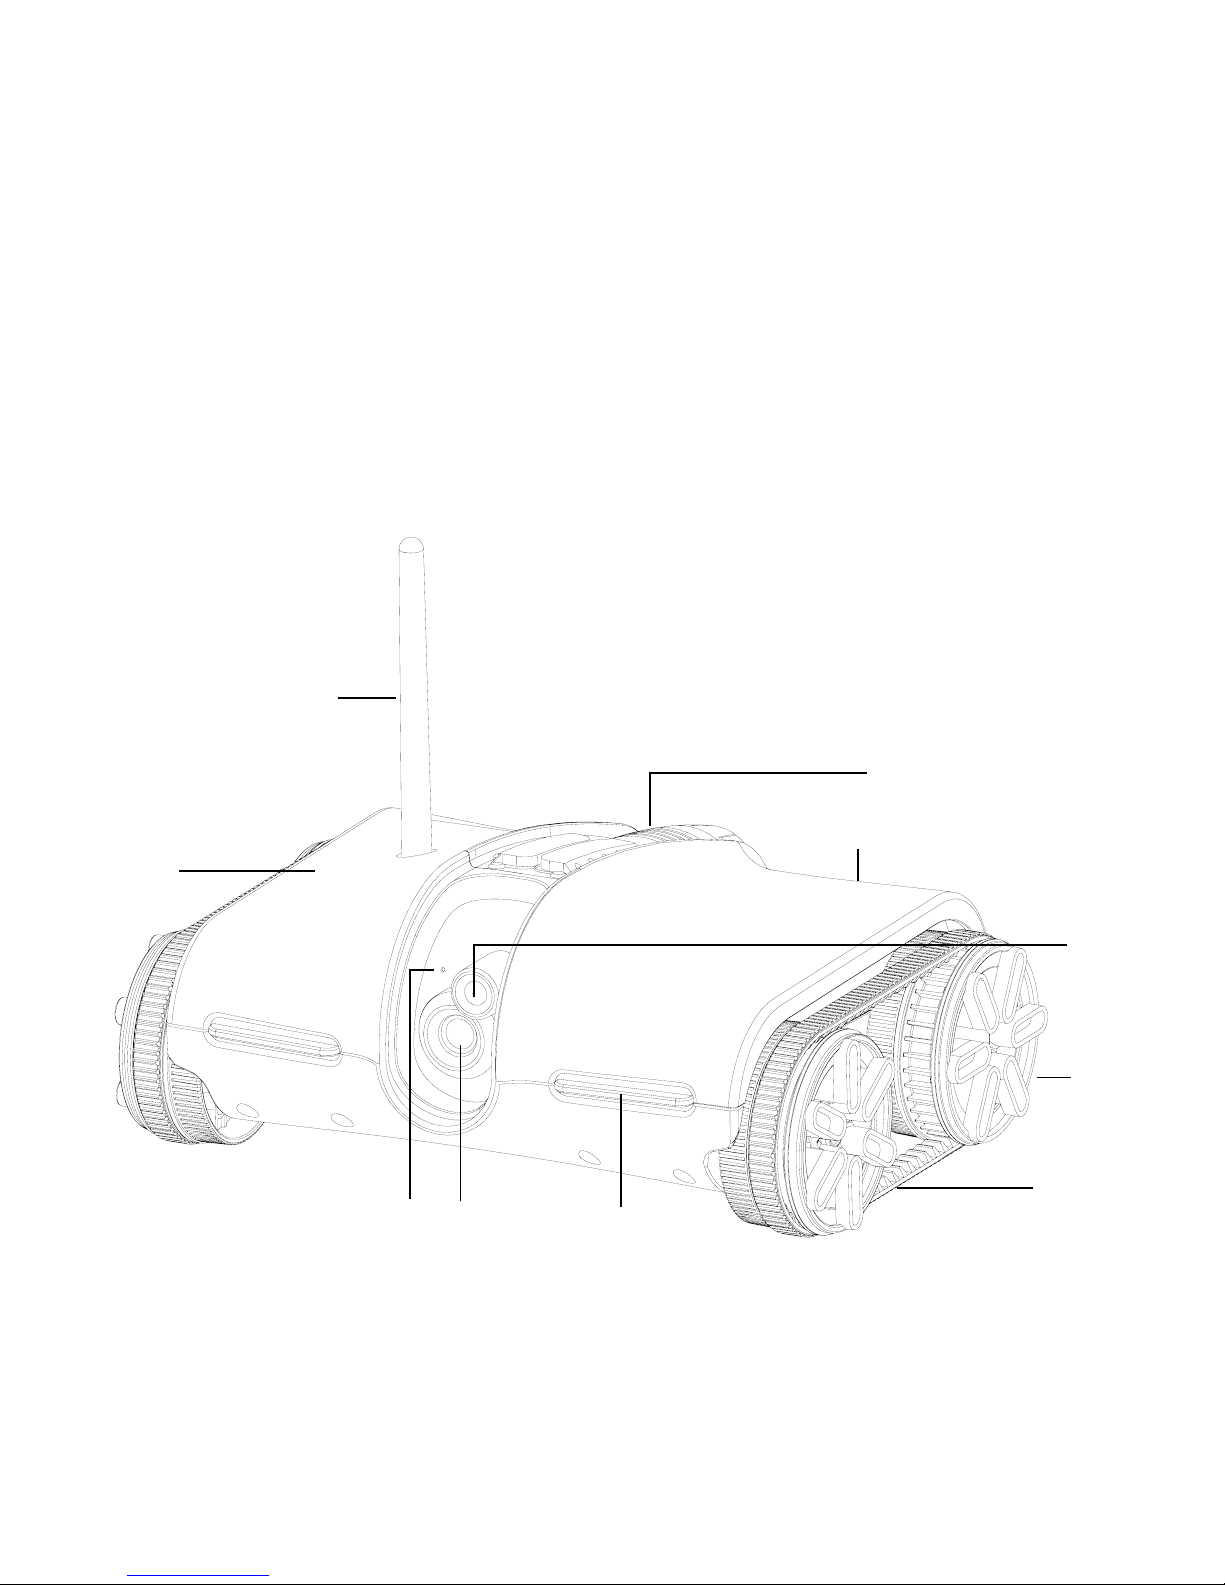
Location of Parts and Controls...............................................................6
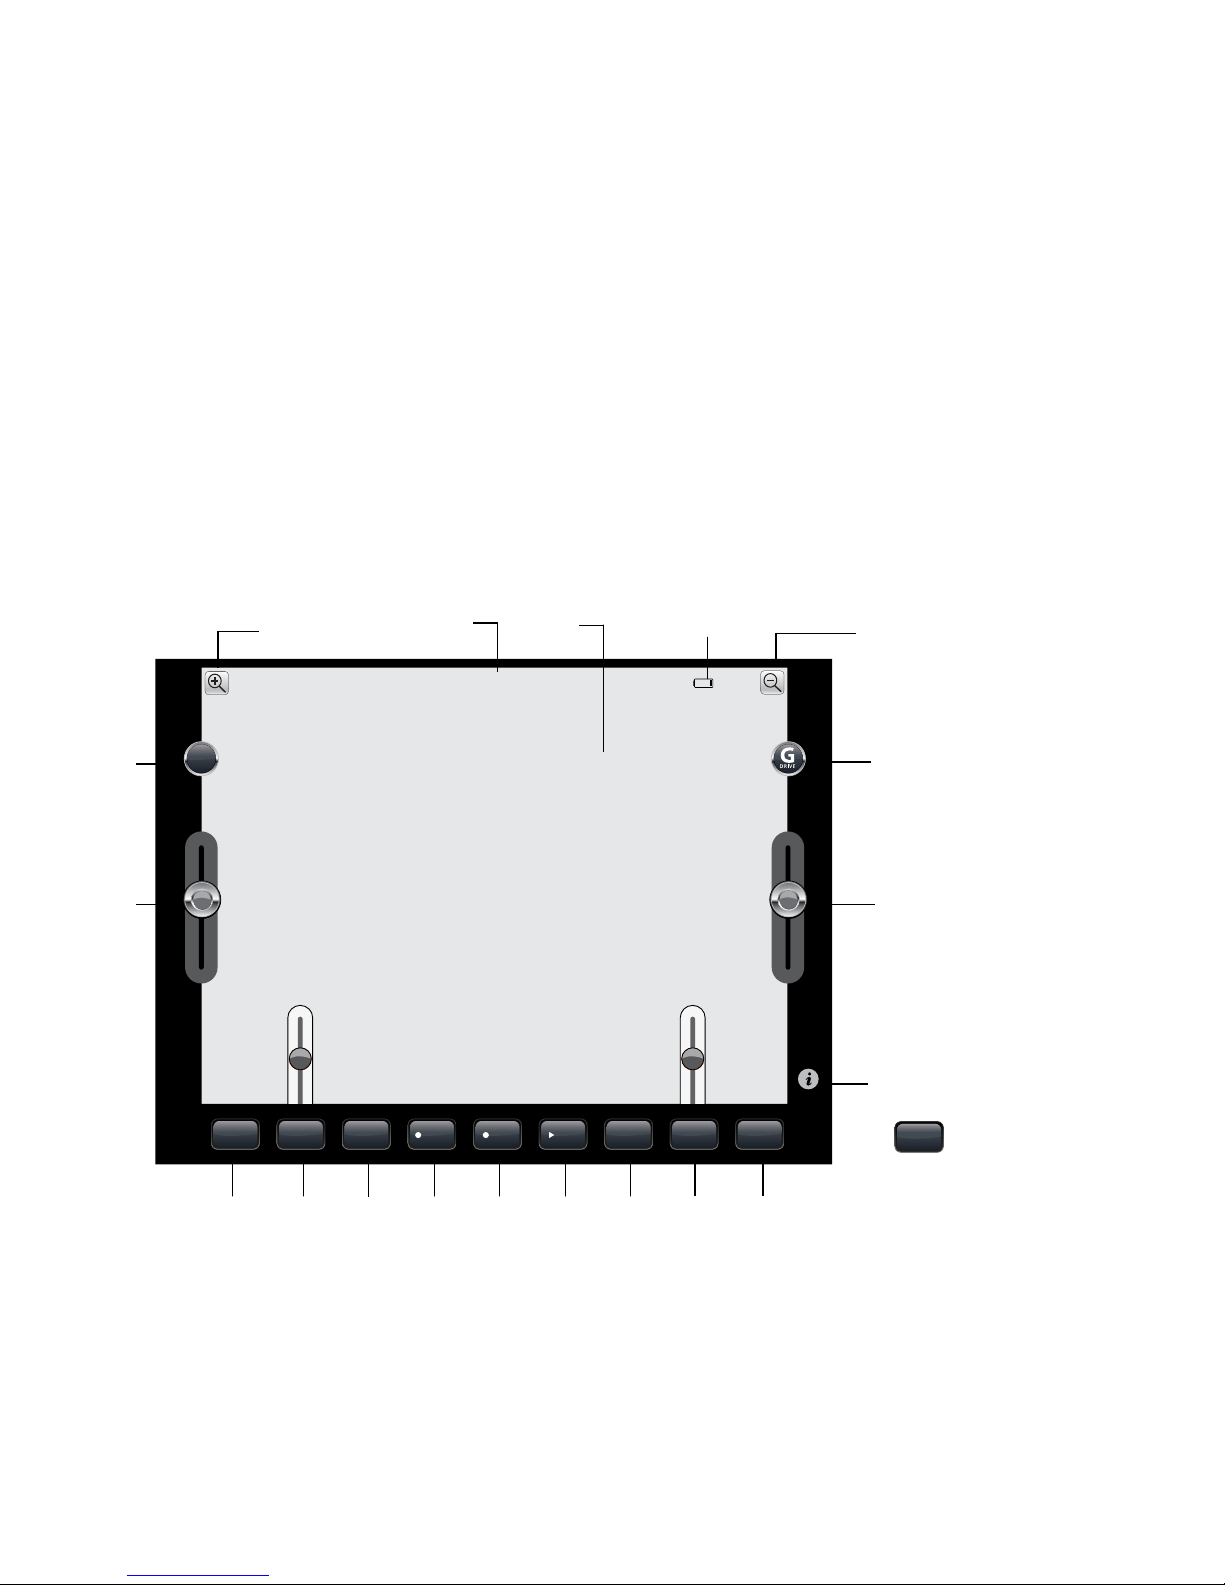
Control Layout..............................................................................8
Compatibility................................................................................9
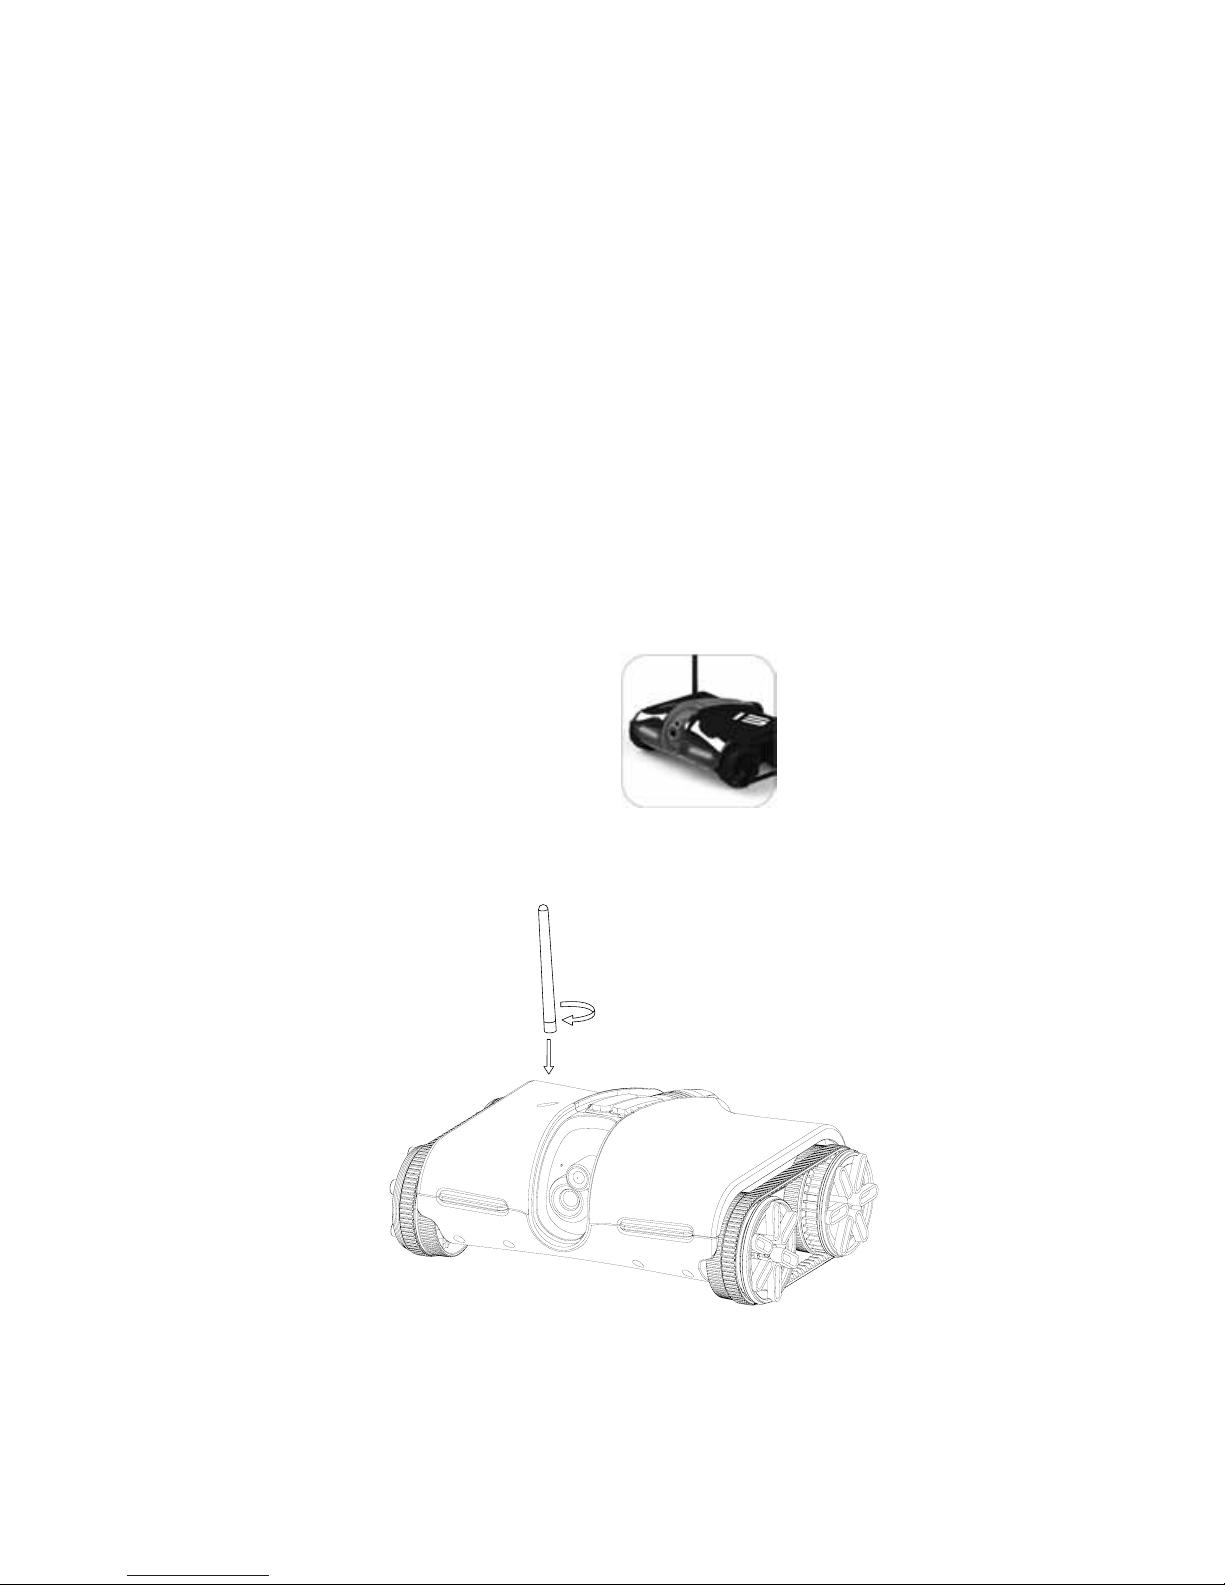
Set Up .....................................................................................9
Inserting the Batteries .....................................................................10
Power Up and Connect ....................................................................11
Driving ....................................................................................12
Driving Using Your Device’s Accelerometer..................................................16
Volume....................................................................................16
Speaker (for AndroidTM devices only) ........................................................17
Stealth Night Vision........................................................................17
Photo .....................................................................................17
Zoom......................................................................................17
Share .....................................................................................18
Camera ...................................................................................18
Video......................................................................................18
Recording a Path/Playing a Path...........................................................19
Two-way Radio.............................................................................19
Headlights and Tail Lights..................................................................19
Sharing....................................................................................20
Reset .....................................................................................22
Care and Maintenance.....................................................................23
Specifications .............................................................................24
Frequently Asked Questions................................................................25
Warranty ..................................................................................29

2
IF YOU READ NOTHING ELSE, READ THIS:
Download the Rover 2.0’s free App from the iTunes® App StoreSM
(for Apple® devices), or Google PlayTM (for Andriod devices), and
attach Rover 2.0’s antenna and insert its batteries.
Slide Rover 2.0’s power switch to “on” and when the green
LED blinks, go to the Wi-Fi connection in the settings menu on
your device to sync.
Open the Rover 2.0 App. The driving controls and live video will
appear on your device’s screen. You are now ready to ROLL!
1
2
3
ROVER 2.0 QUICK START GUIDE
For more detailed instruction, check out the steps starting on page 9.
792593_INS1211_Rover 2.0_Size:5”Wx4.75”H_Output:100%_Prints:1/1,Blk

3
IMPORTANT SAFETY INSTRUCTIONS
All of the safety and operating instructions should be read, adhered to and
followed before the unit is operated.
WARNING
1. Close supervision is necessary when this unit is used by or near children
or mentally disabled individuals.
2. This product can be used to share content with Social Media Websites.
Adult supervision is required.
3. Use this unit only for its intended use as described in this manual.
4. The unit should be situated away from direct sunlight or heat sources
such as radiators, electric heaters, heat registers, stoves or other units
that produce heat.

4
CAUTION
• For ages 14 and up.
• Keep the Rover 2.0 away from face, eyes and hair at all times. Keep fingers
away from wheels and trac-belts while they are in motion.
• Make sure there are no insurmountable obstacles or breakable objects
in the Rover 2.0’s path.
• Do not drop in, spray with or submerge unit in water.
CHOKING
WARNING: This product may contain small parts which may pose a choking
hazard to children.
BATTERY PRECAUTIONS
• Dispose of the old batteries properly. Do not dispose of the old batteries
in a fire.
• Do not leave the batteries where a child or pet could play with or swallow
them. If the batteries are swallowed, contact a physician immediately.
• The batteries may explode if mistreated. Do not attempt to recharge or
disassemble the batteries.
• Use only fresh batteries of the required size and type. Do not mix old and
new batteries, different types of batteries or rechargeable batteries of
different capacities.
792593_INS1211_Rover 2.0_Size:5”Wx4.75”H_Output:100%_Prints:1/1,Blk

5
FCC INFORMATION FCC ID : ZRB719302
This device complies with Part 15 of the FCC Rules. Operation is subject
to the following two conditions:
1) This device may not cause harmful interference.
2) This device must accept any interference received including interference
that may cause undesired operation.
WARNING: Changes or modifications to this unit not expressly approved by the party
responsible for compliance could void the user’s authority to operate the equipment.
Note: This equipment has been tested and found to comply with the limits for a Class
B digital device, pursuant to Part 15 of the FCC Rules. These limits are designed to
provide reasonable protection against harmful interference in a residential installation.
This unit generates, uses and can radiate radio frequency energy and if not installed
and used in accordance with the instructions, may cause harmful interference to radio
communications. However, there is no guarantee that interference will not occur in a
particular installation. If this equipment does cause harmful interference to radio or
television reception, which can be determined by turning the equipment off and on,
the user is encouraged to try and correct the interference by one or more of the
following measures:
• Reorient or relocate the receiving antenna.
• Increase the separation between the equipment and receiver.
• Connect the equipment to an outlet on a circuit different from that to which
the receiver is connected.
• Consult the dealer or an experienced radio/TV technician for help.

6
LOCATION OF PARTS AND CONTROLS (ROVER 2.0)
1. Antenna
2. Tank Body
3. Microphone
4. Tilt Up/Down Camera
5. Headlights/Tail Lights
6. Trac-Belt (2)
7. Wheel (4)
8. Night Vision Light
9. Speaker
3 4
2
1
6
8
7
792593_INS1211_Rover 2.0_Size:5”Wx4.75”H_Output:100%_Prints:1/1,Blk
9
5
5

7
LOCATION OF PARTS AND CONTROLS (ROVER 2.0)
1. Antenna Port
2. Green Connection LED
3. Battery Compartment
Access Screw (2)
4. Battery Compartment
5. Reset Button
6. On/Off Switch
7. Orange Power LED
8. SSID Number
6
5
1
2
84
3
Bottom
Top
7

STEALTH CAMERA PHOTO TALK VOLUME BRIGHTSPATHVIDEO PATH
100%
SHARE
8
CONTROL LAYOUT (YOUR DEVICE’S TOUCH-SCREEN)
1. Rover 2.0 Low Battery
2. Zoom Out
3. G-Drive
4. Driving Controls
5. Information
6. Headlights & Tail
Lights On/Off
7. Audio Volume (Apple)
8. Two-way Audio
9. Play Path
10. Record Path
11. Record Video
12. Take Photo
13. Camera Up/Down
14. Night Vision
15. Driving Controls
16. Sharing Information
17. Zoom In
18. Zoom Ratio
19. Video Screen
17
12 11 10 6
5
18
4
15
Note: The control layout may not appear exactly as shown, depending upon your device.
2
16
7891314
3
1
792593_INS1211_Rover 2.0_Size:5”Wx4.75”H_Output:100%_Prints:1/1,Blk
SPEAKER Audio On/Off
replaces Audio Volume
when using Android.
19

9
SET UP
DOWNLOADING FREE APP
Go to the iTunes® App StoreSM
(for Apple devices) or Google PlayTM
(for Android devices) to download
the Rover 2.0 App.
ANTENNA
See the illustration below for
instruction on how to install
the Rover 2.0’s antenna.
Insert the Antenna in the Antenna
Port and twist the Antenna in a
clockwise manner until secure.
iPod touch® (3rd and
4th generation)
iPhone® 4S
iPhone 4
iPhone 3GS
iPad® (3rd generation)
iPad 2
iPad
Apple iOS: 5.1 and later
Android 2.2 and later,
CPU: 800MHz RAM: 512M
COMPATIBILITY
Rover 2.0
Be sure to visit Brookstone.com for compatibility updates.

10
INSERTING THE BATTERIES
1. Remove the BATTERY COMPARTMENT COVER by unscrewing the two
ACCESS SCREWS on the cover with a small screwdriver.
2. Remove the cover and insert 6 AA batteries (included) according to the polarity
indicators inside the compartment.
3. Replace the BATTERY COMPARTMENT COVER and tighten the two screws
to secure.
Access
Screws
Battery
Compartment
Cover
792593_INS1211_Rover 2.0_Size:5”Wx4.75”H_Output:100%_Prints:1/1,Blk

POWER UP AND CONNECT
1. Slide the Power switch on the bottom of the Rover 2.0 to on. The ORANGE
POWER LED will illuminate. Wait approximately 30 seconds and the GREEN
CONNECTION LED will start to blink slowly.
LED STATE CHART
2. On your device, go to Settings and turn Wi-Fi on. The SSID address of your Rover
2.0 (17 digits starting with ROVER) will appear as an available connection.
Note: Each Rover 2.0 has a unique SSID address (printed on the underside of the
unit). If there are multiple Rover 2.0’s being used, the individual SSID addresses will
appear as Wi-Fi connections on your device. Select your Rover 2.0’s SSID address.
3. Select the Rover 2.0 to confirm the connection. (No user name or password is
required.) Ensure the Wi-Fi connection logo appears at the top of your device’s
screen. There may or may not be a check mark to the left of the SSID address to
confirm the connection.
4. Exit out of Settings and open the Rover 2.0 App.
5. The Green CONNECTION LED will now revert from blinking to solid.
6. When your device’s screen shows the view from the Rover 2.0’s live-stream video
camera—you are ready to start exploring.
11
LE tate Represents
Orange Solid Power on
Blinking Searching for and acquiring Wi-Fi connection
Solid Rover app is open and Wi-Fi is connected
DS
Green
Green

12
DRIVING
• Drive Forward Straight – push both driving control buttons up on your
device’s screen
• Back Up Straight – push both driving control buttons down on your
device’s screen
792593_INS1211_Rover 2.0_Size:5”Wx4.75”H_Output:100%_Prints:1/1,Blk
STEALTH CAMERA PHOTO TALK VOLUME BRIGHTSPATHVIDEO PATH
100%
SHARE
STEALTH CAMERA PHOTO TALK VOLUME BRIGHTSPATHVIDEO PATH
100%
SHARE

13
• Turn Right Driving Forward – push the left driving control button up on the left of
your device’s screen
• Turn Left Moving Forward – push the right driving control button up on the right
of your device’s screen
STEALTH CAMERA PHOTO TALK VOLUME BRIGHTSPATHVIDEO PATH
100%
SHARE
STEALTH CAMERA PHOTO TALK VOLUME BRIGHTSPATHVIDEO PATH
100%
SHARE

14
• Turn Right Driving Backward – push the driving control button down on the left
of your device’s screen
• Turn Left Moving Backward – push the driving control button down on the right
of your device’s screen
792593_INS1211_Rover 2.0_Size:5”Wx4.75”H_Output:100%_Prints:1/1,Blk
STEALTH CAMERA PHOTO TALK VOLUME BRIGHTSPATHVIDEO PATH
100%
SHARE
STEALTH CAMERA PHOTO TALK VOLUME BRIGHTSPATHVIDEO PATH
100%
SHARE

15
• 360º circle to the left – push the driving control button down on the left of your
device’s screen and the driving control button up on the right of your device’s
screen at the same time
• 360º circle to the right – push the driving control button up on the left of your
device’s screen and the driving control button down on the right of your device’s
screen at the same time
• Stop – Release all buttons and remove fingers from the screen
STEALTH CAMERA PHOTO TALK VOLUME BRIGHTSPATHVIDEO PATH
100%
SHARE
STEALTH CAMERA PHOTO TALK VOLUME BRIGHTSPATHVIDEO PATH
100%
SHARE

16
DRIVING USING YOUR DEVICE’S ACCELEROMETER
To turn on this function, hold your device flat or tilted upward
slightly (see image at right), and press the button on your
device’s screen. The manual drive button graphics will disappear
from your device’s screen.
To drive the Rover 2.0, tilt your device in the direction you would like to drive. The
Stop position is the position at which the device was held when the G Drive was
activated.
To turn this function off, press the button, and the drive graphics will
reappear on your device’s screen.
VOLUME VOLUME (for Apple devices only)
The Rover 2.0 can transmit audio to your device.
Press the VOLUME button and slide up and down to control the volume of audio
transmitting from the Rover 2.0 to your device.
Note: The Rover 2.0 will not transmit audio while it is in motion.
Audio is only accessible when Rover 2.0 is stopped.
792593_INS1211_Rover 2.0_Size:5”Wx4.75”H_Output:100%_Prints:1/1,Blk

17
SPEAKER SPEAKER (for Android devices only)
The Rover 2.0 can transmit audio to your device.
Press the SPEAKER button to hear audio. Use the volume control on your device to control
the audio volume. Press the SPEAKER button again to turn the audio off.
Note: The Rover 2.0 will not transmit audio while it is in motion.
Audio is only accessible when Rover 2.0 is stopped.
STEA LTH STEALTH NIGHT VISION
Press the STEA LTH button to turn the stealth night vision function on. All lights will turn off.
Press the STEA LTH button again to turn the stealth night vision function off.
Note: When stealth night vision is on, the video is in black and white.
PHOTO PHOTO
The Rover 2.0 can take snapshots! Press the PHOTO button to take a snapshot.
The photo will be saved in the Rover 2.0 Share Library and the Photos folder on
your device.
Note: Some Android devices require an SD card to save Rover 2.0 photos.
ZOOM
To zoom in on a subject, press the on your device’s screen. To zoom
out, press the .

18
SHARE SHARE
Press the SHARE button for information on how to share and view your Rover 2.0 videos
and photos.
CAMERA CAMERA
Press the CAMERA button and use the slide to control the camera angle.
VIDEO VIDEO
The Rover 2.0 can take videos! Press the VIDEO button to record a video. Press the
VIDEO button to end recording. The video will be saved in the Rover 2.0 Share Library
and in the Photos folder on your device.
Important: The Rover 2.0 will not record audio while it is in motion.
Note: Some Android devices require an SD card to save Rover 2.0 videos.
792593_INS1211_Rover 2.0_Size:5”Wx4.75”H_Output:100%_Prints:1/1,Blk

PATH PATH RECORDING A PATH/PLAYING A PATH
The Rover 2.0 can record up to 60 seconds of a driving route, and then repeat it all
by itself!
1. To record a path, press the Make Path PATH button and drive the Rover 2.0 on the
route you want to record.
2. After you complete your route, press the Make Path PATH button again to save.
3. Press the Play Path PATH to play the recorded route and the Rover 2.0 will
automatically drive the route you recorded – all by itself.
4. Double tap PATH to play the Path in a loop. Press PATH to stop the Path play.
Note: If the Rover 2.0 is reset, or the batteries are removed, the saved route
will be erased.
TALK TWO-WAY RADIO
Rover 2.0 can talk! Press and hold the TALK button and talk into your device to speak
through the Rover 2.0. Then, just release the TALK button to listen.
BRIGHTS HEADLIGHTS AND TAIL LIGHTS
Press the BRIGHTS button to turn the headlights and tail lights on and off.
19
Table of contents
Other Brookstone Toy manuals

Brookstone
Brookstone USB Desktop Missile Launcher User manual

Brookstone
Brookstone Stunt Copter User manual

Brookstone
Brookstone u Control User manual

Brookstone
Brookstone Rover User manual

Brookstone
Brookstone Rover Land & Sea User manual

Brookstone
Brookstone u Control User manual

Brookstone
Brookstone u Control User manual

Brookstone
Brookstone RACER User manual

Brookstone
Brookstone Dave User manual